


Featured Comment
This is now on my repeat meal list. Will be cooking this again many times.
★★★★★
– Marcus
What if authentic katsudon didn’t require pork? This recipe delivers the same soul-warming satisfaction as traditional pork tonkatsu versions using chicken katsu instead.
Let’s craft a bowl that tastes like home and discovery in one. This is sure to be your next favorite donburi dish!
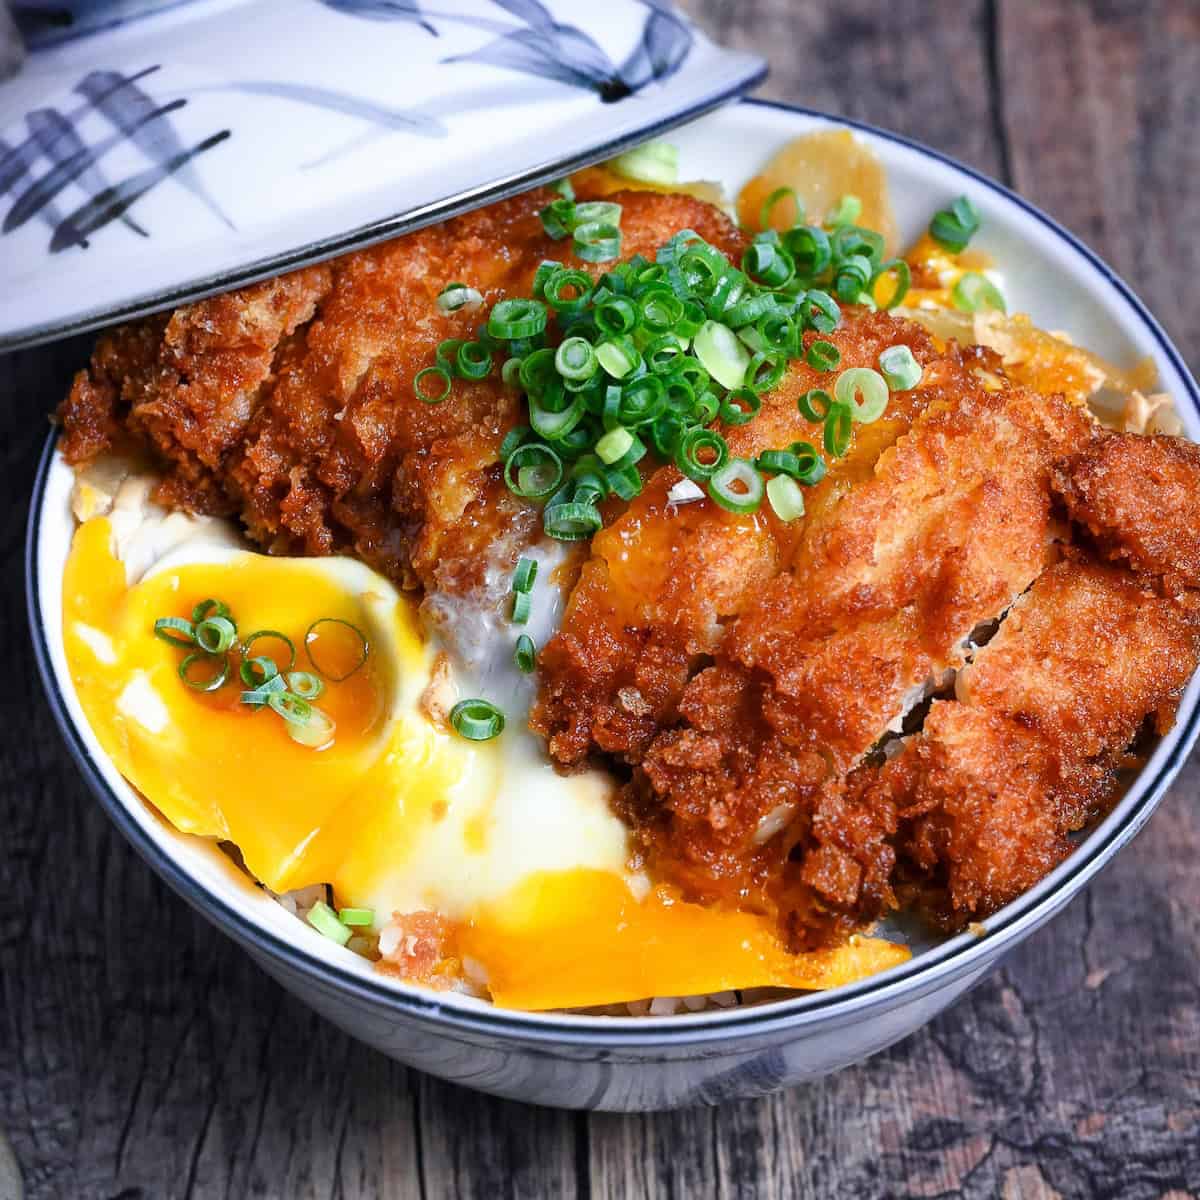
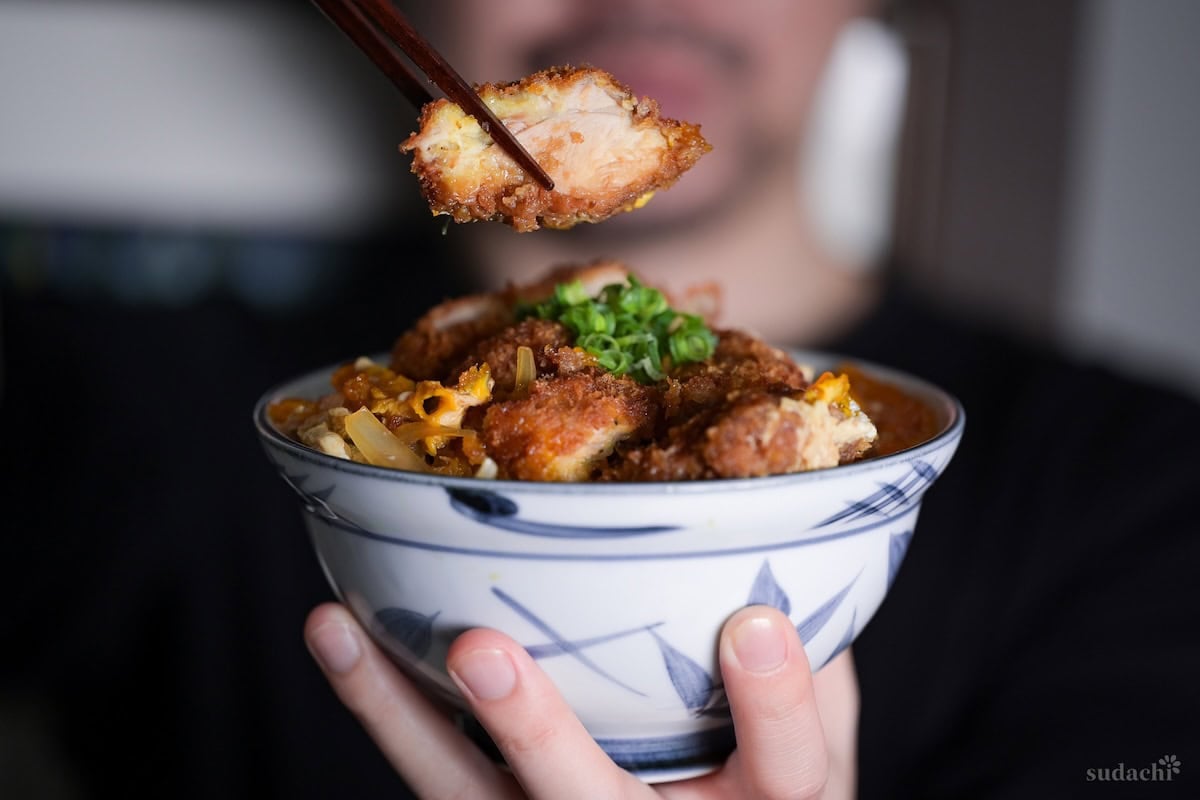
Chicken Katsudon
Recipe Snapshot
- What is it? Crispy chicken, soft simmered onions, and a cloud of just-set egg over steaming rice.
- Flavor profile: Sweet-savory, Mellow, Satisfying
- Why you’ll love this recipe: It delivers the nostalgic comfort of authentic Japanese katsudon using accessible ingredients and clear steps.
- Must-haves: Chicken thighs (or breast), Dashi stock, Small frying pan
- Skill Level: Medium
- Suitable for Meal Prep? Partially.
Summarize & Save this content on:
What is Chicken Katsudon?
Chicken Katsudon is a comforting Japanese rice bowl featuring crispy chicken cutlet (chicken katsu) simmered in a savory-sweet broth with onions and softly cooked egg, all served over a bed of freshly steamed Japanese rice. Originally, katsudon referred to a pork cutlet with egg, but other types such as gyukatsu (beef cutlet) and chicken katsu also exist.
In fact, it’s often nicknamed “oyako katsudon” (“parent and child cutlet bowl”) as a playful nod to that combination, much like the classic oyakodon or oyako udon.
Chicken Katsudon Ingredients
What You’ll Need for The Chicken Cutlet
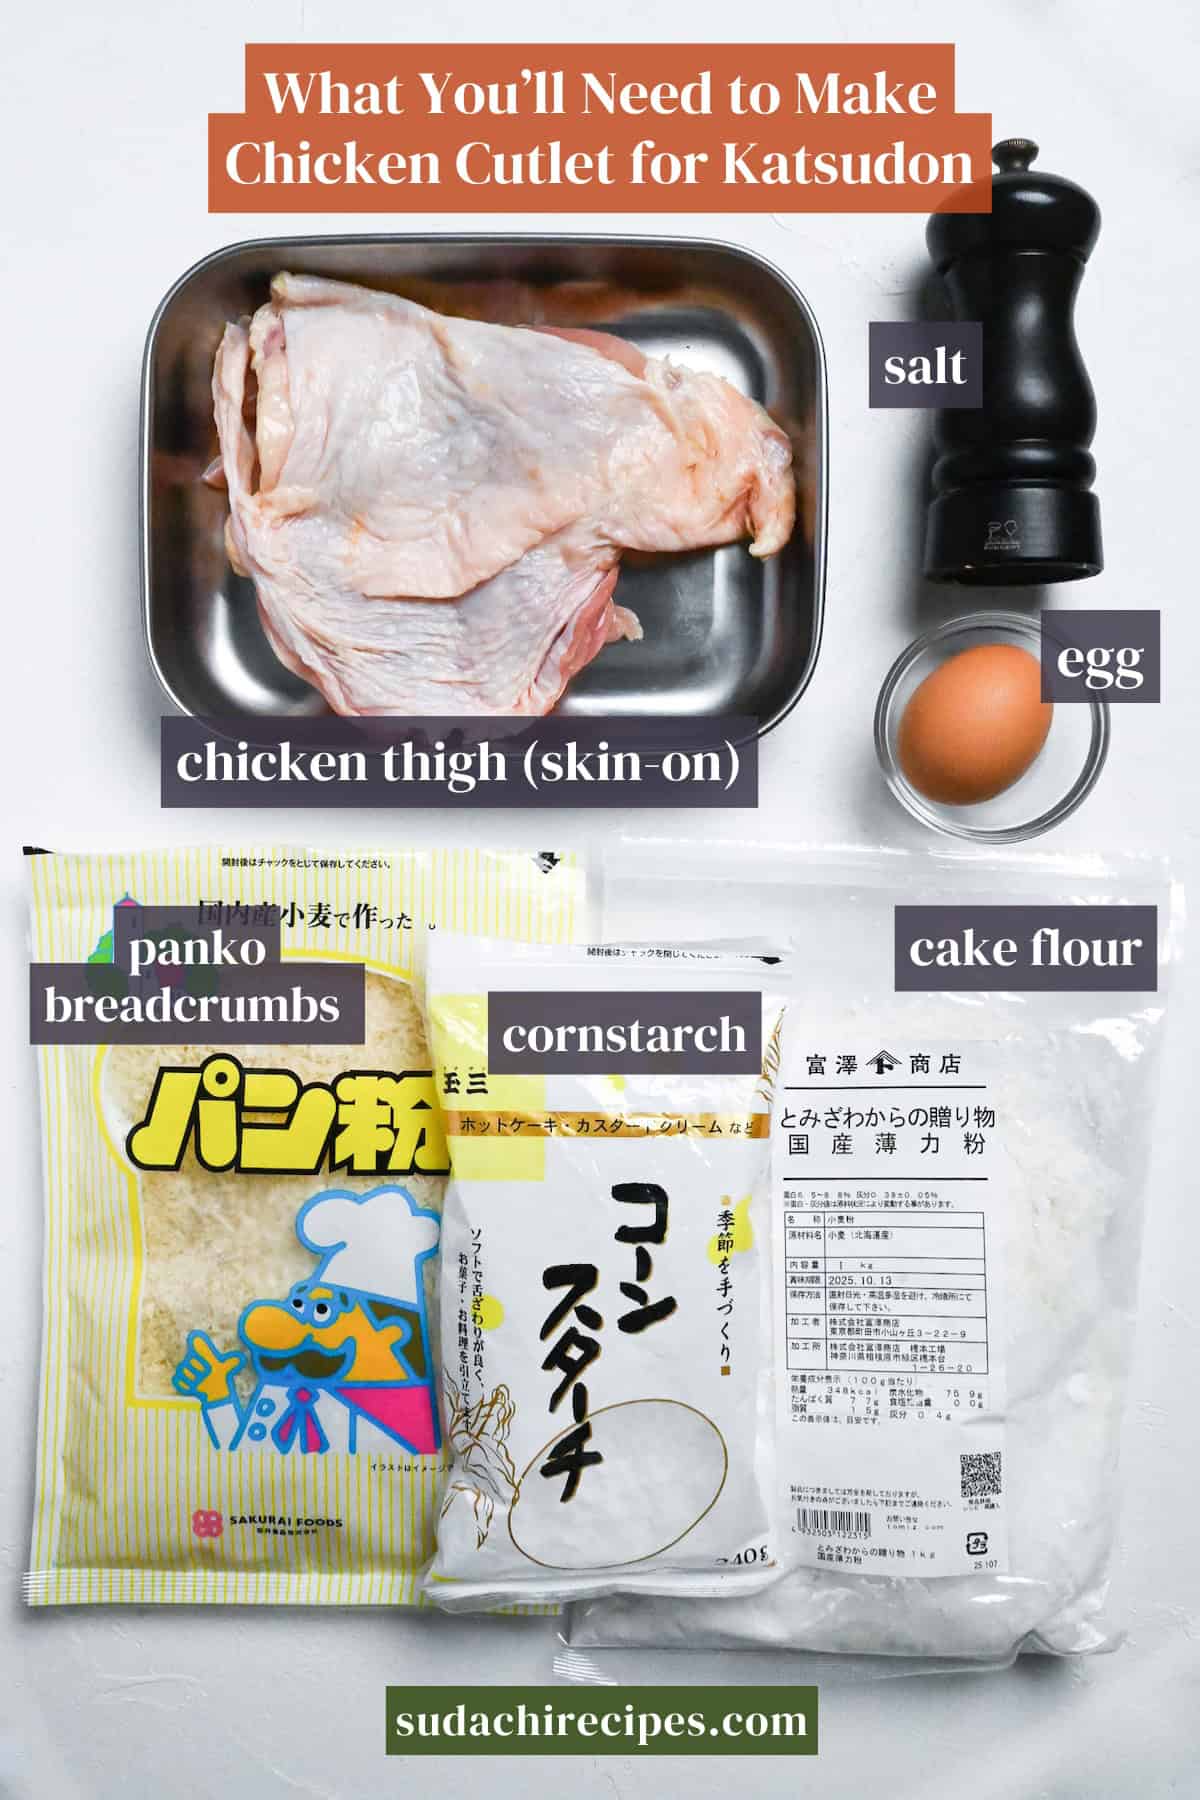
- Chicken: Swap thigh – breast based on your mood and preference. Thigh stays succulent and forgiving, while breast eats lighter. I personally prefer using thigh for this.
- Panko breadcrumbs: These coarse, airy flakes fry into that shattery tonkatsu crunch you love. Dry panko is widely stocked at regular supermarkets. If you want “fresh” (nama) panko, try my homemade panko breadcrumbs recipe!
What You’ll Need for Chicken Katsudon
- Dashi stock: Dashi stock creates depth and gives it that authentic Japanese flavor. Make it with kombu and/or bonito flakes, for convenience use instant dashi or dashi packets.
- Garasupu: This Chinese Style Chicken Bouillon Powder has a light yet umami-rich chicken flavor. Avoid using western style chicken stock powders as these usually contain herbs that are not suited to this dish.
Substitution Ideas
- Protein swaps: Pork loin (tonkatsu) or tenderloin (what we call hire katsu) fries up juicy and traditional.
- Coating swaps: Crushed plain cornflakes or saltines deliver real crunch, while fine Western-style breadcrumbs cook up a touch heavier.
Have trouble finding Japanese ingredients? Check out my ultimate guide to Japanese ingredient substitutes!
How to Make My Chicken Katsudon
If you prefer to watch the process in action, check out my YouTube video of this chicken katsudon recipe!

Before you start (Mise en place):
- Cut your onion into thin slices (or wedges).
- Prepare small amount of dashi stock (either leftover or quickly make with dashi granules)
- Cook Japanese short-grain rice or medium-grain rice (Calrose).
- Separate egg yolks and whites.
i. Score any thick flesh with your knife tip or scissors, then gently pound the thickest parts until the entire piece measures a uniform 1-2cm (½ to ¾ inch) thick.
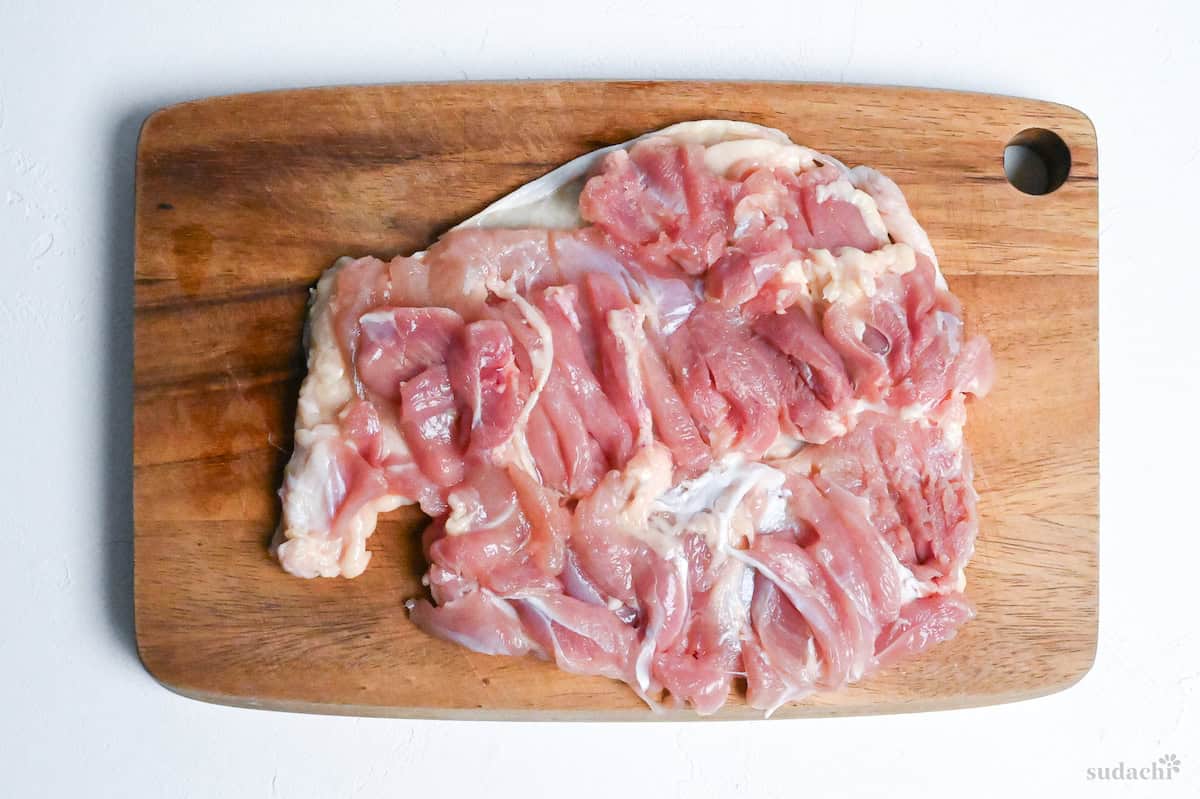
ii. Then cut in half.
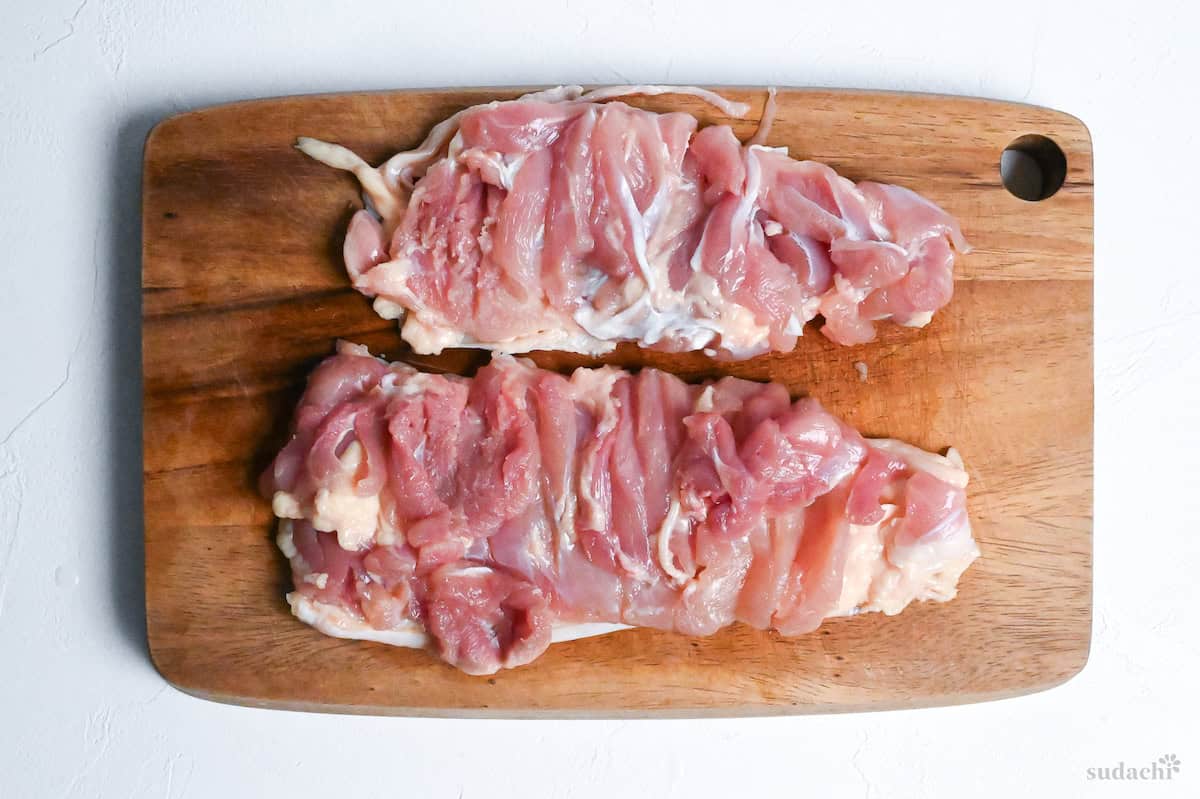
iii. Keep the pieces chilled while you set up. Cold protein fries more evenly and sheds less moisture into the oil.
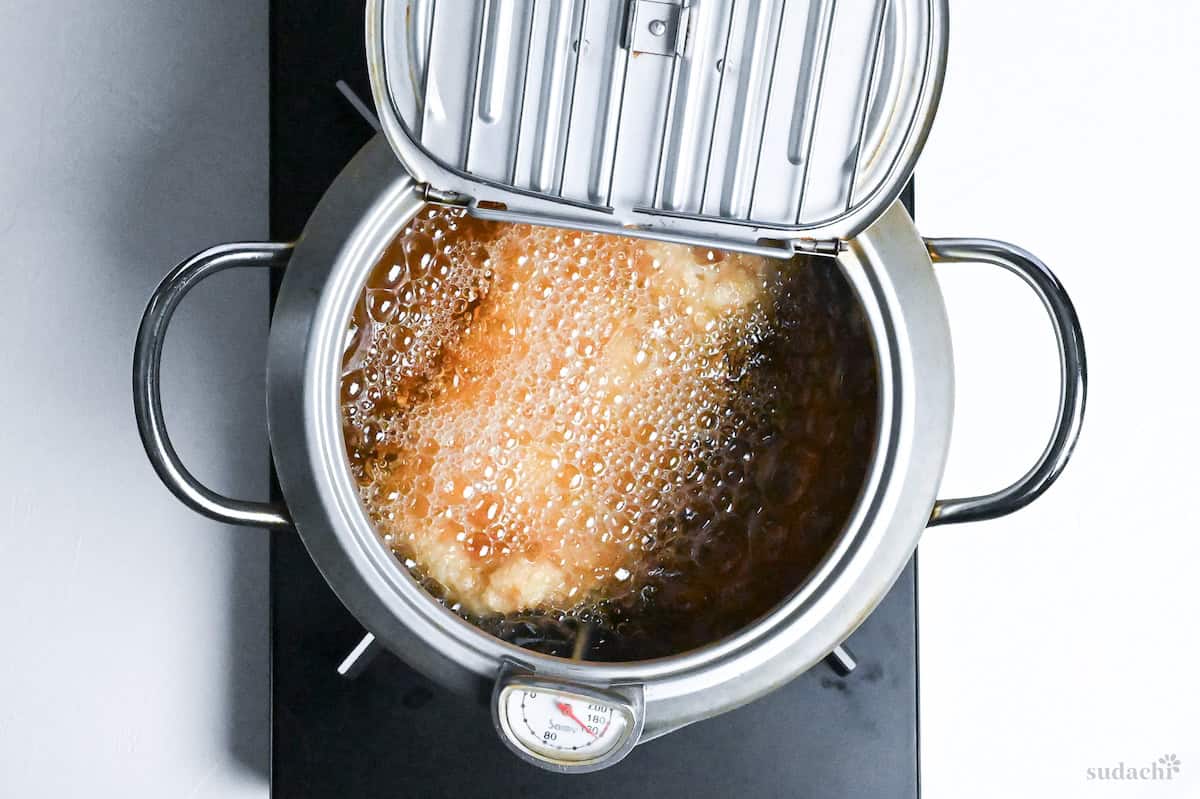
i. Set a heavy pot over medium heat and bring the neutral high-smoke point oil (I always use rice bran oil) to 170℃ (338°F).
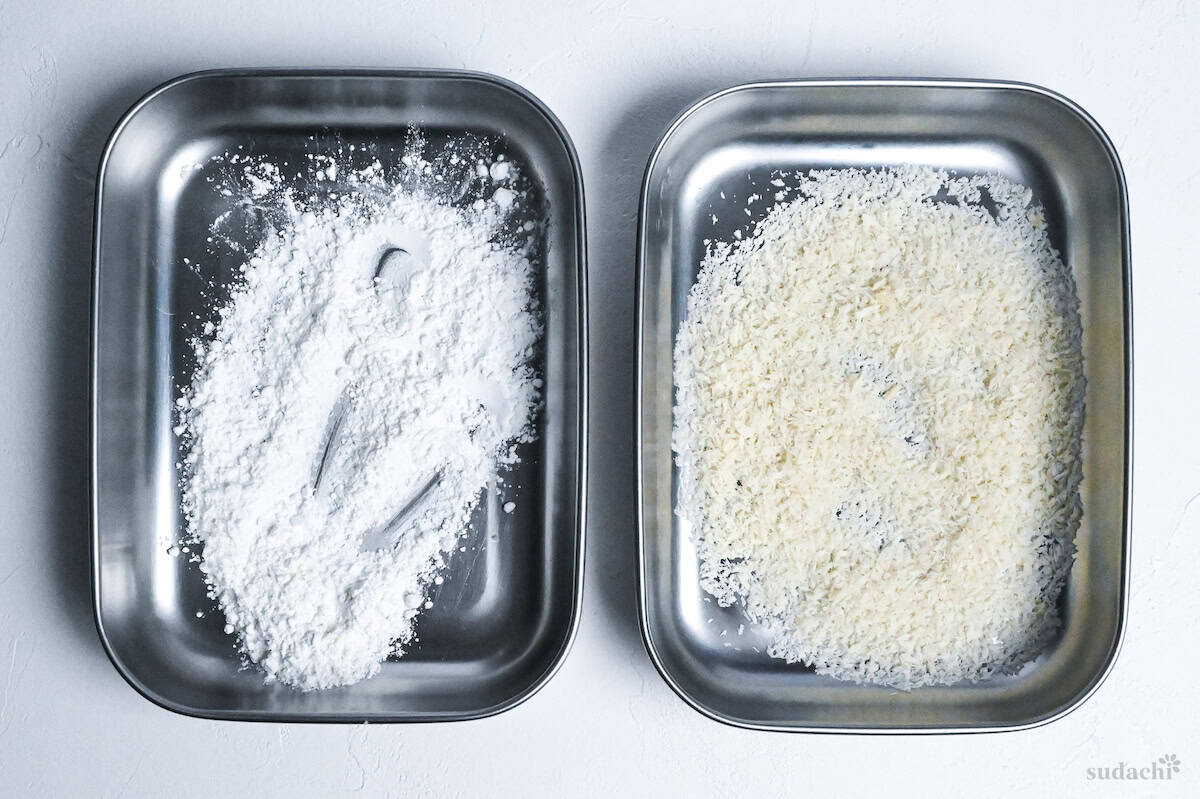
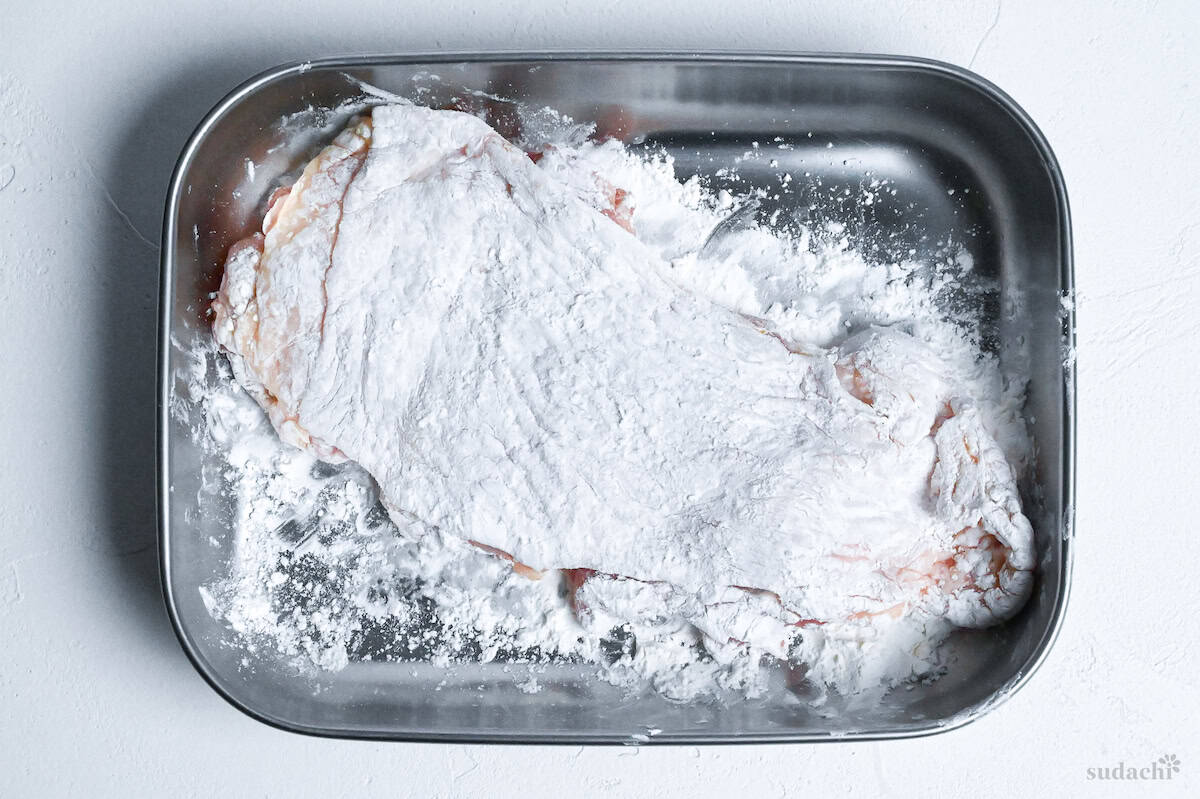
i. Arrange two plates: one with all-purpose flour + cornstarch (light dusting), another with panko (about 4 Tbsp per cutlet).
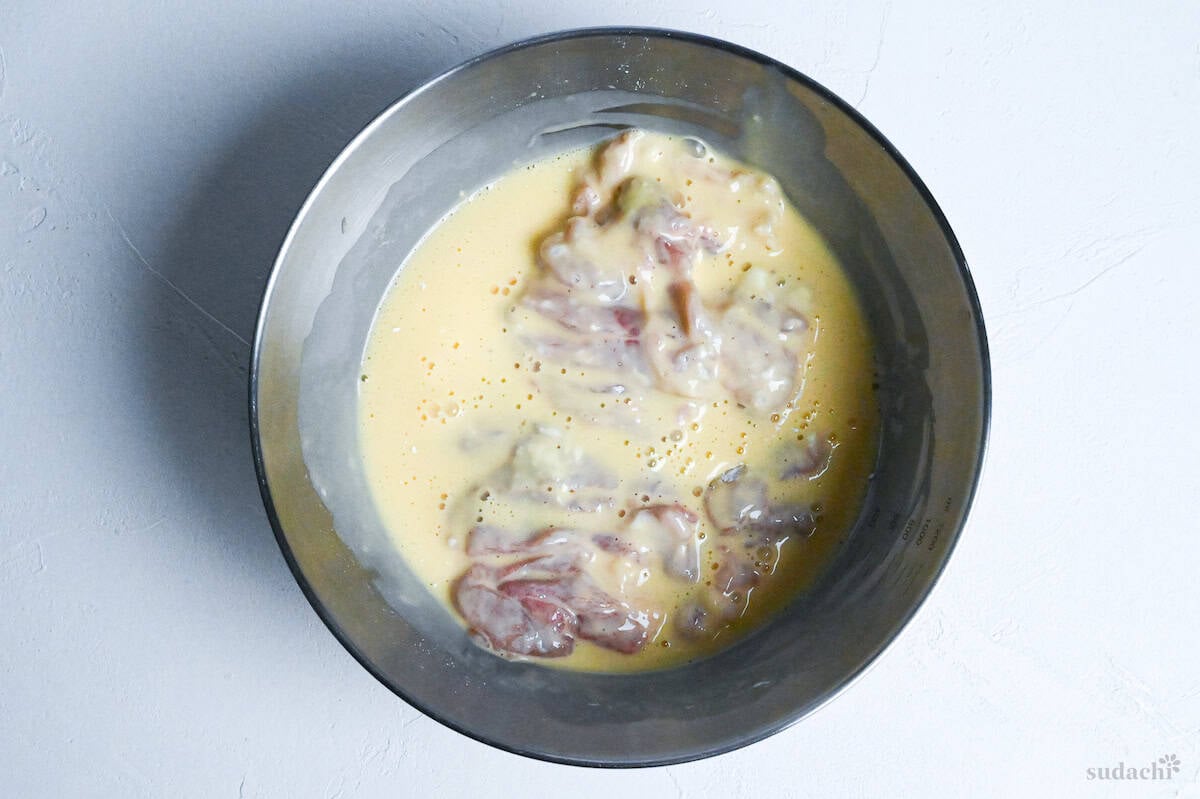
ii. In a bowl, whisk egg + water + flour into a thick batter.
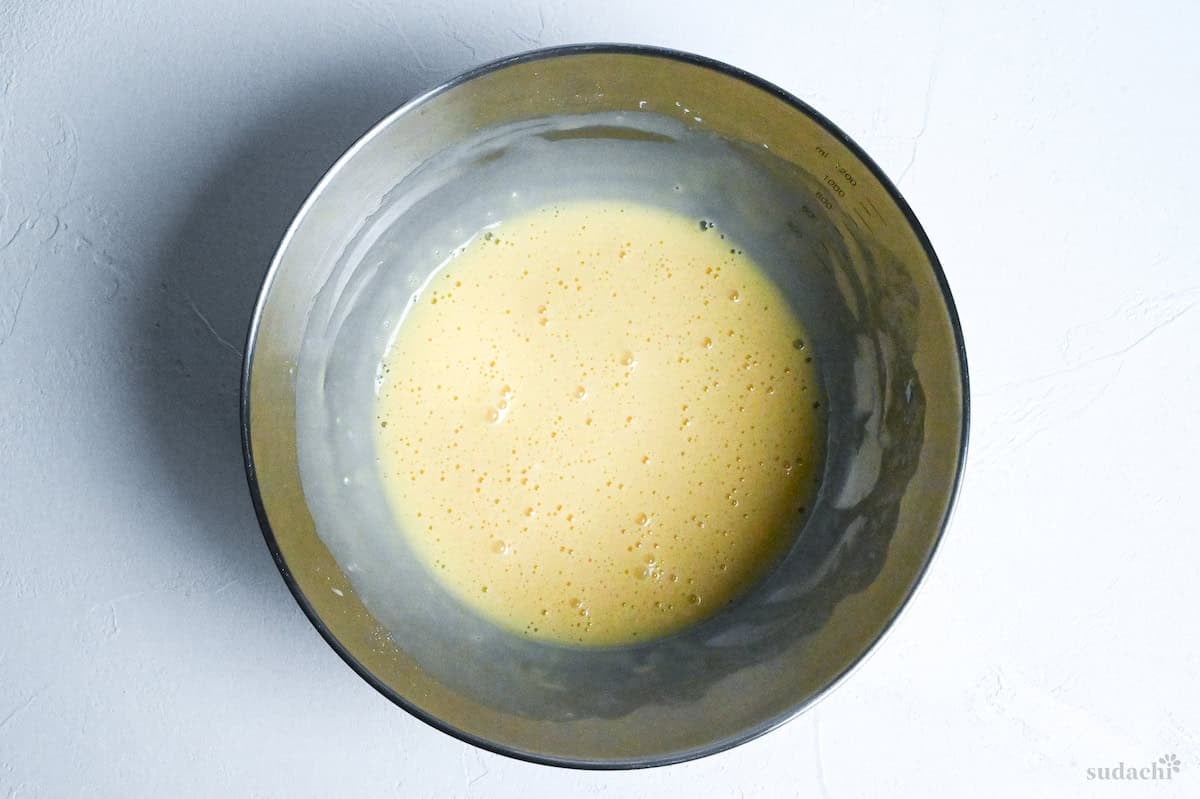
This batter acts like glue so the panko forms a lacier, crunchier coat. Keep everything close to the stove so the coated chicken can go straight into hot oil.
i. Season both sides of each cutlet with a pinch of salt and a crack of black pepper. Dust each piece lightly in your flour-cornstarch mixture, shake off the excess like you’re dusting snow off a jacket.
ii. Then dip fully into the egg batter, lift it out and let the drips fall back into the bowl.
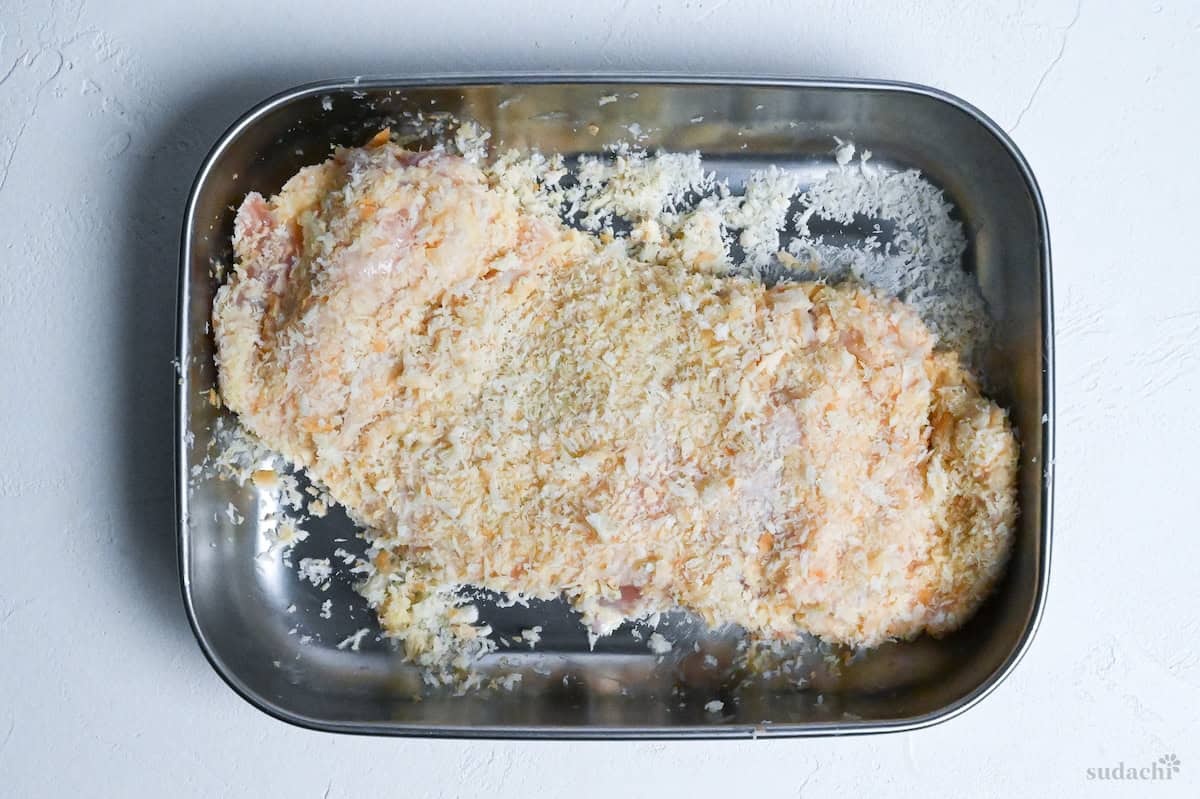
iii. Immediately press both sides into the panko, using your palm to really embed those crumbs.
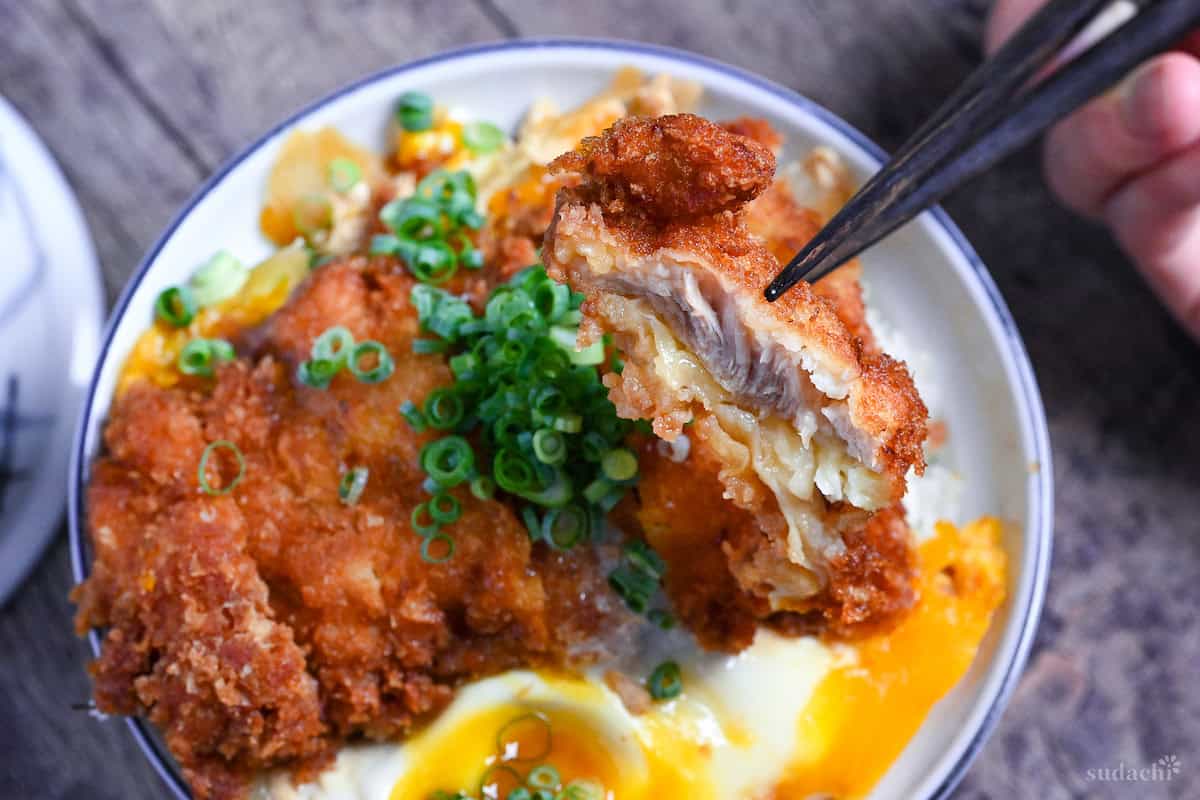
iv. The moment your last piece is coated, gently lower the first cutlet into the oil, laying it away from you to avoid splatter. You’ll hear a vigorous sizzle. That’s the sound of moisture escaping and crust forming. Fry each cutlet for 3 minutes per side at 160-170°C (320°F).
v. After both sides cook, transfer to a wire rack for 2 minutes while you crank the heat to 180°C (356°F).
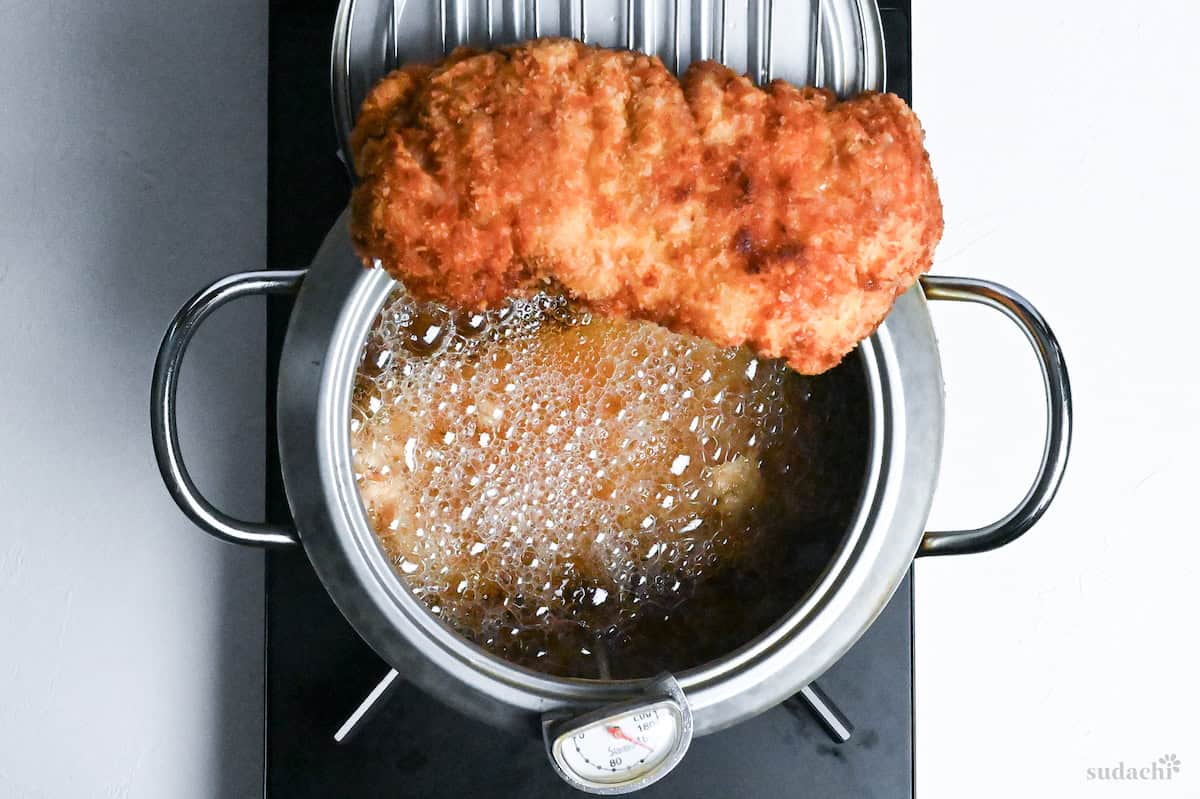
vi. Then give each piece a final 30 to 60 second dunk to achieve that burnished, restaurant-quality amber and seal in the juices.
I totally get it. If you’d rather skip the deep-fry, you can absolutely make this with oven-baked chicken katsu. Check out my oven-baked chicken katsu recipe that works with both thighs and breasts. You’ll sacrifice a bit of that iconic crunch, but you’ll still get a delicious cutlet.

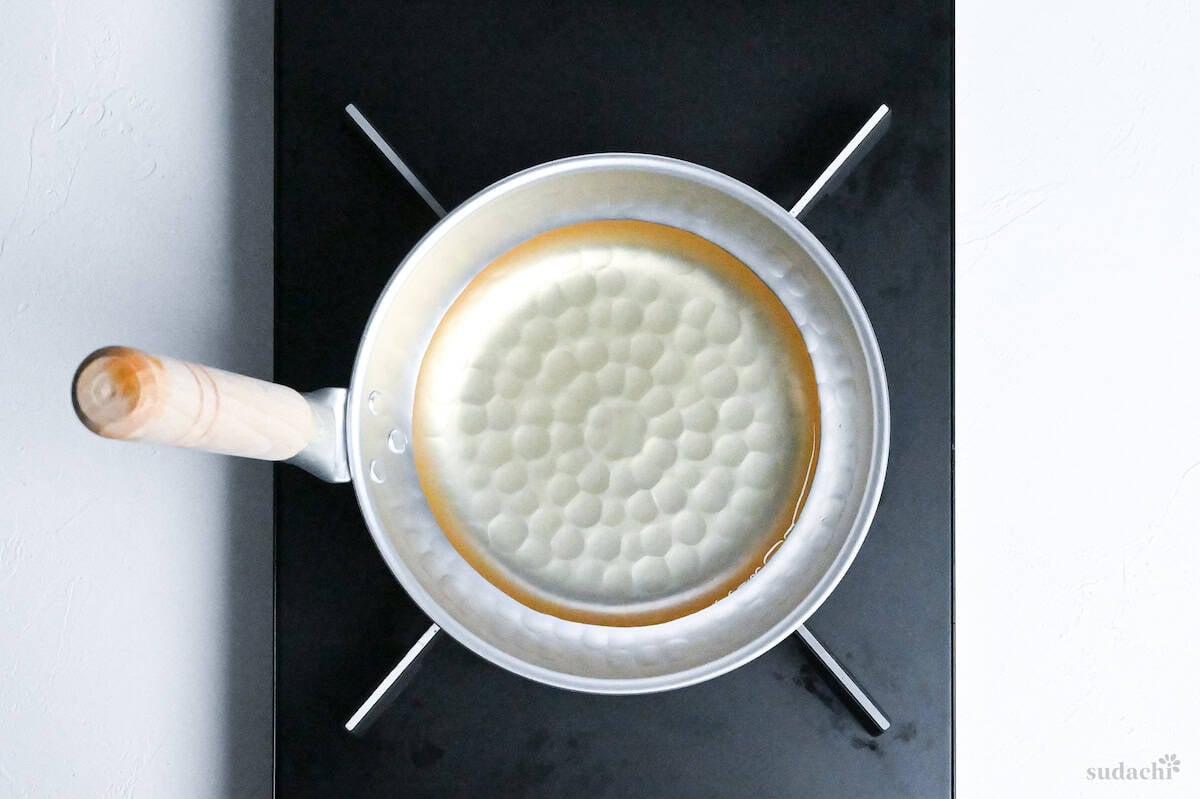
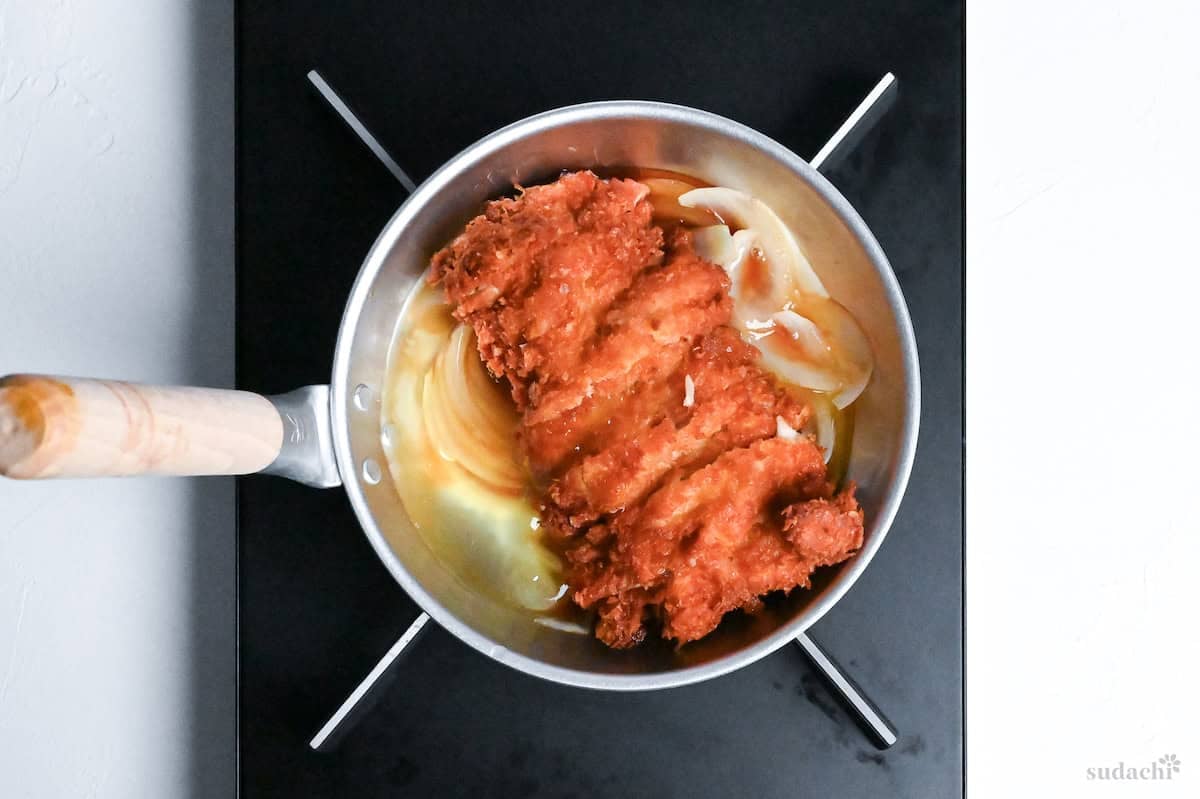
i. Pour dashi stock into a medium skillet or shallow saucepan (something with a lid for later). Set it over medium heat.
Note: I’m using an oyakodon pan (oyako nabe) which is a special pan for making single portions of oyakodon and katsudon (you can find it on my amazon storefront). These are great for presentation, however you can use a large (wide, not deep) pan to make multiple portions at once and then divide it later.
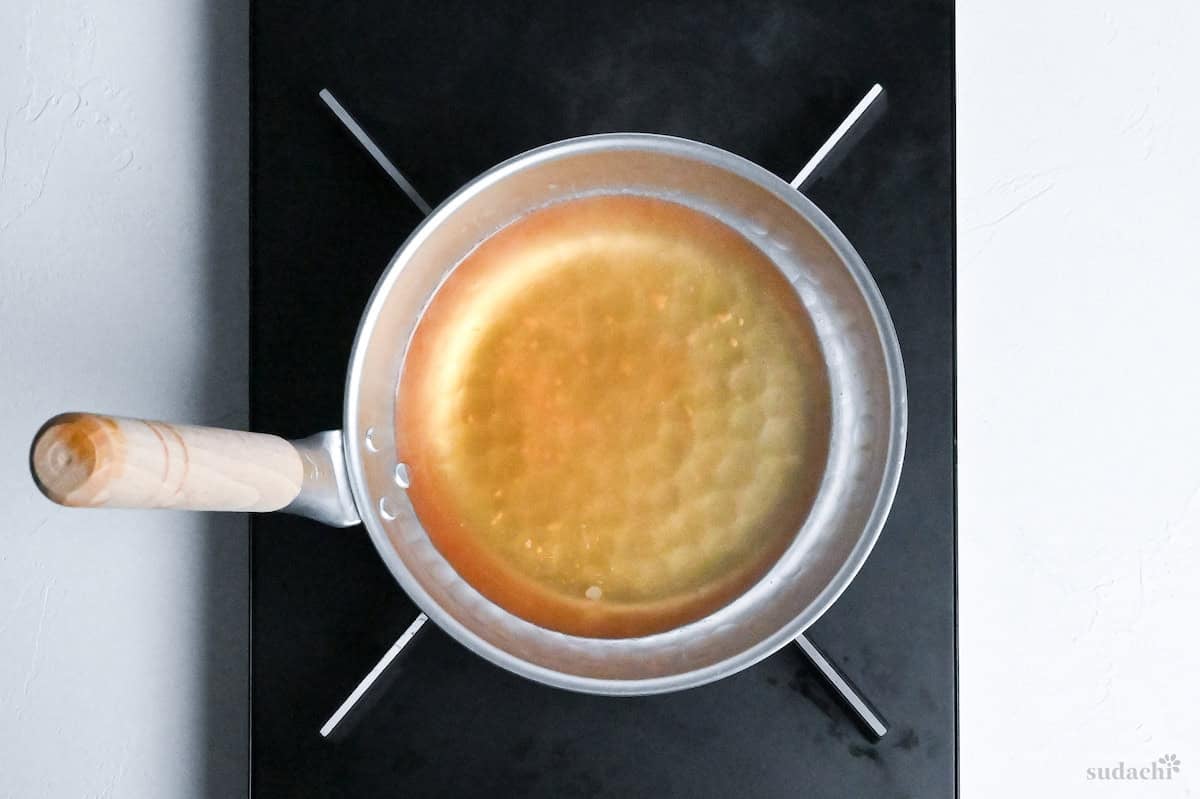
ii. Once it starts to steam, stir in mirin, sugar, and chicken bouillon powder.
Chicken bouillon powder varies by brand. My brand is 1 tsp per 200 ml, so if yours is more concentrated (e.g., 1 tsp per 300 ml), use less to avoid oversalting, and if it’s less concentrated, use a little more (and adjust to taste).
iii. Toss in your sliced onions and let them simmer until they turn translucent and tender, about 3 to 4 minutes.
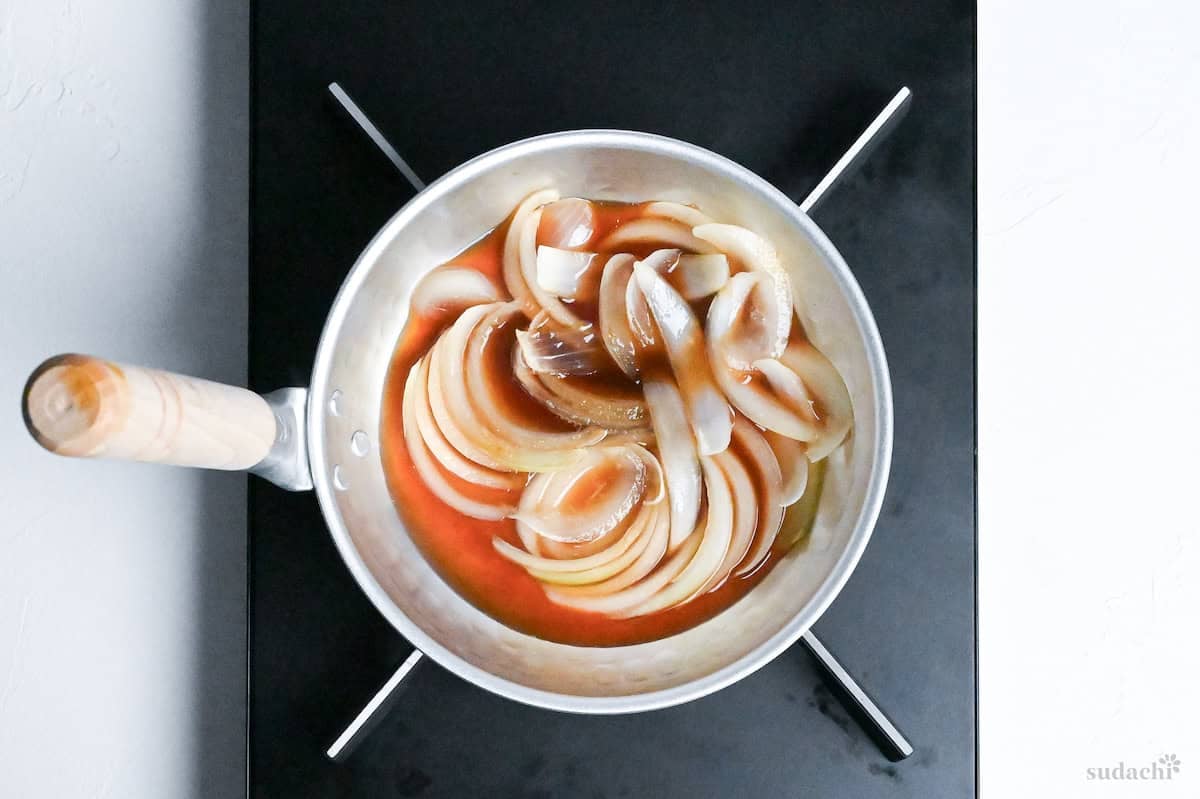
i. Stir Japanese soy sauce into your simmering onion broth.
ii. Slice each rested chicken cutlet crosswise into strips (this makes it easier to nestle into the pan and lets the sauce seep between the pieces).
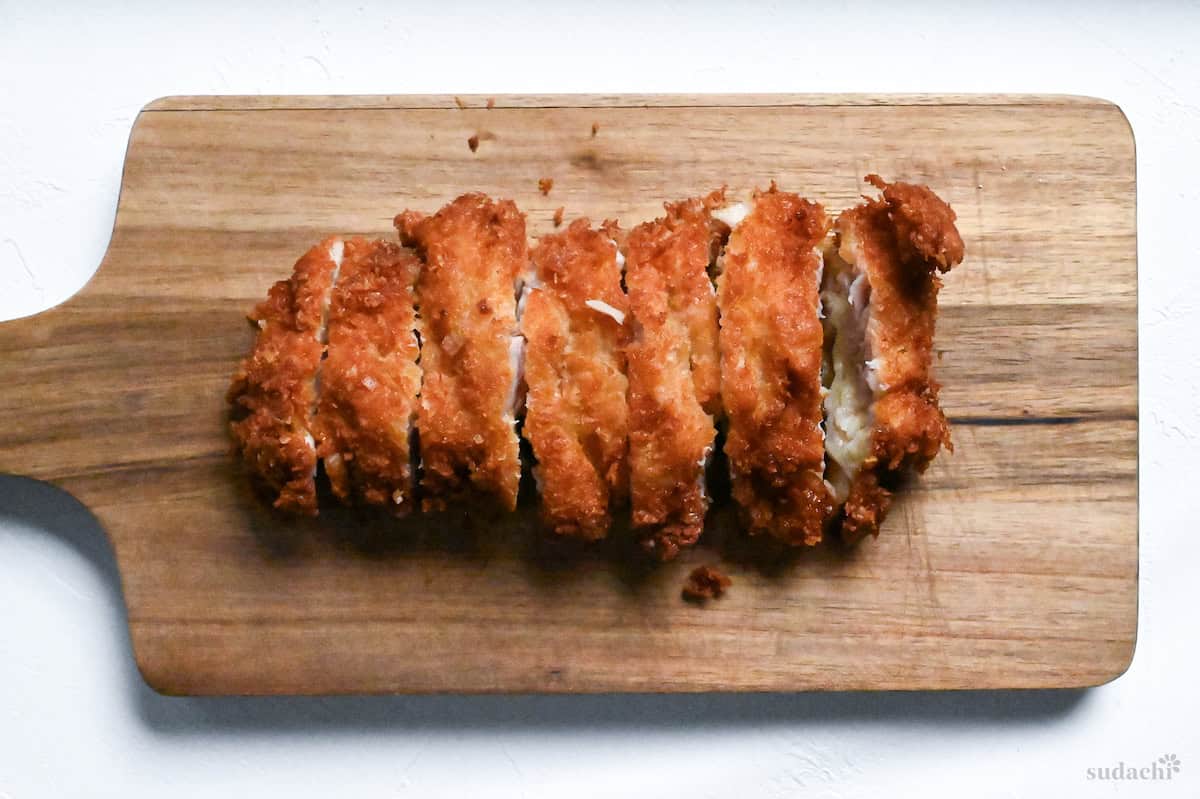
iii. Lay the katsu strips over the onions in a single layer. If you are making multiple portions in one pan, arrange them in a way that is easy to divide later.
Sip a spoonful and adjust to your taste: add a splash of dashi/hot water to soften saltiness, a touch more soy for depth, or a pinch of sugar to balance.
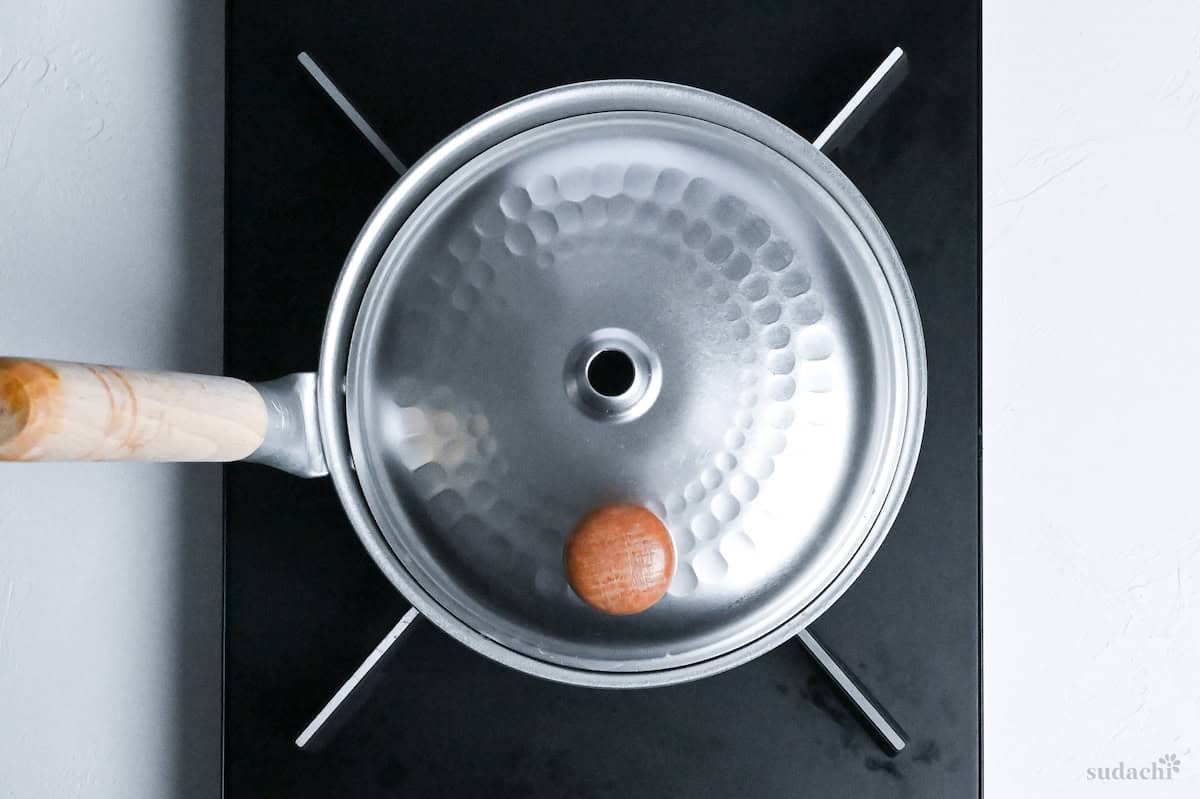
i. Whisk the egg whites until the thick ropes break down into a pourable consistency, then drizzle them in a slow spiral around the edges of the pan, avoiding the chicken at first.
ii. Immediately cover with a lid and let steam work its magic for about 1 minute.
iii. Now lightly beat the yolks (just enough to break them up) and pour them in the same circular motion around the pan.
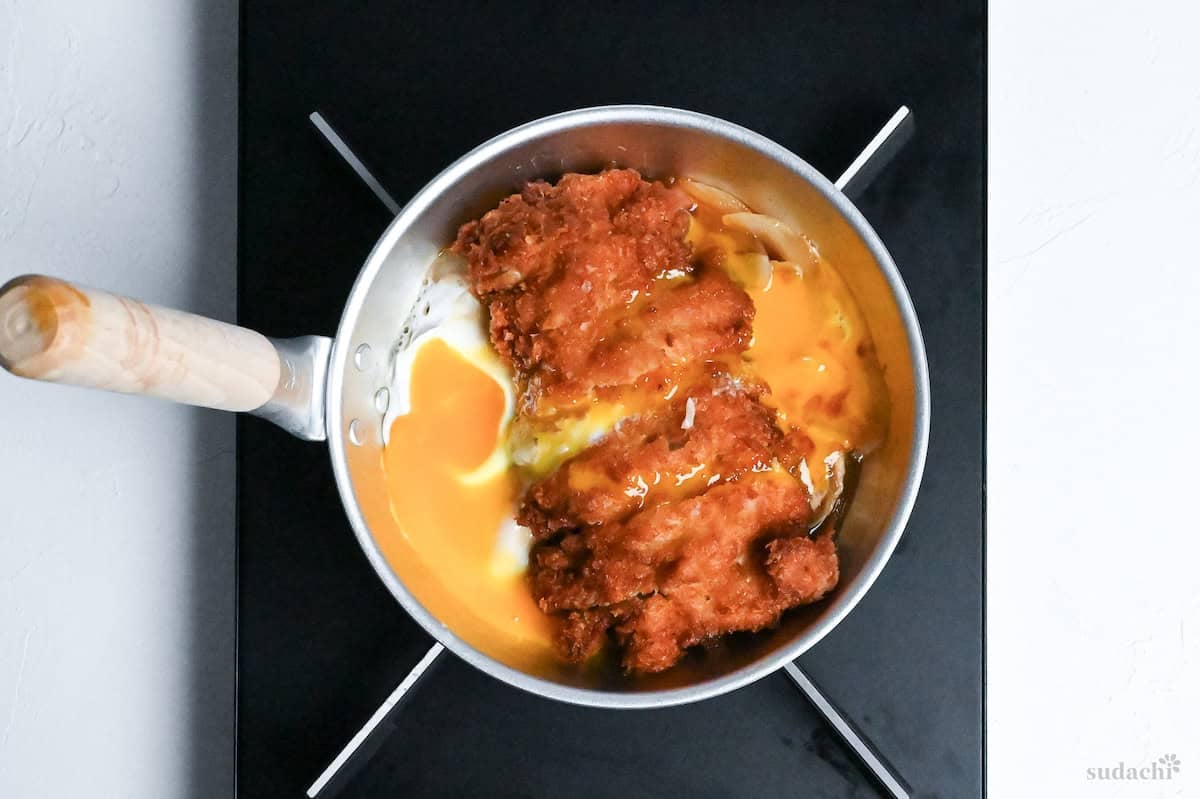
iv. Cover again, then turn off the heat. The residual steam will softly cook the yolks over the next 60 to 90 seconds, leaving them molten and glossy rather than rubbery.
My two-stage method gives you total control. If you prefer fully cooked eggs throughout, simply leave the heat on low for an extra 30 seconds after adding the yolks. If you’re an “onsen tamago” fan who wants that barely-set, lava-like yolk, pull the pan off the heat right after the whites set and let only carryover heat finish the yolks juts like I did. You’re the boss here.
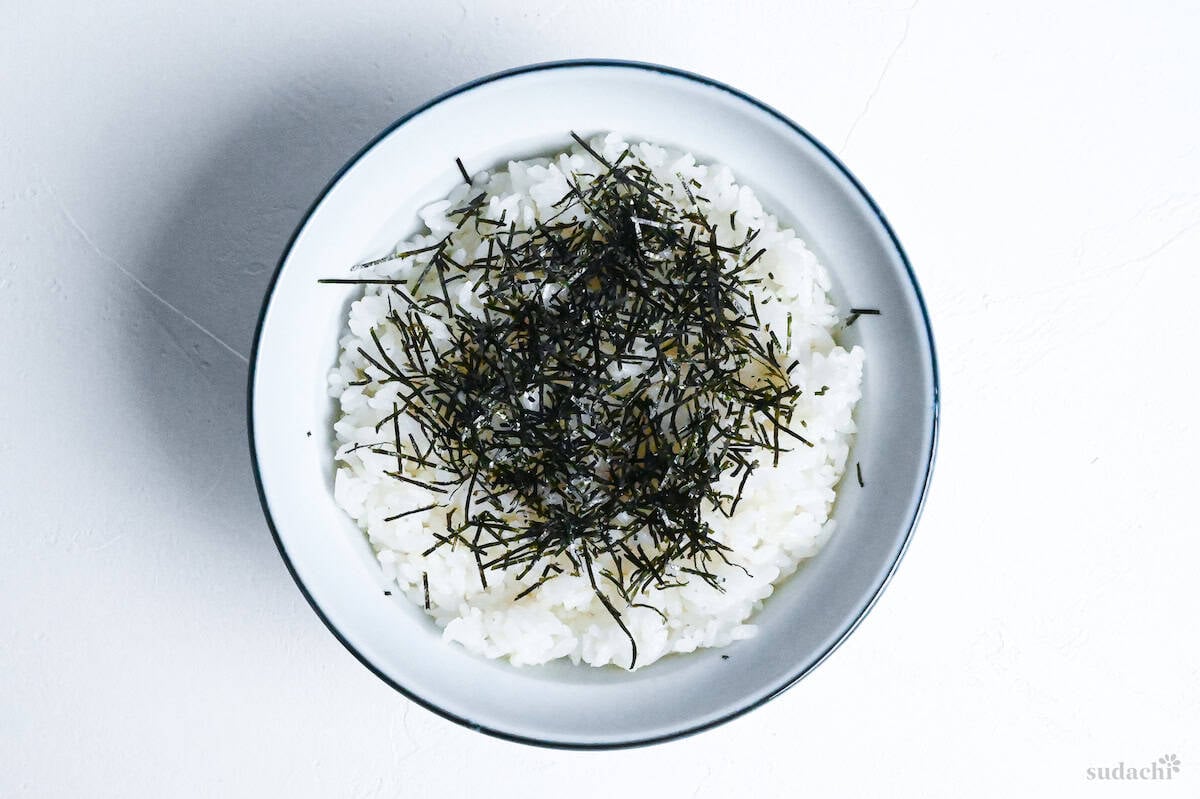
i. Scoop hot steamed Japanese rice into two deep donburi bowls (or any wide, deep bowls you have) and sprinkle some kizami nori (optional) to make a bed.
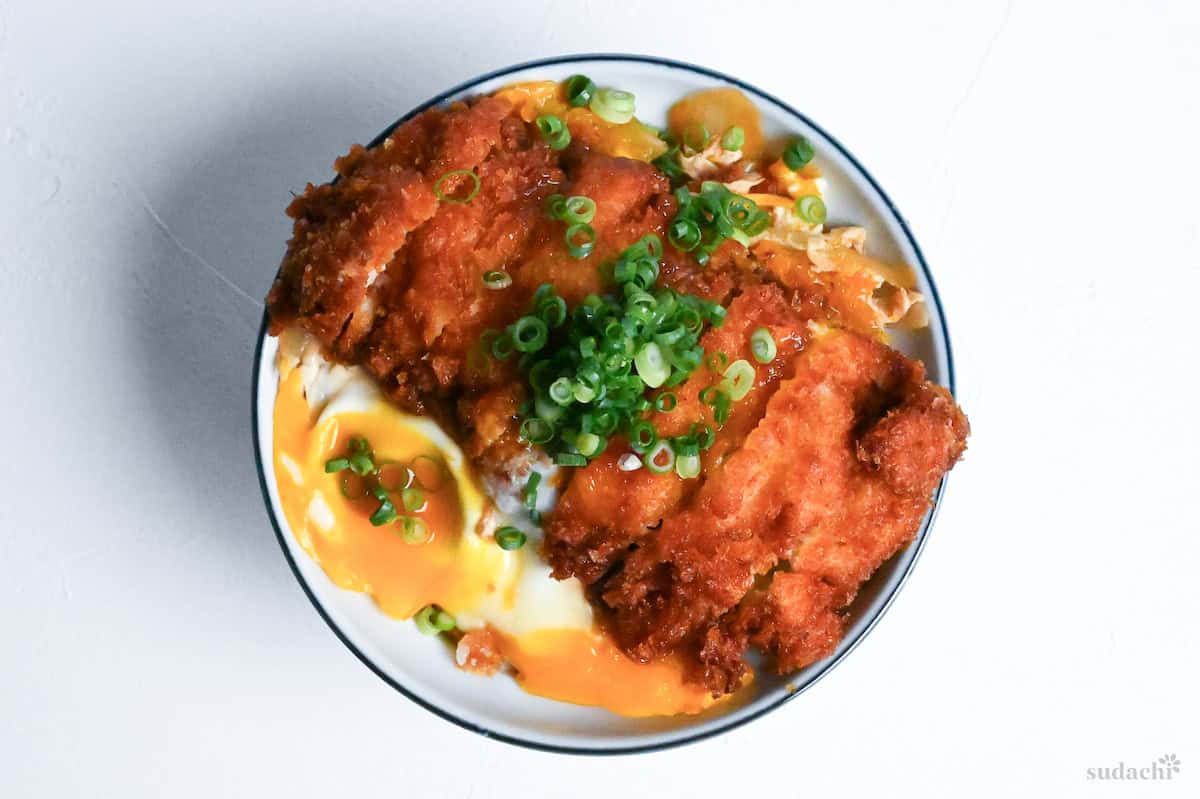
ii. Use a spatula or large spoon to lift half the chicken, onions, and egg mixture from the pan, letting excess sauce drip back, and gently slide it over one bowl of rice. Spoon any remaining broth from the pan over the top. Finish with a sprinkle of thinly sliced green onions.

Essential Tips & Tricks
- Pound chicken to uniform before breading.
- Press panko firmly into the chicken with your palm. Loosely coated crumbs fall off during frying.
- Rest fried katsu on a wire rack, not paper towels. Paper towels trap steam underneath, making the bottom crust soggy.
- Add egg whites first, then yolks separately. This two-stage technique prevents overcooked, rubbery eggs.
- Serve immediately after assembly. Katsudon loses its magic texture contrast within 5 minutes.
With these simple tips in mind, you’re set for success every time you make chicken katsudon.
Storage & Meal Prep
Fridge: Store components separately. Chicken katsu (unsauced), covered on a rack in an airtight container: 1-2 days. Onion-dashi base: 2-3 days. Assembled katsudon: not recommended.
Freezer: Chicken cutlets (raw, breaded): airtight and well-wrapped, up to 2 months. Fried cutlets (cooled completely): up to 1 month. Assembled katsudon: not recommended.
Meal Prep: Best strategy is component prep. Bread and freeze raw cutlets, or fry cutlets a day ahead and chill. For “fresh” results later, re-crisp the katsu.
Reheating: For katsu only, re-crisp in an oven or air fryer at 180℃ (356°F) until hot and crisp, about 8-12 minutes.
What to Serve With This Recipe
Chicken Katsudon Troubleshooting
The surface was too wet, or the flour layer clumped and didn’t adhere. Always pat the chicken dry, coat evenly with flour, shake off excess. Avoid touching them during the first minute in oil.
The oil was too cool or the batch was overcrowded. Drain on a wire rack instead of paper towels to prevent steam re-absorption. To re-crisp, reheat briefly in a toaster oven or air fryer.
Katsudon can be too rich (either too salty or sweet) if you’re not used to it. Always taste the broth before adding the egg. It should feel slightly strong when sipped plain as egg and rice will dilute it. If overly salty, add dashi or water and re-balance with mirin or sugar. If too mild, a drizzle of soy sauce.
More Japanese Chicken Recipes
Ready to expand your dinner rotation? I’ve rounded up the best Japanese chicken recipes that are both approachable and incredibly delicious.
Did You Try This Recipe?
I would love to hear your thoughts!
💬 Leave a review and ⭐️ rating in the comments below. 📷 I also love to see your photos – submit them here!

Chicken Katsudon
Ingredients
Chicken Cutlet
- 350 g boneless chicken thigh or chicken breast
- 1 tbsp cake flour low-gluten flour, or all-purpose, for dusting
- ½ tbsp cornstarch
- 60 g panko breadcrumbs or regular breadcrumbs
- 1 egg for batter
- 5 tbsp cake flour low-gluten flour, or all-purpose, for batter
- 3 tbsp water for batter
- salt and pepper to taste
- cooking oil neutral with high smoke point like rice bran
Katsudon
- 150 ml dashi stock leftover or make quick dashi using dashi granules
- 3 tbsp mirin
- 1 tbsp light brown sugar or little less amount of regular sugar
- 1 tsp Chinese-style chicken bouillon powder
- ½ onion thinly sliced or wedges
- 5 tsp Japanese soy sauce (koikuchi shoyu)
- 3 eggs whites and yolks separated
- 2 portions cooked Japanese short-grain rice or medium-grain (Calrose)
Toppings
- kizami nori (shredded nori) optional
- finely chopped green onions
My recommended brands of ingredients and seasonings can be found in my Japanese pantry guide.
Can’t find certain Japanese ingredients? See my substitution guide here.
Instructions
- Score the flesh of 350 g boneless chicken thigh with the tip of a knife (or scissors) and gently pound until 1-2cm (½-¾") thick.

- Cut into equal portions for each serving.
- Preheat your cooking oil for deep frying to 170 °C (338 °F). Prepare two wide containers or plates, one with a mixture of 1 tbsp cake flour and ½ tbsp cornstarch, the other with about 60 g panko breadcrumbs (approx 8 tbsp/ half US cup per cutlet).
- Crack 1 egg into a bowl and add 5 tbsp cake flour and 3 tbsp water. Whisk until it forms a thick, smooth batter.
- Sprinkle both sides of each piece of chicken with a pinch of salt and pepper, then place in the flour/starch mixture and rub it all over until evenly covered.
- Lift the chicken and dust off the excess flour, then submerge in the batter.
- Lift the chicken and let the excess batter drip off before placing it in the panko breadcrumbs. Press firmly to secure them.
- Once the oil is hot, gently drop the cutlet in the pot and fry for 6 minutes, turning half way through.
- Rest the cutlets on a wire rack for 2 minutes and increase the oil temperature to 180 °C (356 °F). After 2 minutes, place the cutlets back in the oil for 30-60 seconds and transfer to the wire rack once more.
- Pour 150 ml dashi stock into a pan and heat over medium. When it starts to bubble, add 3 tbsp mirin, 1 tbsp light brown sugar and 1 tsp Chinese-style chicken bouillon powder.
- Stir until dissolved, then add ½ onion (sliced) and simmer until soft and translucent. Pour 5 tsp Japanese soy sauce (koikuchi shoyu) and stir.
- Cut the cutlet into strips, and set 3 eggs (separated into two bowls) by the stove.
- Lay the strips neatly in the pan and whisk the egg whites before pouring them around the pan (avoid pouring directly over the cutlet).
- Cover with a lid and steam the egg whites for about 1 minute or until just before your preferred doneness.
- Remove the lid and lightly beat the egg yolks. Pour the beaten yolks around the pan, then cover once more and turn off the heat. Steam until they reach your preferred doneness (about 60-90 seconds for slightly runny).
- Prepare large serving bowls with 2 portions cooked Japanese short-grain rice and sprinkle kizami nori (shredded nori) over the top.
- Carefully slide the eggs and katsu over the rice. Spoon a few tbsp of remaining broth over the top and sprinkle with finely chopped green onions. Enjoy!
Video
Love it, thank you for all amazing recipes!
Thank you so much, Eva! I’m so happy to hear you enjoy my recipes! 🙂
I really like this recipe, thank you.
Thank you, Peter! 🙂
This is now on my repeat meal list.
Will be cooking this again many times.
Hi Marcus,
That makes me so happy to hear! Thank you for trying the recipe and sharing your photo, it looks incredible! Knowing it’s earned a spot on your repeat list truly means a lot to me. 🙂
Yuto