

Featured Comment
Absolutely the best!!
★★★★★
– Claudia
One bite and you’ll know, this chicken katsu is something. Crispy panko shell, juicy thigh meat, fried to golden perfection. But another reason you’ll make this again? It’s not the katsu itself.
It’s the homemade sesame sauce! And it’s more than just the cherry on top. Together, juicy chicken thighs in shattering panko crust plus that sauce? This is the recipe I’ve perfected to be genuinely, no-exaggeration, the best.

Chicken Katsu
Recipe Snapshot
- What is it? Golden, shatteringly crispy chicken katsu drizzled with a rich, nutty sesame sauce you make from scratch in minutes.
- Flavor profile: Audibly crunchy panko crust, savory-sweet sesame drizzle, and tender, juicy chicken thigh in every bite.
- Why you’ll love this recipe: It turns a weeknight favorite into a “signature dish” with zero stress. Clear temp target, no soggy crust, and everyone asks, “What’s in that sauce?”
- Must-haves: Panko breadcrumbs, toasted white sesame seeds, boneless chicken thigh (skin-on).
- Skill Level: Easy! Deep-frying at 170 °C is the only technique to manage, and the rest is coat, fry, and drizzle.
Summarize & Save this content on:
What is Chicken Katsu?
Chicken katsu (チキンカツ) is a panko-breaded, deep-fried chicken cutlet and one of the most popular katsu dishes in Japanese yōshoku cooking. It’s part of Japan’s fry/フライ (Japanese deep fried foods) culture, and it’s usually sliced before serving with shredded cabbage, rice, and a thick, sweet-savory sauce.
Katsu is similar to Western breaded cutlets, but Japanese versions are built around a light crumb crust designed for clean slicing and saucing. If you’re exploring the family, tonkatsu is the most classic pork version, gyukatsu is a beef cutlet often served rarer in the center, and menchi katsu uses seasoned minced meat.
Japanese Chicken Katsu Ingredients
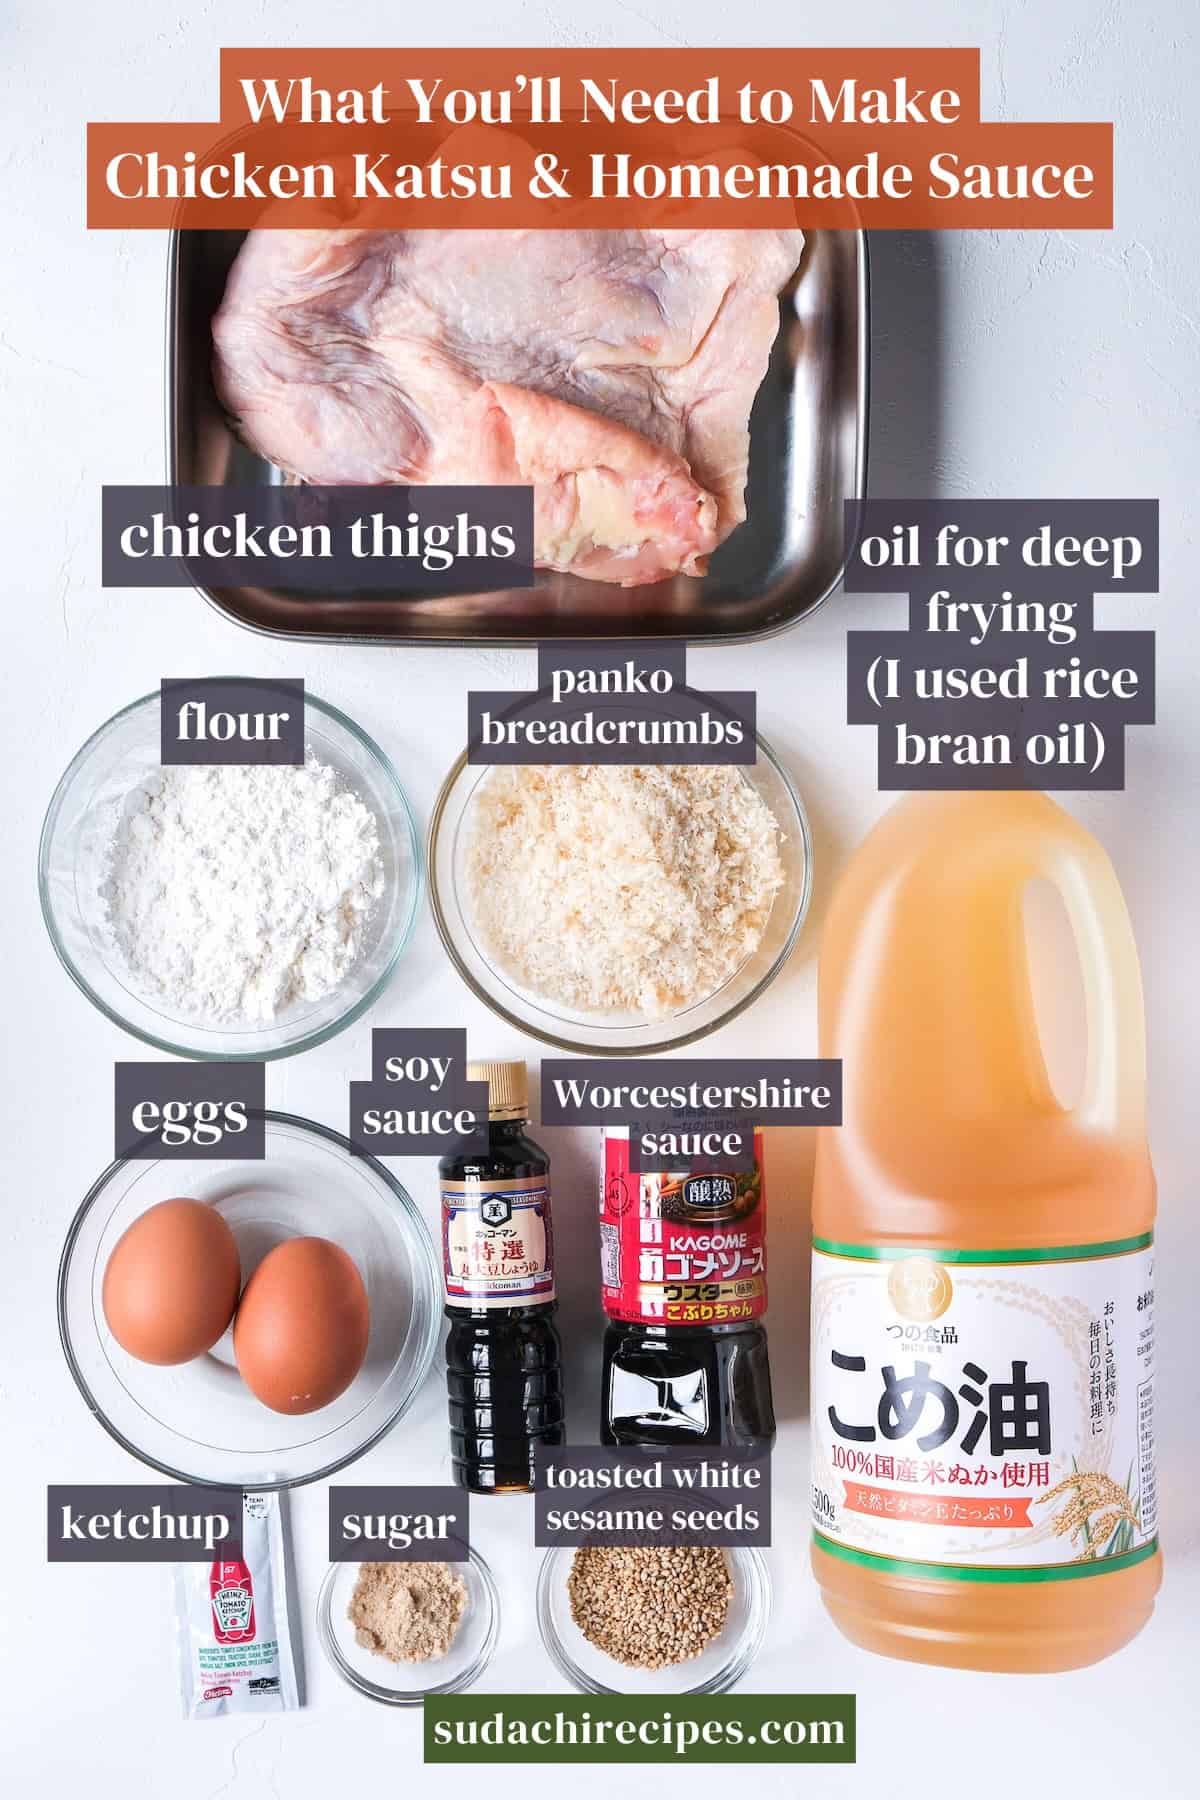
- Panko breadcrumbs: Panko is Japanese-style breadcrumbs (パン粉), think big, airy flakes instead of fine, sandy Western crumbs. In this chicken katsu recipe, that coarse structure is the whole point. It dehydrates fast in the oil and gives you that light, audible crunch. Look for it in the Asian aisle, but if you can’t find it, tear up any bread you have (English muffins, baguette, sandwich bread, anything works), pulse it in a blender until coarse, and use that instead. Homemade panko actually gives you an even better texture.
- Worcestershire sauce: Worcestershire sauce is actually a classic backbone for katsu-style sauce. Japanese brands like Kagome or Bulldog tend to be a bit milder and fruitier, but classic Lea & Perrins works fine. It just leans slightly more vinegary.
- Neutral cooking oil (high smoke point): Use an oil that can handle high heat without smoking or adding unwanted flavors (rice bran oil, vegetable oil, or canola) all work well. Rice bran oil is my absolute deep-fry go-to.
Substitutions & Variations
- Chicken thigh → Chicken breast works, but I’ll be honest, it won’t beat thigh for that juicy-meets-crunchy combo.
- Panko breadcrumbs (panko) → Blitz any (whether stale or not) bread into coarse crumbs. I’ve tried English muffins, baguette, loaf before, and all turned out so delicious. Honestly, homemade is even better than store-bought Japanese panko breadcrumbs.
- Japanese brand Worcestershire sauce → Most grocery-store Worcestershire works fine here.
- Deep frying → If you don’t want to deep-fry, check out my oven-baked chicken katsu recipe.
- Sesame-based katsu sauce: If you want to explore more sauce variations, read my tonkatsu sauce recipe for three different versions.
Have trouble finding Japanese ingredients? Check out my ultimate guide to Japanese ingredient substitutes!
How to Make My Authentic Chicken Katsu
i. Scatter white sesame seeds into a dry frying pan (do not use non-stick for this) over medium-high heat and keep them sliding across the surface with a gentle shake every few seconds.
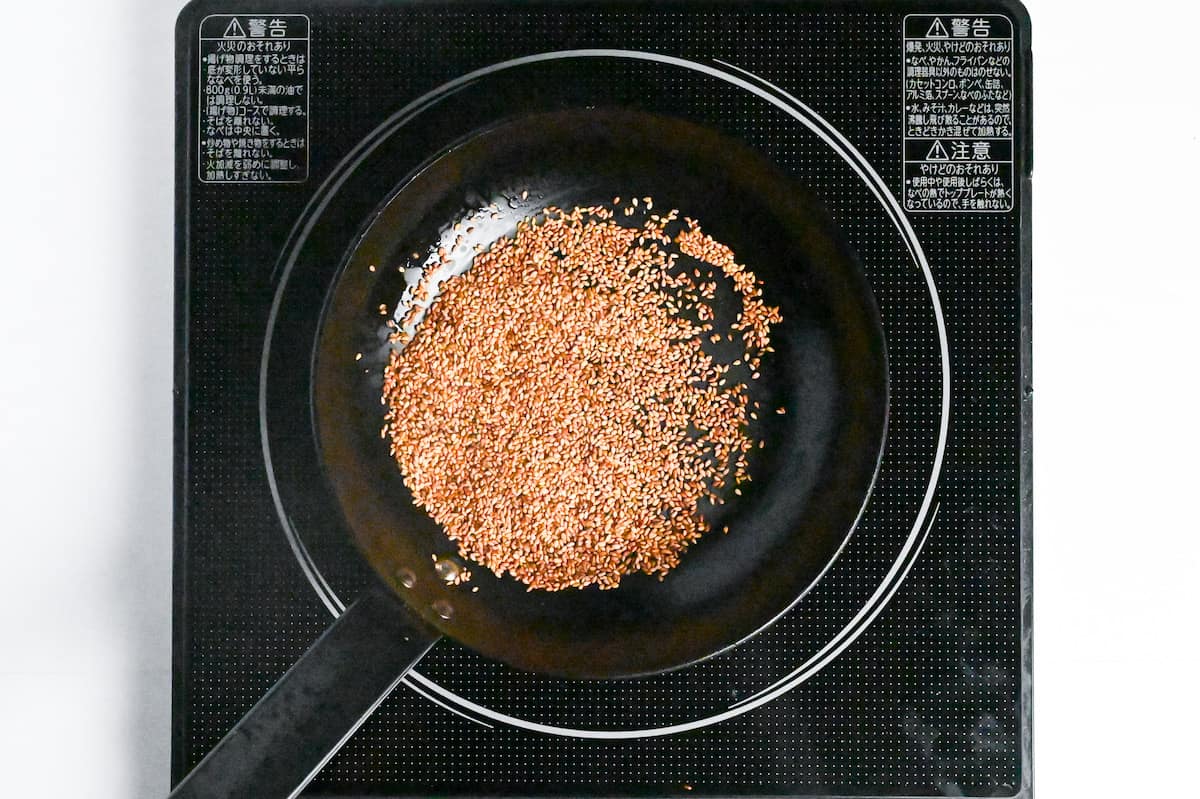
ii. Within 2-3 minutes you’ll catch a warm, nutty fragrance rising from the pan and the seeds will shift from chalky white to the palest gold. Pull them off the heat the instant you smell that toasty wave as sesame burns fast and turns bitter without warning.
Trust your nose more than your eyes here! The aroma change arrives about ten seconds before the color deepens, so fragrance is your most reliable cue. If a few seeds pop and jump, that’s normal. If they start smoking, they’ve gone too far.
iii. Transfer the hot seeds to a mortar and pestle (or a small blender) and grind until the seeds break into a coarse, slightly oily powder. You don’t need a perfectly smooth paste, some texture gives the sauce body.
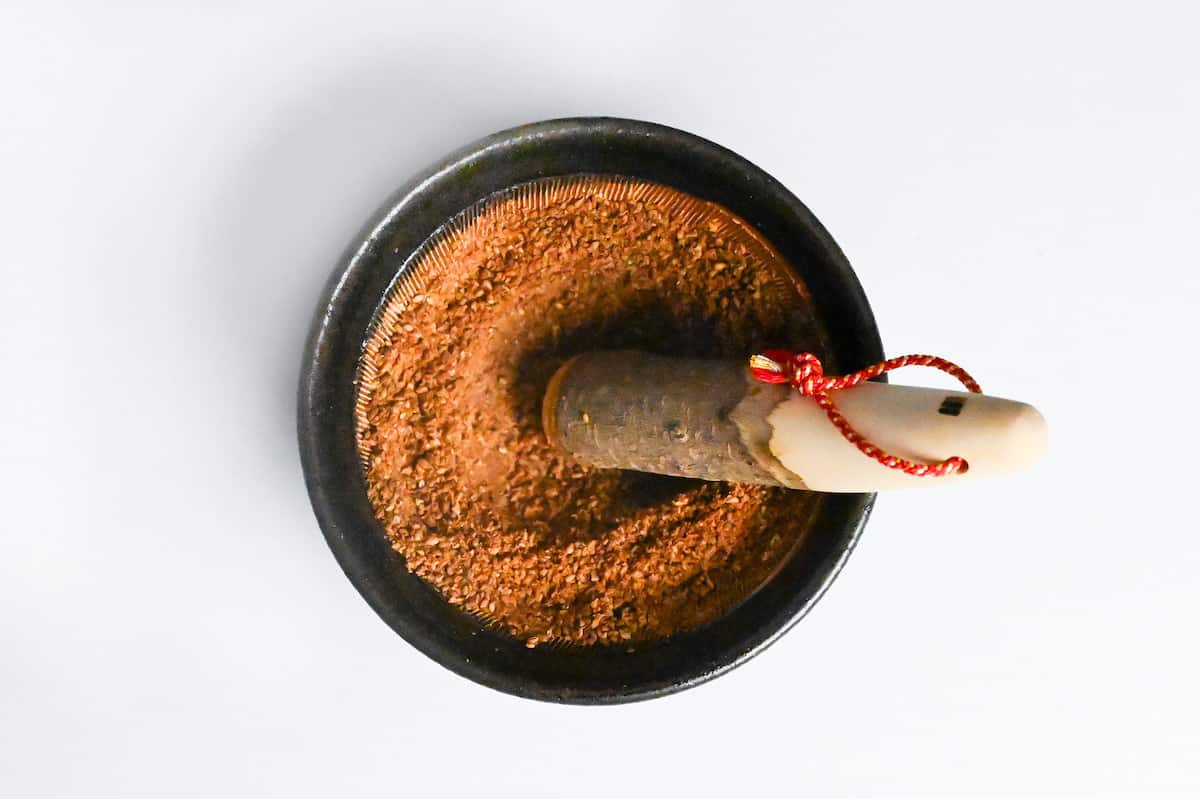
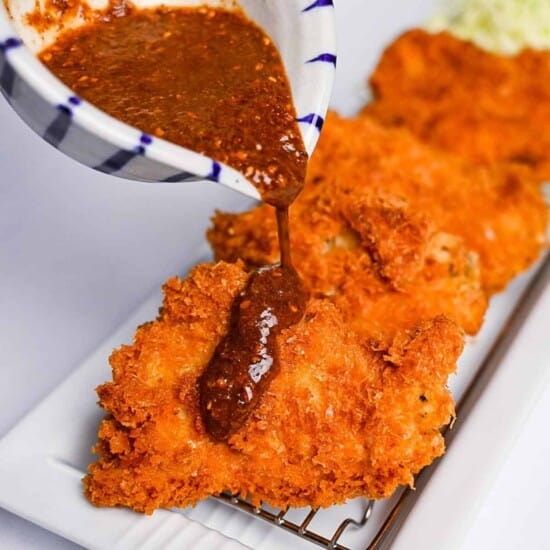
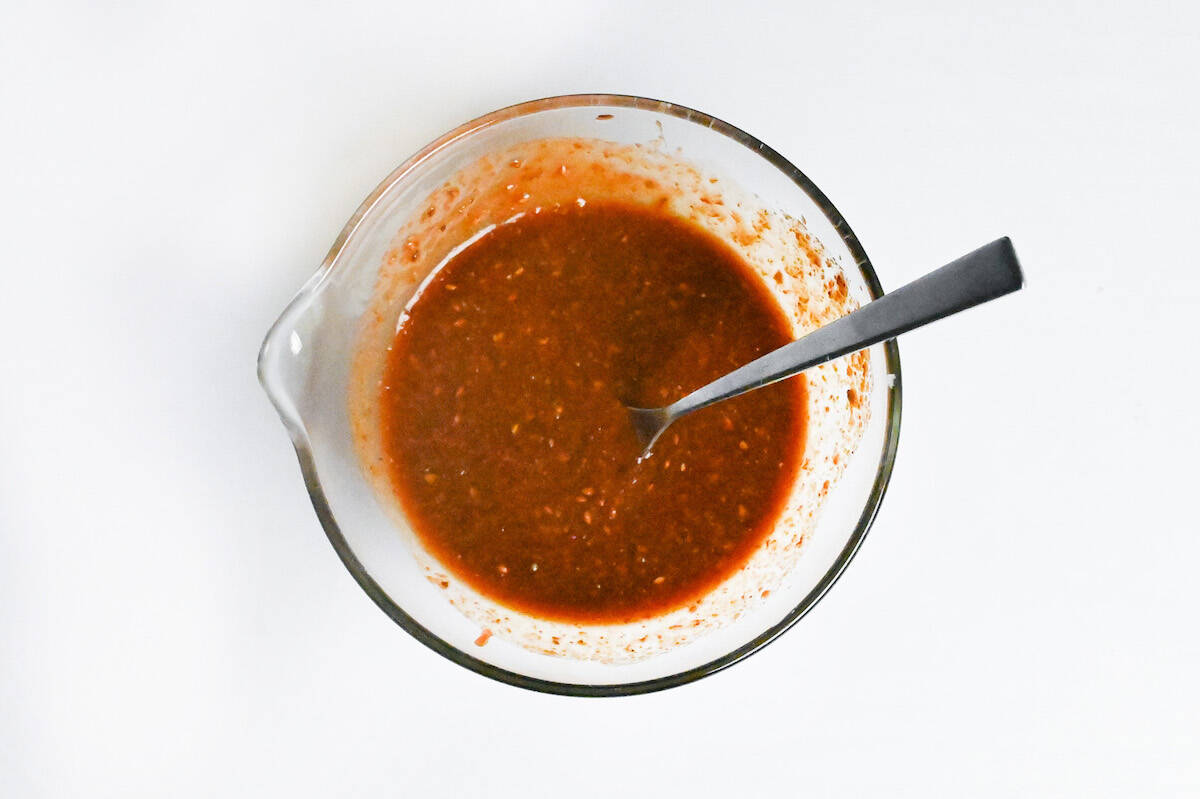
iv. Scrape the ground sesame into a mixing bowl and stir in soy sauce, Worcestershire sauce, tomato ketchup, sugar, and water until the sugar dissolves and the color evens out into a glossy, mahogany-brown blend. Set this aside at room temperature.
A Japanese brand like Bull-Dog is ideal, but a Western brand like Lea & Perrins works too. Just stir in a tiny bit of sugar, ketchup, or unsweetened applesauce to round off its edge and nudge it toward the Japanese style.
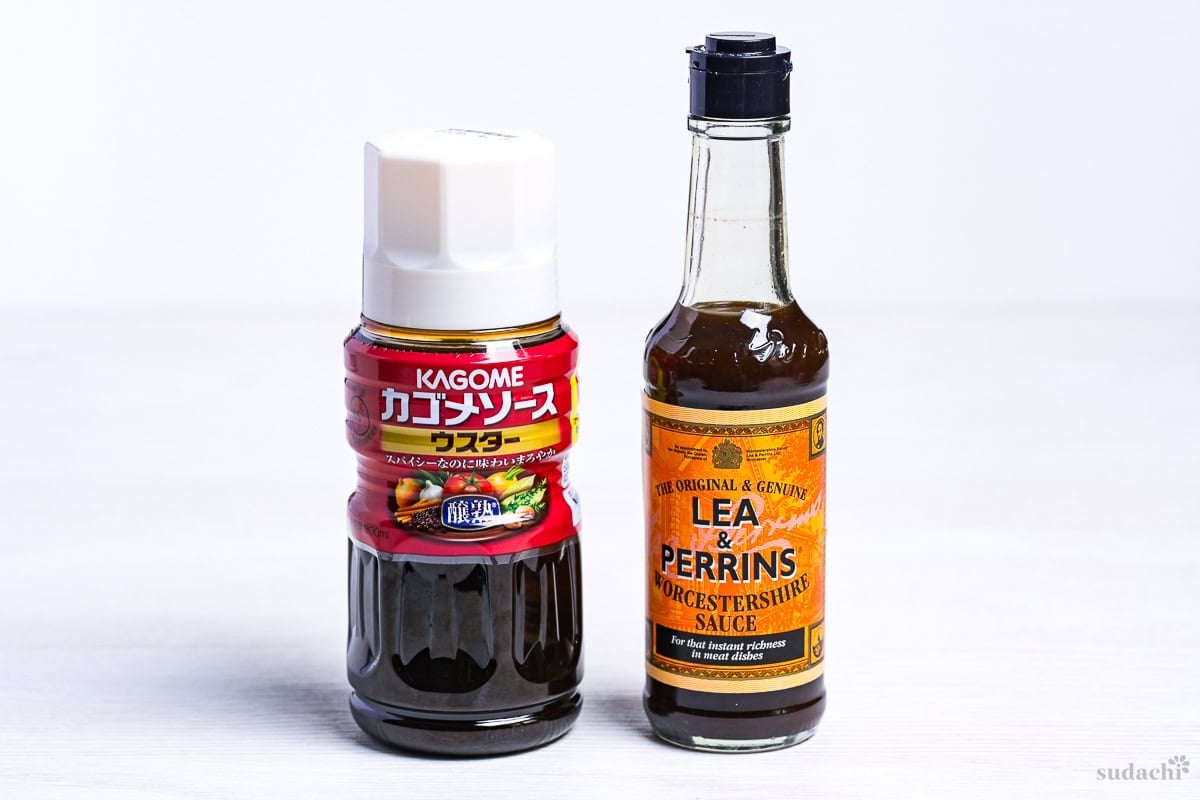
For the full breakdown and my side-by-side cooking tests, see my guide to Japanese Worcestershire sauce.
i. Take boneless chicken thighs and cut each one into quarters or sixths, depending on how large the original piece is or how big you want your katsu to be. Aim for pieces roughly uniform in size so they cook at the same rate.
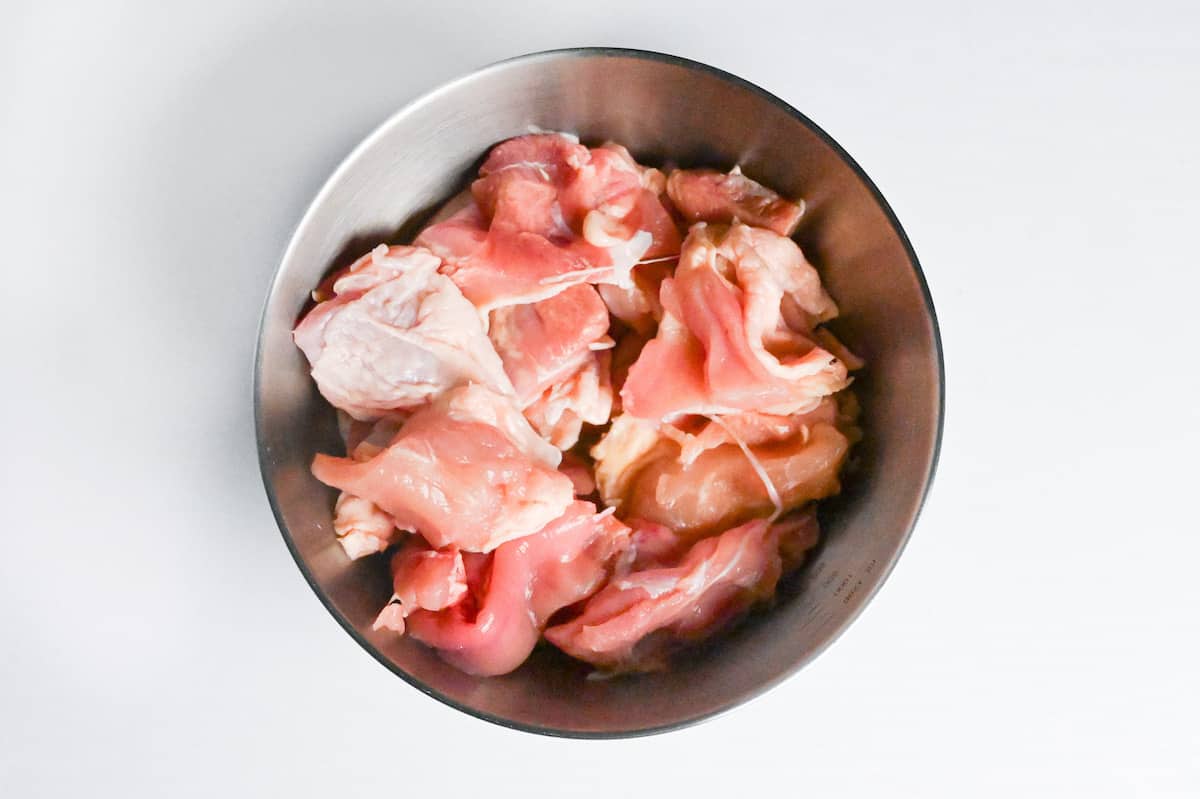
ii. Season the chicken pieces generously with salt and pepper on both sides.
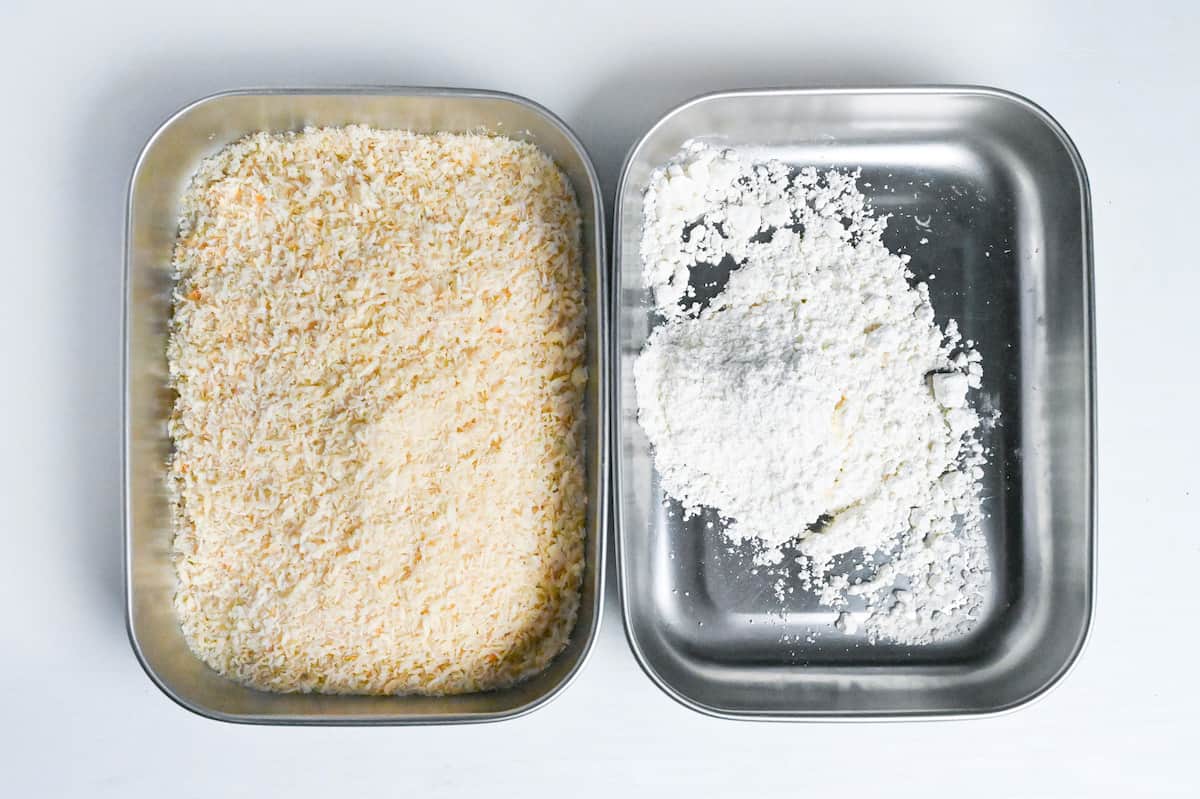
iii. Set up your breading station in a line: A plate of flour on the left, a bowl of batter in the center, and a plate of panko breadcrumbs on the right.
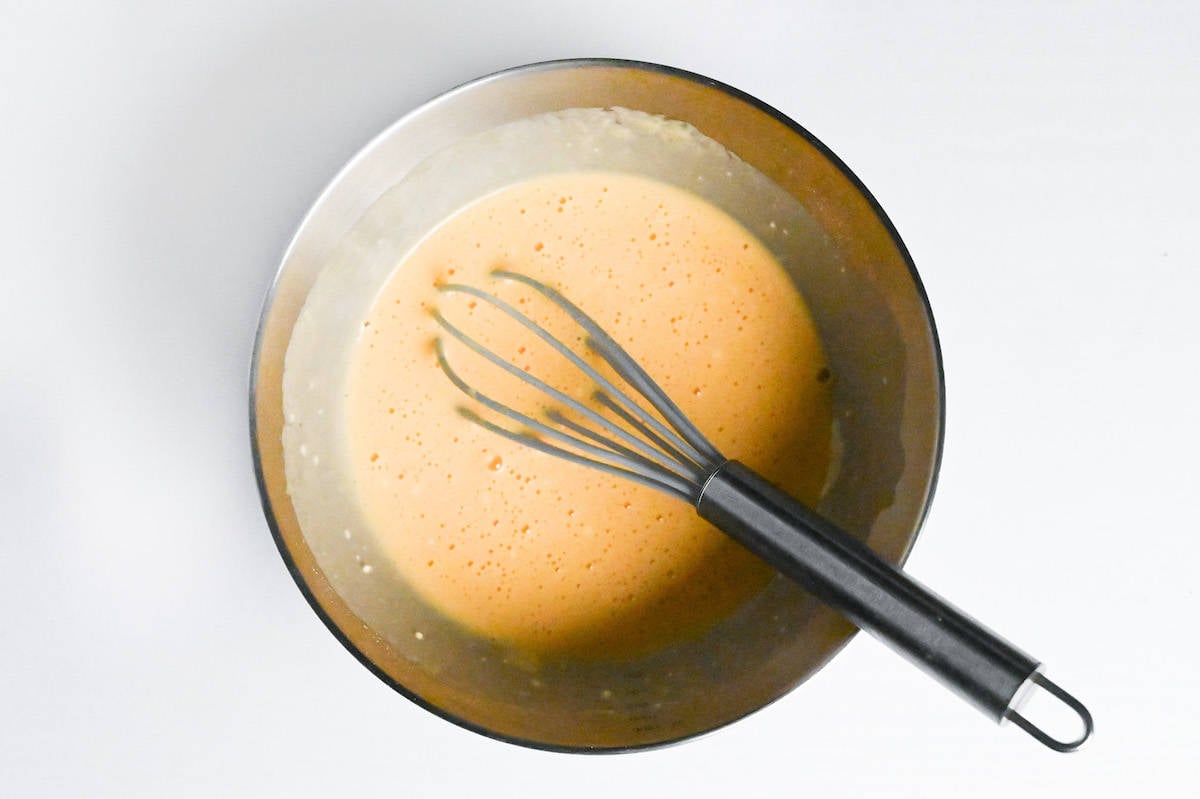
iv. To make the batter, whisk together eggs, all-purpose flour, and a splash of water until you get a thick, smooth paste, like pancake batter consistency.
This three-stop assembly line keeps one hand dry and one hand wet, which prevents clumpy buildup and keeps your coating even from the first piece to the last.
Traditional katsu breading goes flour, then egg, then panko, and for flat cuts like pork loin that works perfectly. But chicken thigh pieces have ridges, folds, and irregular surfaces where a thin egg wash can’t grip consistently, leaving “bald spots” that turn leathery in the oil.
A batter made from egg, flour, and water forms a thicker, stickier bridge layer that fills those gaps and locks panko onto every contour. The result is a noticeably more substantial, crunchier shell. I’ve tested both methods side by side multiple times.
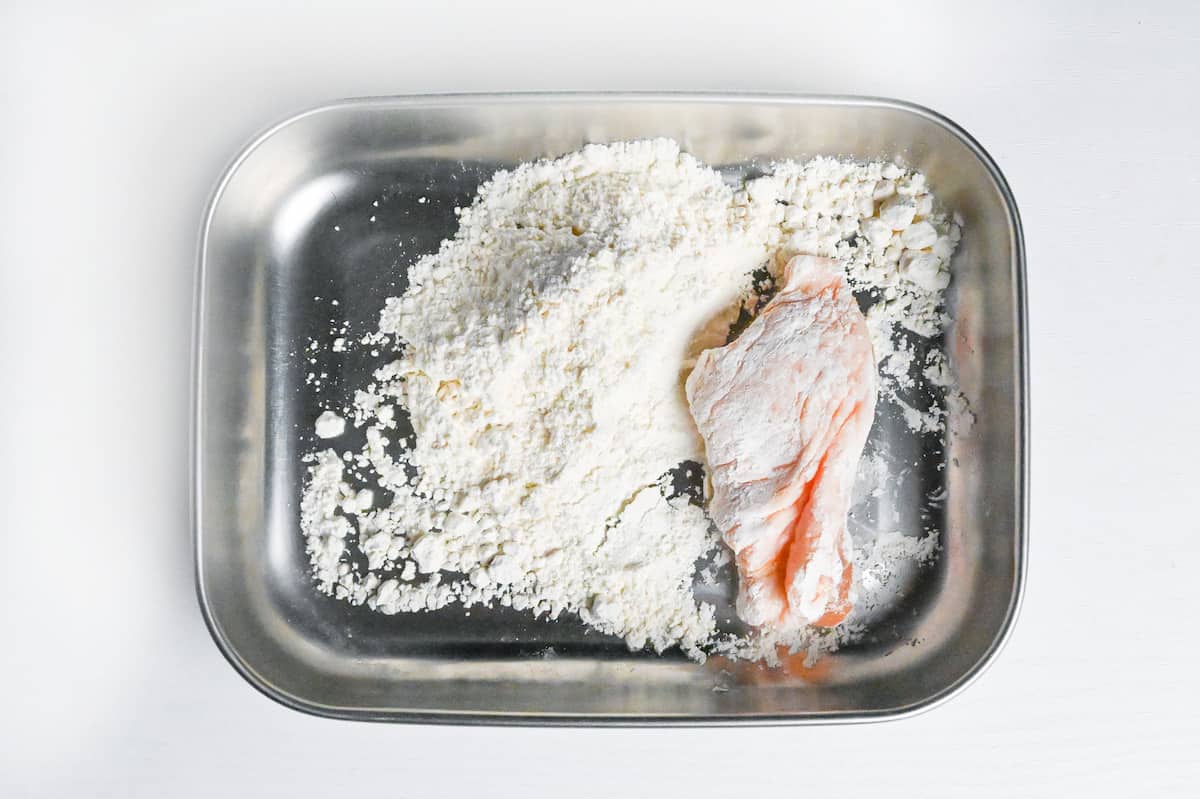
i. Dredge each seasoned, dried piece lightly through the flour, shaking off any excess. The flour creates a starchy base layer that gives the batter something to grab.
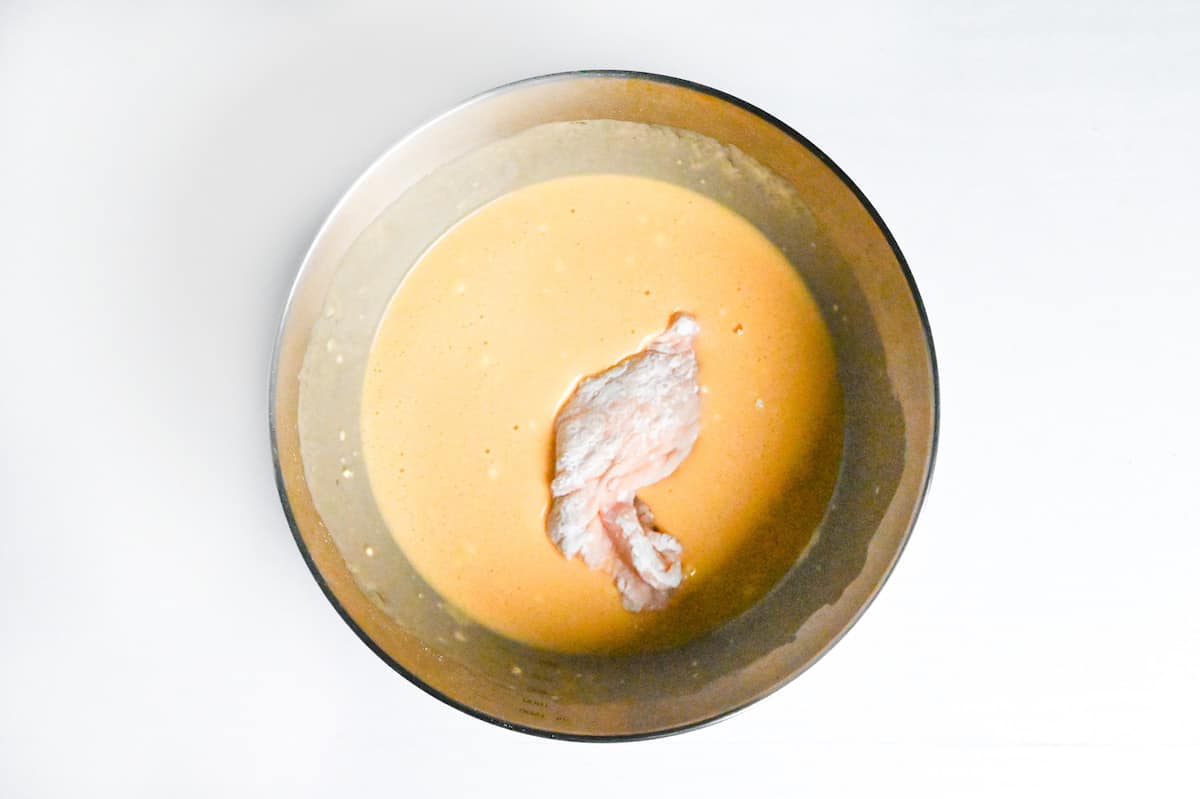
ii. Dip the floured piece into the batter, making sure every surface is coated.
iii. Then lay it into the panko and press the crumbs firmly on all sides. Don’t just sprinkle, use your palm to compact the panko into the batter so the crumbs really seat themselves.
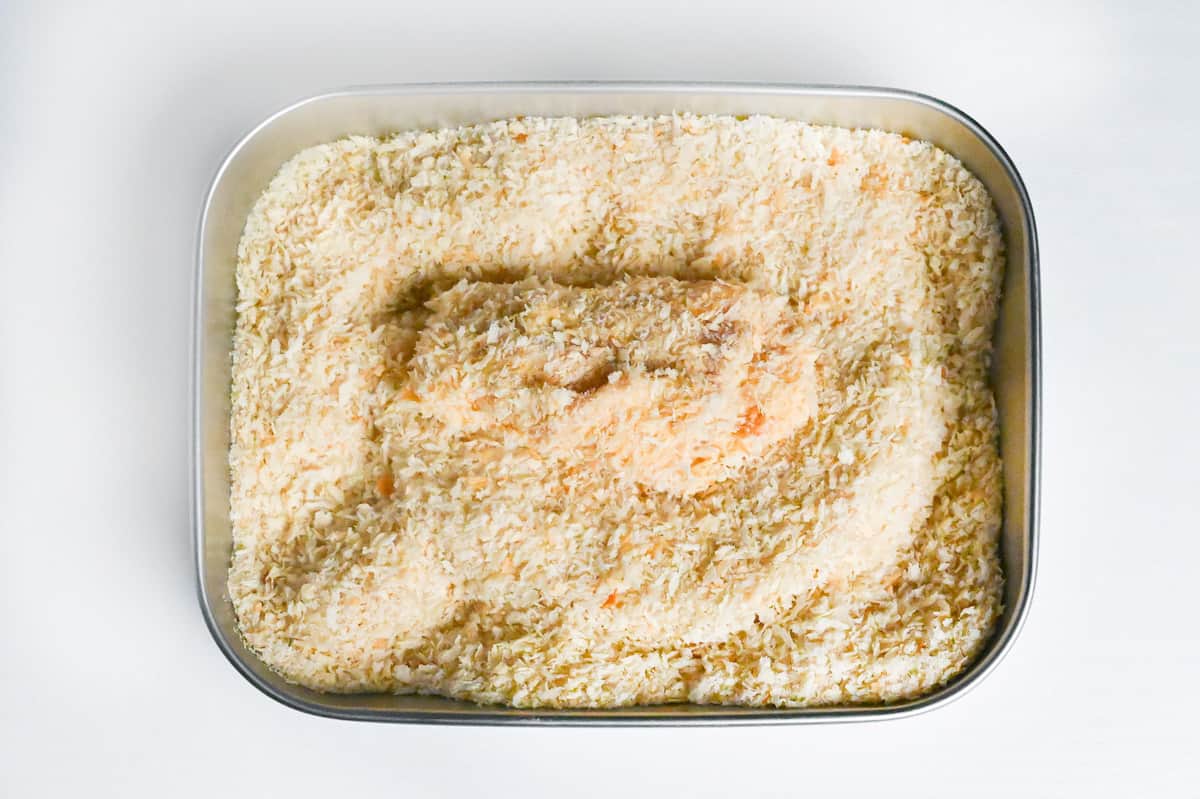
iv. Once breaded, set each piece on a clean plate or wire rack and let the whole batch rest for five to ten minutes before frying.
That short pause lets the flour fully hydrate into a tacky film and allows the panko to settle into the batter layer. Without it, crumbs are just sitting loosely on the surface, and the turbulence and steam burst of the first thirty seconds in hot oil will shear them right off.
v. At this point, pour cooking oil into your pot and start pre-heating to 170℃ (338°F) with a thermometer. Never leave preheating oil unattended.
i. Once preheated, gently lower the breaded pieces into the hot oil one at a time, sliding them away from you to avoid splashback. Fry for 3-4 minutes on the first side without touching or nudging the pieces.
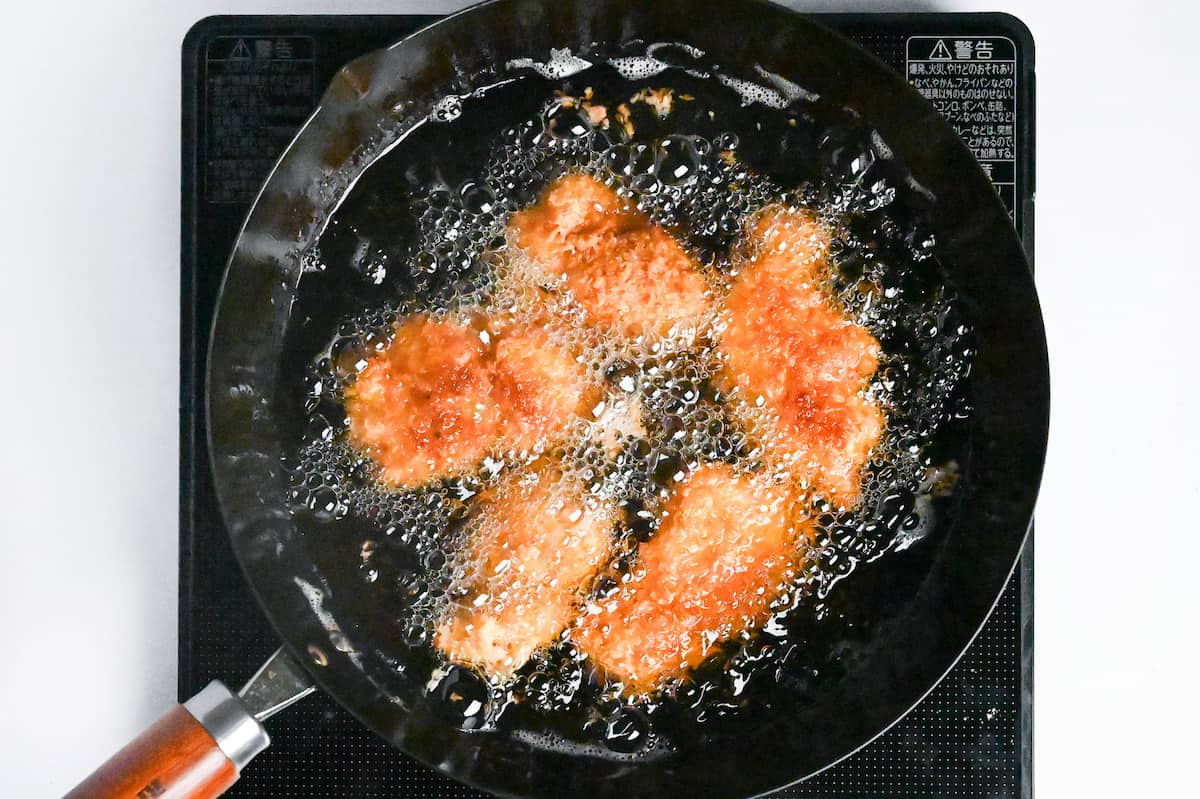
- Test the Oil Temperature: Before you begin frying, determine if the oil is hot enough by dropping in a piece of panko. If it sizzles upon contact, the oil is ready for frying.
- Avoid Disturbing the Katsu: Once the katsu is in the oil, resist the urge to move it around. This helps prevent the panko from detaching. A single flip halfway through is sufficient to ensure even cooking.
- Attune to the Sound of Cooking: Pay attention to the sound of oil. Vigorous bubbling suggests the meat’s moisture is interacting with the hot oil, signaling it’s still cooking. A quieter oil typically indicates the meat is thoroughly cooked.
- Batch Cooking and Storage: Cook a larger quantity than needed, then freeze any leftovers. When you’re ready to enjoy them again, defrost and reheat in the oven or under the grill to revive the katsu’s crispiness. For optimal quality, consume within one month.
ii. Flip each piece once and fry the second side for another three to four minutes until the crust is an even, deep golden brown all over.
iii. Lift each piece out of the oil and set it on a wire rack placed over a sheet pan for 2-3 minutes, not directly onto paper towels.
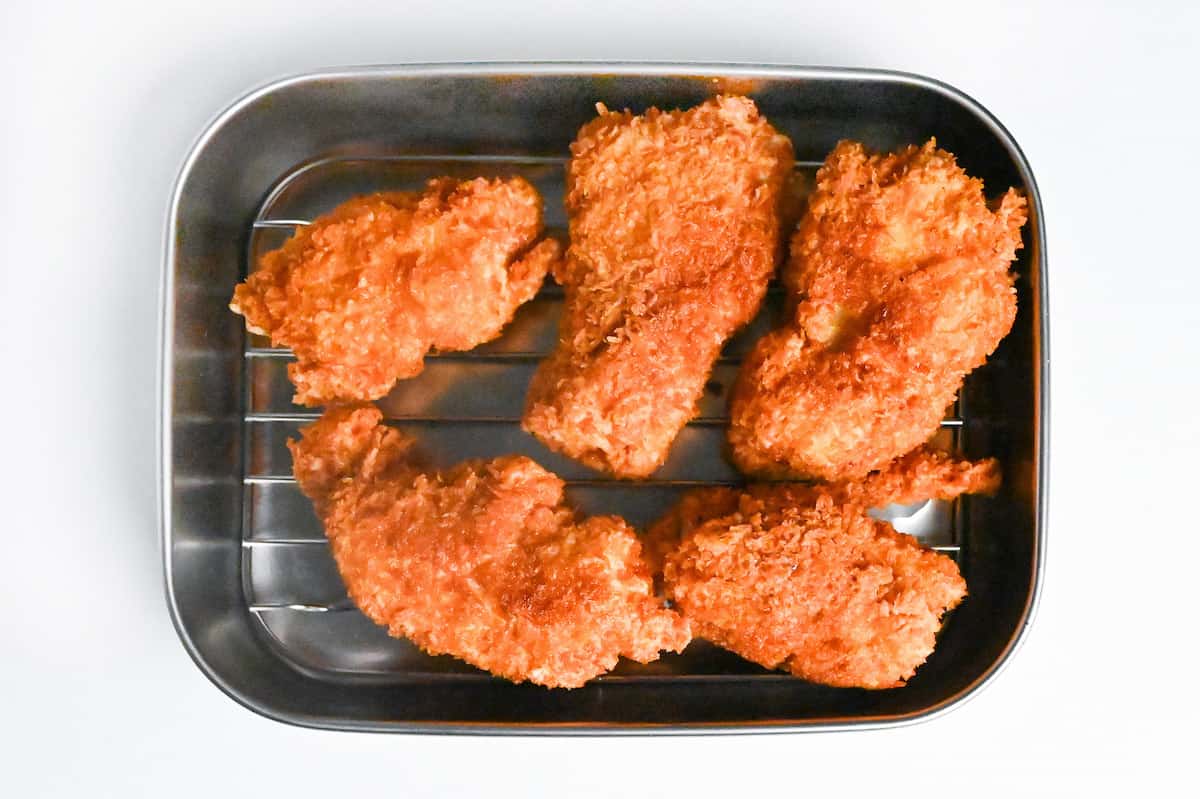
Even after leaving the oil, the internal temperature of each piece continues to rise slightly as residual heat migrates inward. This brief rest also lets the crust firm up and stabilize.
For absolute certainty (especially with thicker pieces) insert an instant-read thermometer into the center. You’re looking for 75 °C (167 °F) held for at least 1 minute.
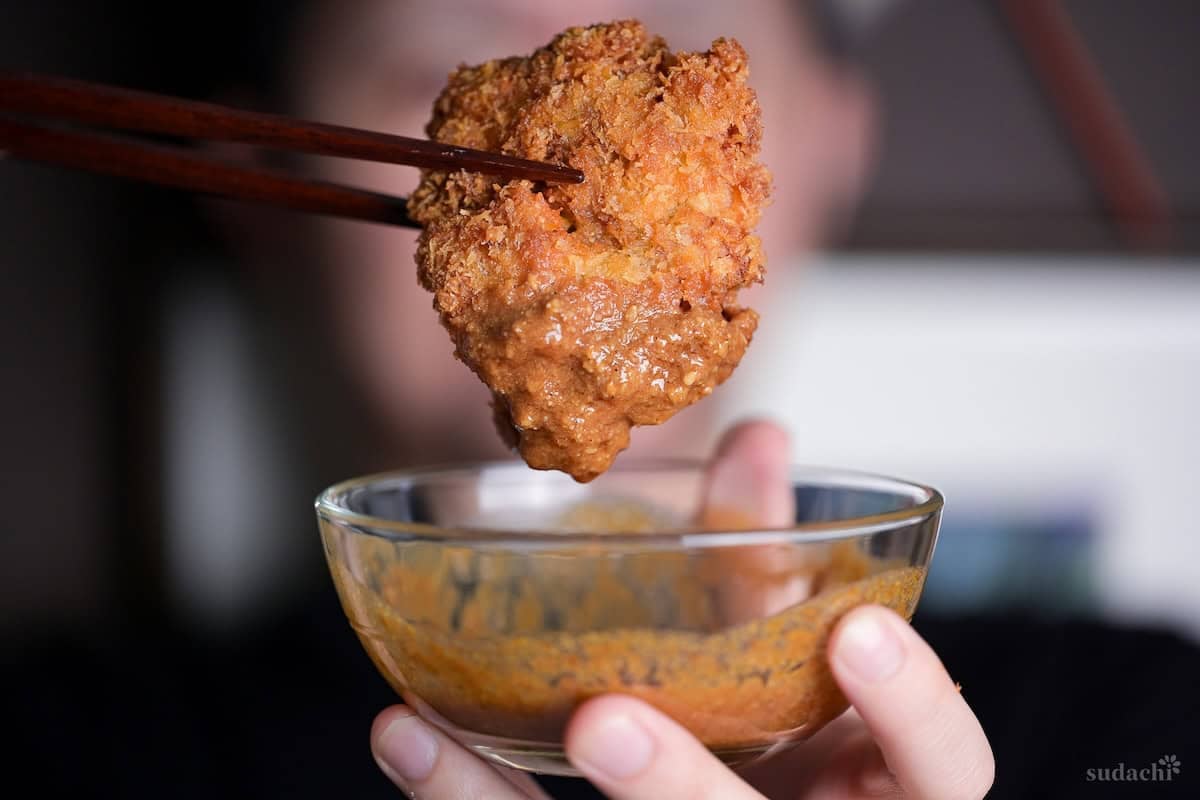
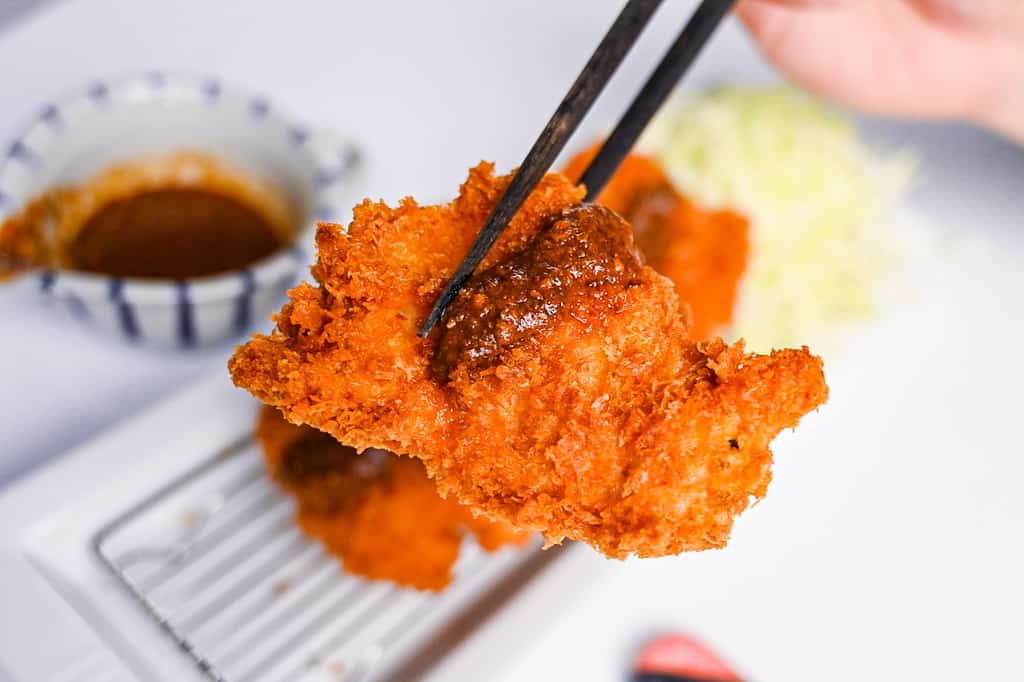
i. Serve the crispy chicken katsu on a plate and generously drizzle with the homemade sesame sauce.
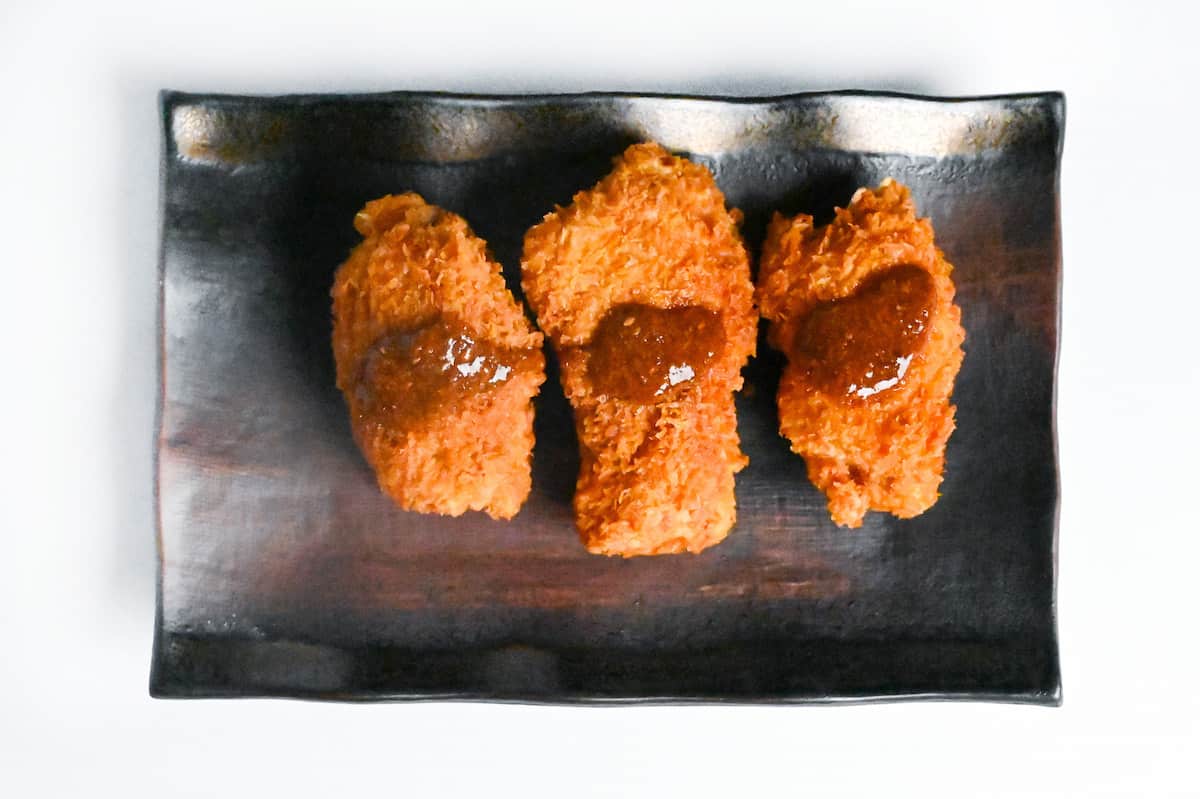
ii. You can also use these katsu for katsudon or katsu curry.

Essential Tips & Tricks
- Blot the chicken thoroughly, then dust with cake flour before battering so the starch layer can grab and form “glue.” Skip drying/flour and the coating slides off in bald sheets.
- Make a thick batter (egg + flour + water) and press panko on gently so crumbs adhere without compacting.
- Rest the breaded chicken 5 minutes before frying so the coating hydrates and sets.
- Keep your oil at 170 °C (338 °F) and fry in small batches of 2-3 pieces so the temperature recovers quickly between additions; overcrowding drops the heat below the threshold where the crust can dehydrate properly, which means longer cook times, higher oil absorption, and greasy, heavy katsu instead of the light, shattering crunch you’re after.
With these simple tips in mind, you’re set for success every time you make chicken katsu.
Storage & Meal Prep
Fridge: Store cooked and cooled chicken katsu in a single layer in an airtight container with a small piece of paper towel underneath to absorb residual moisture; it keeps for up to 3 days, though the crust will soften as moisture migrates from the meat into the breading over time. Always store the sesame sauce in a separate container to prevent the crust from going soggy.
Freezer: Freeze fully cooled, unsauced cutlets in a single layer on a parchment-lined tray until solid, then transfer to a freezer bag with the air pressed out. They’ll keep for up to 1 month.
Meal Prep: You can portion and pound the chicken, mix the breading station components, and prepare the sesame sauce up to a day ahead. Store everything separately in the fridge so you only need to bread and fry at dinnertime.
Reheating: Place refrigerated or frozen cutlets on a wire rack over a sheet pan and bake at 190 °C (375 °F) for 10-15 minutes, or use an air fryer at 180 °C (360 °F) for 8-10 minutes, until the crust is crisp and the interior is steaming hot. Avoid the microwave as a standalone method.
What to Serve With This Recipe
- Steamed Japanese rice (gohan)
- Japanese miso soup
- Shredded cabbage
- Cucumber tsukemono
Chicken Katsu FAQ
This almost always traces back to one of three things: the chicken surface was too wet when you started breading, the flour coat was too thick or uneven, or you moved the cutlet too soon after it hit the oil. Pat the chicken completely dry before flouring, shake off all excess flour so only a thin dusting remains, and resist the urge to touch the katsu for the first two to three minutes while the crust sets-that initial hands-off window lets the starch and protein film lock the panko in place.
Choose a neutral oil with a high smoke point-rice bran oil, canola, or vegetable oil all work well. Avoid olive oil or sesame oil for deep frying here, as their lower smoke points and strong flavors will compete with the katsu’s delicate sesame sauce.
The most reliable method is an instant-read thermometer inserted into the thickest part of the meat-you’re looking for 75 °C (167 °F) held for at least one minute. If you don’t have a thermometer, listen to the frying sound: when the loud, aggressive bubbling settles into a quiet, steady simmer, most of the internal moisture has stabilized, which strongly suggests the center is cooked. When in doubt, sacrifice one piece by cutting it open-the juices should run completely clear with no pink at the center.
More Japanese Chicken Recipes
If you love Japanese flavors, don’t miss my roundup of the best Japanese chicken dishes!
Did You Try This Recipe?
I would love to hear your thoughts!
💬 Leave a review and ⭐️ rating in the comments below. 📷 I also love to see your photos – submit them here!

Japanese Chicken Katsu with Ultimate Homemade Sauce

Ingredients
Katsu Sauce
- 2 tbsp toasted white sesame seeds
- 2 tsp Japanese soy sauce (koikuchi shoyu)
- 2 tsp Worcestershire sauce
- 1 tbsp tomato ketchup
- 1 tsp sugar
- 4 tsp water
Chicken Katsu
- 600 g boneless chicken thigh skin-on (or chicken breast)
- salt and pepper
- 45 g all-purpose flour for coating
- 100 g panko breadcrumbs coarse flakes or coarse homemade crumbs
- 100 ml water
- 2 egg
- 100 g all-purpose flour for the batter
- cooking oil neutral, high smoke point
My recommended brands of ingredients and seasonings can be found in my Japanese pantry guide.
Can’t find certain Japanese ingredients? See my substitution guide here.
Instructions
- Pour 2 tbsp toasted white sesame seeds into a dry frying pan and heat on a medium-high heat. Shake the pan occasionally and heat until the sesame seeds are fragrant. Remove from the heat as soon as you smell a toasty aroma.

- Transfer the toasted sesame seeds to a mortar (or small blender). Grind until coarse and slightly oily, it doesn't need to be perfectly smooth.
- Scrape the ground sesame into a bowl and add 2 tsp Japanese soy sauce (koikuchi shoyu), 2 tsp Worcestershire sauce, 1 tbsp tomato ketchup, 1 tsp sugar and 4 tsp water. Mix and set aside for later.
- Start heating cooking oil for deep frying to 170 °C (338 °F). Cut 600 g boneless chicken thigh into quarters or sixths, then sprinkle each piece with salt and pepper and both sides.
- Prepare one plate with 45 g all-purpose flour and another one with 100 g panko breadcrumbs.
- Crack 2 egg into a bowl and add 100 ml water and 100 g all-purpose flour. Whisk until it forms a smooth thick batter.
- Coat each piece of chicken with a thin layer of flour, dust off the excess, then submerge in the batter.
- Roll each piece in the panko breadcrumbs and press firmly to secure them. Transfer to a clean plate or wire rack and rest for 5 minutes.
- Place the breaded chicken in the preheated oil and fry for 3-4 minutes on each side, or until crispy and golden all over. Fry in batches to prevent lowering the oil temperature.
- Rest on a wire rack for 2 minutes to drain excess oil.
- Drizzle with the sesame sauce, or serve on the side for dipping. Enjoy!
I see two different types of flour
In directions it only says one kind of flour
Im a little confused where the weak flour
Goes
Hi Kim,
The weak flour is for coating the chicken before dipping it in the batter (it helps the batter stick). Although using weak flour is my personal preference for this, it’s not essential and you can use plain flour instead if it’s easier for you.
Thank you for your question, I’ve updated the recipe so that it’s clearer to understand.
Best wishes,
Yuto
Hello Yuto! If I want to save some servings for the future as your recipe suggests, can I freeze them after coating in Panko or do I fry them first?
Thank you!
Hi Jane!
You can freeze them either before or after frying. In an ideal world, it’s tastes better if you freeze them before cooking and then fry from frozen (although they might need to cooked for a little longer after freezing). However freezing them after frying is more convenient since they only need to be reheated.
So in short, either way is fine and depends on whether you want to save time or preserve the quality.
Hope that helps and thank you for trying my recipe!
soooo good, tasted authentic af. thank you for sharing your culture!
Thank you so much, glad you enjoyed the recipe!
Absolutely the best!!
Thank you so much! It means a lot!