


Featured Comment
Amazing recipe. So flavorful and perfect for winter. Love it
★★★★★
– Ralph
On days when I am not cooking for a recipe shoot, on days when I just want something filling and satisfying, this is the dish I come back to and quietly make for my family. That is how often I personally repeat this recipe.
The harmony between the rich umami of the chicken and the natural sweetness of the vegetables is something no other dish can quite replace.
Chicken Zosui
Recipe Snapshot
- What is it? A Japanese rice-and-broth bowl built on already-cooked rice that gets rinsed cold and then simmered briefly in a chicken-and-dashi liquid, finished with eggs folded in at the very end.
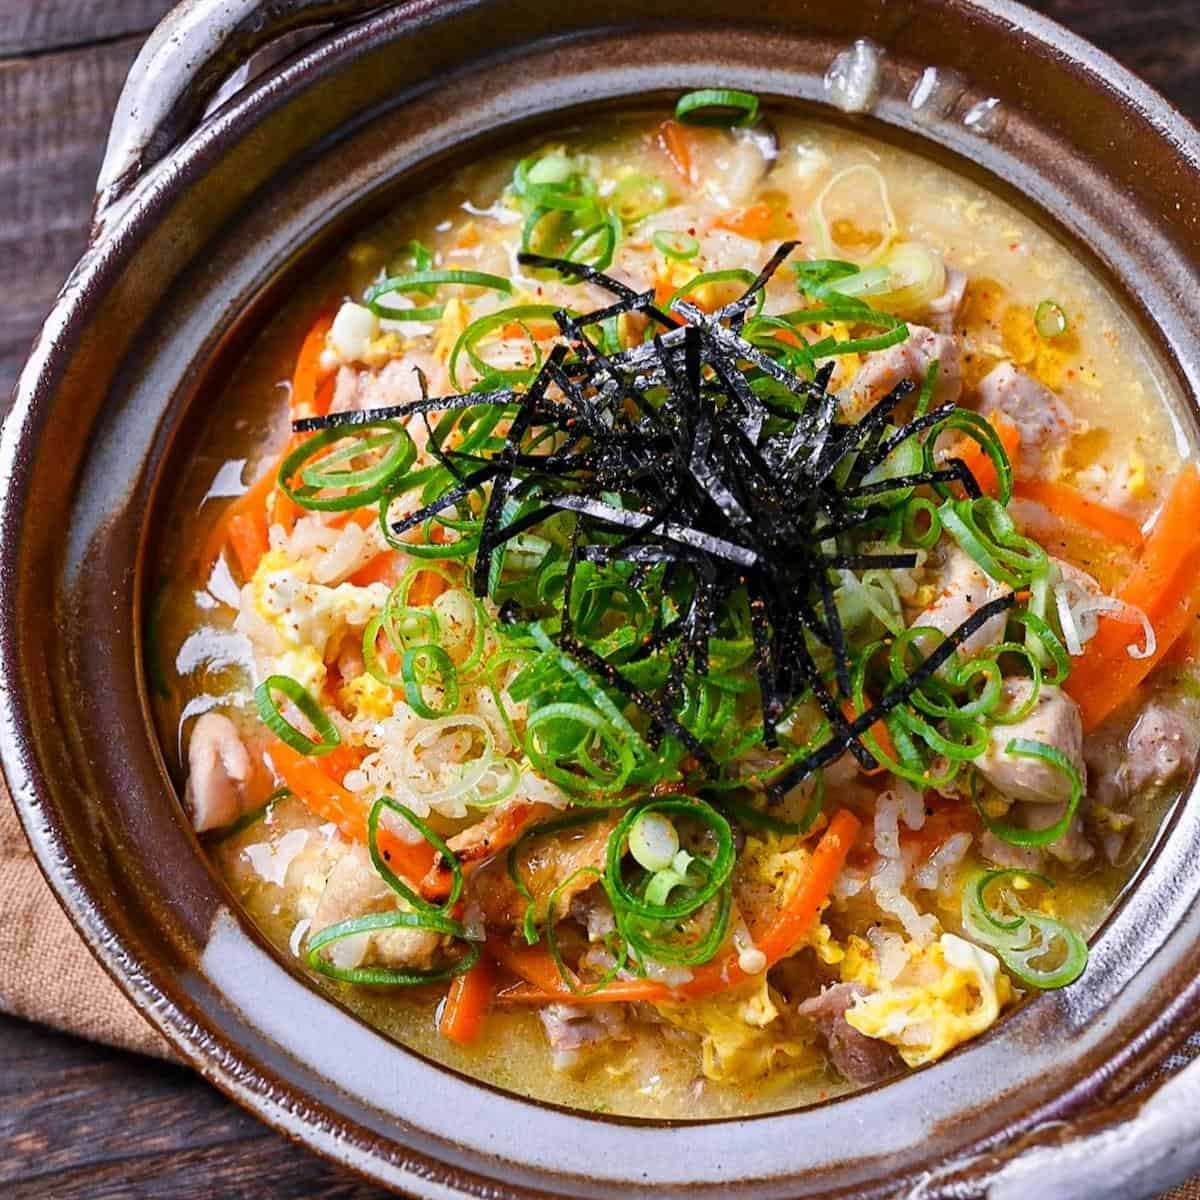
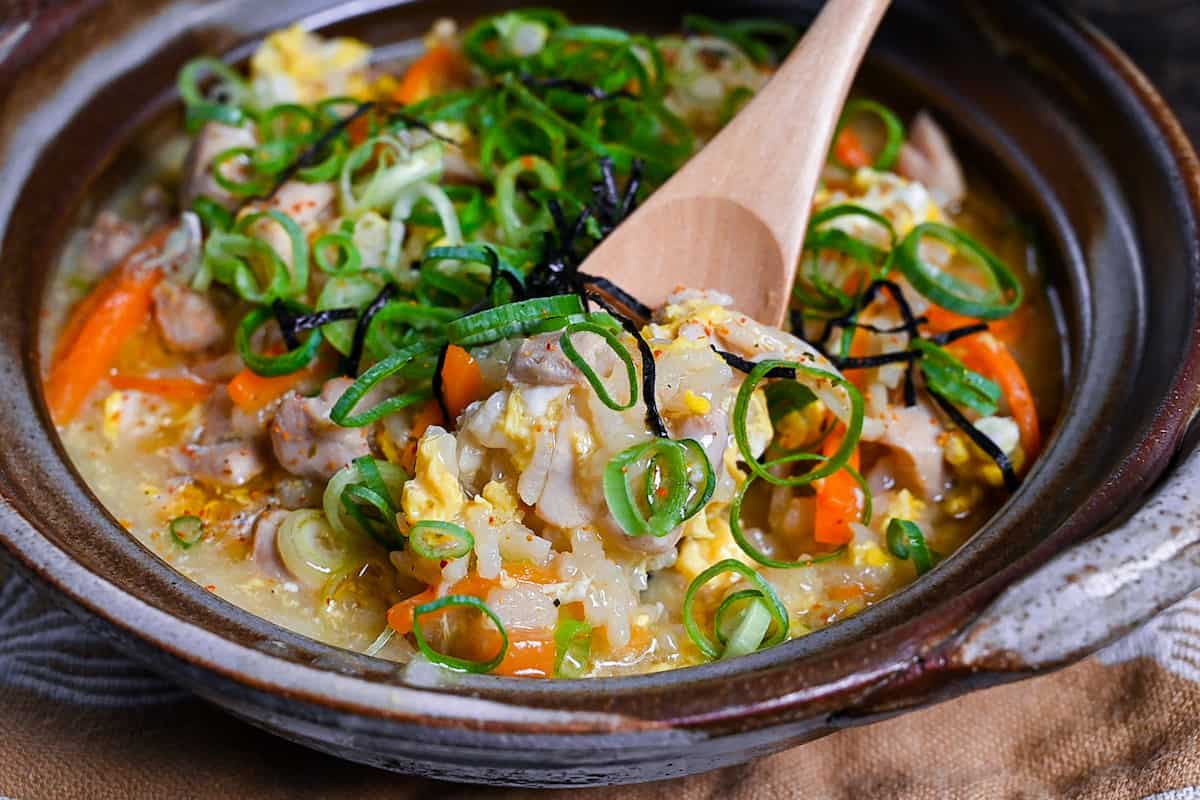
- Flavor profile: Clean, layered, deeply savory. The broth reads clear amber on the surface with inosinate from kombu plus katsuobushi stacked under glutamate from chicken, shiitake, and enoki. The eggs land silky and half-set against tender short-grain rice that holds its shape instead of slumping into porridge.
- Why you will love this recipe: The richness starts at the chicken skin, not at the dashi. A cold-pan render pulls every gram of chicken fat out of the skin and routes it into the broth as the umami base, the same move I run through my chicken miso soup. 10 minutes of active cooking, 30 minutes total, and the bowl tastes like a Saturday-afternoon project compressed into a weeknight pot.
- Must-haves: Skin-on boneless chicken thigh (the skin is the load-bearing ingredient), cooked Japanese short-grain rice (long-grain turns to mush), and dashi stock.
- Skill level: Easy. The pot moves fast once the chicken hits the broth, so mise en place is the whole game.
Summarize & Save this content on:
What is Chicken Zosui?
Chicken zosui (鶏雑炊) is a Japanese rice-and-broth bowl built on already-cooked rice that gets rinsed cold, then simmered briefly in a chicken-and-dashi liquid until the grains are tender and the bowl reads more soup than porridge. English translations like to call it “rice porridge”, and you could kind of say so, but the path is different from risotto, congee, or okayu.
Risotto starts from raw rice and pulls starch out into the liquid on purpose. Congee also starts from raw rice and cooks it down for hours. Zosui starts from cooked rice and rinses the surface starch off, so the broth stays clear and the grains stay distinct.
For this recipe, I borrowed the trick from my own chicken miso soup. I had been rendering chicken skin slowly in a cold pan, transferring the rendered fat into the broth, and once I tried that move on miso soup the result came back richer and creamier than any version before it. So I used the same move on zosui. What came out of the pot was the best chicken zosui I have made. The richness here starts at the chicken skin, not at the dashi. That bowl. The one I keep coming back to.
Japanese Chicken Rice Soup Ingredients
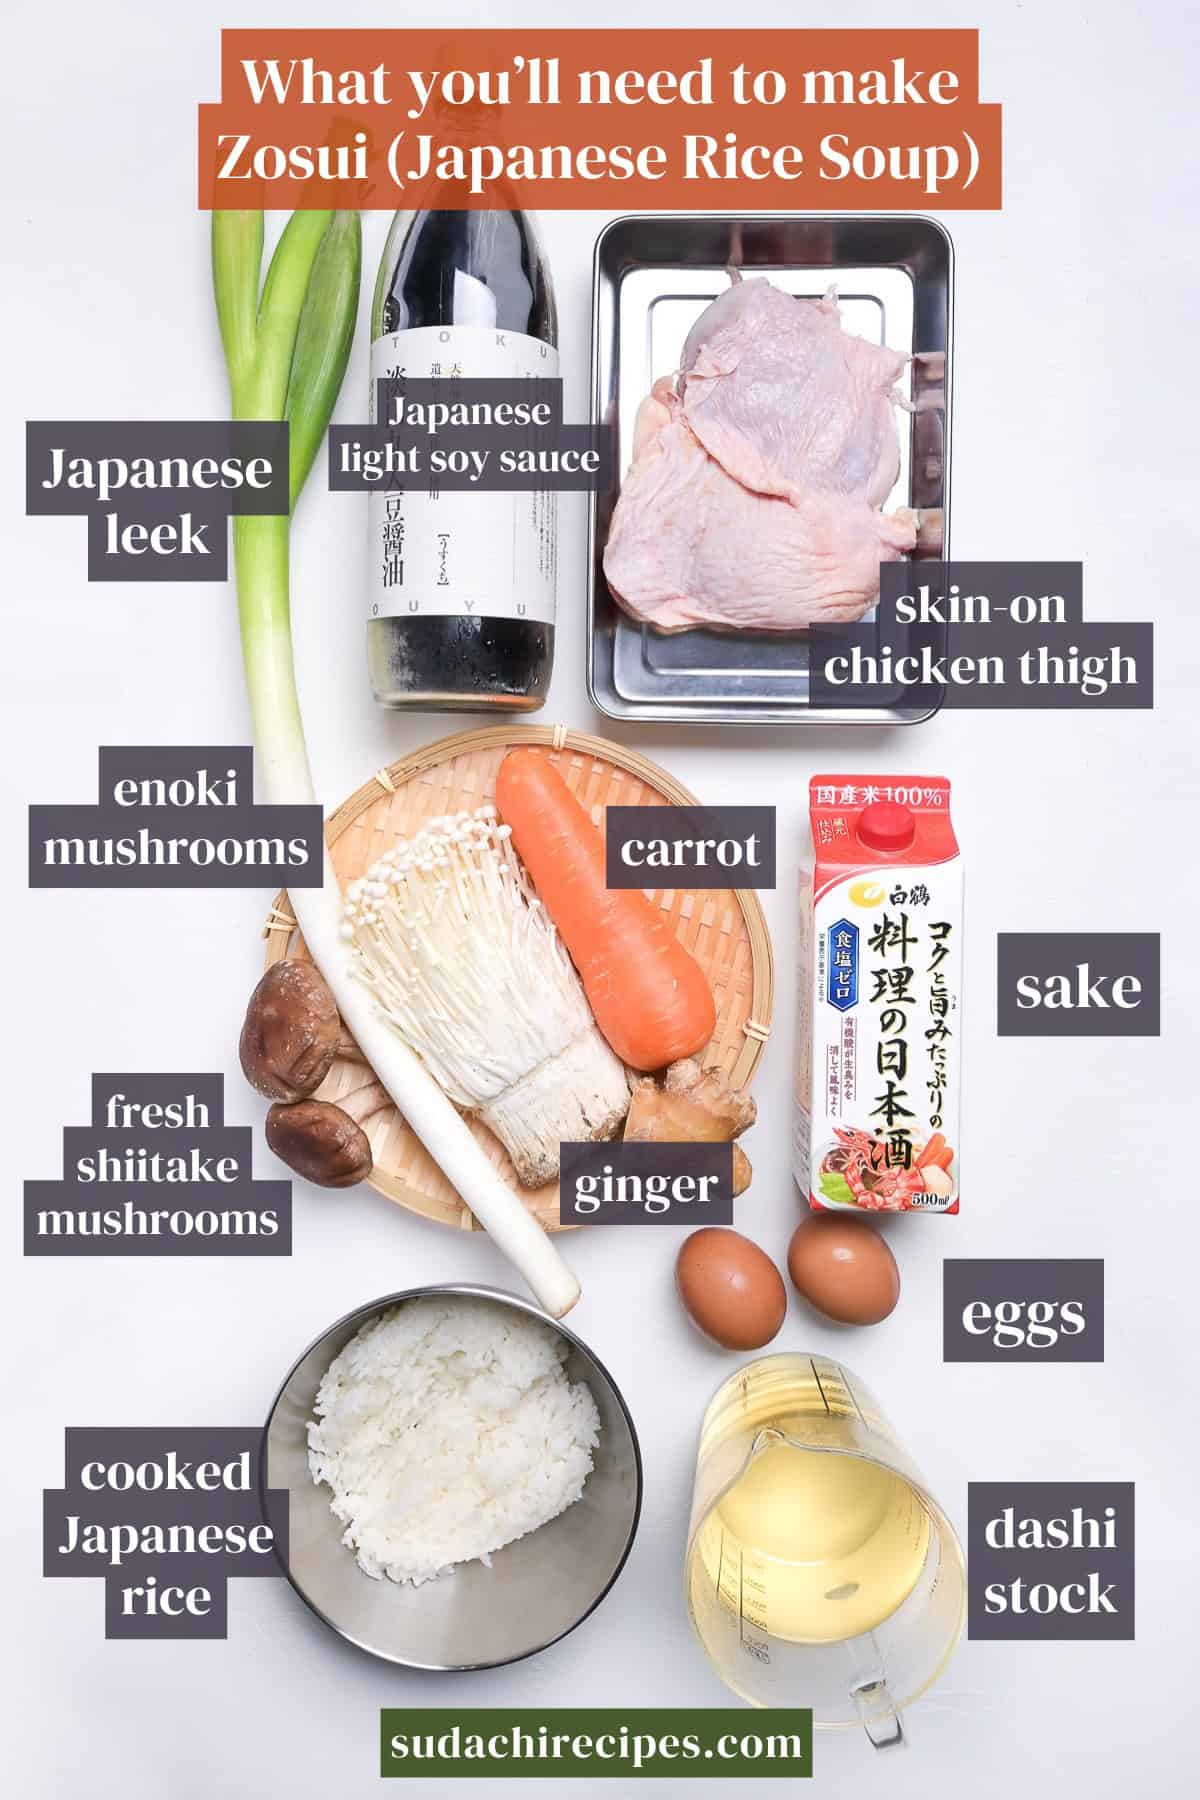
- Boneless Chicken Thigh: Skin-on is highly recommended as we use the skin to create the supreme richness that cannot be reached otherwise. Western supermarket trays usually pull the skin off before they hit the case, so ask the butcher counter for skin-on thigh, or pick it up at any Asian grocer where skin-on is the default cut.
- Dashi stock: The savor floor of the bowl. Homemade awase dashi gives the cleanest, most layered result. I also strongly recommend homemade dashi packets, which are incredibly convenient. Store-bought dashi packets are a solid next choice. Dashi granules work too, but keep in mind that they contain added salt and flavor enhancers, so the taste won’t be as clean.
- Cooked Japanese Short-Grain Rice: Essential for Zosui. Short or medium (Calrose) holds its shape after a brief simmer in a way long-grain (basmati, jasmine) never will, the latter turns to mush the moment it touches hot broth. Already-cooked rice is the point here too, not raw which would make the broth too starchy.
Substitutions, Variations, and How to Customize
Here is where you can pivot the dish without breaking it. The spine of chicken zosui is chicken-and-dashi broth, rinsed cooked short-grain rice, and an egg fold-in at the end. Everything else has a real swap, an adjacent move, or a flavor pivot that lands you in the same bowl with a different face on it.
Substitutions:
- Boneless chicken thigh → Skin-on chicken breast: If you want to use chicken breast instead of thigh, you can, but only the skin-on cut. The skin is one of the key ingredients here, that is where the rendered fat comes from.
- Chicken → Skin-on salmon fillet: If you prefer fish instead of chicken, you can use skin-on salmon fillet. Same playbook, render the salmon skin slowly in a cold pan, transfer the fat into the dashi, simmer the flesh in the broth.
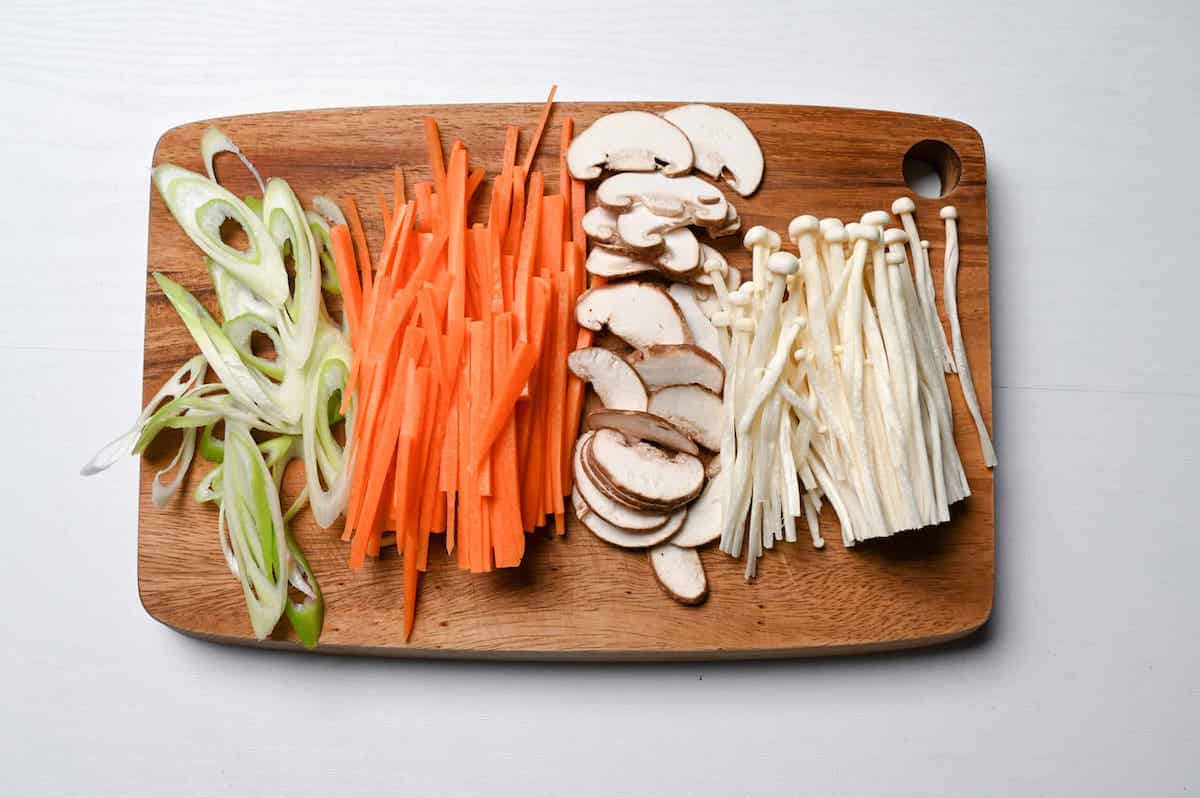
- Shiitake and enoki → Any mushroom you like: Even though I used shiitake and enoki here, you can literally use any mushroom you can get in your local area.
- Light soy sauce (usukuchi) → Regular soy sauce (koikuchi): I specifically used light soy sauce for this recipe so the broth stays a clean amber. If you do not have usukuchi in your pantry, regular Japanese soy sauce works. 1 adjustment though: light soy sauce actually carries more salt per tablespoon than dark, so when you swap to dark soy, use a tiny bit more to land the same seasoning level. Counterintuitive, I know, but salt math wins over color math.
- Sake → Omit it entirely: I know some readers do not want to use alcohol in their cooking, in that case you can simply leave the sake out.
- Fresh rice → Frozen cooked rice: Frozen rice goes straight from the freezer into the rinse step. Do not thaw it on the counter first. Run it under cold water in a fine-mesh sieve until the ice surrender and the grains separate, then it goes into the pot.
Have trouble finding Japanese ingredients? Check out my ultimate guide to Japanese ingredient substitutes!
Variations:
- Kansai-clean style: Swap light soy sauce for shirodashi as the broth base for a paler, lighter, more delicate bowl. Garnish with mitsuba leaves and a sliver of yuzu peel right before serving.
- Miso chicken zosui: Stir 1 to 2 tablespoons of white miso into the pot in the last minute, off the heat. Reduce the soy sauce by about a third to compensate for the salt the miso brings in. The bowl tilts toward a rounder, more fermented register.
- Chinese-leaning chicken zosui: Add a smashed garlic clove and a couple of extra slices of ginger to the broth at Step 3, finish with a drizzle of toasted sesame oil and a pinch of white pepper.
How to Customize:
- Egg cooked-through: If runny yolk is not your thing, pour the beaten eggs in earlier (around the 2-minute mark of the 5-minute simmer) and let the eggs fully set into ribbons.
- 3-bowl flavor rotation: One of the best things about this recipe is how freely you can shift the flavor from bowl to bowl. My own habit is to swap the toppings every time so each bowl tastes different, and that is exactly why 1 batch usually turns into 3 bowls for me. I just do not get bored of it. Here is how I rotate:
- Bowl 1, the standard: chopped green onions, shredded nori, shichimi togarashi, and a drizzle of toasted sesame oil.
- Bowl 2, lean spicy: swap the shichimi and sesame oil for rayu chili oil.
- Bowl 3, a completely different face: a small dab of yuzu kosho for heat with a citrus kick.
The point is, you can transform the flavor as many times as you like, and every spoonful stays exciting.
How to Make My Chicken Zosui Soup
If you prefer to watch the process in action, check out my YouTube video of this chicken zosui recipe!

Before you start (Mise en place):
- Pull the chicken thigh from the fridge 10 minutes before you cook so it loses the deep refrigerator chill. Pat the skin dry with paper towel, the drier the skin, the cleaner the render.
- Slice the leek, julienne the carrot, slice the shiitake, twist the enoki root off and separate the threads, grate the ginger. Line them up on a tray. The pot moves fast once the chicken hits the broth, you do not want to be chasing a carrot at minute 4.
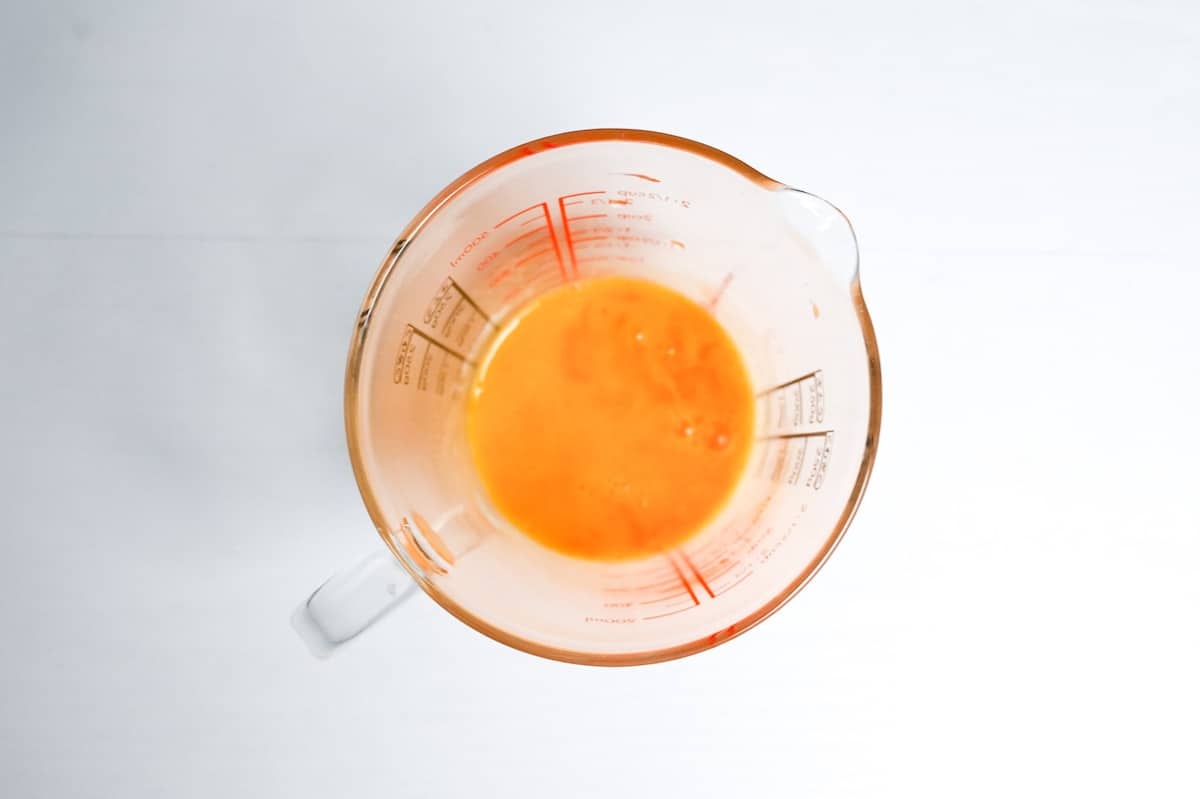
- Beat the eggs in a small spouted bowl until the yellow is uniform with no clear ribbons of white. Set it next to the stove. The egg pour is a 30-second move and you want the bowl in arm’s reach.
i. Lay the chicken thigh skin-side up on a cutting board. Peel the skin off the meat. It releases cleanly along the natural seam, no knife work needed for this.
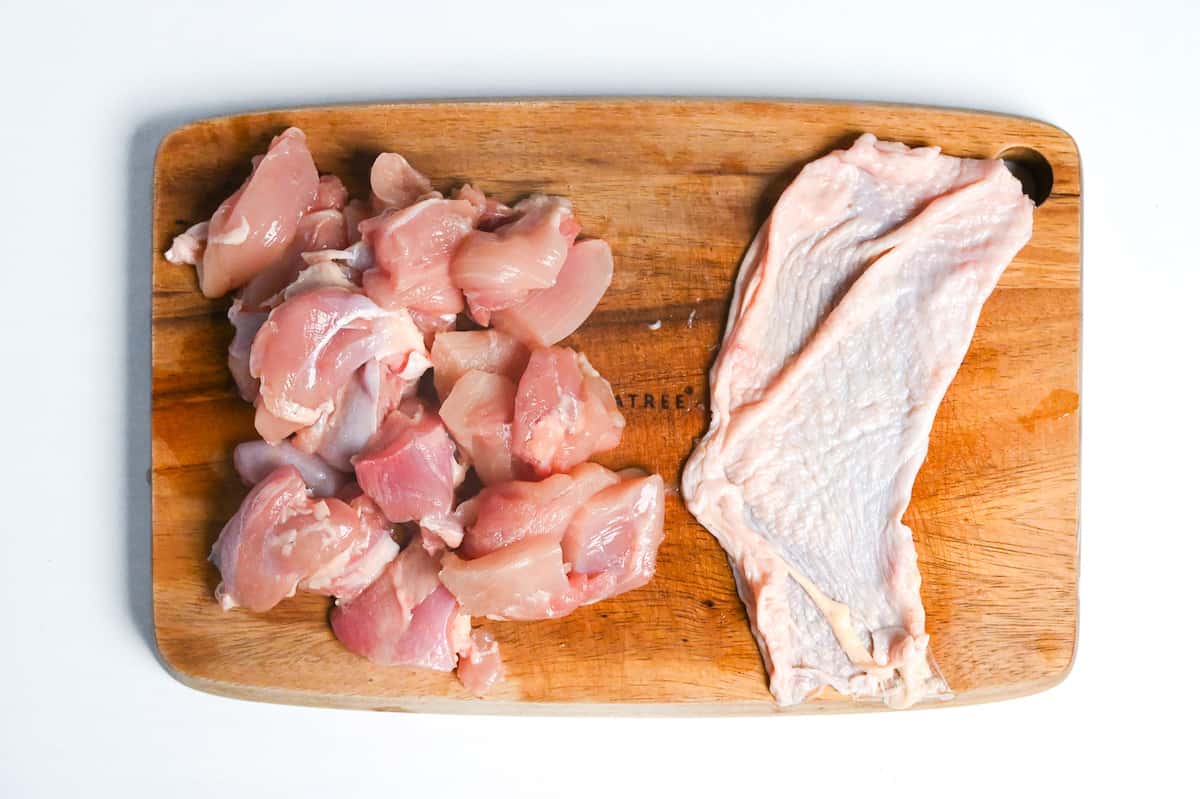
ii. Cut the meat into bite-size pieces, about 2 cm each.
The chicken skin is not garnish here. It is the source of the bowl’s richness. By peeling it off and rendering it separately in a cold pan, you can pull every gram of chicken fat out of the skin and route that fat directly into the dashi as the umami base.
i. Add a splash of neutral cooking oil to a cold (room-temperature) frying pan and lay the skin pieces flat in a single layer.
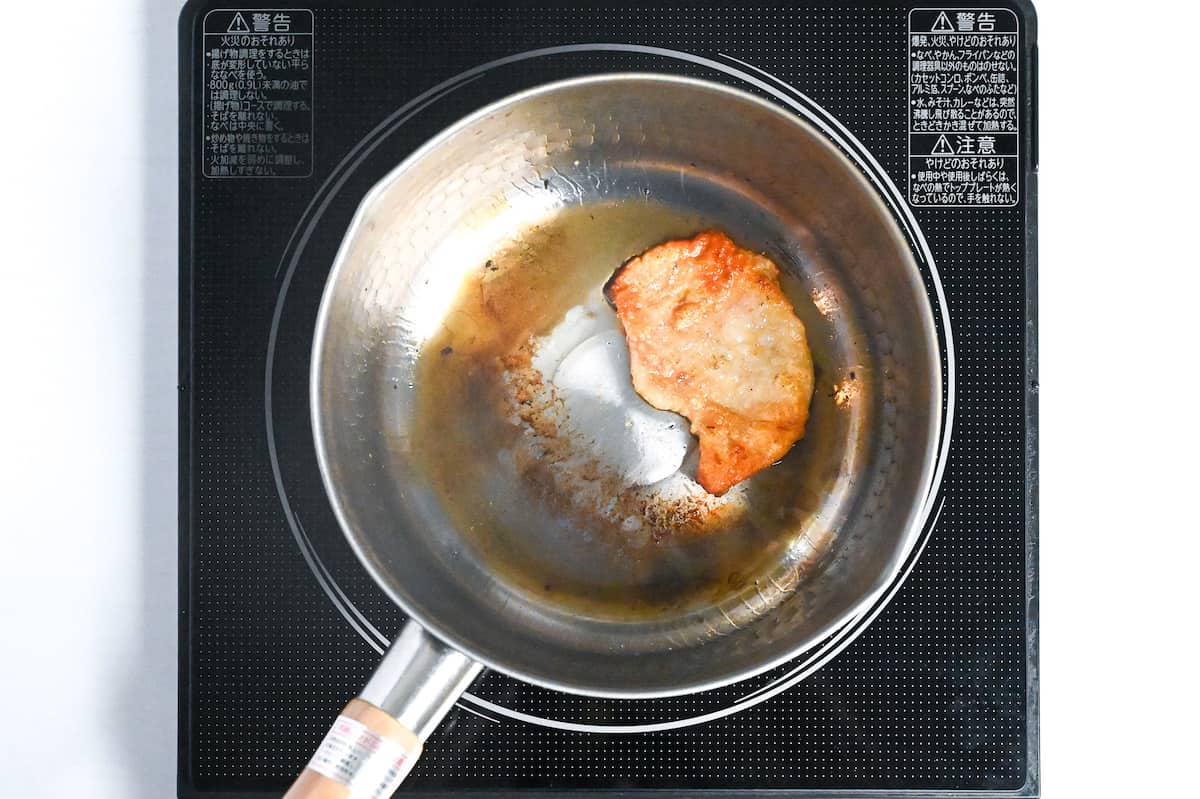
ii. Set the heat to low or medium-low. Do not preheat the pan first. Wait until the underside turns golden, about 5 to 7 minutes. Flip each piece. Wait again until the second side is shatteringly crispy and most of the fat has pooled in the pan.
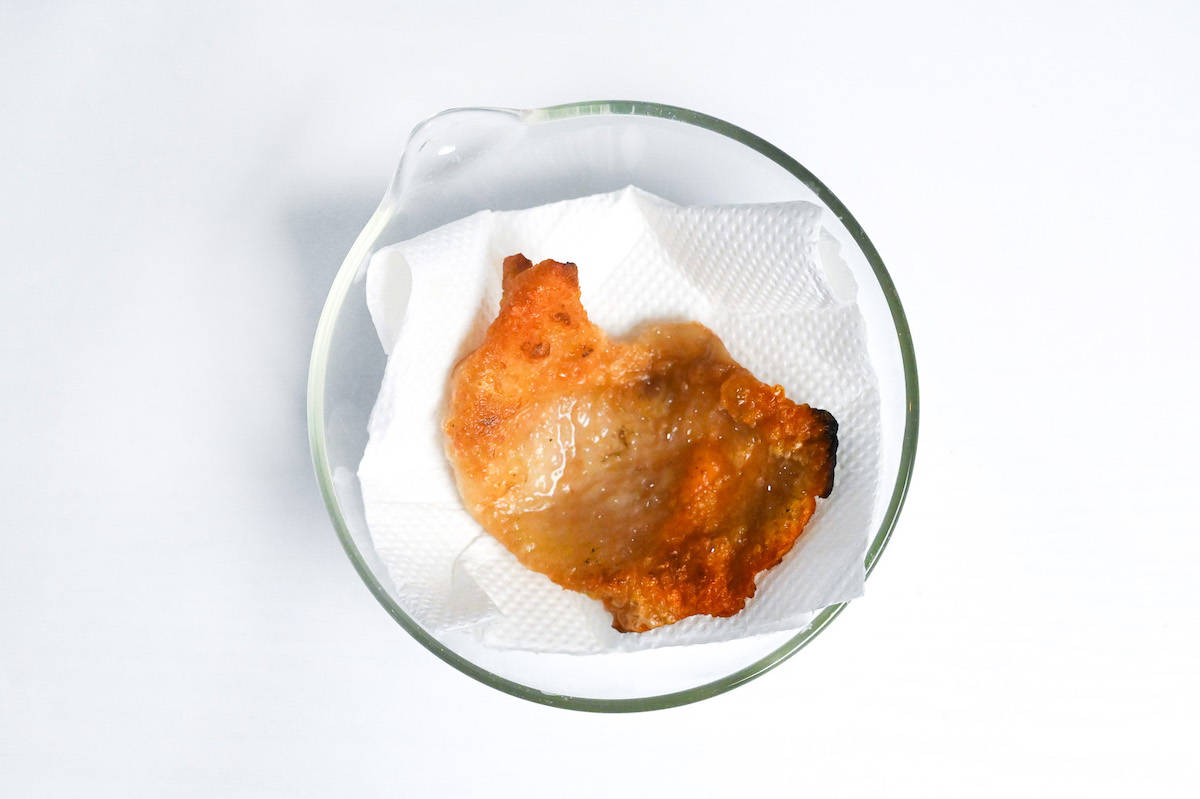
iii. Remove the skin pieces to a kitchen paper-lined plate. Reserve the rendered fat in the pan.
A hot pan sears the outside of the chicken skin before the fat underneath has a chance to melt out, so the skin scorches and the fat stays trapped. A cold pan plus a slow climb in temperature gives the subcutaneous fat time to liquefy and pour into the pan before the skin browns. What you end up with is 2 outcomes that usually fight each other, a shatteringly crispy skin and a pan full of clean, golden chicken fat. Both go to work in the bowl, the fat into the broth, the crispy skin onto the finished bowl as a textural top note.
i. Pour the dashi stock and sake into a pot, then add all the rendered chicken fat from Step 2 (or you can use the same pot). Bring to a boil over medium-high heat.
ii. Lower the heat to medium-low.
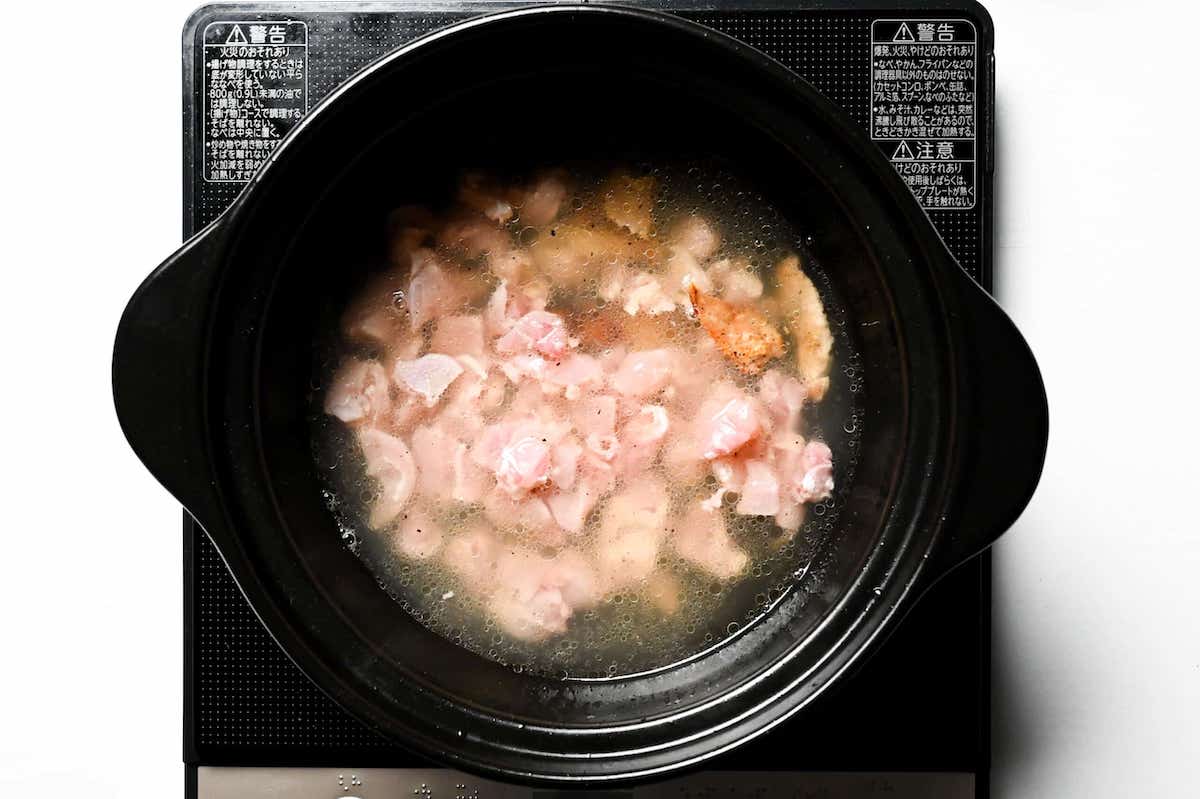
iii. Add the chicken meat pieces. Let them poach in the broth.
i. Place the cooked rice in a bowl lined with a sieve. Fill the bowl with cold water until the rice is submerged.
ii. Swish gently with your fingers for 10 to 15 seconds. The water will cloud immediately, that is the surface starch lifting off.
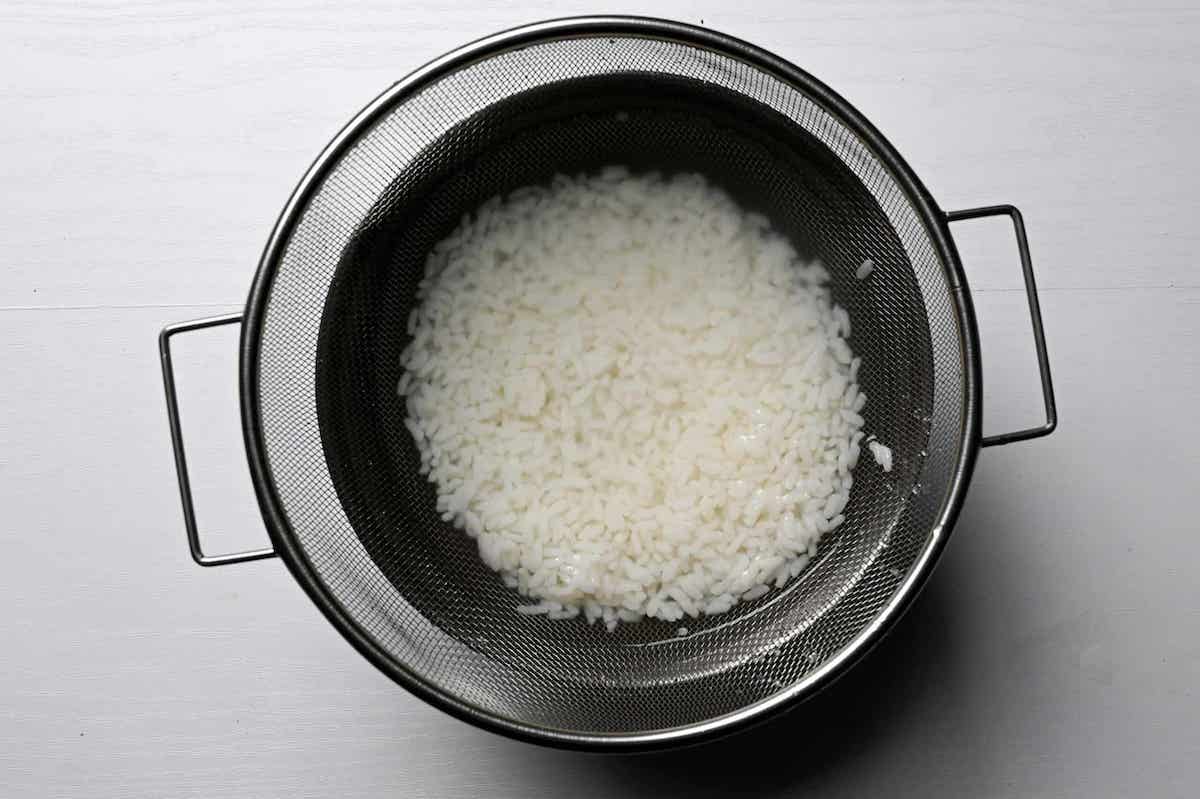
iii. Lift the sieve to drain the rice and dump the water. The drained rice is what goes into the pot.
i. When the chicken meat has changed color from pink to pale (about 1 to 2 minutes after it went in), the pot is ready.
ii. Add the rinsed & drained rice, the sliced leek, the julienned carrot, the sliced shiitake mushrooms, the enoki, the grated ginger, and the light soy sauce.
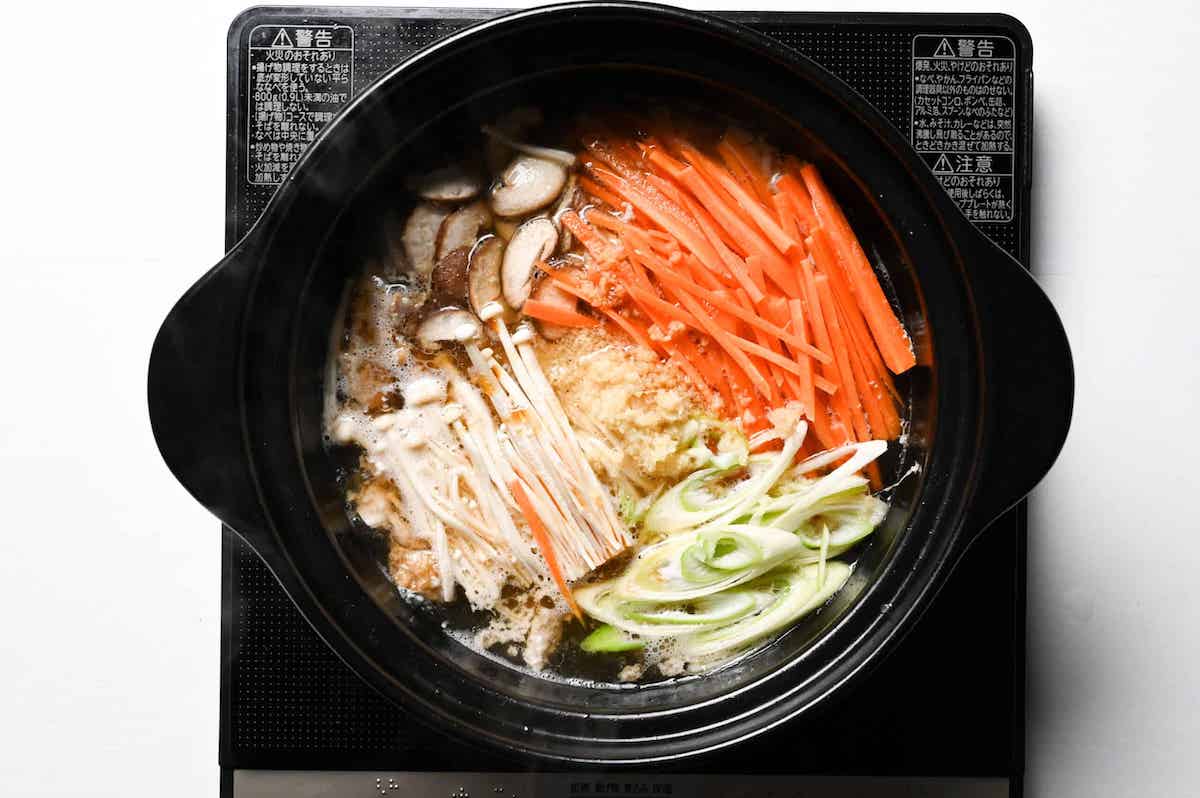
iii. Mix gently so the rice settles into the broth without breaking. When the carrots are slightly soft, set a 5-minute timer.
i. While the timer runs, grab the bowl with the beaten eggs in your hand. At the 5-minute mark, pour the eggs in a thin stream around the pot in a slow circle, starting from the edge and spiraling in. Do not stir.
ii. Set a 30-second timer the moment the last drop of egg hits the broth.
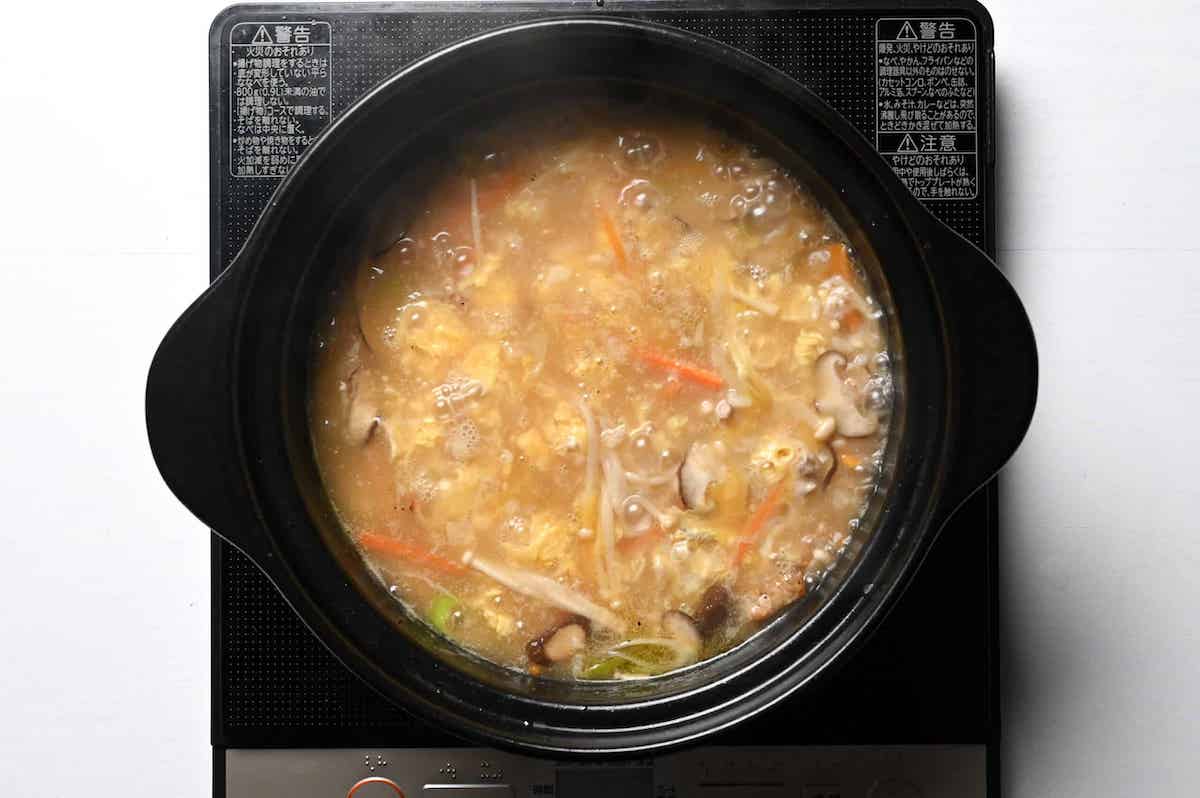
iii. When the 30 seconds are up, turn off the heat completely. Do not lift the lid.
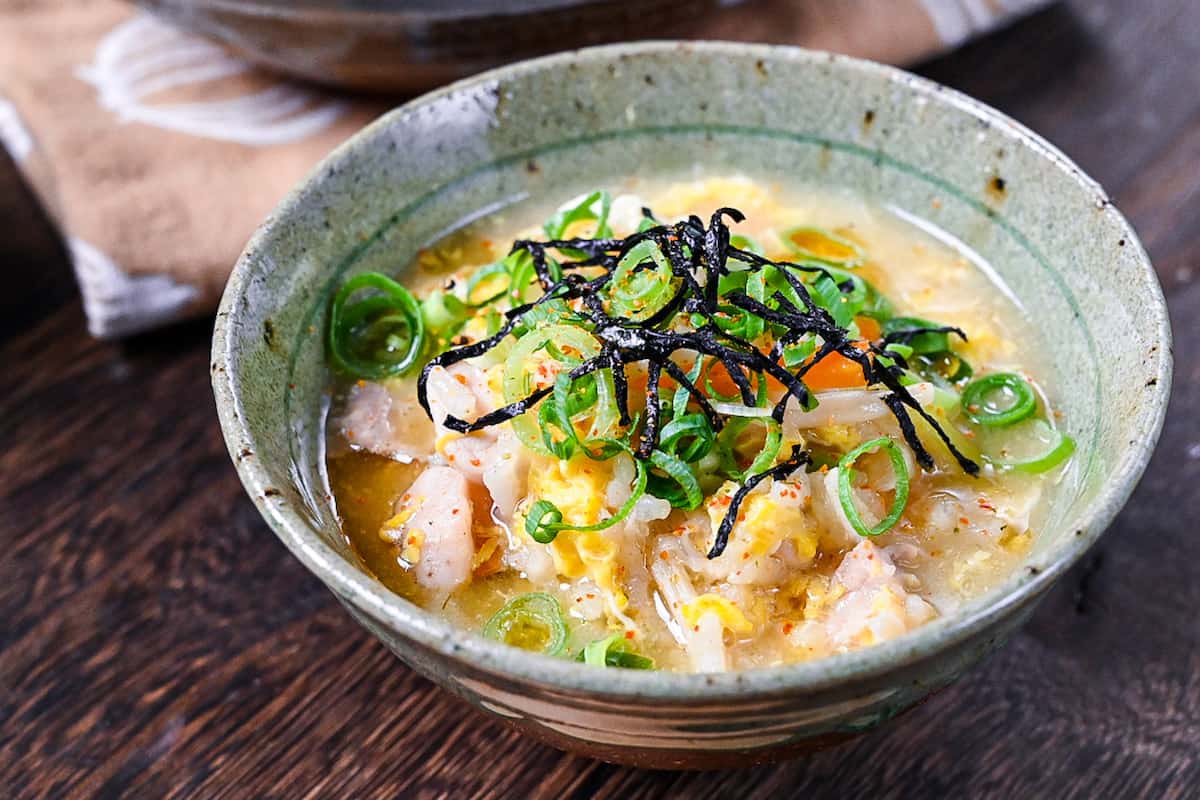
i. Ladle the chicken, rice, and broth into individual bowls.
ii. Crush the crispy chicken skin over the top of each bowl with your fingers. It rains down in golden shards. Scatter chopped green onions and a pinch of kizami nori across the surface. Shake on shichimi togarashi to taste. Finish with a drizzle of toasted sesame oil at the table.
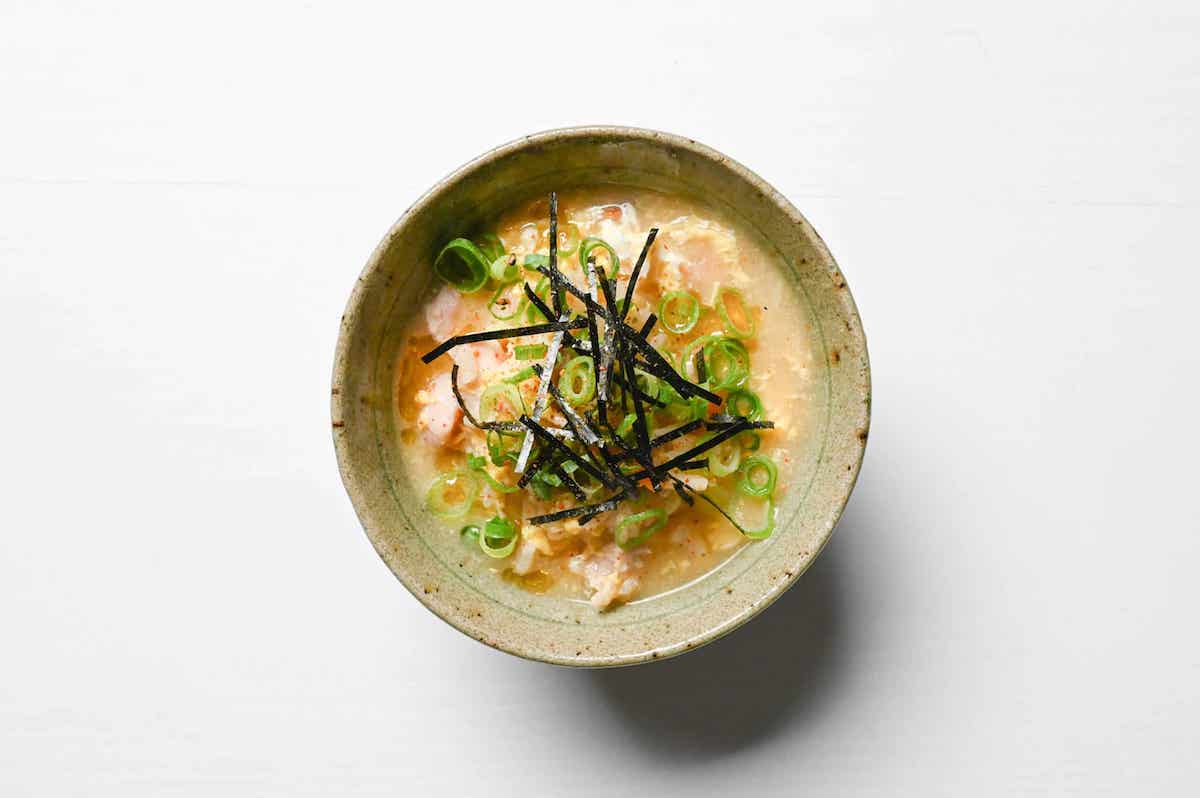
From here you can rotate the toppings bowl to bowl, see the Variations section above for the 3-bowl rotation I run on myself. Standard, spicy with rayu, yuzu kosho. Same pot, 3 different faces.

Essential Tips & Tricks
- Rinse the cooked rice in cold water before it hits the pot. This is the line that splits zosui from ojiya. Skip it and the surface starch on the cooked rice slurries straight into the broth, the liquid turns cloudy and thick, and the grains slump into porridge.
- Render the chicken skin in a cold pan, not a hot one. A hot pan sears the outside of the skin before the subcutaneous fat has time to liquefy, so the skin scorches, the fat stays trapped, and the broth never gets the richness it was built for.
- Kill the heat 30 seconds after the eggs hit the broth. Egg yolk sets around 65 to 70°C (149 to 158°F), egg white spans 60 to 80°C (140 to 176°F), and the broth is sitting near 90°C (194°F) when the pour starts. Hold the heat for another full minute and you will land shattered curds instead of silk.
- Source skin-on chicken thigh at an Asian grocer if your supermarket pulls the skin. Western supermarket trays usually arrive skinless because the trim happens before the meat hits the case. The skin is the load-bearing ingredient here, the source of all the broth richness.
With these simple tips in mind, you’re set for success every time you make chicken zosui.
Storage & Meal Prep
Fridge: Cool the pot on the counter for about 30 minutes until it is just barely warm, then transfer to an airtight container with the lid on and refrigerate. The bowl keeps 1 to 2 days at peak quality. If your eggs are soft-set, eat within 1 day to stay on the safe side.
Freezer: Freeze for up to 1 month in single-serve portions.
Meal prep: Build the dashi-and-chicken broth Saturday morning and stash it in the fridge, then rinse fresh rice and fold the eggs in just before serving on Sunday or Monday night. Cook rice in advance and freeze, you can wash it straight from the freezer.
Reheating: Warm the bowl gently in a small saucepan over low heat with a splash of dashi or water to loosen the broth. Bring it to 75°C (167°F) for at least 1 minute before serving.
What to Serve With This Recipe
Zosui Troubleshooting
Yes, and this is the line that separates zosui from ojiya. Cooked rice carries a layer of surface starch that slurries into the broth the moment hot liquid hits it. Rinse for 10 to 15 seconds in cold water, drain, in it goes. The broth stays clear amber and the grains hold their shape instead of dissolving into porridge.
2 likely suspects. Either the eggs were not beaten well enough before the pour (clear ribbons of white in the bowl mean uneven set), or the heat stayed on past the 30-second mark and the eggs over-cooked into curds. Beat to uniform yellow with no streaks, pour in a slow spiral from the edge of the pot, set a 30-second timer, then kill the heat. Carry-over warmth handles the last bit of setting.
Honestly, not really. (The mush is irreversible once the starch has slurried out.) Once the surface starch on unrinsed rice has dissolved into the broth, the only path forward is to thin it with extra dashi and rebrand it as ojiya, which is its own honest dish in the same family. This is why I always rinse the cooked rice before it goes in the pot. This is a prevent rather than cure situation.
More Japanese Rice Recipes
Hungry for more? Explore my Japanese rice recipe collection to find your next favorite bowl.
Did You Try This Recipe?
I would love to hear your thoughts!
💬 Leave a review and ⭐️ rating in the comments below. 📷 I also love to see your photos – submit them here!
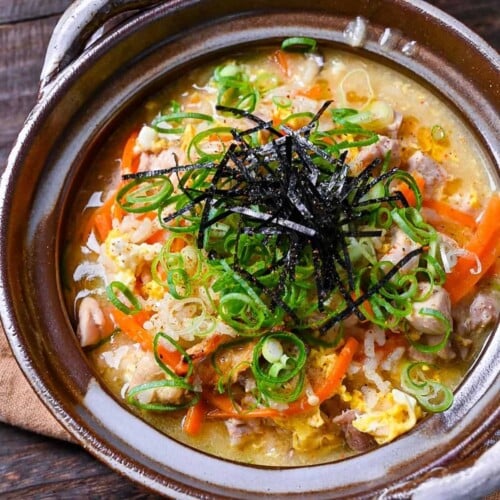
Chicken Zosui (Japanese Rice Soup)

Ingredients
- 150 g boneless chicken thigh skin-on
- 1 tsp cooking oil neutral
- 400 ml dashi stock
- 1 tbsp sake or omit
- 200 g cooked Japanese short-grain rice
- ¼ Japanese leek (naganegi) white part diagonally sliced
- ½ carrot julienned
- 2 fresh shiitake mushrooms thinly sliced
- 100 g enoki mushrooms roots removed
- 15 g ginger root grated, approx 1-2 tbsp
- 3 tbsp Japanese light soy sauce (usukuchi shoyu)
- 2 eggs
- finely chopped green onions
- kizami nori (shredded nori)
- Japanese chili powder (shichimi togarashi)
- toasted sesame oil
My recommended brands of ingredients and seasonings can be found in my Japanese pantry guide.
Can’t find certain Japanese ingredients? See my substitution guide here.
Instructions
- Peel the skin off of 150 g boneless chicken thigh, cut the meat into small pieces and the skin into bitesize pieces.

- Add 1 tsp cooking oil to a cold pan. Stretch out the chicken skin and place it flat on the oil. Heat on low/medium-low and slowly render out the fat. Once golden, flip and fry until crispy on both sides.
- Remove the crispy skin from the pan and place it on a piece of kitchen paper to absorb excess oil. Set aside for later.
- Add the rendered chicken fat, 400 ml dashi stock and 1 tbsp sake to a pot and bring to a boil over medium-high heat. Once boiling, lower the heat to medium-low and add the chicken thigh.
- Place 200 g cooked Japanese short-grain rice in a bowl and fill it with fresh cold water. Swish it around with your hand to gently remove the excess starch and then pour it through a sieve or colander to drain.
- When the chicken pieces are no longer pink, add the rice, ½ carrot, ¼ Japanese leek (naganegi), 2 fresh shiitake mushrooms, 100 g enoki mushrooms, 15 g ginger root and 3 tbsp Japanese light soy sauce (usukuchi shoyu).

- Once the carrots are slightly softened, set a timer for 5 minutes. During this time, crack 2 eggs into a small bowl and whisk.
- After 5 minutes, pour the whisked egg around the pot and set a timer for 30 seconds. When 30 seconds are up, turn off the heat and dish up.
- Garnish with crushed chicken skin, finely chopped green onions, kizami nori (shredded nori) and Japanese chili powder (shichimi togarashi) and a dash of toasted sesame oil. Enjoy!
Our son and wife are having a baby in Japan…his wife is Japanese. We are hosting a Japanese themed baby shower in January. I want to make an authentic chicken and rice soup that I can freeze ahead of time and just heat up the day of the party. Can I freeze the chicken and rice soup and just add the egg and green onions after it is reheated? Thanks!
Hi Diane, congratulations on the new addition to your family!
Japanese rice is very absorbent and tends to soak up the soup in storage, so I would recommend making the soup and rice separately, and freezing them separately. When it comes to reheating, you can heat up the soup first and add the frozen rice directly without thawing. Once it’s heated all the way through, add the egg and green onions. Hope this helps!
Hallo,
Die beste Reissuppe die ich kenne.
Vielen Dank wie immer für das Rezept.
Ich liebe sie.
Sie ist äußert appetitlich.
Unbedingt nachkochen 🙂 vorallem jetzt wo es wieder kälter wird.
Liebe Grüße von Kathleen.
Hallo Kathleen,
vielen Dank für deinen netten Kommentar und dein Foto!
Ich sehe deine Fotos immer gerne!
P.S. I hope my sentences in German are okay!
Yuto
Sehr gerne.
Ich möchte es so gerne teilen was ich nach koche 😀
Weil ich die Japanische Küche sehr schätze und diese Rezepte hier der wahnsinn sind. Super. Ich freue mich sehr darüber.
Your sentences in German are ok. Yes in any case.
(My english is not so good.. 😀 hehe..)
Good Day. Yuto
Amazing recipe. So flavorful and perfect for winter.
Love it
Hi Ralph,
Thank you for trying out my recipe and sharing your wonderful photo! I’m so happy to hear you enjoyed it! 🙂
Yuto
This brought back my will to live during a recent, stubborn flu. It is much lighter and easier to make than the classic European chicken soup with mature chicken and still so flavourful. Plus, without the toppings, it can easily be stored and reheated without losing its tastiness.
Hi Peti,
I’m sorry to hear you were dealing with such a tough flu, but I’m really glad this recipe could bring you some comfort during that time. It means a lot to know it was helpful! 🙂
Yuto
This is fabulous!
Thank you so much, Trish!
This is 🇨🇳 conjee‘s sister from another mister: light, way more refined and not dependent on the strong flavours of century eggs and the like. It is absolute comfort food and this recipe is outstandingly clear and helpful, as usual. We love it