


Featured Comment
These were amazing! The tips regarding dipping hand in ice cold water was very helpful. Thank you this is a delicious recipe.
★★★★★
– Aimee
Ever flip yaki onigiri and watch it crack like dry clay? Even salmon onigiri or chicken rice balls feel easy, until that toasty crust breaks your heart.
It’s one of the fussiest onigiri variations, but a tiny tips and tricks keep it tight and lets a glaze caramelize beautifully, not burn.

Yaki Onigiri
Recipe Snapshot
- What is it? Butter-crispy yaki onigiri with a glossy miso-garlic soy glaze that turns sticky-sweet at the edges.
- Flavor profile: Bold umami, buttery toastiness, and that addictive caramelized tare finish (savory, not one-note).
- Why you’ll love this recipe: Mold-pack + brief air-dry builds cohesion first so the rice ball stays intact and flipping is controlled, not crumble-prone.
- Must-haves: Japanese short-grain rice (uruchimai), onigiri mold (recommended), Japanese soy sauce
- Skill Level: Medium (high reward, short cook time, but watch for rapid browning)
- Freezer Friendly? Yes!
- Suitable for Meal Prep? Yes!
Summarize & Save this content on:
What is Yaki Onigiri?
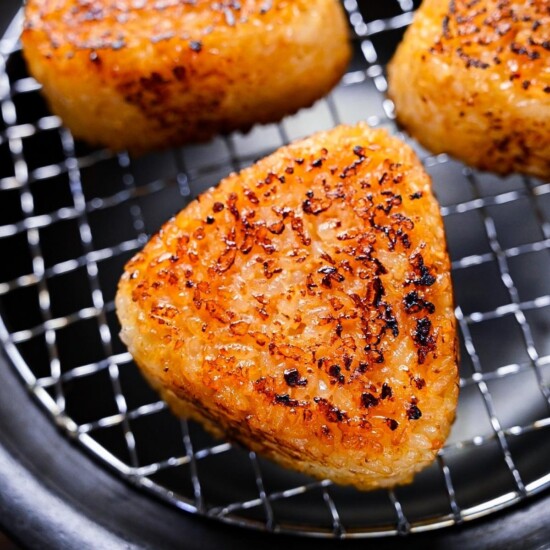
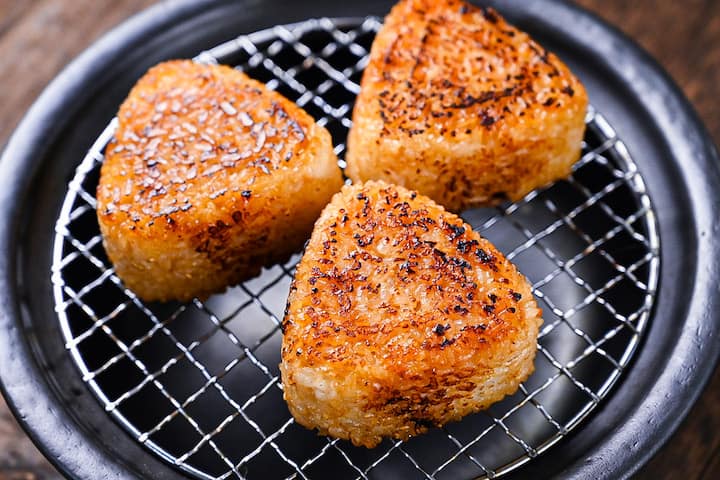
Yaki onigiri (焼きおにぎり) is a grilled or pan-toasted Japanese rice ball. Warm cooked rice is shaped firmly so the grains stick together, then the outside is toasted until it dries slightly and forms a crisp crust.
It looks similar to regular rice balls but differs because yaki onigiri adds a second cooking phase, surface drying and browning, often finished with a brushed glaze made with soy sauce and miso, which caramelizes on the crust instead of soaking into the rice.
You’ll see it everywhere from konbini-style snacks to izakaya menus.
Yaki Onigiri Ingredients
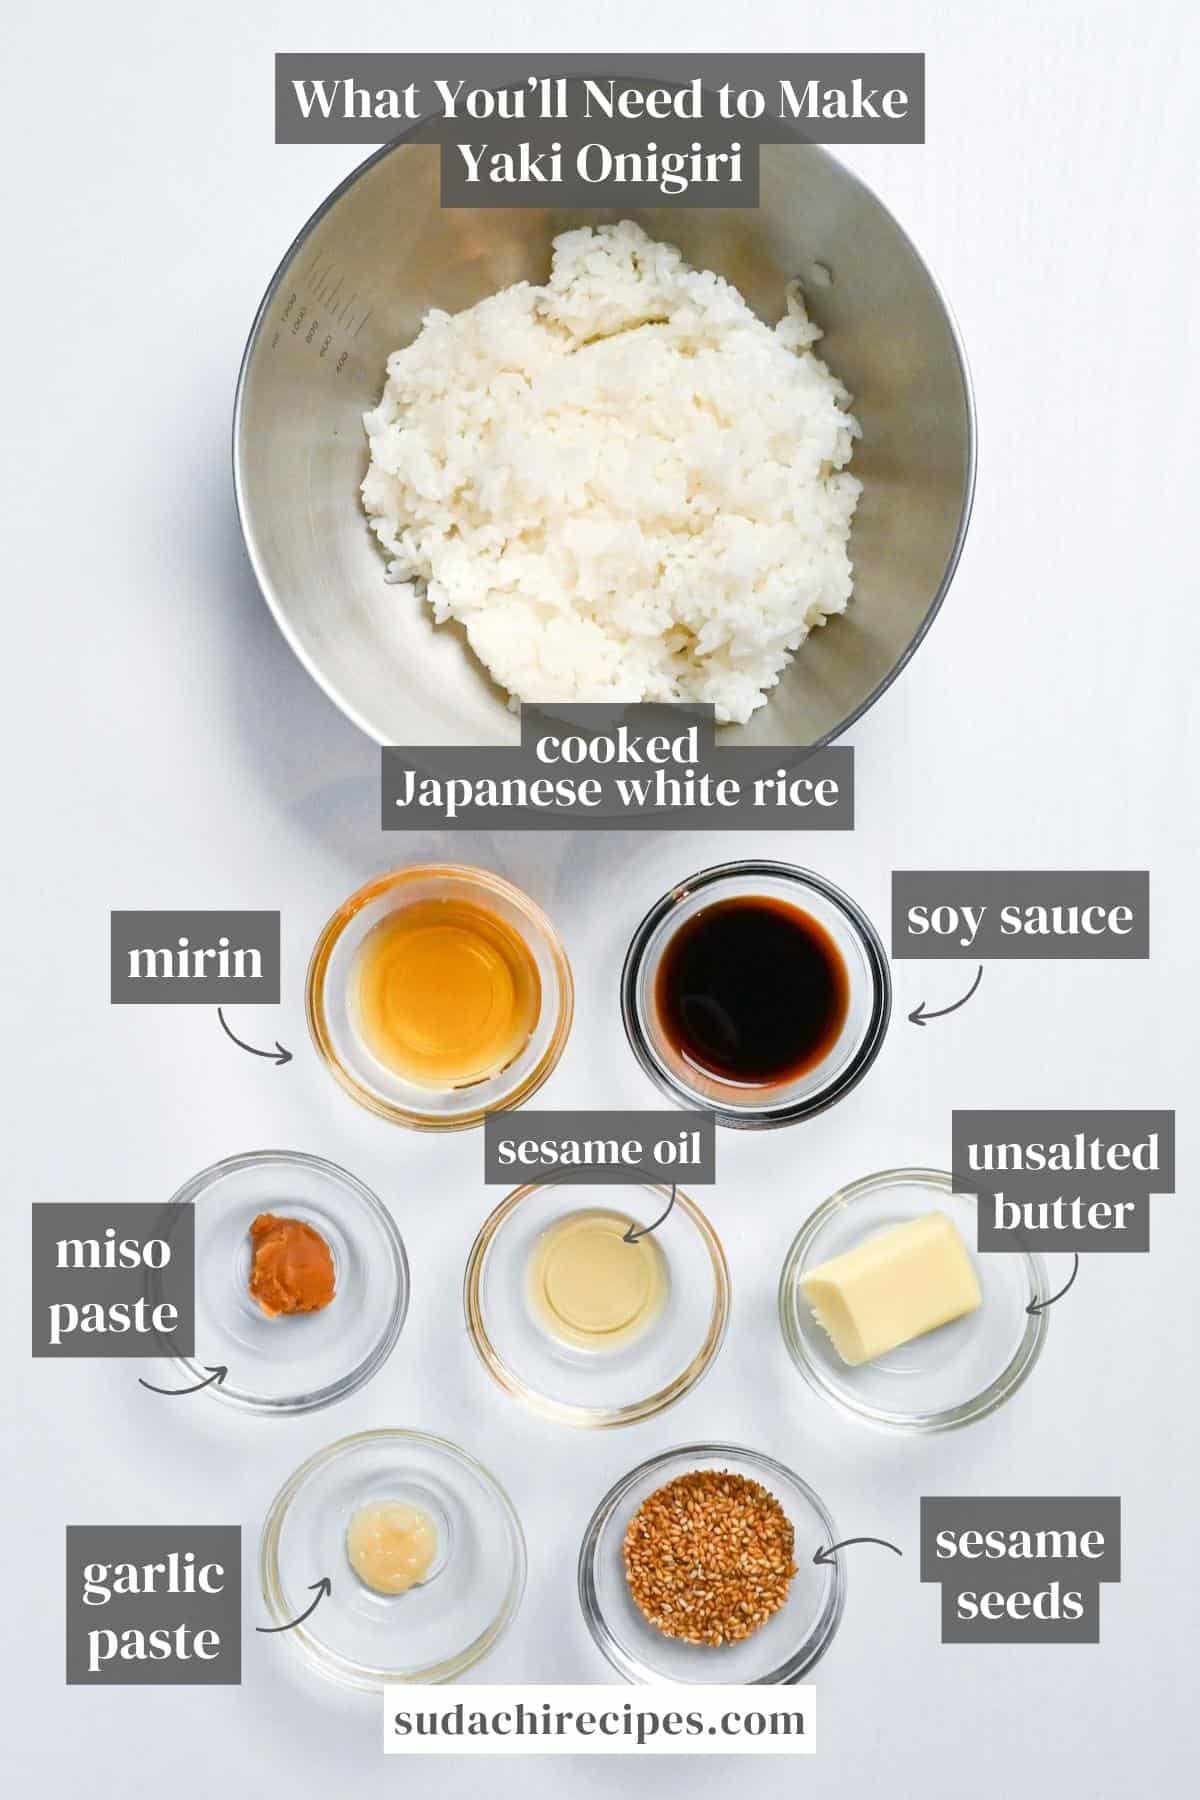
- Cooked Japanese short-grain rice: Sticky, plump rice that naturally clings together. That stickiness is one of your “won’t crumble” insurances when you press, grill, and flip. Long-grain rice can’t hold a tight triangle. You’ll find Japanese short-grain rice at well-stocked Asian markets.
- Mirin: Sweet Japanese rice wine seasoning. Think of it as the gentle sweet backbone behind many Japanese glazes. In this yaki onigiri recipe, it gives the soy + miso sauce body and shine so it caramelizes into a glossy coat instead of tasting harsh.
- Unsalted butter: Regular butter without added salt. That buttery richness plays ridiculously well with soy sauce and miso for an addictive finish.
Substitution Ideas
- Japanese rice: You can use medium-grain Calrose (often labelled as “sushi rice”). Still sticky enough, but it firms up more as it cools so pack it tighter to prevent crumbling.
- Mirin: Dissolve sugar in sake (or water) and use that in the glaze for a similar sweet finish. If you have cola, it’s actually a great 1:1 swap idea!
- Unsalted butter: You can either use salted butter with cut back salt content in the glaze or simply use cooking oil.
Have trouble finding Japanese ingredients? Check out my ultimate guide to Japanese ingredient substitutes!
How to Make My Pan-Fried Yaki Onigiri
If you prefer to watch the process in action, check out my YouTube video of this yaki onigiri recipe!

Before you start: Cook Japanese short-grain rice. I personally recommend using a rice cooker, but you can also see my post on ‘How to Make Japanese Rice on the Stove‘ for alternative methods.
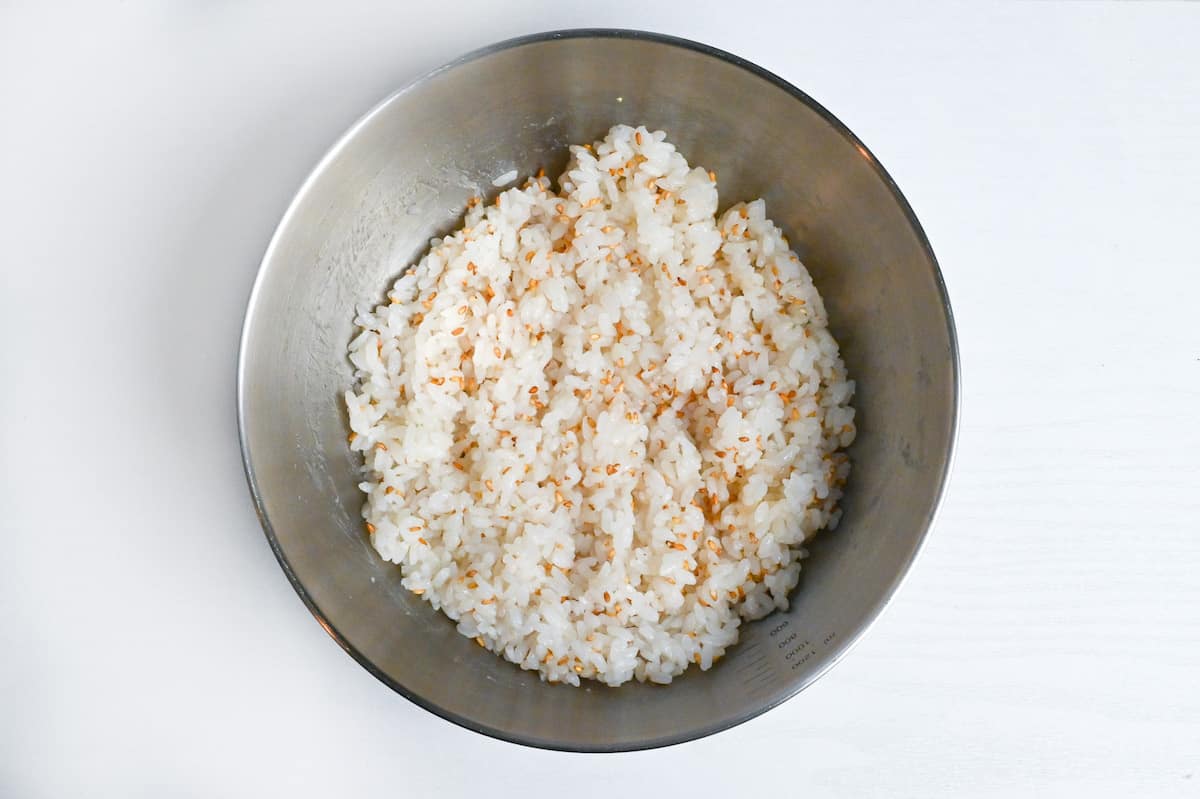
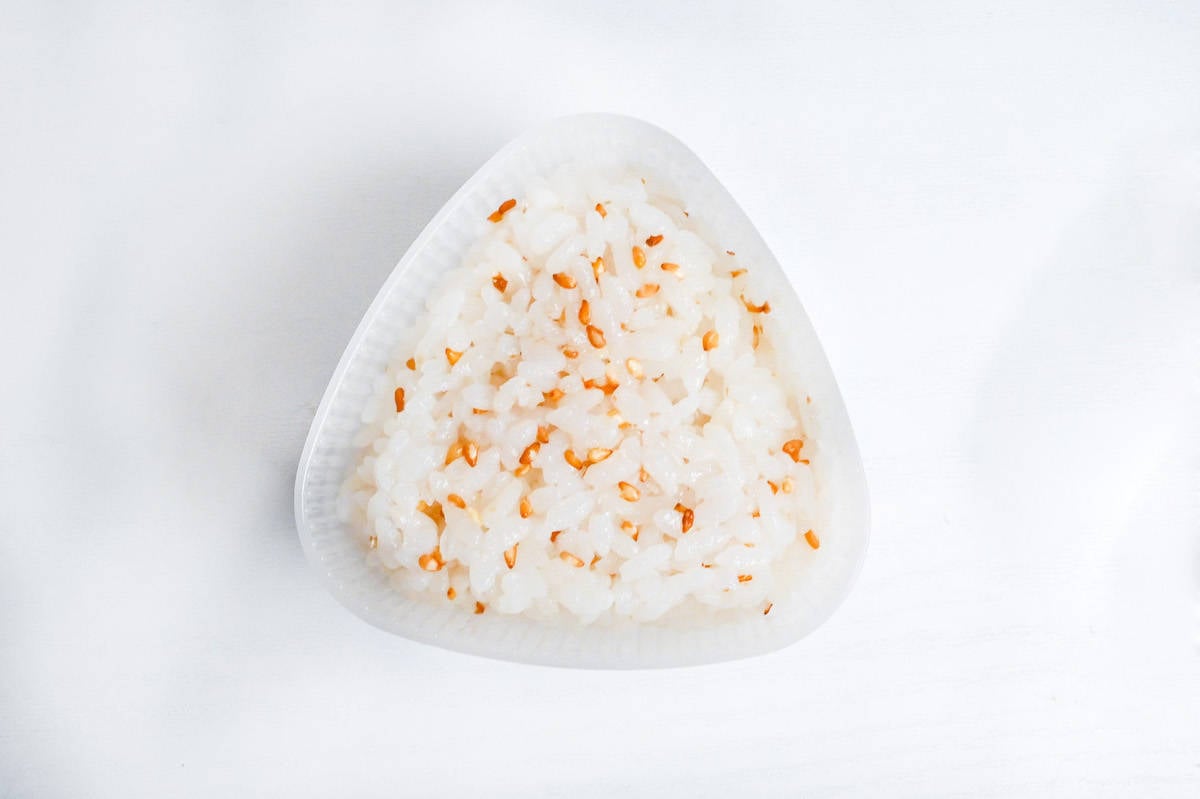
i. Spread the hot rice in a wide bowl, let steam escape, and cool to about 55℃ (131°F) so it’s warm but not tacky. Stir in sesame seeds, then divide into 6 portions. If it smears in your hands, it’s too hot, cool 2-3 minutes and try again.
If you’re starting with refrigerated/frozen rice, microwave it until steaming-hot, then cool back to about 55℃ (131°F) before shaping so it bends instead of cracking.
i. Pack one portion into your onigiri mold and press just until it holds a clean triangle (firm, not crushed). This controlled compression tightens the starch “glue,” so your yaki onigiri won’t crumble when flipped. If it cracks on release, press a little more.
Dip your hands in ice-cold salted water for 20-30 seconds so the rice doesn’t stick.
i. Set the shaped onigiri on a plate, uncovered, and air-dry 10 minutes so surface moisture evaporates and a thin skin forms. This “crust starter” keeps the rice from turning soggy under sauce, so your yaki onigiri stays intact and crisps fast.
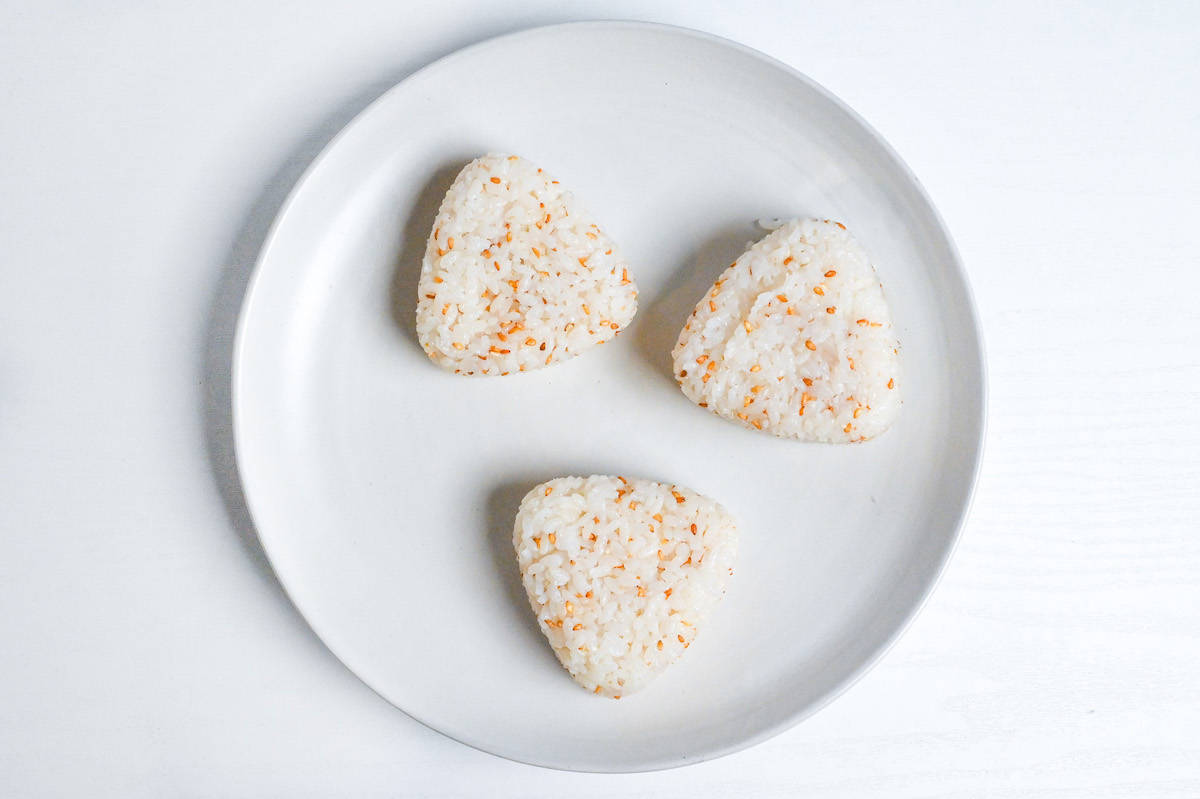
ii. If it still feels tacky, dry 5 minutes longer. Do not cover it.
When I tested drying covered vs uncovered, the covered onigiri stayed sticky and tore the moment I brushed on glaze. Uncovered air-drying fixed both sticking and crumbling!
i. While you wait, whisk soy sauce, mirin, miso paste, toasted sesame oil, and garlic paste until smooth. If you see miso specks, mash and whisk again until lump-free.

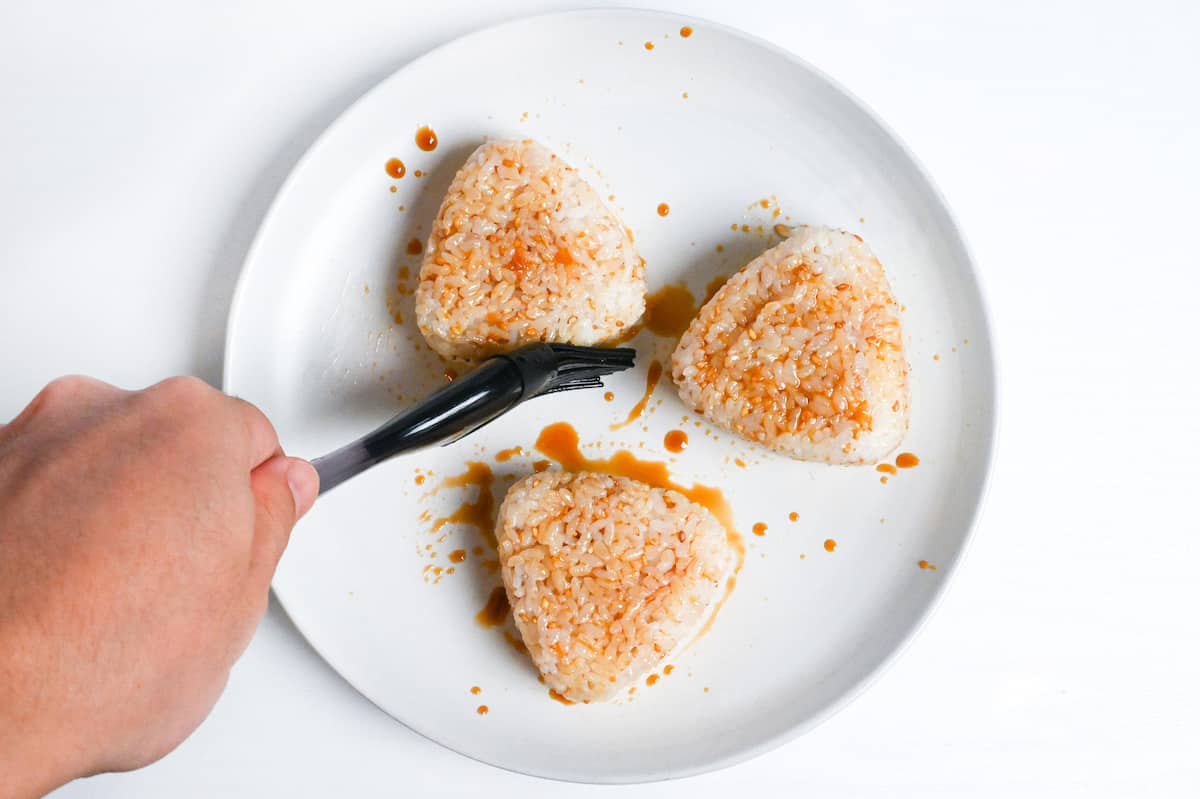
i. After drying, use a pastry brush to paint a thin layer of glaze onto one side. Shiny, not wet. A thin coat limits free water, so the tare sets instead of soaking in and weakening the rice.
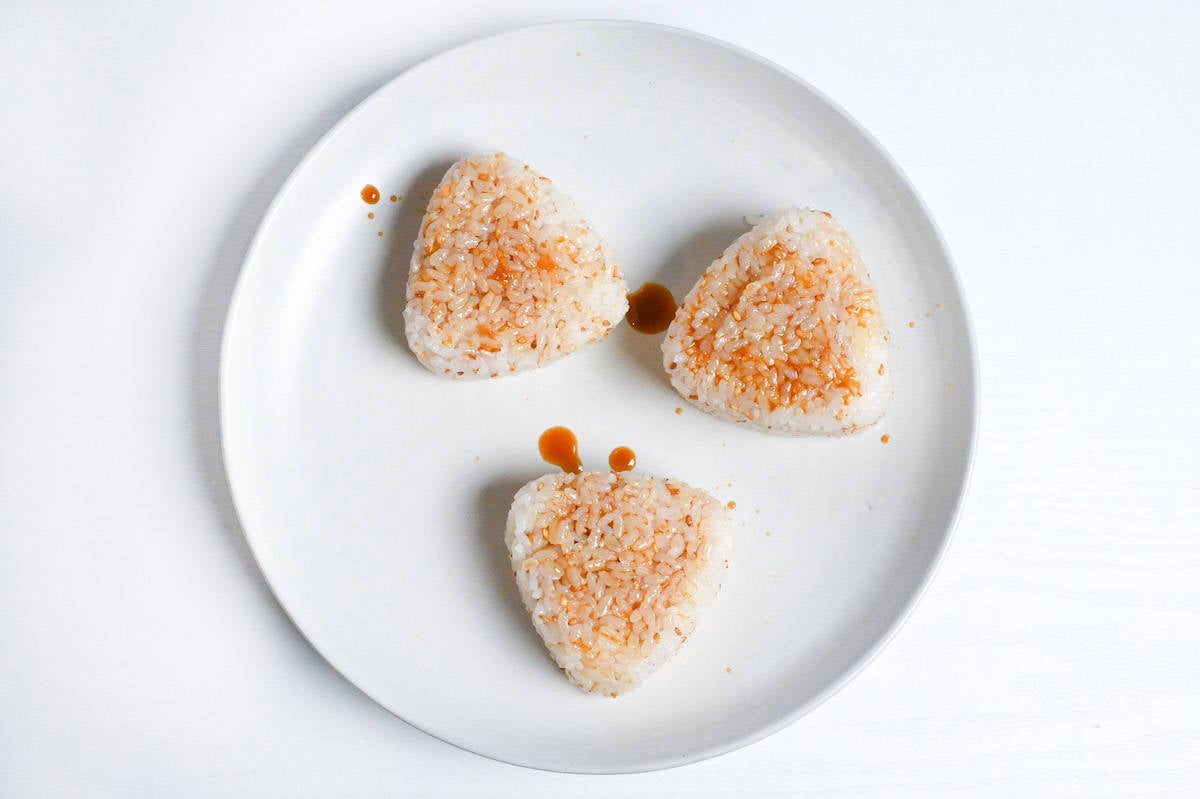
ii. If sauce pools, blot with a towel and let it sit 2 minutes to dry again.
i. Pour a little soy sauce into a small dish and lightly brush the edges of each onigiri. We use just soy sauce here because we will not pan-fry the sides to avoid breakage.
i. On medium to medium-low heat, melt butter until it foams, then add the onigiri glazed-side down. Brush the tops with sauce and wait for a Maillard-browned crust to form and release (about 1 minute).
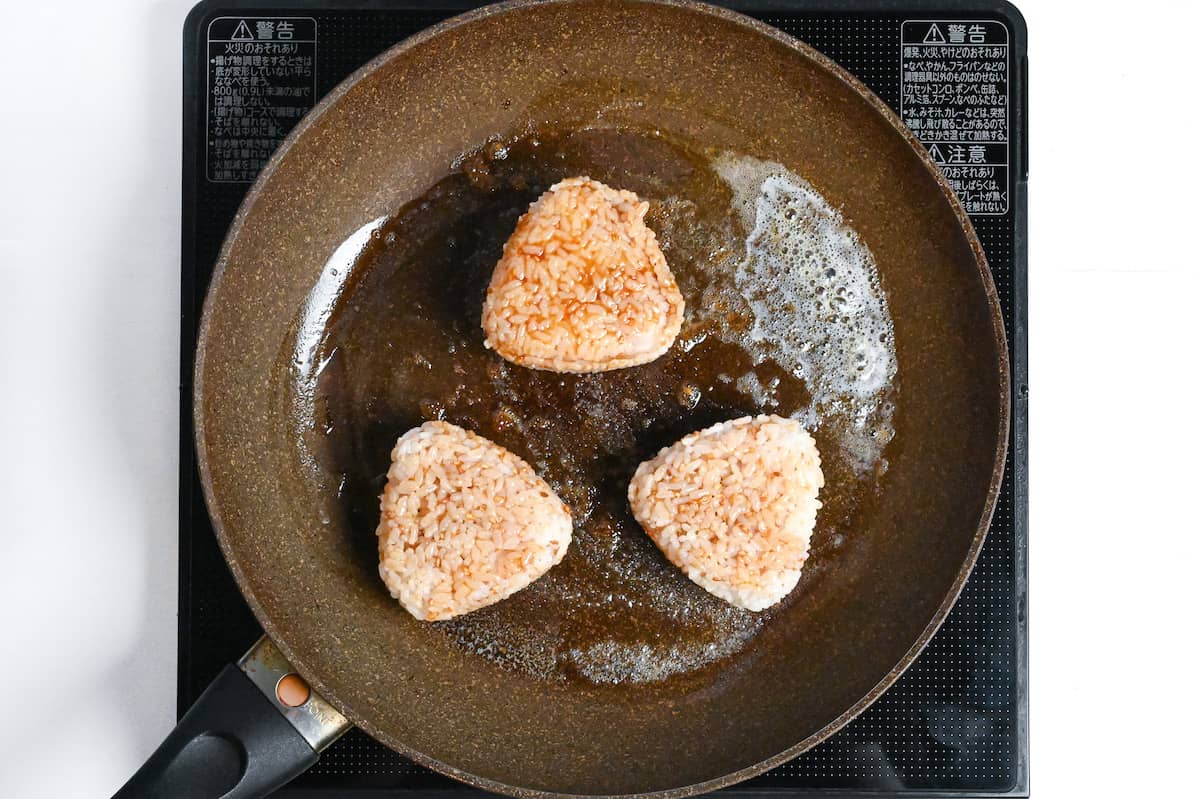
ii. Then flip and cook the other side (1 min).
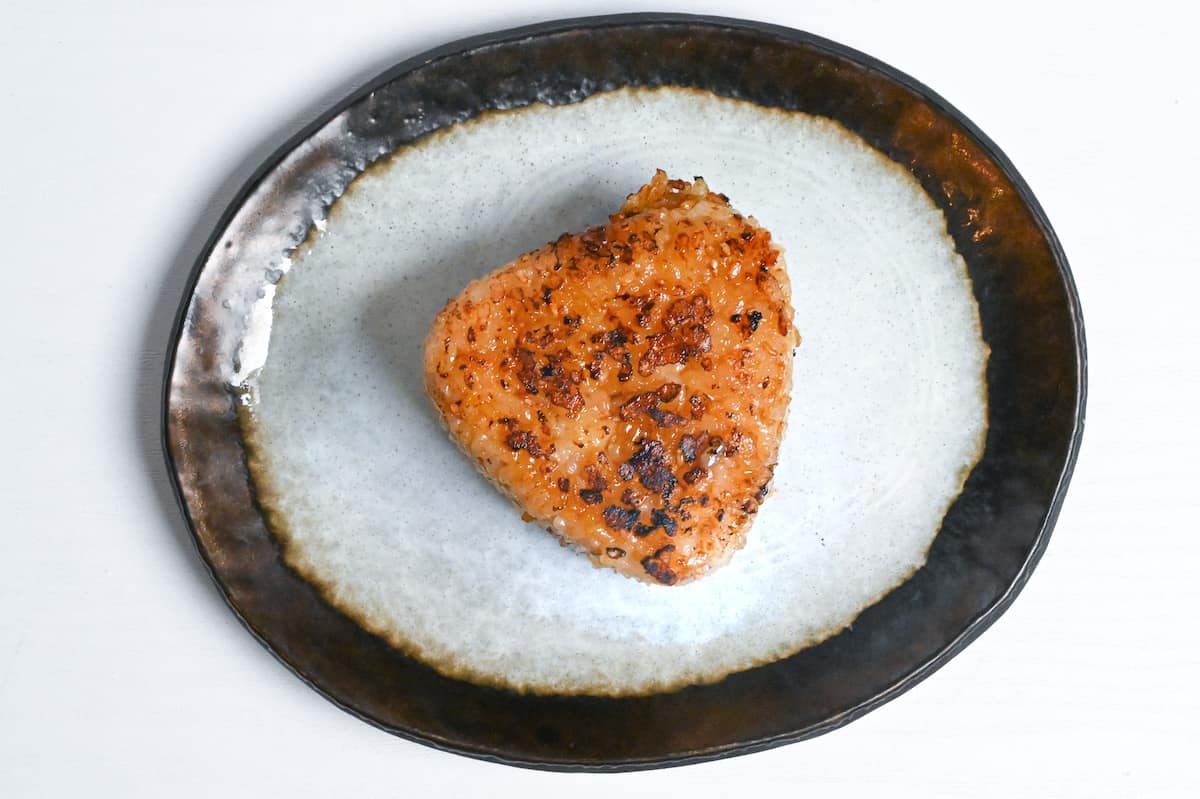
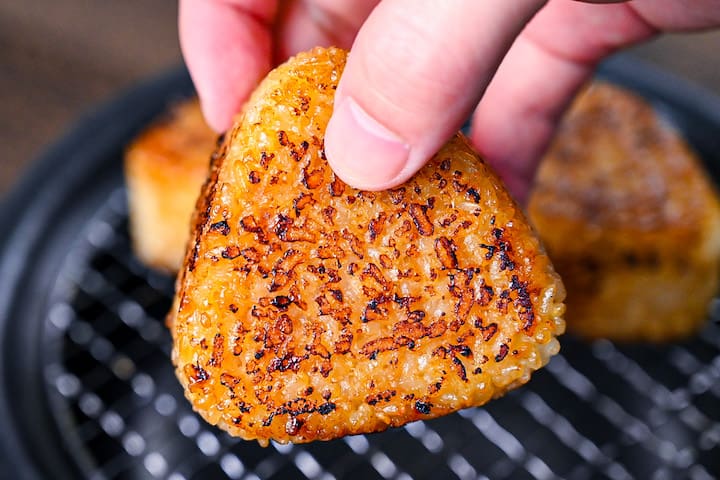
i. Transfer the yaki onigiri to a rack (or a plate, not stacked) and rest 1-2 minutes so steam vents and the crust stays crisp. Serve while the tare is glossy, or add a nori band once it stops steaming so it won’t turn chewy.

Essential Tips & Tricks
- Vent and cool the rice to about 55℃ (131°F) before shaping (reheat chilled rice until steaming first to re-gelatinize, then cool) so stickiness is controllable.
- Use the plastic mold to press just until the triangle holds clean edges so you get structure without a “rice brick”; otherwise under-compression makes it fall apart.
- Air-dry the shaped onigiri uncovered for ~10 minutes to evaporate surface water and start a dry skin.
- Brown first with butter on medium heat and wait for the crust to “release” before moving, to trigger Maillard browning without tearing.
- Whisk the tare until smooth, then lacquer in 2-3 thin coats, letting each coat dry briefly and lowering heat once sugars hit the pan.
With these simple tips in mind, you’re set for success every time you make yaki onigiri.
Storage & Meal Prep
Fridge: Not recommended for best texture. If you must, store in an airtight container for up to 24 hours, and expect the crust to soften and the rice to firm up. You can revive it slightly by refrying in a pan.
Freezer: Recommended: wrap each cooled yaki onigiri tightly (plastic wrap), then place in an airtight container for up to 1 month to prevent freezer burn and moisture loss.
Meal Prep: Best make-ahead is to cook a full batch, cool quickly, then freeze individually.
Reheating: Microwave until steaming-hot to reheat evenly (steam heat), then re-toast in a lightly buttered skillet on medium-low to dry the surface and re-crisp without burning the sugary glaze (dry heat). If it darkens fast, drop the heat and shorten the final caramelization.
What to Serve With This Recipe
- Shiozake (Salt-Grilled Salmon)
- Spinach Ohitashi
- Hiyayakko (Chilled Tofu)
- Gomaae Salad
Yaki Onigiri Q&A
Burning comes from high heat + thick glaze, especially with mirin/sugar and miso (they caramelize fast, then char). If you see dark spots or smell sharp smoke, lift the pan and drop the heat immediately.
Yes, but reheat it until steaming-hot first so the rice softens (re-gelatinization), then cool to about 55℃ (131°F) before shaping. If you shape it cold, it tends to crack and shed grains, if you shape it piping hot, the rice can get crushed and won’t hold clean edges. The goal is warm, pliable rice that packs without turning pasty.
This usually happens when the rice wasn’t fully cooked, the surface is still wet, or you flip before a crust forms. Use short-grain rice, shape while warm (about 55℃ (131°F)), and air-dry so free surface water evaporates. In the pan, wait until the bottom feels “released” before flipping. Forcing it early tears the surface and starts the crumble cascade.
More Japanese Rice Recipes
- Takikomi Gohan (Mixed Rice)
- Ochazuke (Japanese Tea on Rice)
- Yakiniku Rice Burger
- Pork-Wrapped Rice Balls
Hungry for more? Explore my Japanese rice recipes to find your next favorite dishes!
Did You Try This Recipe?
I would love to hear your thoughts!
💬 Leave a review and ⭐️ rating in the comments below. 📷 I also love to see your photos – submit them here!

Yaki Onigiri (Japanese Grilled Rice Balls)
Ingredients
- 700 g cooked Japanese short-grain rice or Calrose
- 1 tbsp toasted white sesame seeds
- 1 tbsp Japanese soy sauce (koikuchi shoyu) toasted
- 1 tbsp butter or neutral oil
Sauce
- 2 tbsp Japanese soy sauce (koikuchi shoyu)
- 1 tbsp mirin or cola
- 1 tsp toasted sesame oil
- 1 tsp yellow miso paste (awase)
- 1 tsp garlic paste or grated garlic
My recommended brands of ingredients and seasonings can be found in my Japanese pantry guide.
Can’t find certain Japanese ingredients? See my substitution guide here.
Instructions
- Place 700 g cooked Japanese short-grain rice (slightly cooled) in a large bowl and mix in 1 tbsp toasted white sesame seeds. Divide it into portions of approximately 120g per rice ball (for 700g of rice, I make about 5-6)

- Divide it into portions of approximately 120g per rice ball (for 700g of rice, I make about 5-6) and press them into triangle shapes. I recommend using an onigiri mold so that you can pack it more tightly without breaking it. Check out this post for 3 ways to shape onigiri.
- Place the shaped rice balls on a plate and allow to air dry for approx 5 minutes on each side to form a thin, dry crust.
- While you wait, mix the sauce ingredients (2 tbsp Japanese soy sauce (koikuchi shoyu), 1 tbsp mirin, 1 tsp toasted sesame oil, 1 tsp yellow miso paste (awase), 1 tsp garlic paste) in a small bowl until smooth.
- After 10 minutes of drying, brush the sauce over one side of each rice ball.
- Pour 1 tbsp Japanese soy sauce (koikuchi shoyu) into a small bowl and use a brush to spread a thin layer over the edges of the rice balls.
- Heat a frying pan on medium and add 1 tbsp butter. Once it has melted, place the onigiri in the pan with the sauce side facing down. Brush the other side with the sauce and fry on each side for approximately 30 seconds to 1 minute, or until nicely browned.
- Serve and enjoy!
These were amazing! The tips regarding dipping hand in ice cold water was very helpful. Thank you this is a delicious recipe and as long as you take your time easy
Hi Aimee.
Thank you for trying the recipe and giving such a positive review, I’m so glad you liked it!
It was pretty tasty and easy to make 🙂
Thank you, Ann! 🙂