


Featured Comment
I made this dish following the recipe with no deviations and it came out great! Thank you for posting!
★★★★★
– Nicholas
Forget the ebi mayo complexity or shrimp tempura technique anxiety. This weeknight hero needs just your stovetop and 20 minutes.
You’ll skip the store-bought pouch and still get perfectly glossy, clinging chili sauce every time.

Ebi Chili
Recipe Snapshot
- What is it? Homemade ebi chili with bloomed doubanjiang, shrimp-infused oil, and the cornstarch coating that changes everything.
- Flavor profile: Spicy, Aromatic, Glossy
- Why you’ll love this recipe: This recipe finally explains how you can recreate restaurant-style ebi chili sauce at home. You’ll understand why behind every step.
- Must-haves: Shrimp, Chili bean paste, A wok or large frying pan
- Skill Level: Easy
Summarize & Save this content on:
What is Ebi Chili?
Ebi Chili (エビチリ) represents a fascinating moment in Japanese culinary history: when Chinese flavors met Japanese home-cooking sensibilities and evolved into something entirely new. At its core, the dish layers succulent shrimp with a chili-tomato sauce that’s spicy enough to excite but gentle enough to serve any night of the week.
This evolution was guided by a Chinese-born chef Chen Kenmin (陳建民), the father of Japan’s “Chuka” cuisine. He played the same role in shaping Ebi Chili that he did in adapting mabo dofu, tantanmen, and chinjao rosu, translating Sichuan technique with deep respect while making it accessible to Japanese palates.
His goal for ebi chili was simple: soften the heat of traditional Sichuan “gan shao” shrimp (乾焼蝦仁) and make the sauce achievable with ingredients Japanese cooks could find. Hence the defining use of ketchup for sweetness, color consistency, and acidity that rounds off the chili heat.
Ebi Chili Ingredients
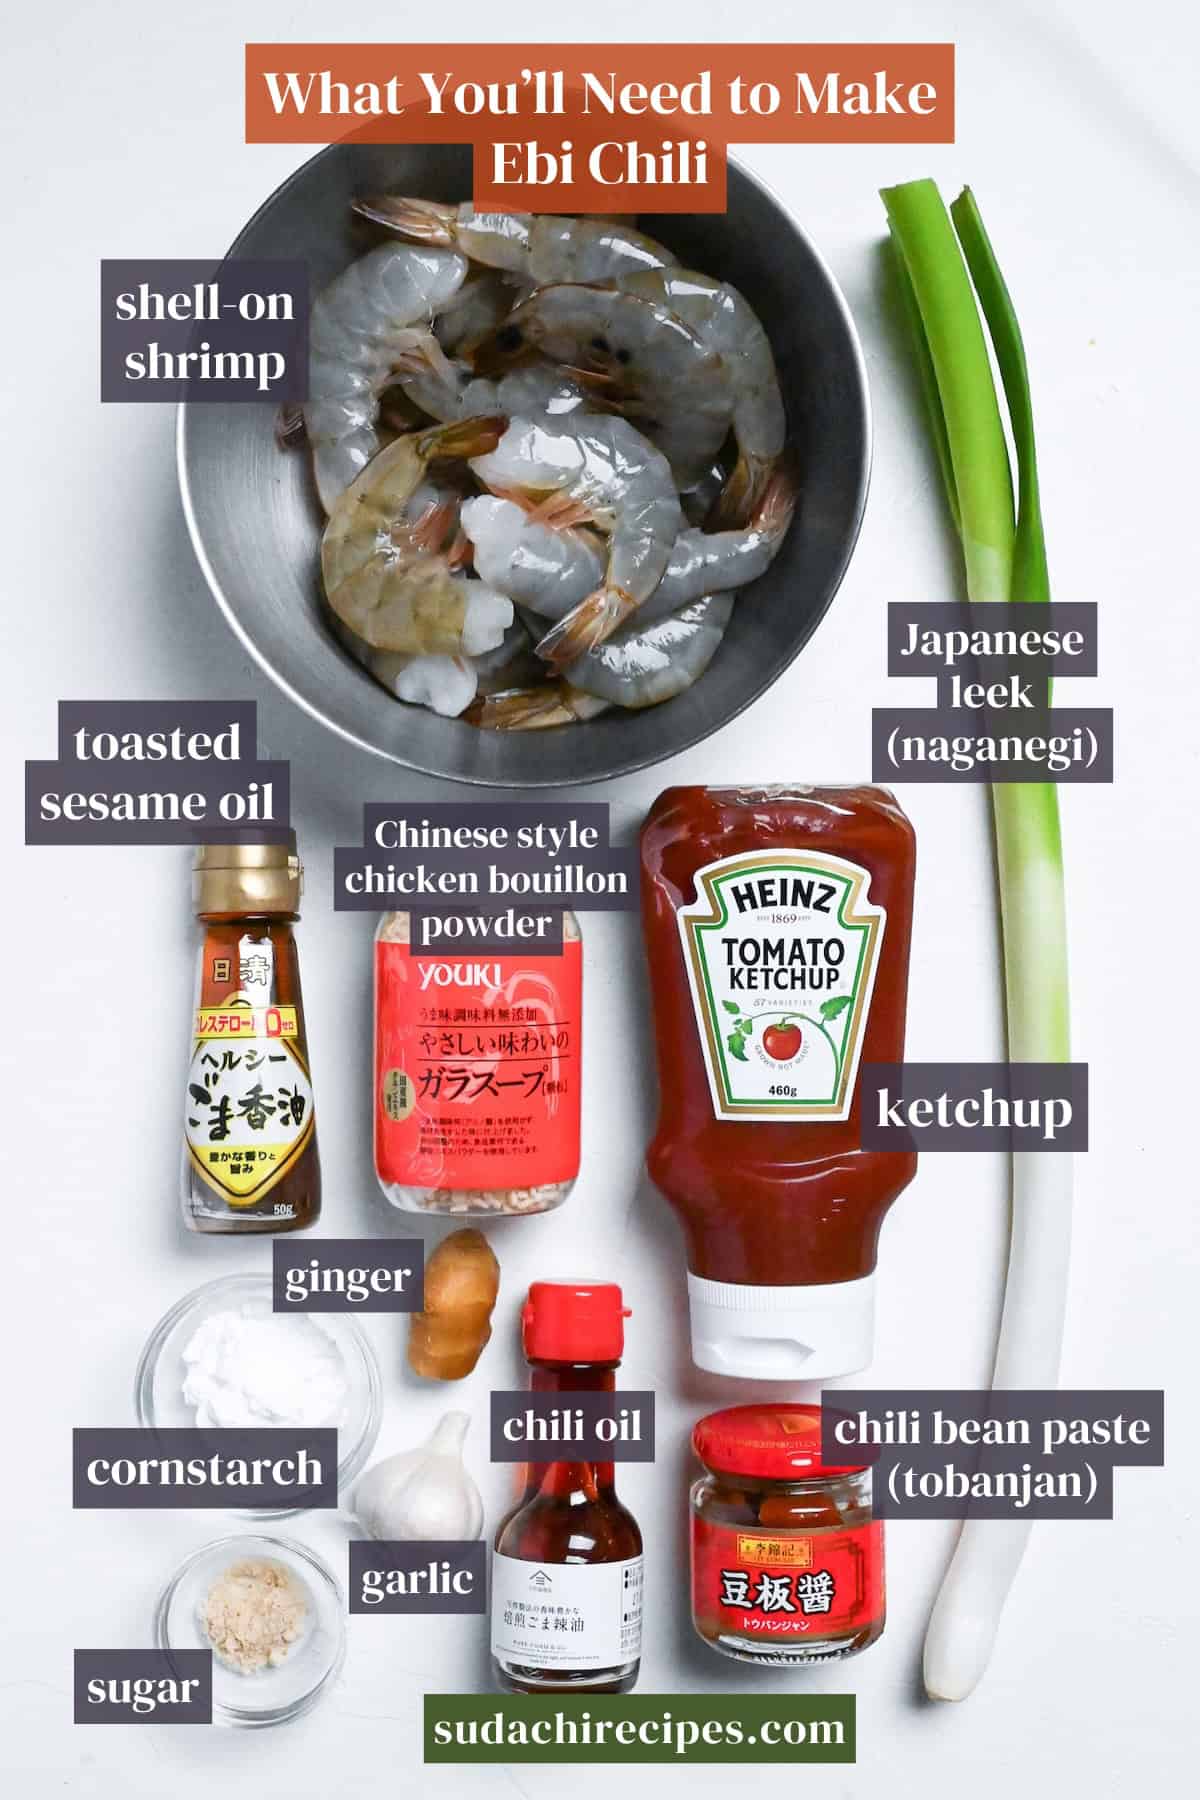
- Shrimp/prawns: Choose larger varieties like Black Tiger or whiteleg (vannamei) shrimp helps you keep that juicy snap even if you cook a minute too long. Shell-on or peeled both work, though you’ll want to devein them either way.
- Chili bean paste (Doubanjiang): This Sichuan fermented fava-bean-chili paste brings complex, savory heat, not just spiciness, so the sauce tastes restaurant-deep. It’s typically in the chili/condiments aisle at Asian markets.
- Tomato ketchup: This is the secret ingredient that transformed a fiery Sichuan dish into a Japanese family favorite back in the 1950s. Chef Chen Kenmin used ketchup to recreate the glossy red appearance of traditional chili sauce while taming the heat for Japanese palates.
Substitutions/Variations
- Shrimp: Use chicken breast/thigh for a heartier “tori chili,” or go with squid rings or sea scallops to keep a gentle ocean sweetness and softer bite.
- Japanese leek: Regular green onions or scallions are your easiest swap. Leeks work too (use the white and pale green sections), though they’re milder and slightly sweeter. Even yellow onions or shallots can pinch-hit here.
- Potato starch: Potato starch is the Japanese go-to for slurries and light coatings, giving sauces a silky, translucent sheen and a delicate crisp. If you don’t have it, cornstarch or tapioca starch works 1:1.
- Chinese chicken bouillon powder: Any chicken-flavored bouillon powder can stand in here.
- Making It Spicier: Drizzle extra chili oil over the finished dish or sprinkle red pepper flakes right before serving. This way you can customize each serving to different heat tolerances (perfect for dinner guests with varying spice preferences).
- Toning Down the Heat: Cut the chili bean sauce in half and increase the ketchup by 1-2 tablespoons for a sweeter, gentler version.
Have trouble finding Japanese ingredients? Check out my ultimate guide to Japanese ingredient substitutes!
How to Make My Ebi Chili
If you prefer to watch the process in action, check out my YouTube video of this ebi chili recipe!

Before you start (Mise en place):
- Peel shrimp, making a shallow cut along the back, and removing the dark vein.
- Save about 5 of those shells.
- Mince your ginger, garlic, and the white part of a Japanese leek.
- If you’re working with frozen shrimp instead of fresh, thaw them gently in a 3% saltwater solution.

Shrimp shells are packed with flavor compounds that are fat-soluble, meaning they release their sweet, briny essence into oil far better than into water. By frying the shells briefly, you’ll create a custom shrimp-infused cooking oil that amplifies the dish’s seafood character without adding extra ingredients.
i. Toss your peeled shrimp into a bowl with cornstarch and salt, working the mixture over every surface until each shrimp wears a light, even coating. Let them sit for 3 minutes.

The salt is drawing out impurities while the starch is acting like a magnet for any surface grit.
ii. While your starch-coated shrimp rest, use this time to set a wok over medium heat and add neutral oil. Once it shimmers, drop in those reserved shells and fry them gently for 3 minutes until vivid orange and fragrant, stirring occasionally.

iii. Strain or scoop out the shells and discard. You’ve just built a quick, umami-rich shrimp oil that will perfume the whole dish.
iv. After the rest, rinse shrimp thoroughly under cold running water, then pat completely dry with paper towels.

i. Dust your shrimp with potato starch, tossing to coat evenly. Add them to your hot, shrimp-infused oil and cook, stirring frequently, until they curl into loose C-shapes and turn about 80% opaque with just a blush of translucent pink at their centers, roughly 2 minutes.

ii. Transfer them immediately to a plate or container. They’ll look slightly underdone, and that’s exactly right. They’ll finish cooking in the sauce later.

A brief pre-cook in oil locks in moisture and speeds final finishing. It also helps colors stay bright and flavors concentrated. In restaurant kitchens, chefs deep-fry in large amounts of oil, but obviously that’s not practical at home, so we’re mimicking that here with a shallow sear instead of deep oil.
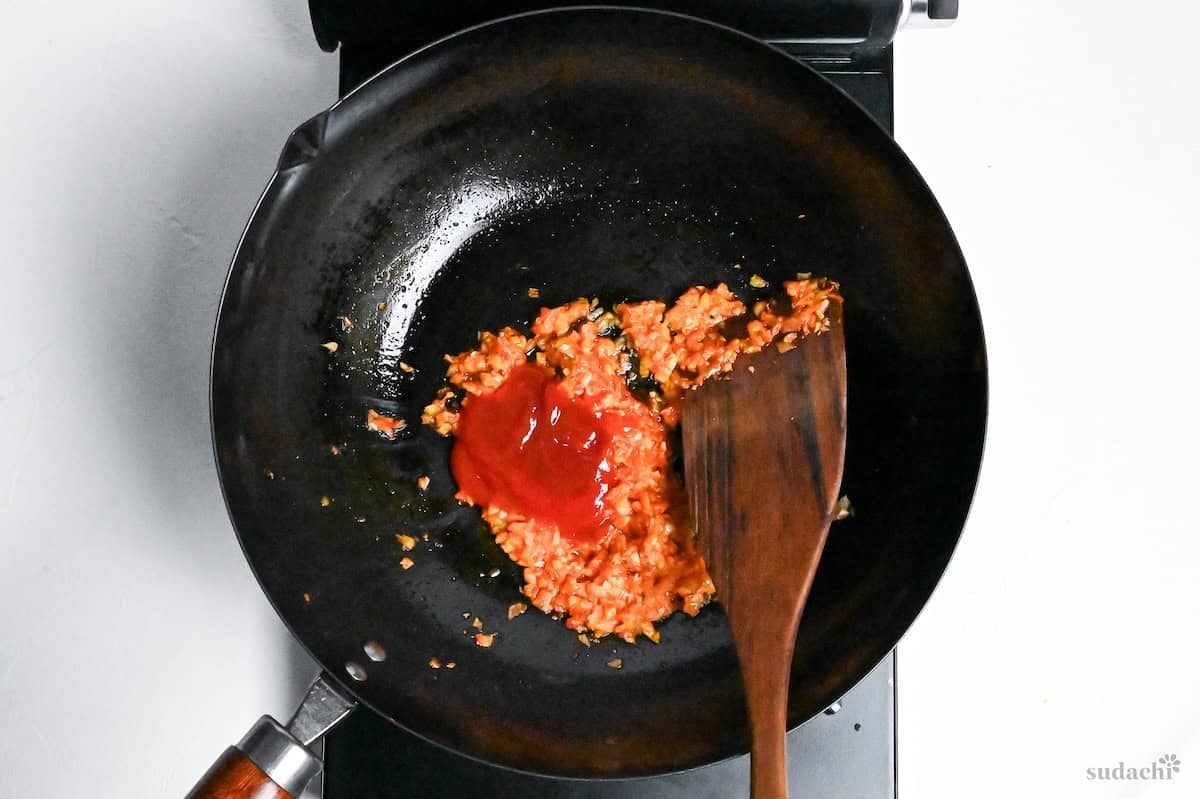
i. Lower the heat to its gentlest setting and add extra neutral oil to the same wok, then stir in chili bean paste. Cook slowly, stirring constantly, until you see bright red oil pooling around the paste and the raw, pungent smell softens into something warm and savory. This takes about 1 minute.
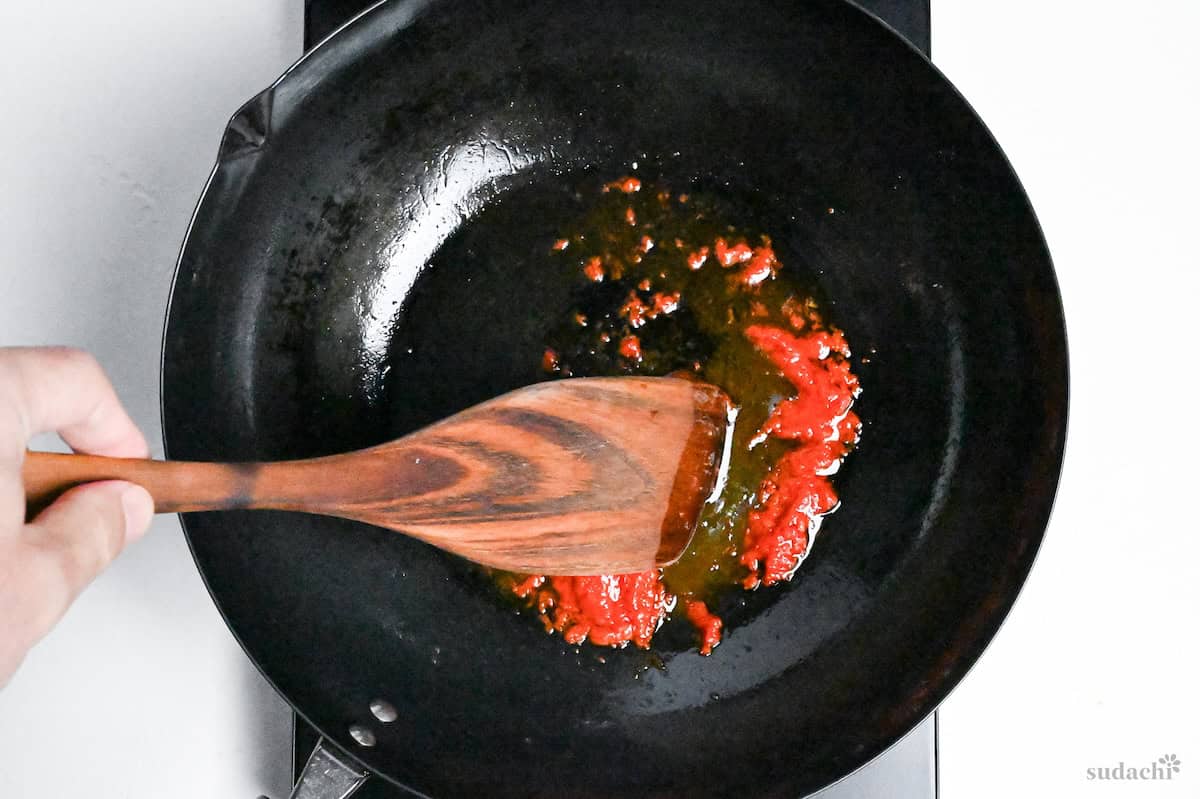
Gently frying doubanjiang until it releases red oil is a technique to open up aroma and depth before adding liquids or aromatics. When done right, the raw bite transforms into mellow complexity, and your oil becomes the flavor foundation of the entire dish.
ii. Add minced ginger, garlic, and leek whites to the fragrant red oil. Stir constantly for about 30 seconds, just until the garlic starts to turn golden at the edges and you can smell that heady, sweet-sharp aroma rising from the pan. Garlic burns easily and turns bitter, so keep everything moving.

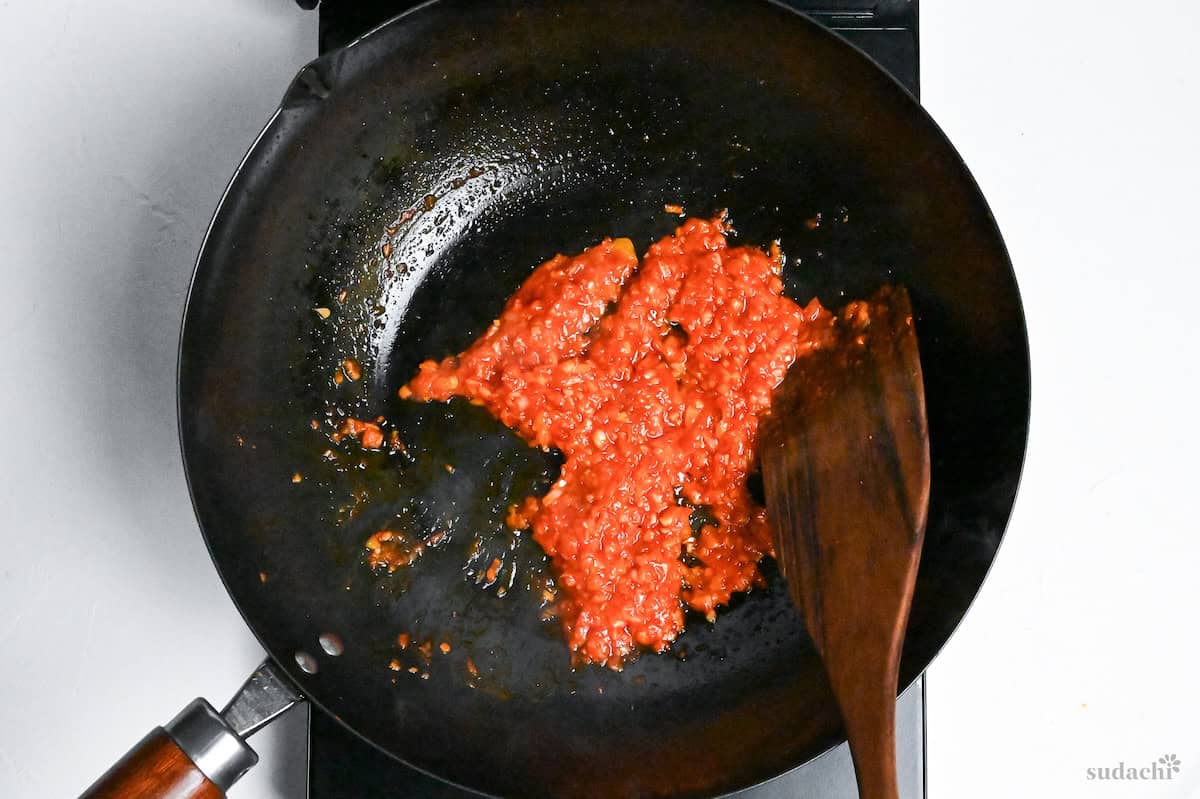
iii. Next, stir in ketchup and cook for 1-2 minutes, stirring frequently, until the ketchup darkens from bright red to a deeper rust color and loses its raw tomato sharpness.
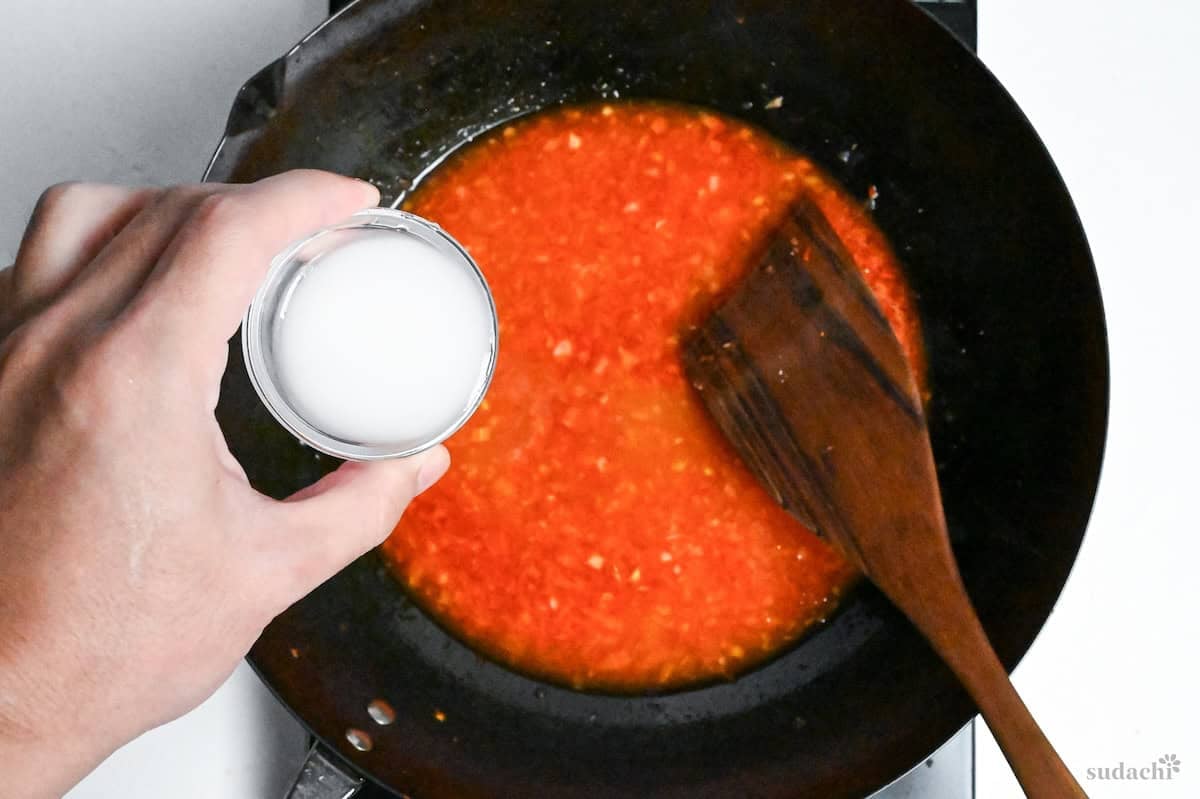
i. Pour in water, then stir in Asian chicken bouillon powder and sugar. Raise the heat to medium and bring everything to a vigorous simmer, stirring occasionally to make sure the bouillon dissolves completely.
Chicken bouillon powder varies by brand. My brand is 1 tsp per 200 ml, so check the label and if yours is more concentrated (e.g., 1 tsp per 300 ml or 1 cup), use touch less to avoid oversalting, and if it’s less concentrated, use a little more (and adjust to taste).

ii. While that simmers, mix starch with cold water in a small bowl until no lumps remain.
Taste test the simmering sauce now, before thickening, and tune it for your palate. Add pinches of salt/bouillon for savoriness, sugar for roundness, or chili bean paste for heat, optionally brighten with rice vinegar.
iii. Drizzle your slurry into the simmering sauce while stirring continuously. Within seconds, you’ll watch the liquid transform. It thickens, turns glossy, and begins to coat the back of your spoon in a smooth, clingy layer. The sauce should look like liquid silk, neither watery nor gloopy.
Potato starch gelatinizes at about 60-65℃ (140-149°F) and yields a clear, glossy viscosity that helps emulsify oil into the sauce; once set, avoid prolonged boiling which can thin it. Adding slurry gradually while stirring to prevent lumps and keep the emulsion stable.
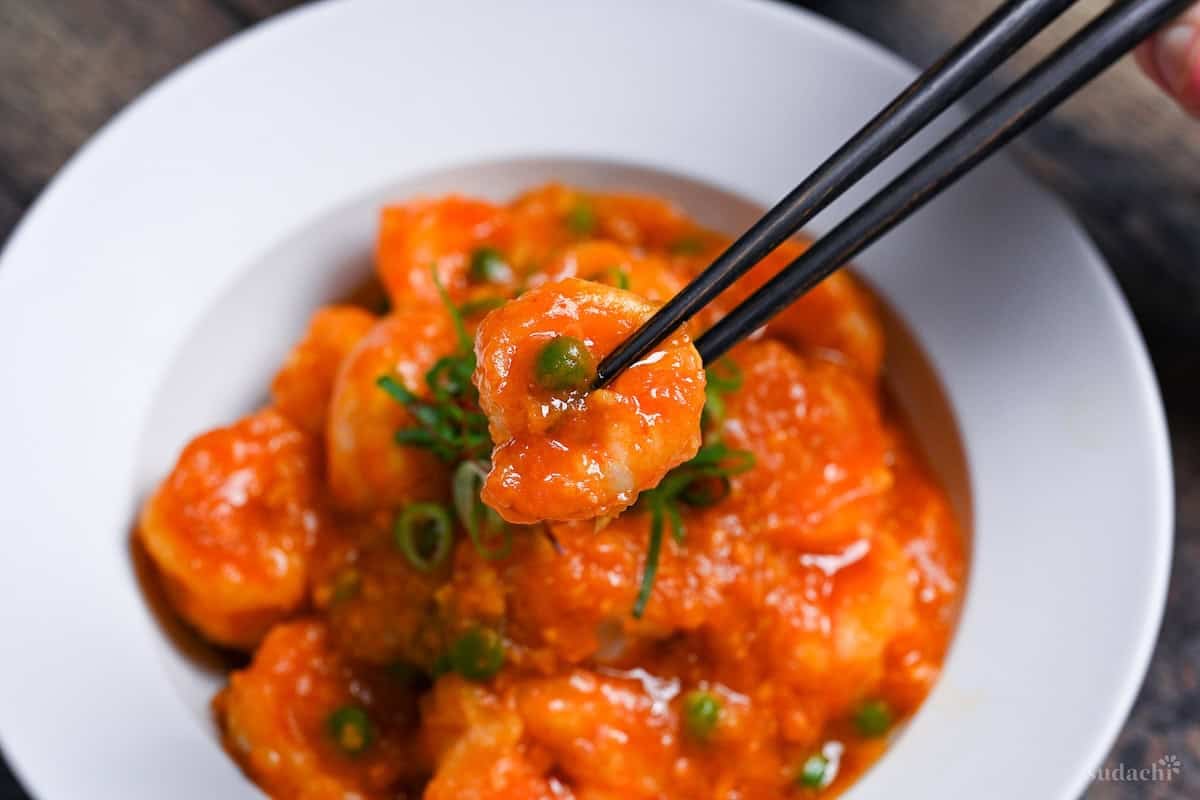
i. Return the seared shrimp with some green peas and toss 15-20 seconds over medium heat until just opaque and springy, then kill the heat.

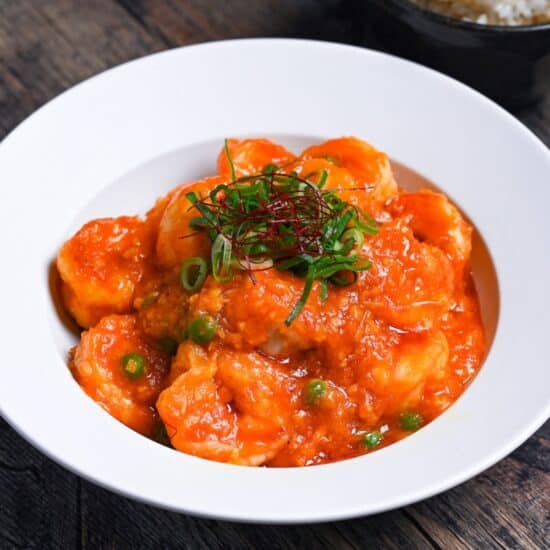
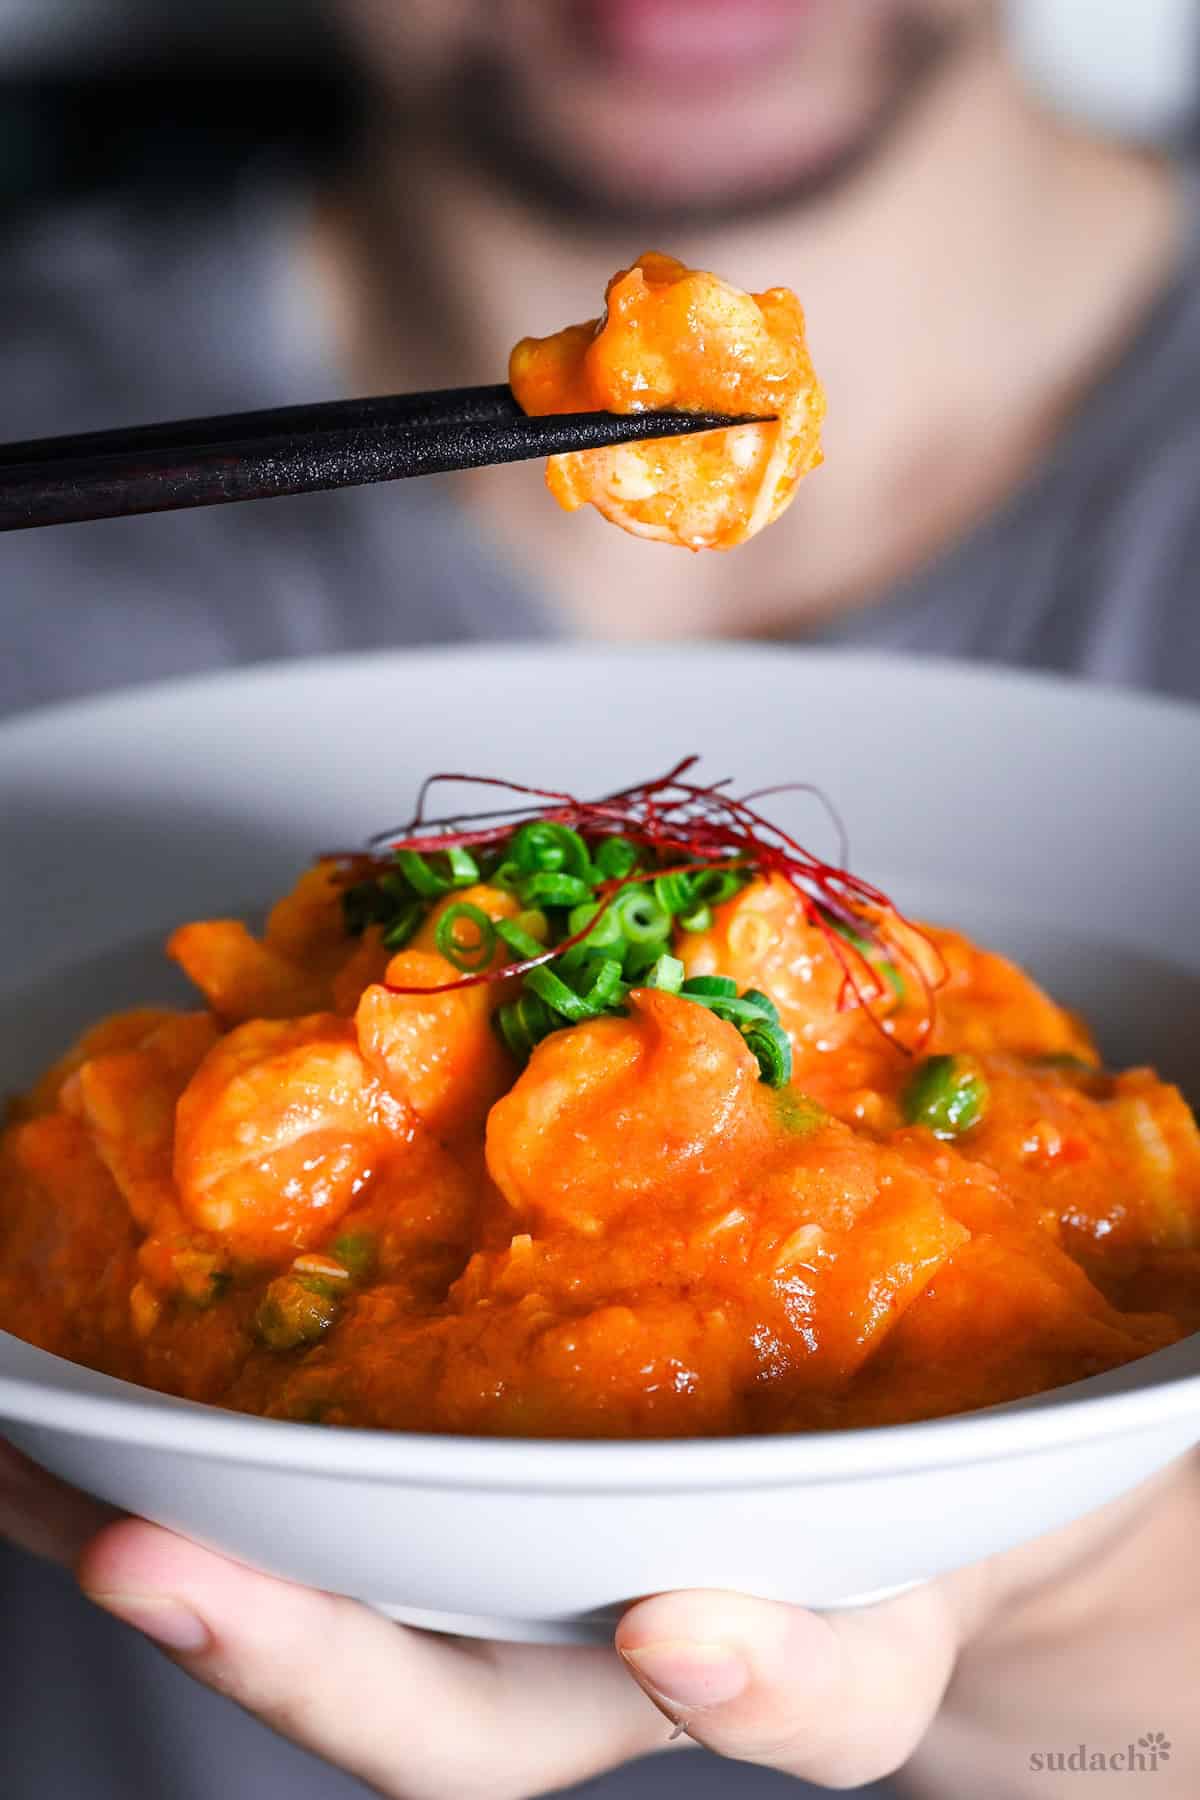
ii. Swirl in a light drizzle of chili oil or toasted sesame oil for sheen and aroma. Scatter chopped green onion and chili thread over the top for a pop of color and fresh bite.
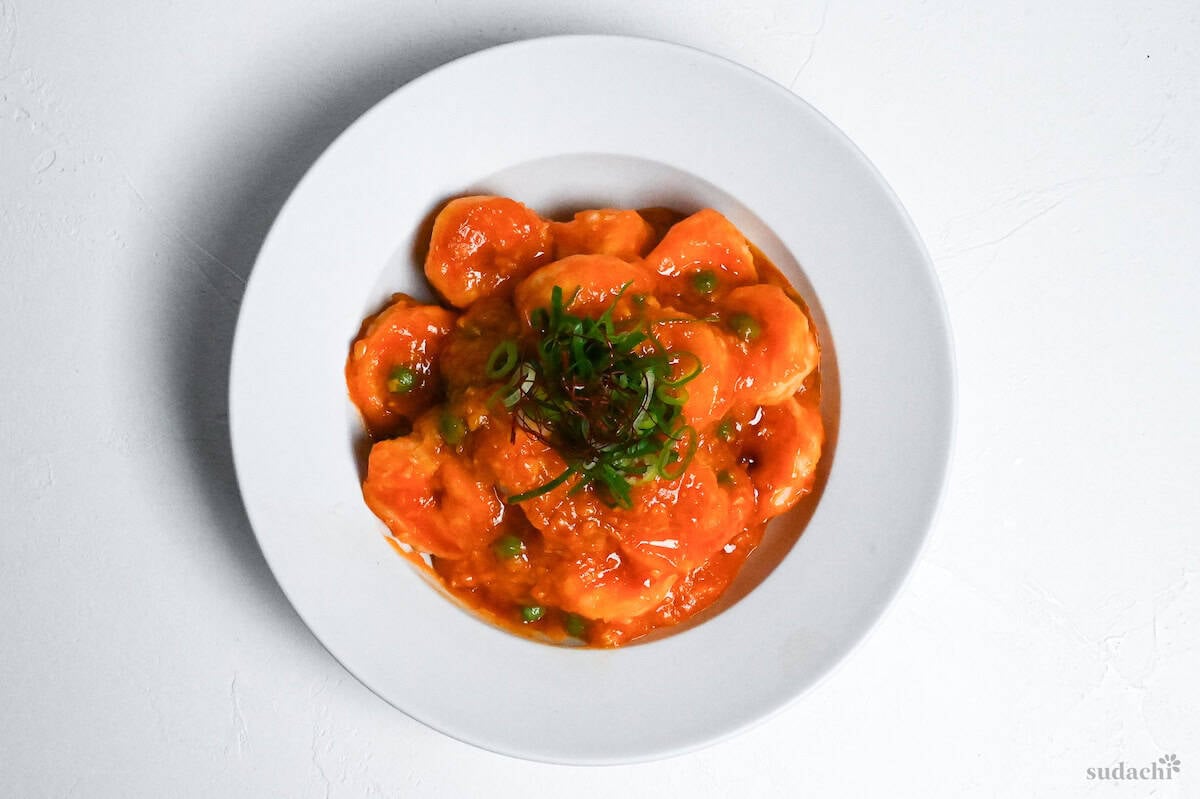
ii. Serve immediately while the shrimp are still plump and the sauce is at its glossiest, alongside steamed white rice to soak up every drop of that flavor-packed sauce.


Essential Tips & Tricks
- Save shells and make a quick shrimp oil by gently frying shells ~3 min until vivid orange.
- Bloom doubanjiang on low heat until the oil turns red and fragrant. Stop before it darkens.
- Fry the ketchup 1-2 min to mellow sharp acidity and build body before adding liquids.
- Taste test before shrimp go back in. Adjust salt for savoriness, sugar for roundness, rice vinegar for brightness, or a touch more doubanjiang/chili oil for heat.
- If the sauce gets too thick, loosen with hot water a tablespoon at a time. Too thin, add a ½ tsp extra slurry and re-boil briefly.
With these simple tips in mind, you’re set for success every time you make ebi chili.
Storage & Meal Prep
Fridge: Airtight container, 2-3 days maximum. Cool completely before storing. Note that shrimp will lose some of their springy texture and the sauce separates.
Freezer: Airtight container or freezer bag, up to 1 month (ideally 2-3 weeks for best quality). Cool completely, portion into single servings, press out all air, and freeze flat for faster thawing. Expect some texture loss. Thaw overnight in the fridge rather than using the microwave defrost function, which can toughen the shrimp.
Meal Prep: Ebi Chili tastes best fresh, but you can prep components separately for faster weeknight cooking. Make the sauce base before adding slurry up to 4 days ahead and refrigerate, or freeze it for 2-3 weeks. On the day you want to eat, clean and coat your shrimp, oil-blanch them, then heat the pre-made sauce and finish the dish.
Reheating: Add 1-2 Tbsp water, warm over medium until simmering. Once bubbling, toss just until shrimp are hot. Alternatively, if your leftover ebi chili is frozen, you can also submerge the heat-proof sealed bag in hot (not vigorously boiling) water until piping hot.
What to Serve With This Recipe
Ebi Chili Troubleshooting
Overcooking is almost always the culprit. Shrimp proteins tighten dramatically when exposed to high heat for too long. Pull them from the oil when they’re only 80% cooked (still slightly translucent in the thickest part), then let them finish in the hot sauce at the end.
Spice level of chili bean paste varies by brands. If you feel like it’s not spicy enough, stir in chili oil (rayu) by the teaspoon. You can also dust the finished dish with ground Sichuan pepper or red pepper flakes. Don’t increase doubanjiang during cooking as it also adds salt.
If the thickest part of the shrimp still looks translucent gray rather than opaque white, return everything to the pan and simmer for another minute until the shrimp are fully cooked through. Better slightly firm than unsafe. For future batches, make sure the sauce reaches a full boil before adding your oil-blanched shrimp back in.
More Japanese Shrimp Recipes
- Ebi Furai (Deep-fried Shrimp with Panko)
- Authentic Chawanmushi
- Prawn Gyoza Dumplings
- Shrimp Tempura Udon
Craving more? Dive into my collection of authentic Japanese shrimp recipes that bring Japan’s flavors straight to your kitchen.
Did You Try This Recipe?
I would love to hear your thoughts!
💬 Leave a review and ⭐️ rating in the comments below. 📷 I also love to see your photos – submit them here!

Ebi Chili (Japanese Shrimp in Chili Sauce)
Ingredients
- 450 g shrimp medium/large size recommended, deshelled & deveined, save shells for flavoring the oil
- ¼ tsp salt to clean
- ½ tbsp potato starch (katakuriko) to clean, or cornstarch/tapioca starch
- 2 tbsp cooking oil neutral
- 1 tbsp potato starch (katakuriko) to coat, or cornstarch/tapioca starch
- 2 tsp chili bean sauce (toban djan)
- 1 tbsp ginger root finely diced
- 2 cloves garlic finely diced
- 30 g Japanese leek (naganegi) white part, or regular leek/onion/shallot, finely diced
- 2 tbsp tomato ketchup
- 150 ml water
- 1 tsp Chinese-style chicken bouillon powder or regular chicken bouillon powder
- ¼ tsp sugar
- 1 tsp potato starch (katakuriko) to make slurry, or cornstarch/tapioca starch
- 1 tbsp cold water to make slurry
- 2 tbsp green peas optional garnish
Garnish (optional)
- finely chopped green onions
- chili threads
- toasted sesame oil or chili oil
My recommended brands of ingredients and seasonings can be found in my Japanese pantry guide.
Can’t find certain Japanese ingredients? See my substitution guide here.
Instructions
- Place 450 g shrimp (deshelled and deveined) in a large bowl and sprinkle with a ¼ tsp salt and ½ tbsp potato starch (katakuriko). Toss until evenly covered and sit for 3 minutes.

- Heat a wok over medium heat and add 2 tbsp cooking oil. Once hot, add about 5 shrimp shells to the oil and fry gently for 3 minutes or until they turn orange and fragrant, then discard.
- Rinse the shrimp thoroughly with fresh cold water and pat dry with kitchen paper. Dry the bowl, place the shrimp back in and add 1 tbsp potato starch (katakuriko). Toss until evenly coated.
- Add the shrimp to the hot infused-oil and stir fry over medium until about 80% opaque (approx 2 minutes), then transfer to a heatproof container. They should be slightly underdone, we will continue to cook them later.
- In the same wok, add 2 tsp chili bean sauce (toban djan) and fry in the oil for about 1 minute.
- Add 1 tbsp ginger root, 2 cloves garlic and 30 g Japanese leek (naganegi), all finely diced. Stir fry until fragrant (about 30 seconds).
- Add 2 tbsp tomato ketchup and fry for 1-2 minutes, stirring continuously. Add 150 ml water, 1 tsp Chinese-style chicken bouillon powder and ¼ tsp sugar. Bring to a simmer and while you wait, take a small bowl and mix 1 tsp potato starch (katakuriko) and 1 tbsp cold water to make a slurry.
- Taste test the sauce and adjust if needed. (Salt or bouillon powder for savory/saltiness, sugar for roundness, chili bean paste for extra heat.) Once you're happy with the flavor, pour in the slurry while stirring continuously.
- Once thickened enough to thinly coat the back of a spoon, add the shrimp back in along with 2 tbsp green peas. Finish cooking the shrimp until opaque and springy, then remove the wok from the heat.
- Plate up and garnish with a drizzle of toasted sesame oil (or chili oil), finely chopped green onions and chili threads. Serve with plain rice and enjoy!

Video
I made this dish following the recipe with no deviations and it came out great! Thank you for posting!
Thank you for trying the recipe and giving such a generous rating, I’m so glad you liked it!
We just enjoyed this on fresh udon – it was lovely. As suggested, I took some more toban djan for a stronger 麻辣 kick!
Hi Peti,
Thank you for trying this recipe too! So happy to hear that! And yes, a little extra toban djan definitely takes it up a notch ️
Yuto