


Disclaimer: This post may contain Amazon affiliate links. Sudachi earns a small percentage from qualifying purchases at no extra cost to you. See disclaimer for more info.
Featured Comment
I made takoyaki based on this recipe. That was unbelievably tasty. By the way this is not the first recipe.
– @k.p.6077 (from YouTube)
What if the takoyaki sizzling in your kitchen could rival those perfect spheres from Osaka’s best street food stall?
This guide walks you through batter science, sourcing tips, and the exact flip technique that turns nervous cooks into takoyaki masters.
Authentic Takoyaki
Recipe Snapshot
- What is it? Japanese octopus balls with crispy outsides and gooey, savory insides.
- Flavor profile: Umami-rich, Savory, Creamy
- Why you’ll love this recipe: It takes the guesswork out of tools and ingredients, so even a first-timer can enjoy an authentic takoyaki experience.
- Must-haves: Takoyaki pan, Dashi stock, Octopus (or alternatives explained below)
- Skill Level: Medium
- Freezer Friendly: Yes.
- Suitable for Meal Prep: Partially.
Summarize & Save this content on:
What is Takoyaki?
Takoyaki represents the soul of Osaka cuisine alongside okonomiyaki and kushikatsu, wheat flour spheres cradling tender octopus that rival yakisoba and chicken karaage as Japan’s most beloved street food.

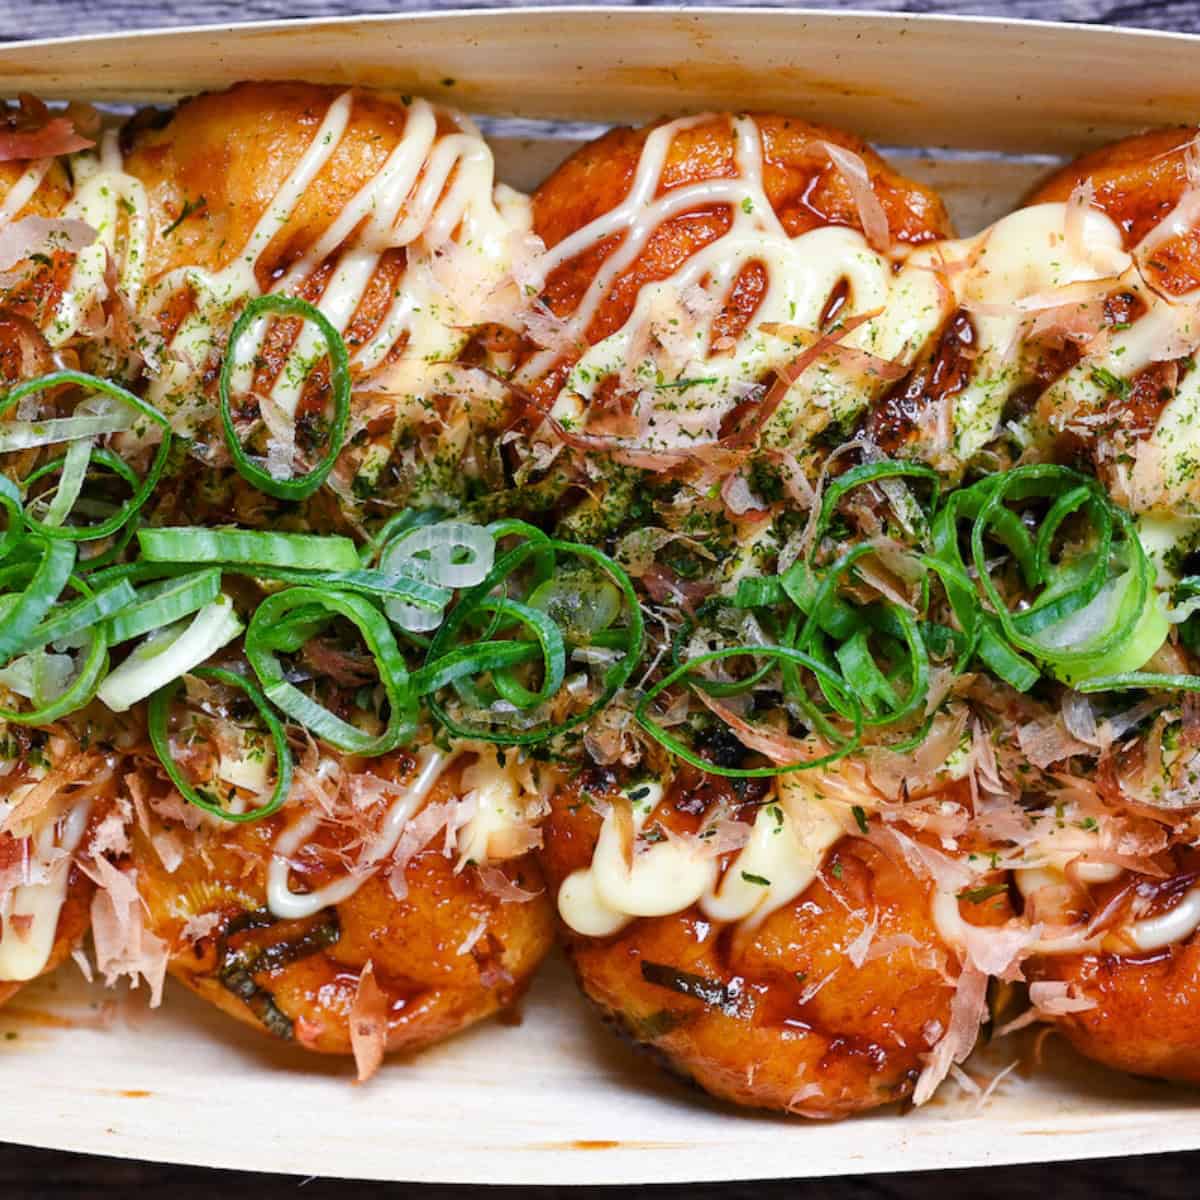
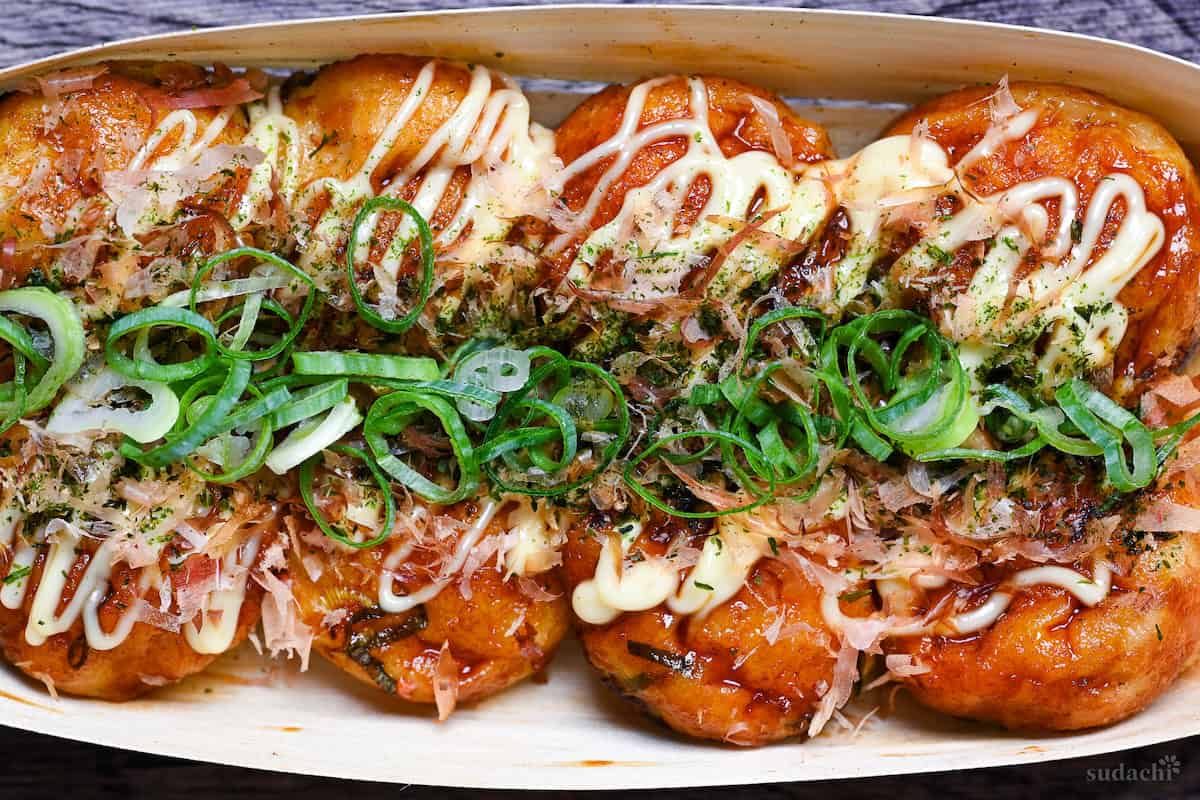
What makes takoyaki iconic is its texture! Crispy outside, molten inside, often called kari-toro (カリトロ) in Japanese. This irresistible contrast has made takoyaki both a festival favorite and a dish recreated at home.
In Osaka, many households own a takoyaki pan, and “takoyaki parties (a.k.a takopa)” are common, where friends gather around the sizzling pan, flipping and laughing together. Proof that takoyaki is as much about connection as taste.
Takoyaki Ingredients
What You’ll Need for Octopus Balls

- Cake flour (low-protein): This is what keeps takoyaki soft and tender instead of dense. If you can’t find it, all-purpose works, but avoid bread flour.
- Dashi Stock: Here’s where takoyaki transforms from “pretty good” to “restaurant-worthy”. Homemade dashi creates an elegant, refined flavor, while instant dashi granules deliver that junky punch. Dashi packets are somewhere in between.
- Octopus: In Japan, we use pre-cooked (boiled or steamed) octopus. Don’t stress if octopus feels hard to source or too adventurous; I’ll share plenty of tasty alternatives below.
What You’ll Need for Takoyaki Sauce
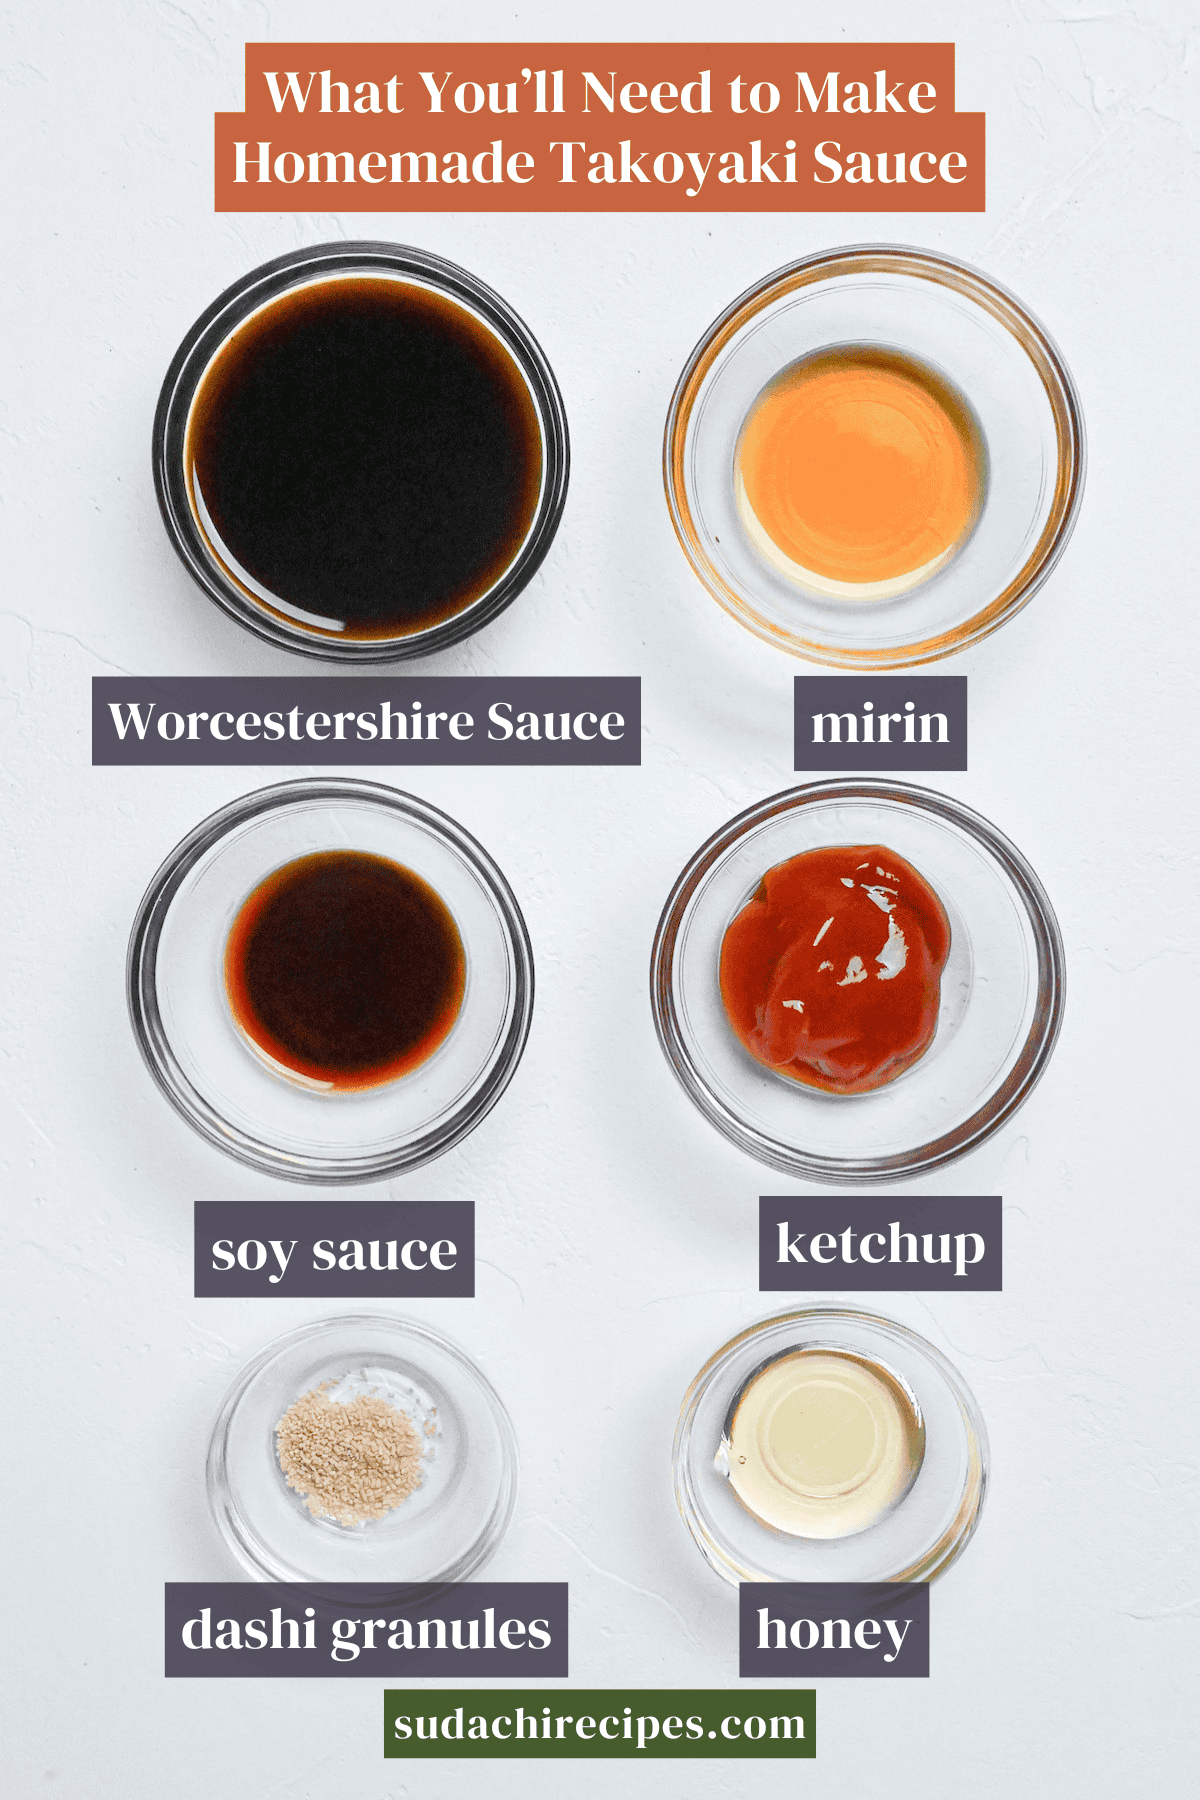
- Worcestershire Sauce: This is non-negotiable, it’s the backbone of authentic takoyaki sauce. If you want the ultimate authenticity, look for Japanese brands like Kikkoman, Kagome, or Bull-Dog. But don’t worry if you don’t! Your regular Worcestershire sauce still works beautifully and keeps the flavor balance right.
- Ketchup: Don’t underestimate this humble ingredient! A little ketchup adds body and that glossy, clingy texture to the sauce, so it sticks perfectly to each ball.
- Soy Sauce: Japanese soy sauce (shoyu) is ideal, but since I’m using a small amount, feel free to use the soy sauce you already have (e.g. Chinese light soy sauce).
Octopus Alternatives
- Shrimp: One of the closest swaps to octopus, shrimp brings a gentle sweetness and softer bite. Just be careful not to overcook, shrimp tightens up quickly and can turn rubbery if left too long in the pan.
- Squid: Mild and pleasantly chewy, squid works beautifully once lightly boiled beforehand.
- Scallops: Sweet, juicy, and full of umami, scallops turn takoyaki into something a little more luxurious.
- Sausage: A kid-friendly favorite in Japan, sausages bring salty, meaty flavor that even picky eaters love. Small slices fit perfectly inside each ball.
- Cheese: To avoid burning or leaking, use cube-shaped processed cheese (like mozzarella sticks or mild cheddar) so each piece melts just enough inside.
- Beef: Not traditional, but bite-sized cubes of lightly marbled beef steak make for a hearty, bold filling. It’s a fun choice if you want to surprise guests with something different.
- King oyster mushrooms: For a vegetarian option, these mushrooms mimic the firm chew of octopus while adding a rich, earthy flavor.
Equipment: How to Choose A Takoyaki Pan
Making authentic takoyaki at home does require specialized equipment, but don’t let that intimidate you! The key piece is a takoyaki pan, which features distinctive hemispherical molds that create those perfect round balls.
| Type | Pros | Cons |
|---|---|---|
Electric Takoyaki Pan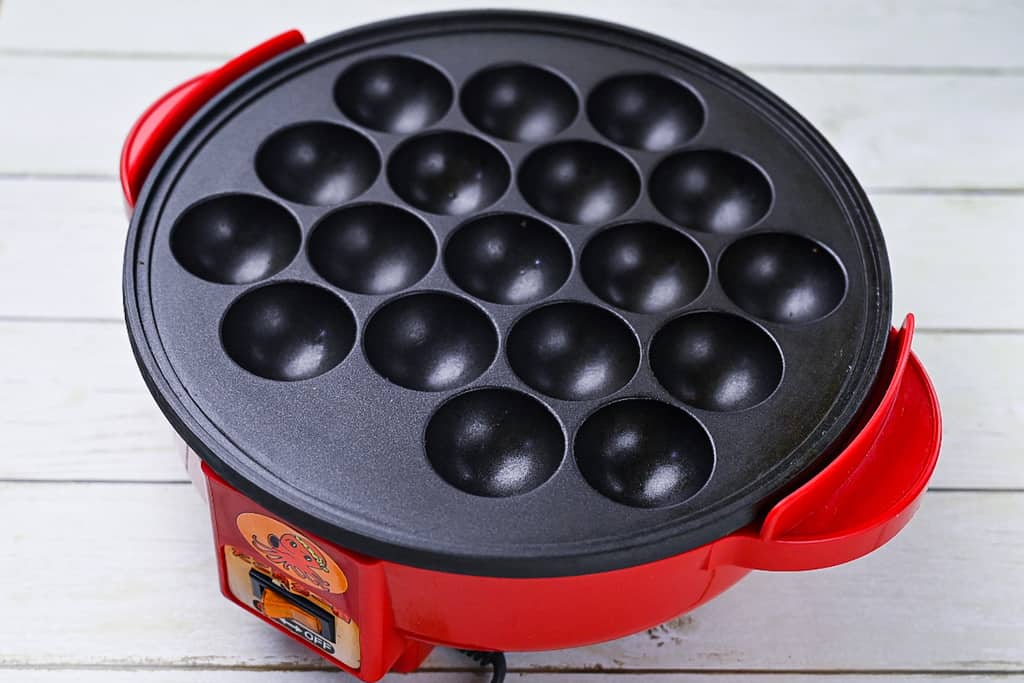 | Plug-and-play, safe (no open flame), easy for group cooking, many models hold 20+ pieces | Lower max heat → harder to get super-crispy outside, longer cook time, sometimes uneven heating |
| Gas-Powered Pan/Grill Plate (e.g. Iwatani Super En-Tako) | High heat for that crispy-outside, creamy-inside finish, quick recovery if temp drops, closest to shop-style takoyaki | Heavier, needs preheating & oil seasoning, requires careful flame control and ventilation |
IH-Compatible or Stove-Top Plates (I use this!) | Works on most stovetops, higher heat than electric pans, compact for storage | Not as portable, heat depends on your stove power, still needs monitoring |
| Æbleskiver Pan (Danish round pancake pan) | Same round shape, widely available in Western cookware shops | Usually larger holes → different texture/size than classic takoyaki |
I personally use an Iwatani Takoyaki Grill Pan on a gas stove since it takes up less room in my kitchen and it’s easier to clean. (You could even take it camping!)
It’s not too difficult to find electric takoyaki pans online these days, just bear in mind that if you are buying electrical products from Japan, contact the seller and ask about the outlet and voltage compatibility to make sure it will work in your country.
How to Make My Takoyaki Recipe
If you prefer to watch the process in action, check out my YouTube video of this Takoyaki recipe for a complete visual walkthrough!

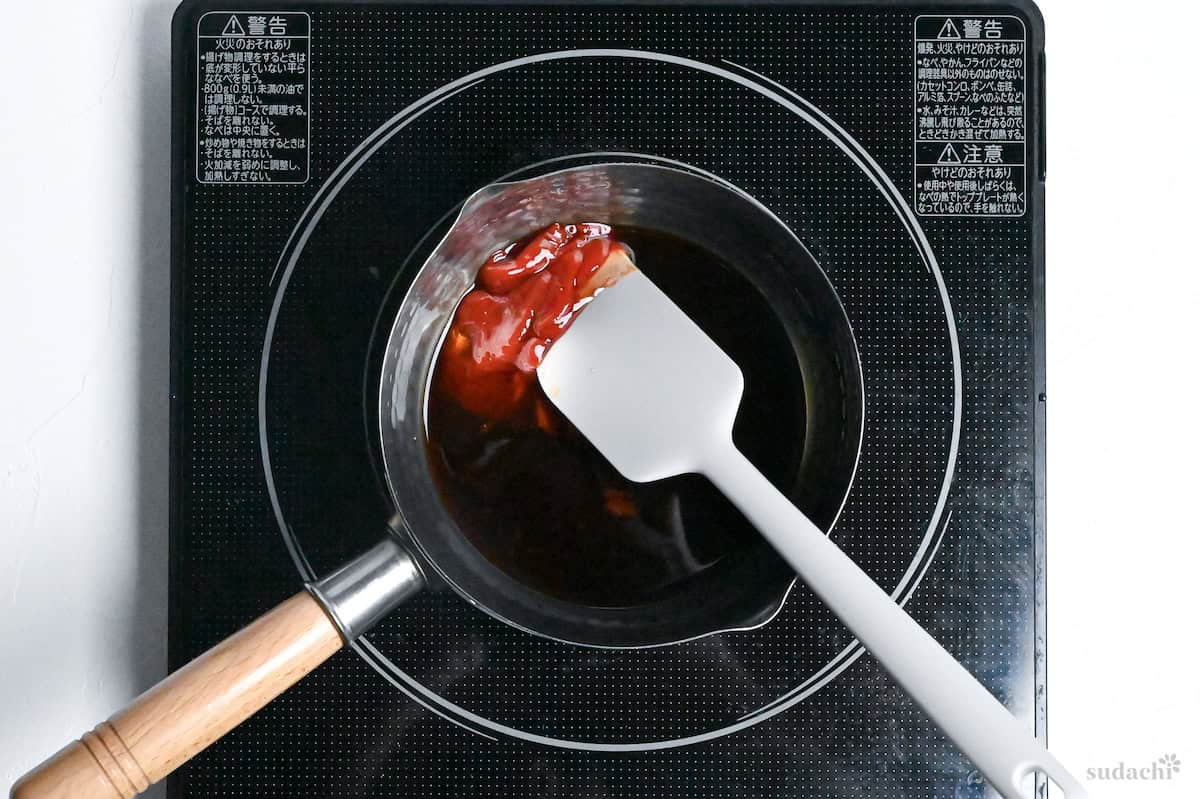
i. Start by whisking together Worcestershire sauce, tomato ketchup, Japanese soy sauce, mirin, honey, and dashi granules in a cold saucepan.
A Japanese brand like Bull-Dog is ideal, but a Western brand like Lea & Perrins works too. Just stir in a tiny bit of sugar, ketchup, or unsweetened applesauce to round off its edge and nudge it toward the Japanese style.
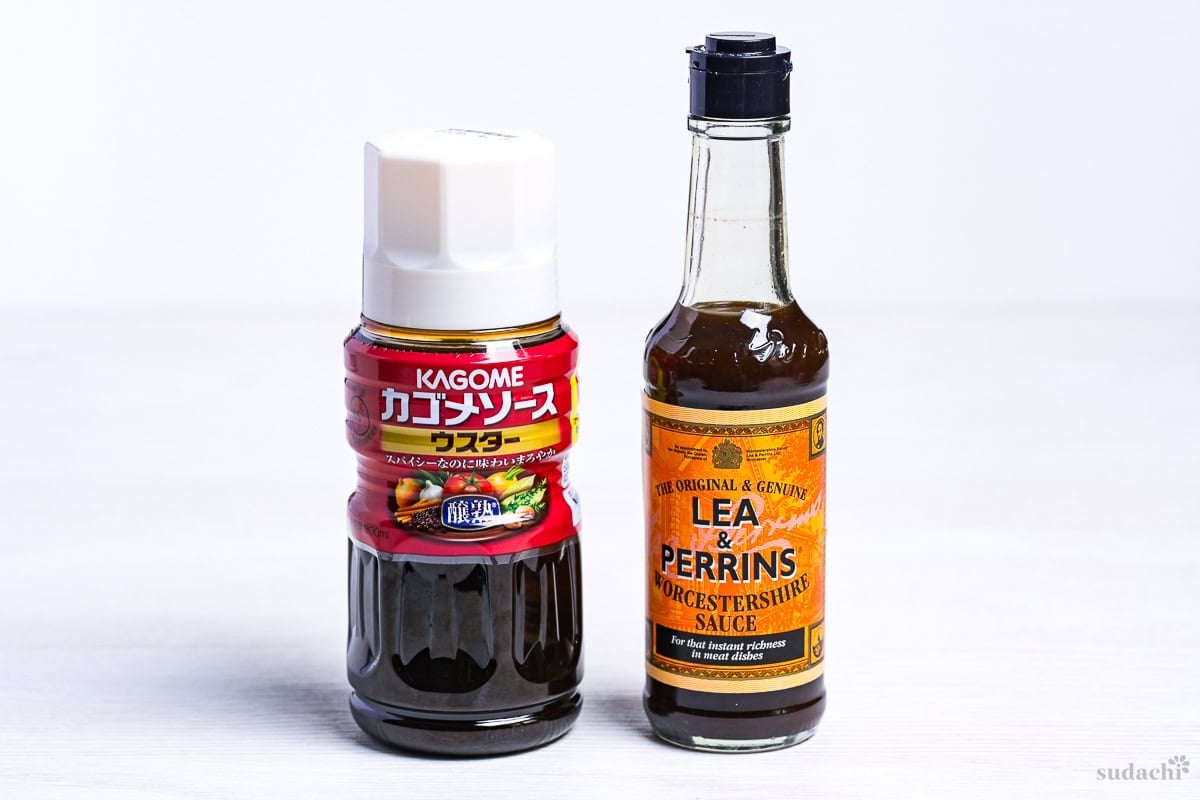
For the full breakdown and my side-by-side cooking tests, see my guide to Japanese Worcestershire sauce.
ii. Set over medium heat, stirring continuously so nothing scorches. Let it gently bubble for about 3 minutes until slightly syrupy and the mirin’s alcohol cooks off slightly.
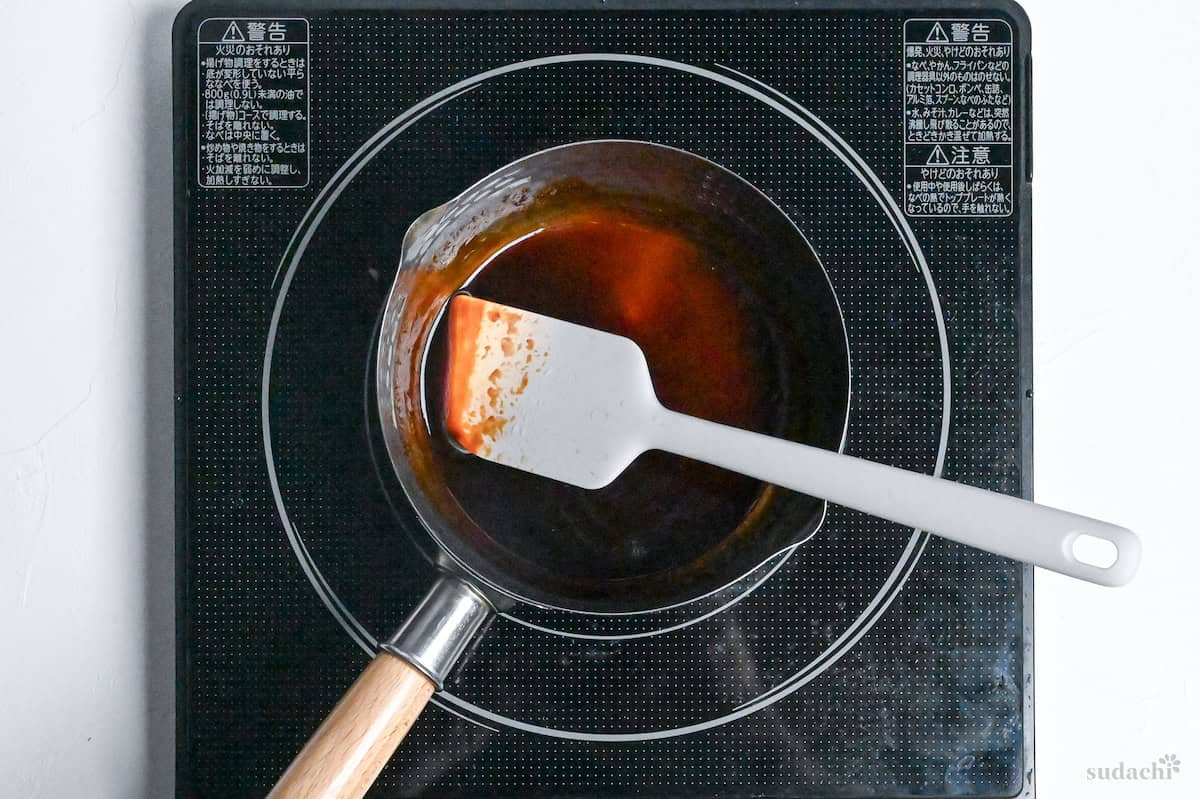
iii. Take it off the heat to cool to room temp. Next, we’ll build the batter.
Let’s face it, I don’t make takoyaki that often, and takoyaki sauce bottle is one of these bottles that is forever forgotten in the back of your fridge! So why not make it ourselves with pantry ingredients? Plus, having full control over the taste is an added bonus!
For example, you can try adding just ONE optional flavor booster (chili powder, karashi mustard, sansho pepper, or lemon juice) at a time if you want to play around with the flavor, starting with a tiny pinch.
i. Combine dashi and Japanese light soy sauce (or regular Japanese soy sauce) in a bowl. Crack an egg into the bowl and whisk until smooth and combined.
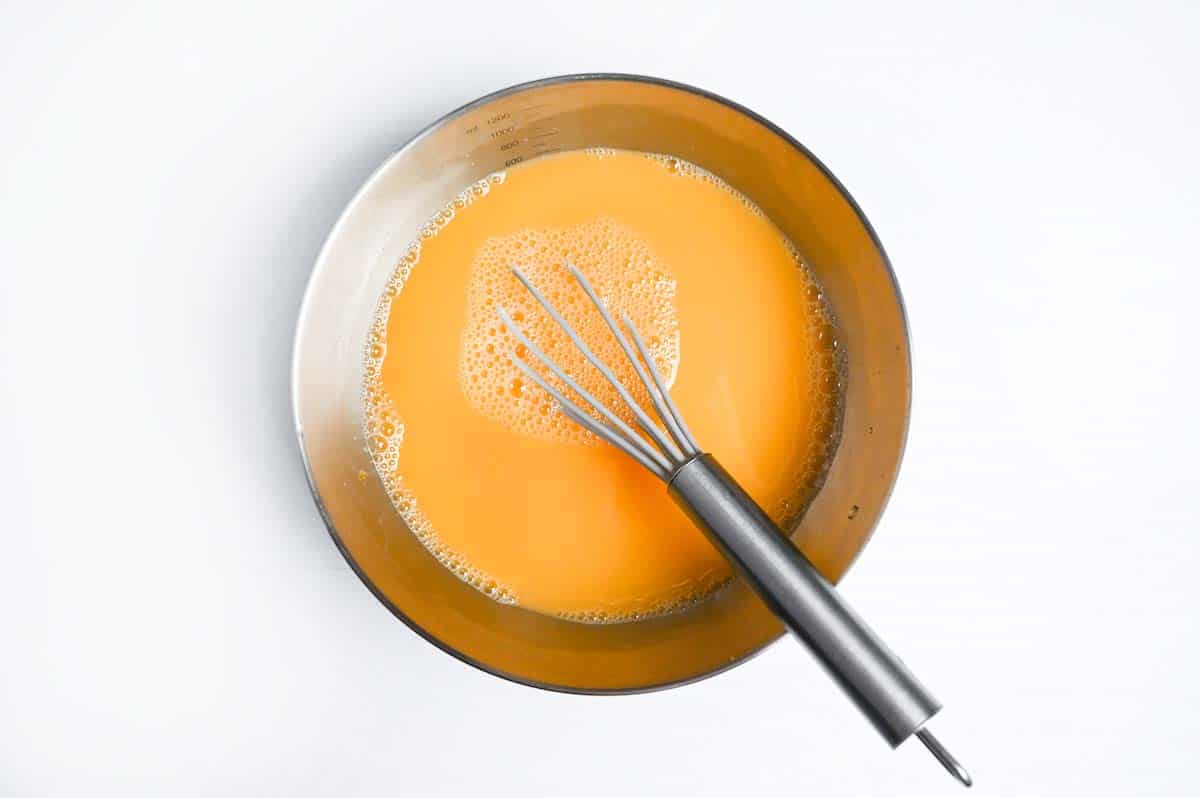
ii. In a second bowl, add cake flour (or all-purpose in a pinch). Make a well and stream in the egg-dashi, whisking until lump-free.
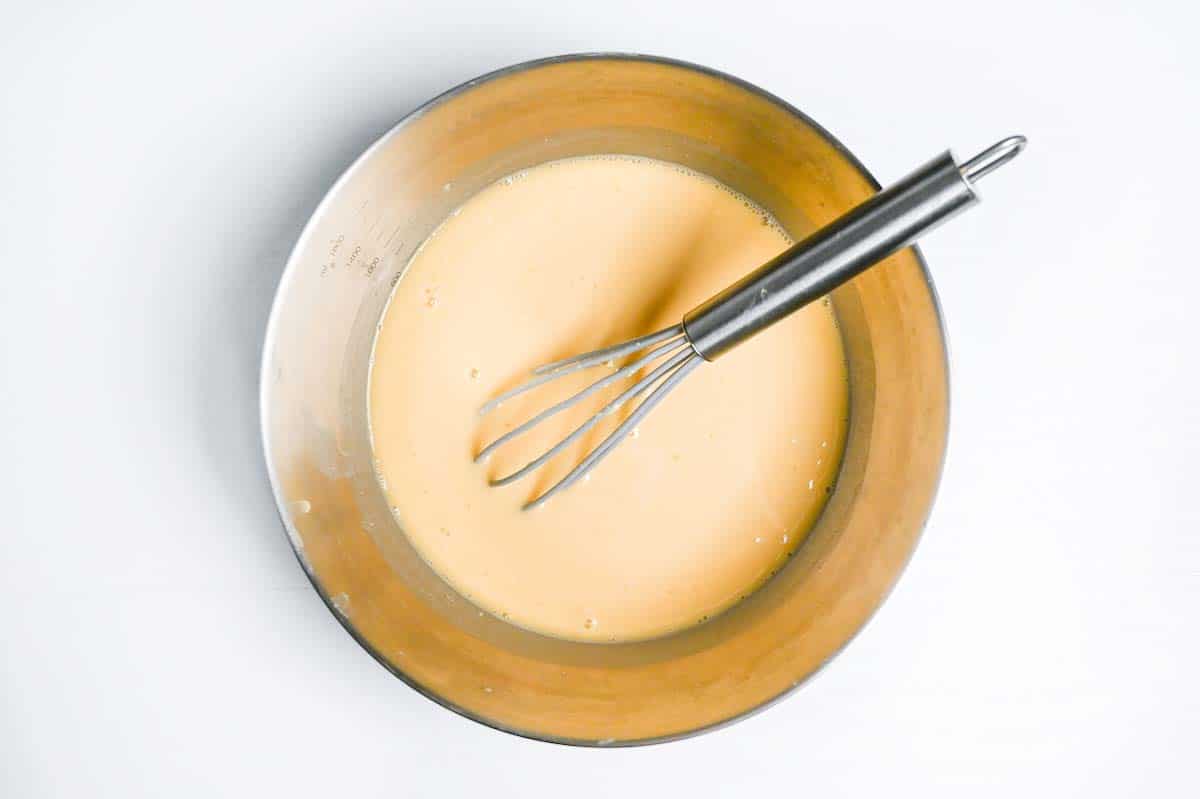
Thin batter is the secret to a custardy center, trust me!
This loose batter is intentional and crucial. When you heat high-moisture batter quickly, the starch granules gelatinize at around 60-70℃ (140-160°F), but the center never fully sets due to the high water content.
Meanwhile, constant rotation creates steam pockets that become those coveted gooey cavities. The result? A crispy shell with a molten, custard-like center that’s the hallmark of authentic takoyaki.
iii. If time allows, refrigerate the batter 30 minutes to a few hours. Resting lets flour fully hydrate, smoothing the texture and preventing floury pockets. You can also drop a few ice cubes into the batter while mixing just like what I do for my tempura batter recipe!
i. Dice 120 g boiled (or steamed) octopus into about 2.5 cm (1-inch) bite-size pieces. Finely chop green onions and beni shoga (red pickled ginger). Have ~30 g tenkasu (crispy tempura bits) ready.
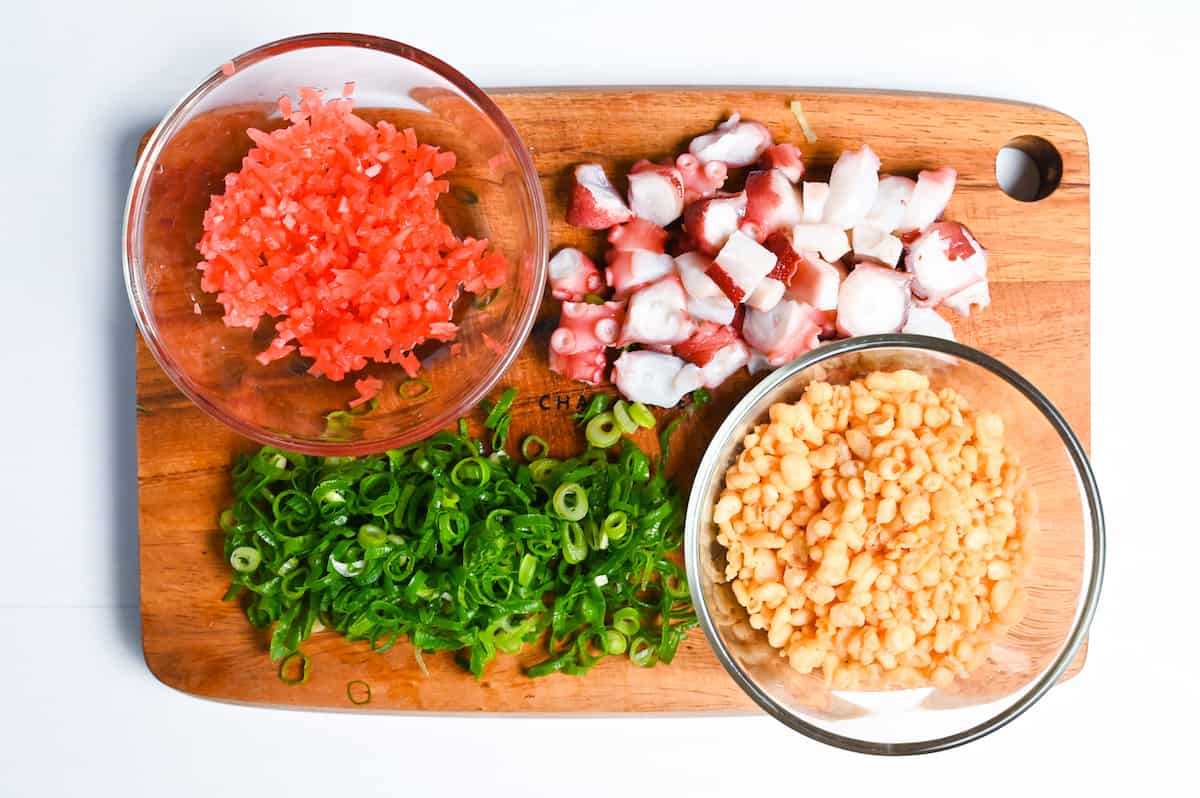
It releases a little oil as it heats, micro “fry points” that boost crispness, and its bubbles act like insulation, creating tiny pockets for that juicy bite.
You might wonder why we use pre-cooked octopus. Raw octopus releases too much moisture during cooking, which can make your batter soggy and prevent proper crisping. Boiled octopus has the perfect chewy texture and concentrated flavor that won’t water down your batter.
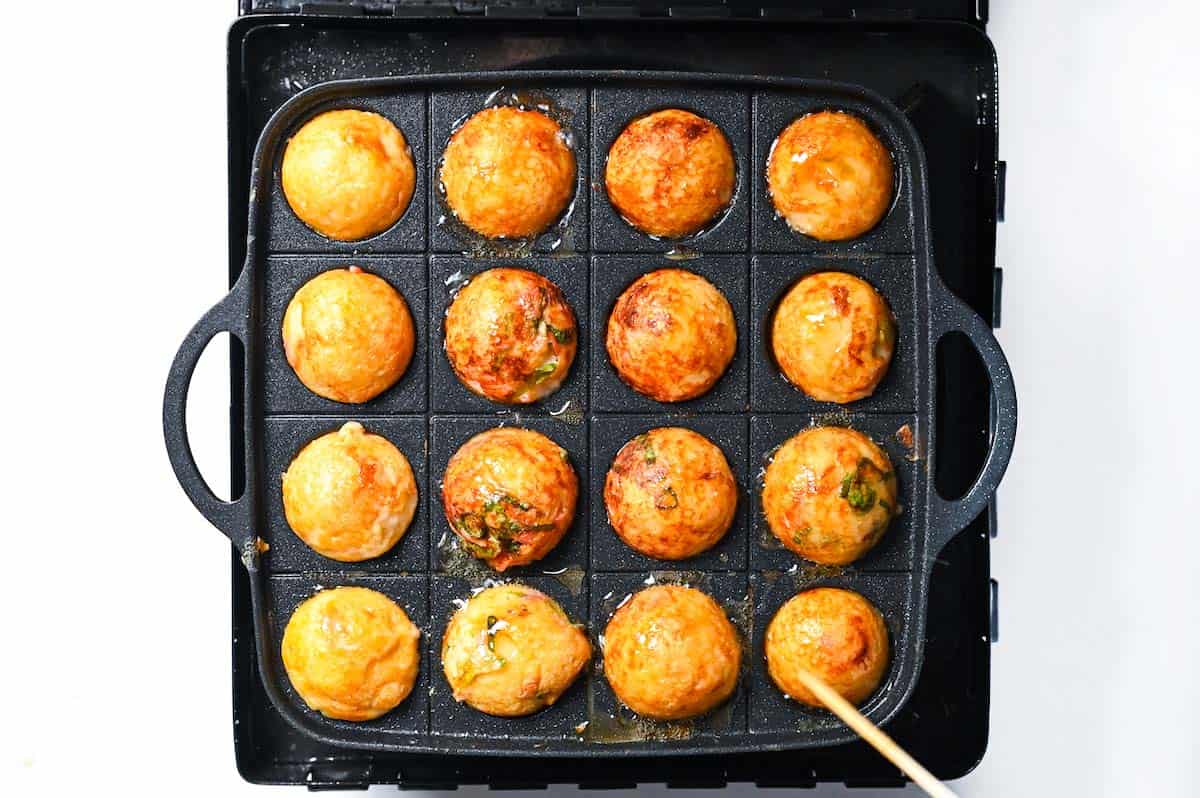
i. Preheat your takoyaki pan over medium-high heat until it’s smoking hot. This is crucial for creating that initial sear. Brush each cavity generously with sesame oil using a pastry brush, making sure to coat the sides as well as the bottom.
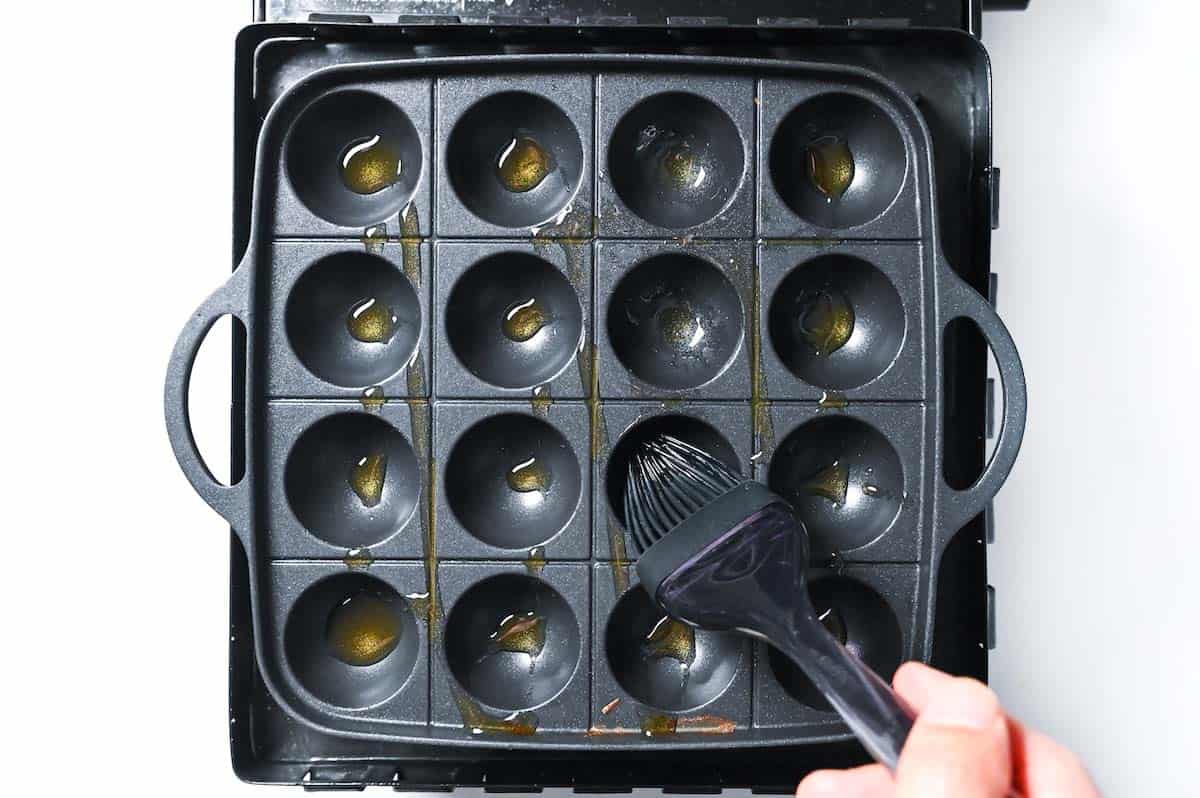
A properly heated pan should make the batter sizzle aggressively when it hits the surface. If your pan isn’t hot enough, the batter will stick and won’t develop that golden crust.
The generous oil coating not only prevents sticking but also contributes to the crispy exterior through a mini deep-frying effect.
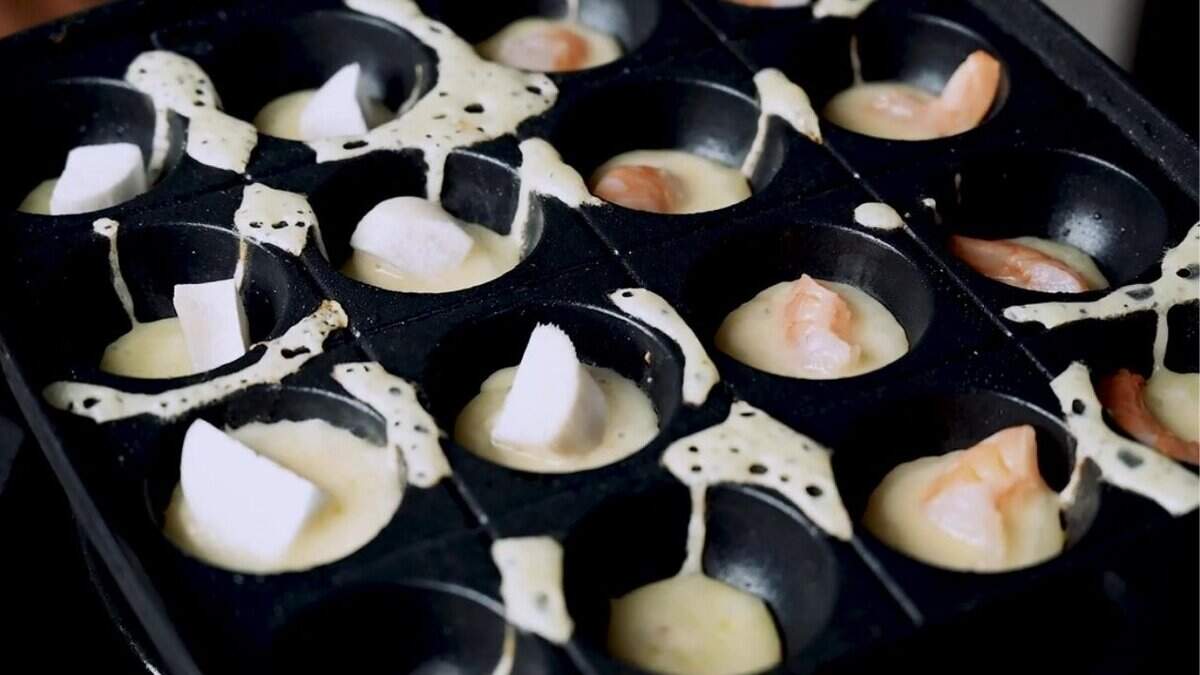
i. Fill each well halfway with batter.
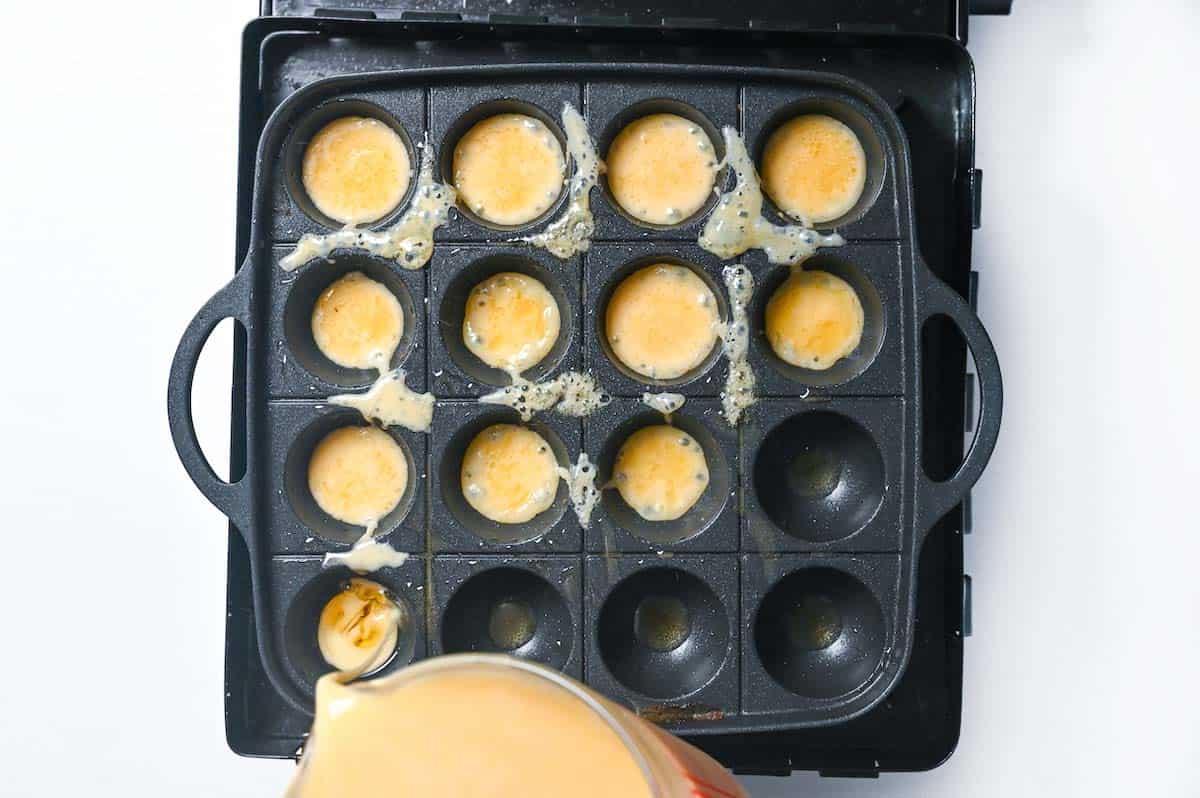
ii. Then immediately drop one octopus piece into each.
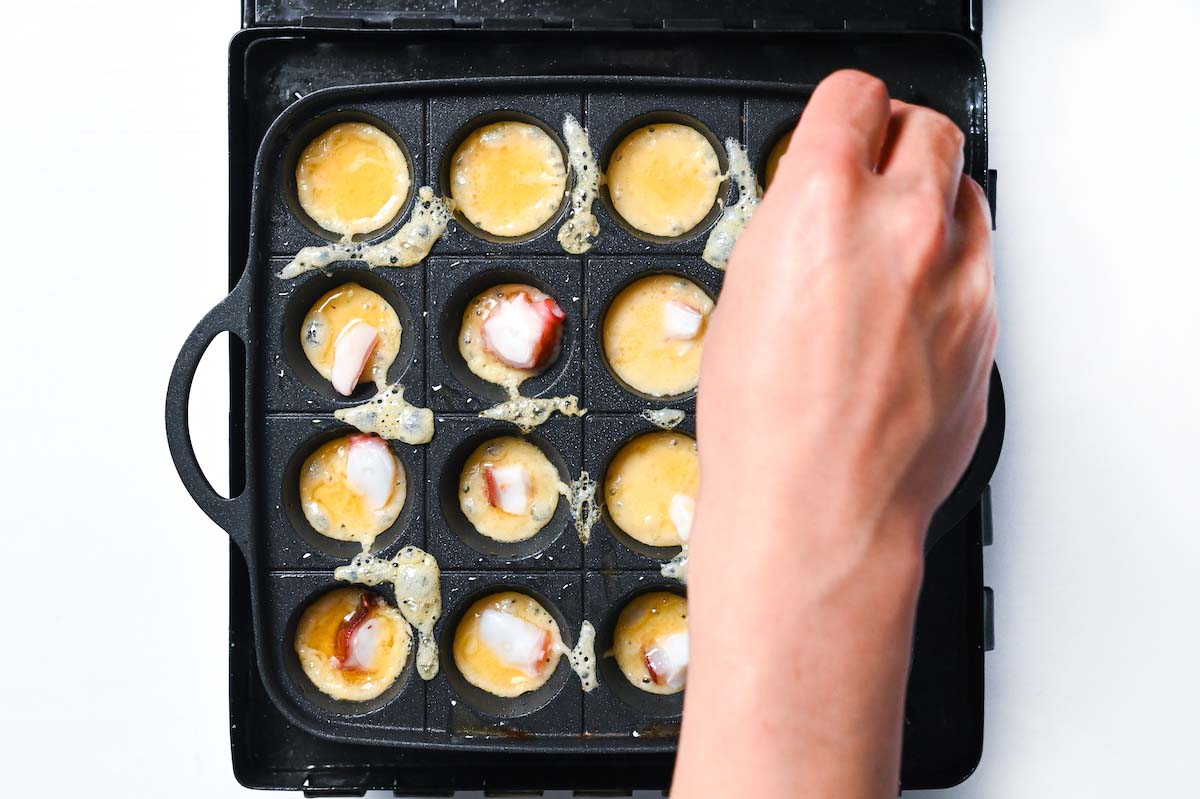
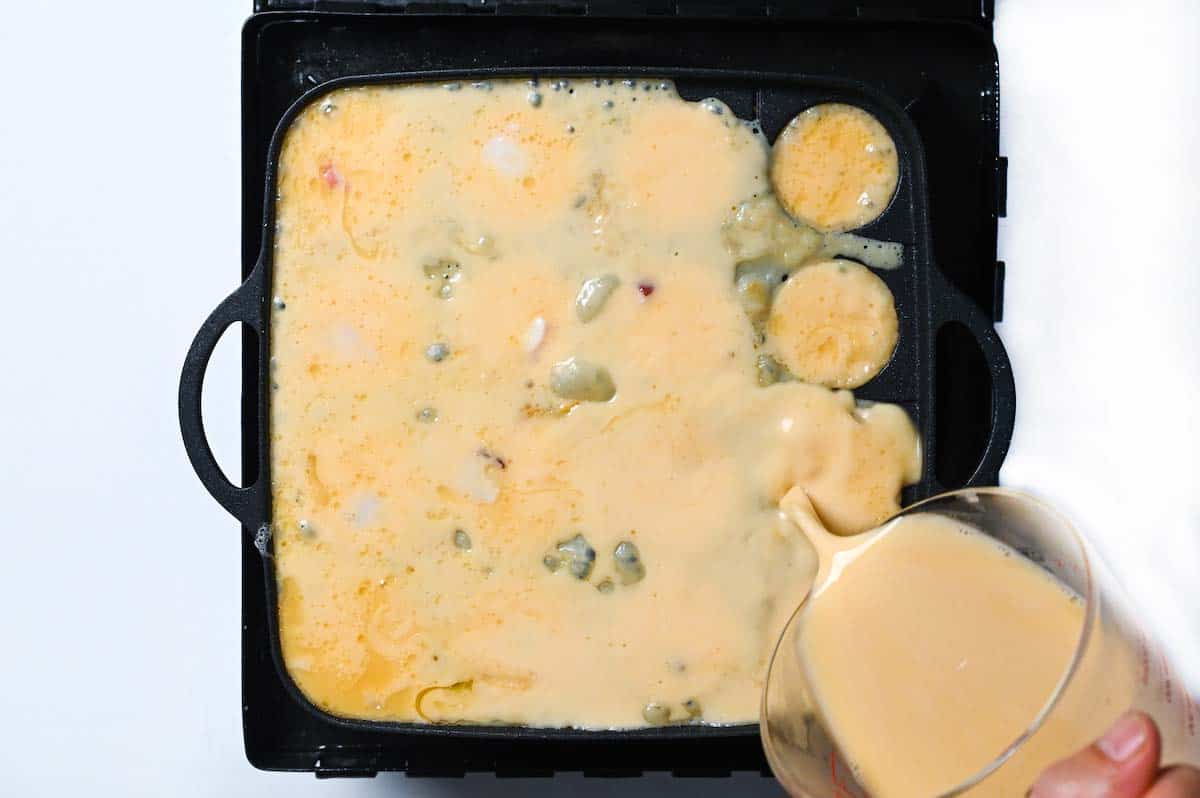
iii. Top off with more batter until wells overflow slightly, letting batter run between holes.
iv. Shower on a generous layer of tenkasu.
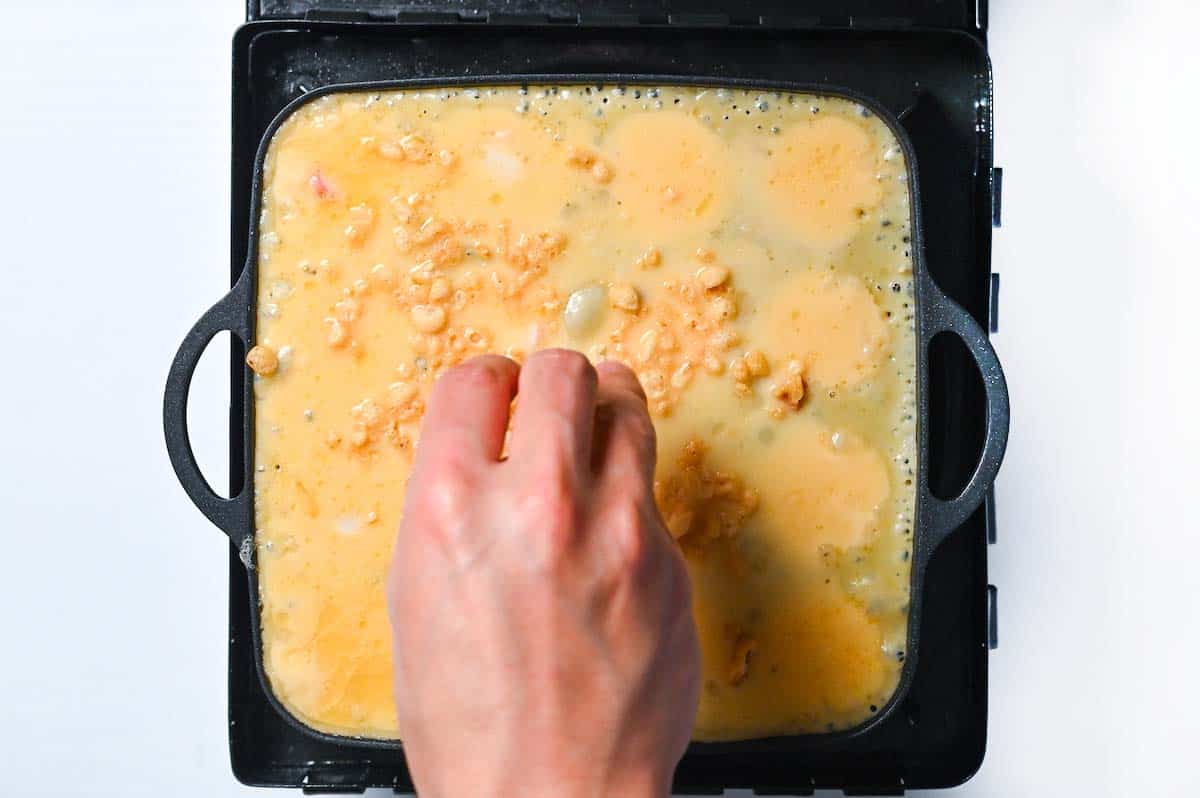
v. Then green onions, beni shoga.
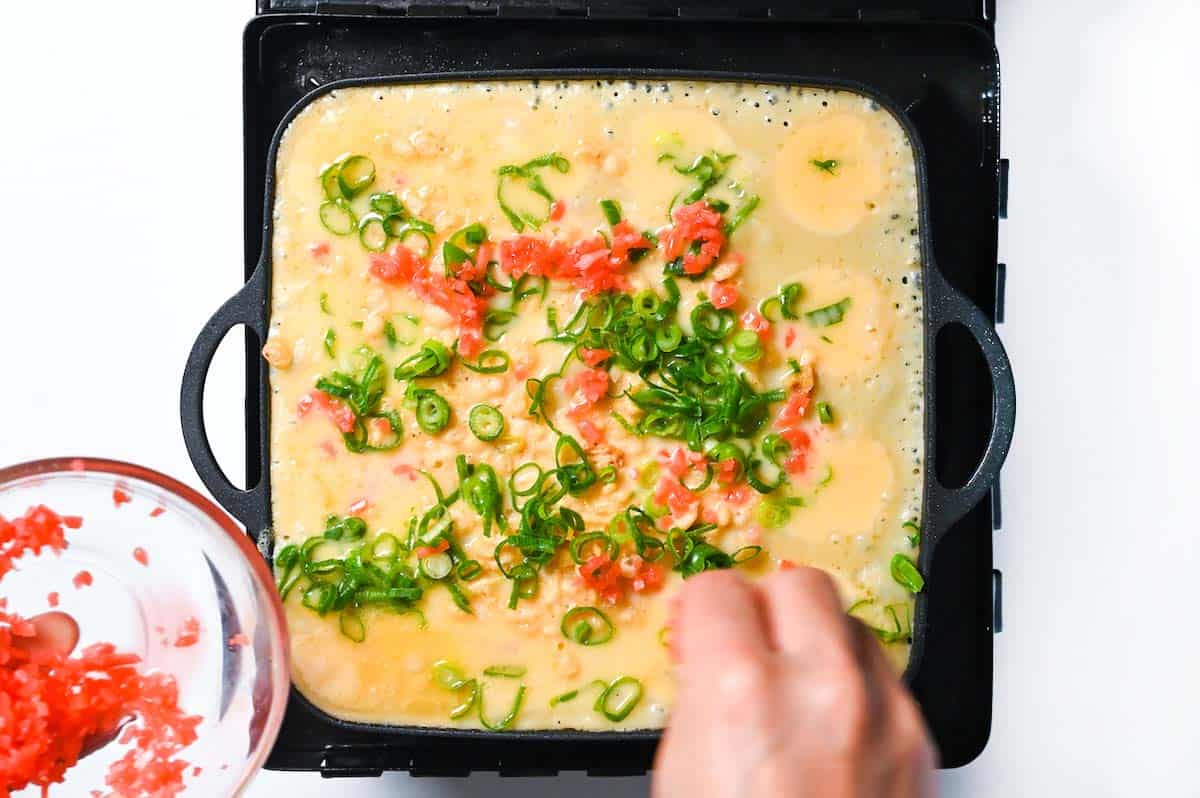
vi. Now, hands off for a minute or two while the surface sets. This high-heat, short rest builds the “shell” that makes the first flip possible.
That excess batter connecting the balls isn’t a mistake! It’s your raw material for creating perfect spheres. As you rotate the takoyaki, you’ll use this overflow to patch any gaps and build uniformly round balls.
i. Use a long skewer to “trace” channels between wells, cutting the sheet of set batter into squares.
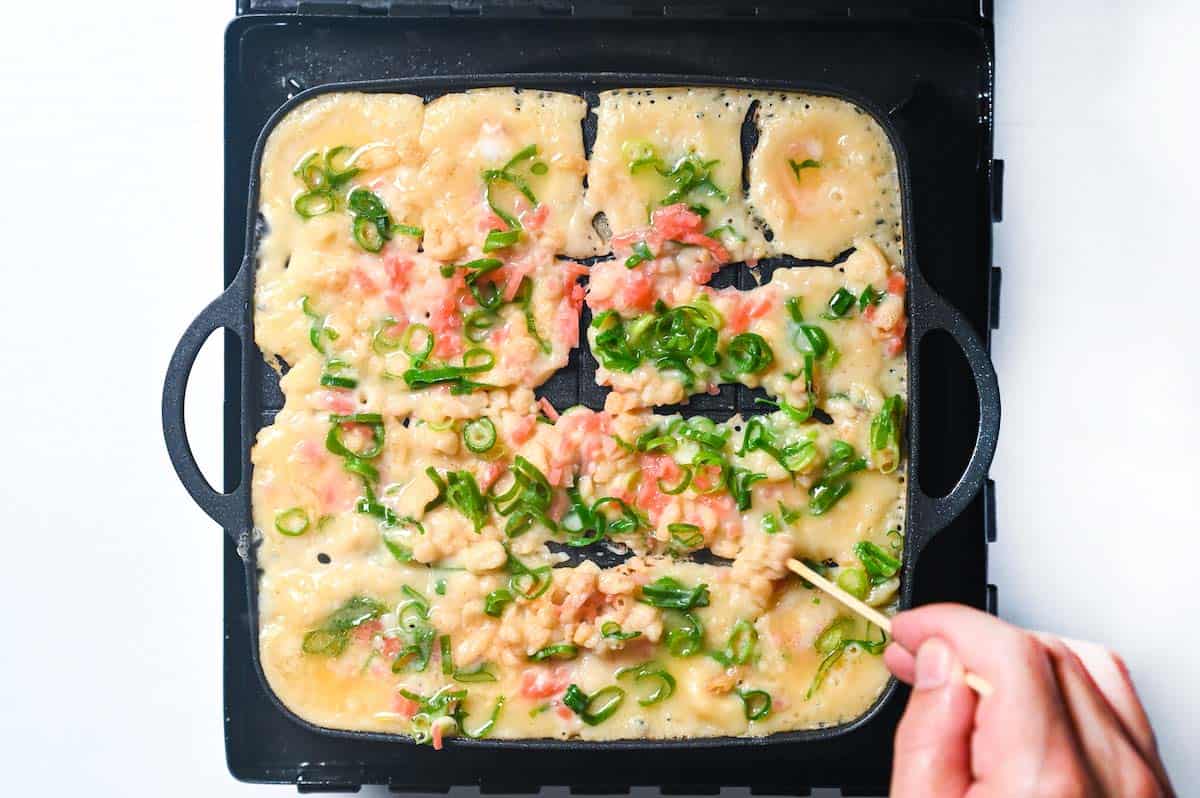
ii. Slide the skewer around the rim of each well and twist to rotate each piece about 90-180 degrees. It will look messy, which is actually good.

iii. Continue rotating each takoyaki every 30-45 seconds, gradually working the loose batter around the edges into the growing sphere. Use your skewer to tuck any uneven bits underneath.

iv After 2-3 rotations, you should have recognizable round balls. Keep turning them constantly.
Start turning when the edges look set but the center still jiggles slightly. If you wait too long, the batter hardens and won’t form proper spheres. Turn too early, and everything falls apart.
Look for that sweet spot where the bottom is golden but the top still glistens with moisture.
i. Once your takoyaki are almost round, brush them with another layer of sesame oil. This creates a second frying effect that develops that coveted golden-brown, crackling crust.

ii. Keep rolling them around for another 2-3 minutes, making sure each ball gets evenly browned.

iii. This “Gindaco-style” polish briefly turns the surface into a shallow fry, forming a thin, crackly, deep-golden shell without greasiness.

iv. If some of the takoyaki seem paler than the rest, it might be because of heat spots. This is a common problem, but it’s nothing to worry about. Just swap the pale takoyaki with the darker ones. This will make sure all the takoyaki are cooked and browned evenly.
Your takoyaki are ready when they feel surprisingly light when lifted with a skewer. This indicates the interior has developed those steam cavities. Total cooking time is typically 7-10 minutes, but focus on visual and tactile cues rather than the clock.
Perfectly cooked takoyaki will actually shrink slightly as they cool-this is a good sign! It means the interior had enough moisture to create steam, which then condenses as the temperature drops.
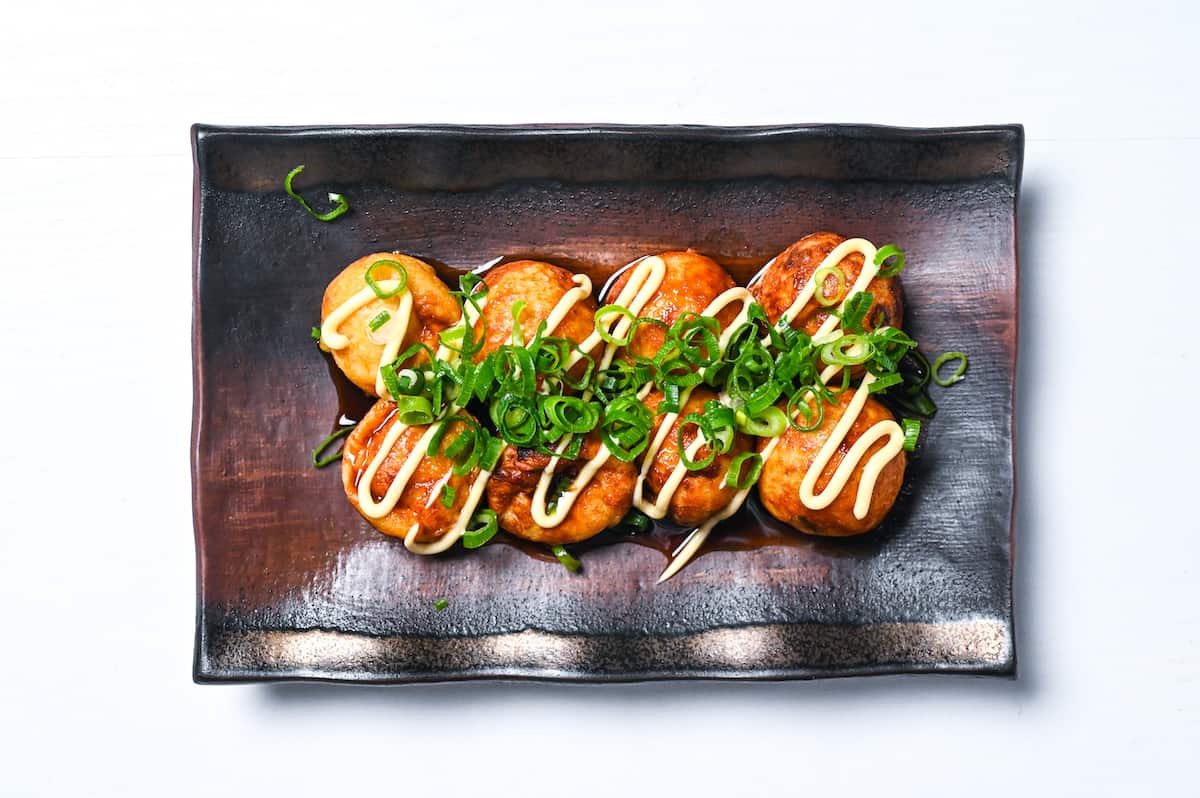
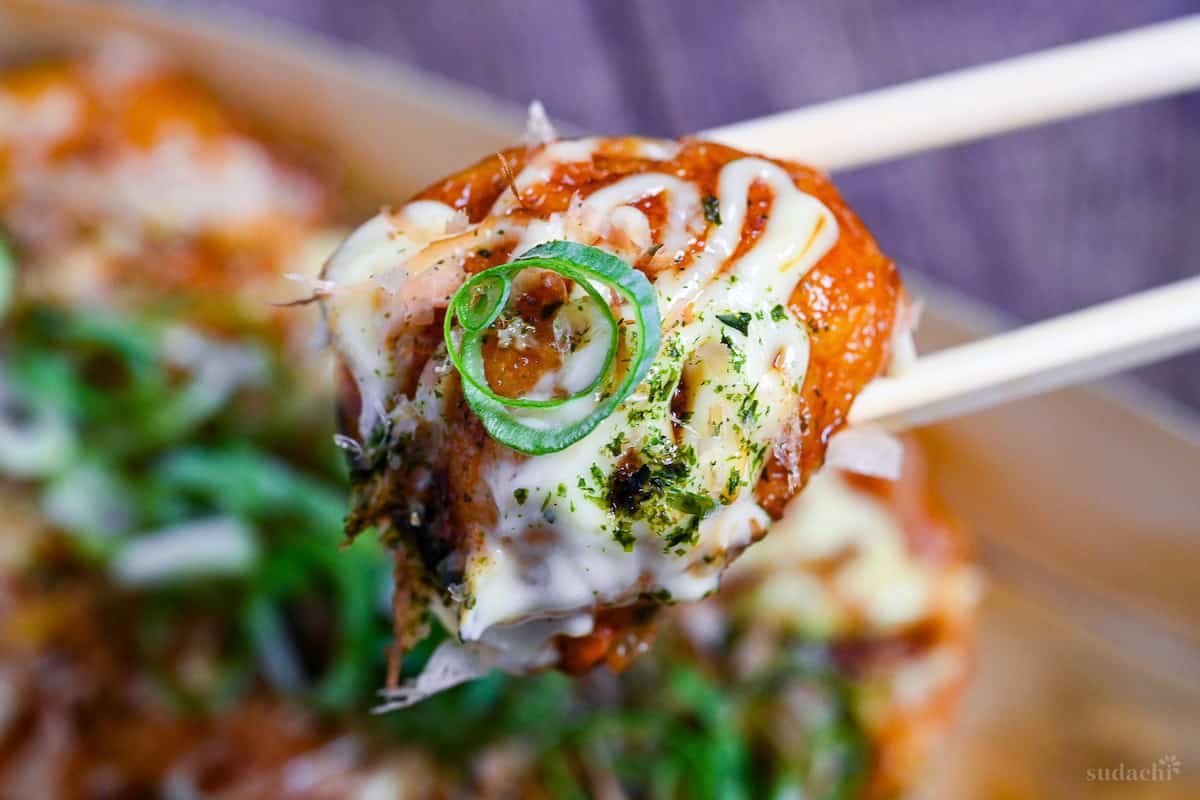
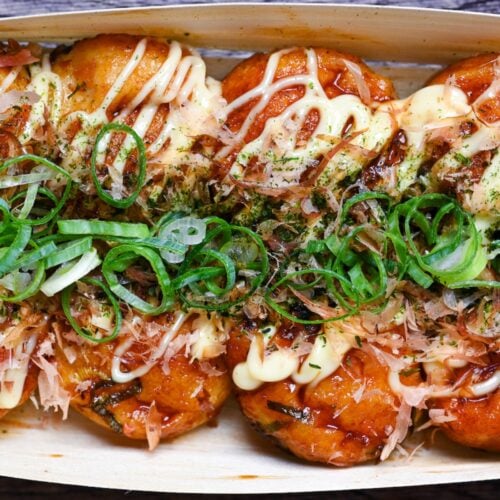
i. Transfer to plates or boat trays, brush with your cooled sauce, zigzag Japanese mayo, and shower with aonori (green seaweed powder) and katsuobushi (dried bonito flakes). Eat while audibly hot.
ii. Continue making batches with your remaining batter and ingredients, adjusting your heat as needed to maintain that perfect sizzling temperature!

Essential Tips & Tricks
- Overfill the mold: If you just fill each mold with a small amount of batter, you will find that either the takoyaki becomes quite small or they’re not round enough. You need to overfill it and then push the excess batter into the mold and turn it when it starts to cook and firm up.
- Use picks or bamboo skewers to turn them: It’s easy to use a pick to scoop around the edges and turn each takoyaki.
- Swap places: Usually, the heat isn’t 100% evenly spread across the takoyaki pan, even with high-quality ones. That’s why it’s good to occasionally swap the pale ones with golden ones to ensure they’re all evenly cooked.
With these simple tips in mind, you’re set for success every time you make authentic takoyaki.
Takoyaki Sauce & Toppping Variations
Takoyaki isn’t just “takoyaki sauce + Japanese mayo.” Shops in Japan often run full menus of alternate finishes! Salty, citrusy, spicy, even dippable. Here are 8 party-friendly ideas you can make at home, with amounts sized for about 8 balls so you can mix-and-match a tray at a time.
| Variation | How to Prepare | Amount (per 8 balls) |
|---|---|---|
Shoyu (Soy Sauce)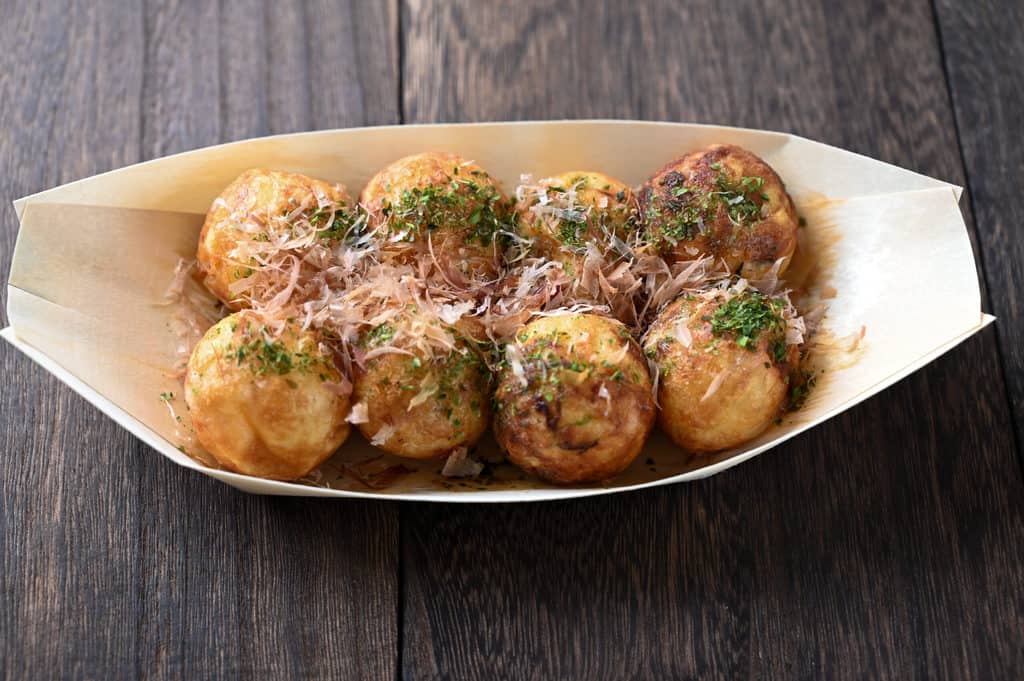 | Replace takoyaki sauce with soy sauce, skip mayo and green onions | 1-1½ tsp soy sauce |
Negipon (Daikon & Ponzu) | Top with grated daikon, ponzu sauce, and green onions | Large mound daikon + 1 tbsp ponzu + 1 tbsp green onions |
Ponzu & Shichimi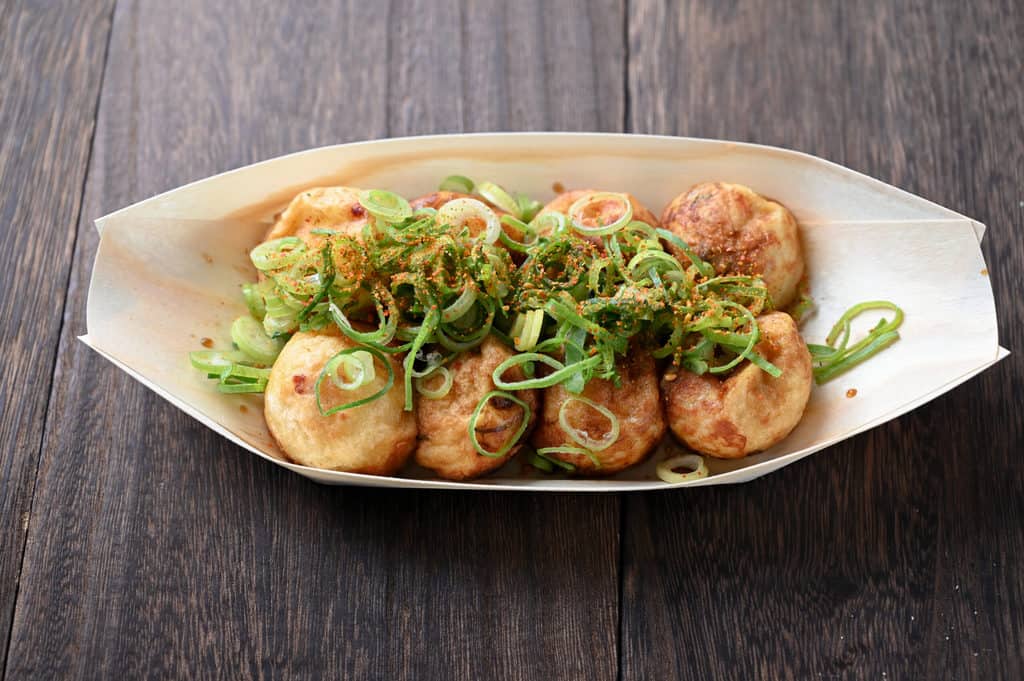 | Drizzle ponzu sauce, sprinkle shichimi chili powder and green onions | 1 tbsp ponzu + ¼ tsp shichimi + 1 tbsp green onions |
Salt & Mayo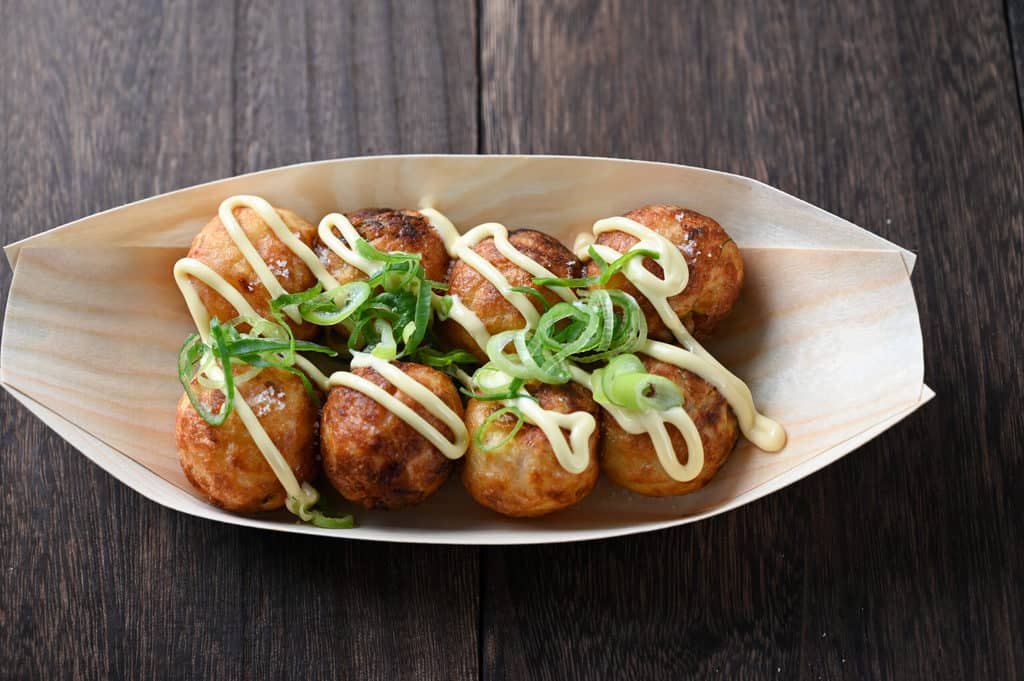 | Light salt sprinkle, mayo drizzle, green onion finish | 2 pinches salt + 1 tbsp mayo + 1 tbsp green onions |
Pure Salt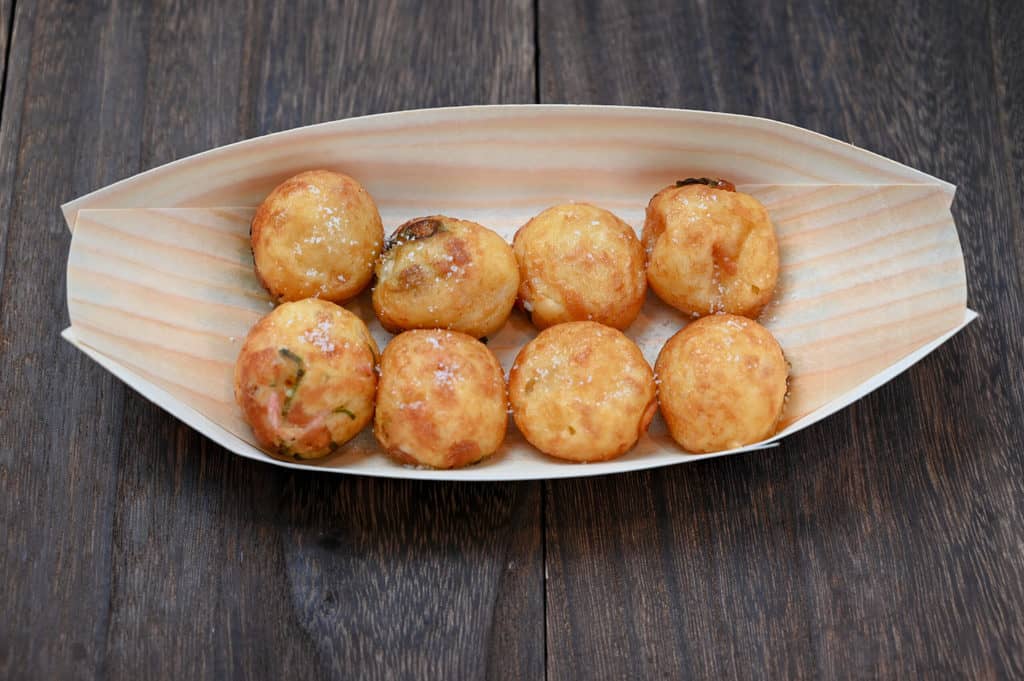 | Just a sprinkle of quality salt | 2 pinches salt |
Lemon-Salt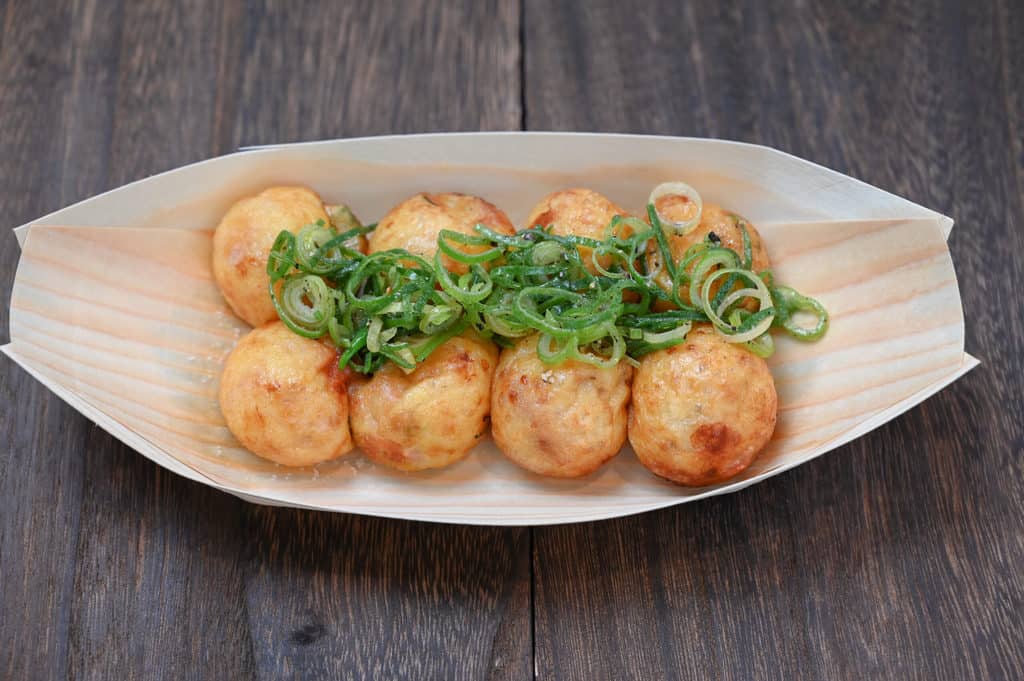 | Pre-mix green onions, salt, and lemon juice | 1 tbsp green onions + pinch salt + ½-1 tsp lemon juice |
Mentai Mayo | Mix mentaiko with mayo, top with green onions | 40g mentaiko + 2 tbsp mayo + 1 tbsp green onions |
Dashi Tsuyu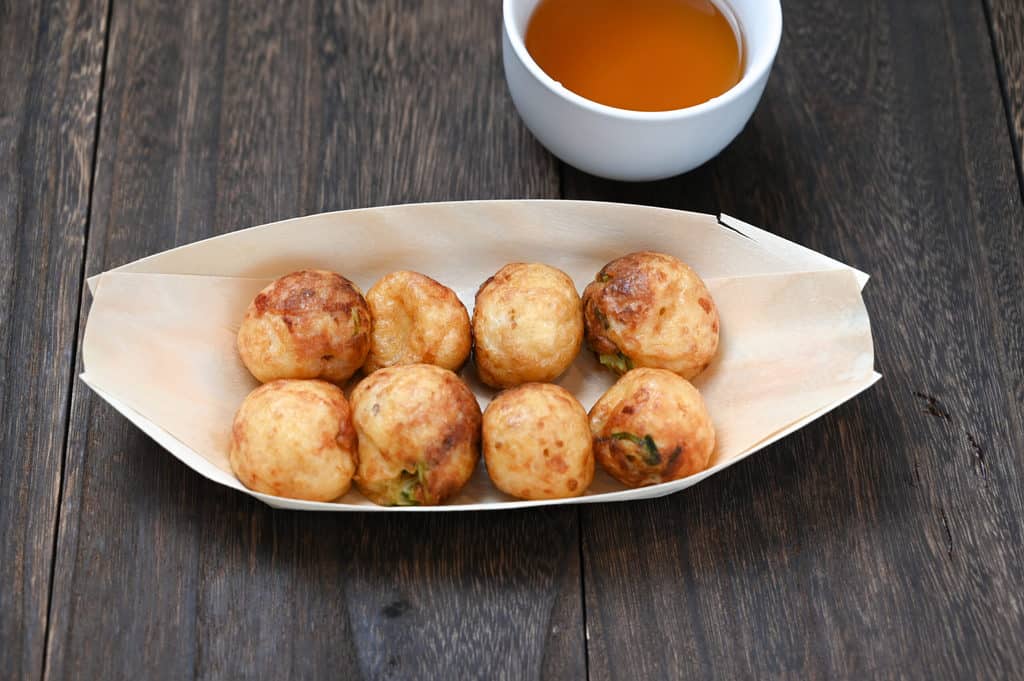 | Serve with warm dipping broth | 100ml dashi tsuyu per serving |
Storage & Meal Prep
Fridge: Airtight container, next day only. Store plain without sauces or toppings.
Freezer: Tray-freeze plain balls, then transfer to an airtight bag, press out air. Up to 1 month. Freeze sauce-free takoyaki as soon as possible after cooking for best quality.
Meal Prep: Batter can be prepared 24 hours ahead and refrigerated. Pre-cut octopus, pickled ginger, and green onions can be stored separately in airtight containers for same-day use. Takoyaki itself is not suitable for traditional meal prep.
Reheating: Microwave 30-60 seconds uncovered (to release steam), then immediately transfer to preheated toaster oven for 3-5 minutes until exterior crisps. For frozen: microwave 3-5 minutes to defrost, then toaster oven to revive the crispy exterior. Alternative: pan-fry with small amount of oil, rolling constantly until heated through and crispy.
Homemade Takoyaki Q&A
This is usually caused by insufficient heat or overly thin batter. Make sure your pan is smoking hot before adding batter, and don’t touch the takoyaki for the first 1-2 minutes to let the bottom set properly. If your batter is too thin, add a bit more flour to thicken it.
Either not using enough batter or not rotating properly. Fill cavities until batter overflows. Use that excess to patch gaps as you turn. Add more batter after the first flip to build the upper half of the sphere, and keep rolling until the centers cook through and feel light.
Your heat is too high. Once the pan starts smoking heavily, reduce the heat or temporarily remove it from the burner. Keep rotating and swapping the takoyaki constantly to prevent hot spots.
More Japanese Street Food Recipes
- Easy Hiroshima Style Okonomiyaki
- Chicken Breast Karaage
- Chicken Tsukune
- Easy Yakitori Chicken Skewers
Discover more authentic flavors you can recreate at home with these Japanese street food recipes!
Did You Try This Recipe?
I would love to hear your thoughts!
💬 Leave a review and ⭐️ rating in the comments below. 📷 I also love to see your photos – submit them here!
Authentic Takoyaki (Japanese Fried Octopus Balls)

Equipment
Ingredients
Sauce
- 3 tbsp Worcestershire sauce
- 1 tbsp tomato ketchup
- 1 tsp Japanese soy sauce (koikuchi shoyu)
- 1 tsp mirin
- 1 tsp honey
- ⅛ tsp dashi granules
Batter
- 500 ml dashi stock cooled
- 1 egg
- 100 g unbleached cake flour or AP flour/plain flour
- 1 tsp Japanese light soy sauce (usukuchi shoyu) or regular Japanese soy sauce
- toasted sesame oil for cooking
Fillings
- 120 g boiled octopus or steamed
- 4 tbsp red pickled ginger (benishoga)
- 50 g finely chopped green onions
- 30 g tempura flakes (tenkasu)
Toppings (add according to preference)
- Japanese mayonnaise such as Kewpie
- aonori (dried green seaweed powder) for garnish
- bonito flakes (katsuobushi) for garnish
- finely chopped green onions for garnish
My recommended brands of ingredients and seasonings can be found in my Japanese pantry guide.
Can’t find certain Japanese ingredients? See my substitution guide here.
Instructions
- Combine the sauce ingredients (3 tbsp Worcestershire sauce, 1 tbsp tomato ketchup, 1 tsp Japanese soy sauce (koikuchi shoyu), 1 tsp mirin, 1 tsp honey and ⅛ tsp dashi granules) in a saucepan and bring to a gentle simmer over medium heat. Mix continuously to prevent splattering. Use a spatula to scrape the bottom of the pan and prevent burning.

- Simmer the sauce for 3 minutes or until slightly thickened, then remove from the heat and set aside for later.
- Next, take a mixing bowl, pour in 500 ml dashi stock and 1 tsp Japanese light soy sauce (usukuchi shoyu). Crack 1 egg into the bowl and whisk until combined.

- Measure out 100 g unbleached cake flour in a separate bowl and make a well in the center. Pour the dashi mixture into the well while whisking until it forms a smooth batter.
- Cut 120 g boiled octopus into small pieces (approx 1 inch / 2.5cm) and finely chop 4 tbsp red pickled ginger (benishoga) and 50 g finely chopped green onions.
- Heat up the takoyaki pan and generously coat the mold with toasted sesame oil. Brush the oil into each crevice until evenly coated. (If you don't have a brush, spread the oil using kitchen paper.)
- Once the takoyaki pan is hot (almost smoking), pour the batter into the mold, filling the crevices half way.
- Place a piece of octopus in each slot and then fill the entire mold with batter, including the areas around each slot.
- Sprinkle the chopped green onion, chopped pickled ginger and 30 g tempura flakes (tenkasu) generously over the top of the wet batter and allow to cook for 1-2 minutes.
- Using a long bamboo skewer (or similar), draw horizontal and vertical lines between all the slots to divide the batter around each takoyaki.
- Roll each takoyaki about half way by scraping the bamboo skewer around the edge of the slot in a circular motion with your wrist. It's okay if the shape is still messy at this point. Leave to cook for a few minutes.

- Roll the takoyaki again, tucking any messy parts into the bottom to shape it nicely. After the second roll it should already be more or less round.
- Once the takoyaki is round enough, brush with another layer of sesame oil and keep rolling the takoyaki one by one.
- Swap any pale takoyaki with the more golden ones to ensure even cooking. (This is due to the inevitable heat spots on the pan, generally the ones in the middle directly over the heat source cook faster.)
- Once the outside looks golden and crisp, remove the takoyaki from the pan. (The middle is still usually a bit runny, this is normal and you don’t need to cook it until it’s firm all the way through.)
- Place the cooked takoyaki on a plate and brush the with the sauce from earlier. Drizzle with mayonnaise and sprinkle with your choice of toppings. Repeat until all the batter and ingredients are used up, enjoy!
Hi everyone,
After reading the part about the takoyaki pan and its possible alternatives, I felt I needed to leave a comment on this article.
I am not familiar with the takoyaki pan or this Dutch Aebleskive pan. Why this pan is called Dutch aebleskive pan in English, I don’t know, because this is something Danish and I haven’t seen it in the stores here in the Netherlands.
Because I am Dutch, but here in the Netherlands we have another traditional dish called “poffertjes” – who are best described as miniature pancakes – and they are baked in a similar pan as the takoyaki pan. Therefore, takoyaki is always descriped as “savoury japanese poffertjes” here. Some TV cooks even mention that they can be made in a poffertjes pan.
But by the looks of it, a takoyaki pan is not entirly the same as a poffertjes pan. I have the impression that the wells of a poffertjes pan are a bit shallower. I have measured the wells and they are 2,4 cm in diameter and 1 cm deep, for references. Therefore I think that if you were to use these, you need to chop your filling a little bit smaller, but I haven’t been able to try it so far.
Hi Laura, thank you for your comment and bringing this to my attention. Actually aebleskiver are Danish and as you mention, poffertjes are Dutch. I remember reading about both when I was writing this article and must of gotten them mixed up. I’m sorry about that! I appreciate you pointing this out and I’ve updated the article.
I agree that poffertjes look smaller than aebleskiver and takoyaki, it might be difficult to make takoyaki in a poffertjes pan because the octopus would need to be cut very small. I’d love to hear if it works though, please let us know if you try it.
Hello Yuto and other curious readers,
Yesterday I tried making takoyaki in the poffertjes pan. Although I had to make it with cultivated mushrooms, as octopus is not easy available here. I wasn’t unhappy about the result, but it wasn’t picture worthy (most of them looked more like failed Kaiserschmarrn). But I think that had more to do with my own skills then that it doesn’t work.
I used my moms heavy traditional cast-iron pan that need to be put on a (gas) stove, as I do not have access to my own untill around christmas. The difference with my own is, that I have an electric waffle iron with excangable non-stick plates – including a poffertjes plate. This requires a bit different technique in the baking process.
As such, I had difficulties in estimating how much oil I need to use per well, meaning that some were more deepfried, whereas others did not want to release from the well.
I had taken into account that I need to cut the filling smaller, but I hadn’t taken it into account that a smaller well also means that the batter becomes faster solid. As a result, I didn’t add all the filling (mushroom and spring onion) fast enough. I.e. the filling didn’t go deep enough in the batter anymore.
Therefore I think next time, I would even cut the fillings smaller and mix them together before starting. This way I can take a “pinch” of the filling and hopefully add them all at once fast enough.
As for the turning them around, I did this as I would do for poffertjes, meaning they are only turned around once. I didn’t think that there would be any point trying to get them spherical, as a poffertje-well is mathematically roughly 1/75 of its sphere in volume, and therefore just the cap. The problem here is that I could not turn them around untill the batter wasn’t liquid anymore, but then the surface that was up before could not go properly in the well to get baked aswell.
Therefore I really would like to try to make the takoyaki in my own waffel/ poffertjes iron. Because here I would fill the well, and close it so it gets bottom and top heat at the same time. Beside this, the manifacturer recommends turning the machine upside down (the machine is designed that way) immediatly after closing, so that the batter can divide properly, and turning it staight later in the baking process.
Furthermore, the traditional poffertjes batter contains yeast and the non-traditional one bakingpowder, meaning it would rise during baking. In addition, the water/flower ratio is different and therefore easier to turn around when it is semi-liquid, allowing it to be more flexible and filling the well after turning it around.
As a result, it wasn’t really clear to me if the cakeflower you use contains baking powder or anything else to make it rise while baking. The recipe I have to make cakeflower is 82-87% flower, 10-15% starch (potato or corn) and 3% bakingpowder. This resulted in 3 gram baking powder.
I also have another question. As far as I can tell, tsuyu sauce is not available, and also the ingredients aren’t very easy to get here. The Asian cuisine here is heavely dominated by chineese and indonesian influences. As you were stating that tsuyu sauce is mainly soysauce with a taste of sweet and umami, I was wondering if tsuyu sause can be (sometimes) replaced – in your opinion – by ketchap manis, maybe with some extra mushroom. For now, I just used soysause (by the way, japanese soysause is available here and I know how to make ketjap manis myself, so I could leave out/ add things/ change ratio if I want to).
In addition, sake is more easy available then mirin, as making sushi is on the rise here. But from my “Aroma” book I didn’t get any wiser then that sake contains a higher alcohol percentage then mirin, but both taste great with fish. Therefore I was also wondering wheather or not they can be exchanged with each other.
To make a long story short, I am definitly going to try it again around christmas with my own waffel/ poffertjes iron. For comparison I will “tweak” the poffertjes batter to obtain takoyaki flavour, and see what happens (I like appologise to poffertjes/ takoyaki traditionalist before hand, but I just like an experiment). So, to be continued…
Hi Laura,
Thank you so much for sharing your results with us!
Takoyaki takes some practice to get a nice shape, I had to practice many times too.
To be honest, it’s better to use more oil so that it’s easier to turn. The outside also becomes crispy, it’s okay if it has a deep fried effect. (Although this is my personal preference.)
The poffertjes pan seems to be smaller than I thought, I think that adding the ingredients to the batter is a great idea in this case, seeing as it cooks too quickly to add it in later.
The cake flour I use doesn’t contain baking powder, the main reason to use cake flour is due to the low gluten content which makes the takoyaki lighter and a bit airy. We don’t really need it to rise because we turn it as it cooks. (Although, if it does rise a little, I don’t think it would cause problems. The eggs would add a little rise anyway.)
As for tsuyu sauce, this recipe only uses a little and I think soy sauce is a fine substitute. I’ve never used ketchap manis, but I do have a recipe for homemade tsuyu sauce here > https://sudachirecipes.com/multipurpose-tsuyu-sauce/
This recipe doesn’t require sake or mirin (unless you decide to make your own tsuyu sauce.) Sake and Mirin are both kinds of rice “wine” but sake has a higher alcohol content and mirin is sweeter (a natural sweetness develops during the fermentation process.) They taste quite different and I wouldn’t suggest exchanging them with each other, many Japanese recipes use them both because they have different qualities.
Some people use a small amount of sake and then increase the sugar in place of mirin, this works for things like teriyaki sauce, but I haven’t tried it with tsuyu sauce. Hope this helps and I wish you all the best with your takoyaki making journey!
Sooo delicious! I’ve been wanting to try this recipe for a long time and finally I got an electric pan. Mine doesn’t have the holes lined up and the space between them is less so it was a bit more difficult at the beginning and unfortunately I couldn’t find benishoga in my city so I had to opted for normal sushi ginger thinly sliced, but I’m pretty proud of the final result!
Hi Andrea,
Thank you so much for making my takoyaki recipe and sharing your photo! Looks great! I actually made takoyaki the other day too and added too much benishoga trying to use it up haha. Your sushi ginger twist sounds amazing! 🙂
Yuto