

Featured Comment
That’s my first time with Japanese sweets, if they are all like this one, I’m gonna have a beautiful relationship with them
★★★★★
– Andrea
Fall in Japan is all about embracing those seasonal flavors. Think sweet potatoes, kabocha squash and chestnuts, finding their way into everything from street food snacks to cozy home cooking.
One of the most loved autumn treats is the “suito poteto”, a rich and creamy Japanese sweet potato snack shaped like the vegetable itself. If you love the earthy sweetness of roasted yaki imo, or the bitesized fun of daigaku imo, this recipe is sure to become another favorite!
Suito poteto
Recipe Snapshot
- What is it? A classic Japanese sweet snack made with mashed sweet potatoes, butter, cream and sugar.
- Flavor profile: Sweet, Creamy, Buttery
- Why you’ll love this recipe: This iconic dessert is delicately sweet and delivers cozy Fall flavors that highlights the taste of Japanese sweet potato.
- Must-haves: Japanese sweet potato
- Skill Level: Medium
- Freezer Friendly? Yes!
What is Japanese Sweet Potato Dessert (Suito Poteto)?
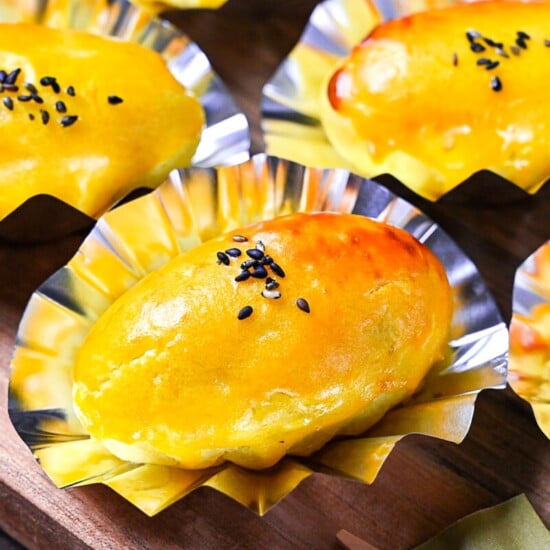
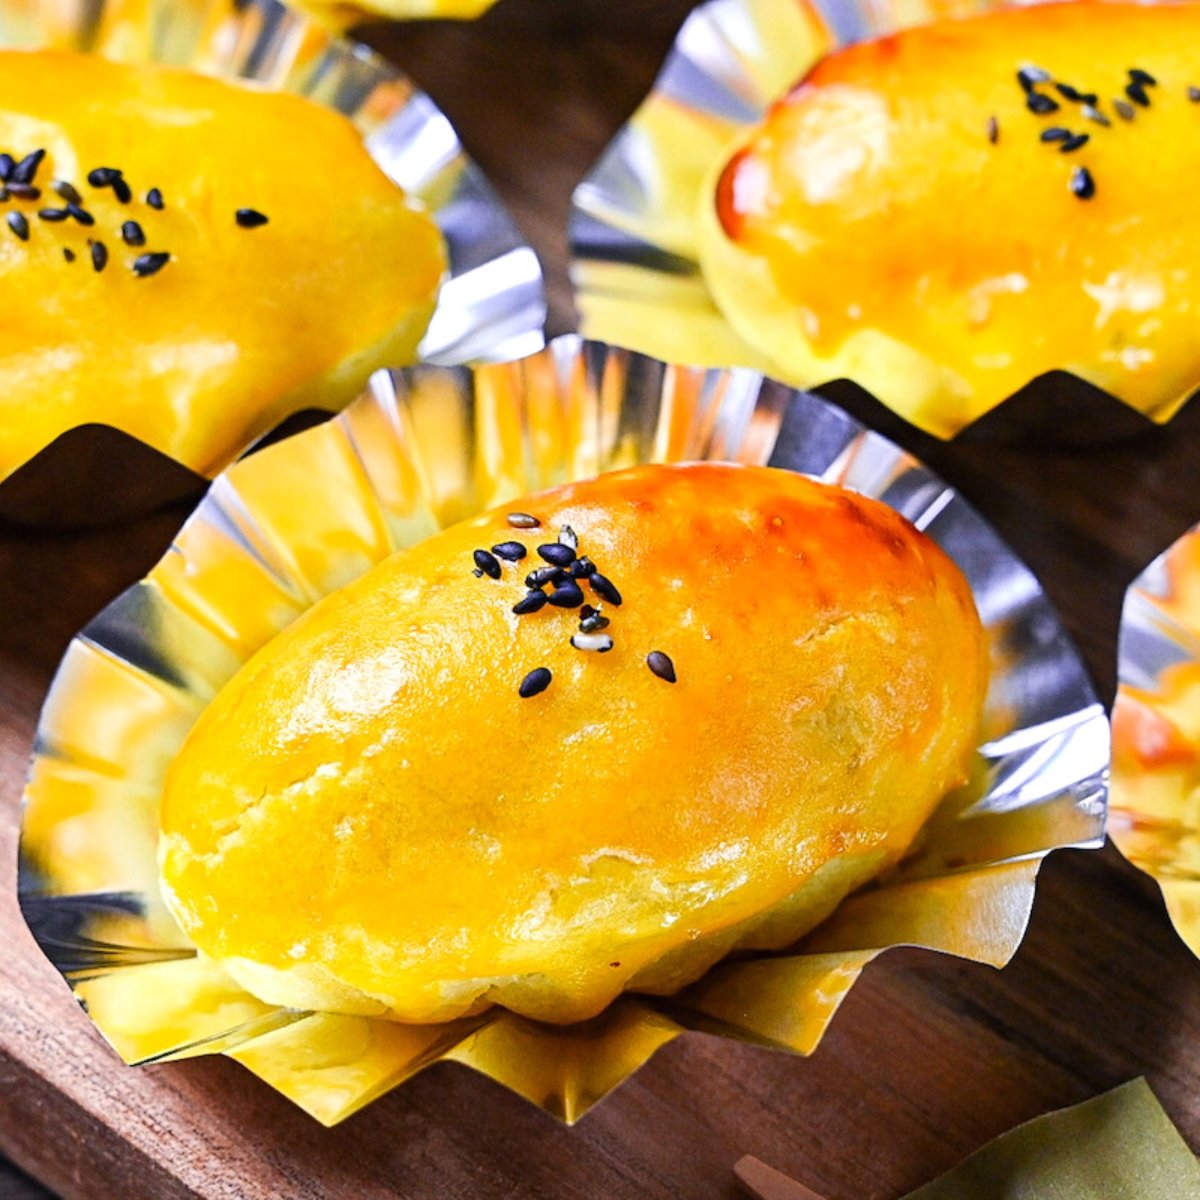
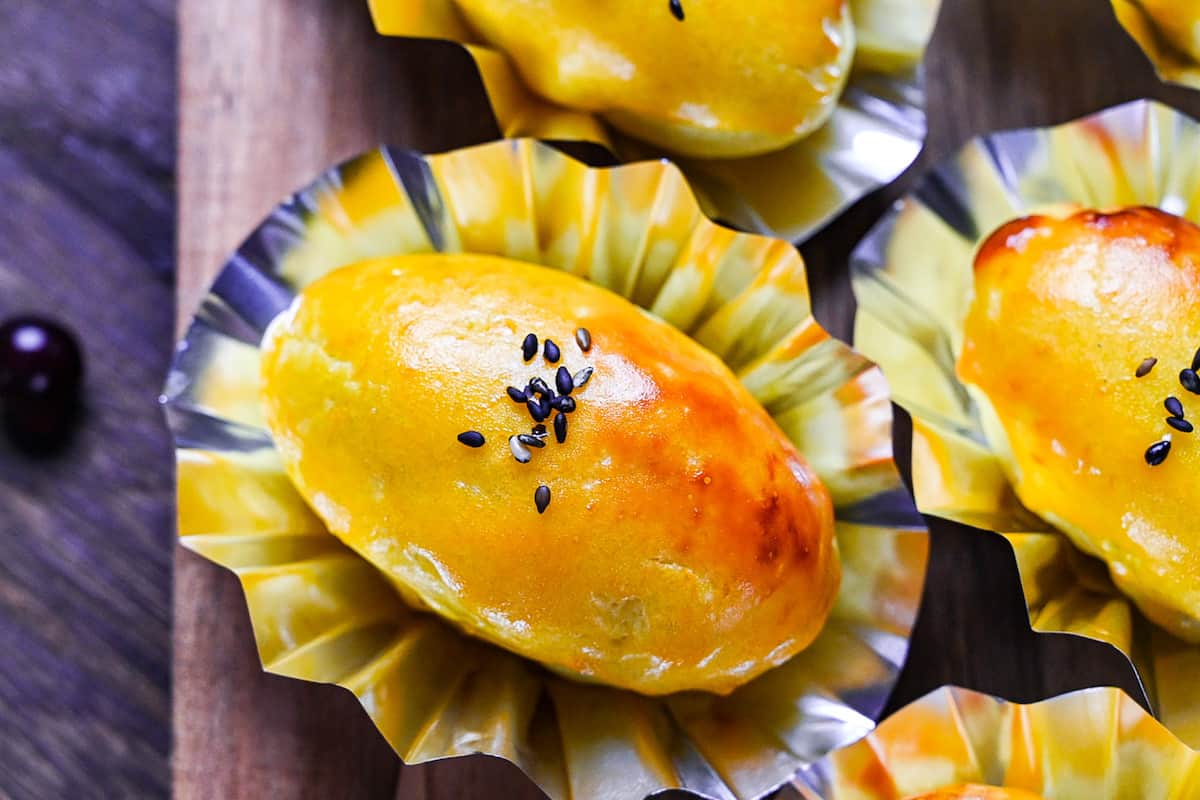
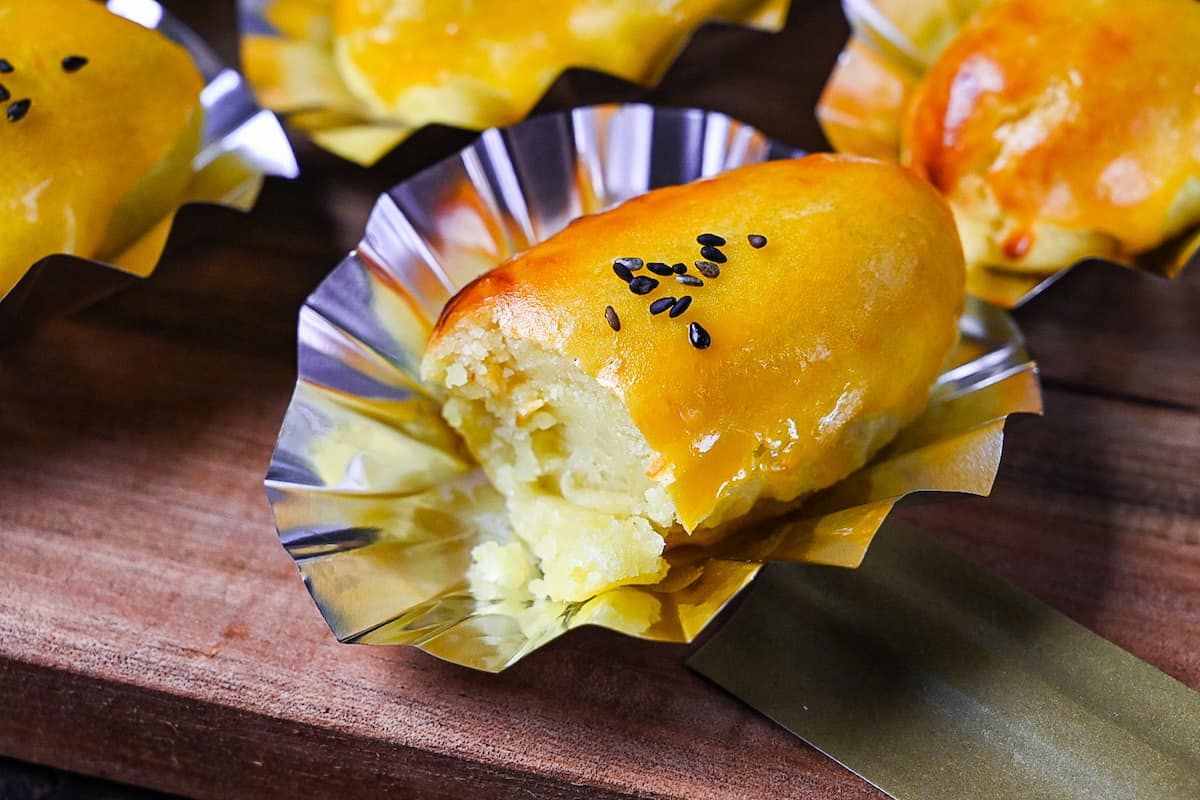
Sweet Potato or suito poteto (スイとポテト) in Japanese, is a miniature sweet potato-shaped dessert made with mashed sweet potato mixed with cream, butter and sugar. This cake-like snack is coated with a beautiful golden egg-wash and a sprinkle of bold black sesame seeds, appearing in convenience stores and supermarkets across Japan every Fall.
While the exact origin remains unclear, it is believed that the suito poteto appeared in Japan sometime during the Meiji period (1868-1912) and was made by mixing baked sweet potato with eggs and sugar, then serving them on their original skins.
It didn’t gain popularity until after the war, when famous confectionary stores started selling their own versions. One of the stores that influenced Sweet Potato’s rise in popularity was the renowned bakery “Donq”, which released the “Matsuzo Poteto” created by Matsuzo Inoue in 1949.
Since then, Sweet Potato has become a beloved Japanese sweet and seasonal icon.
Sweet Potato Dessert Ingredients
What You’ll Need for Japanese suito poteto
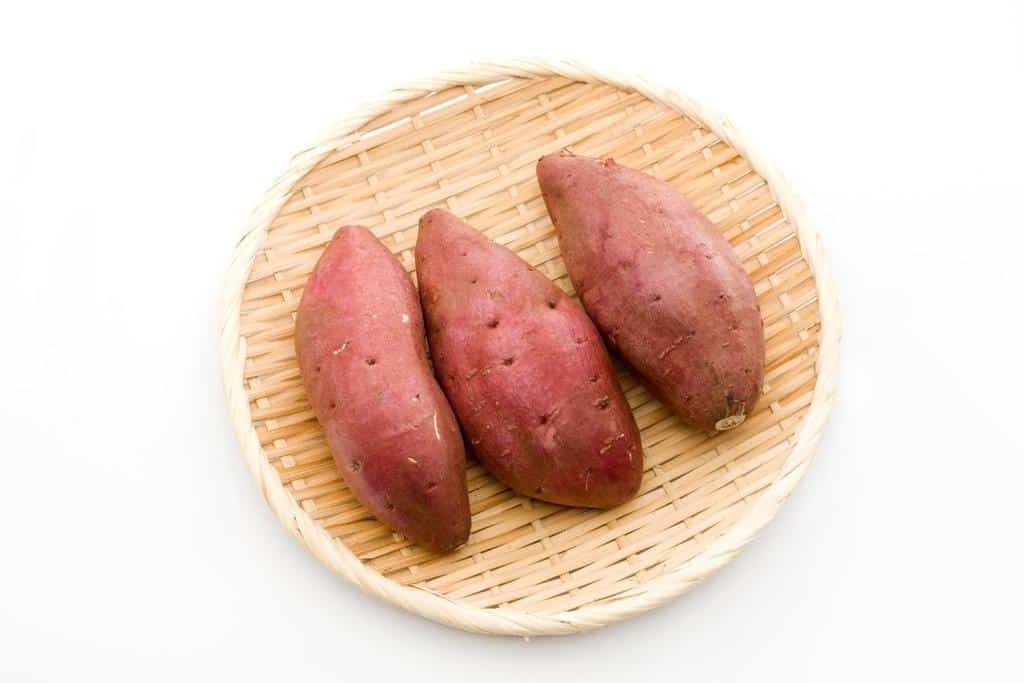
- Japanese Sweet Potato: Compared to regular American sweet potatoes, Japanese sweet potatoes are especially sweet with a flavor that is often compared to roasted chestnuts. They are also particularly starchy and dry. For this reason, I recommend sticking with Japanese sweet potatoes (satsumaimo) for this recipe, which should be available at well-stocked Asian supermarkets. If possible, choose a starchy (hoku hoku) type like Beni Azuma or Naruto Kintoki for easier shaping (moist “shittori” varieties are too sticky for this recipe). Learn more about the different varieties of sweet potato on my Yaki Imo recipe.
Substitution Ideas
- Sweeteners: I use a mixture of granulated sugar, honey and mirin for different depths of sweetness. This recipe is quite forgiving and works with most kinds of sugar. Avoid dark brown sugars since they can be too overpowering for this recipe, but honey can be subbed with maple syrup and mirin is optional.
- Double cream: Use a plant-based milk alternative to make this recipe suitable for vegetarians and vegans. Since milk is thinner than cream, add a little at a time until you get the right consistency.
- Butter: Switch to coconut oil for a plant-based substitute.
How to Adjust this Recipe Based on Potato Weight
Because sweet potatoes vary greatly in size, you will need to adjust the ingredients depending on the weight to get the right consistency. I’ve done the math so you don’t have to, and put together this chart so you can pick the weight closest to your sweet potato (with the skin on) and follow the measurements accordingly.
| Sweet Potato (with skin) | 250g | 350g | 450g |
| Sugar | 20g | 30g | 40g |
| Honey | 1 tsp | 1 ½ tsp | 2 tsp |
| Mirin | ⅛ tsp | ¼ tsp | ¼ tsp |
| Unsalted butter | 16g | 24g | 32g |
| Double cream | 1 tbsp | 1 ½ tbsp | 2 tbsp |
| Vanilla essence | ⅛ tsp | ¼ tsp | ¼ tsp |
| Yield | 4 | 6 | 8 |
How to Make My Japanese Sweet Potato Dessert
If you prefer to watch the process in action, check out my YouTube video of this recipe!

Before you start: Preheat the oven 180 °C (356 °F) and prepare 6-8 foil cupcake liners. Open the cupcake liners, flatten them slightly and place them spaced apart on a baking sheet.
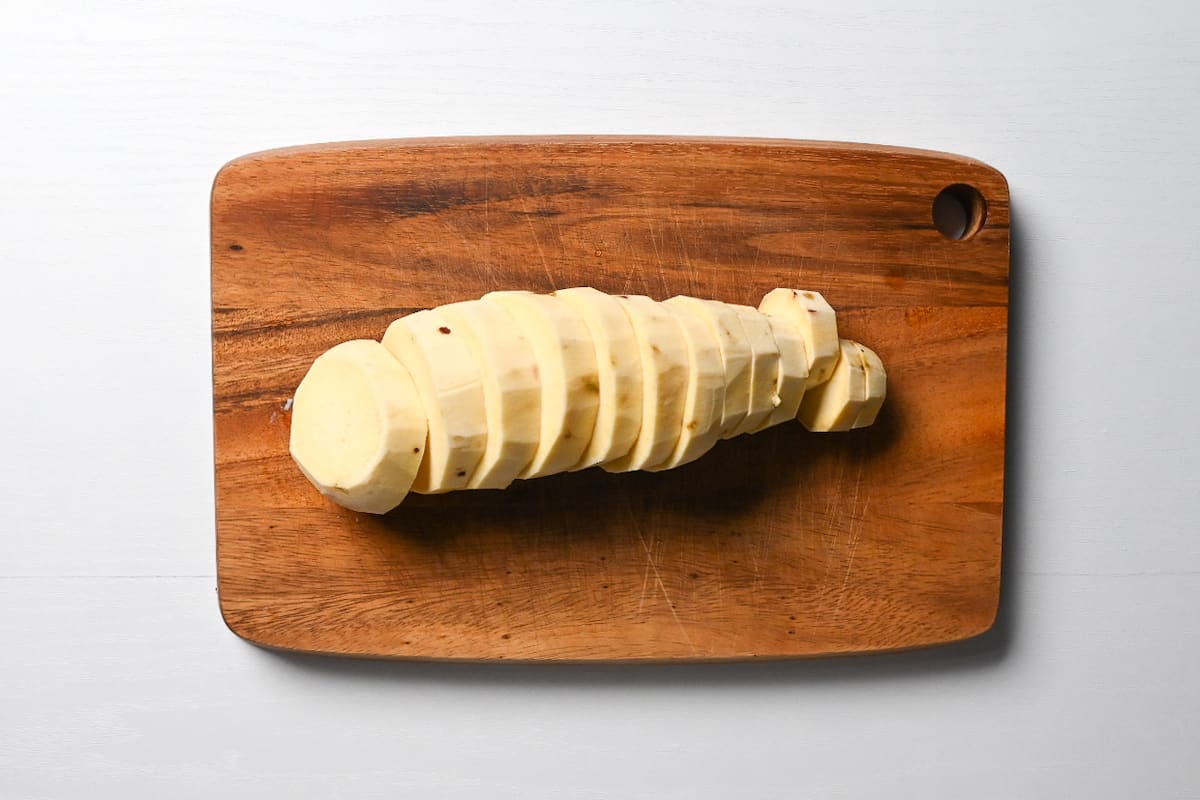
Start by preparing the sweet potato. Peel off the skin and cut it into slices. I recommend cutting the larger slices in half so that they cook evenly (I didn’t here and regretted it!)
Next, place the slices in a microwavable bowl and fill it with cold water and a pinch of salt. This helps remove excess starch and prevents discoloration. Let them soak for about 5 minutes, no longer than 10!
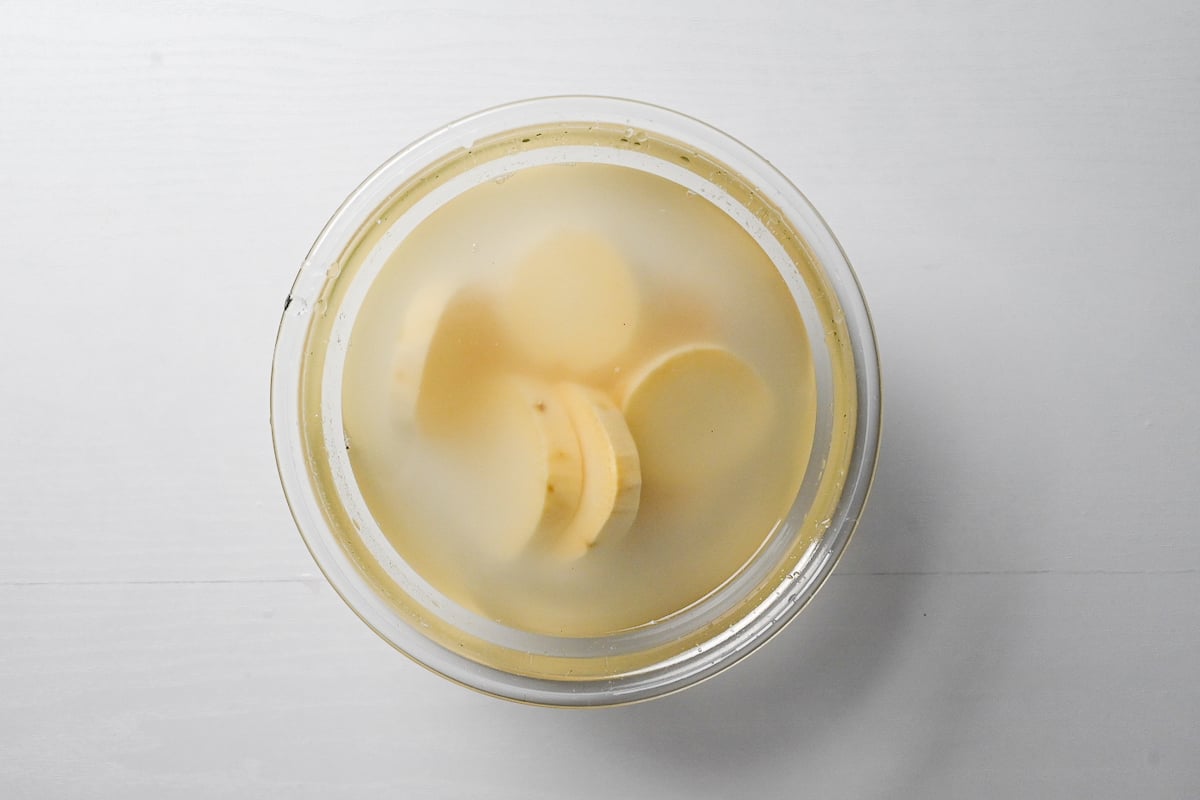
If you soak the sweet potato for longer than 10 minutes it will start to lose its flavor and natural sweetness. 5-10 minutes is the sweet spot!
I recommend using a microwave or steamer for the best results in this recipe. When sweet potato is microwaved, it is not as soft and sweet as when it’s baked, but it’s quicker to cook and easier to shape after it’s mashed and mixed with the other ingredients. Since we add sugar and cream anyway, I don’t feel guilty skipping baking this time!
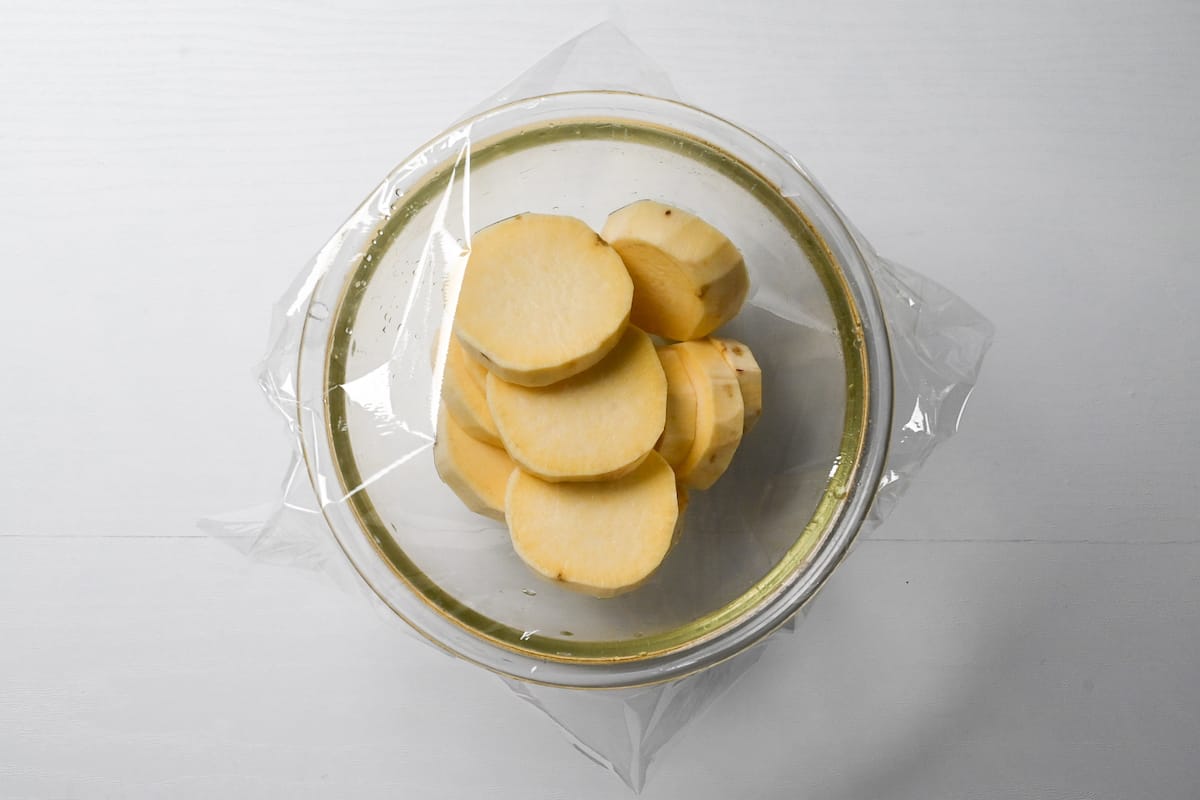
Place the pieces of sweet potato in a microwave-safe bowl and cover it with plastic wrap. Microwave for 5-6 minutes at 600W, mix the pieces about halfway through to ensure even cooking, and be careful when removing the plastic. If the potato seems wet, try microwaving a little longer uncovered to evaporate some excess moisture.
Stand back and slowly and carefully peel one corner of the plastic wrap to prevent burns from hot steam.
Once it’s fork-tender, mash the sweet potato while it’s still hot using your preferred method. You might need an oven mitt to hold the bowl, or transfer it to a new bowl. I use a potato masher because that’s what I have, but a potato ricer will yield smoother results.

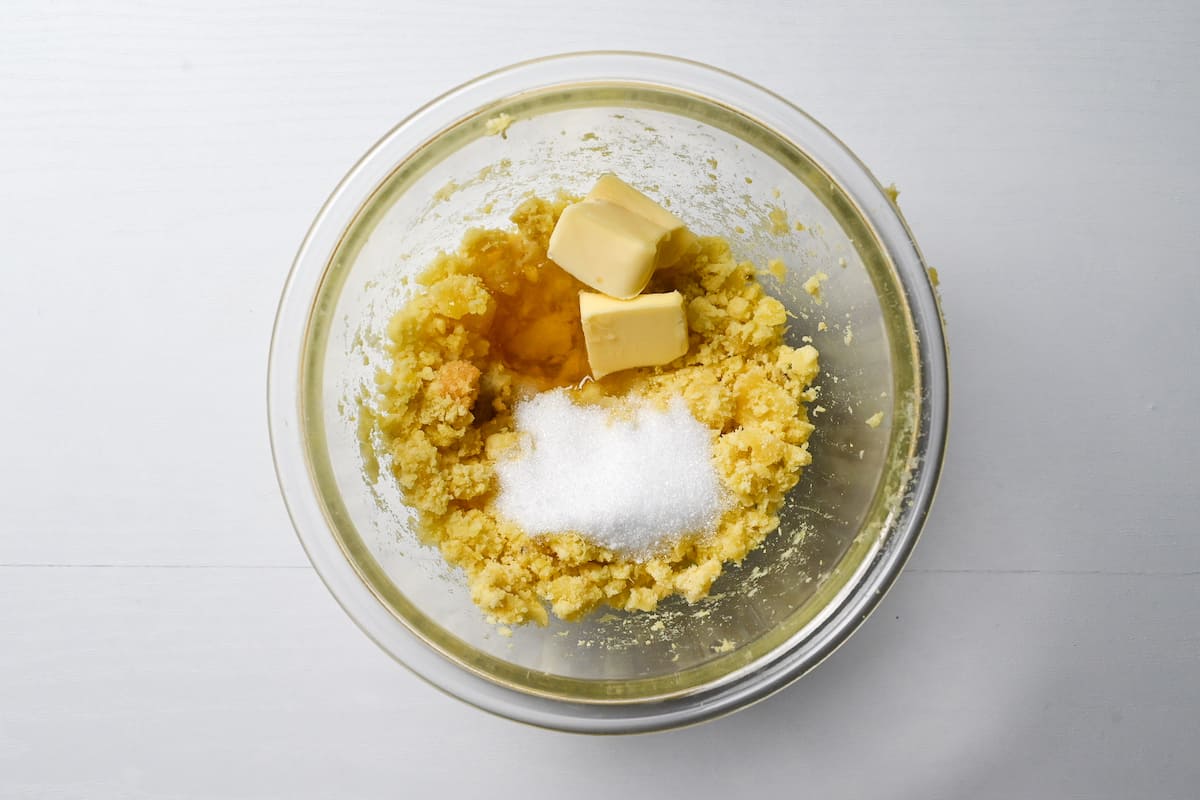
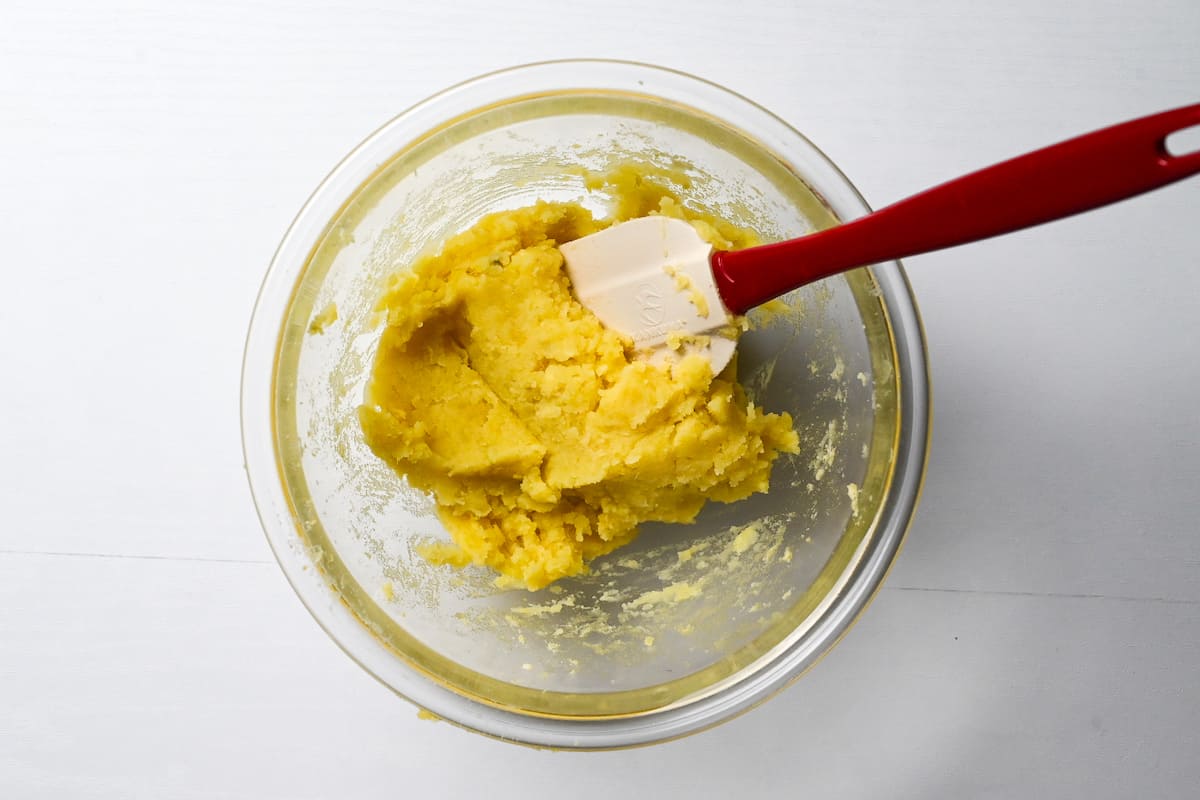
Add the butter, sugar, honey, mirin, vanilla essence, and cream while the mashed sweet potato is still warm. The heat will melt the sugar and butter, making it easier to combine everything with a silicone spatula.
Once combined, it should look like this:
Add the milk a little at a time and mix thoroughly before adding more. This is to make sure the mixture doesn’t become too wet and difficult to shape.
If you used a potato ricer, you can probably skip this step. If you used a regular potato masher like me, you might find the potato still has a few chunks in there.
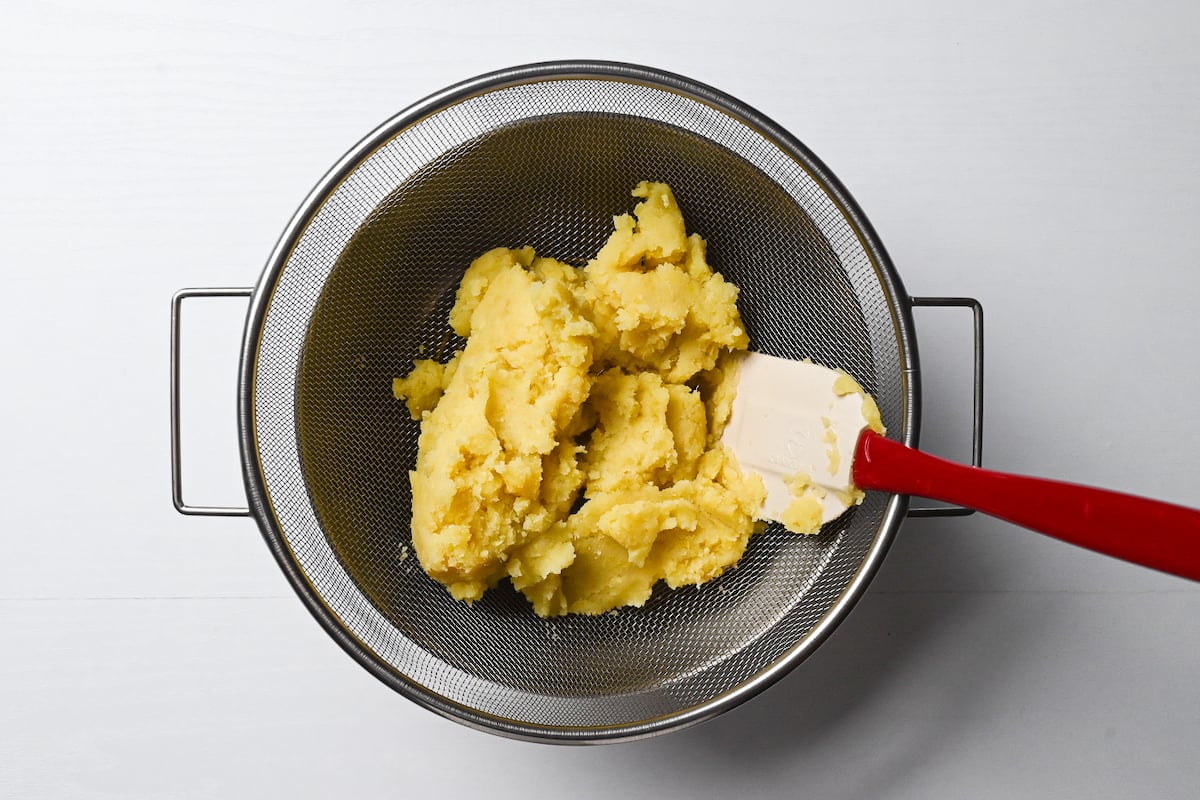
Use a spatula to work the mixture through a sieve. It will be beautifully smooth, so I feel this step is really worthwhile!
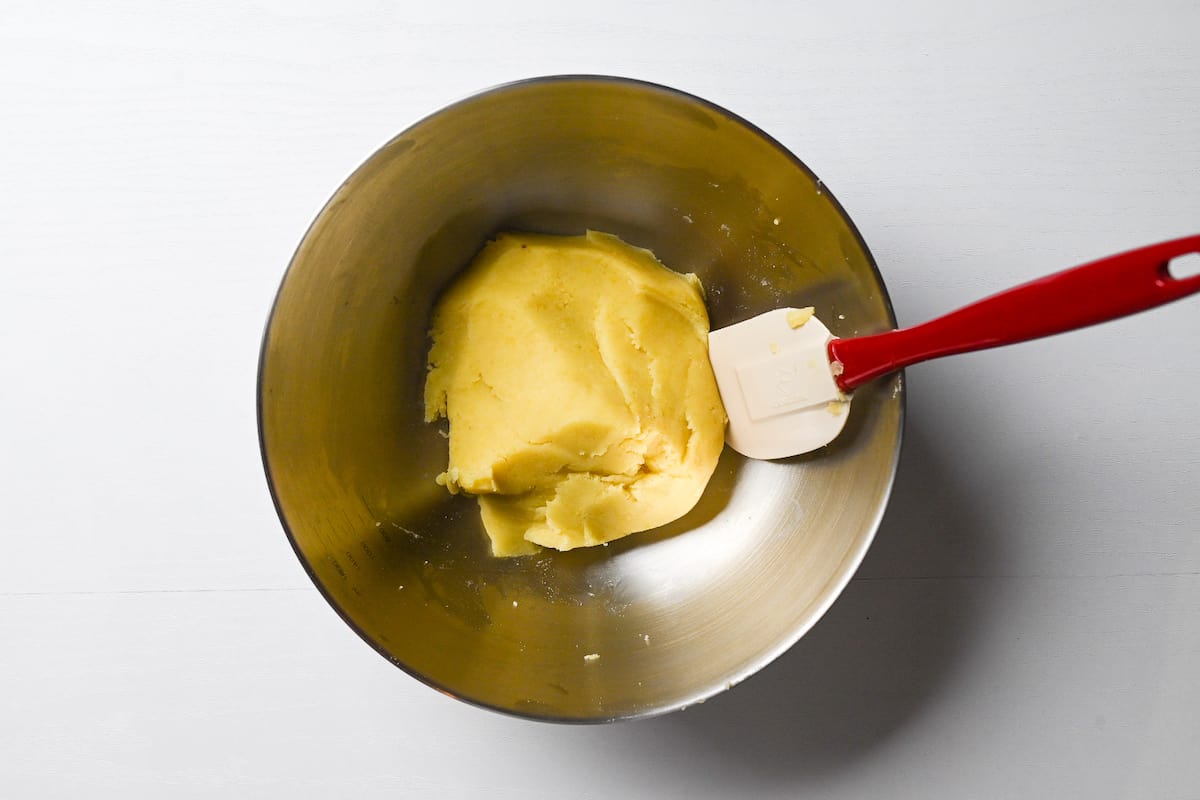
For perfectly uniform size, weigh the mixture using scales and then divide it precisely into 6-8 equal pieces. Each portion uses approximately 50g of mixture. Or you can eye-ball it, it’s up to you!
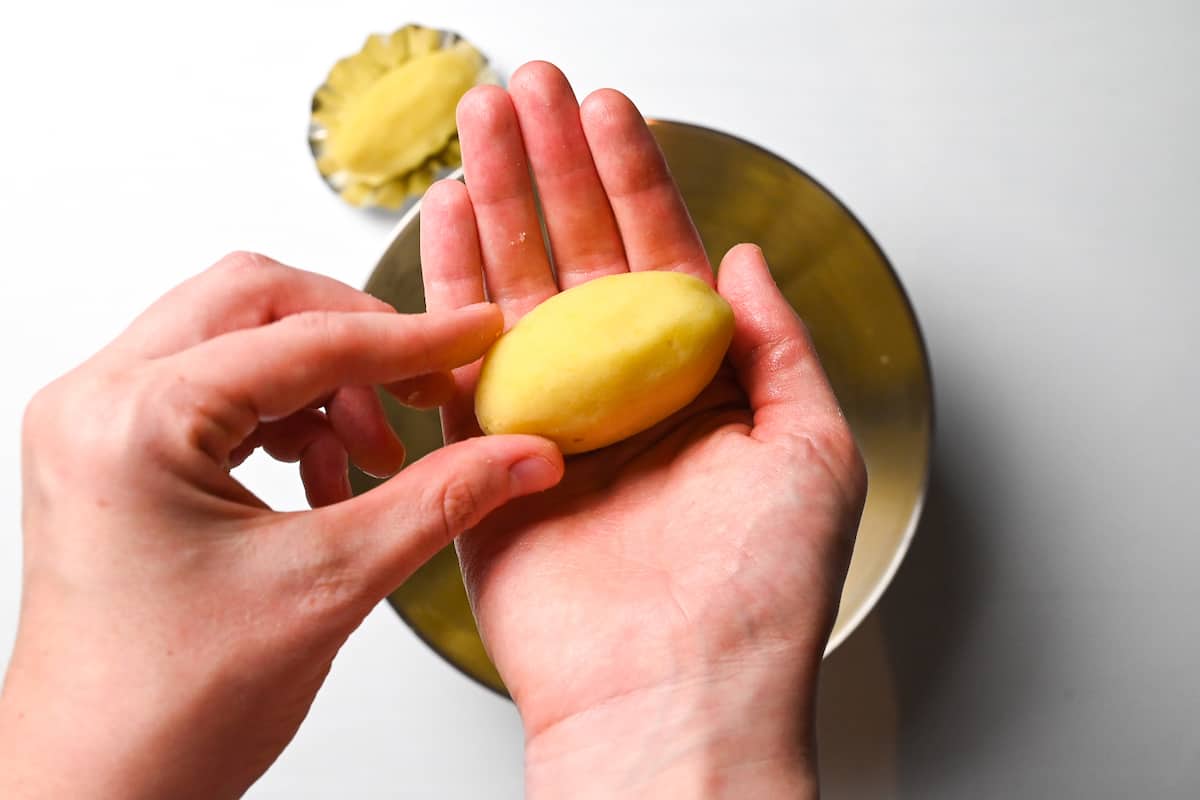
Roll the mixture in your palm to make an oval shape. It’s common to use foil cupcake cases (affiliate link) for these and flatten them out, but you can regular cupcake or muffin cases.
i. Whisk an egg yolk in a bowl and generously brush each sweet potato. You can use a pastry brush (affiliate link), the back of a spoon or even your finger. Make sure you get all around the sides so there isn’t any white parts showing, if you miss a spot it will become obvious after they’re baked.
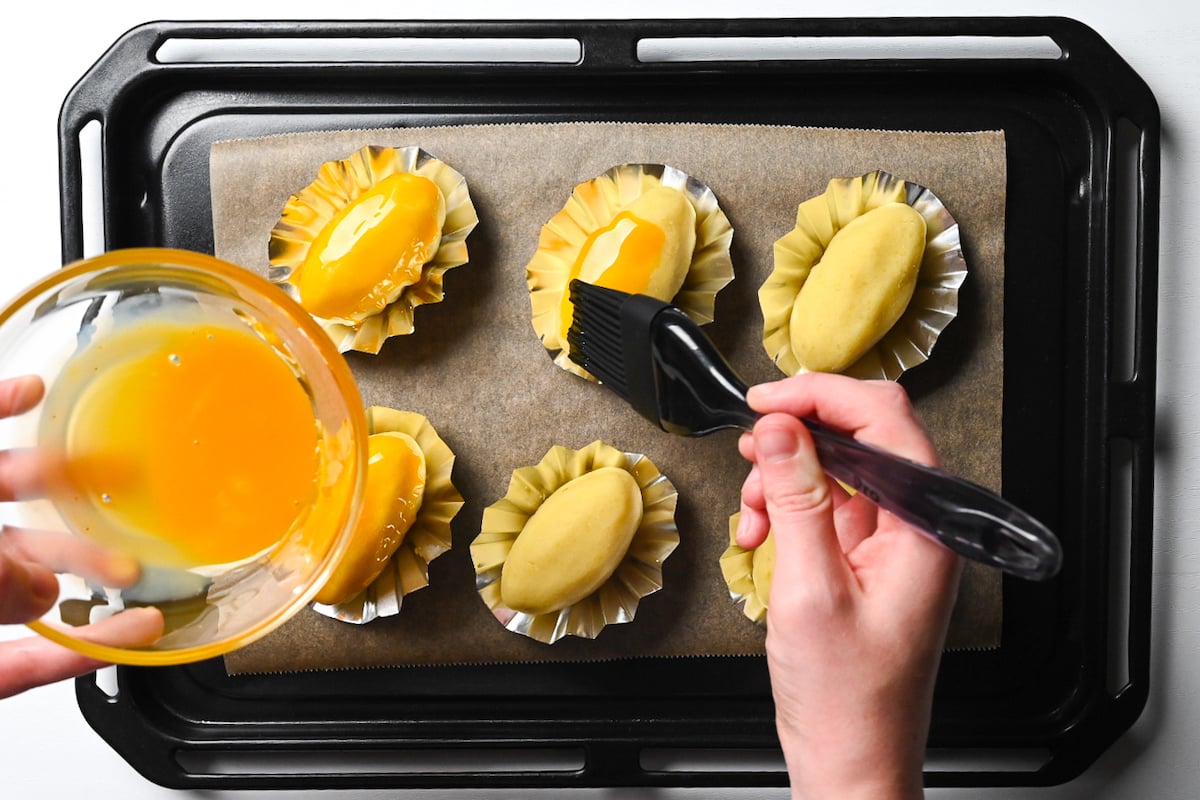
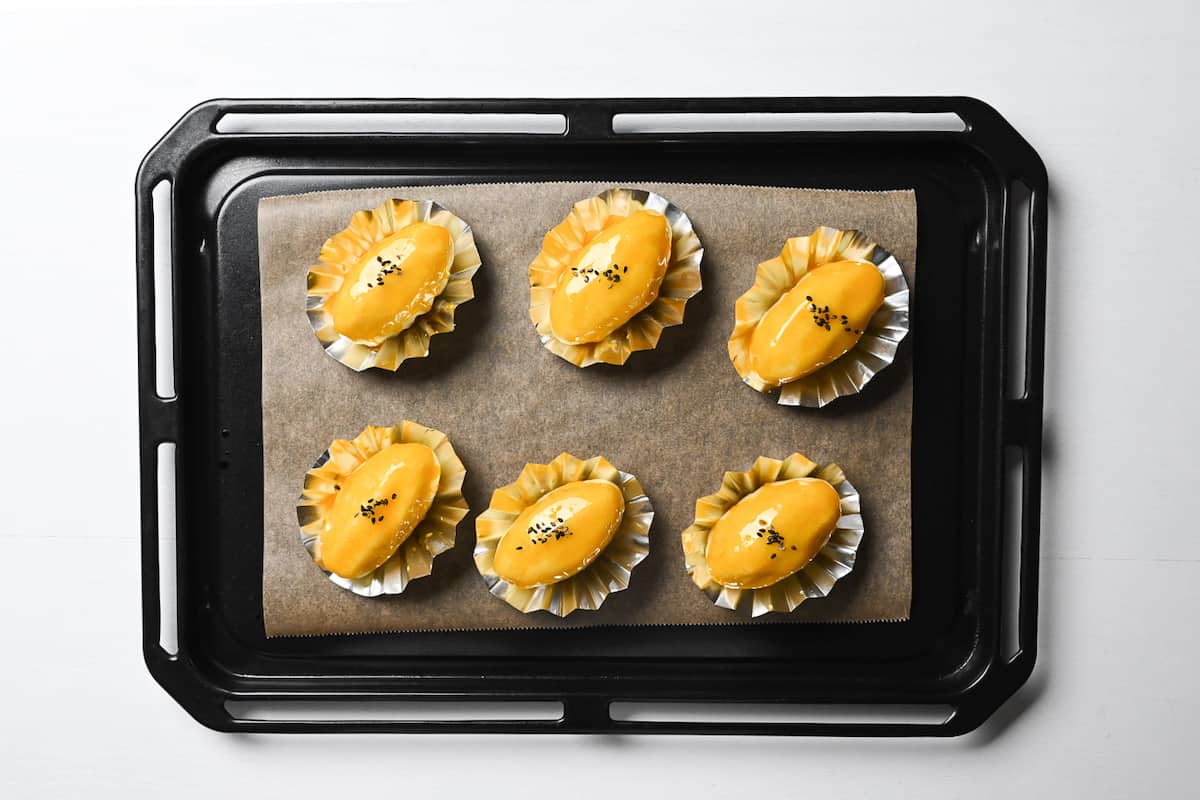
ii. Sprinkle each sweet potato with a few black sesame seeds and then bake in a preheated oven for about 15 minutes at 180°C (356°F) or lightly browned on top. (Alternatively, place in a toaster oven and cook until lightly browned.)
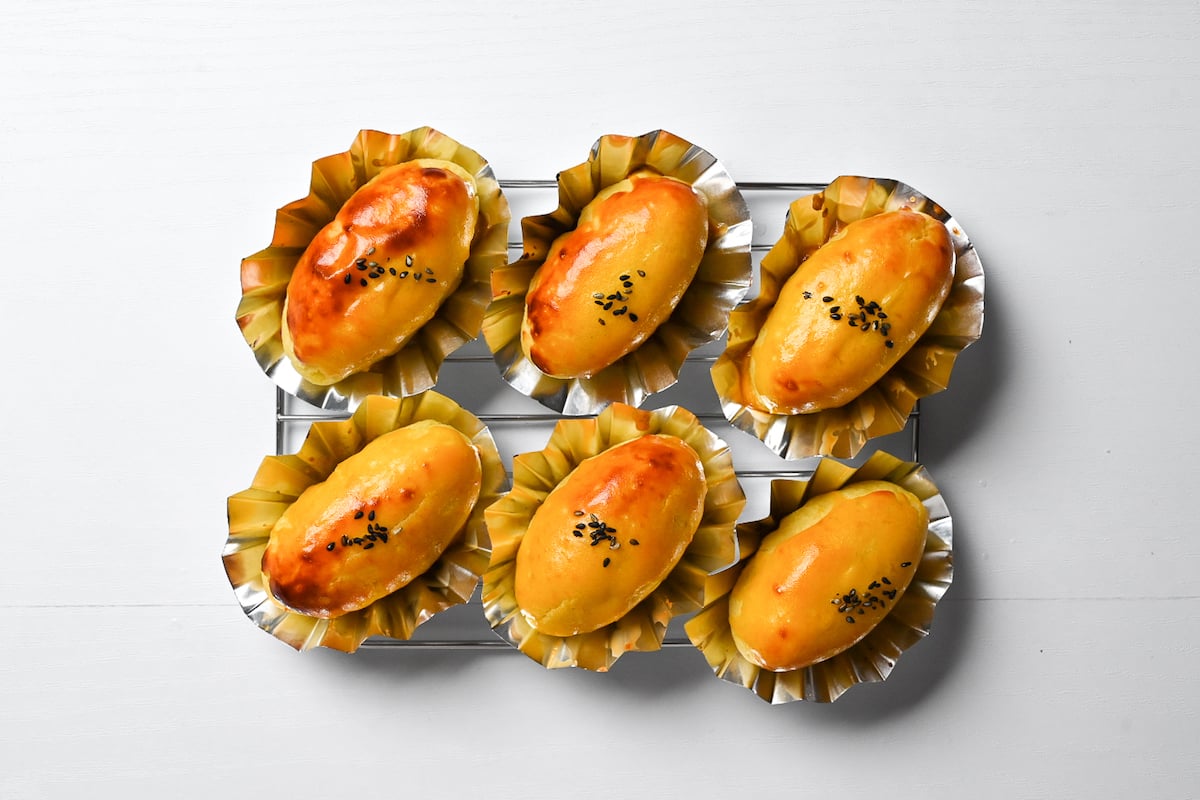
Place the baked sweet potato on a wire rack and leave them to cool. I like to chill them in the fridge before eating, but you can also enjoy them warm!
Enjoy!

Essential Tips & Tricks
- Cut the sweet potato into small pieces and microwave or steam for faster cooking.
- Mash the potato while hot to break them down more easily.
- Add the other ingredients while the potato is still hot to melt them into the mixture. Add cream gradually until you have a soft, shapable consistency. You might not need all of it.
- Scrape through a fine mesh sieve for an extra smooth texture (it’s worth it!)
- Make sure the egg-wash covers the whole surface. Missed spots will be obvious after baking.
With these simple tips in mind, you’re set for success every time you make suito poteto.
How to Store
Room Temperature: Sweet potato can be kept at room temperature in winter or cooler environments if you plan to eat them the same day (within 5-6 hours).
Fridge: If the weather is warm or you plan to eat them the next day or later, it’s better to keep them in the fridge. Store them in an airtight container in the fridge and eat within 2-3 days. I actually find they taste best the next day after being chilled overnight.
Freezer: Wrap them individually with plastic wrap and then store them in an airtight container to prevent freezer burn. You can store them frozen for up to 1 month.
Thawing/Reheating: Defrost them at room temperature or thaw in the microwave for about 20-30 seconds. If you prefer them warm, you can reheat them in a toaster oven or under the grill.
Japanese Sweet Potato Dessert Q&A
If the mixture is too crumbly to shape, try adding a little more cream/milk a little at a time. Knead well between each addition until you reach a shapable consistency.
It’s possible that your sweet potatoes contained more moisture than the ones I used in my recipe. Try microwaving a little longer uncovered to evaporate excess moisture, or try adding a small amount of cake flour or potato starch to absorb it. Knead well in between additions to avoid adding too much.
American Sweet Potatoes contain more moisture which will make them more difficult to shape. The flavor is also different to Japanese sweet potatoes. Using American Sweet Potato to make this recipe is not impossible, but I don’t recommend it either.
Despite its Japanese origins, the name “Sweet Potato” comes from the English language. In fact, many Japanese people believed that it was a Western dessert because of the name.
It is believed that it adopted its English name because it is made with typical Western ingredients like butter and milk or cream, these ingredients don’t tend to appear in traditional Japanese sweets and desserts.
In English it might feel natural to add the word “cake” or “dessert” to the name to differentiate the dessert from the sweet potato itself, however, this is not necessary in Japanese because sweet potato as a vegetable is called “satsumaimo” and the word “sweet potato” is only used for this dessert. Confusing right?
More Japanese Potato Recipes
- Japanese Candied Sweet Potato (Daigaku Imo)
- Sweet Potato Mash with Candied Chestnuts (Kuri Kinton)
- 3 Ways to Make Sweet Potato Tempura
- Imo Mochi (Japanese Potato Mochi)
Want more inspiration? Explore my Japanese Dessert Roundup Post for a carefully selected collection of tasty recipe ideas to spark your next tea party!
Did You Try This Recipe?
I would love to hear your thoughts!
💬 Leave a review and ⭐️ rating in the comments below. 📷 I also love to see your photos – submit them here!

Japanese “Sweet Potato” Dessert

Ingredients
- 350 g Japanese sweet potato (satsumaimo) weight before peeling, see note
- 30 g sugar
- 25 g unsalted butter
- 1 ½ tsp honey or maple syrup
- ½ tsp mirin or extra honey/maple syrup
- ¼ tsp vanilla essence
- 1 ½ tbsp heavy cream
- 1 egg yolk
- black sesame seeds
The ingredient brands and tools I trust are in my Japanese pantry guide and my cooking tools guide.
Can’t find certain Japanese ingredients? See my substitution guide here.
Instructions
- Preheat the oven 180 °C (356 °F). Peel the skin of 350 g Japanese sweet potato (satsumaimo) and cut it into slices approximately 1cm thick. (Cut larger pieces in half.)

- Place the pieces in a bowl of cold water with a pinch of salt and soak for 5 minutes. Drain the water and wash the pieces with cold running water to remove any excess starch.
- Transfer the sweet potato to a microwavable bowl and cover with plastic wrap. Microwave for 5-6 minutes at 600W, mix halfway through to ensure even cooking. (Be careful of the steam when removing the plastic wrap.)
- Mash while it's still hot until no lumps remain.
- Add 30 g sugar, 25 g unsalted butter, 1 ½ tsp honey, ½ tsp mirin, and ¼ tsp vanilla essence to the mashed potato. Mix until incorporated, then add 1 ½ tbsp heavy cream a little at a time, mixing with a spatula until incorporated. If you feel the mixture is becoming too soft, you don't need to add everything.
- Bonus step: Scrape the mixture through a fine-mesh sieve for an extra smooth result.
- Divide the mixture into equal 6 pieces and roll them into oval shapes.
- Place them in flattened cupcake cases on a baking sheet, then whisk 1 egg yolk in a small bowl and generously brush the tops and sides until fully coated.
- Sprinkle the tops with black sesame seeds and bake for 15 minutes or until the tops are lightly browned. (Alternatively, use a toaster oven or grill and cook until browned on top.)
- Cool on a wire rack for a few minutes, then serve them warm or chill in the refrigerator and serve later. Enjoy!
Video
That’s my first time with Japanese sweets, if they are all like this one, I’m gonna have a beautiful relationship with them ahahahah
Hi Andrea,
I’m so glad to hear your first Japanese sweet experience was a good one! Thanks for trying this recipe and sharing your picture, and I hope this is the beginning of a beautiful friendship with them. 🙂
Yuto
Hi Yuto,
I’ve made this recipe few times now and I really like the flavor but every time the mixture seems to be too soft and hard to shape. This time I even completely avoided to add the heavy cream in hope to make a firmer mixture but it wasn’t. What can I do?
Hi Andrea,
Thank you for trying the recipe! I’m sorry to hear it hasn’t been working for you.
Are you using Japanese sweet potatoes? American sweet potatoes are too wet for this recipe, but even Japanese sweet potatoes vary in moisture. I use a starchy type like beni azuma or naruto kintoki, silk sweet can also work. If you can’t find these specific varieties, my suggestion would be to microwave them a little longer uncovered to dry them out a bit, or as a last resort, add a touch of potato starch to absorb some of that excess moisture. I hope this fixes the problem, let me know how it goes!
Yuto
Thanks! I also thought it was the variety, here in Italy normal supermarkets sells sweet potatoes from Egypt (orange skin and orange pulp) but in ethnic supermarkets I’ve found a different variety (reddish skin white pulp) that the guy at the shop called “Chinese sweet potato”. I’ll try your suggestions!
No problem! Ah yes, I think the orange type are similar to the American ones. White pulp sounds the same as Japanese sweet potatoes, I hope you have more luck with the Chinese sweet potato! Let me know how it goes.
All the best,
Yuto