


Featured Comment
This is a phenomenal recipe! Thank you for the clear directions, the thorough explanation and the Q&A section WOW this is the best recipe i have seen in a long time.
★★★★★
– Rachel
Think you need store-bought okonomiyaki mix to make a great okonomiyaki? You are not alone. Even in Japan, most home cooks reach for the premixed bag without a second thought, the same way they reach for a box of curry roux.
But authentic okonomiyaki is completely doable with plain flour. To my taste it comes out even better that way, closer to an Osaka specialty shop. I will show you how to build it from scratch, wherever you are in the world, no specialty mix required. Once you nail this, it is going to be your go-to move at any casual Japanese dinner party.
Osaka Okonomiyaki
Recipe Snapshot
- What is it? The Osaka mix-and-grill style of okonomiyaki, where the batter, cabbage, and toppings all go into 1 bowl and cook as a single round, rather than the layered Hiroshima okonomiyaki. At heart it is a cabbage dish held together by a thin, dashi-flavored batter, finished with sauce, mayo, bonito flakes, and aonori.
- Flavor profile: Savory and a little sweet, with a crisp pork-fat edge against a soft, cabbage-sweet interior, all carried by a dashi backbone in the batter and a okonomi sauce on top.
- Why you will love this recipe: It frees you from the bag of pre-made okonomiyaki flour, building everything from plain pantry staples instead, which means you can make a specialty-shop-style okonomiyaki anywhere in the world.
- Must-haves: Unbleached low-protein cake flour or AP flour, a generous amount of tender cabbage, and thinly sliced pork belly for that crisp top.
- Skill level: Medium. The mixing and the flip take a little nerve and a couple of rounds of practice, but the batter rests on its own and a wide turner does most of the heavy lifting.
Summarize & Save this content on:
What Is Osaka Style Okonomiyaki?
Okonomiyaki (お好み焼き) is a lot more than the shorthand “Japanese savory pancake” lets on. The word “okonomi” means “as you like,” so the name is an open invitation. Osaka style and Hiroshima style are 2 different builds. Hiroshima stacks batter, cabbage, pork, and noodles in layers. Osaka mixes it all into 1 bowl and grills it together, bound into a single layer.
Here is the part that flips your mental picture. This is not a pancake with cabbage stirred in. It is a cabbage dish, and the batter is just enough glue to hold it together. Cabbage outweighs the flour, so what you build is a hot, golden cabbage round bound by a thin dashi batter, not a bread base with a few shreds.
In my version, I skip the bag of pre-made okonomiyaki flour that most home cooks in Japan reach for, and build it from scratch. Premix always tastes like premix, and to my taste from-scratch lands closer to a specialty shop. It travels too: you can make it anywhere with plain flour you already keep on the shelf.
Okonomiyaki Ingredients
What You’ll Need for OKONOMIYAKI
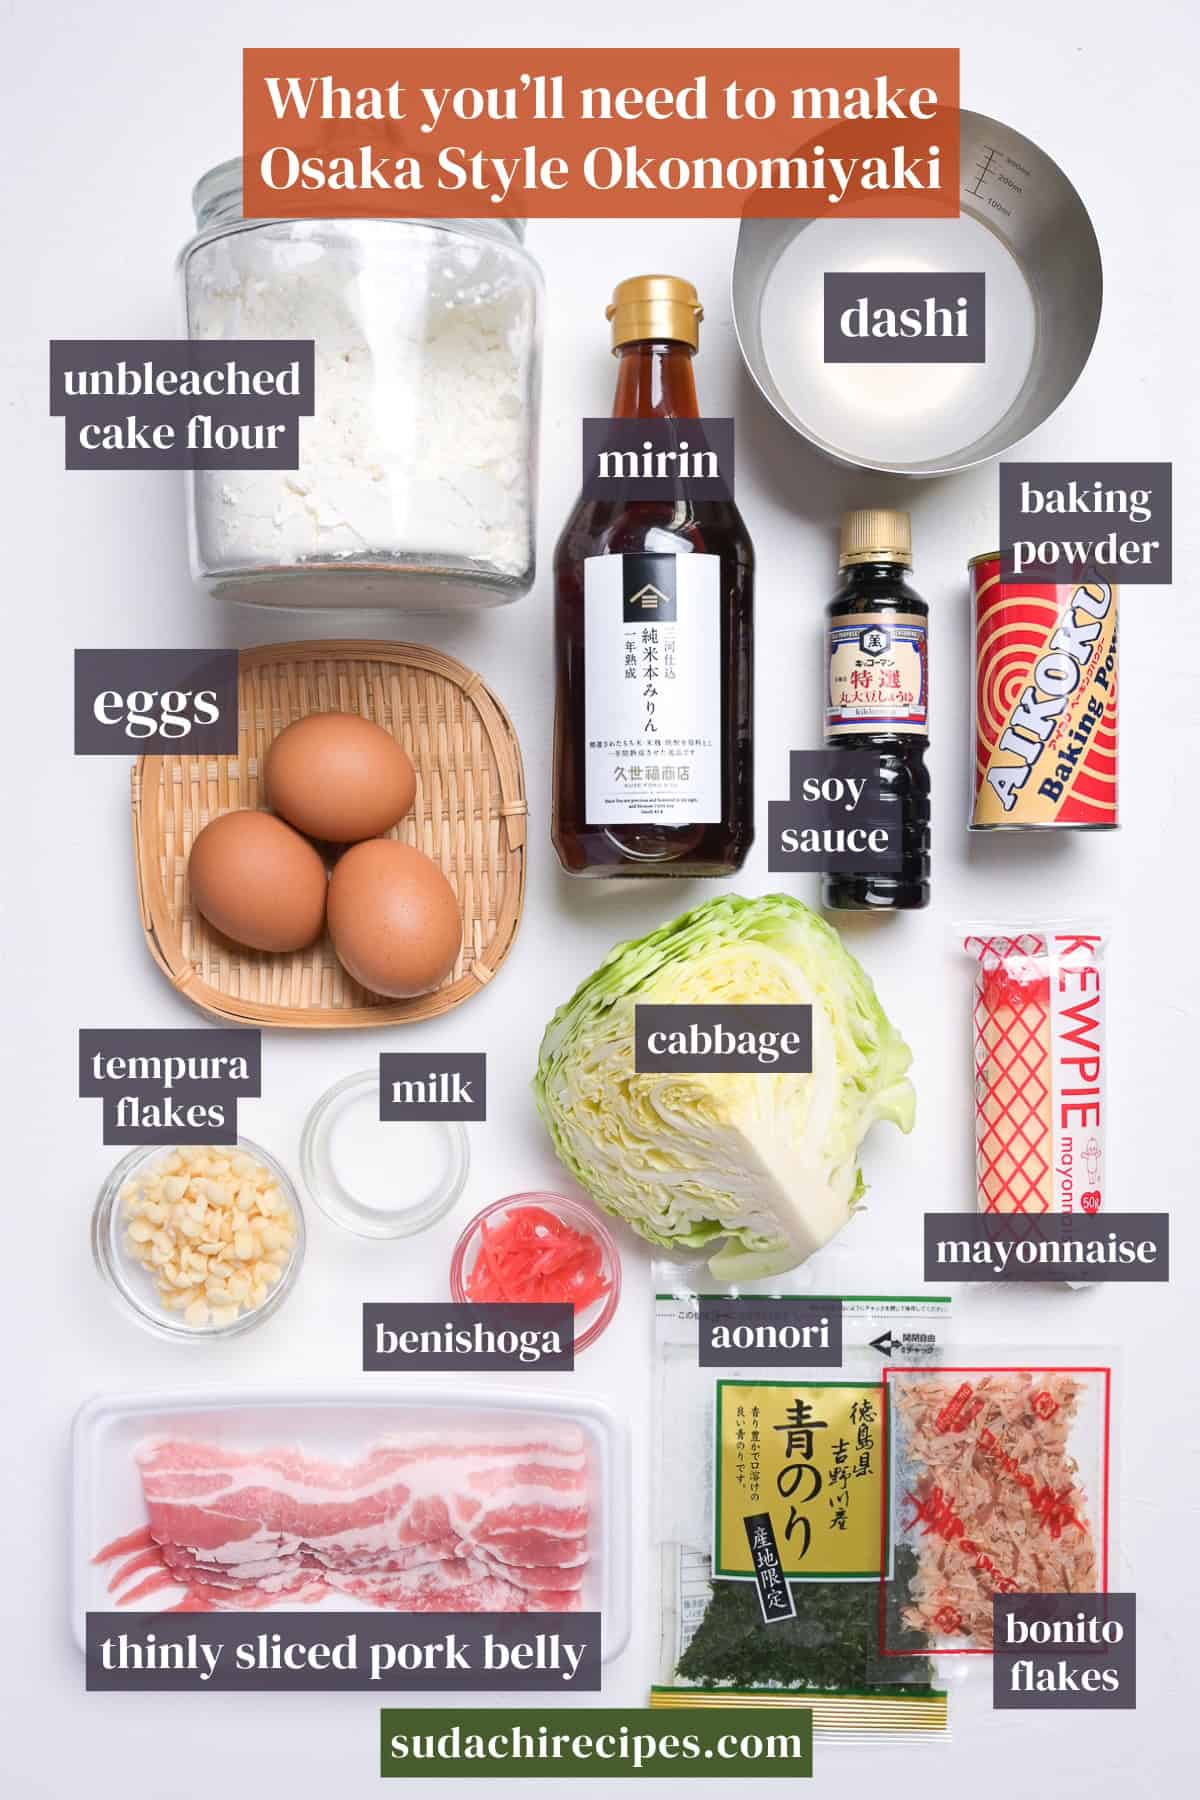
- Unbleached cake flour (or plain flour): Reach for a low-protein cake flour if you can. Less protein means less gluten, and that is exactly what you want here, just enough to bind the cabbage and not a shred more. In Japan I use unbleached cake flour, but plain all-purpose flour works fine, which is the whole reason you can make this anywhere in the world. Avoid bread flour.
- Cooled dashi stock: This is the flavor backbone of the batter, and water alone tastes flat and raw by comparison. In theory, this is how the from-scratch version is better than premix. The one rule that matters: cool it down before it touches the flour. Granular instant dashi is a perfectly honest shortcut.
- Green cabbage: The star, by weight and by spirit. Cabbage is the bulk of the dish, not the batter, so do not be shy with it. Go for tender spring or pointed cabbage over a dense winter head, it softens kindly and keeps the inside light. The dense stuff drags everything down.
What You’ll Need for Okonomi Sauce

- The okonomiyaki sauce (from scratch): Ketchup, Worcestershire, oyster sauce, honey, and a little soy, whisked together in a bowl. A bottle of okonomi sauce is one of those condiments that sits in the fridge forever after a single use, and pantry staples you already own do the same job without the graveyard shelf.
Substitutions, Variations, and How to Customize
Here is the honest truth about okonomiyaki. Wherever you live, you can probably build a real one tonight, because almost every piece has a swap that lands you in the same neighborhood. The 2 things you cannot fake are cabbage and a flour base to bind it. Everything else flexes.
Substitutions:
- Cake flour → All-purpose (plain) flour: Plain flour is a touch higher in protein, so the result reads slightly denser, but it is genuinely close and it is what makes this recipe makeable anywhere.
- Cooled dashi → Granular instant dashi or a dashi packet: A granular dashi mixed in cooled water is a clean swap that skips a whole step. Just keep the liquid cool before it meets the flour. Plain water with no dashi at all tastes flat, so reach for something.
- Thinly sliced pork belly → Streaky bacon, thin pork shoulder, or shrimp and squid: Bacon brings smoke and flavors the whole round, so cook it for the fat first and lean on it or lean away on purpose. Thin pork shoulder is a quieter stand-in. For a seafood okonomiyaki, briefly sear shrimp or squid to drive off water, then fold them into the batter.
- Tenkasu (tempura flakes) → Crushed plain potato chips or quickly fried panko: Tenkasu adds little pockets of fat and crunch. Crushed plain salted chips do the same trick in a pinch. Use plain, not flavored.
- Homemade okonomiyaki sauce → Store-bought bottle
Have trouble finding Japanese ingredients? Check out my ultimate guide to Japanese ingredient substitutes!
Variations:
- Grated nagaimo (Japanese yam): This recipe leans on a pinch of baking powder for lift because nagaimo is hard to find outside Japan. If you can get nagaimo, it is the upgrade. Grate it in and it traps and stabilizes air like nothing else, giving that silky, melt-in-the-mouth bounce that is the go-to in Japan. Freeze-dried yam powder is the next best thing.
- Grated zucchini (skin on): The substitute that Japanese who live abroad use sometimes. Grate it with the skin on for a little moisture and a gentle lift. It is not identical to yam, but it earns its place.
- Modan-yaki with yakisoba noodles: Fold cooked yakisoba noodles into the build for a heartier round. This is a postwar Osaka favorite in its own right.
How to Customize:
The name says “as you like,” so this is your playground, with 1 piece of advice: nail the basic round once before you start loading it up. Once you know how the standard build behaves, you have the footing to experiment without it falling apart on you.
- Green onions or garlic chives: Mixed into the batter, green onions add color and a mild bite, garlic chives a deeper one. Cut chives into short lengths so they spread evenly.
- Cheese or mochi: Cheese melts beautifully tucked into the surface before you flip it. Dice mochi small and fold it into the batter, but go easy, a little goes a long way.
- Kimchi, corn, or mentaiko: Fold these into the batter. Drain kimchi well and dial back the salt elsewhere, drain canned corn, and use mentaiko in small amounts, where it pairs especially well with cheese and mochi.
When you try something new, start with a little. You can always add more next time, and it is a lot harder to walk back a flavor once it is mixed in.
How to Make My Okonomiyaki
If you prefer to watch the process in action, check out my YouTube video of this okonomiyaki recipe!

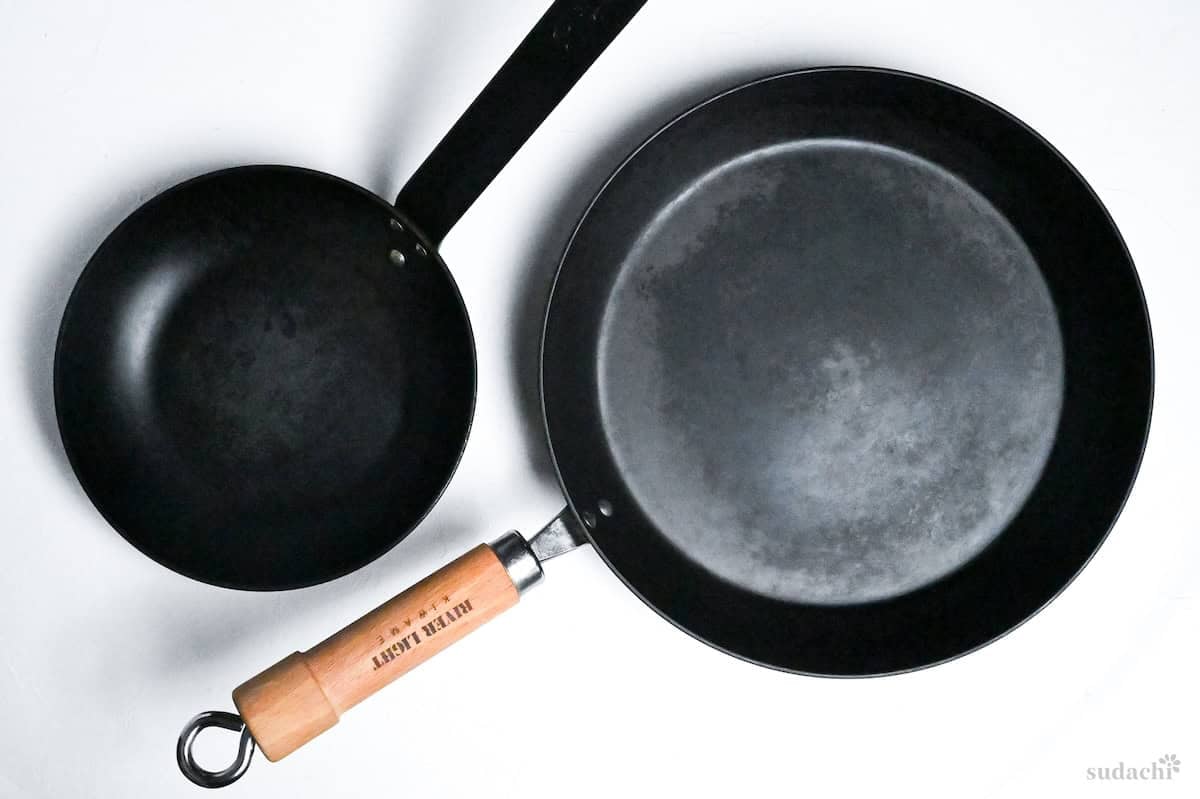
To develop this okonomiyaki recipe, I used a 28cm carbon steel pan.
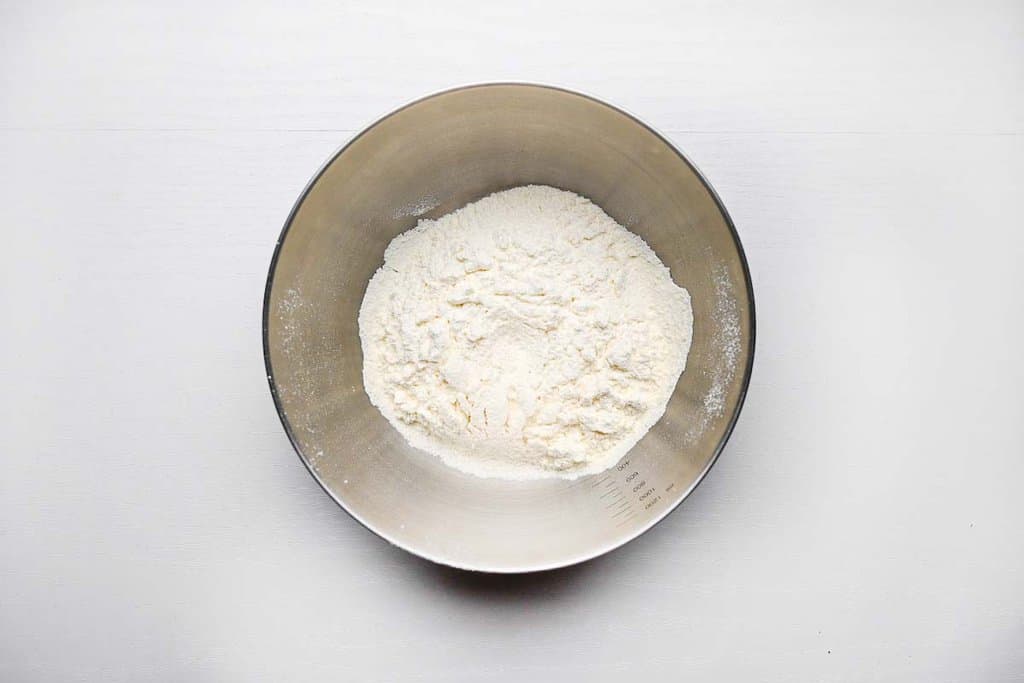
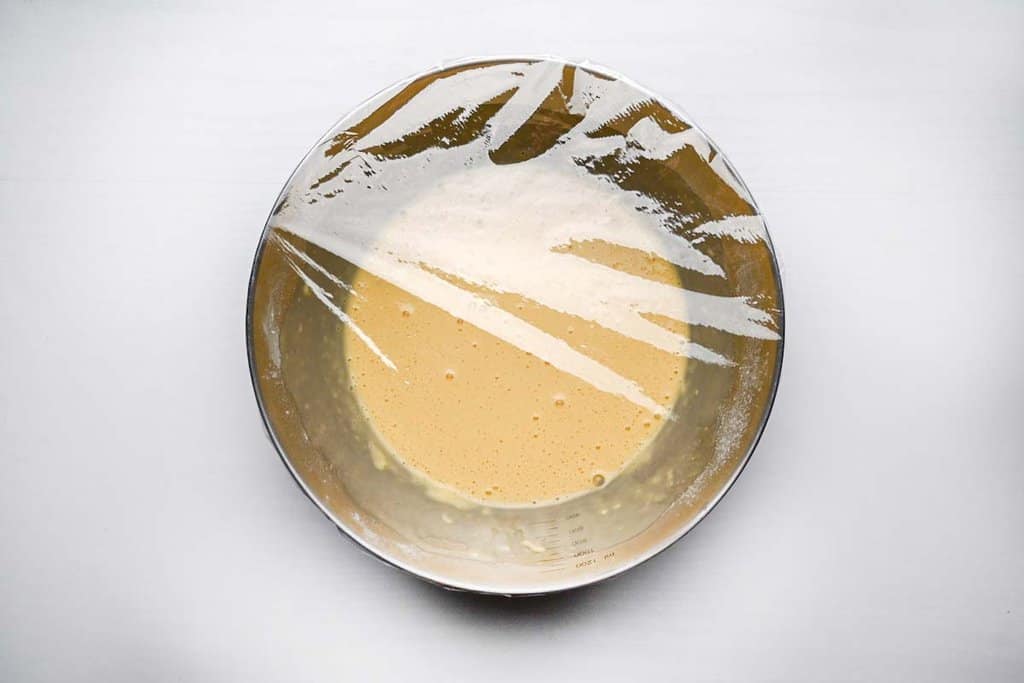
i. In a large mixing bowl, combine sifted unbleached cake flour (or all-purpose) and baking powder.
ii. Then, whisk in the cooled dashi, milk, soy sauce, mirin, and egg until just combined.
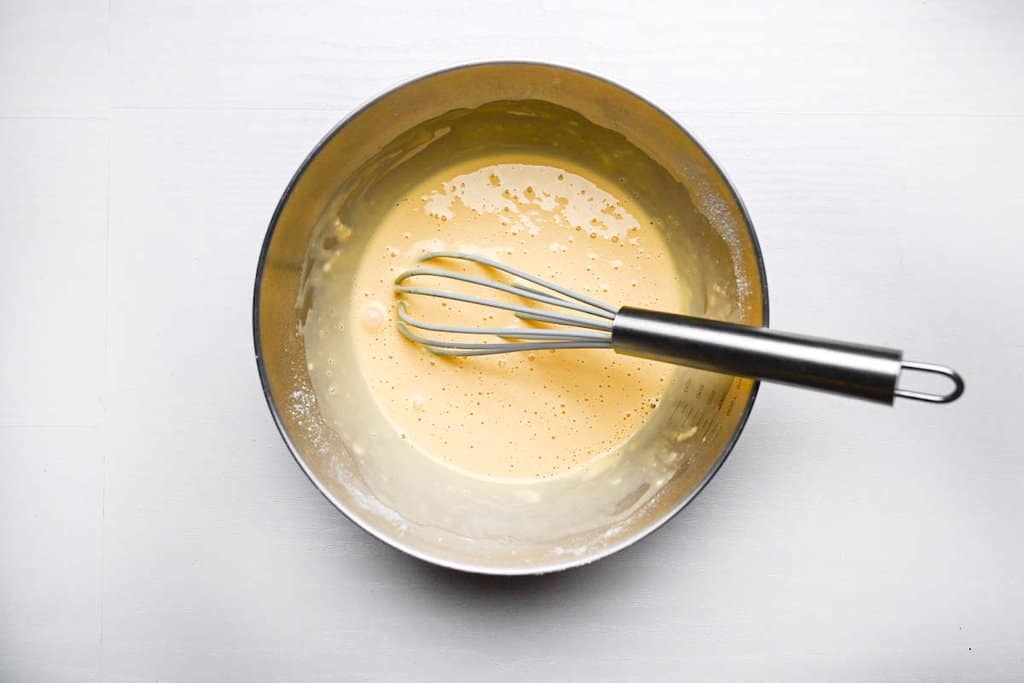
Whether you use instant dashi,dashi packets, or homemade dashi, hot dashi can make gluten develop too quickly, which can make the mixture gummy and heavy. So, make sure to use dashi that’s either room-temperature or chilled.

iii. Cover the bowl and chill it for at least 30 minutes (an hour is even better) while you get everything else ready.
Resting lets moisture distribute evenly and gives the gluten network time to settle, helping you get a thicker, easier-to-shape okonomiyaki. If you really don’t have time, you can skip the rest, but the pancake may spread a bit more.
i. Mix Worcestershire sauce, oyster sauce, ketchup, honey, and soy sauce in a small bowl and set it aside for later. If you already have store-bought okonomiyaki sauce, you can skip to the next step.
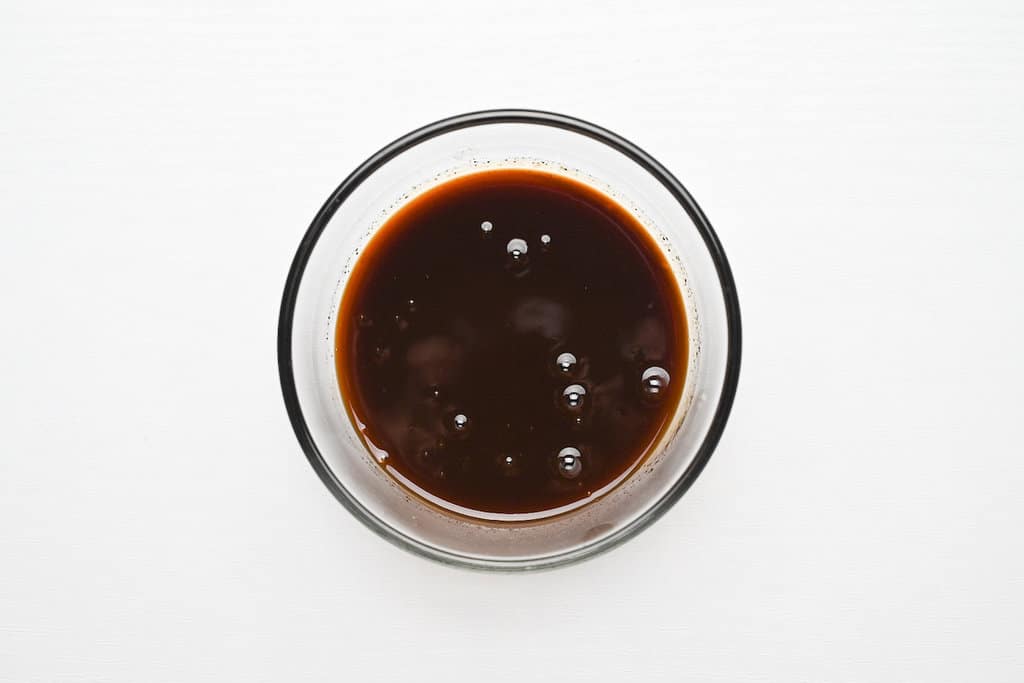
ii. You can also adapt the ingredient ratio to suit your tastes. For example, add more honey or ketchup if you want it sweeter. If you want it to be saltier, add more soy sauce or even a pinch of salt.
Most people in Japan use store-bought okonomiyaki sauce, but I don’t make okonomiyaki that often. You know those condiments that sit in your fridge forever after one use? That’s okonomiyaki sauce in a nutshell.
Instead of having a whole bottle sitting around, I make sauce from scratch using pantry staples I already have. If it makes sense for me in Japan where the sauce is cheap and available everywhere, it definitely makes sense outside of Japan too. You’ll save money and fridge space, and you can control what goes into the sauce!
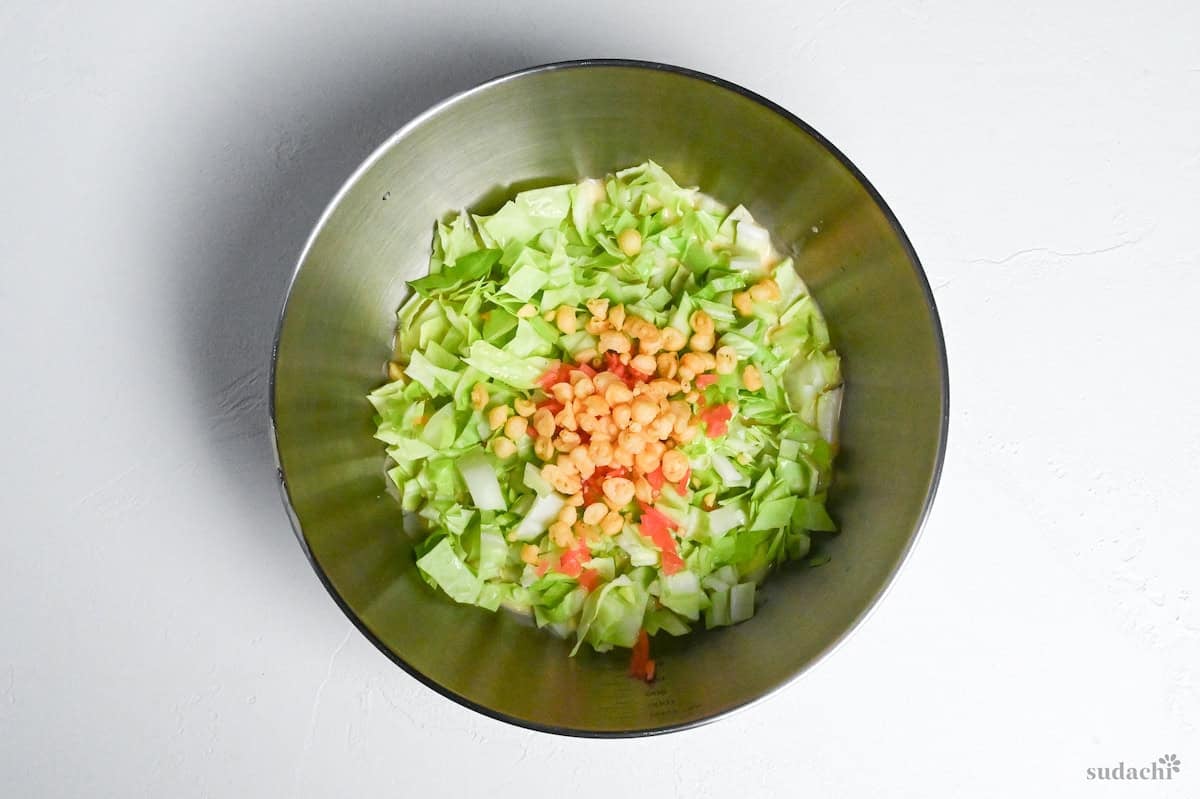
i. It is undeniable that cabbage is one of the most important ingredients for okonomiyaki, and it should be cut roughly yet finely.
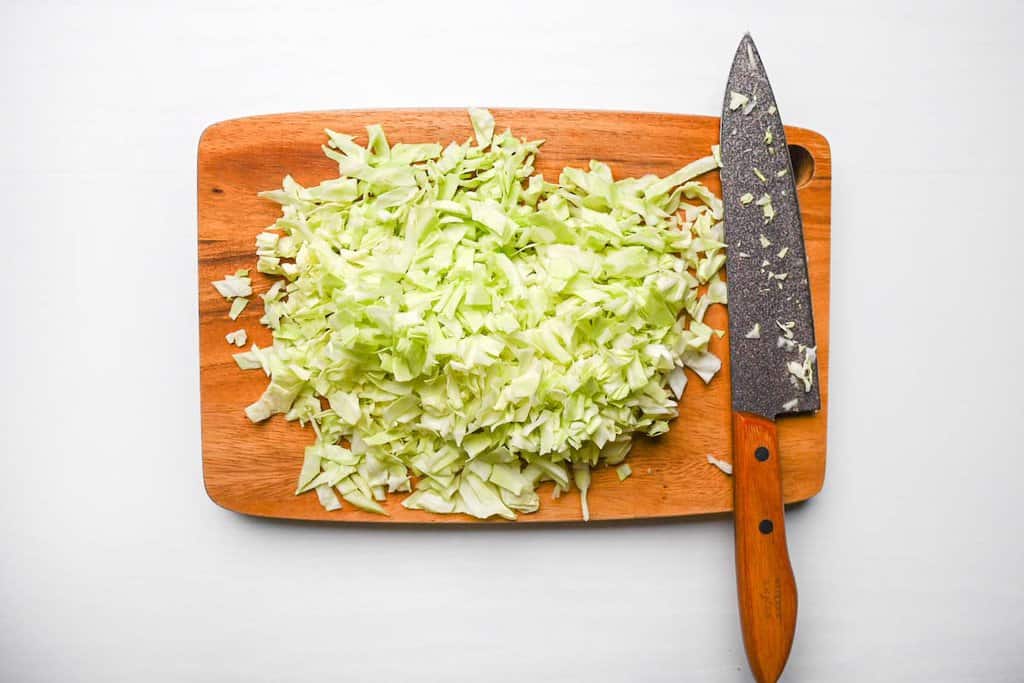
ii. If you cut it too thin or finely, the moisture from the cabbage starts to leak out, negatively affecting the texture of your okonomiyaki. By cutting it small but rough, you can enjoy the texture of the cabbage and avoid making your batter sticky or watery.
Try spring, green, or pointed types, go for tender over dense. Tough winter cabbages take longer to soften and can weigh the batter down.
i. Divide the rested batter into two bowls (one goes back in the fridge while you cook the first pancake).
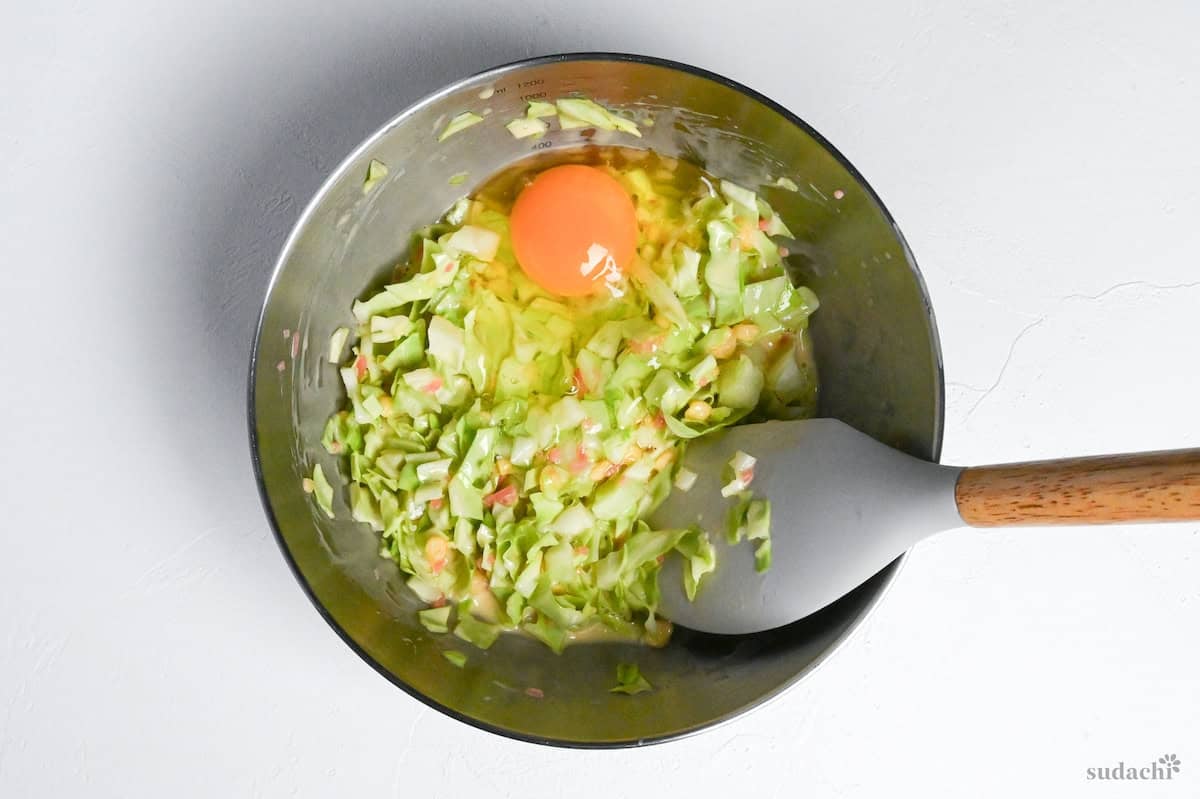
ii. Working quickly so the cabbage stays crunchy, fold the chopped cabbage, tenkasu (sub crushed plain potato chips in a pinch), and minced red pickled ginger into the batter. Crack in an extra egg and stir just until you stop seeing streaks.
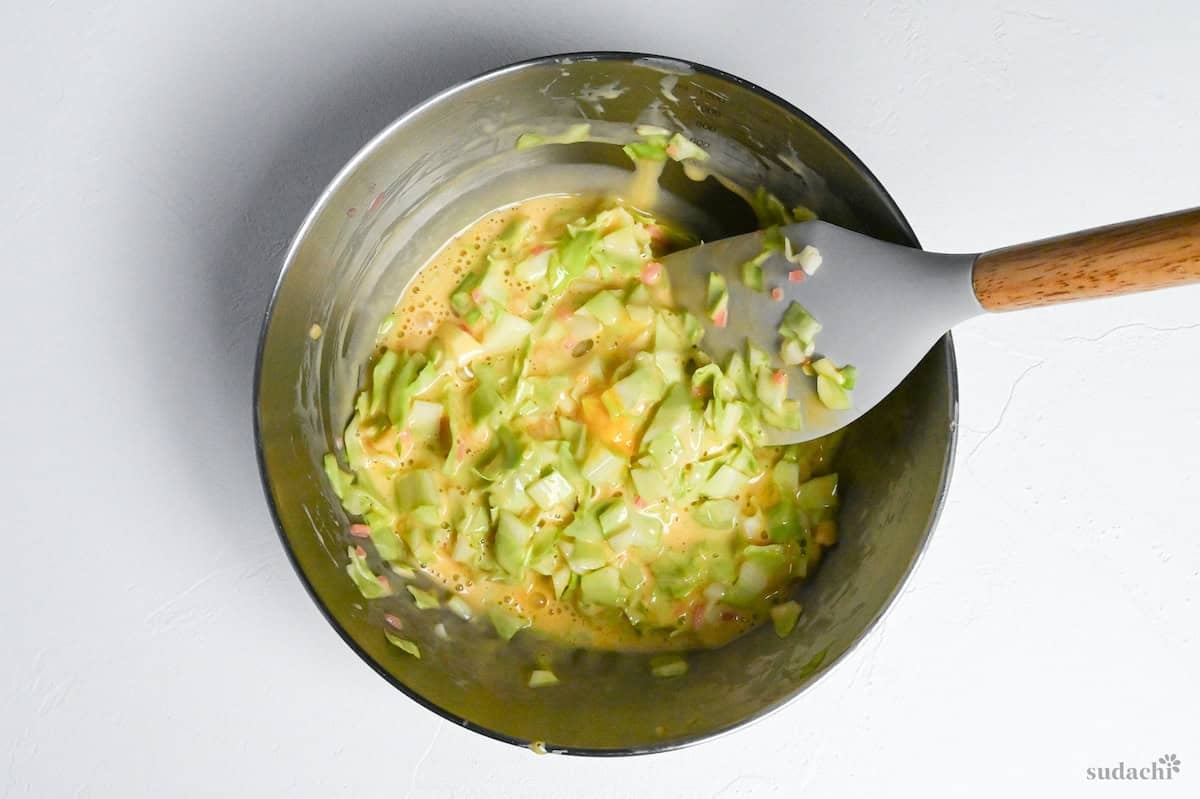
If you over-stir, you toughen the gluten and knock out the air. If you under-mix, you end up with unstable pockets that collapse when you flip the dough. Try for a light 30-second fold that feels more like tossing a salad than whipping cake batter.
If you’re chasing ultra-light texture and don’t mind the extra work, beat the egg whites to soft peaks and fold them in. I personally don’t usually do this but it’s fun to make sometimes if you like that soufflé-like texture.
i. Heat a well-seasoned cast-iron or heavy stainless skillet over medium-high heat until a bit of water dances and evaporates.
Cast iron retains heat, which sears the crust before the center overcooks. Non-stick works okay, but don’t crank it up too high because the coating doesn’t do well with extreme temperatures.
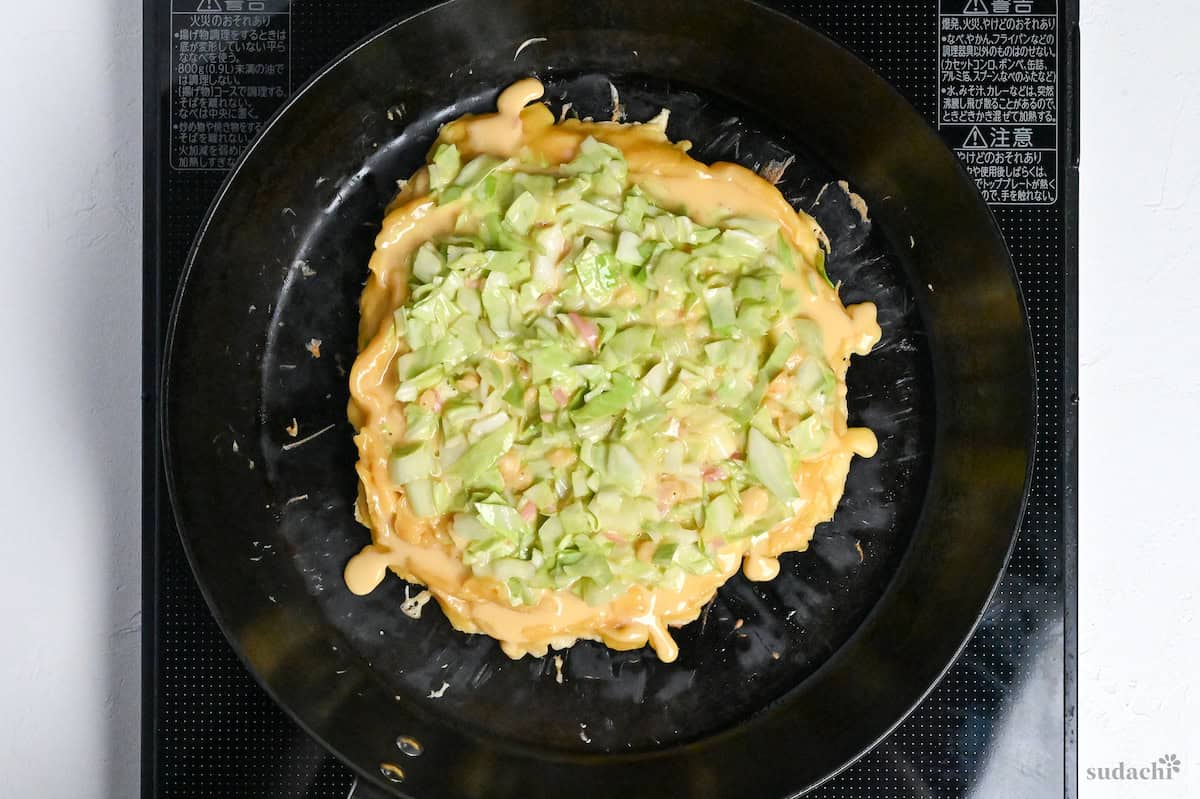
ii. Add a thin layer of neutral oil, then pour the batter into the center. Use a spatula to shape it into a circle that’s 14-16cm (about 6½ inches) wide and 2cm (just under ¾ inch) thick. This is the “average” size.
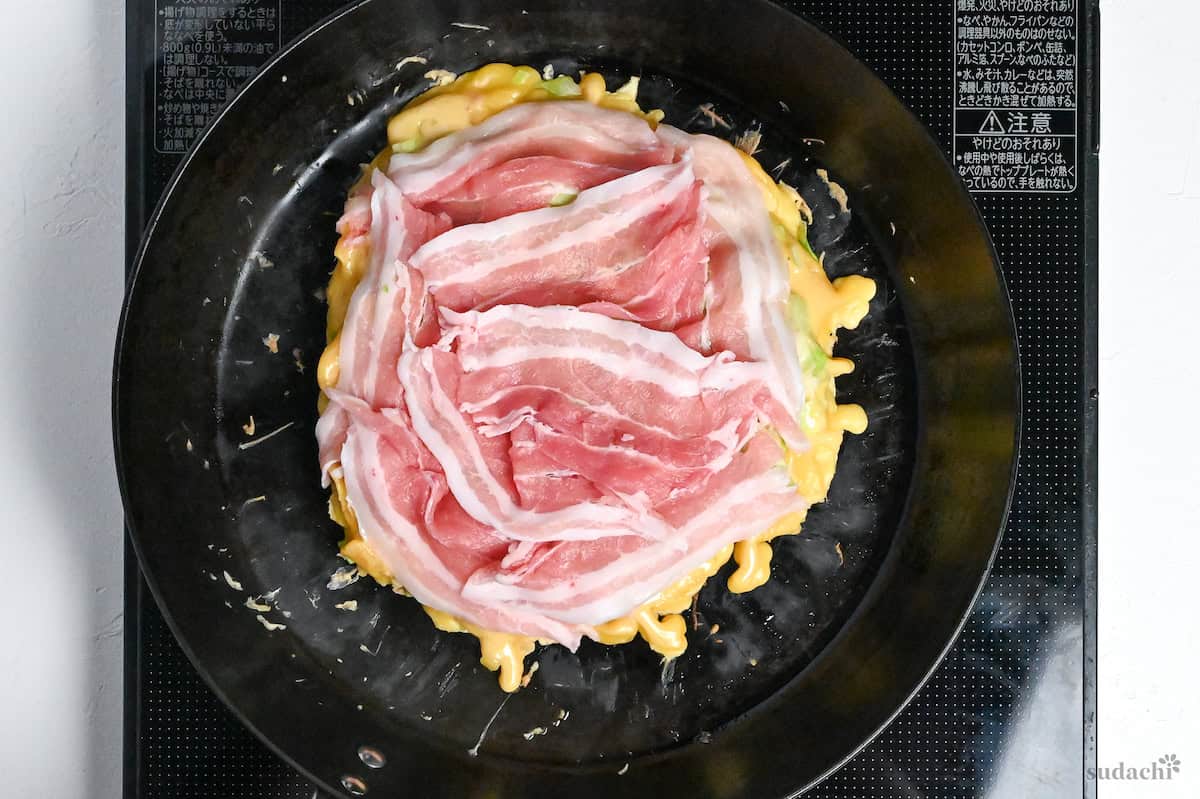
iii. Lay thin pork belly slices over the surface. As the meat sizzles, its rendered fat effectively shallow-fries the top, adding smokiness and preventing curl.

i. When the edges are dry and the bottom is a deep golden color, slide a wide spatula (or two smaller ones) under the cake and flip it in one confident motion. Then, turn the heat down to medium-low, put the lid on, and let the steam finish cooking for 5 minutes.
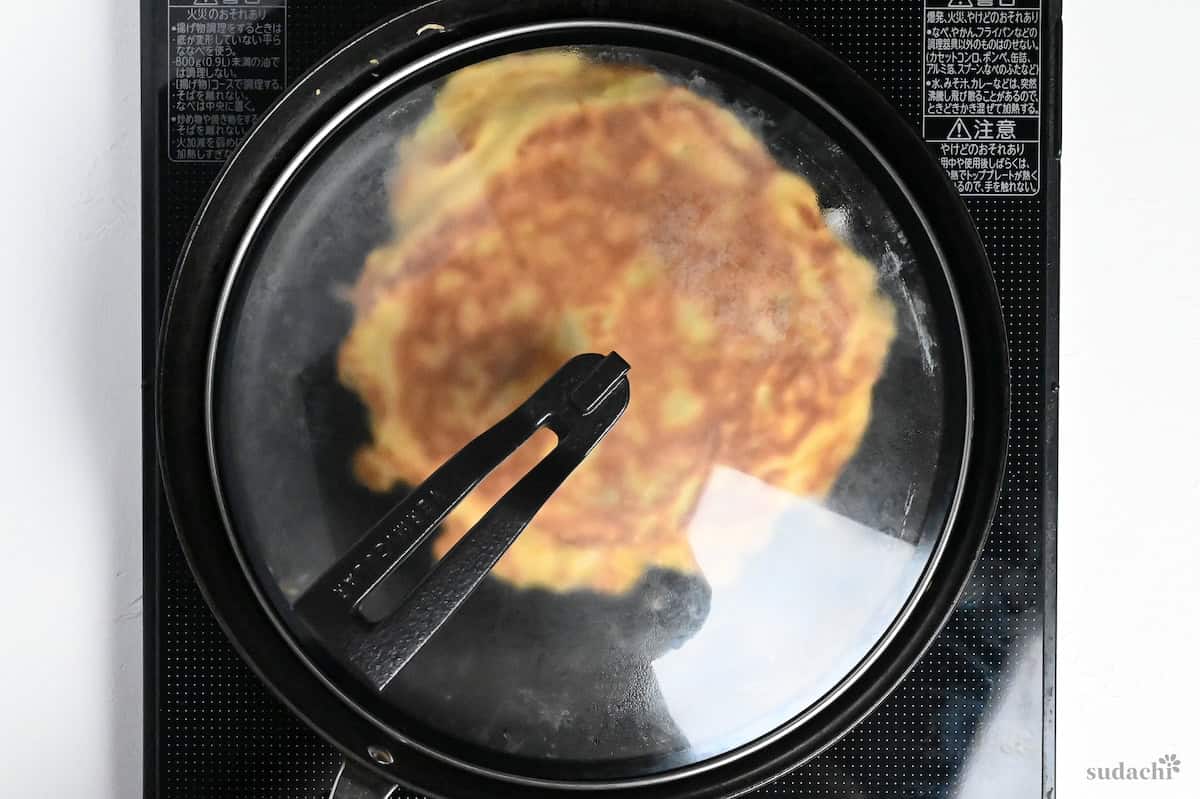
ii. Resist flattening with your spatula. Pressing squeezes out the air and water vapor that make the interior light and juicy.
Steam brings gentle, all-around heat so the center sets without burning the crust. Take the lid off after 5 minutes re-crisp the surface and get rid of any excess moisture.
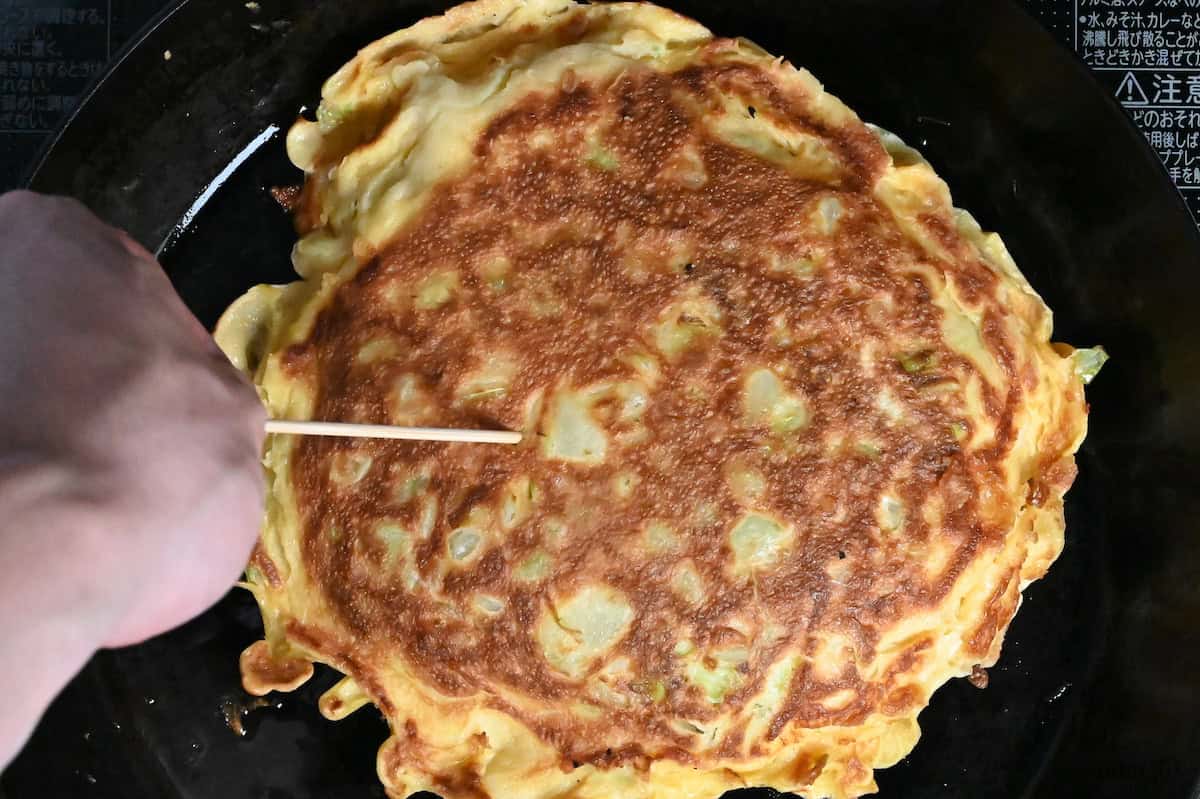
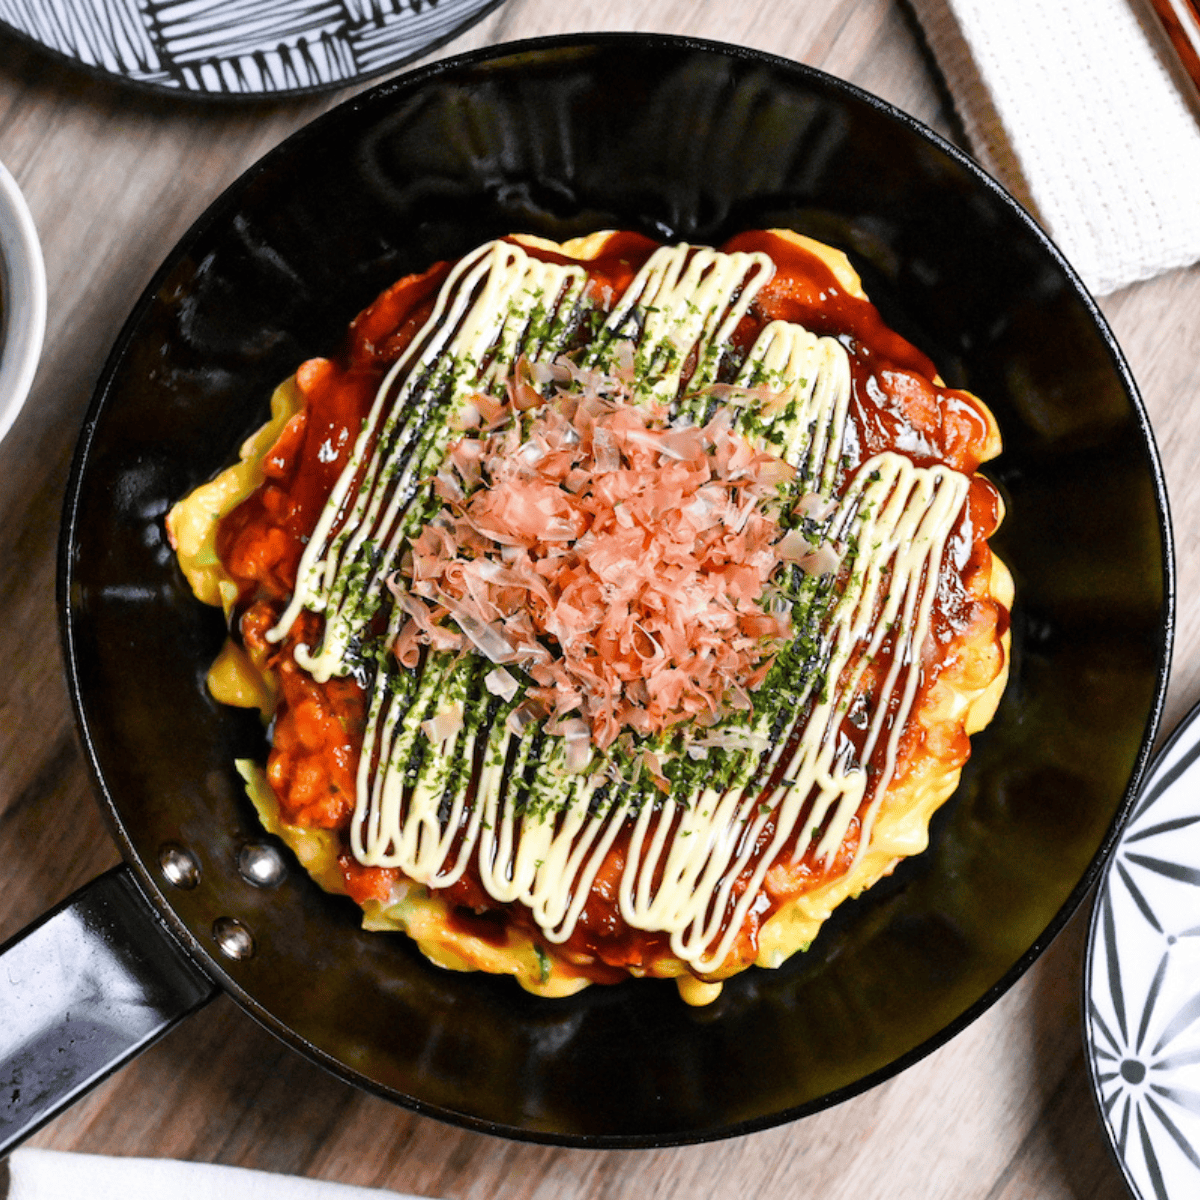
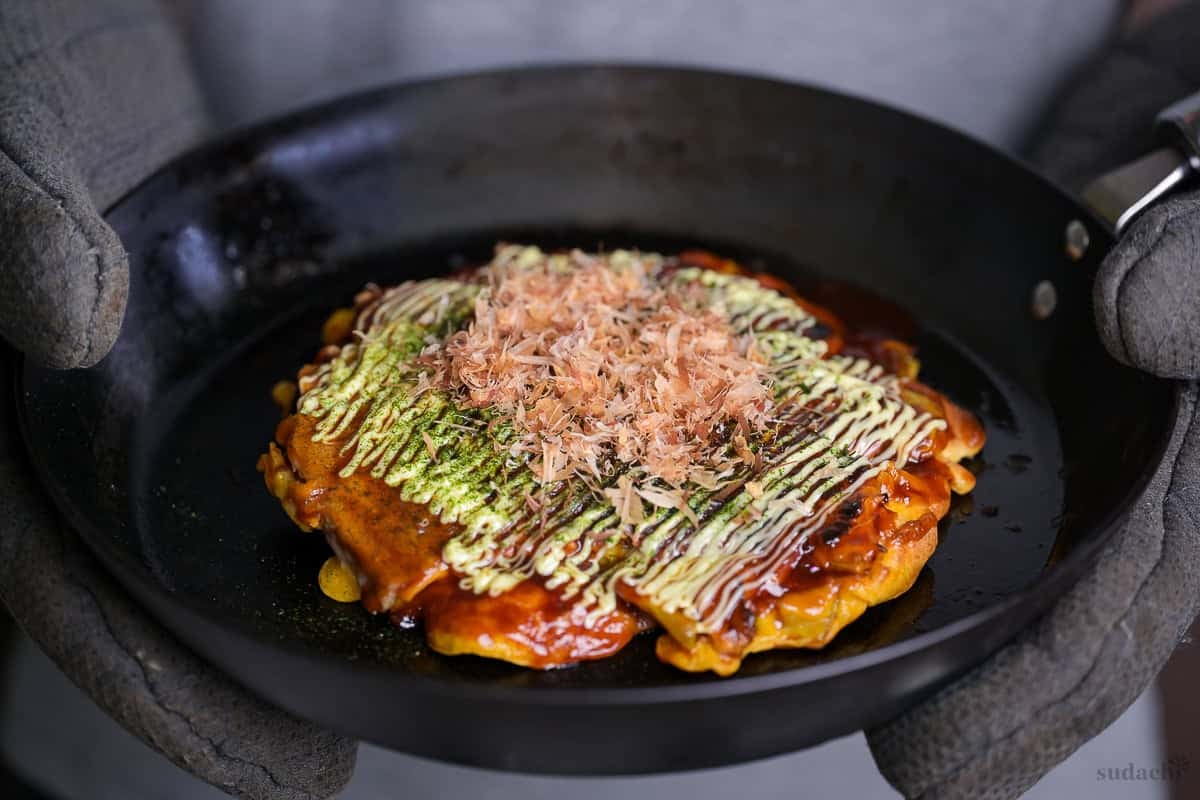
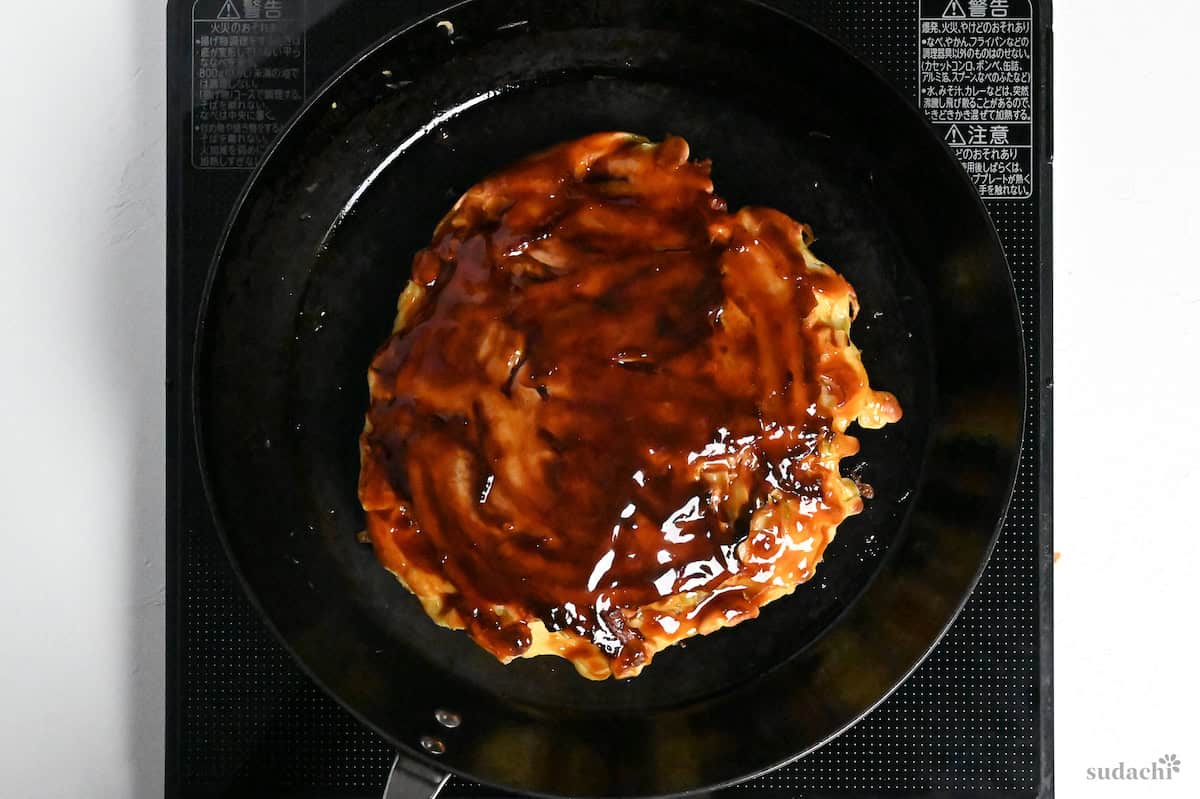
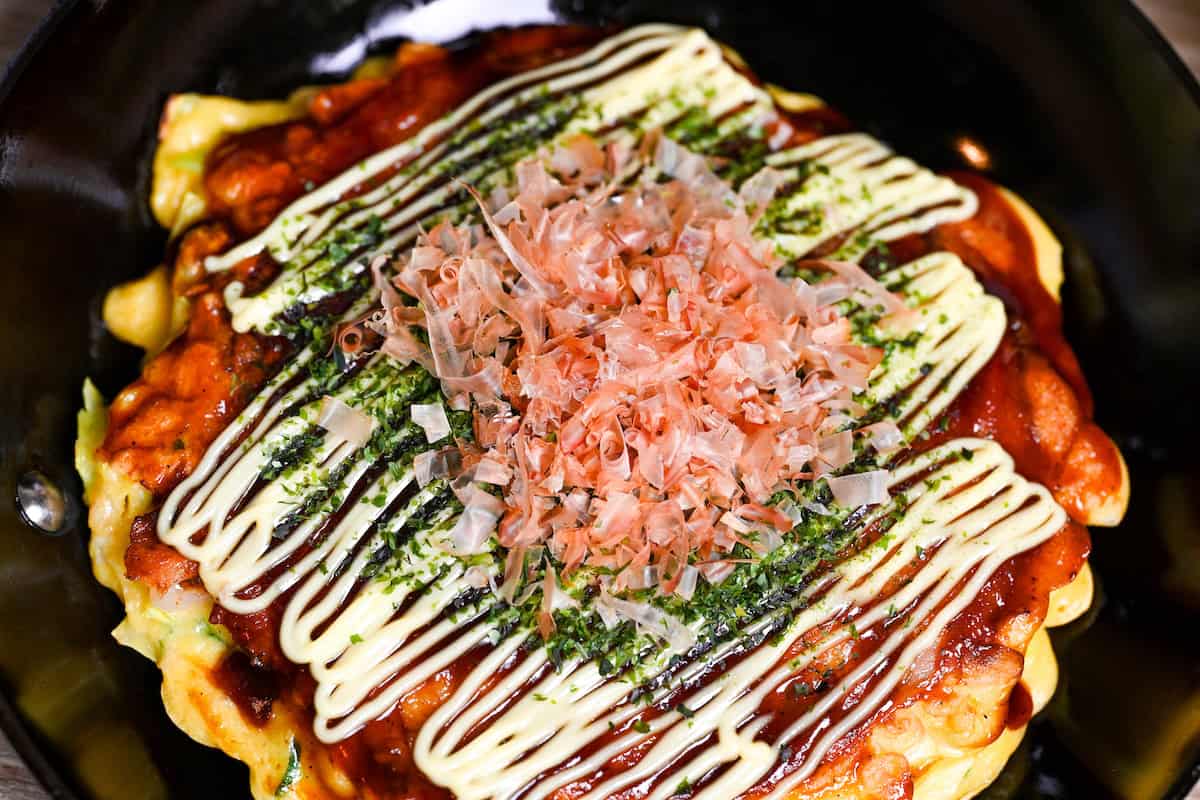
i. Poke the center of the pork with a toothpick. If it comes out batter-free, flip it again so the pork faces up. Just brush half of the sauce on, drizzle in thin lines of Japanese mayo, and then shower with bonito flakes and a pinch of aonori right before serving.
ii. The heat will make the bonito dance, and the aonori’s sea aroma will really pop when you add it last.
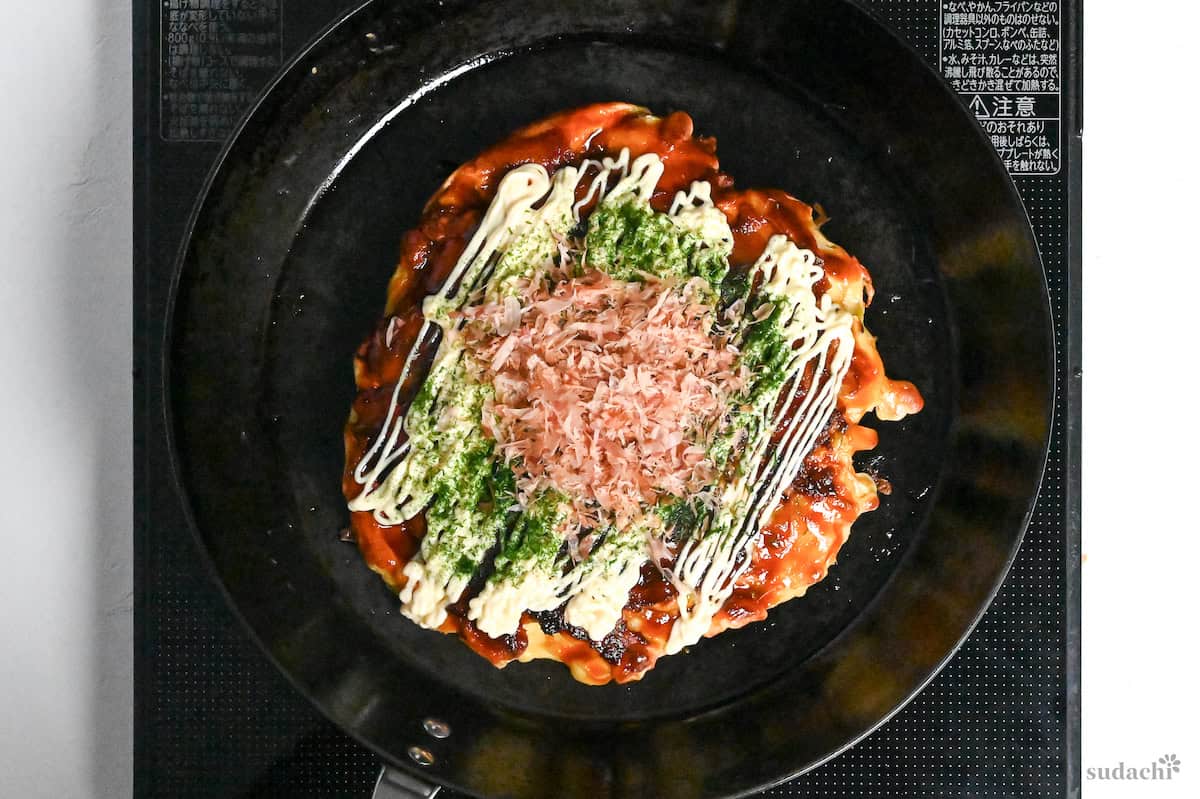
You can add a touch of karashi mustard to your mayo for a more specialty restaurant-style depth!
iii. Slice it into wedges (a pizza cutter works great) and enjoy while it’s still hot. Just repeat the whole process with the second bowl of batter. And feel free to nibble on the first one while you wait!
If you follow the default recipe, it will yield 2-3 main servings, or 4-5 side servings.

Essential Tips & Tricks
- Flip like you mean it. This is the moment people lose their nerve, and a timid, half-committed flip is exactly how the round breaks apart on you. Slide a wide turner all the way under and turn it in 1 decisive motion. A big turner does most of the work, though I will be honest, a little of this is just confidence you build over a few rounds.
- Cook the pork until it is crispy. It is tempting to pull the okonomiyaki the second the center is done, but the crisp pork on top is half the joy of the dish. Give that side real time on the heat after the flip so the fat renders and the edges go crackly, not just warmed through.
- Trust your eyes, not a timer. An undercooked center is the single most common way this goes sideways, because the outside browns long before the middle is cooked. Instead of strictly following timers, test with a toothpick in the thickest part. When it comes out clean, it is ready.
- Make a couple and eat together. This is a dish that wants company, so if you have a tabletop hot plate, set it on the table and cook the second round in front of everyone. The cook gets to nibble the first one while the next is going, and nobody minds.
With these simple tips in mind, you are set for success every time you make Osaka-style okonomiyaki.
Storage & Meal Prep
Fridge: Let the okonomiyaki cool to room temperature, then wrap each round well or transfer to an airtight container and refrigerate for 1 to 2 days.
Freezer: Cooked and cooled rounds freeze well for up to 1 month. Wrap each one tightly, then bag them flat with a sheet of parchment between any that touch. Freeze them plain, before sauce and toppings, so the finish stays sharp when you bring them back.
Meal prep: This one is friendly to a head start. You can cut the cabbage and mix the batter base a few hours ahead and keep them cold and separate, then fold and cook when you are ready. You can also cook the rounds fully a day before, refrigerate, and re-crisp them in a pan at dinnertime. Sauce, mayo, bonito, and aonori always go on right before serving though.
Reheating: A skillet is the way to go. Warm the round over medium heat with a tiny bit of oil until the bottom crisps back up and the center is hot through, then flip and do the other side. The microwave works in a pinch, but the texture changes a lot, the crisp edges go soft and the inside turns a little dense, so reach for the pan if you can.
What to Serve With This Recipe
Okonomiyaki Troubleshooting
You probably cranked up the heat too high, so the surface browned before the middle cooked all the way through. Cook on medium heat, cover the pan for 5 minutes after flipping, and check the doneness with a toothpick. If it comes out clean and warm, you’re good to go. If not, reduce the heat, cover and continue to steam until its fully cooked to your liking.
Absolutely. Put the pancake back in the pan, cover it, and cook it over low heat with the lid on until it’s ready. Or, if you’re in a hurry, just microwave it for a minute (600 W) with plastic wrap on top. It might not look perfect, but the texture will recover.
It’s mostly due to extra moisture. It’s usually from watery cabbage or adding liquids too early. Pat the cabbage dry, mix the fillings into the batter right before cooking, and keep the stove at medium rather than low (low heat steams the pancake).
There are two main reasons why this might happen: not enough binding and flipping too soon. Mix the batter and fillings for about 30 seconds to activate the gluten, use the recommended amount of egg, and don’t flip until the edges look dry and the bottom is a deep golden color.
If you’ve got small eggs or not enough of them, it’ll reduce the binding power. If your eggs are small, go ahead and add an extra one. The protein in the eggs will act like glue and help the pancake hold together.
After shaping, start on medium-high just until the bottom sets, then drop to medium-low and cover.
Over-mixing or using hot liquid can overdevelop gluten. Add room-temperature dashi and stir only until the flour is moistened. Lumps are fine.
It could be that the batter is too thin or the pan isn’t hot enough. You can reduce the dashi slightly or add a spoonful of flour, and always preheat the skillet until a water droplet sizzles.
The flip was too timid, and a half-hearted turn is the classic way the round breaks. Wait until the bottom is deep golden and the edges look dry and set before you go near it, then slide a wide turner all the way under and turn it in 1 confident motion. A big turner takes most of the fear out of it.
More Japanese Street Food Recipes
Hungry for more? Explore my Japanese street food recipe collection to find your next favorite dishes!
Did You Try This Recipe?
I would love to hear your thoughts!
💬 Leave a review and ⭐️ rating in the comments below. 📷 I also love to see your photos – submit them here!

Authentic Osaka Style Okonomiyaki (Traditional Japanese Savory Pancake)

Ingredients
Batter
- 100 g unbleached cake flour or AP/plain flour
- ⅛ tsp baking powder
- 75 ml dashi stock cooled
- 1 tsp milk
- 1 tsp Japanese soy sauce (koikuchi shoyu)
- 1 tsp mirin
- 1 egg relatively large
Okonomiyaki Sauce
- 2 tbsp tomato ketchup
- 1 tbsp Worcestershire sauce
- 1 tbsp oyster sauce
- 1 tbsp honey
- 1 tsp Japanese soy sauce (koikuchi shoyu)
Fillings (see in post for more ideas)
- 150 g green cabbage or spring/pointed cabbage
- 2 tbsp tempura flakes (tenkasu) optional, or crushed plain potato chips
- 2 tsp red pickled ginger (benishoga) optional
- 100 g thinly sliced pork belly
- 2 tbsp cooking oil neutural flavor
- 2 eggs
Toppings (see in post for more ideas)
- Japanese mayonnaise to taste
- bonito flakes (katsuobushi) to taste
- aonori (dried green seaweed powder) to taste
The ingredient brands and tools I trust are in my Japanese pantry guide and my cooking tools guide.
Can’t find certain Japanese ingredients? See my substitution guide here.
Instructions
Batter
- Sift 100 g unbleached cake flour and ⅛ tsp baking powder into a large bowl. and add the 75 ml dashi stock, 1 tsp milk, 1 tsp Japanese soy sauce (koikuchi shoyu), 1 tsp mirin and 1 egg to the bowl. Mix until the ingredients are well incorporated, but be careful not to over mix.

- Cover the bowl and rest it in the fridge for 30 minutes.
Okonomiyaki Sauce
- Take a small bowl and add 2 tbsp tomato ketchup, 1 tbsp Worcestershire sauce, 1 tbsp oyster sauce, 1 tbsp honey and 1 tsp Japanese soy sauce (koikuchi shoyu). Mix well and set aside for later.
Fillings
- Cut the 150 g green cabbage into into small rough pieces.Once the batter has been resting for 30 minutes, pour half of it into a new bowl. Place the original bowl back in the fridge for later. Alternatively, make two simultaneously in two separate frying pans.
- Start preheating your pan on a medium/medium-high setting.While you wait, add half of the cabbage to the bowl of batter along with 1 tbsp tempura flakes, and 1 tsp red pickled ginger. If you want to add other ingredients such as cheese, kimchi, mochi etc add them here. Mix until everything is evenly distributed.

- Add 1 egg and mix again until it's incorporated. Be careful not to over mix.
- Add the oil to the pan and swirl around until evenly coated. Wipe out the excess with kitchen paper and pour the okonomiyaki mixture into the center of the pan. Use a spatula to neaten up the edges.
- Lay the slices of pork belly over the top of the wet mixture and fry the okonomiyaki until the bottom starts to become brown and crispy.
- Carefully flip it over and place a lid on the pan. Reduce the heat to medium-low and continue to fry with the lid for about 5 minutes or until cooked all the way through.
- Pierce the middle with a toothpick to make sure it's cooked. If the toothpick doesn't come out clean, continue to cook on a low heat and check it every few minutes until it's done.
- Once it's cooked through, flip it over again and pour half of the sauce over the top. Use a pastry brush or spoon to spread it evenly. You can do this while it's still in the pan or slide it onto a plate first.
- Drizzle with mayonnaise and sprinkle generously with bonito flakes and aonori. Repeat steps 2-8 with the other bowl of batter in the fridge. Enjoy!
made it with shrimps topping, and it was superb. the instructions are easy to follow and the result is great.
Hi Hadas,
Thank you for sharing your experience and picture! Looks good! I’m glad you enjoyed the recipe!
Yuto
Already my family’s favorite. I out some Kurobuta pork belly as a topping and it is just perfect.
Hi Edith,
Thank you so much for trying this recipe and sharing your photo! Looking great! I’m happy to hear this has become a family favorite already! 🙂
Yuto
Haven’t made the recipe yet but have made it before. Great background info and explanation. Has plenty of options and substitutions. Glad that fixes are included.
Good job. I subscribed for these reasons.
Hi Margaret,
Thank you so much for your lovely words! I’m happy to hear you enjoyed the content!
Yuto
This is a phenomenal recipe! Thank you for the clear directions, the thorough explanation and the Q&A section WOW this is the best recipe i have seen in a long time.
Hi Rachel,
Wow, thank you for such wonderful feedback! It means a lot knowing the explanations and Q&A made such a difference for you! 🙂
Yuto
Just as good as restaurants in Japan!! I am japanese-American it’s nice to have recipes in English that brings authentic taste from the motherland My grandma never wrote down recipes so this brings nice memories. All his recipes are delicious definitely try them!!
Hi Rin,
That means a lot, thank you! I’m honored the recipe brought back good memories, and I’m really glad you enjoyed it. Thanks for sharing that with me! 🙂
Yuto
There seems to be more eggs in the ingredient list than in instructions. In the ingredients it says 1 egg for the batter initially and then 2 eggs for the ingredients. But the instructions say to only add 1, not 2 eggs for the ingredients. Could you clarify?
Hi Tanja,
Thank you so for your question. I completely understand how the way the eggs are listed can be confusing! For the default recipe, which makes 2 okonomiyaki, I use a total of 3 eggs.
First, I mix 1 egg into the base batter. Then I divide that batter evenly into two separate bowls, one for each pancake. Into each bowl, I crack in 1 additional egg and mix it in with the batter + fillings. So that’s 1 egg in the batter + 1 egg per pancake = 3 eggs total.
I hope this breakdown makes it clearer. And if you have more questions about the steps or substitutions, feel free to ask anytime! I’m always happy to go into detail!
Yuto
I made it a couple times and it’s perfect but I think there was tsuyu in recpie. Did you change something?
Hi Micchael,
Thank you for your comment and I’m so happy you noticed that! The previous version did include tsuyu, but I’ve recently adjusted it to soy sauce and mirin. My thought process was that, because the batter already has dashi stock, soy sauce and mirin would be enough and give a cleaner taste than using prepackaged tsuyu sauce. If you’d like to make it the old recipe though, my old YouTube video is still available! (https://youtu.be/yCHECSJzeOA)
Yuto
My family rated this a 5 star. So far everything I’ve made has been outstanding. This time though I used bacon instead of the pork belly. Mistake, it was too salty. I’ll stick with following the recipes going forward. 🙂 Still my family loved it.
Hi Susan,
Thank you for trying my recipe and sharing your picture! I love hearing that your family rated it 5 stars! And totally get you on the bacon, it can be tricky with salt. Thanks for sharing how it went and for cooking with me! 🙂
Yuto
I tried this recipe today for the first time and it’s perfect, same taste I’ve found in Japan, so damn good!
Hi Roberto,
Thanks for giving it a try! It honestly makes me happy to hear that. Bringing the taste you found in Japan back into your own kitchen is exactly what I was hoping for! 🙂
Yuto