


Featured Comment
It is absolutely delicious! The rice has an amazing garlicky flavor, it’s soooo good I could be eating it all by itself 😄 The salmon is fantastic, I’m in love with the texture and subtle flavors, thank you for giving so many tips on how to cook it properly!
★★★★★
– @niidzumakun8170 (from YouTube)
What if your best salmon dinner wasn’t shiozake, teriyaki salmon, or miso-glazed salmon, but something a little more restaurant-worthy and impressive?
Honestly, this might be the best Japanese salmon recipe I’ve ever created. I want you to experience that first golden, butter-basted bite for yourself.
Soy butter salmon
Recipe Snapshot
- What is it? Crispy-skin salmon with garlic butter rice and a glossy soy-mirin finish.
- Flavor profile: Buttery, Umami-rich, Garlicky
- Why you’ll love this recipe: Anyone tired of “same old” Japanese salmon staples will enjoy this fresh lane: familiar umami, but a new soy-butter gloss that feels restaurant-level.
- Must-haves: Fresh skin-on salmon fillets, unsalted butter, Japanese soy sauce.
- Skill Level: Easy
Summarize & Save this content on:

How I Developed This Recipe
Western-inspired Japanese cuisine (yoshoku/洋食) draws heavily from French cuisine. One example of this is the meunière technique, which has become beloved even in Japanese households. Simply put, it’s a lightly dusted fish fillet sautéed in butter.
Pan-fried salmon with a butter and soy sauce base is a great example of this fusion, combining classic French cooking methods with what we Japanese call the “golden combo” (bata shoyu) of butter and soy sauce.
Soy Butter Salmon Ingredients
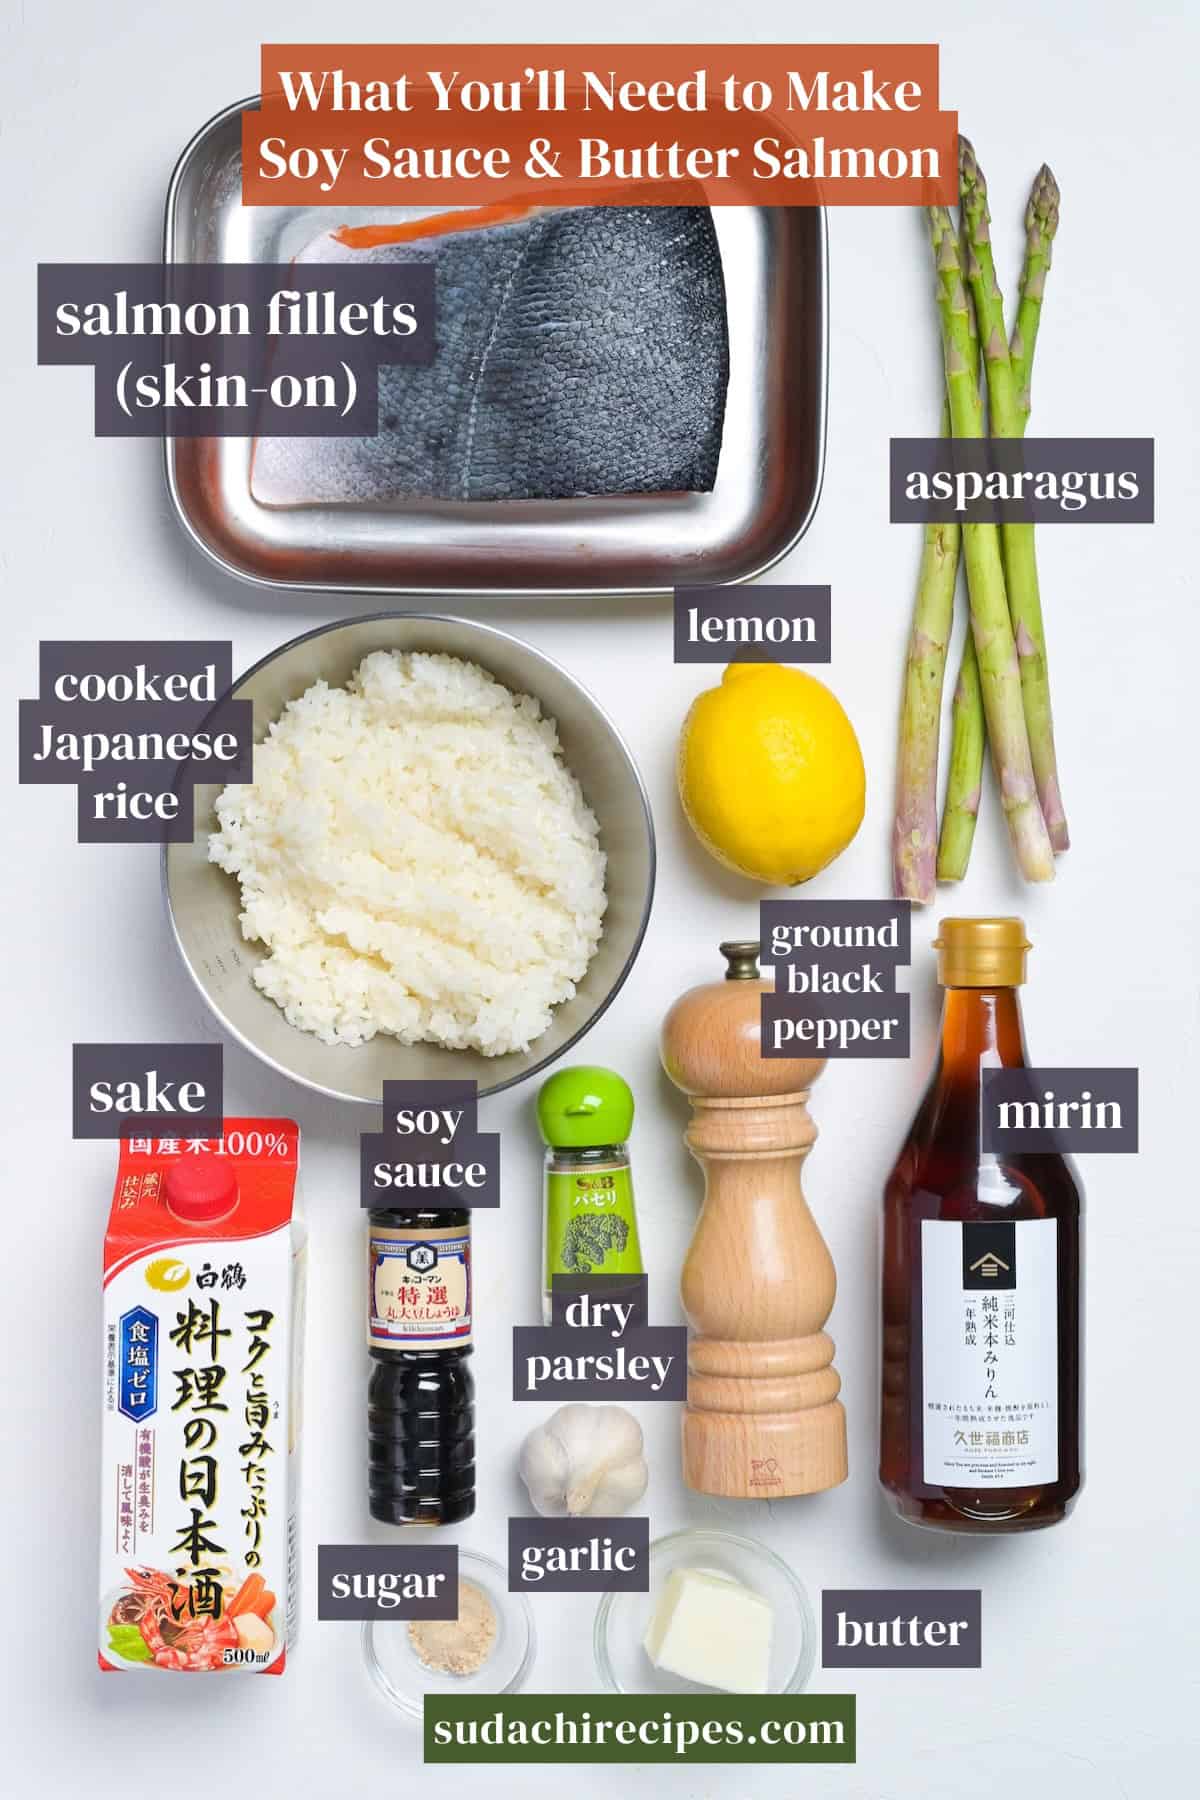
- Salmon fillets: Go for ones with bright, clear eyes and firm, springy flesh. Fatty varieties like King or Atlantic salmon work best for meunière as they stay moist during cooking. You can also use other fish fillets such as cod, swordfish, and yellowtail!
- Asparagus: If possible I recommend choosing young or thin asparagus for its fresh delicate flavor and quicker cooking time.
- Mushrooms of your choice: Choose whatever variety is available in your area! Shiitake, shimeji, enoki, button, or cremini… possibilities are endless!
How to Make My Soy Butter Salmon
Before you start: Cook your rice using your preferred method (if you don’t have a rice cooker, check out my perfect stove-top Japanese rice recipe). Ideally you want the rice to be cooled for frying, so preferably cook it in advance and spread it out in wide container to cool it quickly.
If you prefer to watch the process in action, check out my YouTube video of this soy butter salmon recipe!

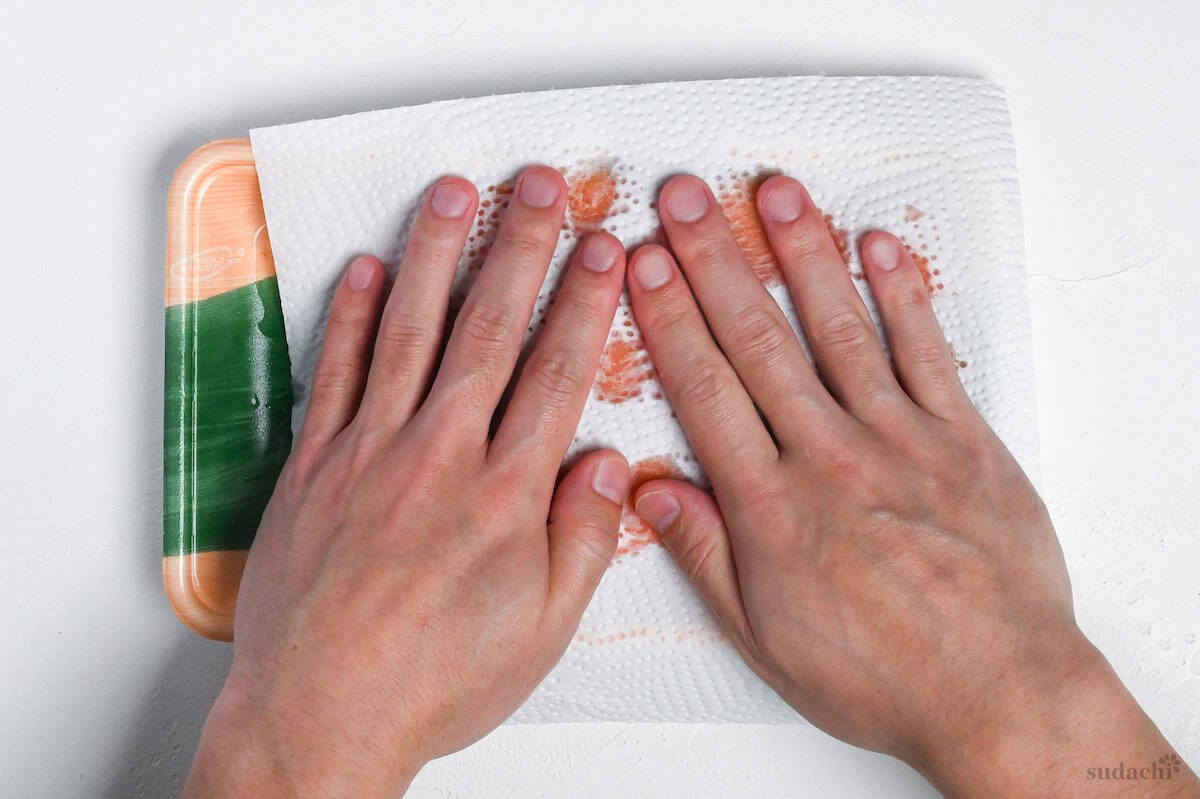
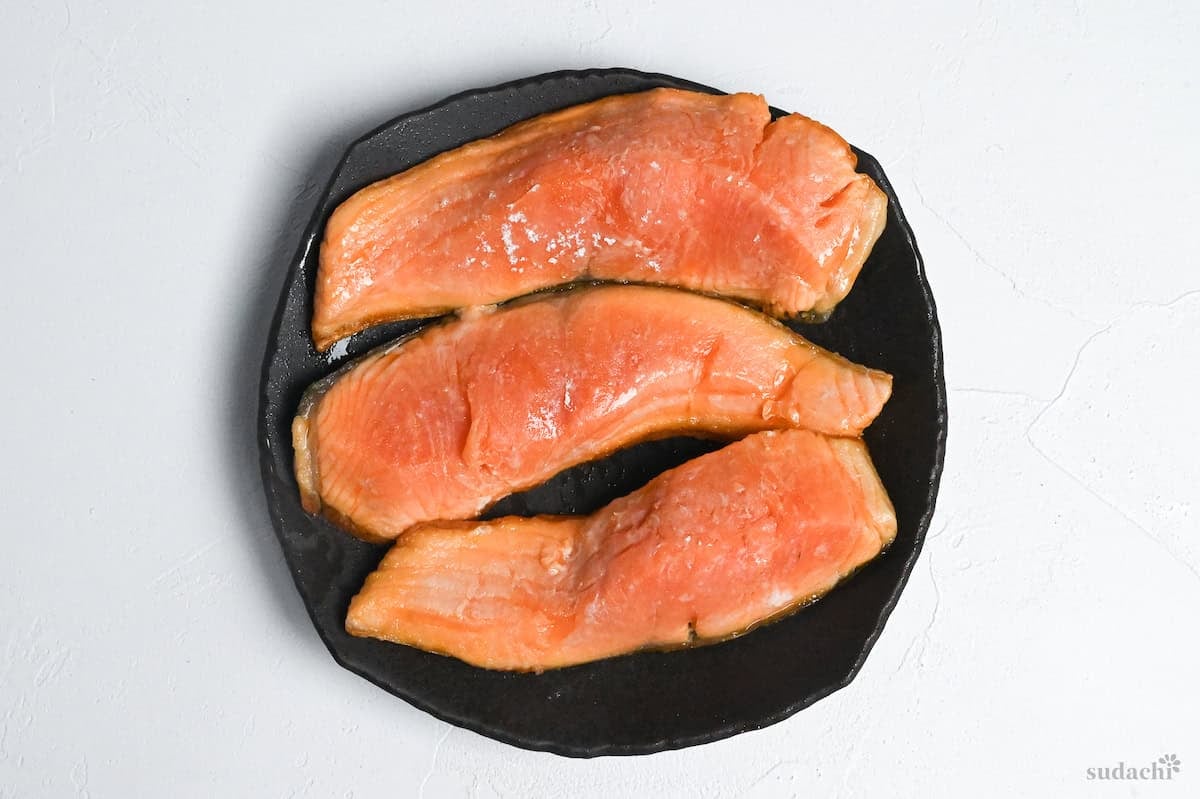
i. Before you start, take your salmon fillets out of the fridge and pat them dry with kitchen paper.
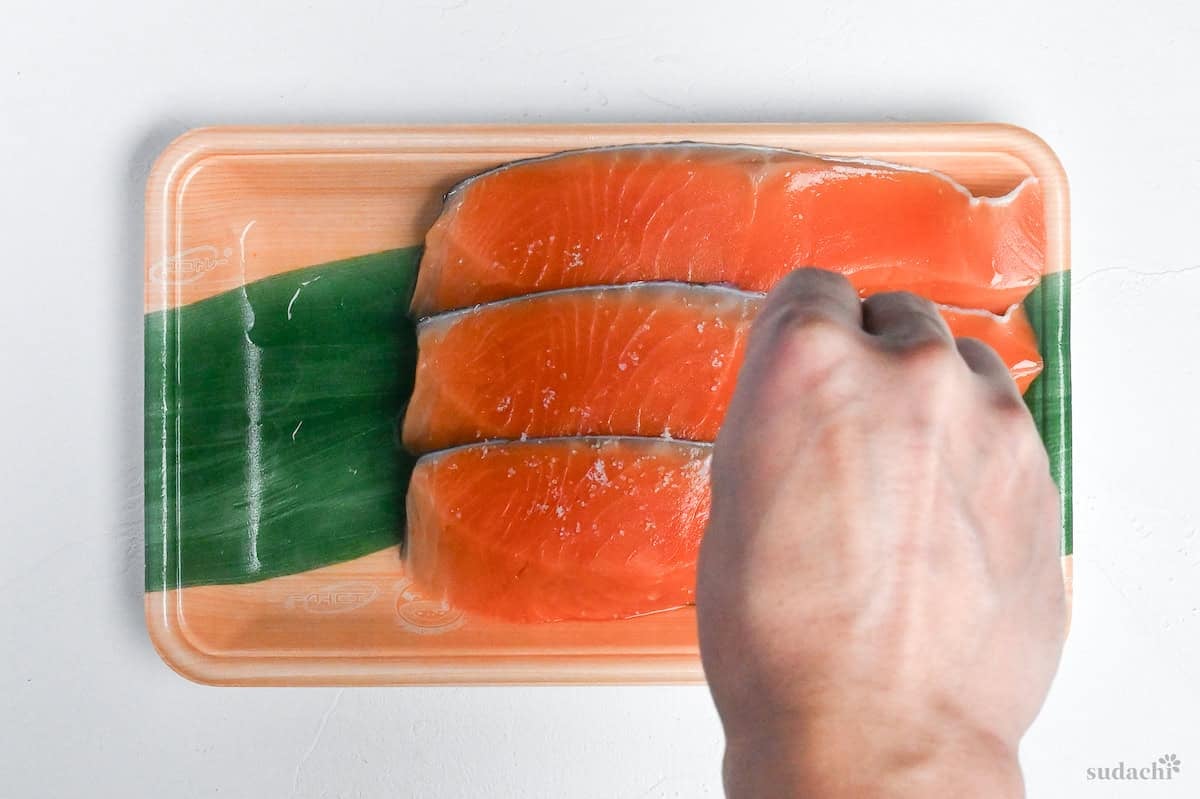
ii. Sprinkle a bit of salt (about 1-2% of the salmon’s weight) on both sides, and then let it rest on the counter for about 20 minutes. This lets them reach room temperature, so they cook evenly.
You can salt the salmon ahead of time for two important reasons. First, salt draws out excess moisture and fishy-smelling compounds (like trimethylamine), resulting in a cleaner flavor.
It also seasons the fish more deeply than surface seasoning alone and helps stabilize the proteins for better texture when you cook it.
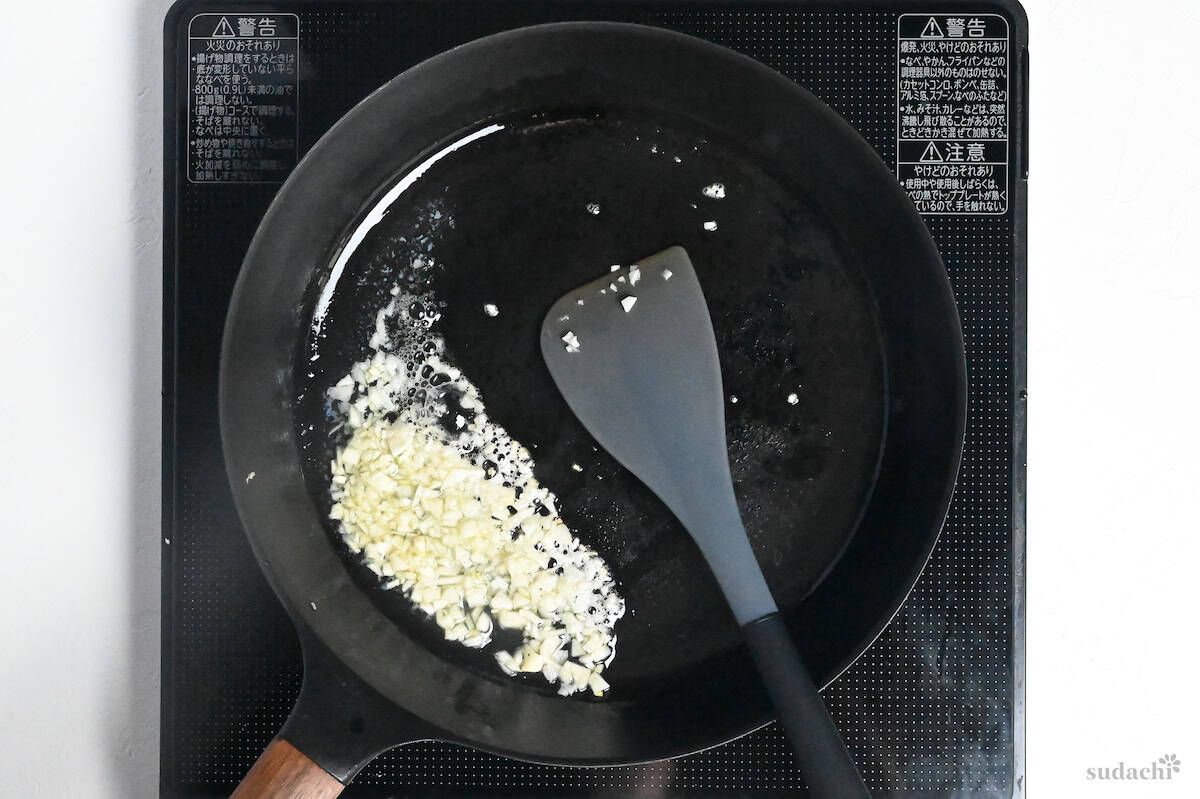
i. While you wait for the salmon, melt butter with olive oil together in a frying pan over low heat. Once the butter has melted, add the minced garlic and continue cooking on low heat.
Watch carefully as the garlic transforms from its raw white color to a beautiful golden brown.
Garlic burns quickly and becomes bitter when cooked at high temperatures. Starting with low heat allows the garlic to release its flavor gradually into the fats without scorching.
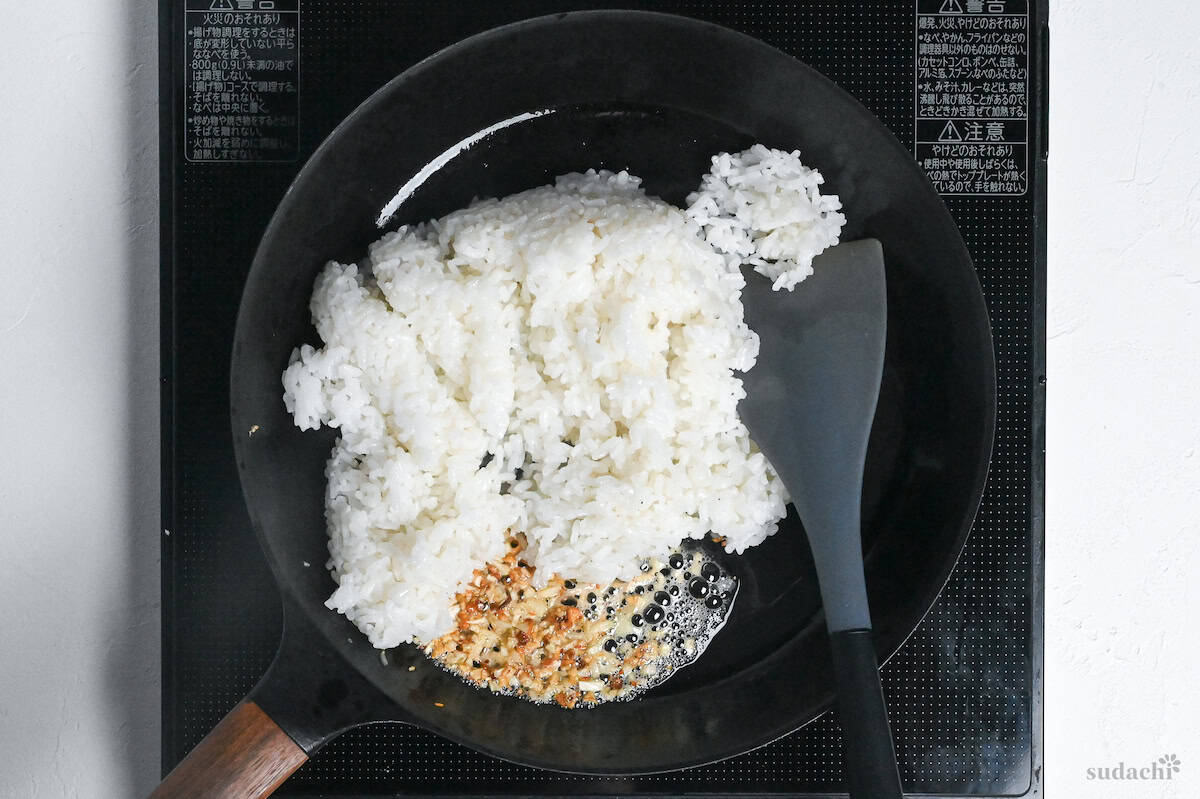
ii. When the garlic has reached the ideal golden color, add the rice to the pan. Immediately pour the sake (or dry white wine as an alternative) over the rice. Use a spatula to break up any clumps, making sure each grain is coated with the aromatic garlic-infused oil.
iii. At this point, increase the heat to medium.
iv. Once the rice and garlic have thoroughly combined, season with salt, black pepper, and fresh parsley. Continue mixing to distribute the seasonings evenly throughout the rice.
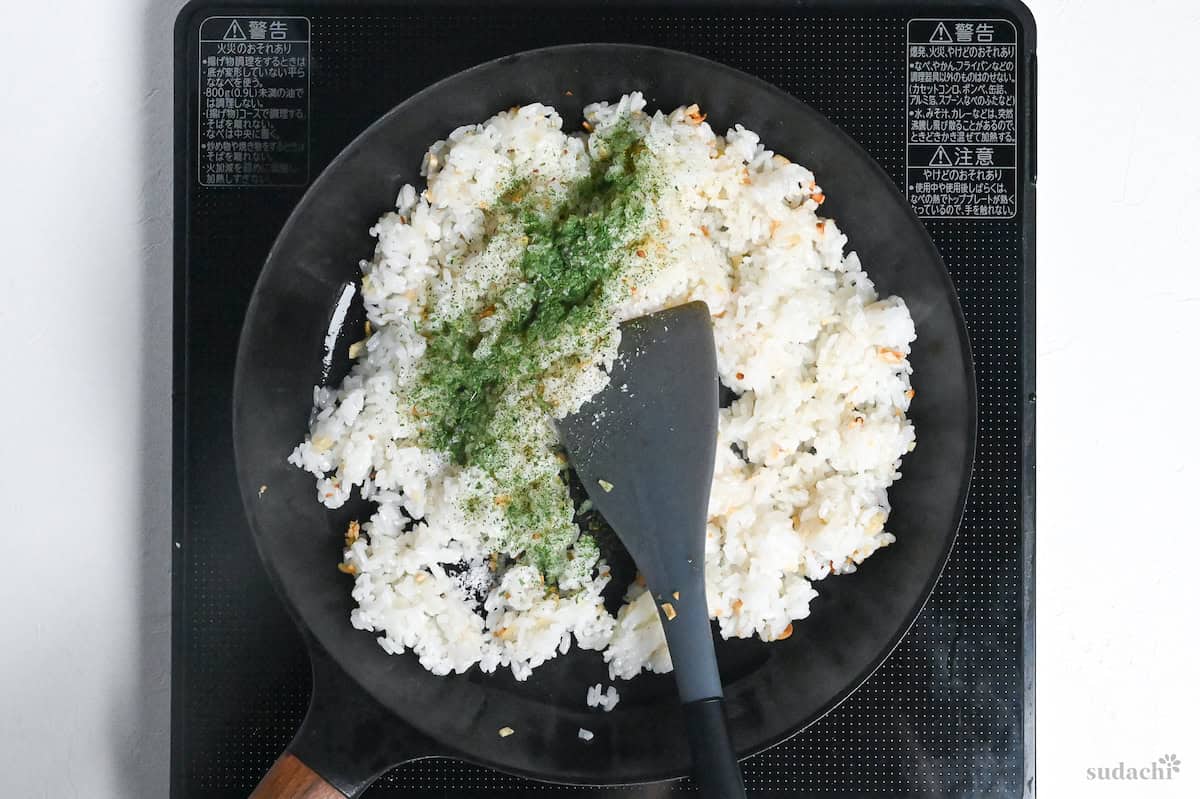
v. Allow the rice to cook until the grains have separated and some parts begin to develop a slight crispness. Next comes the flavor-sealing final touch – pour soy sauce down the side of the pan rather than directly onto the rice.
This technique allows the soy sauce to heat quickly against the hot pan before it reaches the rice, developing more complex flavors.
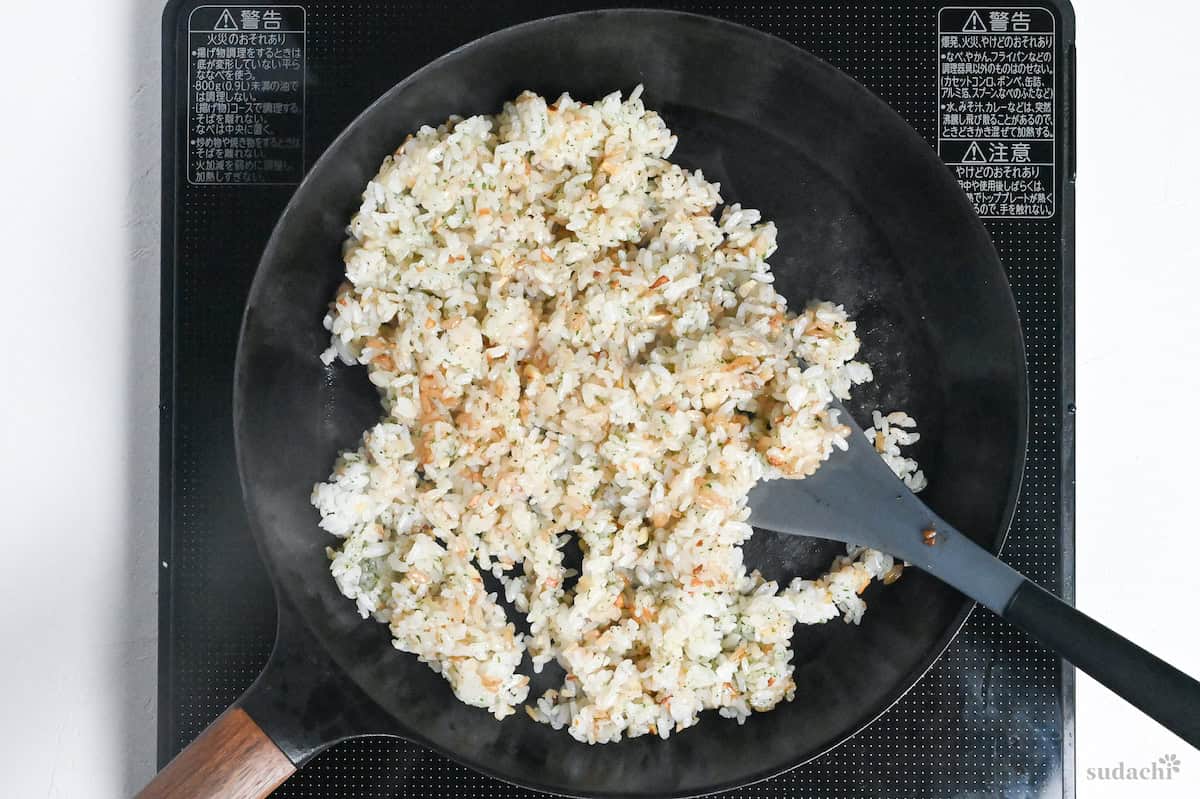
vi. Mix everything thoroughly to incorporate the soy sauce evenly throughout the dish. Then turn off the heat and let the rice stand in the pan until serving.
This garlic rice is intentionally made first because it’s easy to reheat. You can prepare it ahead of time and reheat it quickly just before serving your salmon.
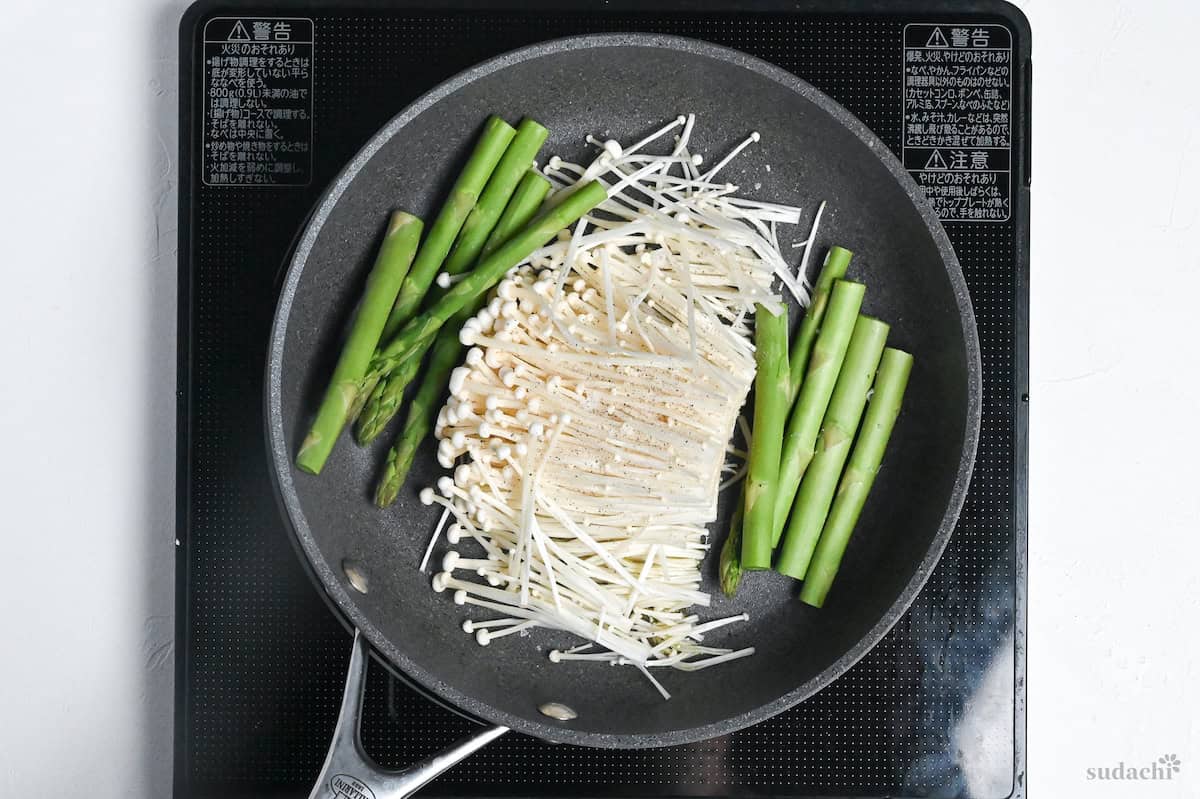
i. 5 minutes before the salmon is finished resting with the salt, heat a pan over medium heat and add olive oil. Throw in your asparagus, along with a bit of salt and pepper. Fry for 4-8 minutes depending on the thickness, then add the enoki mushrooms and stir fry for a further 1-2 minutes.
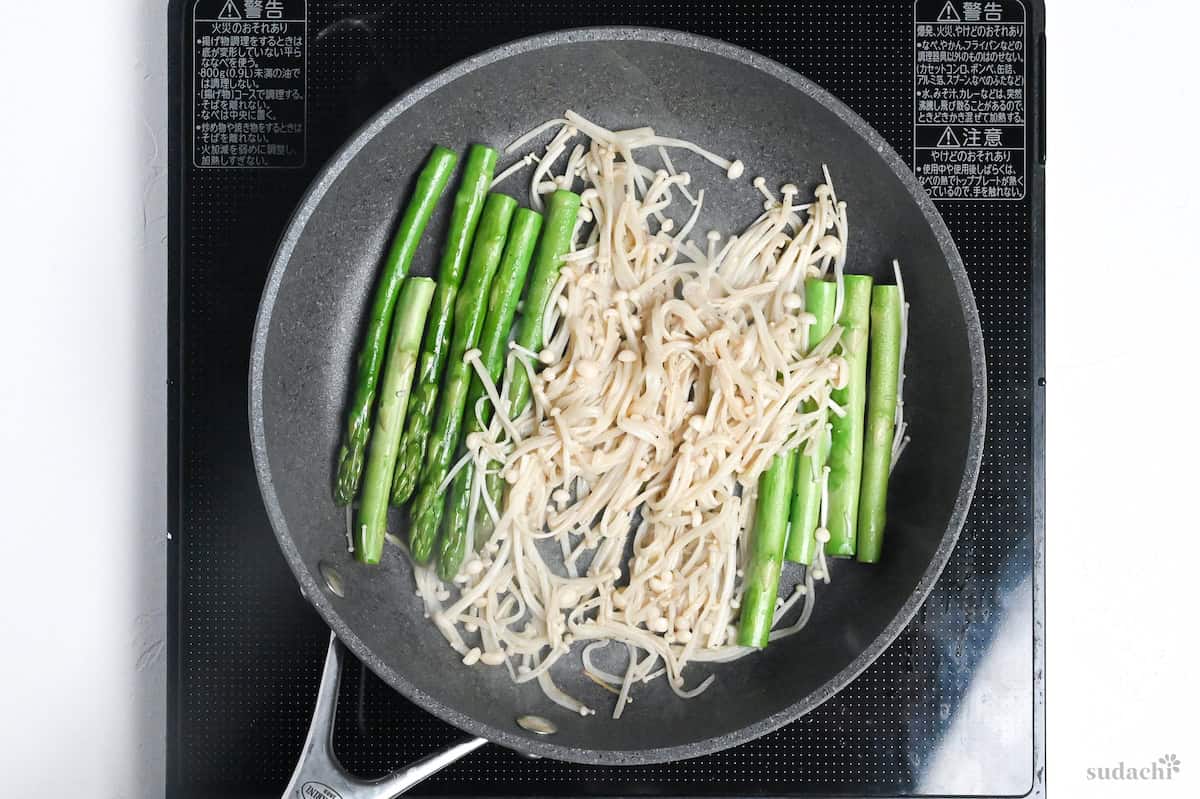
ii. Delicate varieties of mushrooms like enoki, only takes 1-2 minutes. If using other kinds of mushrooms, add them to the pan earlier to allow enough time to cook together with the asparagus.
iii. Once cooked, transfer to a warm plate. We will reuse the pan, so turn off the stove and save the pan for later.
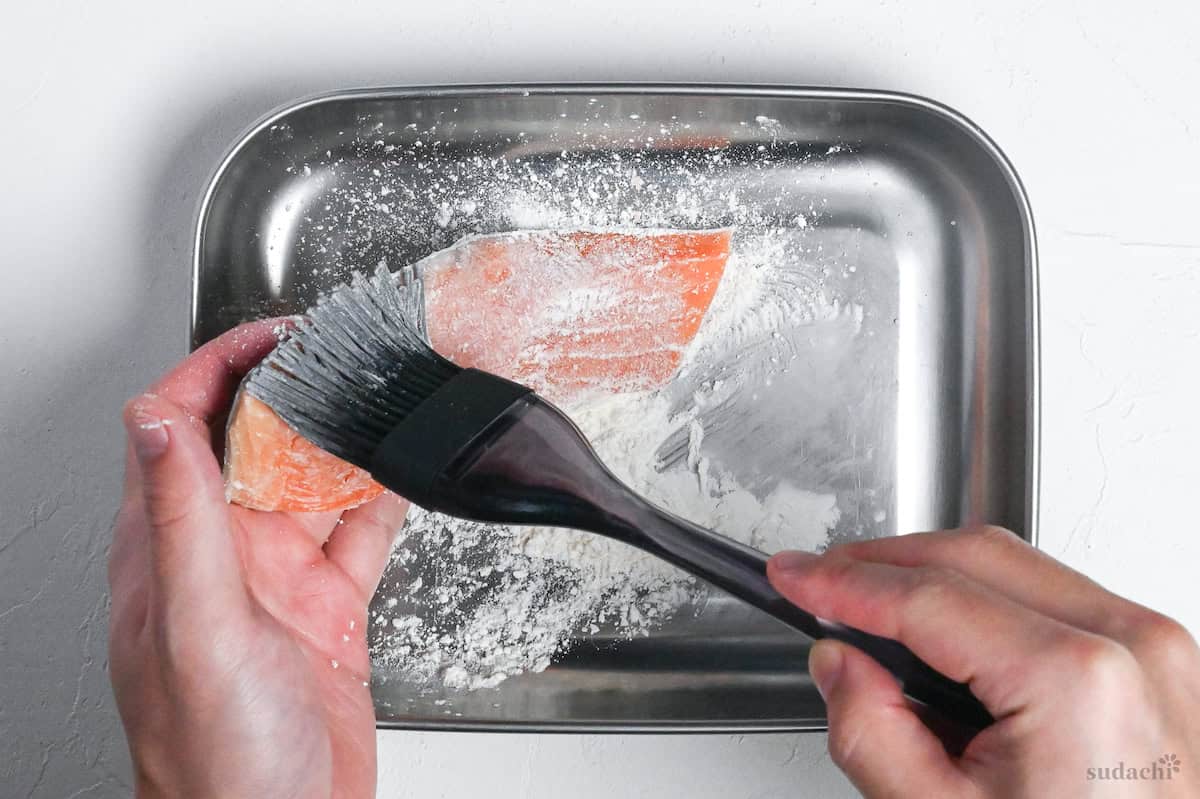
i. After the salmon has rested, check that the surface is dry again, the salt will have drawn out more moisture so you’ll likely need to pat them with kitchen paper once more. Then, lightly coat the salmon all over with a thin, even layer of all-purpose flour.
ii. Shake off any excess flour as it can burn in the pan.
The thin flour coating has a few jobs: it creates a barrier that keeps moisture inside the salmon, provides a surface for browning through the Maillard reaction, and helps develop that distinctive meunière flavor.
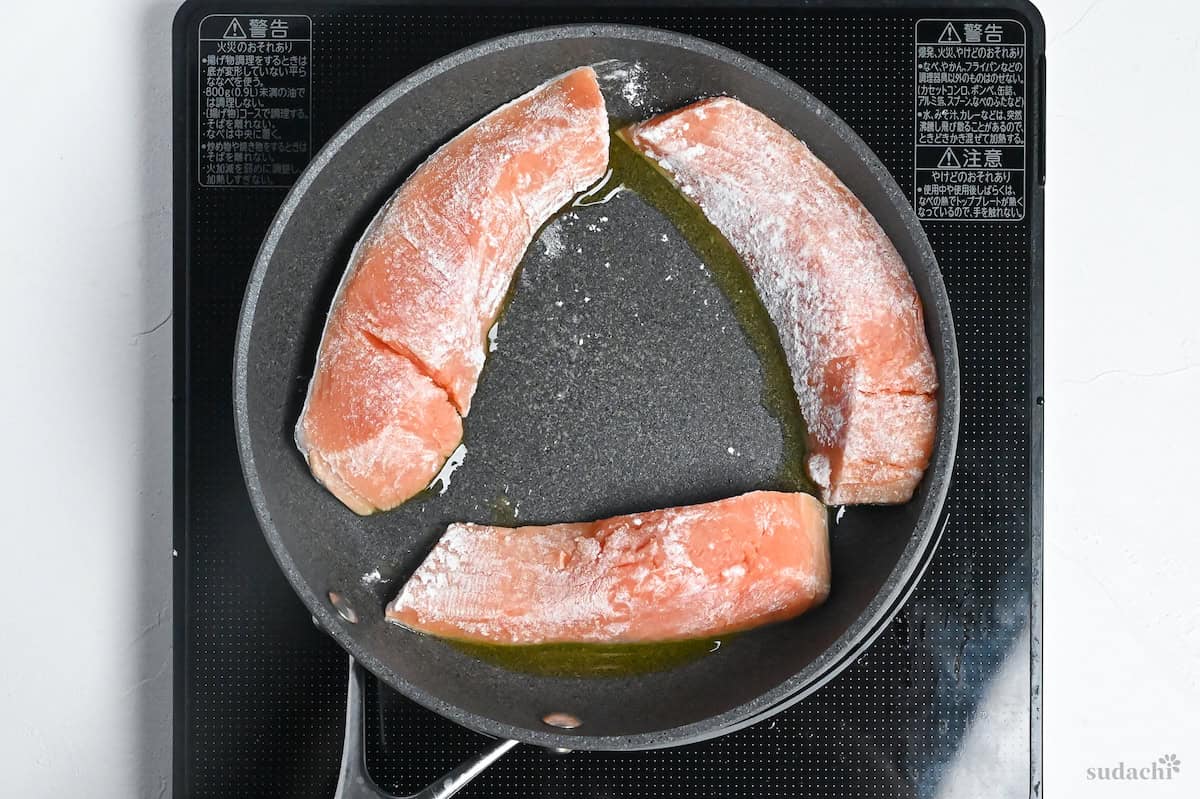
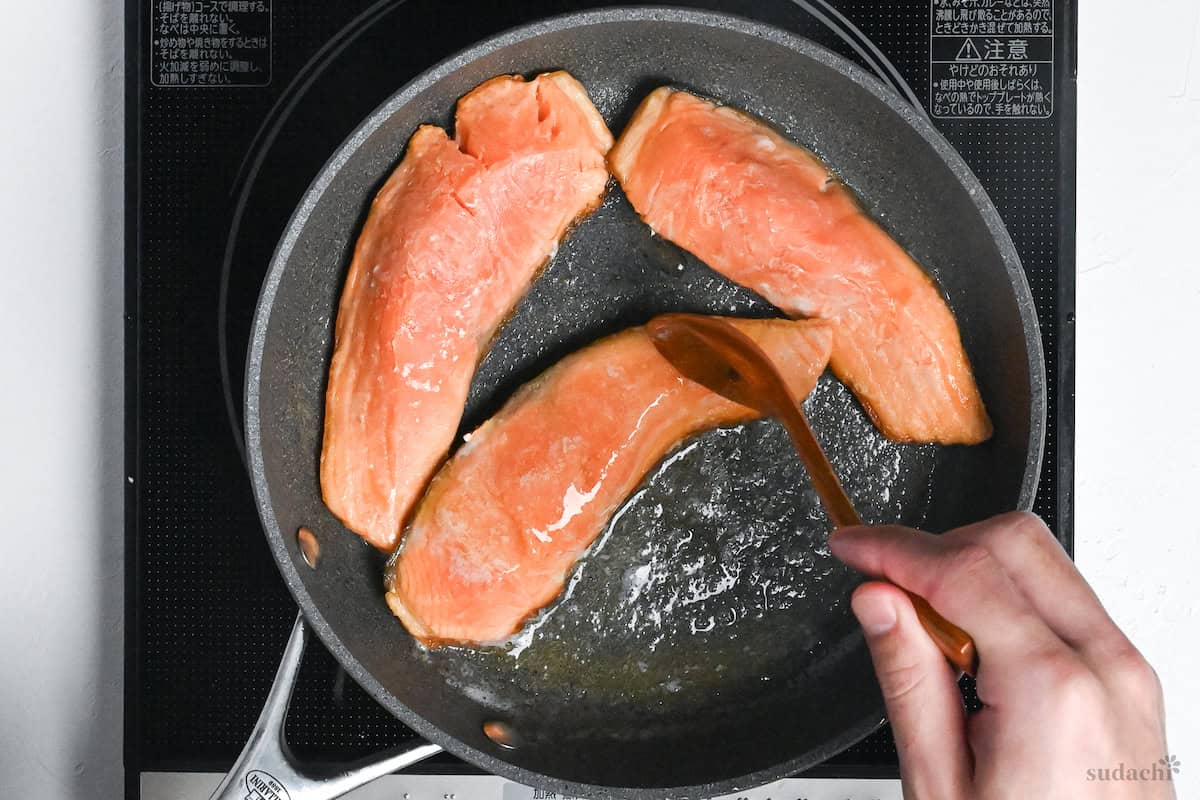
i. Next, add a tablespoon of olive oil to the same pan you used for the mushrooms and heat it to medium-high. Pop the salmon in there, skin side down. Use a spatula to press down on the salmon for the first 30 seconds to make sure the skin touches the pan.
ii. Cook until the skin is golden and crispy, about 3-4 minutes, depending on thickness.
Starting skin-side down can remove the fat between the skin and flesh, which can cause fishiness if left in, and it creates a crispy, delicious skin that provides a textural contrast to the tender flesh. The skin also protects the delicate flesh from overcooking while the skin crisps up.
iii. When the skin is crispy, carefully take the salmon out of the pan and set it aside – it should not be fully cooked at this point. Now for a crucial step that a lot of people might skip: wipe the pan clean with paper towels.
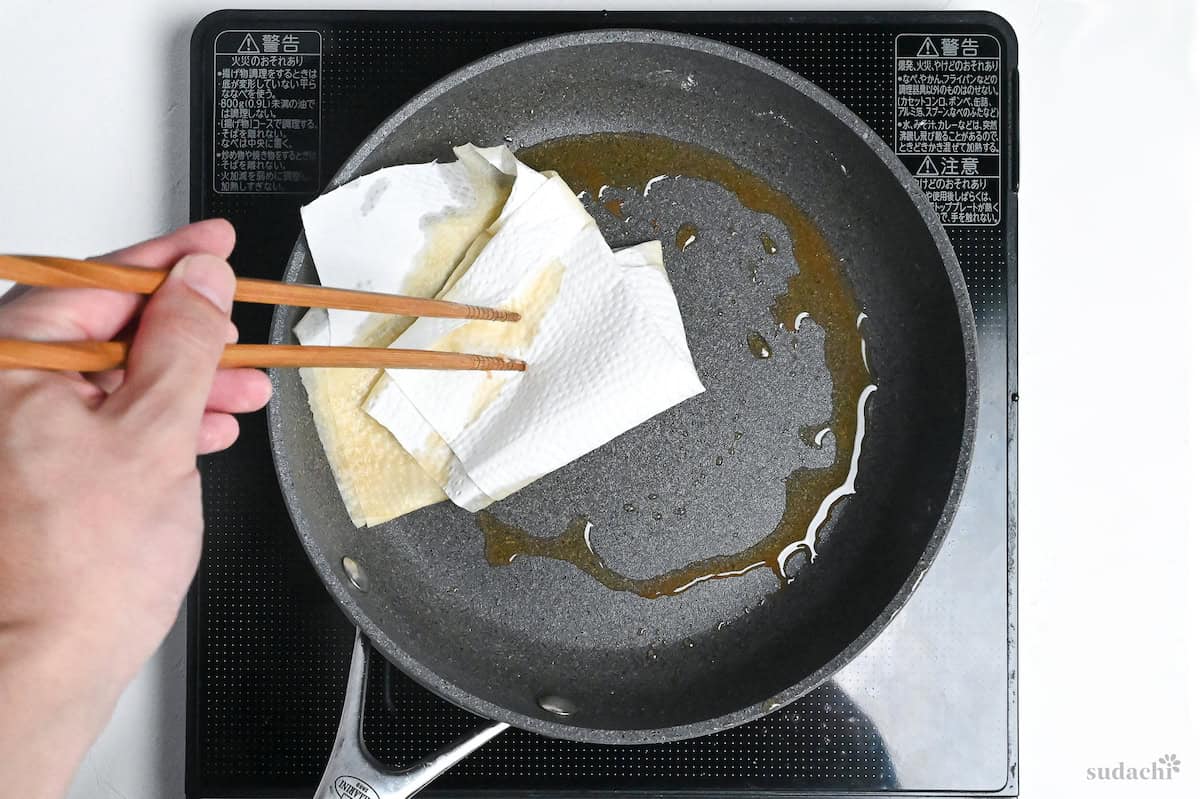
The oils and juices that accumulate during the initial frying contain compounds that can impart a fishy odor to your final dish.
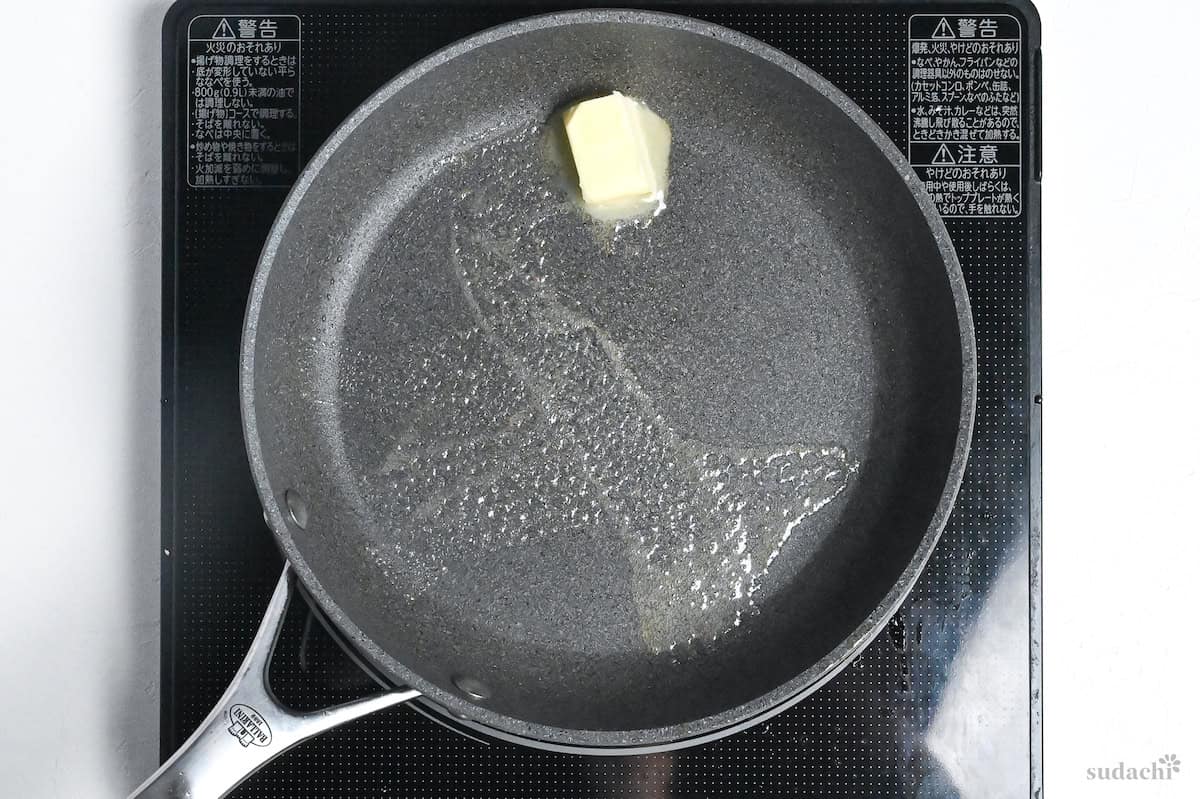
i. After cleaning the pan, turn the heat down low and add the butter. Once the butter’s melted but not browned, put the salmon back in the pan, again skin-side down.
ii. Now, use the French arrosé technique (baste) by tilting the pan and collecting the melted butter in the pan. Then, use a spoon to continuously ladle the hot butter over the flesh side of the salmon.
This basting technique is key for even cooking and getting that perfect flavor. The hot butter really brings the heat in a way that hits the top of the salmon while also infusing it with flavor.
iii. To make sure everything goes just right, tilt the pan a bit away from you, grab the butter with a spoon, and pour it over the salmon’s flesh side every 3-4 seconds. Keep going for about 1-2 minutes until the salmon’s flesh turns opaque but remains moist.
Keep the heat low to prevent the butter from burning (which happens at around 150°C).
iv. When the salmon is fully cooked (it’s opaque throughout but still moist), remove it from the pan and place it on a wire rack. Let it rest until the sauce is ready.
Placing the salmon on a rack prevents it from sitting in its own juices or excess butter, which would make the crispy skin soggy.
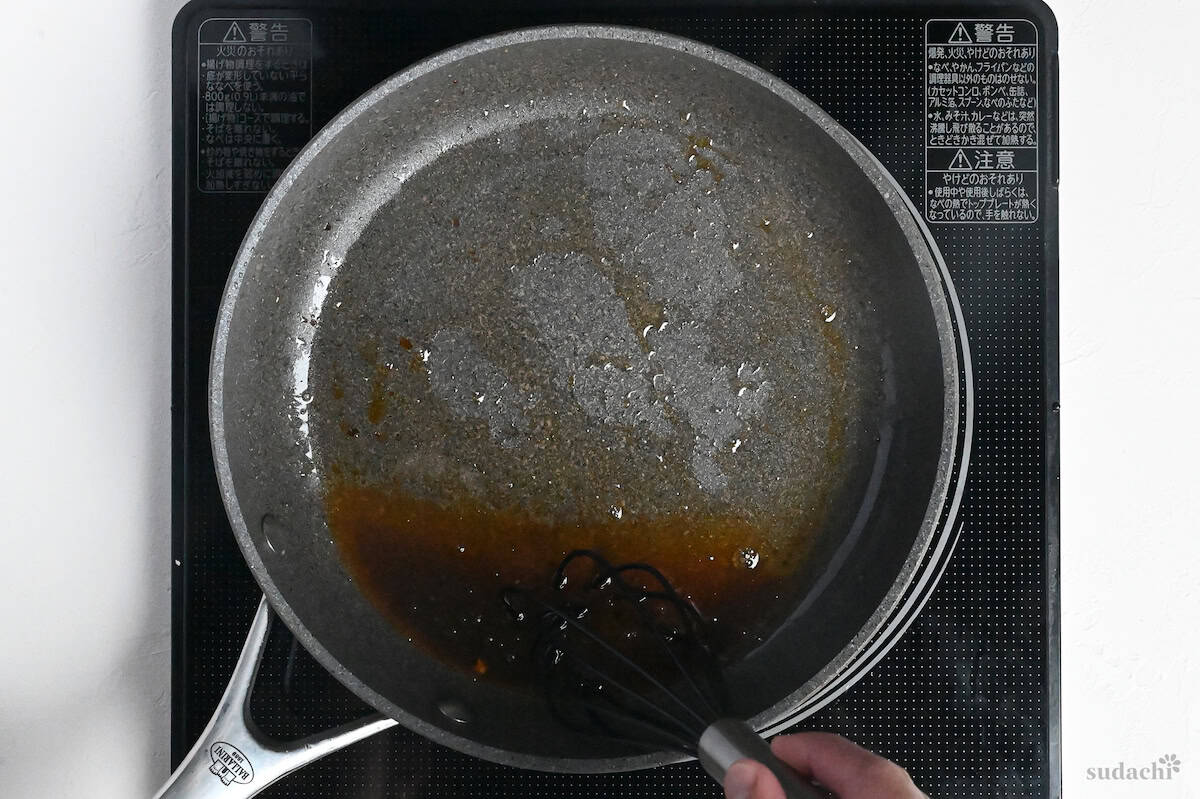
i. In the same pan, add more butter, soy sauce, mirin, and light brown sugar. Cook this mixture over low heat for about 30 seconds, stirring constantly, to create a smooth, emulsified sauce.
This combo is what we Japanese call “bata shoyu” (butter soy sauce), affectionately known as the “golden combo.” The fats in butter help carry the umami compounds in soy sauce, while the glutamic acid in soy sauce enhances the butter’s richness.
ii. Keep the heat very low to prevent the sauce from breaking (separating) and burning. Both butter and soy sauce can burn easily.
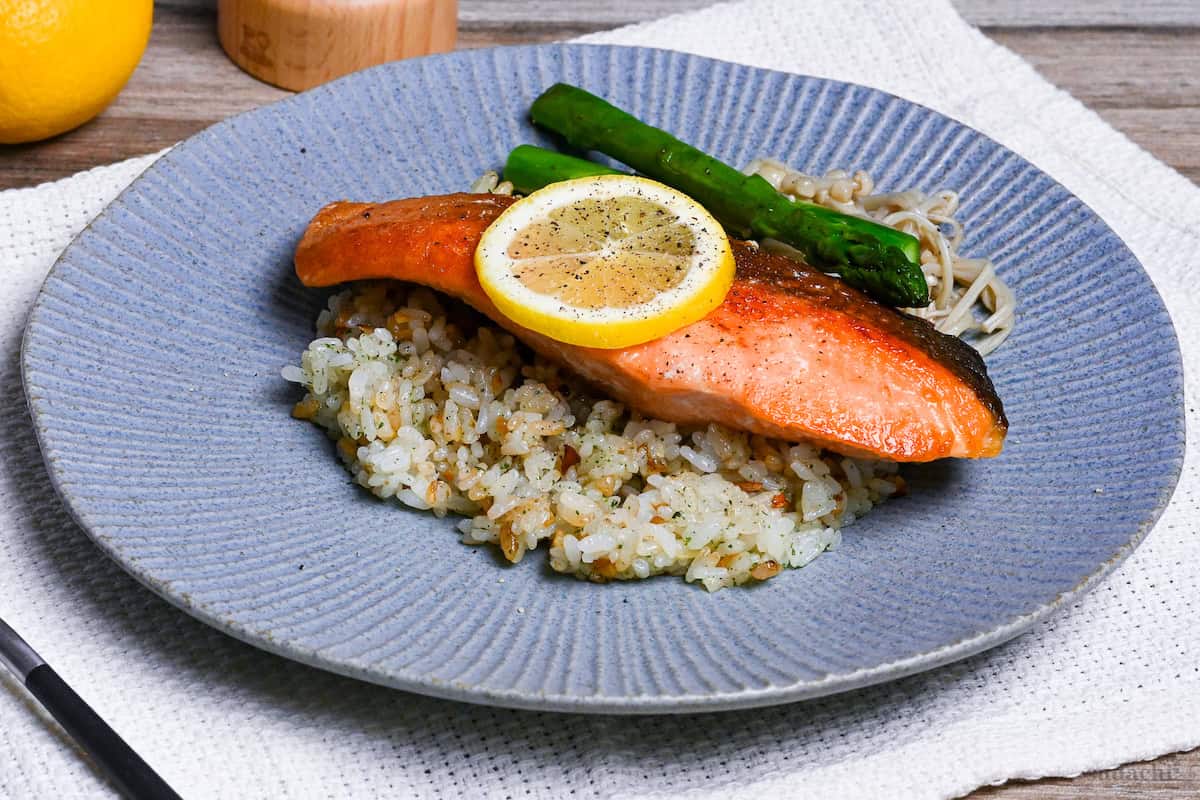
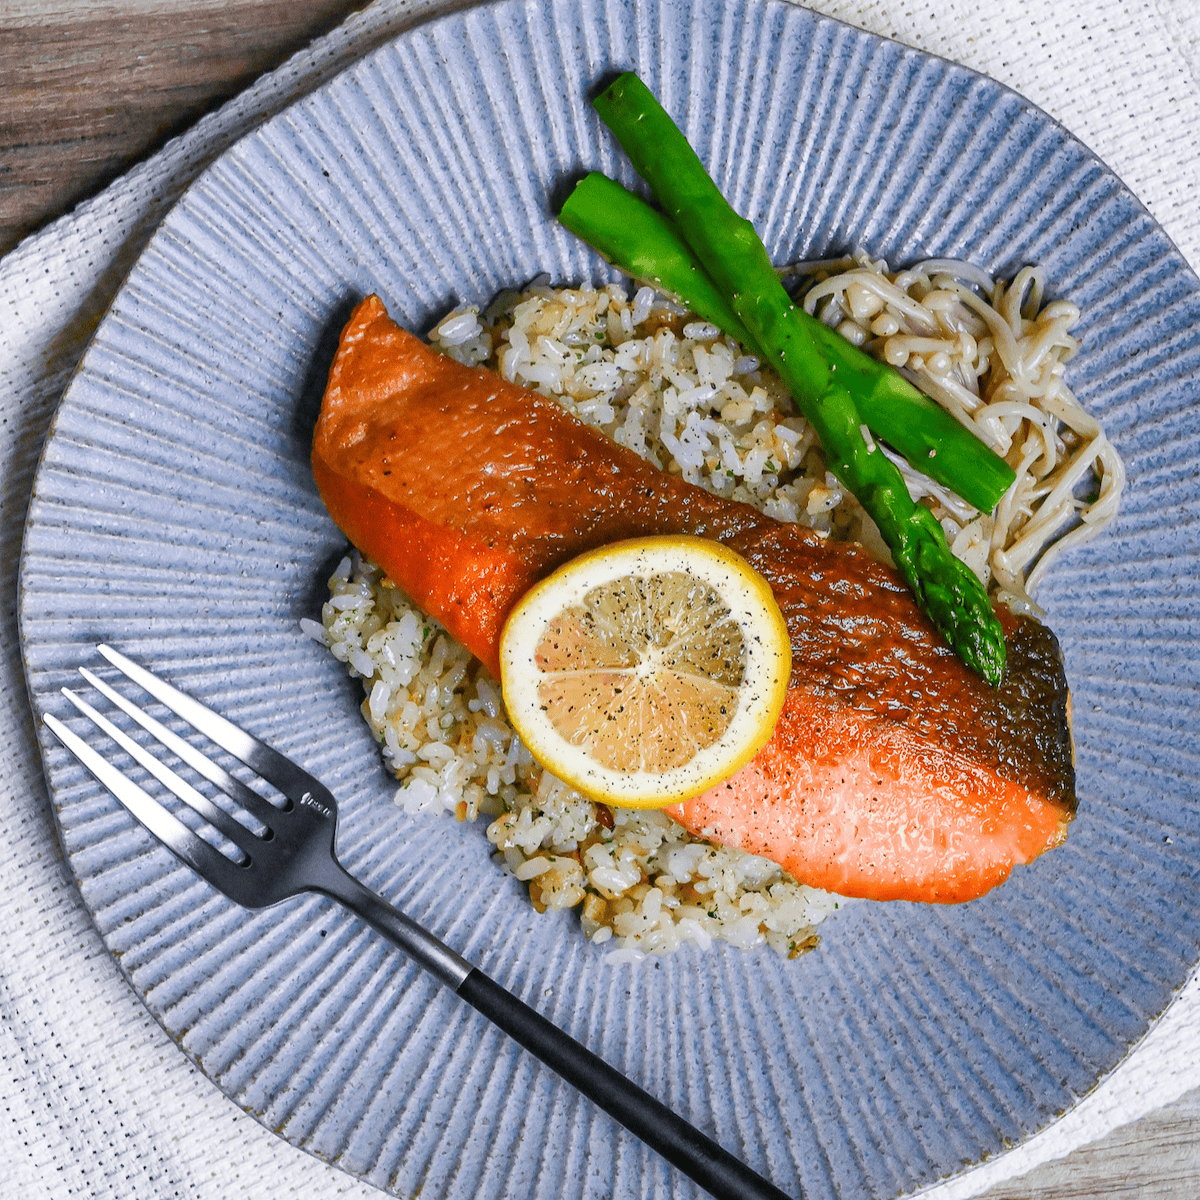
i. Gently reheat the garlic rice if necessary, then make a bed of garlic rice on each serving plate and put the salmon on top with the skin-side facing up.
ii. Then arrange the asparagus and mushrooms next to the salmon. Pour the butter-soy sauce over and around the salmon.

iii. Garnish with a sliced lemon and a sprinkle of freshly ground black pepper.

Essential Tips & Tricks
- Cook and cool your rice before starting the recipe, this will stop it from getting mushy.
- Pat the salmon completely dry before cooking.
- Salt the salmon 15-20 minutes before cooking to draw out excess moisture and fishy odors while enhancing flavor.
- Use just enough flour to create a thin, even coating – shake off any excess to prevent burning.
- Start with skin-side down and press gently with a spatula for the first 30 seconds to ensure perfect contact with the pan.
- Keep the heat low when using butter to prevent burning.
- Whisk the sauce continuously on very low heat to prevent separation and burning.
With these simple tips in mind, you’re set for success every time you make soy butter salmon.
Storage
Fridge: Store cooked salmon and sauce separately in airtight containers for up to 2 days in the refrigerator.
Freezer: Not recommended, as freezing would significantly degrade the texture of the cooked salmon and cause the sauce to separate.
Reheating: Gently warm the salmon in a 120°C (250°F) oven for 5-7 minutes until just heated through. Separately reheat the sauce over low heat.
What to Serve With This Recipe
- Authentic Miso Soup
- Nikujaga (Meat & Potato Stew)
- Spinach Ohitashi Salad
- Japanese Cucumber Salad
Soy Butter Salmon FAQ
Yes! Thaw frozen salmon in the refrigerator overnight, not at room temperature. Once fully thawed, pat it thoroughly dry with paper towels as frozen salmon often releases more moisture during thawing.
While skin-on is preferred for texture contrast and protection during cooking, you can use skin-off fillets. Just be extra gentle with flipping and reduce the initial cooking time slightly since there’s no skin to protect the flesh from direct heat.
The salmon should be opaque on the outside but still slightly translucent in the very center when cut into. The flesh should flake easily with a fork but still appear moist. Remember that salmon will continue cooking slightly after removing it from heat.

More Yoshoku Recipes
- Hamburger Steak (Hambagu)
- Hayashi Rice
- Tonkatsu
- Crab Cream Croquette
Hungry for more? Explore my yoshoku recipe collection to find your next favorite dishes!
Did You Try This Recipe?
I would love to hear your thoughts!
💬 Leave a review and ⭐️ rating in the comments below. 📷 I also love to see your photos – submit them here!

Soy Sauce and Butter Salmon

Ingredients
- 2-3 salmon fillets
- salt 1-2% of the salmon’s weight
- ½ tbsp olive oil for vegetables
- 4 stalks asparagus halved
- 150 g mushroom of your choice I used enoki mushroom, thinly sliced shiitake also works well
- all-purpose flour
- 1 tbsp olive oil for salmon
- 1 tbsp butter preferably unsalted
Garlic Rice
- 300 g cooked Japanese short-grain rice or other variety of cooked rice, cooled
- 1 tsp olive oil
- 1 tsp unsalted butter
- 1 tbsp sake or dry white wine
- 2 cloves garlic minced
- 1 tsp dried parsley or fresh
- ¼ tsp salt
- ground black pepper to taste
- 1 tsp Japanese soy sauce (koikuchi shoyu)
Sauce
- ½ tbsp Japanese soy sauce (koikuchi shoyu)
- 1 tsp butter preferably unsalted
- 1 tsp mirin
- ¼ tsp sugar I used light brown sugar
Garnish
- lemon sliced
- ground black pepper to taste
The ingredient brands and tools I trust are in my Japanese pantry guide and my cooking tools guide.
Can’t find certain Japanese ingredients? See my substitution guide here.
Instructions
- Take 2-3 salmon fillets and pat them dry with kitchen paper. Sprinkle salt (1-2% of the salmon’s weight) from a height on both sides then leave to rest at room temperature for about 20 minutes.

Garlic Rice
- Place 300 g cooked Japanese short-grain rice in a bowl next to the stove. Heat up a pan over low heat and add 1 tsp olive oil and 1 tsp unsalted butter. Once the butter has melted, add 2 cloves garlic and fry until golden (be careful not to let it burn).
- Add the rice and pour 1 tbsp sake over it. Use a spatula to break up the rice and mix thoroughly to coat each grain with garlic-infused oil and butter.
- Increase the heat to medium and add 1 tsp dried parsley, ¼ tsp salt and ground black pepper. Mix until evenly distributed and continue to cook the rice grains have separated and have a slightly crispy texture in places.
- Pour 1 tsp Japanese soy sauce (koikuchi shoyu) down the side of the pan and mix thoroughly. Turn off the heat and let the rice stand in the pan until serving.
Vegetables & Salmon
- About 5 minutes before the salmon has finished resting, heat a pan over medium and add ½ tbsp olive oil. Add 4 stalks asparagus and sprinkle with a pinch of salt and pepper, fry for 4-8 minutes (depending on thickness) then add 150 g mushroom of your choice and fry for another 1-2 minutes.
- Once cooked, transfer the vegetables to a warm plate and turn off the stove, saving the pan to reuse later.
- Once the salmon has been resting for 20 minutes, pat the surface dry once more and coat it with a thin, even layer of all-purpose flour all over.
- Reheat your pan over medium-high and add 1 tbsp olive oil. Place the salmon with the skin side facing down and press them gently to make sure the skin is in direct contact with the pan. Fry for 3-4 minutes (depending on thickness) or until the skin is crispy and golden.
- Transfer the salmon to a plate and set it aside. It should not be fully cooked yet.
- Wipe the pan with kitchen paper to remove accumulated juices, then set the heat to low and add 1 tbsp butter(add more depending on the size of fillets and pan)
- Once melted, place the salmon back in the pan, again with the skin side facing down. Tilt the pan and scoop the hot butter onto a spoon, then pour it over the top the the salmon. Baste continuously until the flesh turns opaque (approx 1-2 minutes). Once done, transfer the salmon to a wire rack to drain excess butter.

Sauce
- Return the pan to the stove and add ½ tbsp Japanese soy sauce (koikuchi shoyu),1 tsp butter,1 tsp mirin, and ¼ tsp sugar. Cook the mixture over a low heat for 30 seconds while whisking, then remove it from the heat.
- Reheat the garlic rice if necessary, then make a bed of rice on each serving plate. Place the salmon over the top with the skin side facing up, then arrange the asparagus and mushrooms on the side. Garnish with lemon and ground black pepper, then drizzle with the sauce left over in the pan. Enjoy!
I’m putting that on next week’s schedule, with one substitute. I catch a lot of trout so I’ll sub a nice rainbow for the salmon.
More exciting though is when I jumped over here from YouTube expecting to see the salmon recipe (I ended up having to do a search) I spotted your ayu recipe! There is virtually no chance that I can get real ayu here although a chef friend occasionally had some for me when I lived in Houston. But I’m pretty sure brook trout will be a great substitute for ayu and we have plenty of those. So, a big thank you for that recipe!
Hey Yuto! I thought I had added a comment but it’s not here so I’ll try again.
This looks really good and I’ll try it this week. I catch a lot of trout so I’ll do it with a nice rainbow. Pretty sure that will be great. When I popped over here from YouTube this recipe wasn’t obvious but I found it easily. What did catch my eye was your ayu recipe! I can’t get them here but a chef friend would get them for me in season when I lived in Houston. I’m almost certain that our brook trout will be a close match for ayu and we have a bunch of them here. You have to catch them you can’t buy them but I have no problem with that. Next time I get a few I’ll let you know how it turns out.
Hi John,
Hi John, thanks so much for the comment! Rainbow trout will definitely work great for this recipe. I’m glad you found the Ayu recipe too — brook trout sounds like a great substitute. I just looked it up and I’m sure the method will work well. I’m really curious how it turns out!
P.S. Sometimes comments take a little while to appear here — sorry for the confusion and that you had to post it again!
Yuto
I always follow every step, and it never fails me — as usual 😊
Hi May,
That really means a lot to hear! Thank you so much for trusting my recipes & steps every time. I’m so happy this salmon recipe worked out too! 🙂
Yuto
Delicious! Very clear directions and quick and easy to make. A nice change from what I usually make. Worthy of a company dinner. I have never been disappointed in any of your recipes and enjoy your narrative of how you came up with them. Also appreciate your list of substitute ingredients!
Hi Marilee,
Messages like this are the reason I keep doing this. Sticking with the recipes over time and still finding new ones worth serving to company is exactly what I hope for. Really glad I could bring something a little different to your table, and it means a lot that you keep enjoying the recipes! 🙂
Yuto