

Featured Comment
My father spent many years in the Orient while he was in the Navy and always raved about the sukiyaki dishes of Japan. I made this for him and he LOVED it. I taught him how to make it and now he enjoys it weekly.
★★★★★
– Kay
Does cooking expensive beef at home terrify you? Authentic Sukiyaki is surprisingly forgiving. In fact, this communal feast is the easiest way to serve a crowd without stress.
You don’t need a restaurant to create this magic. With flexible ingredients and one traditional warishita sauce, you’ll bring that same warmth to your own table.

Sukiyaki
Recipe Snapshot
- What is it? An authentic sukiyaki recipe featuring marbled beef and vegetables simmered in a homemade warishita sauce.
- Flavor profile: Bold sweet-savory with layered umami from beef, soy, and shiitake. A raw egg dip rounds the intensity into something creamy and mellow.
- Why you’ll love this recipe: The interactive “cook-a-little, eat-a-little” prevents overcooking expensive beef, making it a low-risk, high-reward dinner project.
- Must-haves: Thinly sliced marbled beef, warishita sauce (soy-mirin-sugar base), wide shallow pot or cast-iron skillet.
- Skill Level: Easy (and fun for hosting!)
Summarize & Save this content on:

What is Sukiyaki?
Sukiyaki (すき焼き) is a Japanese hot pot dish in which thinly sliced beef is cooked tableside with vegetables, tofu, and noodles in a sweetened soy-based seasoning called warishita (割り下). Classified as a type of nabemono (one-pot cooking), sukiyaki often uses a shallow cast-iron pan where ingredients simmer in a small amount of intensely flavored broth rather than being fully submerged.
Because sukiyaki features high-quality beef as its centerpiece, it holds a similar status to other premium Japanese beef dishes like shabu shabu, beef tataki, Japanese roast beef, and gyukatsu.
As a 1986 questionnaire survey shows, sukiyaki has long functioned as a “special-occasion feast,” and the shared experience of gathering around the pot is an important part of the dish. It’s often served during celebrations such as Japanese New Year’s gatherings and year-end parties (忘年会), making it both comfort food and a festive centerpiece. The rich, sweet-savory flavor of sukiyaki also translates beautifully into more casual dishes like sukiyaki udon and sukiyaki don.
Kanto vs Kansai Sukiyaki
The way sukiyaki is made differs greatly from east to west. For an easier comparison, see the following table.
| Kanto (East) | Kansai (West) | |
|---|---|---|
| Cooking method of beef | Stew | Grill |
| Seasoning | Make warishita sauce first and cook the beef in the sauce | Grill beef first and then season with sugar, soy sauce and sake |
| Appearance | Like a hotpot | Grilled beef and vegetables |
| Difficulty | Easy | Intermediate |
| How to eat | With raw egg | With raw egg |
Isn’t it easier to cook Kansai-style, where all you have to do is grill? You might think so, but because it is difficult to get the timing and seasoning just right for Kansai style, it is actually said that Kanto style is easier.
There may be some differences in ingredients, but the bottom line is that every homemade sukiyaki tends to use different ingredients according to the preference of the family, so there are no set ingredients that are specific to the Kanto region or to the Kansai region.
Sukiyaki Ingredients
What You’ll Need for Sukiyaki
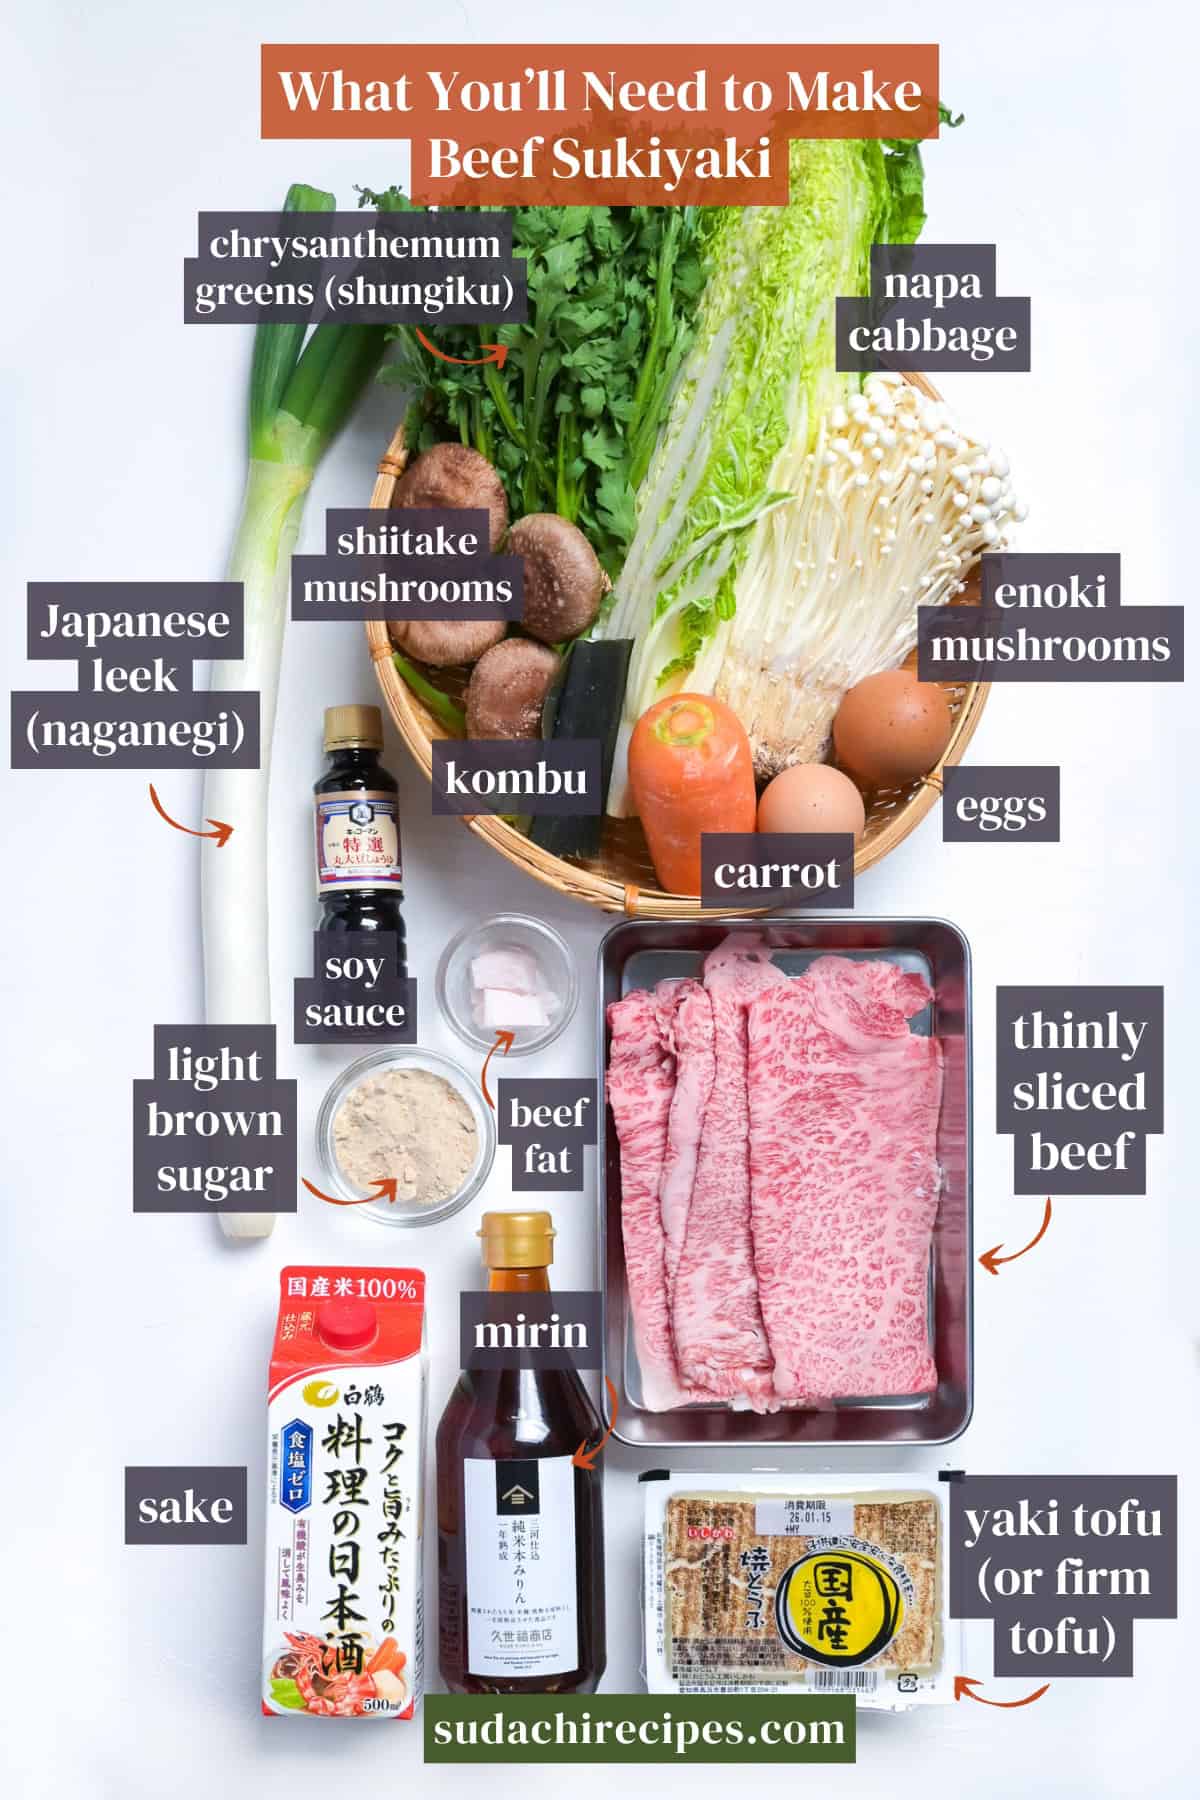
- Warishita Ingredients: Japanese soy sauce, mirin, sake, sugar create the sweet-savory braising liquid (warishita) that makes your sukiyaki taste like sukiyaki. In my recipe, I add kombu (dried kelp) for subtle umami depth.
- Eggs: Raw egg is the traditional dipping sauce for sukiyaki. It sounds unusual, but it creates a silky, rich coating that tempers the salty-sweet meat beautifully. In some countries, always use pasteurized eggs (check the label).
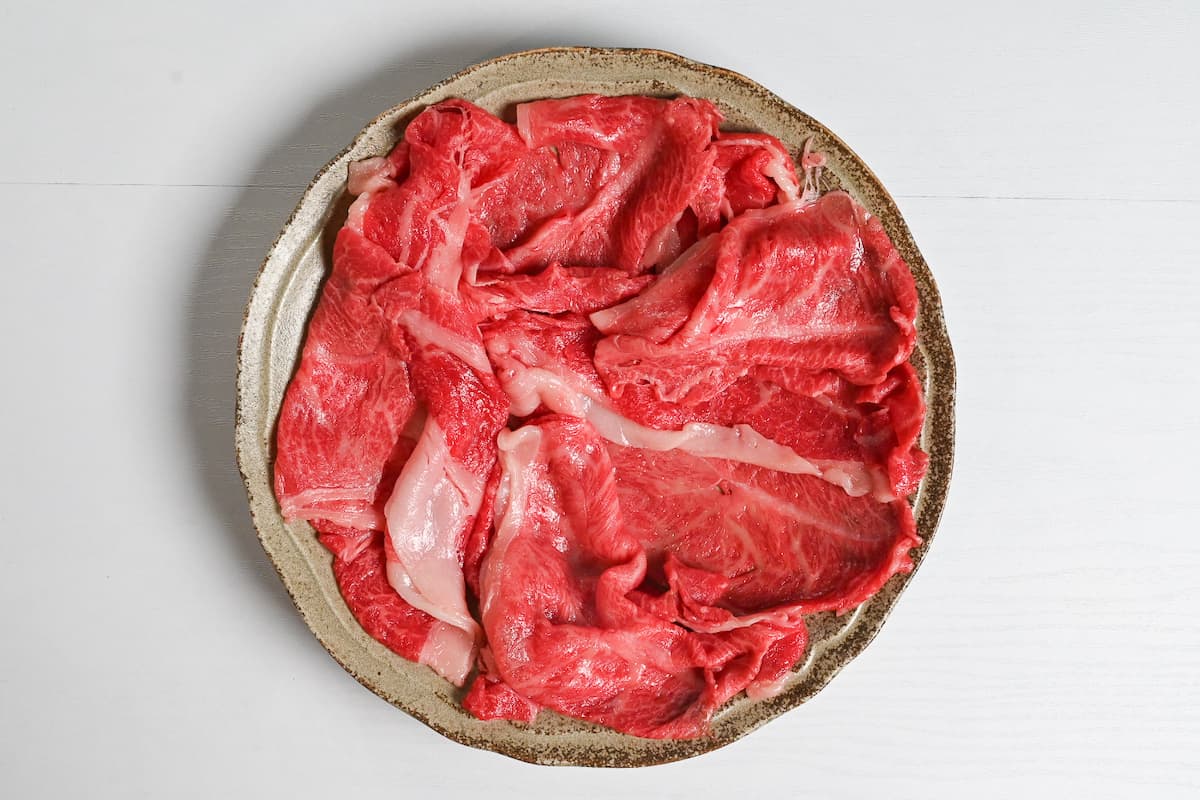
Ideal beef cuts for Sukiyaki
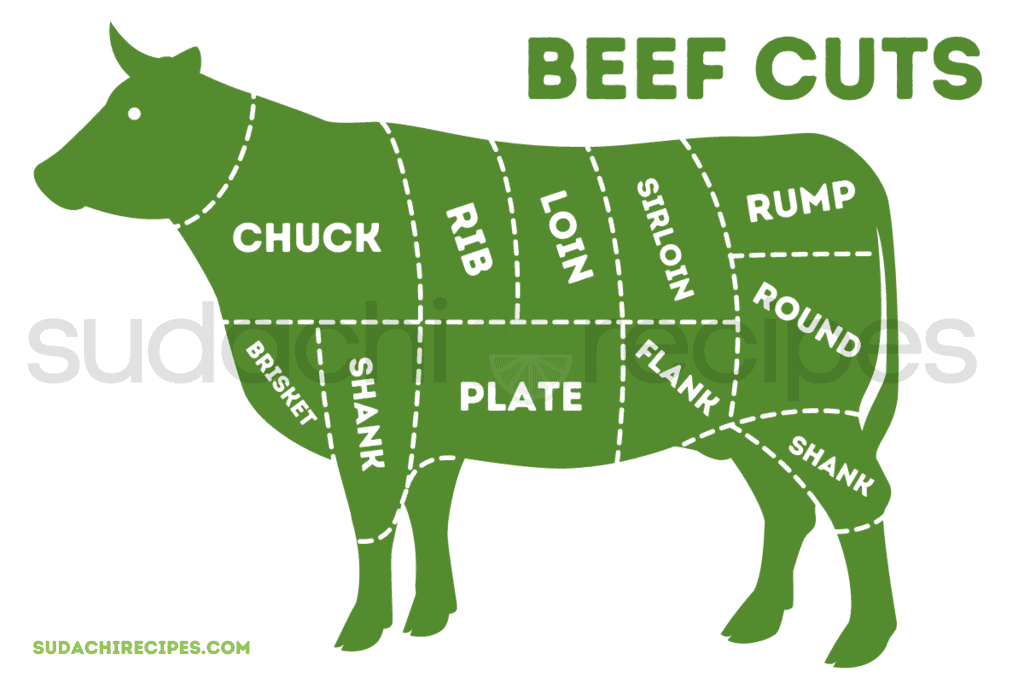
The type of beef used depends on personal preference and budget, but generally speaking, high quality meat with marbling fat is most suitable for sukiyaki. Here are four types of beef parts suitable for sukiyaki.
- Rib eye roll: Considered one of the finest cuts for sukiyaki. Has a good balance of fat and lean meat with beautiful marbling.
- Chuck eye roll: High fat content with fine marbling (although not as much as rib eye) makes chuck eye an ideal part for sukiyaki. Also often used for shabu shabu and yakiniku (grilled meat).
- Plate: A slightly coarser option with a good amount of fat makes plate a decent part for making sukiyaki for a lower cost.
- Round: A leaner option for people who don’t enjoy fatty meats. Cooking time should be reduced to prevent the meat from becoming too tough.
Whichever cut of beef you use, the meat must be thinly sliced (about 2mm) for sukiyaki.
Substitution Ideas
- Beef (DIY Slicing): If you can’t find pre-sliced meat, buy a well-marbled chuck or ribeye roasting block and partially freeze it, then slice paper-thin yourself (approximately 2mm).
- Pork or Chicken: Thinly sliced pork belly or chicken thigh are budget-friendly alternatives. They taste slightly lighter than beef, but be sure to cook them thoroughly.
- Chrysanthemum Greens (Shungiku): Watercress is a good bet for replicating that signature peppery bite, though spinach is a mild, family-friendly alternative. Spinach wilts instantly, so add it at the very last second to keep it fresh.
- Mushrooms: Cremini, button, or portobello mushrooms are great accessible swaps for shiitake and/or enoki.
- Napa Cabbage: Regular green cabbage stands in nicely. It has a sturdier crunch and takes a bit longer to soften, but adds a lovely natural sweetness.
- Japanese Leek (Naganegi): Western leeks are an ideal substitute! Simply stick to the white and light green sections. They cook down (takes a bit longer) to the silky, sweet texture that makes this dish so comforting.
- Kombu (Kelp): A pinch of instant dashi granules is the easiest way to replace dried kelp while keeping the savory backbone.
- Raw Egg: If you prefer not to eat raw eggs, a soft-poached egg is a fantastic, safe alternative that mimics the creamy richness. Skipping the egg entirely makes the flavor too rich, so balance it with plenty of plain steamed rice.
Have trouble finding Japanese ingredients? Check out my ultimate guide to Japanese ingredient substitutes!
How to Make My Authentic Sukiyaki
If you prefer to watch the process in action, check out my YouTube video of this sukiyaki recipe!

i. Boil mirin and sake in a saucepan over medium until bubbling and the alcohol smell softens, 1-2 minutes (alcohol evaporation).

During this simmer, the raw alcohol evaporates, leaving behind a rounded sweetness instead of a harsh boozy bite.
ii. Reduce the heat to low, then add the soy sauce, light brown sugar, and water to the pot. Stir gently with a wooden spoon or silicone spatula, dragging it along the bottom until you feel no more gritty resistance. That’s your signal that every sugar crystal has melted.
Keeping the heat low here prevents the soy sauce from losing its fragrant complexity and stops the sugars from scorching onto the pan.
iii. Transfer the mixture into a container, drop a piece of kombu (dried kelp, roughly palm-sized) into the warm warishita and let it rest at room temperature for about 30 minutes, or until the kombu feels soft and pliable.
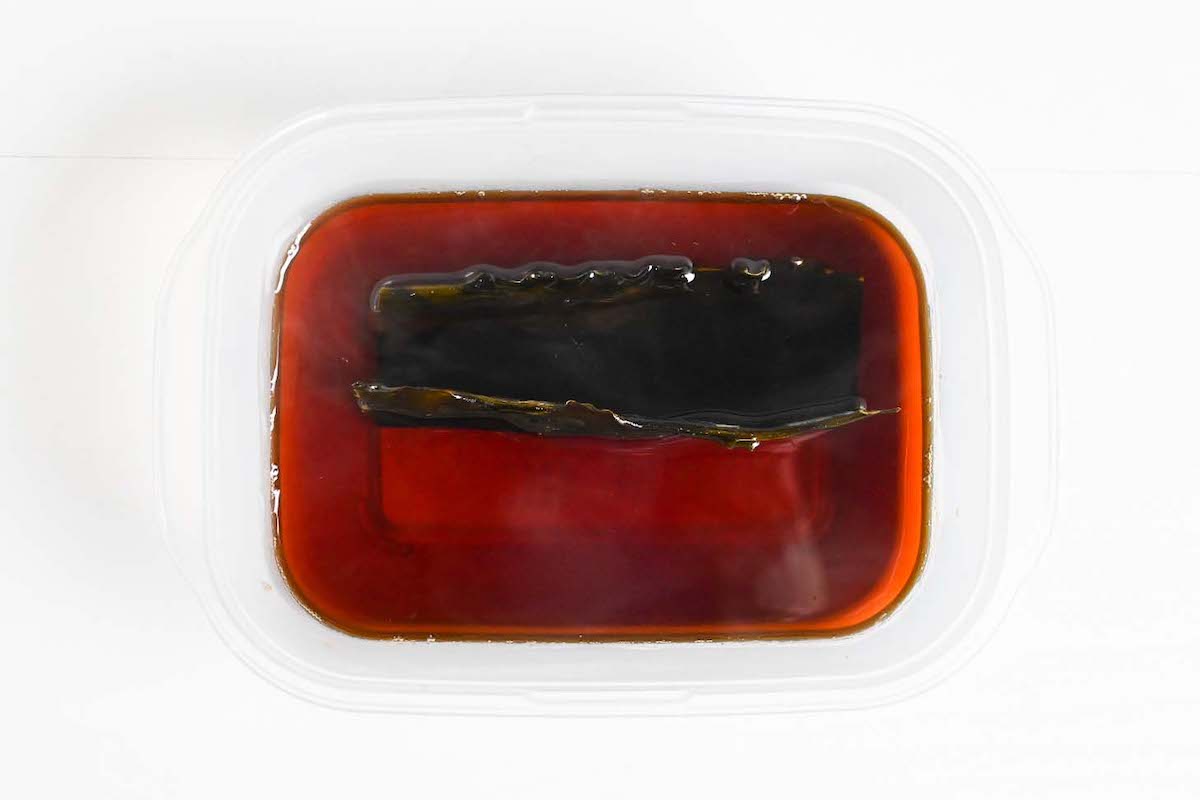
Kombu contains high concentrations of glutamic acid, which creates the foundational umami layer in your warishita. When this combines with the nucleotides released later by shiitake mushrooms in the pot, you get synergistic umami.
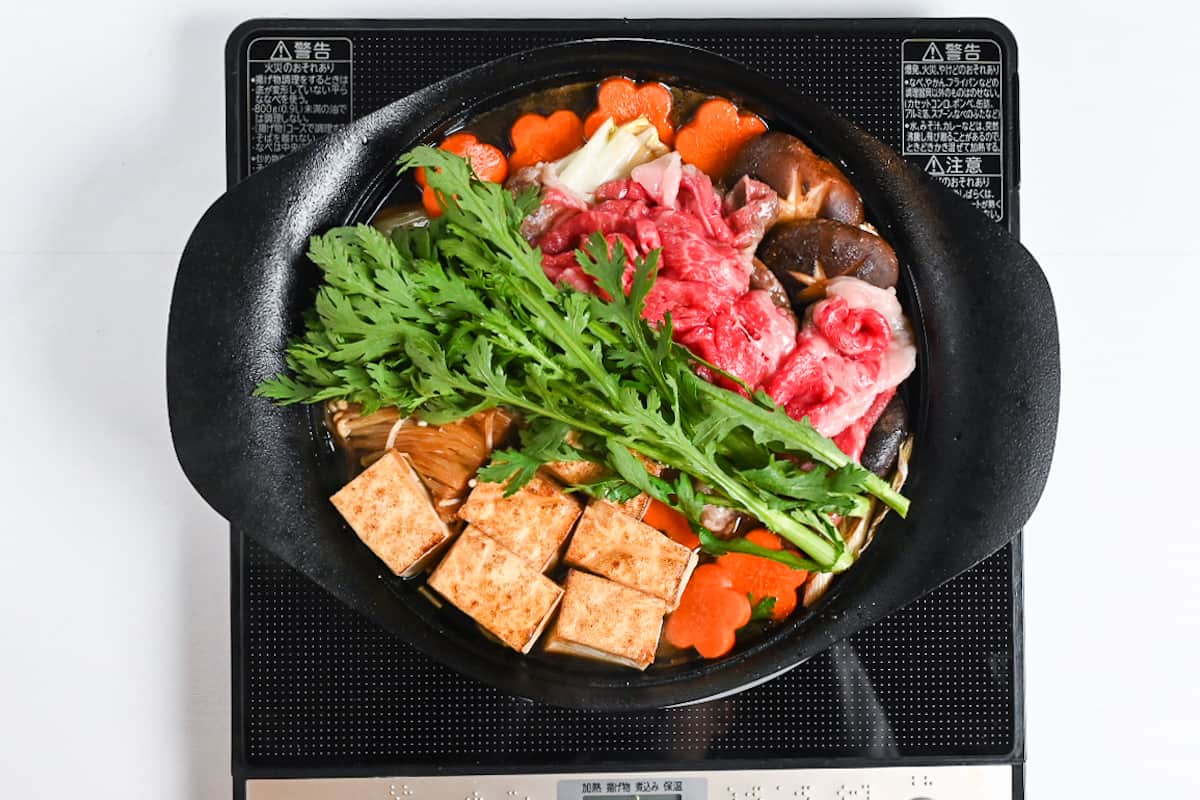
i. Prepare all your ingredients on a large platter or wooden board before anyone sits down to eat. This isn’t just about looking impressive (though it certainly does) it’s about controlling the flow of cooking so every element hits the pot at the right moment.
ii. If you can find pre-sliced sukiyaki beef at an Asian grocery, you’re ahead of the game. If not, place your block of well-marbled beef in the freezer for about 30-45 minutes until it’s firm but not frozen solid. Using your sharpest knife, slice across the grain into paper-thin (2mm) sheets.
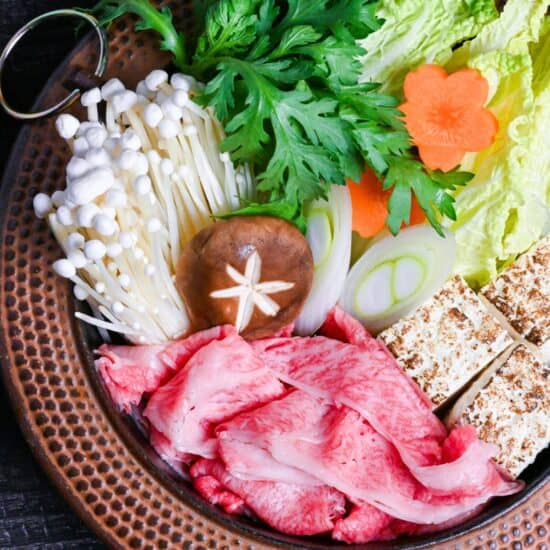
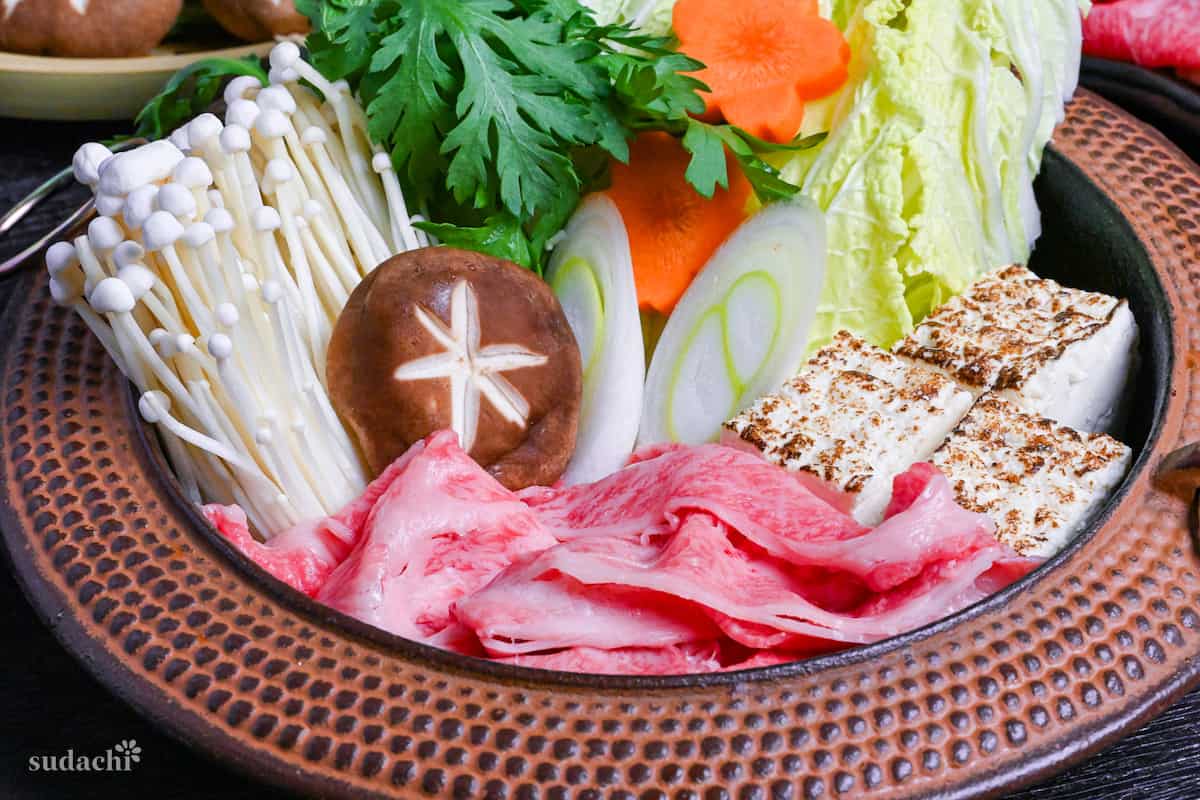
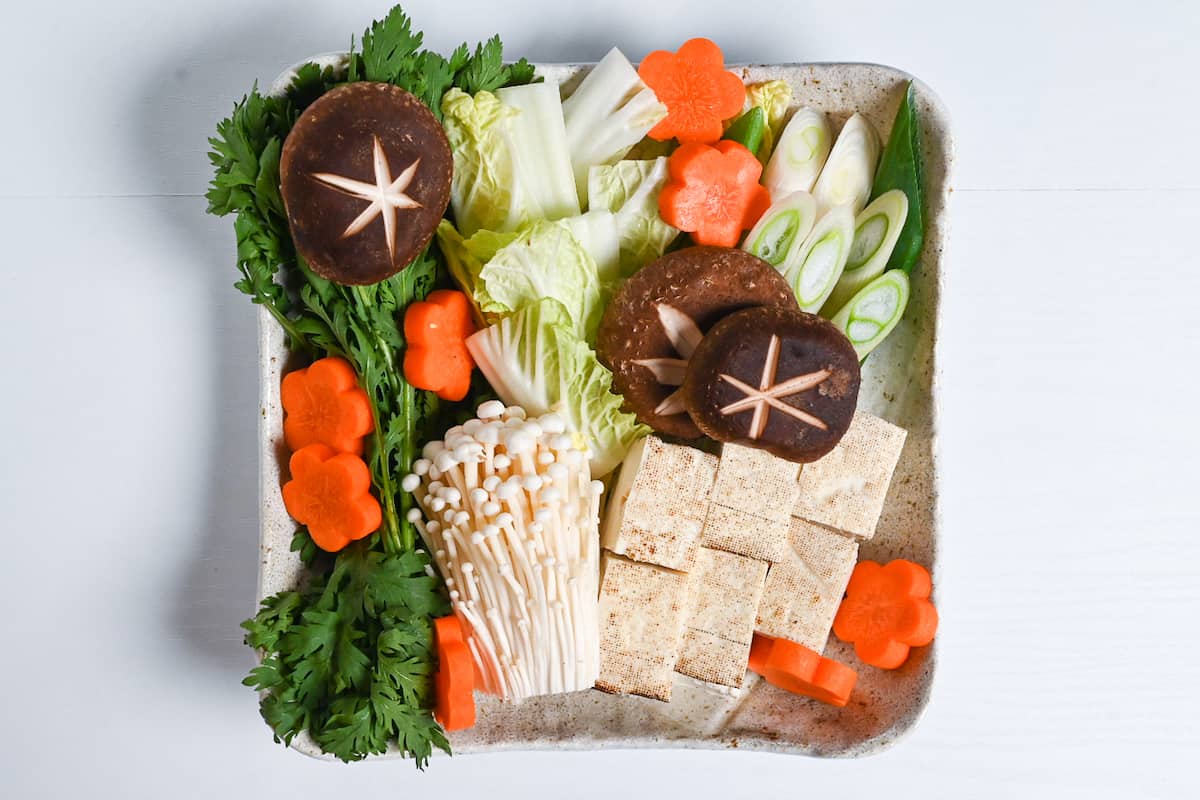
iii. The vegetables and tofu should also be cut with presentation in mind. Here is a breakdown of how I cut my vegetables, but this is just a suggestion and you can cut them however you like:
- Shiitake mushrooms: Stems removed and a star pattern cut on top.
- Napa cabbage: Roughly cut into squares/rectangles.
- Leek: Diagonally sliced.
- Tofu: Cut into squares or rectangles.
- Enoki mushrooms: In a bunch with roots removed.
- Carrots: Sliced or cut with a shaped cutter.
- Chrysanthemum greens (shungiku): Stems trimmed.
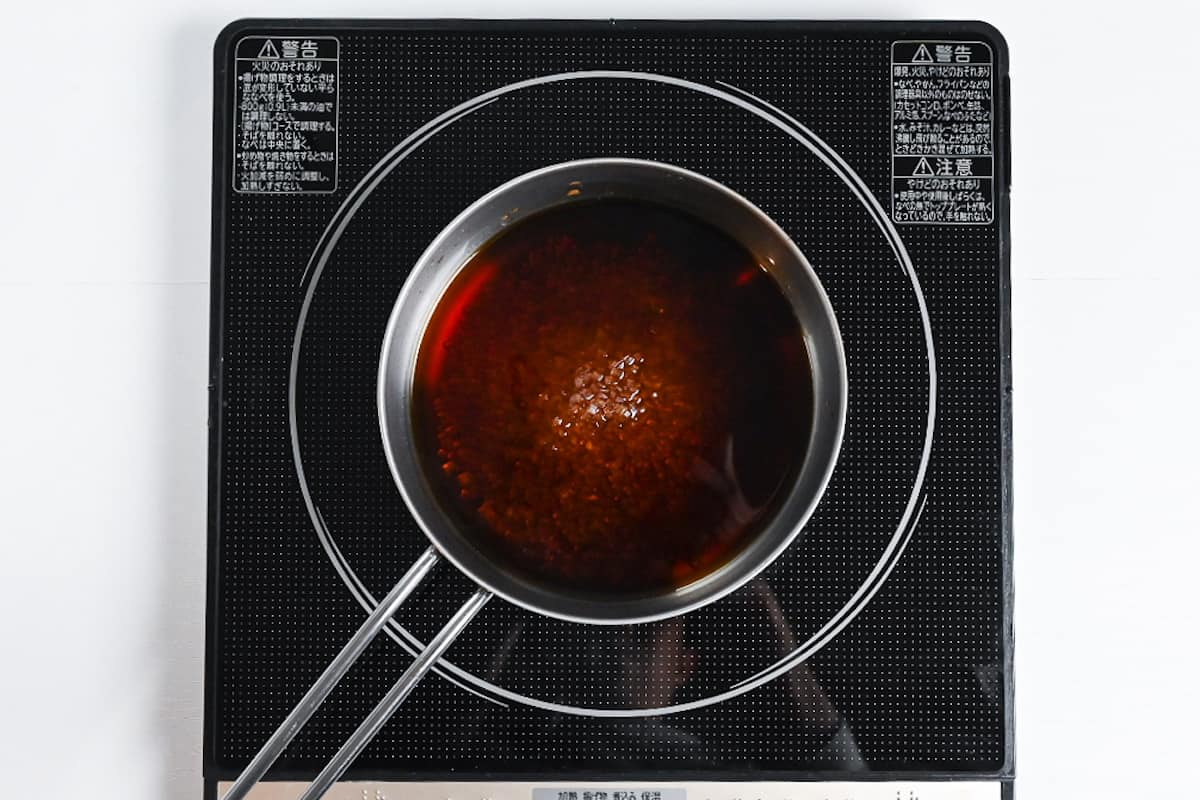
i. Heat your pot over medium-high and add a chunk of beef fat (suet) or a tablespoon of neutral oil/lard if you don’t have fat trimmings. Swirl it around as it melts, coating the bottom of the pan in a thin, shimmering layer.
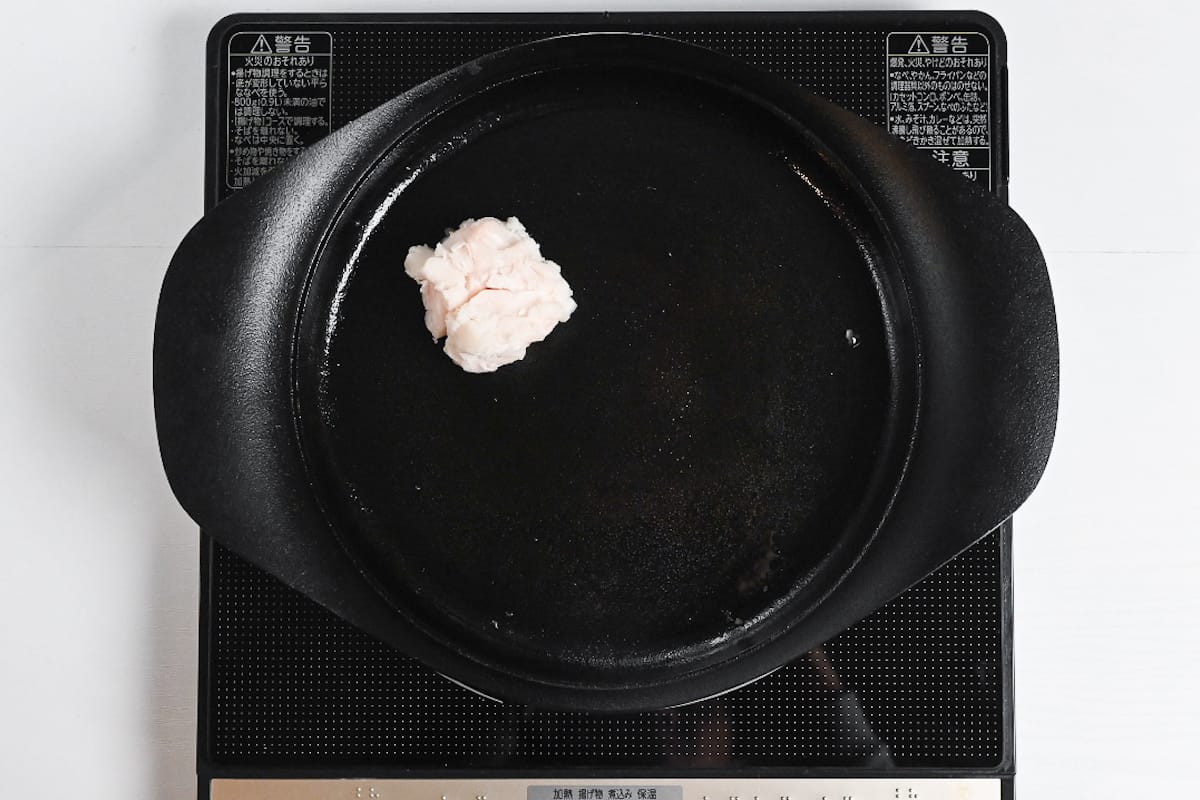
A cast-iron sukiyaki pot delivers the best results, but a heavy cast-iron skillet works beautifully too. You can use any deep pan/pot in a pinch.
A properly hot pot triggers Maillard browning later so the sauce tastes roasted, not just sweet-soy. If it smokes too hard, lower heat.
i. Lay your diagonal-cut leek pieces into the hot fat. Resist the urge to move them for at least 60 seconds. You want golden-brown char marks to develop. Listen for a steady, gentle sizzle.
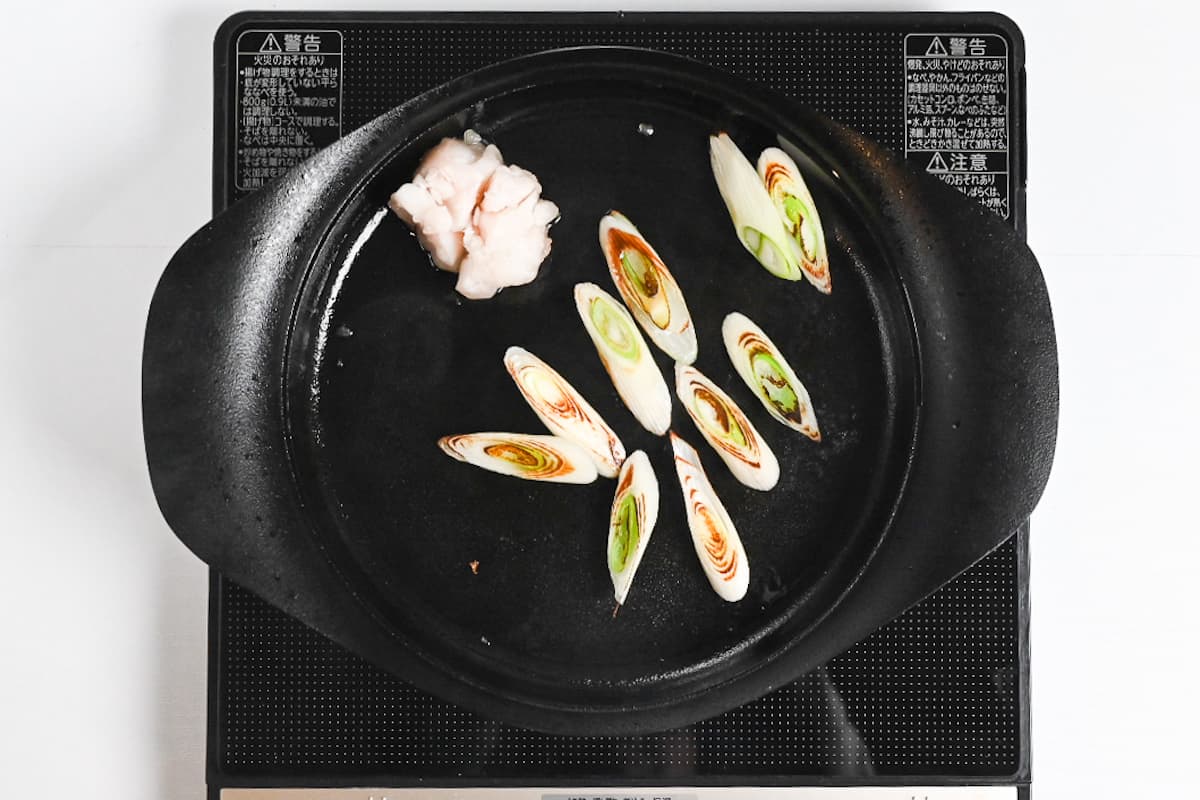
As the negi caramelize, their natural sugars deepen into something almost sweet and smoky, flavoring the fat itself with that roasted allium essence that will permeate everything cooked afterward.
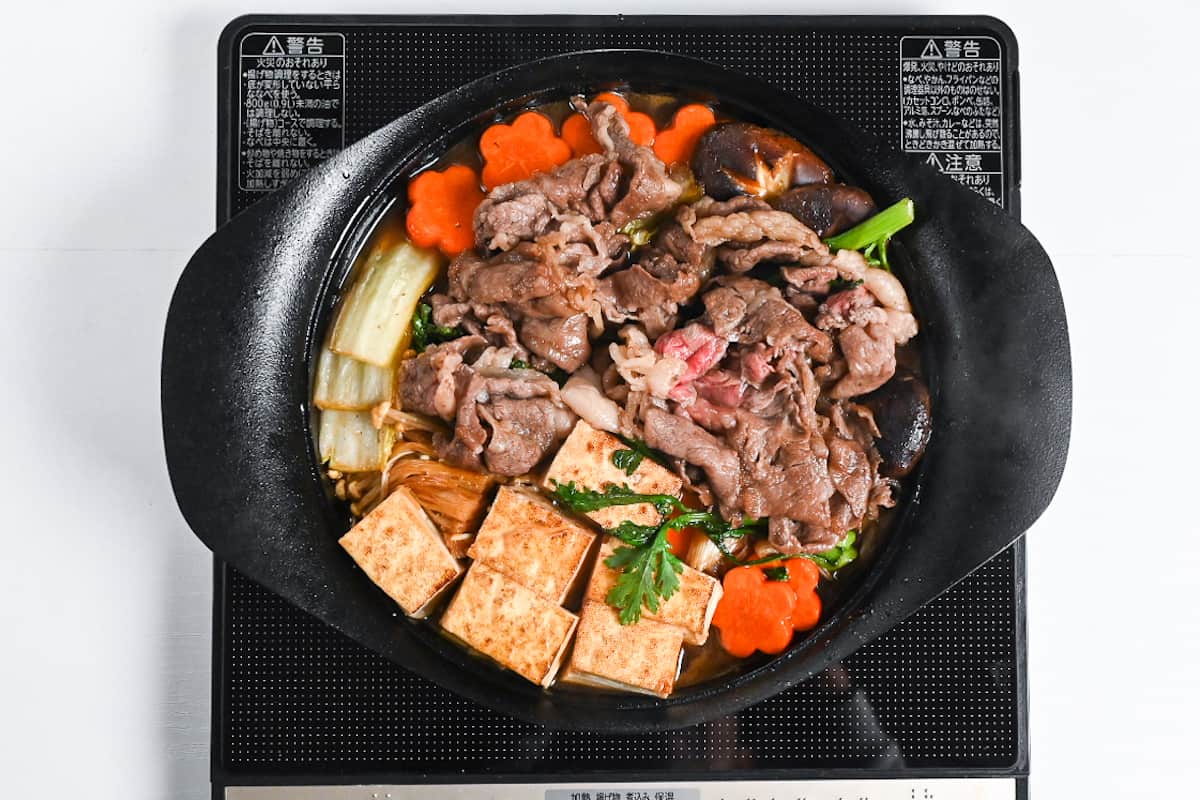
i. Push negi aside, add warishita sauce, vegetables, and tofu (hold shungiku just yet), bring to a boil, then lower to a gentle simmer.
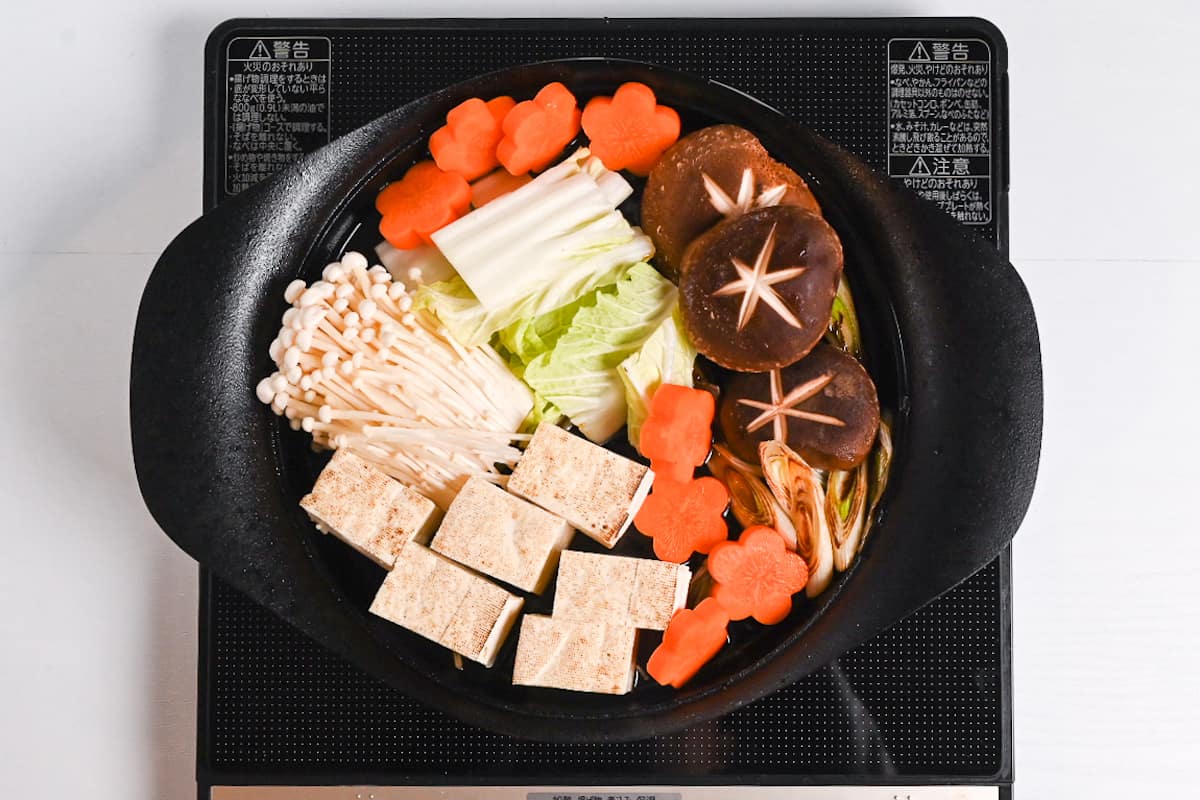
ii. Add beef so it hits the sauce; once it’s just no longer pink, pull it out to avoid toughening.
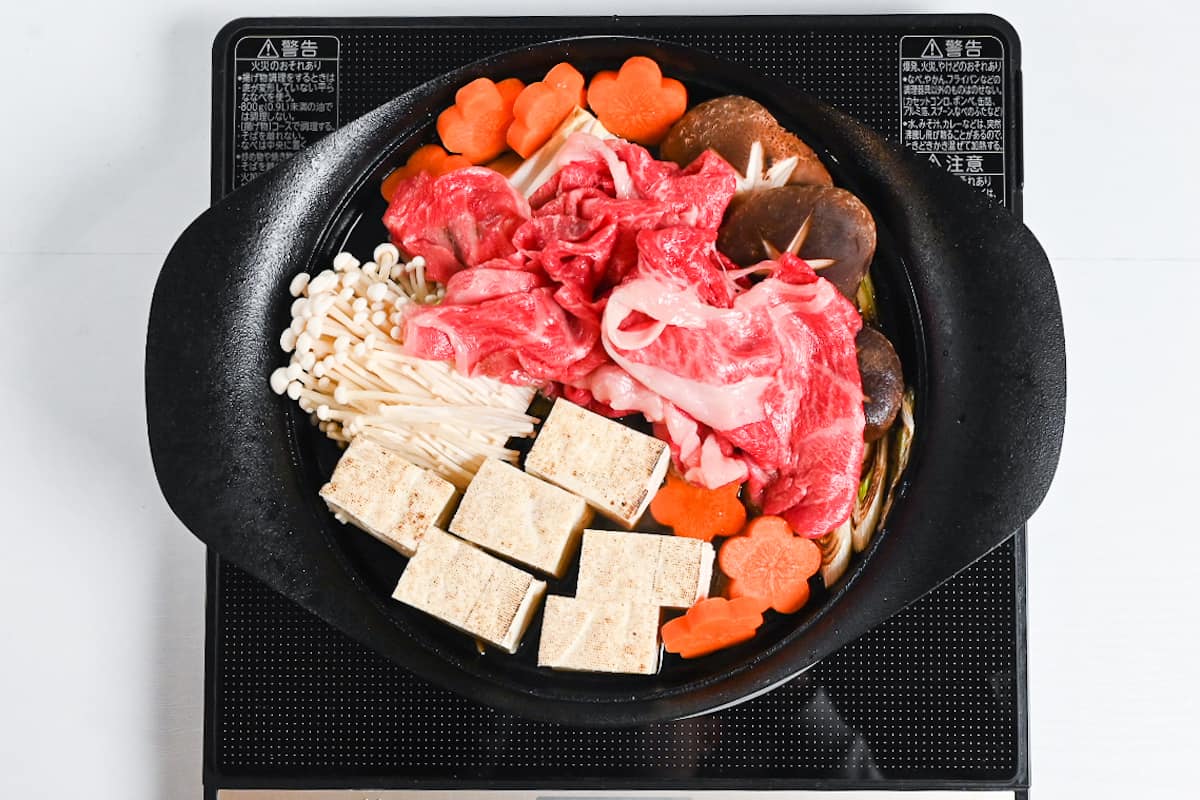
iii. Turn the tofu over and add the shungiku.
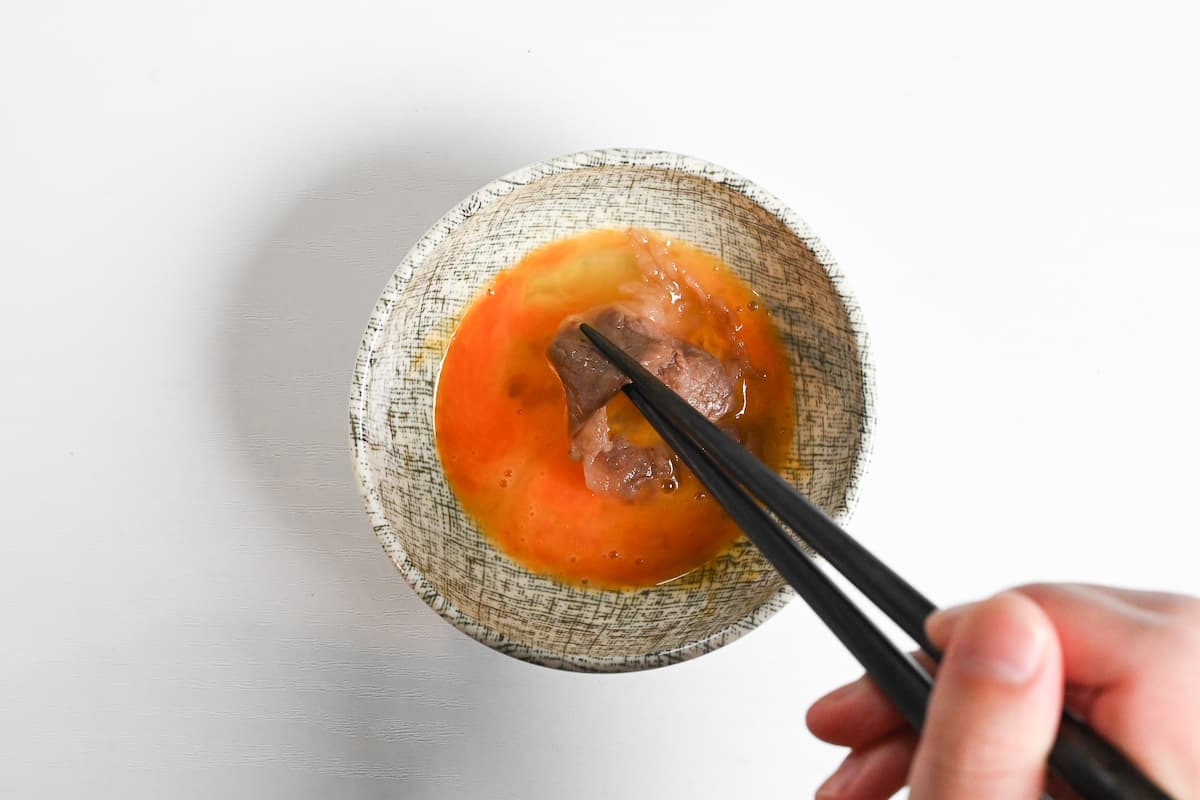
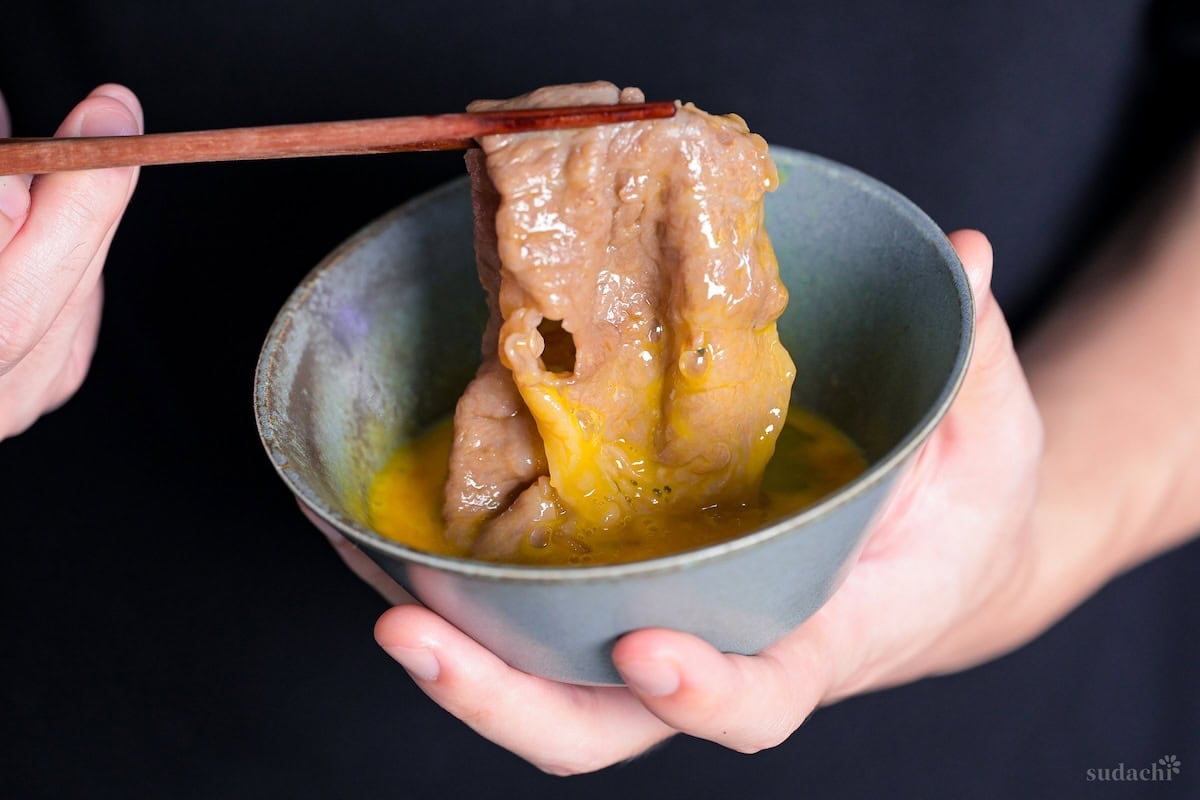
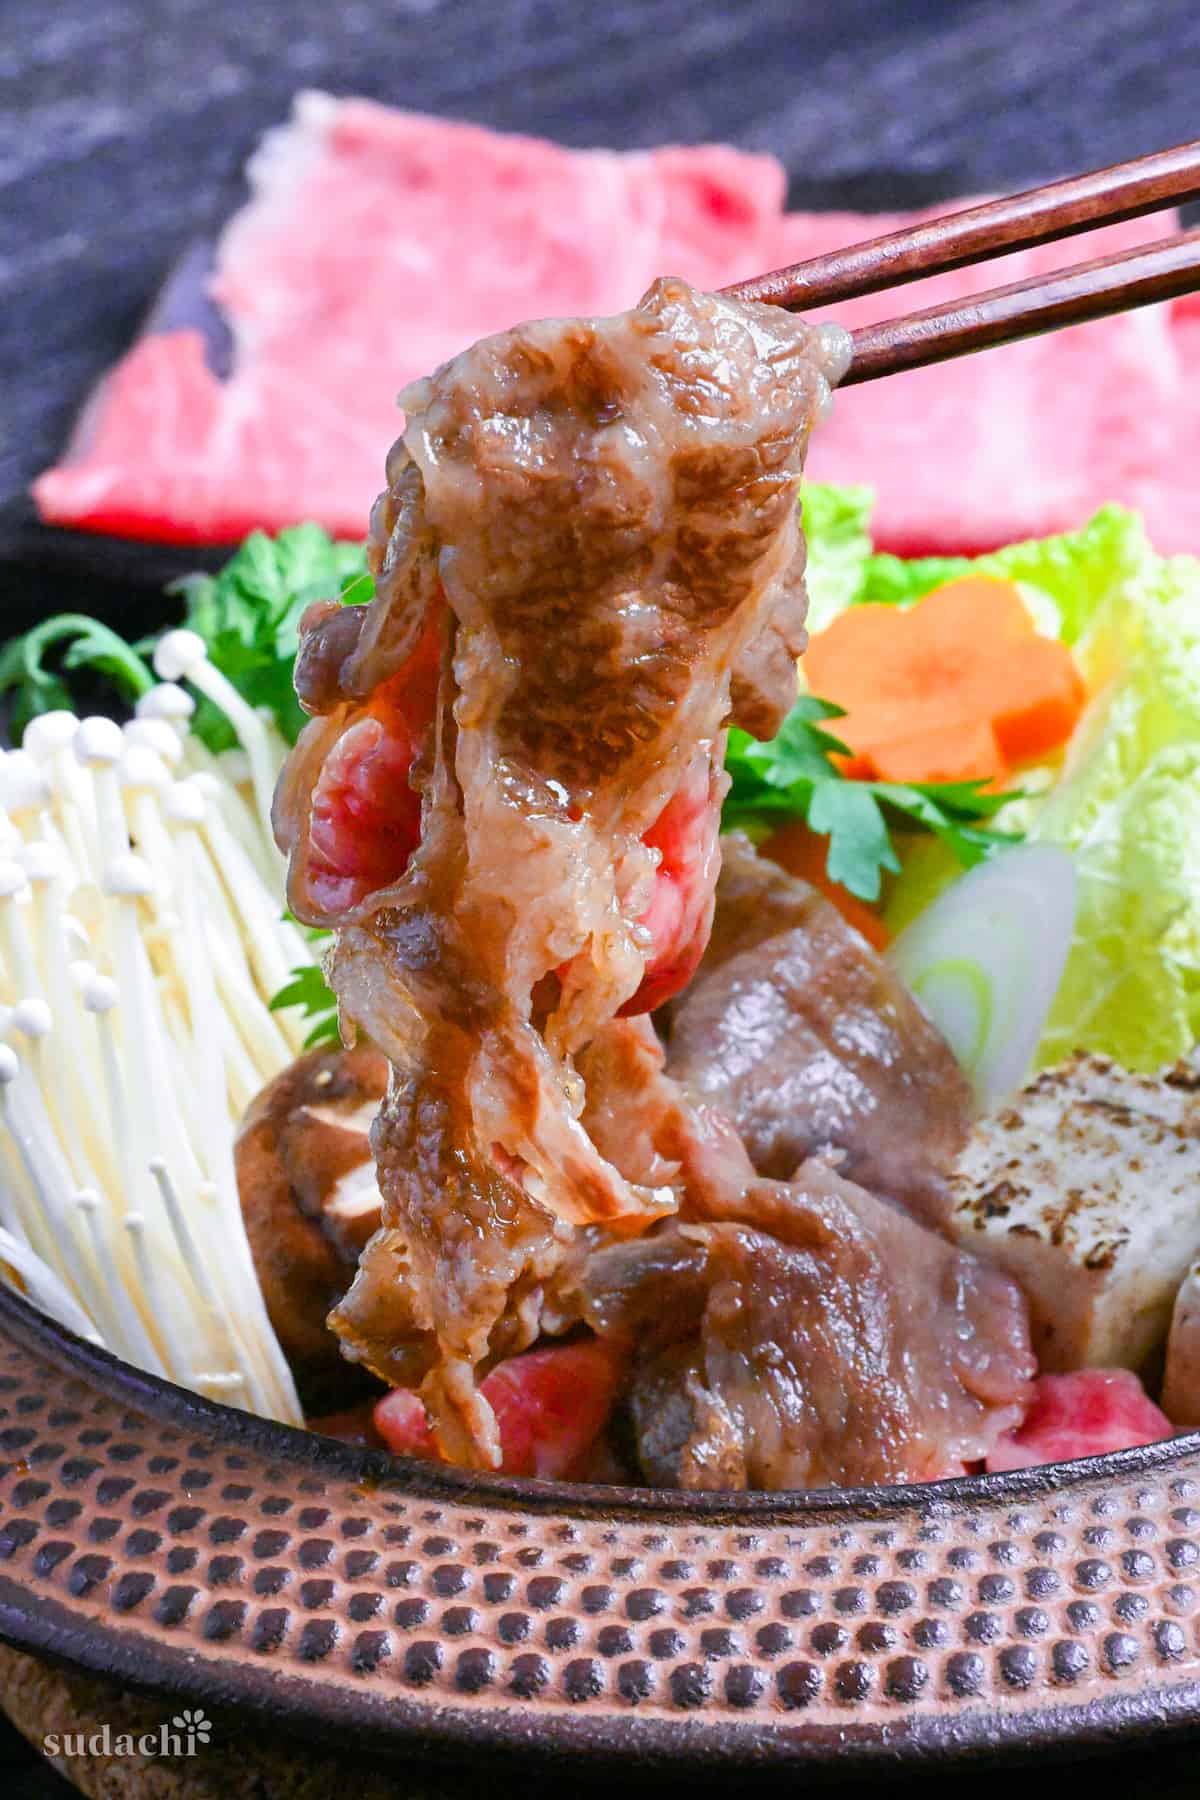
i. Give each diner a small bowl with one raw egg, lightly beaten with chopsticks until the white and yolk are just combined. It coats each hot bite in a silky layer that tempers the sauce’s sweetness and adds an almost custard-like richness.
ii. Sukiyaki is meant to be eaten continuously as ingredients finish cooking, not served in one big bowl at the end.
iii. As beef and vegetables reach perfection, fish them out with chopsticks, dip them in your egg, and eat immediately with cooked Japanese rice.
iv. As cooked items disappear, add fresh ingredients to the pot (more beef slices, another handful of mushrooms, more negi). The sauce remaining from the first round is now deeply flavored with caramelized umami from previous cooking as well as natural water from vegetables, making each subsequent batch even more delicious.
i. Once the meat and vegetables are finished, toss pre-cooked udon noodles into the remaining concentrated sauce to soak up the final flavors.
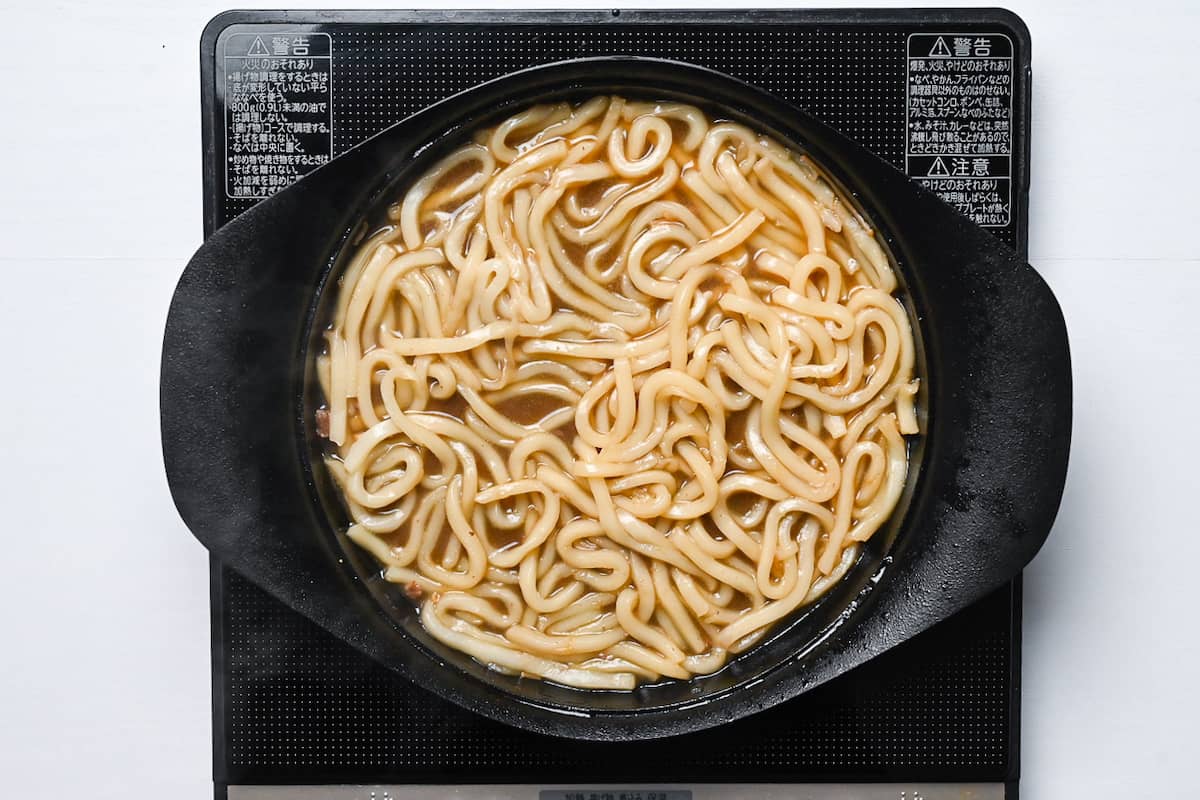
This “shime” (closing dish) utilizes the leftover beef fat and dissolved gelatin to glaze the noodles, creating a rich, savory finale that ensures zero waste. Simmer until the noodles turn a deep amber color.
If you follow the default recipe, it will yield 3 main servings.

Essential Tips & Tricks
- Boil mirin + sake first, then add soy/sugar and let kombu soak for smoother, deeper warishita.
- Sear leek in rendered beef fat until browned, then add warishita to deglaze the pot for that signature deep sukiyaki depth.
- Drop heat to a gentle simmer immediately after adding the Warishita to control the rate of evaporation.
- Use pot zoning: sear in the center, rest cooked items at the edges. The pan’s outer rim stays cooler, creating a natural holding area where finished beef can wait without overcooking.
- Use pasteurized eggs for dipping.
With these simple tips in mind, you’re set for success every time you make sukiyaki.
Storage & Meal Prep
Fridge: Store leftover sukiyaki in an airtight container for up to 2 days. Expect the beef fat to solidify into a white layer on top and leafy greens to turn soft and olive-colored.
Freezer: Not recommended.
Meal Prep: Great for make-ahead! Make the warishita and store in the fridge and cut/portion vegetables and tofu 1 day ahead so table cooking stays calm and your beef stays tender. Not recommended to combine ingredients with sauce ahead of time.
Reheating: Warm leftovers gently in a saucepan over medium-low heat with a splash of water or dashi to rehydrate the concentrated sauce and prevent scorching.
Sukiyaki FAQ
Sukiyaki is traced back to the Edo period (1603 – 1868), when a rustic style of grilling meat emerged despite widespread taboos around meat-eating. One popular theory says the name comes from cooking outdoors on a farmer’s plow (suki), and early versions were simply seasoned with salt or miso rather than today’s sweet-savory sauce. It then took its modern shape in the Meiji era (1868 – 1912), when beef became more common and the dish spread under different regional names, “sukiyaki” in Kansai and “gyūnabe” in Kantō. A 2018 study frames it as a fusion dish built on Japanese seasonings but centered on beef, tied to cross-cultural exchange in port cities. A 2021 paper notes how explosively it caught on as a symbol of “civilization and enlightenment (文明開化),” with 1870s Tokyo reportedly home to 550+ gyūnabe restaurants.
Thin beef can overcook in seconds. If it sits in a rolling boil, proteins tighten and squeeze out moisture. Keep the heat at a gentle simmer, swish the slices just until they lose their raw look, then move them to the edge/onto vegetables to “hold” off the hottest zone.
Absolutely! Any heavy-bottomed skillet or cast-iron pan works well because the key requirements are good heat retention for searing and stable temperature for simmering. Cook on your regular stovetop, then bring the hot pan to the table on a trivet for serving. The only trade-off is that without a heat source at the table, the dish cools faster. Serve in warmed bowls and consider keeping a second batch warm on the stove for replenishing.
This often occurs when vegetables like napa cabbage release excess water, diluting the Warishita. To fix it, let the sauce reduce on a gentle simmer for a few minutes to evaporate moisture, or add a splash of soy sauce and sugar to restore the glaze.
More Japanese Beef Recipes
You can also check out more Japanese beef recipes here!
Did You Try This Recipe?
I would love to hear your thoughts!
💬 Leave a review and ⭐️ rating in the comments below. 📷 I also love to see your photos – submit them here!

Beef Sukiyaki with Authentic Japanese Sauce

Ingredients
Warishita Sauce
- 3 tbsp sake drinking grade preferred
- 3 tbsp mirin
- 2 tbsp light brown sugar or white sugar
- 3 tbsp Japanese soy sauce (koikuchi shoyu)
- 3 tbsp water
- 5 g dried kelp (kombu) or pinch of instant dashi granules
Sukiyaki
- 1 tbsp beef suet (fat) or lard/neutral oil
- 250 g thinly sliced beef well-marbled ribeye or chuck, sliced 2mm thick
- 200 g firm tofu drained, or yaki-tofu
- 2 leaves Napa cabbage or regular green cabbage
- 4 fresh shiitake mushroom or cremini
- 60 g enoki mushrooms root ends trimmed, or mushroom of your choice
- ½ carrot sliced thinly
- 1 Japanese leek (naganegi) or regular leeks
- 75 g chrysanthemum greens (shungiku) or watercress/spinach
- 2 pasteurized eggs optional
- 2 portions cooked udon noodles optional
My recommended brands of ingredients and seasonings can be found in my Japanese pantry guide.
Can’t find certain Japanese ingredients? See my substitution guide here.
Instructions
Sukiyaki Sauce (warishita)
- Add 3 tbsp mirin and 3 tbsp sake to a small sauce pan and bring to a boil over a medium heat for 1-2 minutes.

- Lower the heat to medium-low and add 3 tbsp Japanese soy sauce (koikuchi shoyu), 2 tbsp light brown sugar and 3 tbsp water. Stir over the heat until the sugar has dissolved.
- Place 5 g dried kelp (kombu) in the sauce and leave to soak at room temperature for about 30 minutes (or until the kombu has rehydrated).
Sukiyaki
- While the kombu is soaking, prepare your tofu and vegetables.• 200 g firm tofu – large cubes• 2 leaves Napa cabbage – roughly cut• 60 g enoki mushrooms – cut off the roots• ½ carrot – peel and slice about 1cm thick, use a cutter to make decorative shapes (optional)• 1 Japanese leek (naganegi) – cut diagonally into 5-6cm pieces• 4 fresh shiitake mushroom – stems trimmed and decorative incisions cut on caps (optional)
- Once the sauce is ready, heat a wide, shallow iron pot over a medium heat and coat evenly with 1 tbsp beef suet (fat) or lard.
- After the fat is melted and the pot is hot, add the leek and cook until slightly charred.
- When the leeks are lightly browned, push them to one side and add the sauce, tofu and vegetables (except the crown daisy). Bring the sauce to a boil and then lower the heat to a simmer.
- Make some space between the ingredients and add 250 g thinly sliced beef so that it's in contact with the sauce.
- Turn the tofu over and add 75 g chrysanthemum greens (shungiku) to the pot.
- Simmer without a lid until the beef and vegetables are cooked to your liking. (Approximately 5-15 minutes depending on the ingredient.)As each ingredient cooks, remove it from the pot and distribute between each person. Top up with more ingredients as you go.
- Give each person a bowl and a raw pasteurised egg. Each person should crack the egg into the bowl and whisk thoroughly before using it to dip the cooked sukiyaki ingredients. (optional)
- Once all of the ingredients are eaten, enjoy the last of the sauce by adding some cooked udon or shirataki noodles.
- Enjoy!
My father spent many years in the Orient while he was in the Navy and always raved about the sukiyaki dishes of Japan. I made this for him and he LOVED it. I taught him how to make it and now he enjoys it weekly. Thank you for sharing! The instructions and recipe were very easy to follow and I look forward to trying your other recipes listed.
Hi Kay,
Thank you so much for your comment! It really made my day! I’m so happy to hear that he makes it regularly after trying my recipe! 🙂
Yuto
We just got back from our vacation in Japan. In Tokyo, we went to a little Sukiyaki restaraunt in Asakusa next to the Senso-ji Temple. It was such an incredible surprise, one of the top 2 meals in a 16 day trip. I made this last night for Thanksgiving dinner (4 people) and it was sooo good!!! This recipe was just like I remember at that restaraunt. The sauce is incredible. I used every ingredient, Easy to cook and it was a fantastic hit! Out of the park! I bought a hot plate and used a cast iron pot. Cooked in the middle of the table – it was a great way to bring everyone together. Now a go-to recipe in my arsenal. Thank you very much.
Hi Mitchell,
Thank you so much for making this recipe for your Thanksgiving dinner! I’m really happy to hear that it brought back such a great memory from your trip to Japan and delivered the flavor you remembered. It means a lot to know that it was a hit with everyone and that it’s now part of your go-to recipe collection. Thank you again for sharing your experience!
Yuto
Truly excellent. Brought me right back to my grandma’s table. Thank you for helping me keep some family traditions (and memories) alive. The recipe is straight forward, with good substitutions options. Tons of prep, but if you follow all the basic instructions, you stick the landing and get gold, THANK YOU!
Hi Jaimie,
Thank you so much for the warm words! Being even a small part of bringing your family table back means a lot to me! 🙂
Yuto