
The best shigureni doesn’t have to be made with the best beef.
If you once bought a shigureni onigiri from a konbini and have been quietly chasing that exact filling ever since, this is the recipe that finally lands it. Hot over rice, it stops a conversation. Packed cold into tomorrow’s lunchbox, it is somehow even better.

Beef Shigureni
Recipe Snapshot
- What is it? Shigureni is a short-simmered Japanese home dish of thinly sliced beef and julienned fresh ginger bound in a sweet-soy glaze. Classic gohan no otomo (rice companion), classic jōbisai (make-ahead dishes).
- Flavor profile: A concentrated, lacquered soy-and-mirin glaze with the peppery bright flavor of fresh ginger. The sweet-salty-umami axis runs hot enough to carry a full bowl of rice, and the ginger’s volatile oils stay perceptible even when the dish is cold.
- Why you will love this recipe: I know the instinct is to throw the beef in with the seasoning liquid and let it simmer down together, but reducing the glaze first and adding the beef at the very end cuts the meat’s time in the pan by more than half, and that single change is the difference between beef that is actually tender.
- Must-haves: Thin-sliced beef with moderate marbling, fresh ginger, and a wide shallow pan that lets the glaze reduce fast without scorching.
- Skill level: Beginner-friendly. The only real judgment call is knowing when to stop the simmer, and this article gives you the exact visual cue used.
Summarize & Save this content on:
What Is Beef Shigureni?
Beef shigureni (牛肉のしぐれ煮) is thinly sliced beef simmered with julienned fresh ginger in a sweet soy glaze, reduced until almost no liquid remains. In washoku terms it sits under nimono, the simmered-dish family, specifically in the nishime branch where the glaze clings to the ingredients instead of bathing them.
What separates shigureni from gyudon or sukiyaki is the generous hit of fresh ginger and the almost-dry finish. Japanese home cooks treat it as gohan no otomo, a concentrated companion to plain rice, and as a make-ahead staple that actually improves overnight in the fridge.
The name comes from Kuwana in Mie Prefecture, where Edo-period merchants soy-simmered clams and had a local haiku poet brand the style after shigure (時雨), the passing cold rains of early winter. The beef version arrived centuries later, but the method and the poetic name stayed.
Shigureni Ingredients
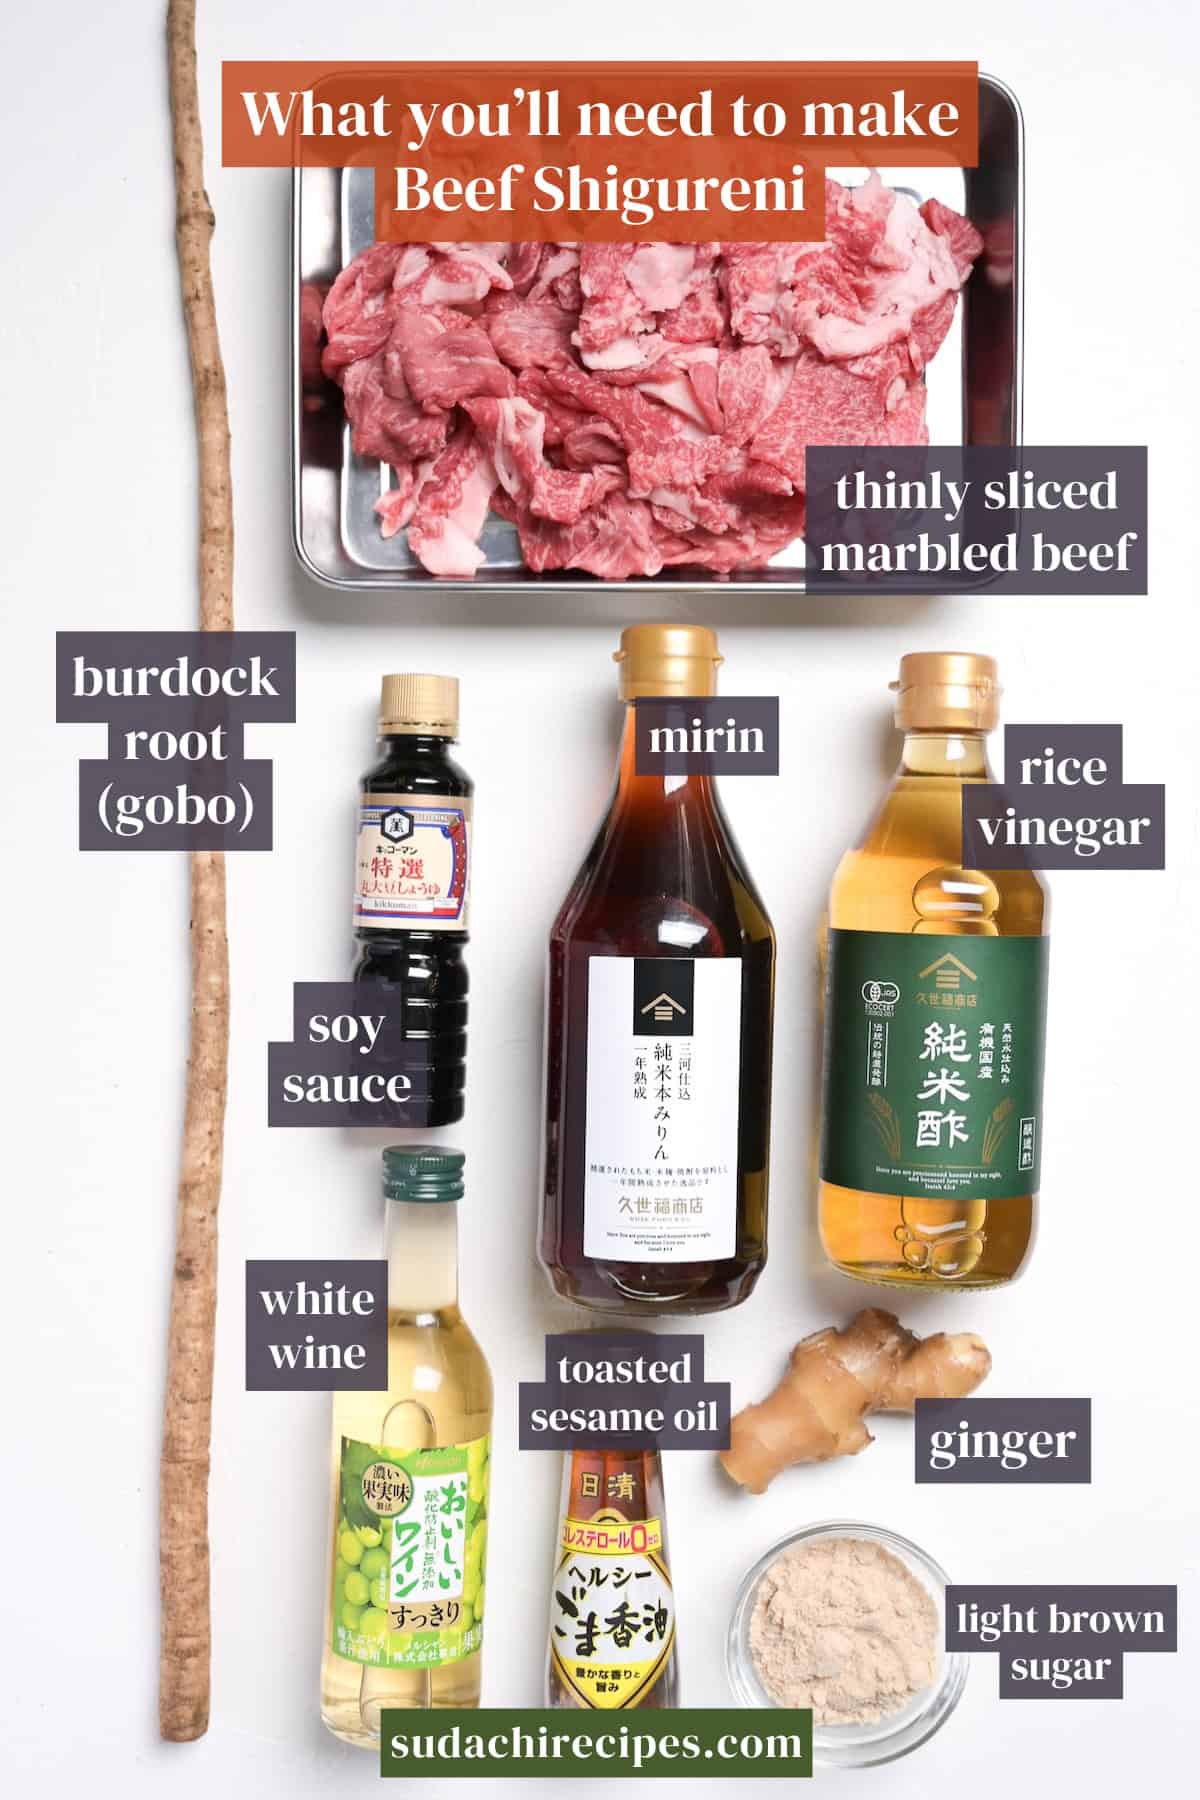
- Beef: I usually reach for the inexpensive mixed trimmings and end cuts of moderately marbled beef cuts. It doesn’t have to be wagyu. Thin slices labeled for sukiyaki, shabu shabu, or even Korean bulgogi at any Asian grocer all work beautifully.
- Japanese Soy Sauce: This is the backbone of the entire dish. Use a naturally brewed Japanese shoyu if you can find one. Kikkoman is a reliable supermarket default. During the final reduction, the soy sauce amino acids brown together with the sugar, which is what builds the dark, lacquered color that makes shigureni look like itself on a plate.
- White Wine: I know, wine in a Japanese simmered dish reads unusual at first. You can use sake here without question, but I reach for a dry white instead. The crisp acidity cuts through the beef’s richness in a way I cannot fully describe until you taste it side by side. Pick anything dry and unoaked. A basic Sauvignon Blanc or Pinot Grigio works. Nothing showy, nothing sweet.
Substitutions, Variations, and How to Customize
Substitutions:
- Beef → Pork belly: Pork belly is the most common Japanese swap and some home cooks actually prefer it for its richer body. Use the same weight. The glaze clings to pork fat differently but still reads as shigureni.
- Beef → Chicken thigh: Thigh works. You lose the specific beefy richness, but the technique transfers cleanly. Skip chicken breast, it dries out fast in a reduction this concentrated.
- Beef → Mushroom blend (vegetarian): A shimeji, enoki, and maitake combination is the meatless version of shigureni. Increase the total mushroom weight by roughly 30 percent to offset cooking shrinkage.
- White wine → Sake: Any inexpensive junmai slots straight in with no ratio change. This is actually how shigureni is traditionally made, and the sake version is equally correct. Use whichever you have.
- Fresh ginger → Tube ginger: Tube ginger will get you roughly the right flavor profile but delivers essentially zero of the tenderizing enzyme zingibain that makes fresh raw ginger load-bearing. Treat this as a different recipe rather than a like-for-like swap. If tube is your only option, a 2 to 3 cm squeeze per thumb-sized knob gets you in the right neighborhood.
- Japanese soy sauce → Tamari (GF). Tamari has roughly the same salt concentration as koikuchi shoyu, so use the same amount. The flavor runs slightly rounder and darker, which the dish carries well. Historically, tamari was actually the original soy sauce used in Kuwana shigureni.
Have trouble finding Japanese ingredients? Check out my ultimate guide to Japanese ingredient substitutes!
Variations:
- Spoon it over a rice bowl: Pile the finished shigureni over a hot donburi of plain short-grain rice and top with a soft-yolked egg or onsen tamago. You have just built a beef shigureni donburi.
- Stuff it into onigiri: A scoop of shigureni folded into a rice ball turns leftovers into a portable lunch.
- Pour hot tea over it (ochazuke style): Place a spoonful of shigureni on hot rice and pour hot green tea or dashi over the top. This is the historically documented Kuwana style of eating shigureni, immortalized in a local folk song.
How to Customize:
- Push the ginger further: Double the ginger for a sharper, more peppery profile if you love the heat.
- Use a darker sugar: Swap the light brown sugar for muscovado or dark brown sugar for a deeper, molasses-tinged glaze. The dish gets a touch earthier.
- Add a hit of sansho at the end: A small pinch of ground sansho pepper stirred in at the off-heat moment adds a bright citrus-pepper top note that plays beautifully with the ginger.
How to Make My Beef Shigureni
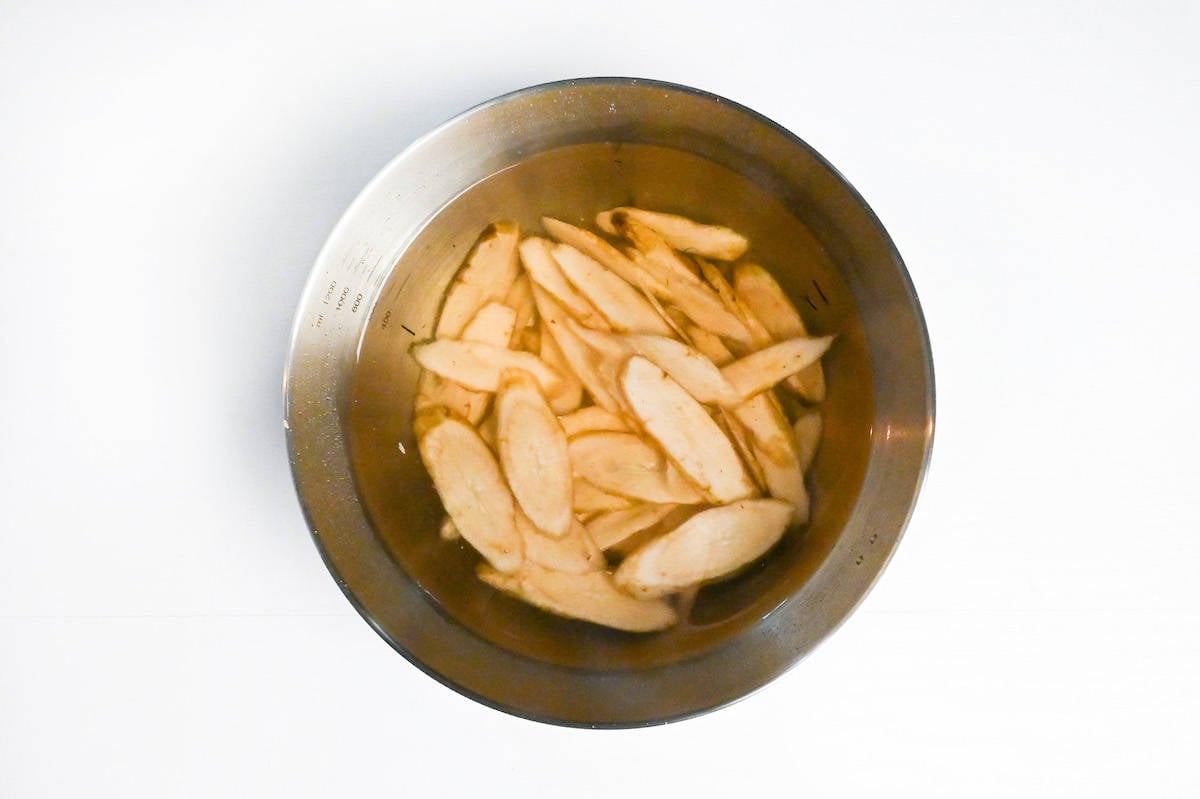
i. Use the back of a knife or a steel scrubber and work down the length of the root. The skin of the burdock is very thin, and a peeler wastes too much of the vegetable and strips out the flavor that lives right under the surface.
ii. Cut into thin slices, roughly the thickness of a coin. Drop the slices into a bowl of cold water with a splash of rice vinegar. The vinegar prevents discoloration and pulls out the surface bitterness that burdock sometimes carries.
iii. Slice the ginger lengthwise along the fiber grain, then stack the slices and cut them into fine matchsticks, roughly 3 to 4 cm long. Drop the matchsticks into a separate small bowl of cold water while you work on the beef.
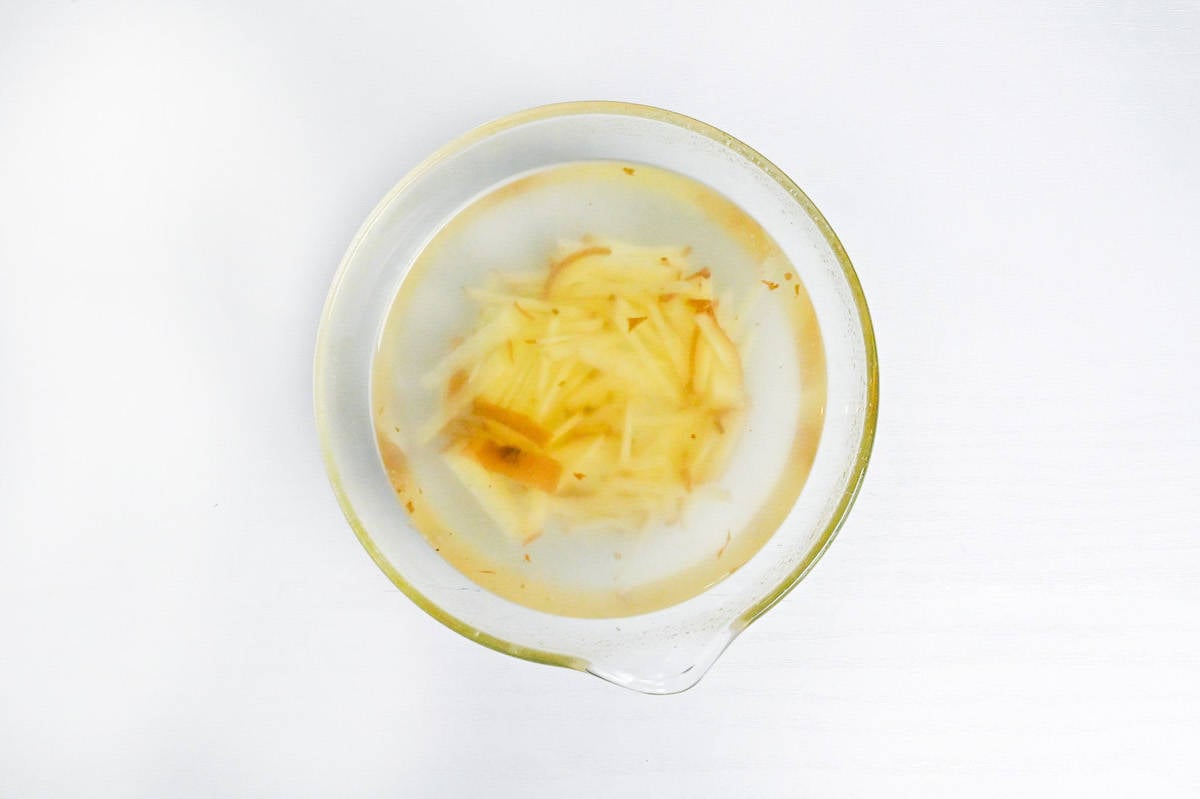
The quick soak softens the sharpest raw edge without stripping the aromatic compounds you want in the finished dish.
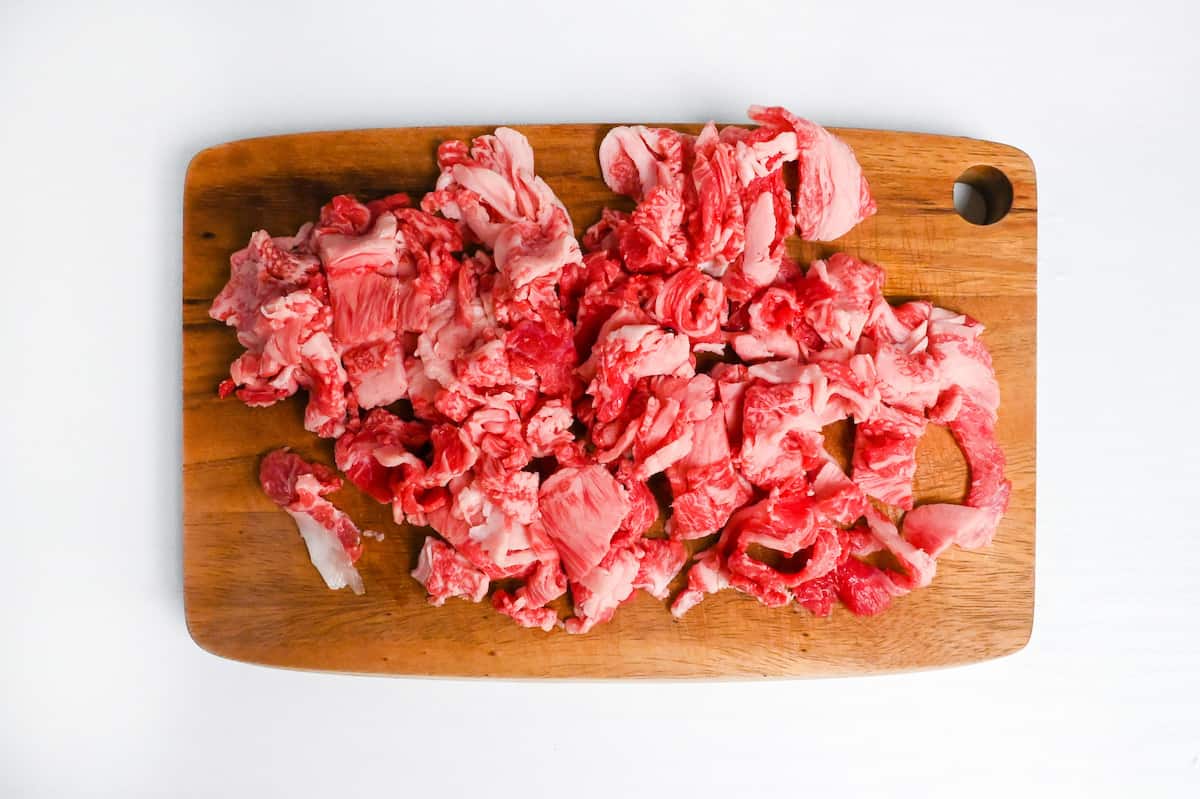
i. If the pre-sliced strips are large, roughly 2 to 3 cm wide is the target. Kitchen scissors work fine here and no knife is required.
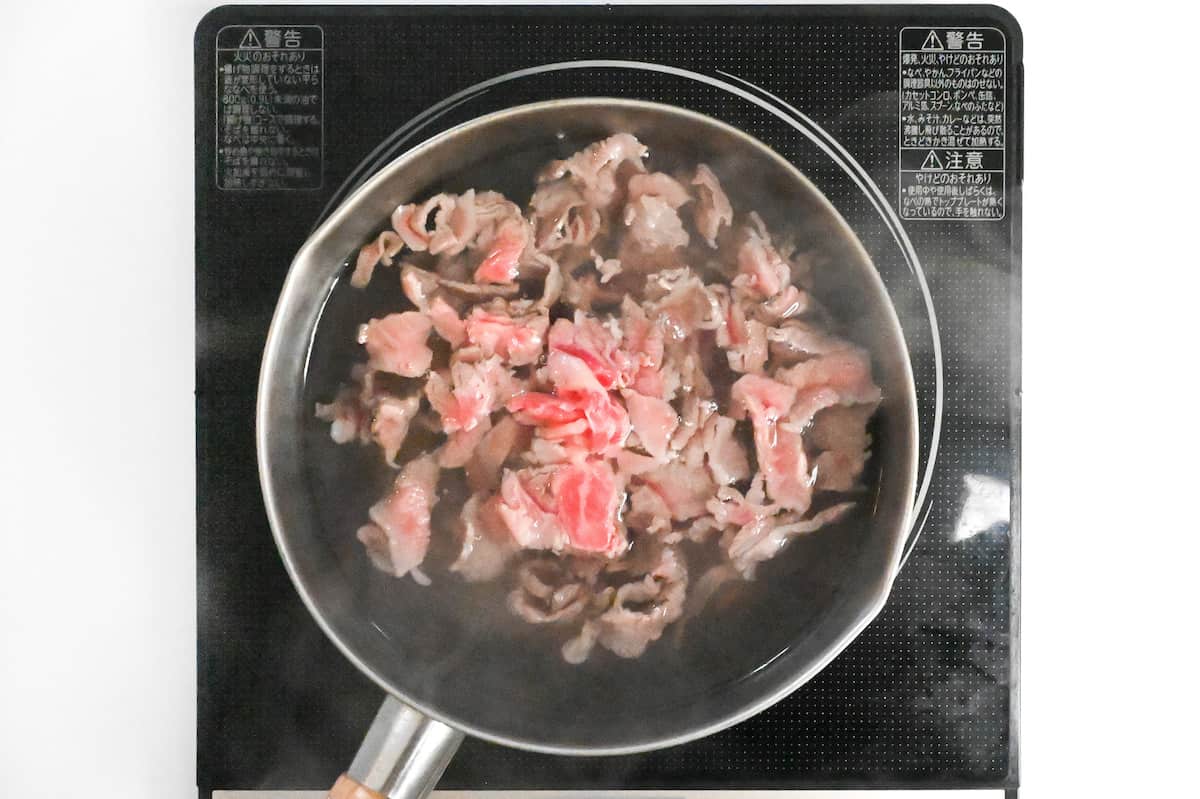
ii. Bring a pot of water just under a boil, not to a full rolling boil. You want small bubbles lifting from the bottom without the surface breaking. If a thermometer is on hand, 80 to 90°C (176 to 194°F) is the target zone. Turn off the heat before adding the beef.
iii. Slip the beef slices through the hot water for 20 to 30 seconds, just until the surface changes color. The interior should still look a little pink.
iv. Transfer the slices immediately to a waiting bowl of ice water to halt the cooking, then drain thoroughly.
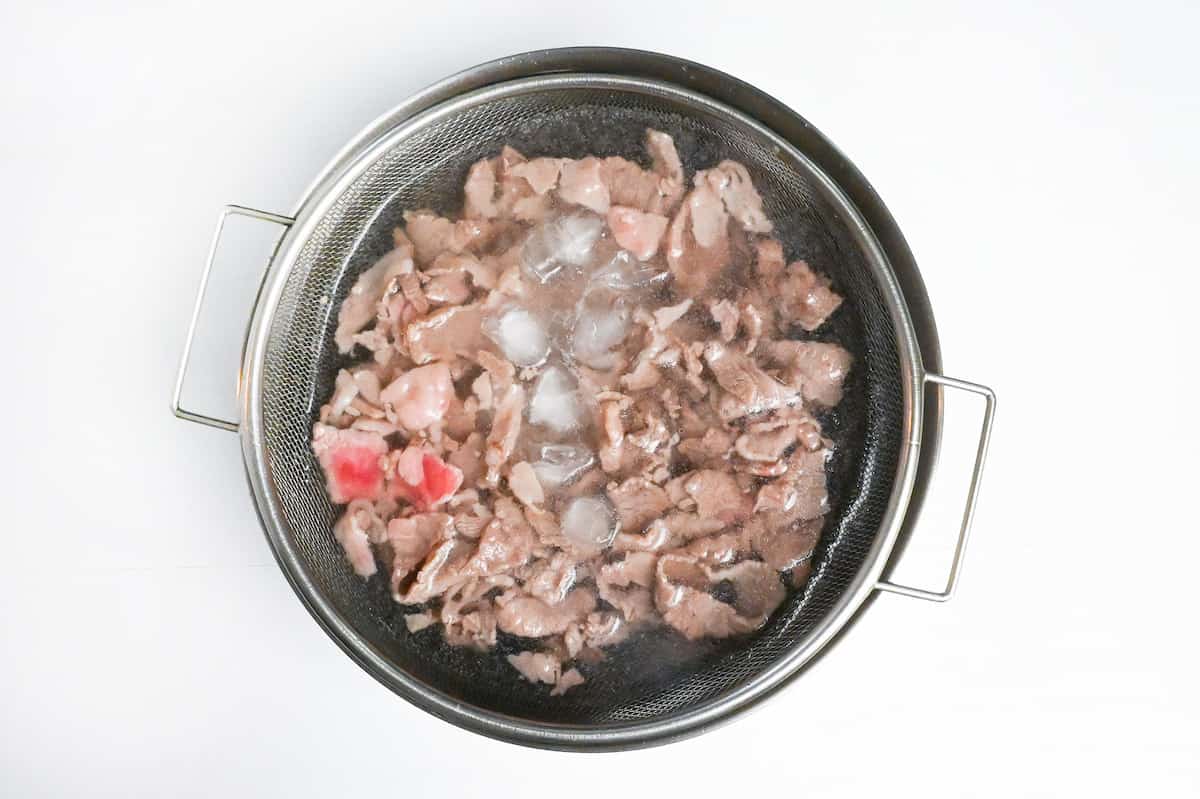
Sub-boiling temperatures set the surface proteins gently, without the violent contraction that happens at a full rolling boil. At a rolling boil, the outer layer of each slice shrinks fast and loses its ability to hold moisture during the main simmer. At sub-boil, the surface denatures softly, and the meat carries the later simmer with more tenderness. Shimofuri also strips the surface fat and the off-odor compounds that would otherwise float into your glaze and make it seem greasy when cold the next day. It is 2 extra minutes of work for a visibly cleaner final dish.
i. Heat a wide shallow nonstick pan over medium heat and add a small pour of neutral oil. Drain the burdock root and add it to the pan. Fry for about 2 minutes, tossing, until the slices start to glisten.
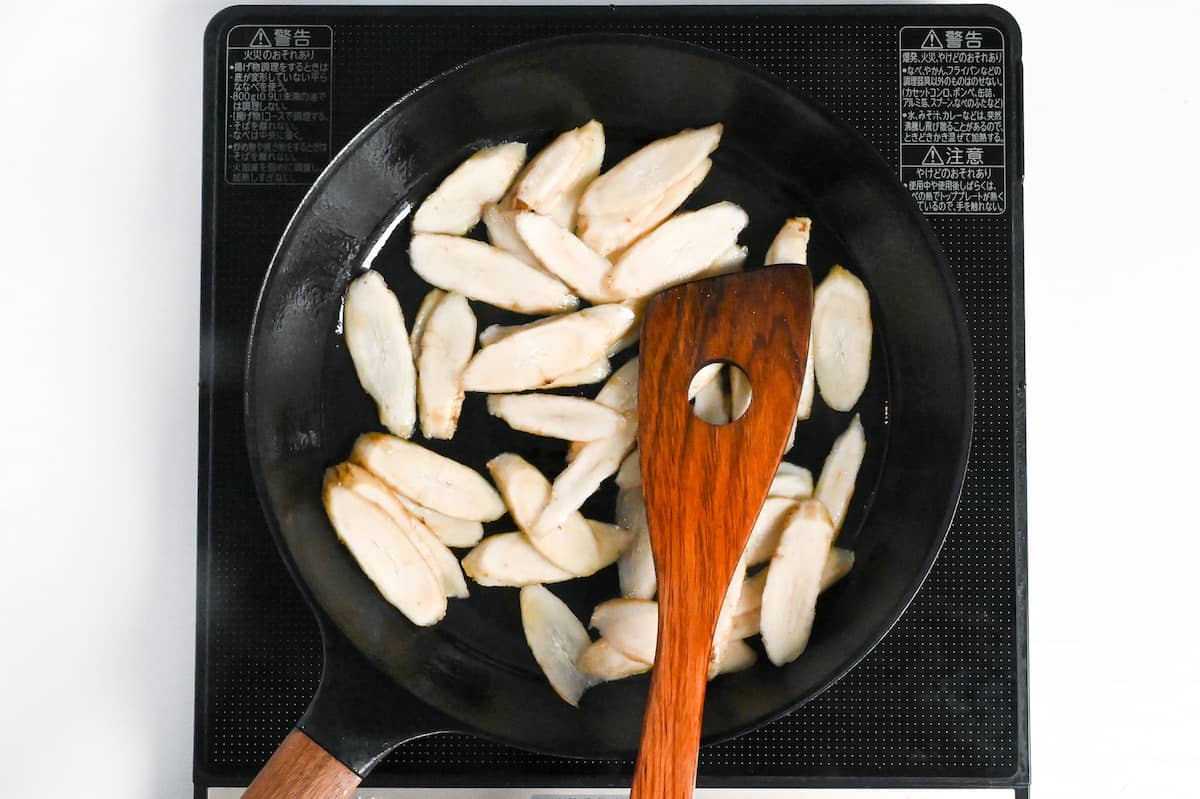
ii. Drain the ginger and add it to the pan along with the soy sauce, white wine, light brown sugar, and mirin. Stir once to combine, and bring the whole mixture to a strong simmer.
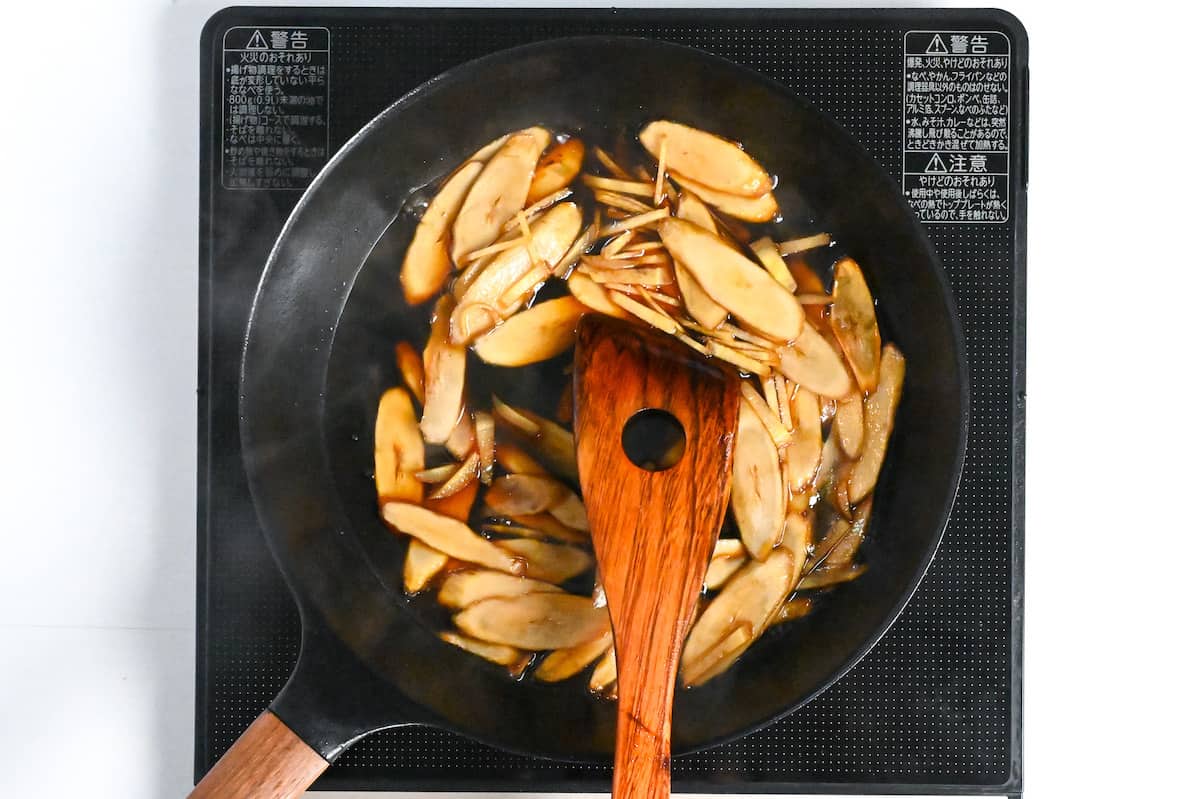
iii. Reduce the liquid by roughly two thirds. The liquid should still move when you tilt the pan, but there will be visibly less of it than you started with. This takes 3 to 5 minutes once the pan reaches a full simmer. Do not add the beef yet.
You might add raw beef to the full volume of seasoning liquid at the start, and then simmer everything together until the liquid reduces. The problem with that sequence is that the meat has to sit in heat for the entire reduction window. With that protein heat exposure, thin beef does not survive that politely. It tightens, dries, and turns grey at the edges.
This move is to reduce the seasoning liquid first, then add the beef second, last, for the final few minutes. Done this way, the beef’s total heat exposure drops significantly. That difference is the line between slightly dry and genuinely tender.
i. Drop the blanched beef into the reduced glaze and raise the heat to medium-high. Use cooking chopsticks (saibashi) to quickly separate any pieces that are sticking together. The goal is an even single layer so the glaze coats every slice.
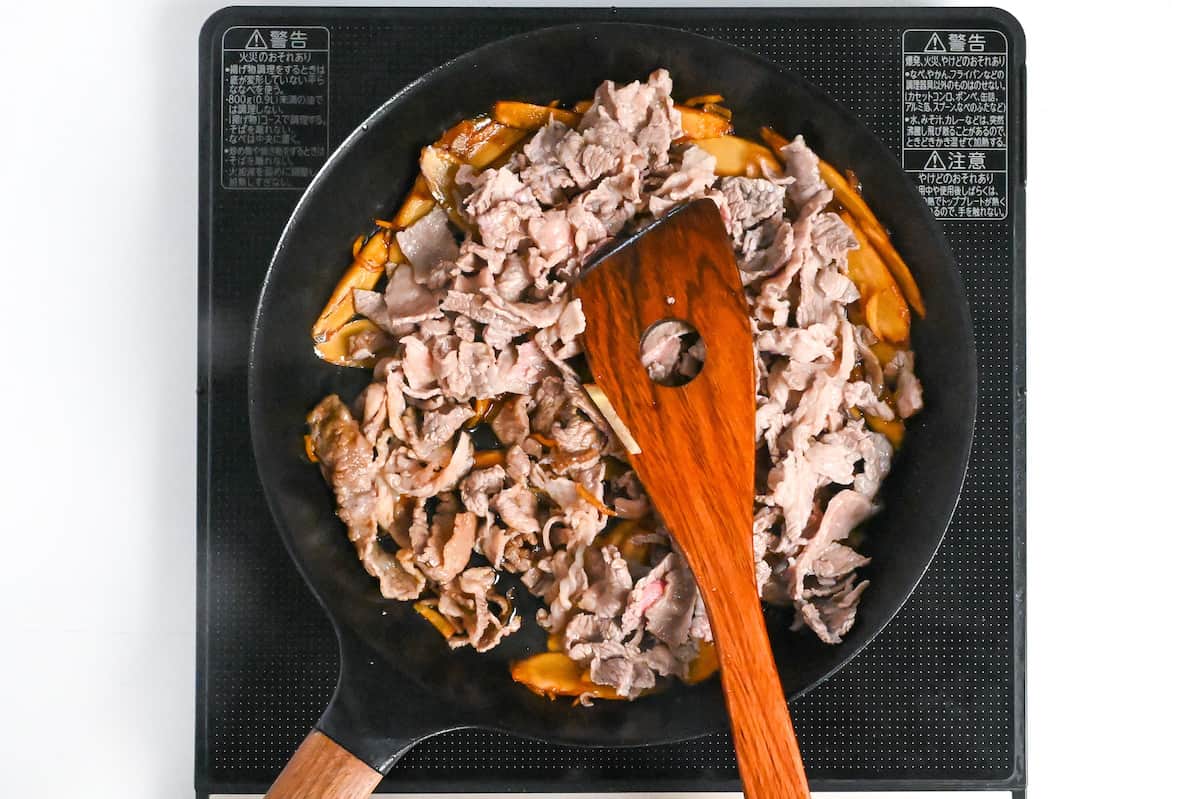
ii. Toss gently. Do not over-stir. Once the pieces are separated, your job is to let the glaze wrap the beef while the remaining moisture evaporates around it. Over-stirring tears the slices and scratches the glaze contact surface.
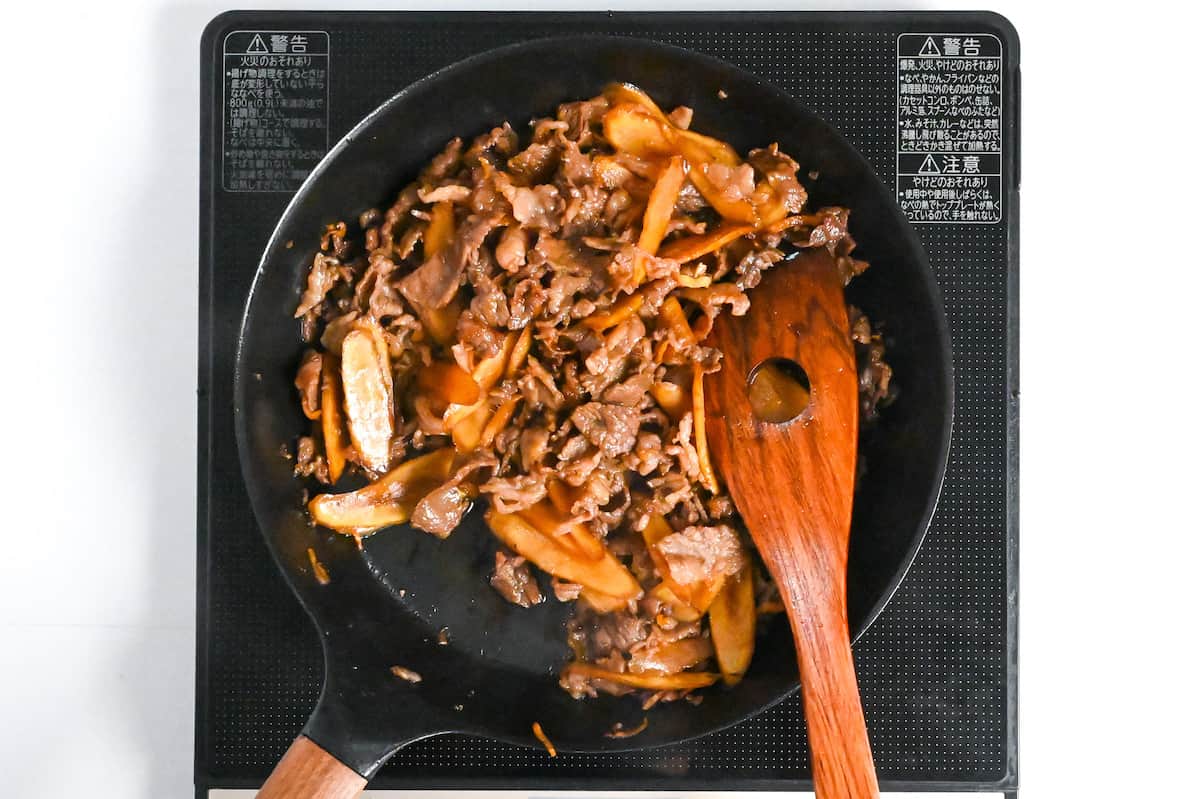
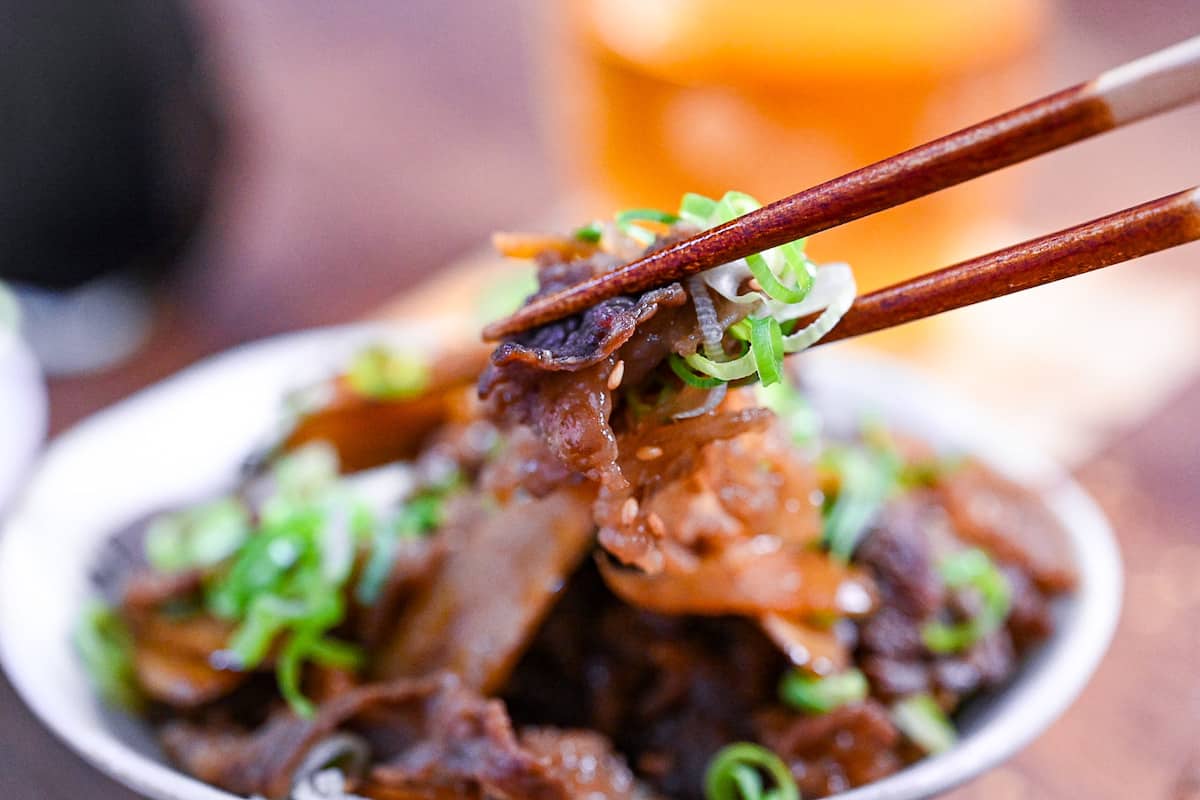
Push the beef aside with chopsticks and look at the pan bottom. The correct stopping point is a thin glistening film of liquid, not a visible puddle and not a dry pan. When you move the beef, a thin layer of liquid glistens on the pan bottom.
- If there is still a visible pool of liquid, keep simmering on low for another 1 to 2 minutes and check again.
- If the pan looks dry, you are a moment past the window. A small splash of water/wine/sake can re-wet the glaze and partially rescue the finish. The meat texture, unfortunately, cannot be reversed.
iii. Turn off the heat and let the pan rest for about 30 seconds before transferring to serving bowls. The residual glaze will continue to be drawn into the meat fibers as the pan cools.
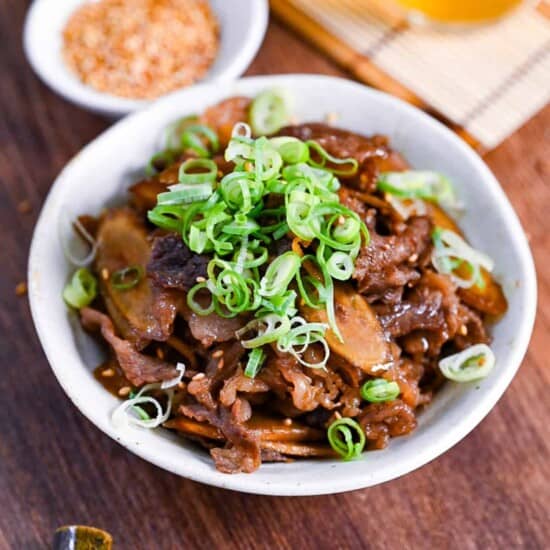
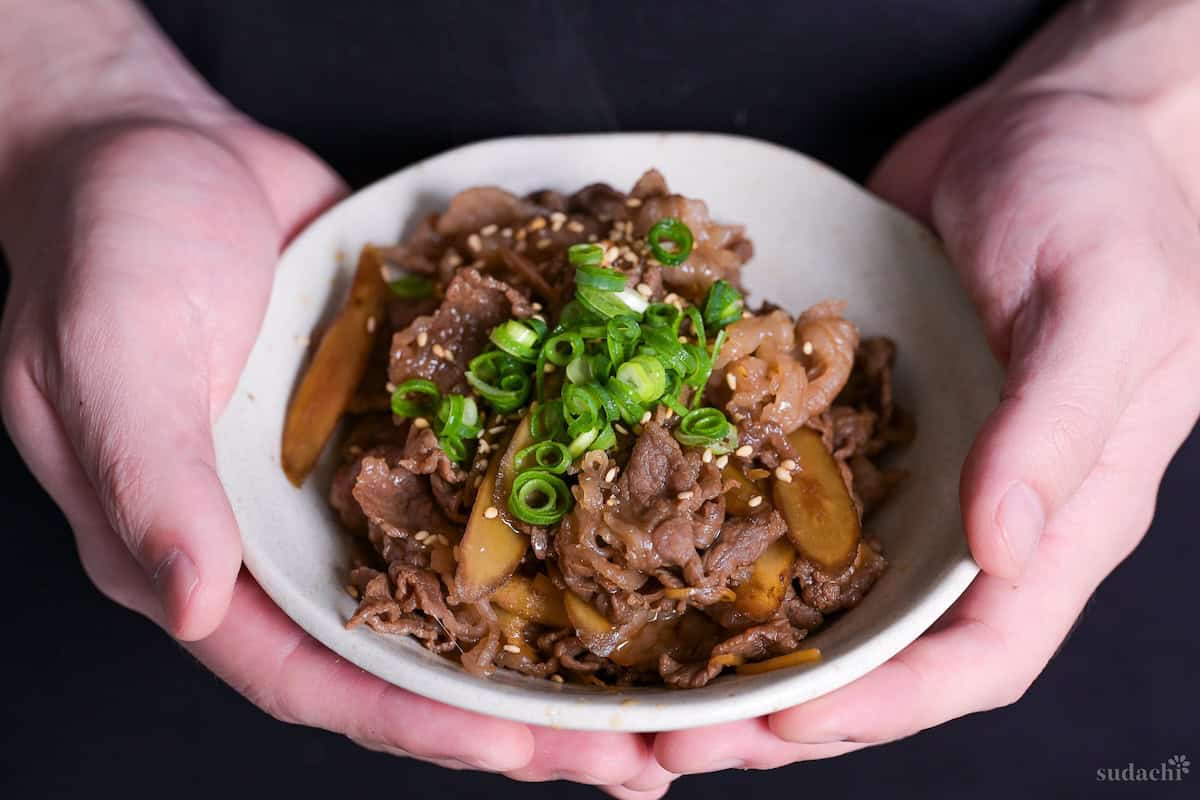
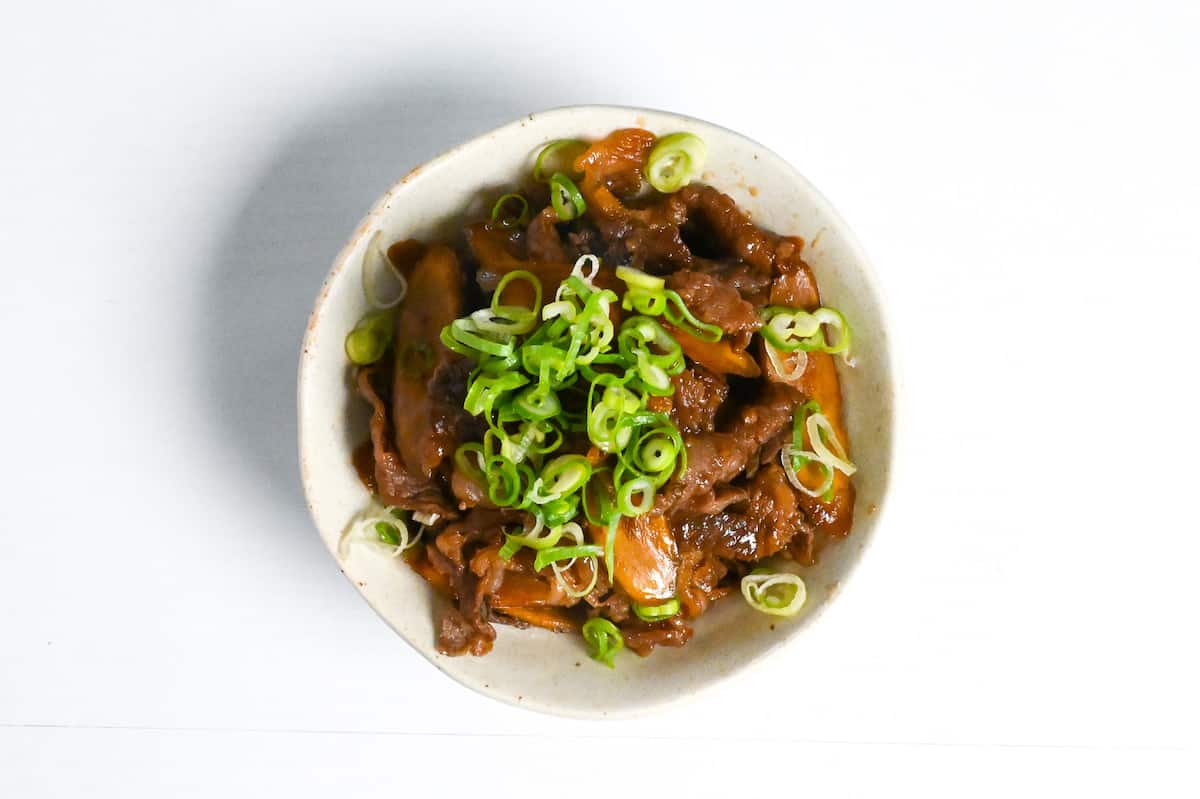
iv. Garnish with finely chopped green onion, a light scatter of toasted white sesame seeds, and a drizzle of toasted sesame oil.
If you follow the default recipe, it will yield about 4 side servings.

Essential Tips & Tricks
- Reduce the seasoning liquid before the beef enters the pan. If you only take one thing from this article, take this one.
- Stop simmering when you see a glistening film, not a puddle and not a dry pan. Push the beef aside with chopsticks, look at the pan bottom, and if a thin layer of liquid still catches the light, you are done. A visible puddle means the dish is under-reduced and watery. A completely dry pan means you are 30 seconds past the point where the glaze starts tipping into scorch.
- Do not skip the shimofuri blanch. The 20 to 30 second pass through water at 80 to 90°C (176 to 194°F) strips the surface fat and off-odor compounds that would otherwise float into your glaze and make it read greasy when cold the next day.
With these simple tips in mind, you’re set for success every time you make beef shigureni.
Storage & Meal Prep
Fridge: 4 to 6 days in an airtight container. The glaze’s concentration of sugar and salt slows bacterial growth, which is part of why shigureni historically served as a preserved pantry food in Japan. Always cool the finished dish to room temperature with the container lid off before sealing, because trapping hot steam inside shortens the storage window and dulls the flavor.
Freezer: 2 to 4 weeks for standard portions in airtight containers, up to 1 month for well-sealed portions.
Reheating: For hot service, a 500W microwave takes about 60 seconds per single portion, or warm gently in a small nonstick pan with a splash of water/wine/sake to restore moisture. Avoid high-heat reheating on the stovetop. The sugar-heavy glaze scorches fast and undoes everything the reduction step was designed to protect.
What to Serve With This Recipe
Shigureni FAQ
It is not folklore, it is physics. As the dish cools and rests in the fridge overnight, a slow convection inside the meat pieces draws the concentrated glaze deeper into the fibers, and the sharp edges of the fresh ginger soften as gingerol partially converts to the milder shogaol. The final flavor is rounder, more unified, and slightly deeper than the fresh from the pan version. The Japanese term for this is aji ga najimu (味が馴染む, flavors melding), and it is one of the core reasons shigureni is specifically designed as a make-ahead dish.
The sugar and mirin in the glaze caramelize rapidly once the liquid volume drops below a critical threshold, and the transition from perfect to burnt caramel happens in about 20 seconds. If scorching has already happened, do not scrape the burnt residue into your finished dish, transfer the unburnt portion to a clean container. A thin layer of light caramelization at the bottom is actually desirable. Black char is not.
Yes, and I usually do. The dry white wine swap is a personal preference, not a tradition. The crisp acidity of a dry white cuts through the beef’s richness in a way that is hard to describe until you taste it side by side. Reach for a dry, unoaked white, a basic Sauvignon Blanc, Pinot Grigio, or inexpensive Chardonnay all work. Avoid anything sweet or heavily oaked.
More Japanese Simmered Recipes
- Japanese meat and potato nimono (nikujaga)
- Simmered dried daikon strips (kiriboshi daikon)
- Saba no misoni (simmered mackerel with miso)
- Simmered kabocha
If you want the full tour, my collection of Japanese beef recipes is a good next stop!
Did You Try This Recipe?
I would love to hear your thoughts!
💬 Leave a review and ⭐️ rating in the comments below. 📷 I also love to see your photos – submit them here!

Beef Shigureni (Simmered Wagyu)

Ingredients
- 150 g burdock root (gobo)
- 1 dash unseasoned rice vinegar (komezu) for the gobo soak
- 20 g ginger root fresh, julienned along the grain
- 250 g thinly sliced beef preferably with marbling fat
- ½ tbsp cooking oil
- 4 tbsp white wine dry, unoaked, or sake
- 3 tbsp Japanese soy sauce (koikuchi shoyu)
- 2 tbsp light brown sugar
- 1 tbsp mirin
- finely chopped green onions to garnish
- toasted white sesame seeds to garnish
- toasted sesame oil
My recommended brands of ingredients and seasonings can be found in my Japanese pantry guide.
Can’t find certain Japanese ingredients? See my substitution guide here.
Instructions
- Throughly scrub 150 g burdock root (gobo), then rinse and diagonally slice about 2mm thick. Submerge in a bowl of cold water with 1 dash unseasoned rice vinegar (komezu) and set aside for later.

- Scrape off the skin of 20 g ginger root with a spoon and cut it into thin matchsticks (julienne). Submerge in a separate bowl of cold water and set aside for later.
- Bring a medium-sized pot of water to a boil. While you wait, cut 250 g thinly sliced beef into 2-3cm (1 inch) pieces and prepare a bowl of ice-cold water.
- Once the water is boiling, turn off the heat and blanch the beef by submerging for about 30 seconds or until lightly cooked (it should still be a little pink).
- Use a sieve to drain the hot water and quickly transfer the blanched beef to the bowl of ice-cold water to halt the cooking process and cool for a few minutes. Once cooled, drain and set aside for later.
- Heat a frying pan on medium and add ½ tbsp cooking oil. Once hot, drain the burdock root and add it to the pan. Fry for 2 minutes.
- Drain the ginger and add it to the pan along with 4 tbsp white wine, 3 tbsp Japanese soy sauce (koikuchi shoyu), 2 tbsp light brown sugar and 1 tbsp mirin. Mix well and simmer over a medium heat until the liquid ingredients are reduced by two-thirds.
- Add the blanched beef to the pan and increase the heat to medium-high.
- Stir fry everything together until the liquid has almost gone and the beef is coated in the sauce, then turn off the heat.
- Transfer to serving bowls and garnish with finely chopped green onions, toasted white sesame seeds and a drizzle of toasted sesame oil. Enjoy!
Leave a rating and a comment