


Featured Comment
Fantastic recipe – Simple, easy to navigate and incredibly flavorful. The only change I made was broiling them (didn’t have access to a grill), but still turned out wonderful!
★★★★★
– Yuka
What if the best yellowtail you’ve ever tasted wasn’t yellowtail sashimi, yellowtail teriyaki, or even buri daikon, but a collar grilled with just salt?
Think of yellowtail collar as the premium cut. Everything you love about the fillets, but even richer and more succulent, delivering restaurant-quality flavor. One bite releases buttery juices that cling to every crisp, charred edge.

Salt-Grilled Yellowtail Collar
Recipe Snapshot
- What is it? Japanese-Style Salt-Grilled Yellowtail Collar
- Flavor profile: Savory, Buttery, Smoky
- Why you’ll love this recipe: The high fat content in collar makes it nearly impossible to overcook. Even if you go a minute over, the marbled fat keeps it juicy.
- Must-haves: Yellowtail collar (or other fish’s), Sea salt, Fish grill (broiler or similar)
- Skill Level: Easy
Summarize & Save this content on:
What is Hamachi/Buri Kama?
Hamachi/Buri Kama no Shioyaki is a simple yet deeply flavorful Japanese dish made by grilling the collar (kama) of a yellowtail fish (buri or hamachi depending on the size/age of the fish) with just salt. This cut, located between the gills and the pectoral fins, is prized for its rich, tender meat and natural fat that melts beautifully under high heat. Traditionally cooked over an open flame, it delivers that golden, slightly smoky edge with juicy flesh inside.
In Japan, salt-grilling is considered a fundamental fish cooking technique. The collar has long been a fisherman’s favorite “secret cut,” once overlooked but now a star in izakaya menus.
Grilled Yellowtail Collar Ingredients

- Yellowtail collar: Think of it as the “ribeye” of the fish with 18-25% fat content that keeps it juicy even if you slightly overcook it. You can usually find frozen packs at large Asian groceries, often surprisingly affordable for such a quality cut. In Japan, we often see them fresh in yellowtail season (fall to winter).
- Salt: Using a quality sea salt is recommended seeing as this is the only condiment we use.
- Grated daikon: This cooling, slightly spicy condiment cuts through the collar’s richness like a palate reset button.
Substitution Ideas
- Salmon collar: Fattier and more forgiving than regular salmon fillets, with that same crispy-skin-to-tender-meat payoff, though it has a milder, slightly sweeter flavor.
- Tuna collar: It rivals yellowtail in richness with an almost steak-like intensity (intensely savory but richer).
- Sea bream (tai) collar: It offers a leaner, more delicate option if you prefer a lighter taste, though you’ll want to watch it closely to avoid drying it out.
- Other large-fish collars: Swordfish or amberjack work too. Look for any collar with visible marbling and bone-in structure for the best results.
Have trouble finding Japanese ingredients? Check out my ultimate guide to Japanese ingredient substitutes!
How to Make My Hamachi Kama Shioyaki
Before you start:
- Pick hamachi/yellowtail or salmon collars that look moist but not slimy, with firm flesh and springy skin.
- Run a scaler or the back of a knife from tail toward head to scrape off fine, stubborn scales.
- Rinse away loosened scales.
i. Fill a bowl with cold water and add a splash of sake (highly optional). Submerge your collar and swish it briefly, using your fingers to gently rub away any visible blood clots or dark residue clinging to the bone cavity.

ii. Drain your collar and inspect the bone cavity closely. Use a spoon or your fingertip to scrape out any remaining blood pockets if any, especially where the backbone used to sit and along the inner membrane of the skin.
iii. Rinse under cold running water one final time, then press the collar firmly between layers of paper towels until no moisture seeps out when you squeeze. Dry fish equals better salt penetration and crispier skin.

i. On the skin side, add 1-2 diagonal cuts 1-2 cm deep where the flesh is thick, so heat reaches the center at the same pace as the edges avoiding cutting through to the bone to prevent dryness.

These shallow scores serve two purposes: they create escape routes for the thick layer of fat beneath the skin (preventing blowouts and flare-ups), and they interrupt the skin’s collagen network so it shrinks evenly instead of curling up.
i. Season at about 2% salt by fish weight as a base line. For especially fatty collars, go up to 3%. Sprinkle from high so the grains fall evenly into creases and along cut edges. Rub if needed.

Then rest 30 minutes in the fridge.

ii. Use this window to prep your daikon oroshi (grated daikon radish) and slice citrus wedges.

iii. After 30 minutes, you’ll see a film of moisture and dissolved salt glistening on the collar’s surface. Gently press it with a clean paper towel, soaking up this liquid without rubbing or scrubbing.

You want the fish dry to the touch but still lightly seasoned.
i. Preheat your fish grill or broiler to medium heat. If you’re using a gas grill, aim for a zone around 175-200°C (350-400°F). When the grates are hot, place your collar flesh-side up to the heat source (the side where you see exposed pink meat, not skin) and set a timer for 5 minutes.

Starting with the flesh side allows you to drive off excess moisture early, while saving the skin for last guarantees it finishes crispy, not steamed.

ii. After 5 minutes, use a thin spatula to gently flip the collar, revealing a golden-bronze crust with darker edges. Now grill skin-side up for 9 minutes, letting the thicker skin shield the delicate meat while its subcutaneous fat slowly renders.

iii. Check frequently to make sure it’s not burning. If the skin side is browning too fast, reduce the heat. We’re aiming for a skin that is deeply bronzed and crispy.

Insert a chopstick or paring knife tip near the thickest part of the flesh and gently twist. The meat should flake apart in thick, moist layers and pull away from the bone with no resistance. If it still clings stubbornly or looks translucent, give it 1-2 more minutes. Overcooked collar tightens and dries out, so watch closely as you approach the 15-minute mark.
Alternative Heat Sources:
| Equipment | Heat Setting | Total Time | Notes |
|---|---|---|---|
| Fish Grill (single-sided): This is what I used | Medium | 14 min | 5 min flesh side, then 9 min skin side |
| Fish Grill (double-sided) | Medium | 10-12 min | No flipping needed |
| Oven | 180°C (350°F) | 15 min | Preheat required, gentler browning |
| Charcoal Grill | High heat | 10-12 min | Watch closely, flip at 5-6 min |
| Frying Pan | Medium, then low | 15-18 min | Sear both sides, then cover and steam |
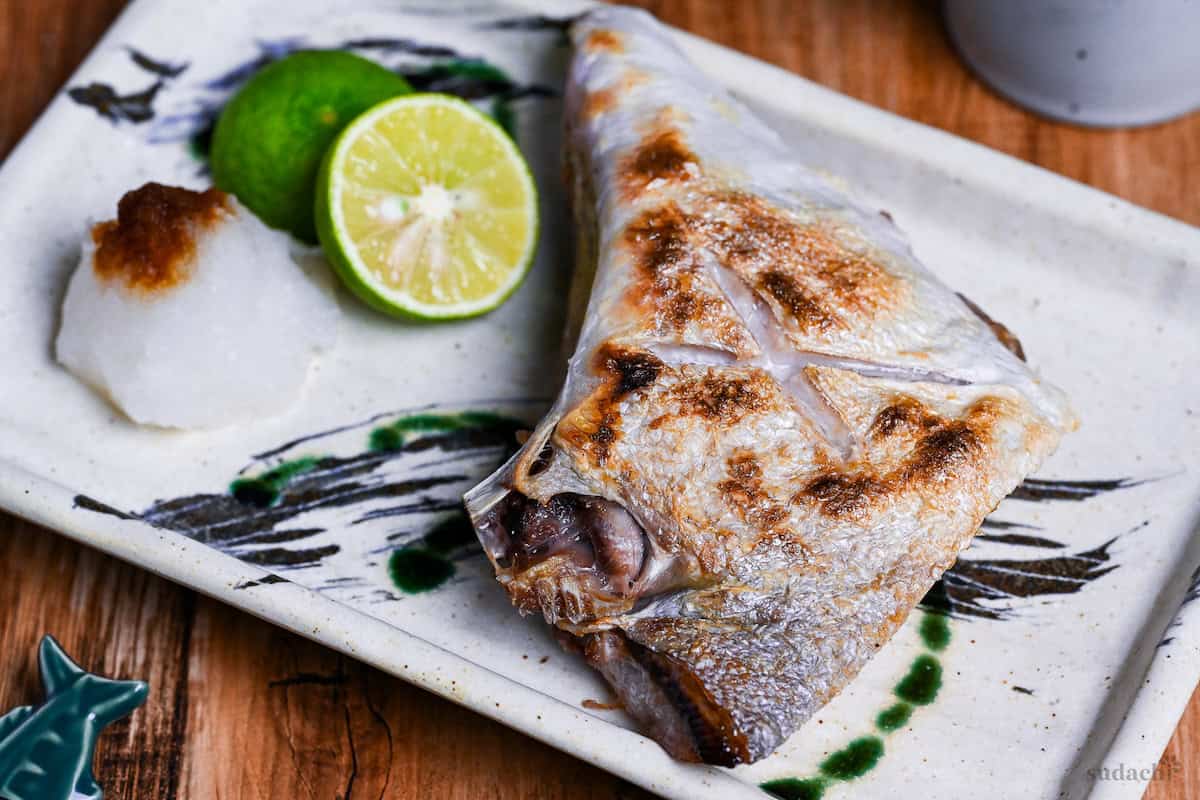
i. Pile the collars onto a warm plate with grated daikon with a bit of soy sauce or ponzu sauce (optional), and citrus.

Daikon contains the enzyme diastase, which helps break down fish oils and refreshes your palate between bites. The citric acid brightens the rich, umami-forward meat. Together, they transform an indulgent dish into something you can eat with pure joy, bite after bite, without palate fatigue.

Essential Tips & Tricks
- Dry thoroughly before salting.
- Rest for 30 minutes after salting.
- Score shallow, not deep. Cut only 2-3 mm into the skin; going deeper causes juice loss and dry meat.
- Use medium heat, not high – High heat burns the outside before the inside cooks.
- Don’t over-flip. Constant movement prevents proper browning and can tear delicate flesh.
With these simple tips in mind, you’re set for success every time you make grilled yellowtail coller.
Storage Guide
Fridge: Wrap tightly in plastic wrap or store in an airtight container, 2 days maximum. The fish will lose its crispy skin texture.
Freezer: Wrap in plastic wrap, then aluminum foil, then place in a freezer bag. 2-3 weeks maximum. Beyond this, the fat oxidizes and freezer burn degrades quality.
Reheating: For refrigerated or thawed fish, use a toaster oven or fish grill on low-medium heat for 2-3 minutes to restore some crispness to the skin.
What to Serve With This Recipe
- Kohaku Namasu
- Spinach Ohitashi Salad
- Goya Champuru
- Hiyayakko (Cold Tofu)
Hamachi Kama FAQ
You likely overcooked or oversalted. Stop once fat beads and the flesh just flakes. Rely on carryover heat instead of chasing deeper color. Restrict dry-brining to 30 minutes, then blot well before cooking.
Weigh the fish and use 1.5-3% salt by weight, sprinkled evenly from a height. If oversalted, balance with rice and citrus (ponzu/lemon) rather than rinsing. If under, finish at the table by drizzling a bit of soy sauce or ponzu on grated daikon.
Remove scales and bloodline thoroughly, give a brief ≤60-second rinse, pat very dry, and score. A short salt rest reduces odor. Optional use of sake helps further. Serve with grated daikon and citrus to neutralize any lingering aromas.

More Japanese Fish Recipes
- Unagi Donburi
- Saba no Shioyaki (Grilled Mackerel)
- Japanese Salted Breakfast Salmon
- Pan-Fried Miso Glazed Salmon
Ready to explore more? Dive into my guide to Japanese fish dishes and discover authentic flavors!
Did You Try This Recipe?
I would love to hear your thoughts!
💬 Leave a review and ⭐️ rating in the comments below. 📷 I also love to see your photos – submit them here!

Hamachi Kama Shioyaki (Grilled Yellowtail Collar)

Ingredients
- 2 yellowtail collars hamachi/buri kama, or other fish's collar
- sake optional, rinse aid
- sea salt I recommend 1.5-2% salt by fish weight
- grated daikon radish (daikon oroshi) palate cleanser
- Japanese soy sauce (koikuchi shoyu) optional, or ponzu sauce, to drizzle on daikon oroshi
- citrus of choice sudachi/lemon/yuzu/lime
My recommended brands of ingredients and seasonings can be found in my Japanese pantry guide.
Can’t find certain Japanese ingredients? See my substitution guide here.
Instructions
- Fill a large bowl with cold water and add a splash of sake (optional). Submerge 2 yellowtail collars and gently rub the surface, removing any blood clots or dark residue.

- Drain and rinse with cold water, then dry both sides of the yellowtail collars thoroughly with kitchen paper.
- Score the skin side with a cross, about 1-2cm deep (avoid cutting through the bone).
- Season with sea salt, about 2% of the yellowtail collar's weight. Sprinkle from a height for more even coverage, salt both sides and rub it gently if needed for even distribution.
- Place in a sealable container and rest in the fridge for 30 minutes.
- After 30 minutes, preheat your grill to medium heat (around 175-200°C/350-400°F). While it heats up, gently press kitchen paper on both sides of the yellowtail collars to blot away excess moisture without removing too much salt.
- Place the collars on the grill with the flesh side facing the heat source. Once fully preheated, grill for 5 minutes.
- Gently flip and grill the skin side for 9 minutes or until deeply bronzed and crispy. Check doneness by piercing the thickest part with a chopstick or paring knife, the flesh should flake away from the bone with no resistance.
- Plate up with a mound of grated daikon radish (daikon oroshi) drizzled with a few drops of Japanese soy sauce (koikuchi shoyu). Serve with citrus of choice and enjoy!
Fantastic recipe – Simple, easy to navigate and incredibly flavorful. The only change I made was broiling them (didn’t have access to a grill), but still turned out wonderful!
Hi Yuka,
Thank you so much for giving it a try! I’m really glad you enjoyed it and it still turned out wonderful with the broiler!
Yuto