


Have you given up on making the kind of rolled, spiral-cut chashu you see used as a ramen topping in restaurants? Here is the thing. No matter where you live, if you can get a slab of pork belly, you can make real Japanese ramen-shop chashu. I am not exaggerating.
It is not even hard. The ingredients are simple. What you really need is a bit of care and a little patience.

Ramen Chashu
Recipe Snapshot
- What is it? Japanese ramen-shop chashu, a slab of pork belly rolled tight, tied with twine, and simmered low until the collagen turns silky, then rested cold in a sweet-salty marinade overnight and sliced into spirals.
- Flavor profile: Deeply savory and faintly sweet, with the soy-mirin lacquer on the edges and a melt in the center that disappears against hot ramen broth. A quick torch finish throws out caramel and roasted aromas that make the bowl smell like the real thing.
- Why you will love this recipe: 2 hours of braise give you 3 things at once, chashu for the fridge, a pork stock rich in collagen, and a marinade that lands 80 percent of the way to a ramen tare. A single Sunday cook feeds your ramen bowls Monday, Wednesday, and Friday.
- Must-haves: A skinless pork belly block with clean fat-lean layers, cotton butcher’s twine or a meat net for the roll, and a deep pot with a drop lid (otoshibuta) so the meat stays covered through the low simmer.
- Skill level: Medium. No unusual hardware, no sous-vide, but the 2-stage method and overnight marinade want planning a day ahead, and the low-simmer temperature window is the single most important line in the recipe.
Summarize & Save this content on:
What is Japanese Chashu?
Chashu (チャーシュー) is the sliced pork that rides on top of a bowl of Japanese ramen. The kanji 焼豚 hints at a roast, but the version you see across Japan today is braised low and slow. The word traveled from the Cantonese char siu, but somewhere between Yokohama Chinatown and the postwar ramen counters the technique got quieter. The braise stuck.
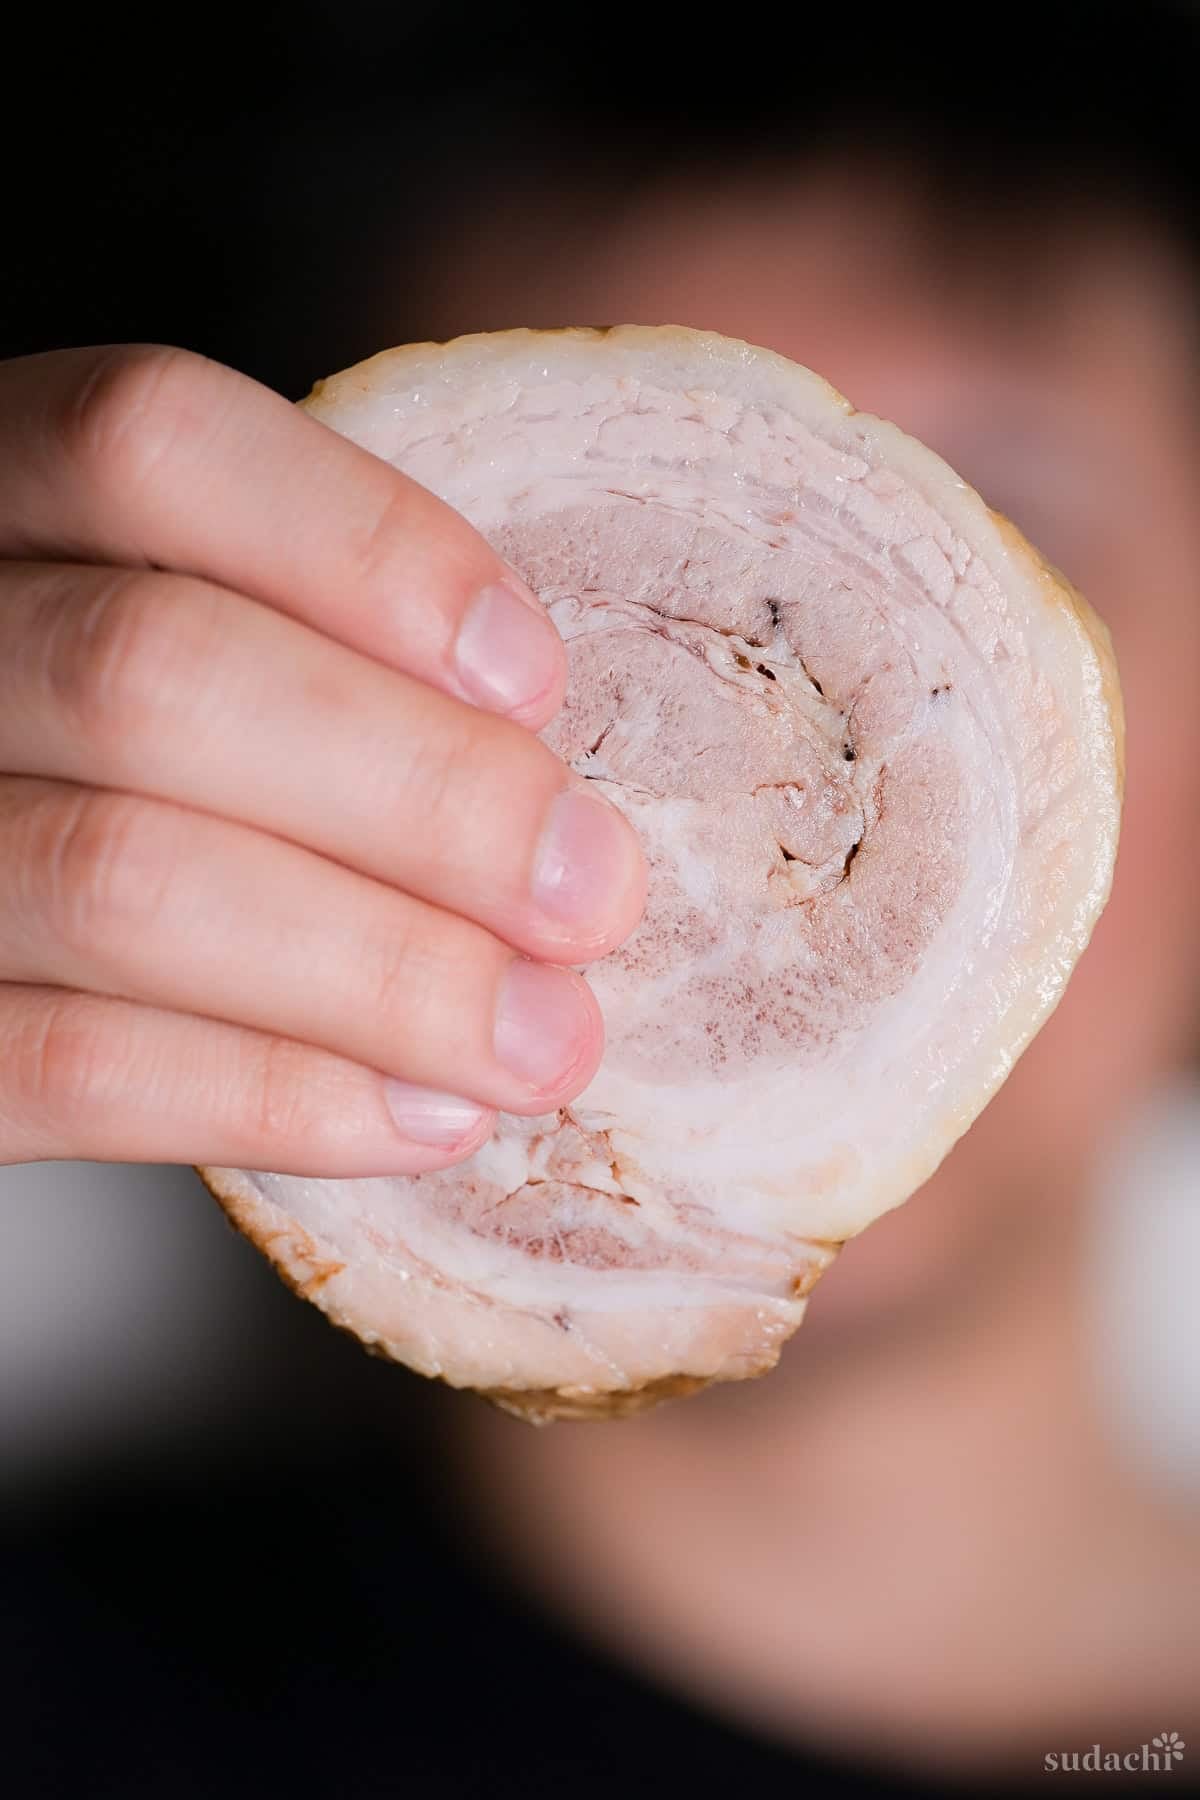
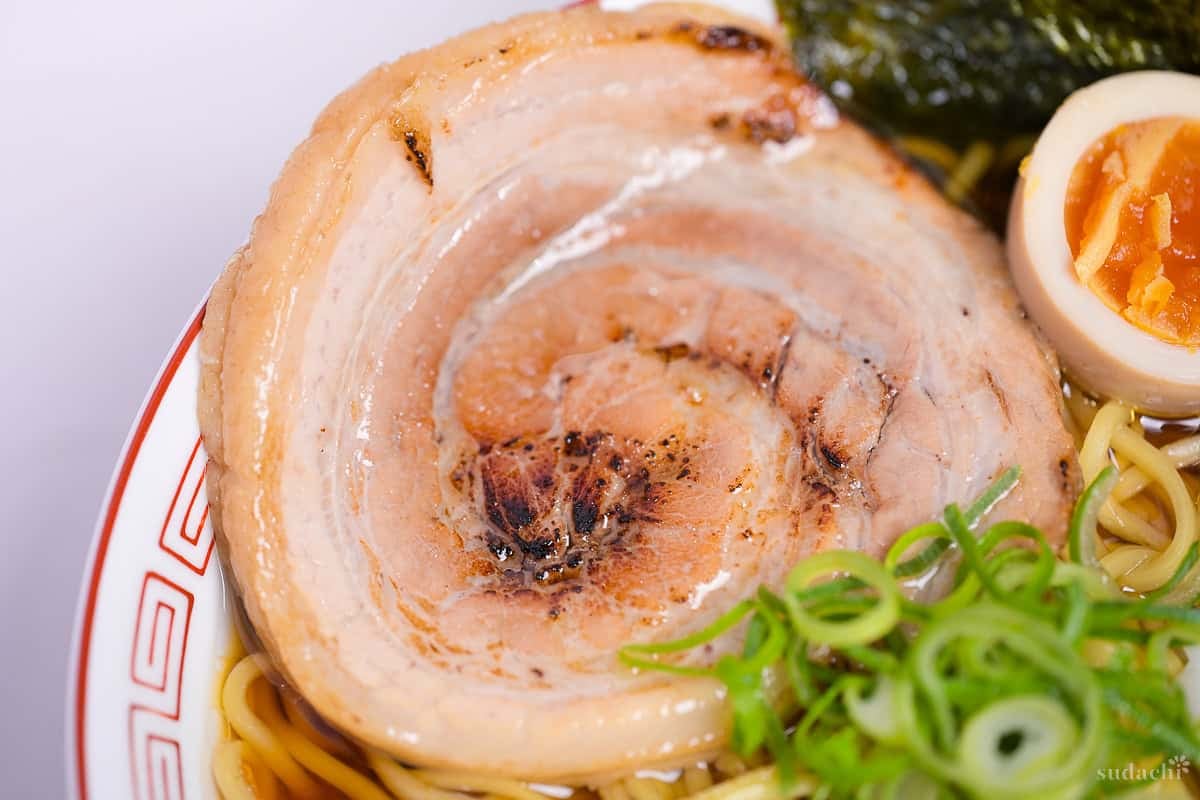
The shape is engineering. A flat slab of belly rolled tight, tied with cotton twine, and simmered until the collagen gives up and turns silky. Slice it cold, perpendicular to the roll, and every piece shows the same spiral of lean and fat. That spiral is how a pot of pork belly turns into portions you can stack across a run of ramen bowls.
For this recipe, I am chasing the specific melt you get at a good ramen shop, the slice that sags a little when you lift it from the bowl and disappears in 2 bites.
Pork Belly Chashu Ingredients
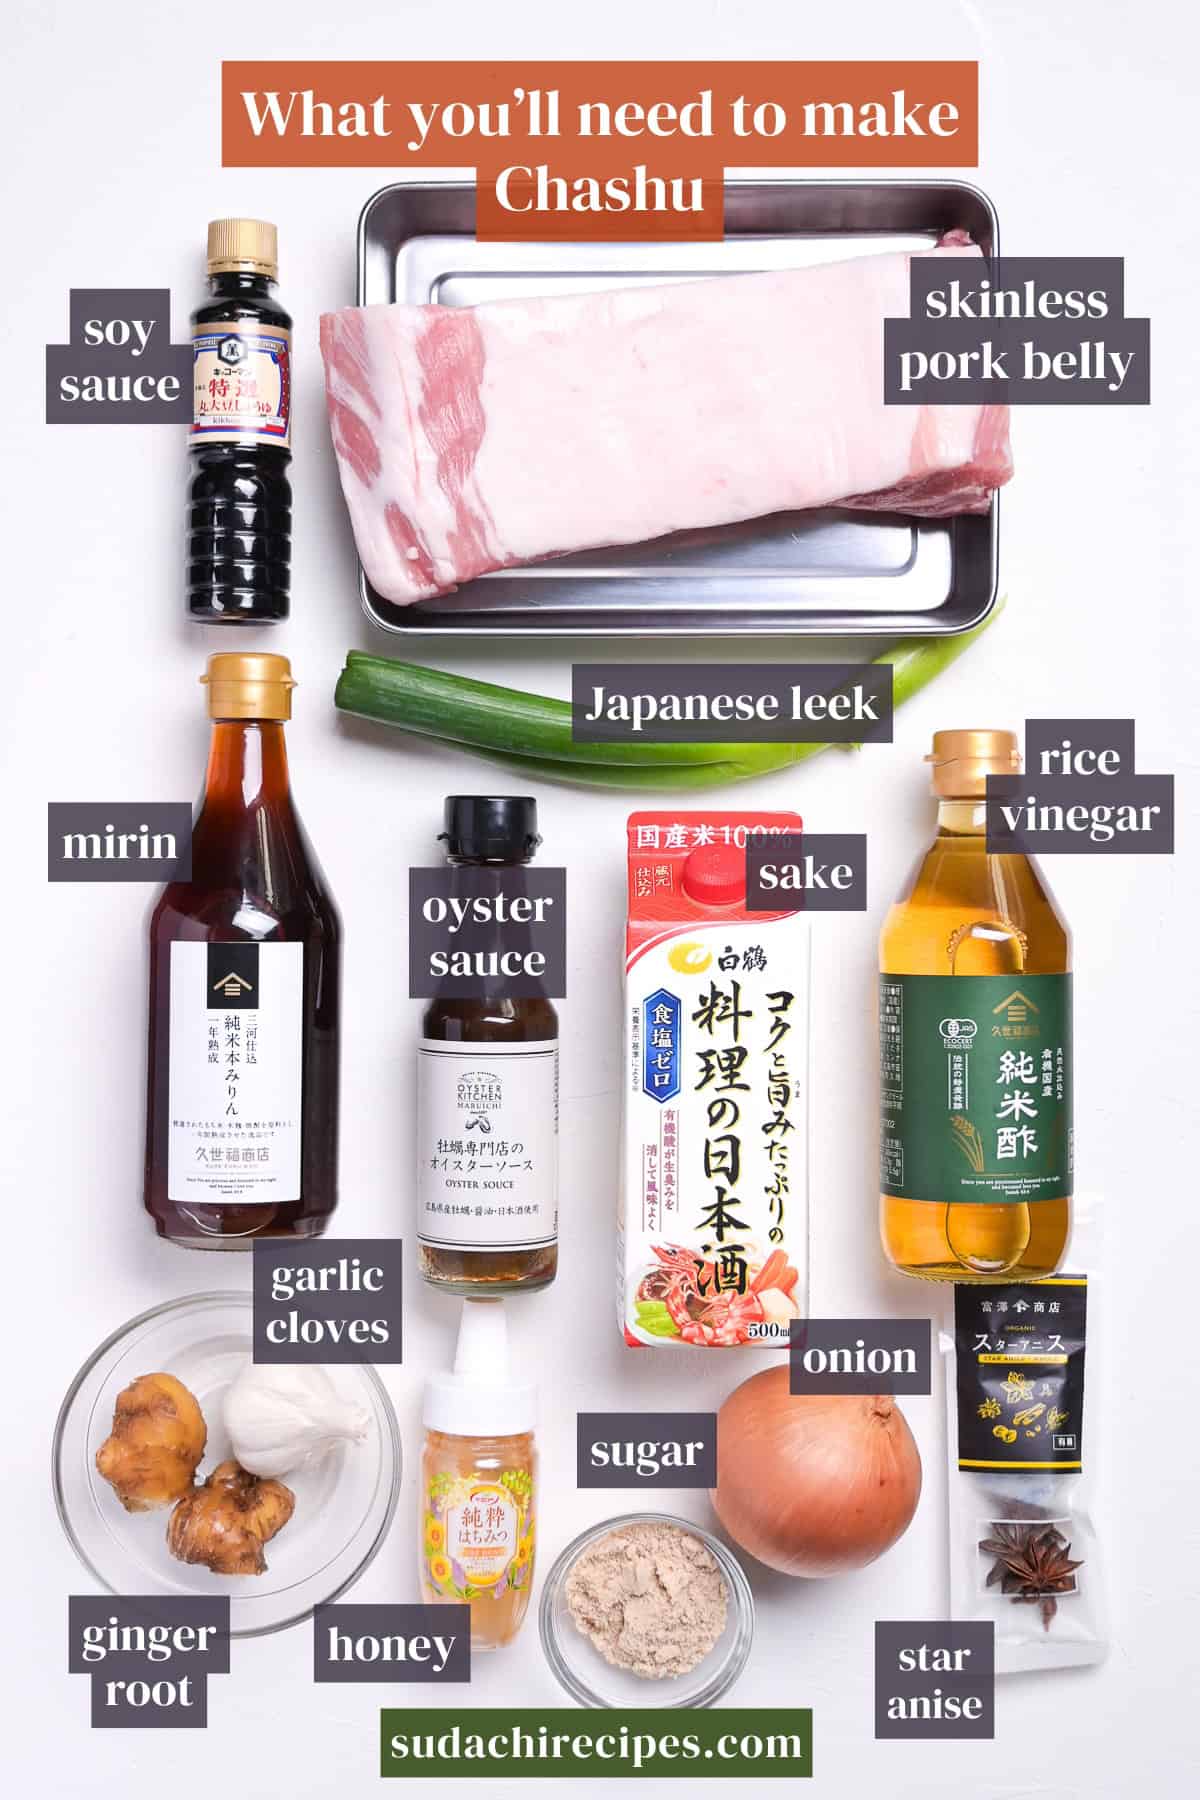
- Pork belly block, skinless: I look for 3 things: 1. Clean, well-defined layers of fat and lean, 3 to 4 bands running through the slab. 2. Even thickness end to end, because a lopsided slab cooks unevenly and the center stays tough while the edges give up. 3. A slab around 20 cm (8 inches) wide or more rolls into a cylinder that actually looks like ramen-shop chashu when you slice it cold. Aim for a lean-to-fat ratio around 6:4 or 7:3. Too much fat and the finished roll tastes slick. Too lean and it feels dry no matter how carefully you braise.
- Japanese leek (green part): These are in the pot for 1 job, pulling the pork smell out during the first braise. Nothing more. If you cannot find Japanese long green onion, the dark green tops of a large leek are a clean substitute. What does not work is the thin scallion. Those are too mild to deodorize the pork and they go slimy after 1 hour in the pot.
- Soy sauce: Without this, you are not getting ramen-shop flavor, full stop. Use a Japanese brand if you can. Kikkoman is available in most stores, so call that the floor. Anything nicer is a bonus.
Substitutions and Variations
Pork chashu is one of those recipes where the big swaps usually fail and the small swaps quietly work. The pork belly has to be pork belly, the soy has to be real soy, the braise has to be a real braise. But there is a lot of room inside that frame, here is what I actually trust.
Substitutions:
- Pork belly block → Pork shoulder: Close, not identical. Shoulder has less fat cap but enough collagen to turn silky with the same braise time. The spiral will not be as dramatic in the cross-section. Belly is way better if you can get it.
- Japanese leek (naga-negi) tops → Leek green tops: One-for-one swap. The dark green ribbons from a regular leek have the same fiber thickness and behave the same in a long simmer. Thin scallions or chives do not substitute here, they go slimy.
- Star anise → Omit: Star anise is already optional in this recipe. If you’re not a fan, you can skip it entirely or break off one-quarter for a softer hint. Your chashu is not in trouble without it.
- Oyster sauce → Soy sauce plus a small pinch of sugar: If you do not keep oyster sauce on hand, an extra spoon of soy plus a tiny pinch of sugar covers the role in the marinade. Not perfect, but close enough that most of your bowl will not notice.
Have trouble finding Japanese ingredients? Check out my ultimate guide to Japanese ingredient substitutes!
Variations:
- Chicken chashu: Swap the pork belly for boneless skin-on chicken thighs rolled the same way. My full writeup is over here at tori chashu.
- Aburi finish: Take your cold slices and hit them with a kitchen torch right before plating. The surface sugar caramelizes, the fat lightly scorches, the aroma changes completely. Nothing else about the recipe changes. This is a habit worth picking up.
- Rice-cooker low-temp: If you do not want to babysit the stove, sear the rolled belly, bag it with the cut aromatics, and hold it in the rice-cooker keep-warm setting for 2 hours. The temperature sits around 70 to 75°C (158 to 167°F), which is the same window the pros target with sous-vide.
How to Make My Chashu Pork
If you prefer to watch the process in action, check out my YouTube video of this chashu recipe!

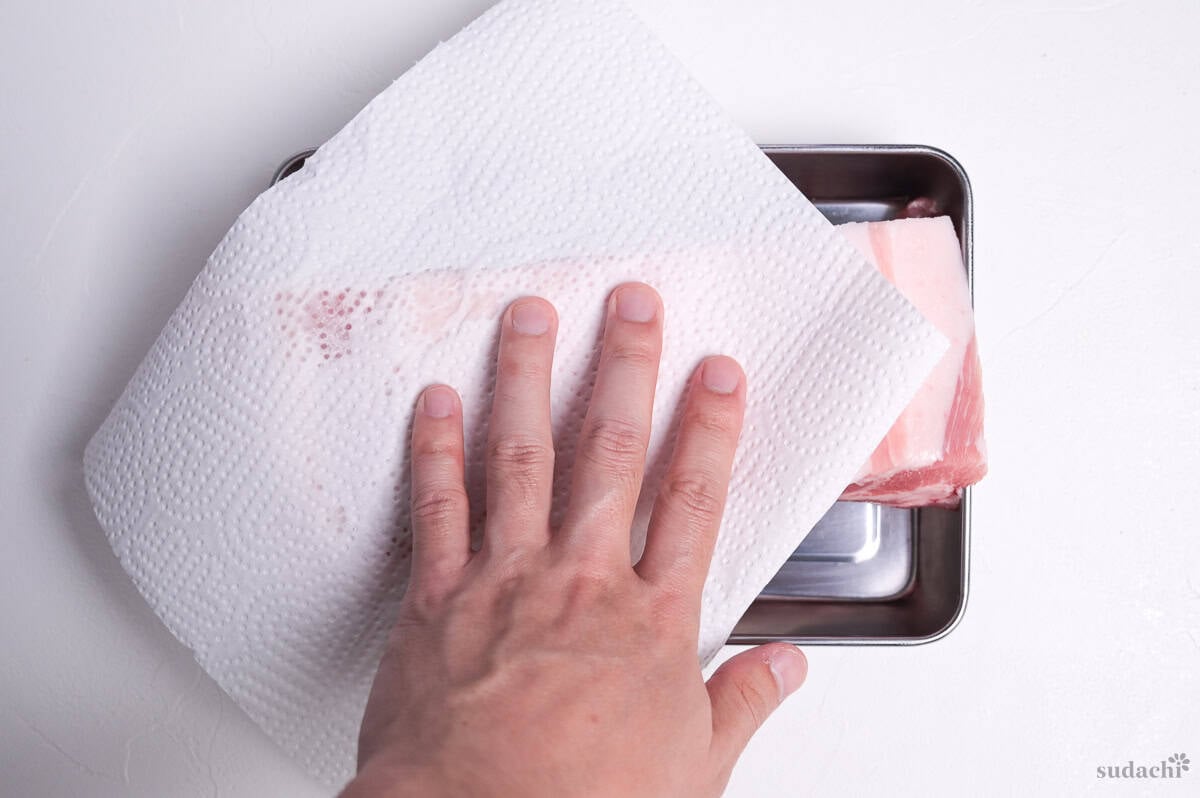
i. Pat your pork belly slab dry with paper towels.
ii. To make it easier to roll, make shallow vertical cuts on the surface at 1-centimeter intervals.

iii. Roll the slab into a tight cylinder, pressing the spiral down at each turn so there are no air pockets running along the fascia.
iv. Once the roll is set, tie it with cotton butcher’s twine or slide a meat net over it. Wrap the twine at roughly 1 inch intervals, snug but not so tight that the fat squeezes out.
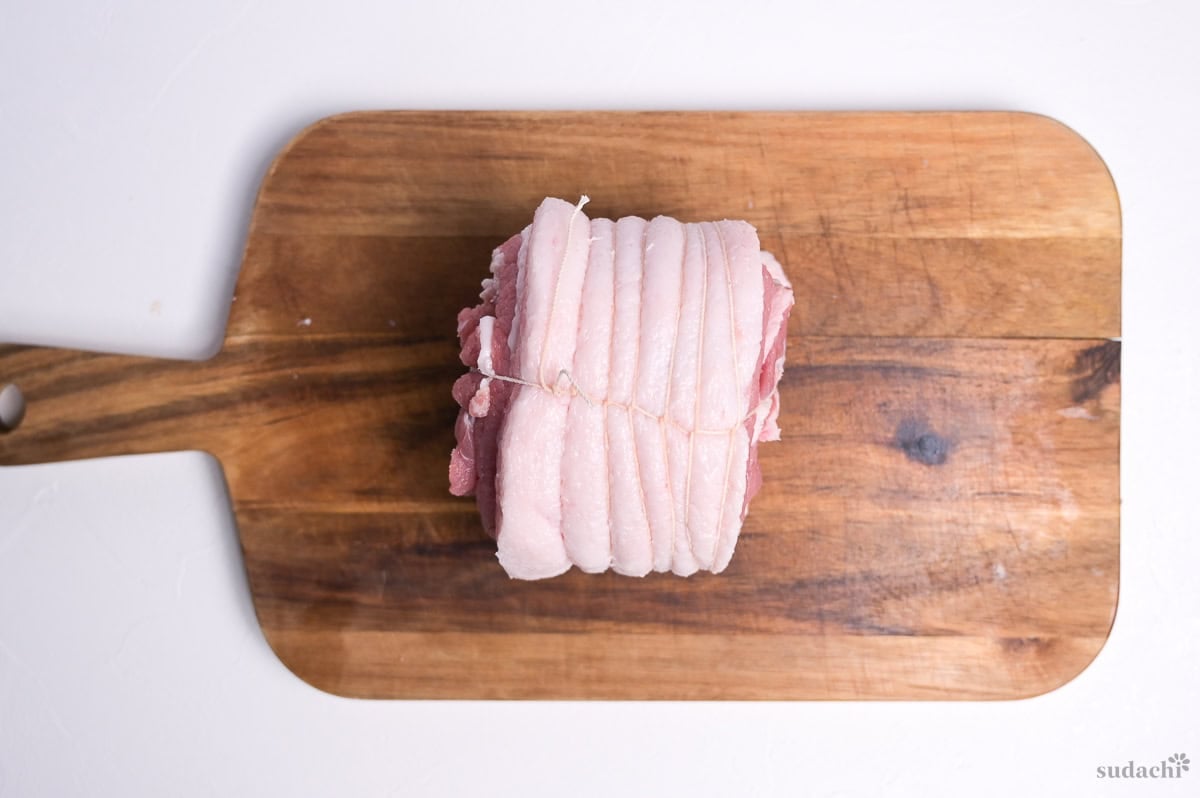
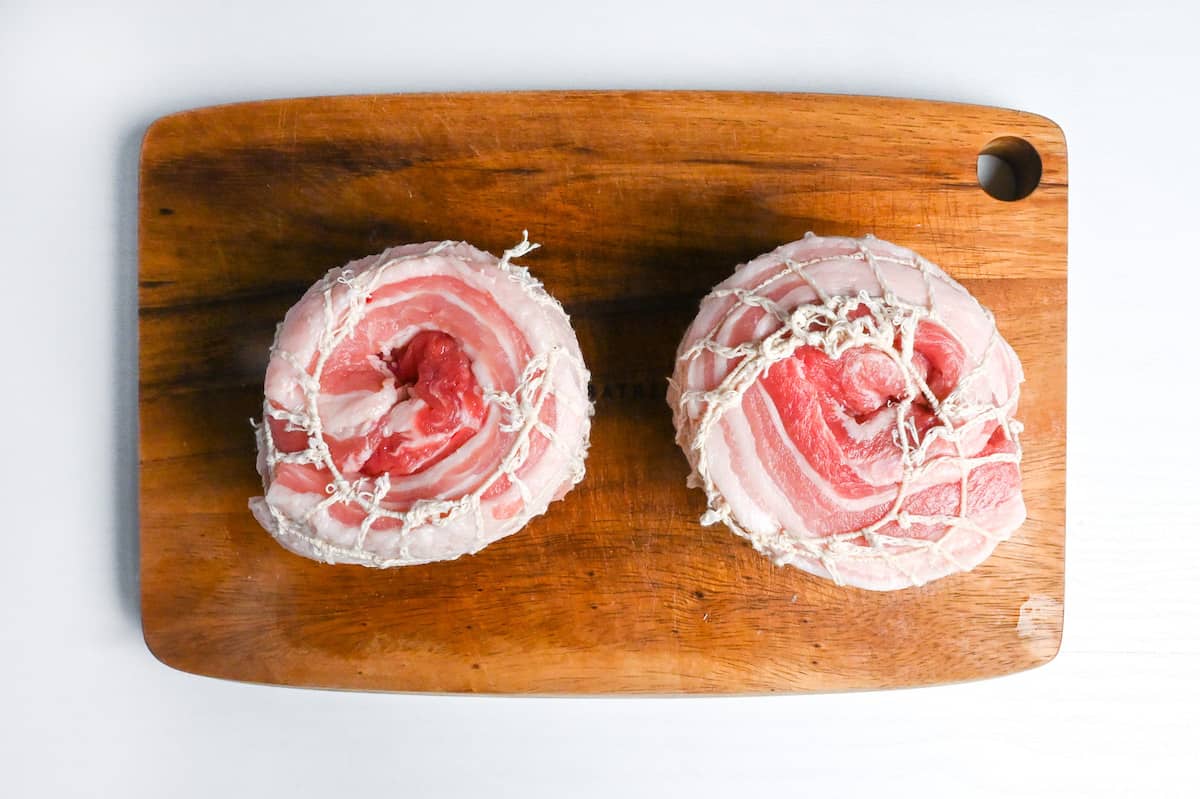
Tying the roll does several things at once. It holds the cylinder shape through the braise so it does not uncoil along the fascia. It promotes even cooking because a cylinder transmits heat through the center evenly. It gives you that iconic spiral cross-section when you slice cold. It lets you cut clean slices without the roll collapsing.
i. Place the tied roll in a deep pot and pour in cold water until the pork is almost fully submerged. Start cold, not hot. The slow rise pulls blood and protein out of the meat instead of sealing them in.
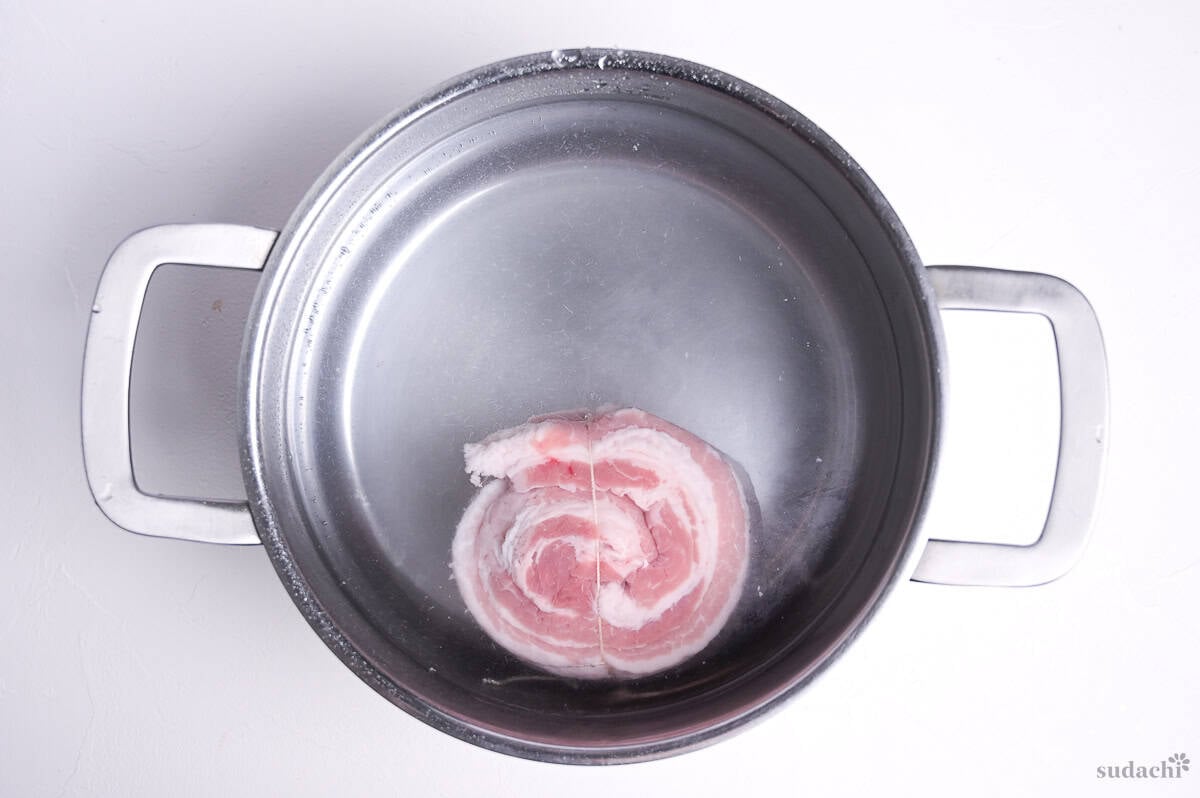
ii. Bring the water up over medium heat and hold it just below a simmer, somewhere around 85 to 95°C (185 to 205°F), for 5 to 6 minutes. Grey-brown foam will climb to the surface. Skim it off patiently. The first 2 minutes of foam is where most of the pork smell lives, so do not skip this.
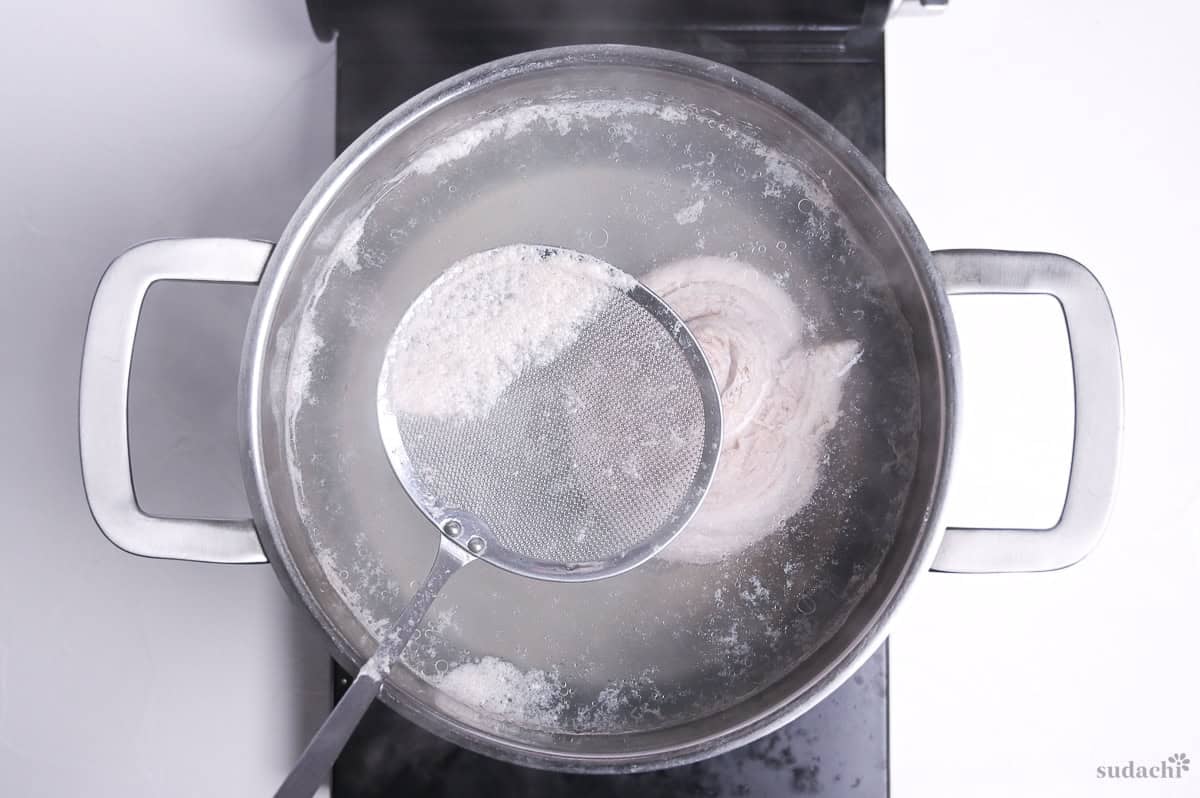
iii. When the foam stops coming up in meaningful volume, pull the pork out with tongs or by the twine tail, and rinse it under running water to wash off anything still clinging.
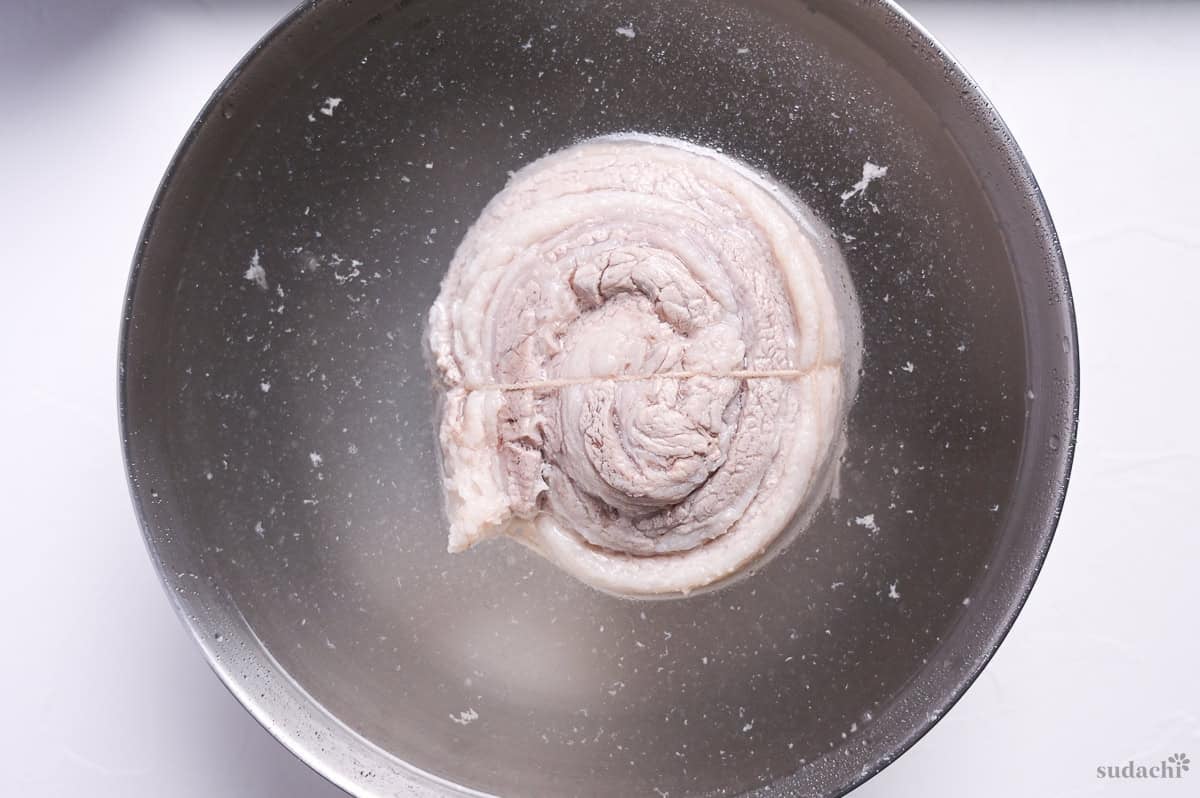
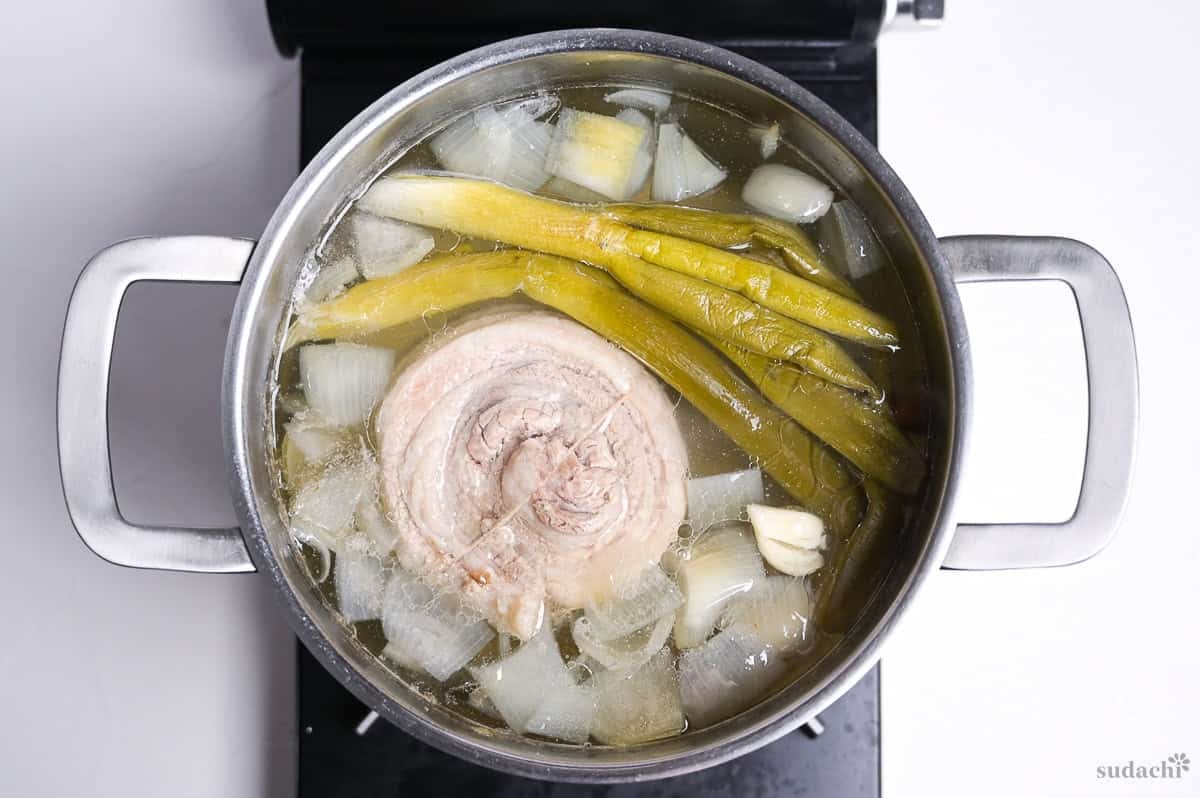
i. At the same time you are rinsing the pork, bring a second clean pot of water up to roughly the same temperature range over medium heat. Once the new water hits that zone, slide the rinsed pork in, then turn the heat down to low.
Cold-to-hot or hot-to-cold on a piece of meat is thermal whiplash. The cleaner move is to heat the fresh water to around 60 to 70°C (140 to 158°F) before the pork goes in, then keep bringing it up slowly once the pork is submerged. The surface stays calm and the collagen starts its long conversion without any sudden contraction.
ii. Add the negi tops, the rough-chopped onion, half of the sliced ginger, the whole peeled garlic cloves, and a small splash of rice vinegar. The negi and onion are in the pot for deodorizing. They are not going to the table. A splash of rice vinegar is small but does real work on the pork smell without touching the finished flavor.

iii. Set a drop lid (otoshibuta) directly on the surface of the liquid, cover any remaining gap with the pot lid if you like, and braise on low for 1 hour.
i. Lift the otoshibuta, use tongs or the twine tail to flip the pork over so the previously-up side is now down, replace the drop lid, and braise another hour at the same gentle temperature.
Yes, you should flip it. The drop lid creates some convection as liquid hits the lid and drips back, but the part of the roll that sits just above the liquid line still dries faintly. Flipping once per hour splits the time evenly between both sides. Twice per hour is fine if you are already in the kitchen.
ii. Keep the heat low. If the surface has gone to an active simmer while you were away, pull the pot off briefly, let it settle, and bring it back on low.
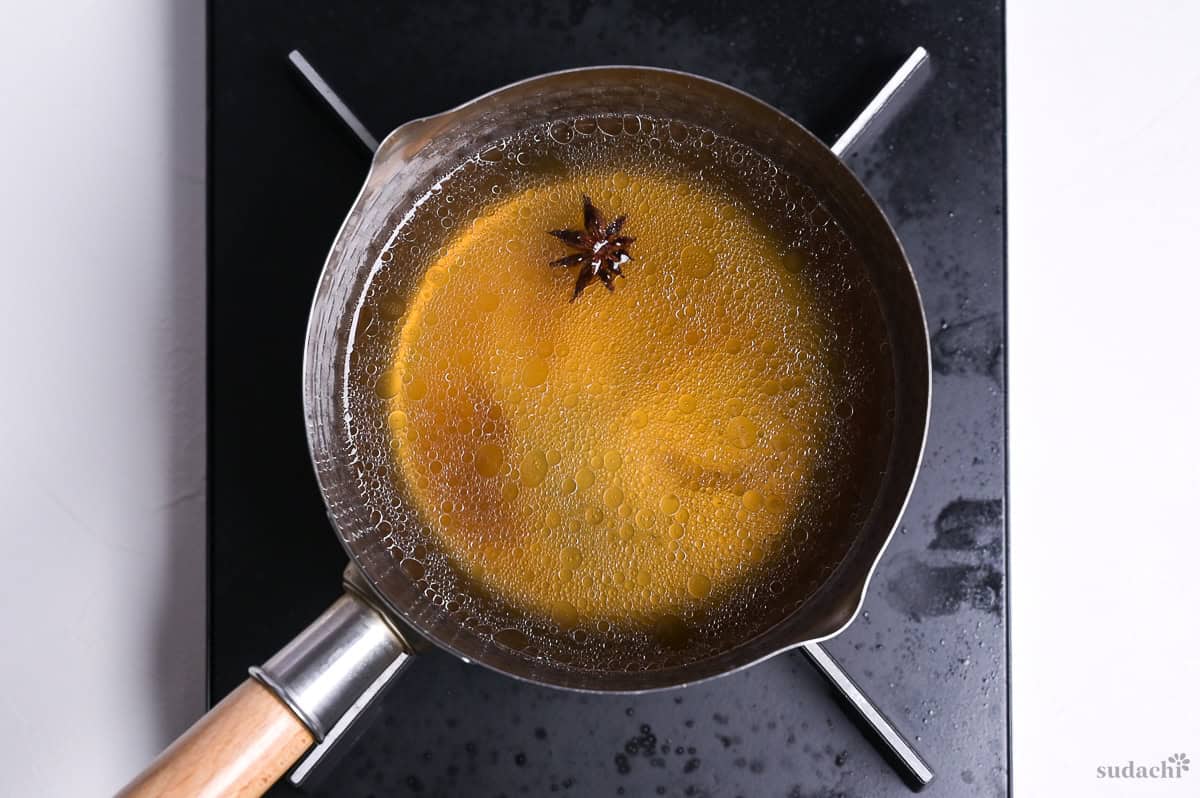
i. When you are about 1 hour into the second braise hour, ladle some of the braising liquid out of the pot.
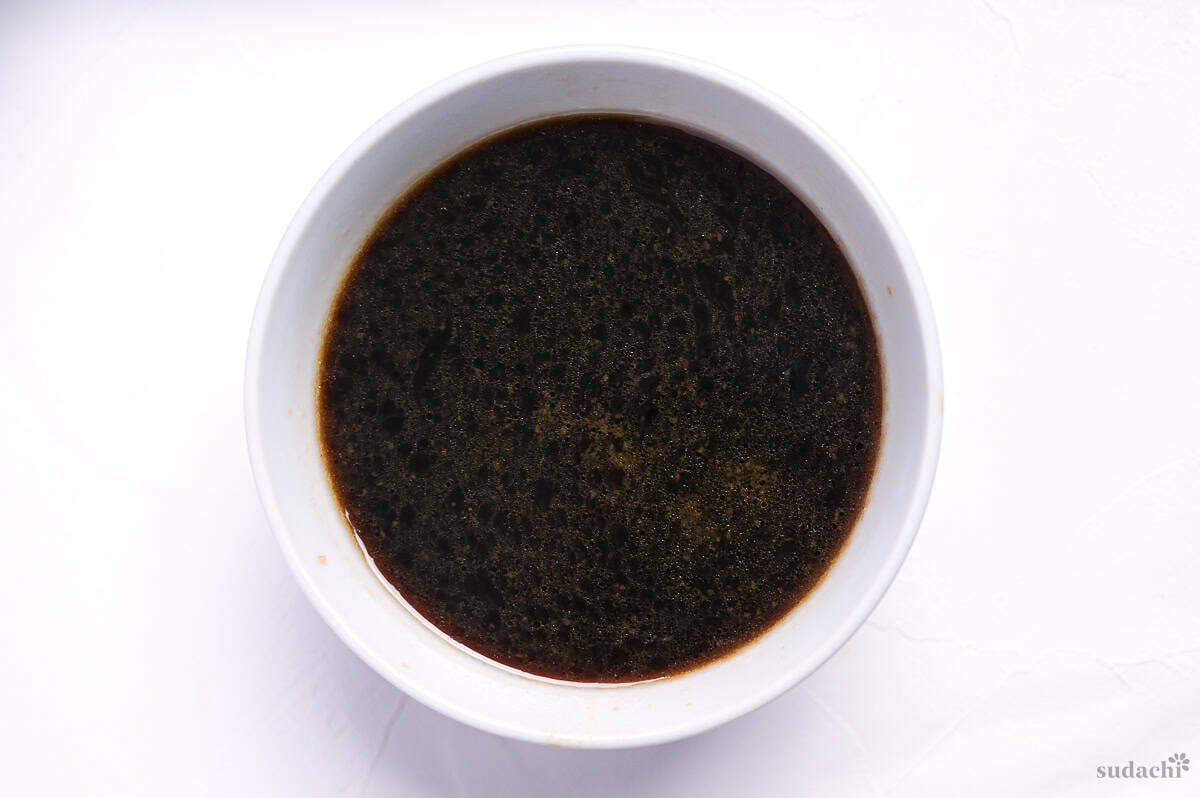
ii. Add it to the saucepan along with sake, mirin, sugar, honey, and the star anise if you are using it. Bring the saucepan up to a gentle simmer for about 1 minute, until the raw alcohol smell has cooked off. The alcohol smell from the sake and mirin burns off faster than you expect. Nose over the pot and you will know.
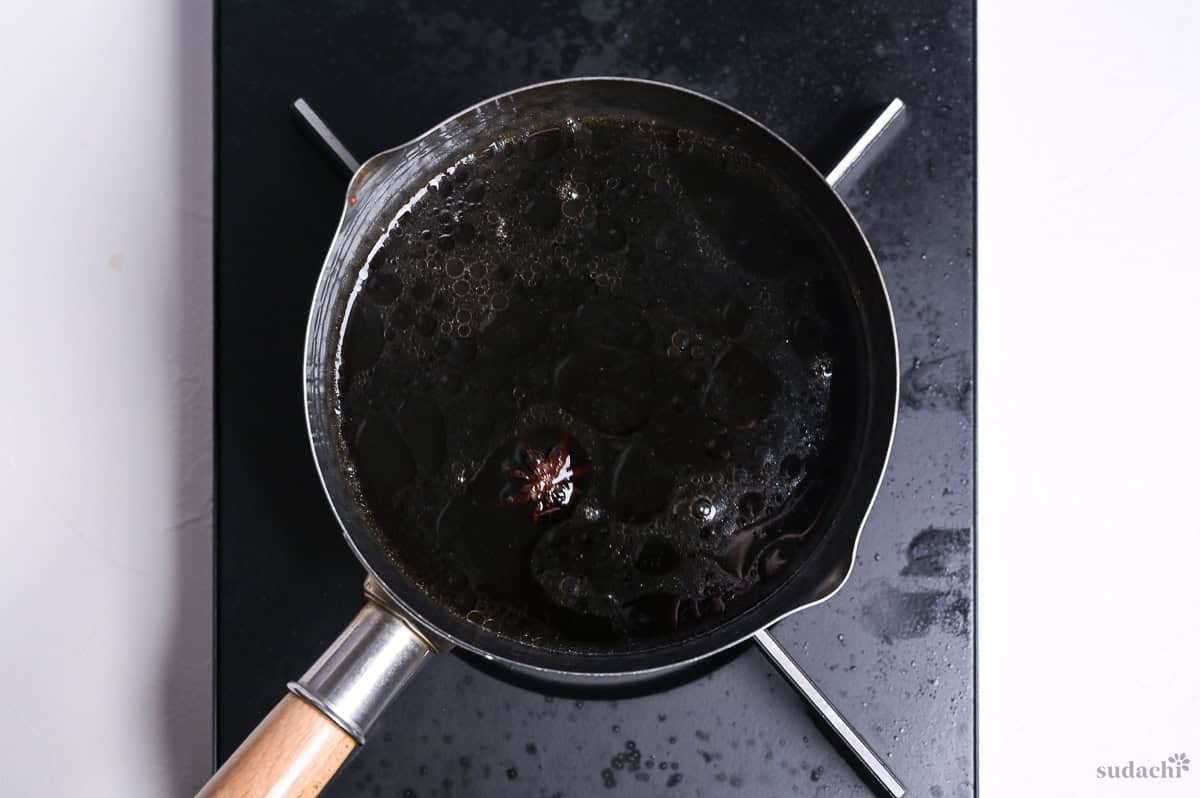
iii. Turn off the heat, add the soy sauce, oyster sauce, and mix.
From what I understand, star anise is a love-or-hate ingredient. If you love it, add it whole. If you are on the fence, break off one-quarter for a softer lift. If you do not love it, skip it. It’s still delicious without.
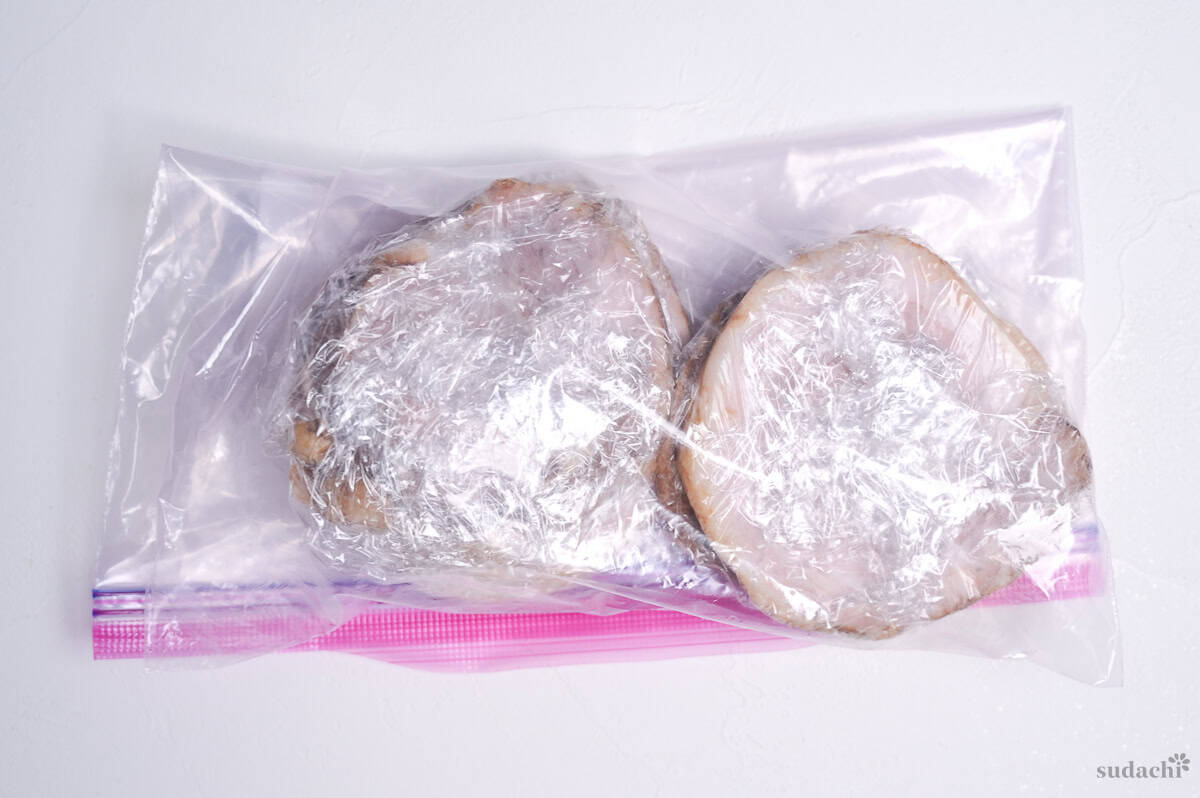
i. At the 2 hour mark total, cut the heat under the main pot. Lift the roll out and slide it straight into a large zip-top bag set in a bowl for stability (though I used a self-standing silicone one this time).
ii. Pour the contents of the saucepan into the bag along with the remaining half of the sliced ginger. Press the air out of the bag as you seal it. Full contact between liquid and meat is the whole point of a bag marinade versus a pot soak.
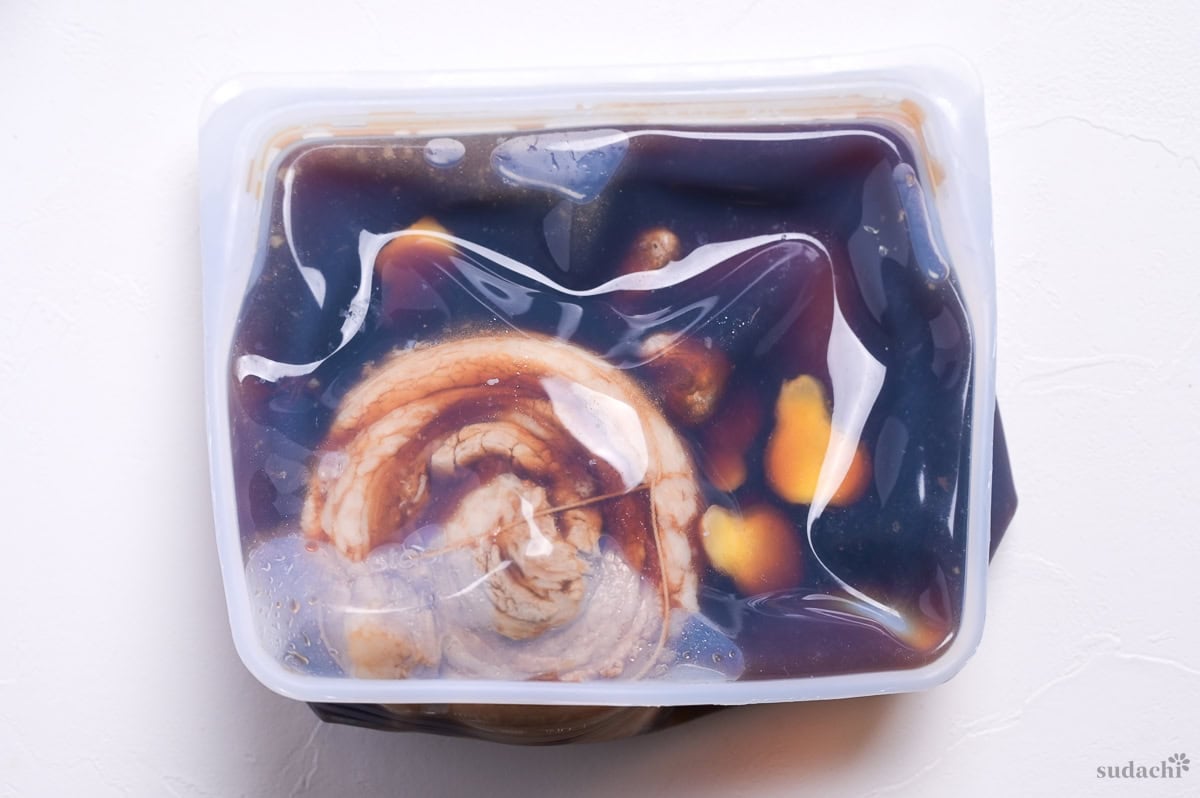
iii. Let the sealed bag cool on the counter until it is just warm to the touch. Then move it to the fridge and let it marinate for at least 12 hours, ideally overnight. 12 hours is the floor. 18 to 24 hours gives you a slightly deeper flavor penetration without much downside.
Do not marinate longer than 48 hours. Past that, the soy starts to over-salt the surface and the texture gets tighter and drier.
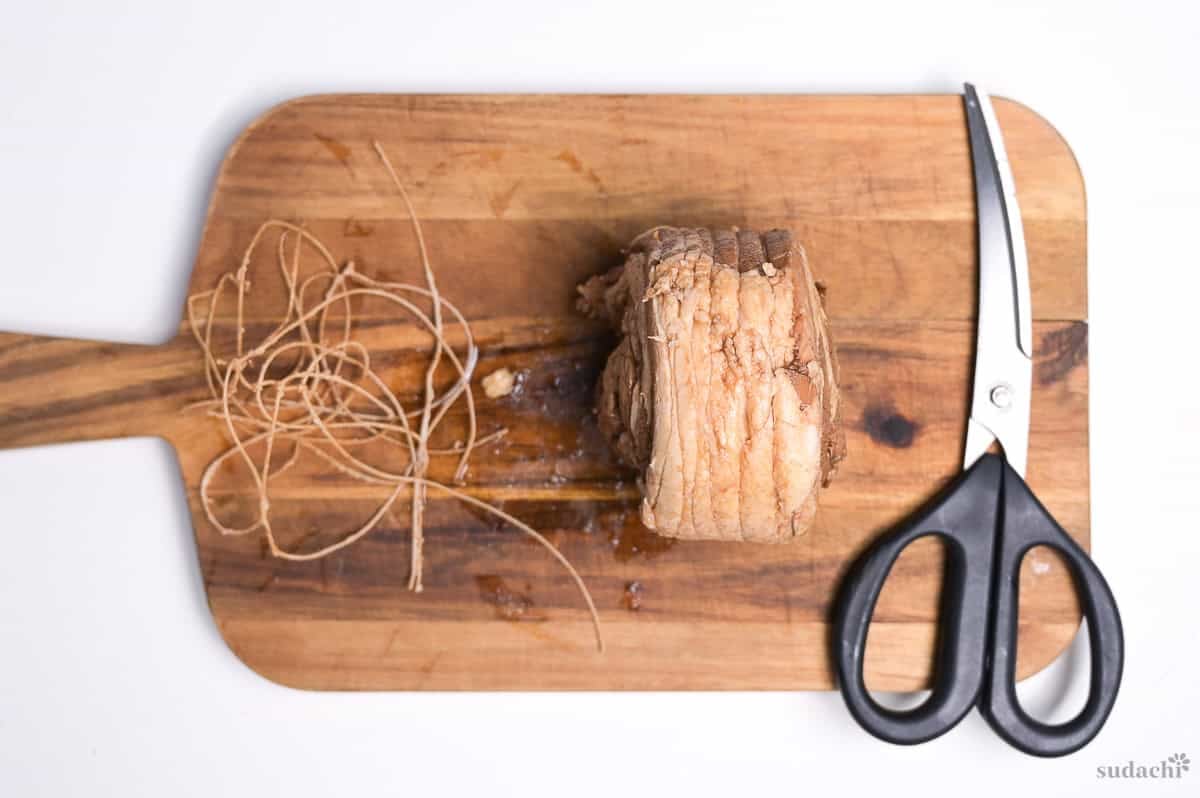
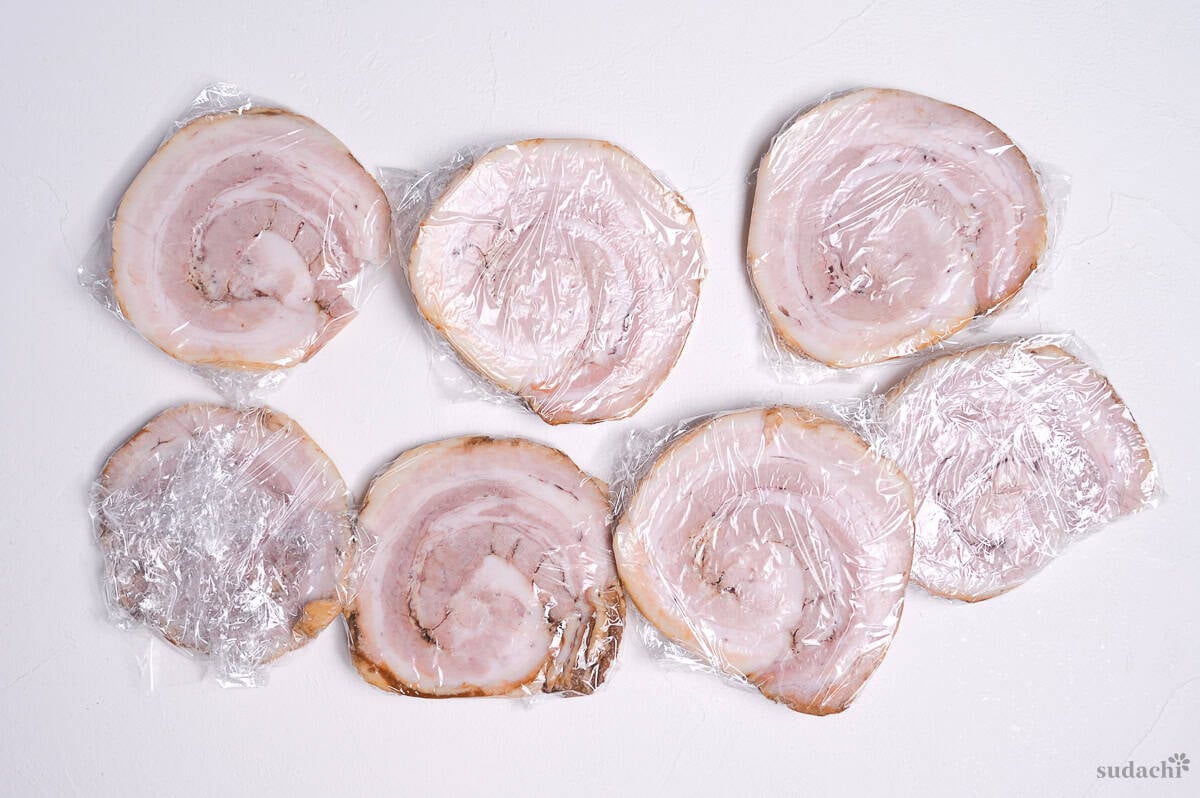
i. Once the roll is fully chilled through, pull it out of the bag, save the marinade (do not throw this out either), cut off the twine or slide the meat net off, and slice with a sharp knife. Cold is non-negotiable here. A warm roll falls apart on the knife and you lose the spiral.
ii. For ramen, 3 to 5 mm slices are the thin shop style and about 0.5 cm is the standard. I think 0.5 cm hits the best balance of sauce-grip and pork flavor.
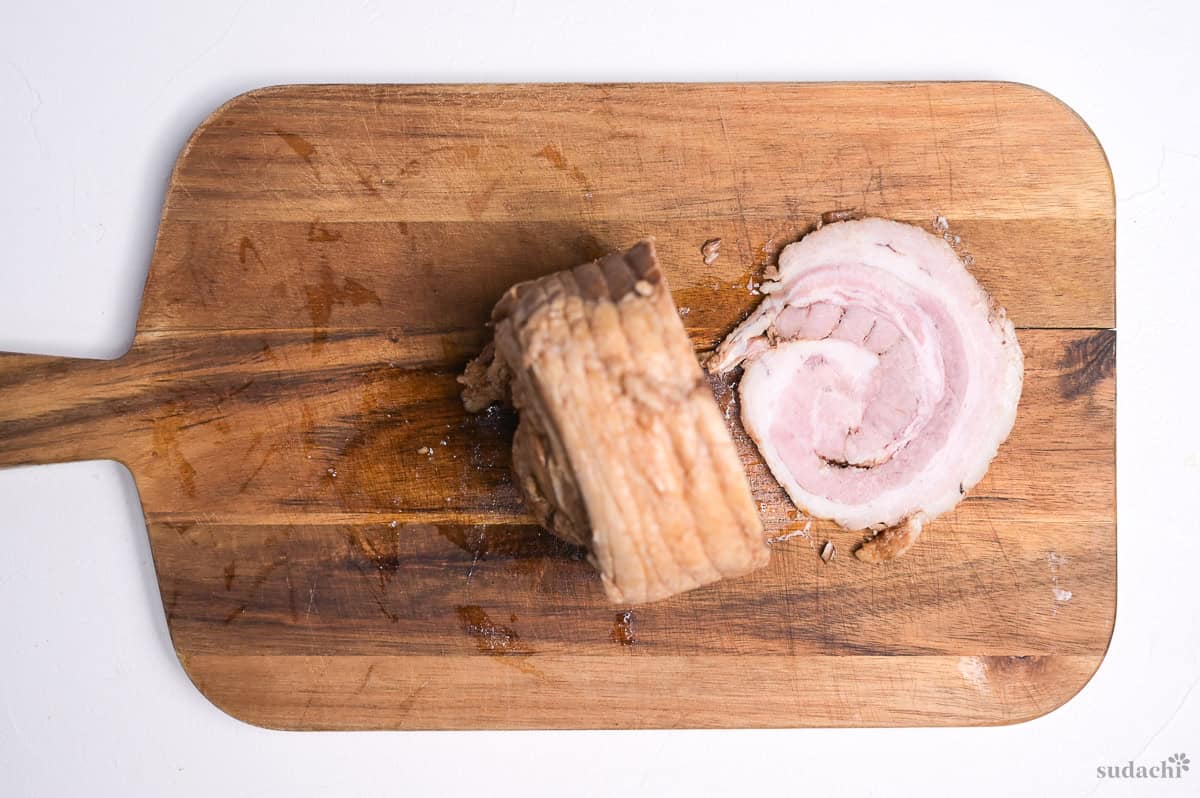
iii. The ragged end pieces that do not slice beautifully go straight into chahan or a chashu don.
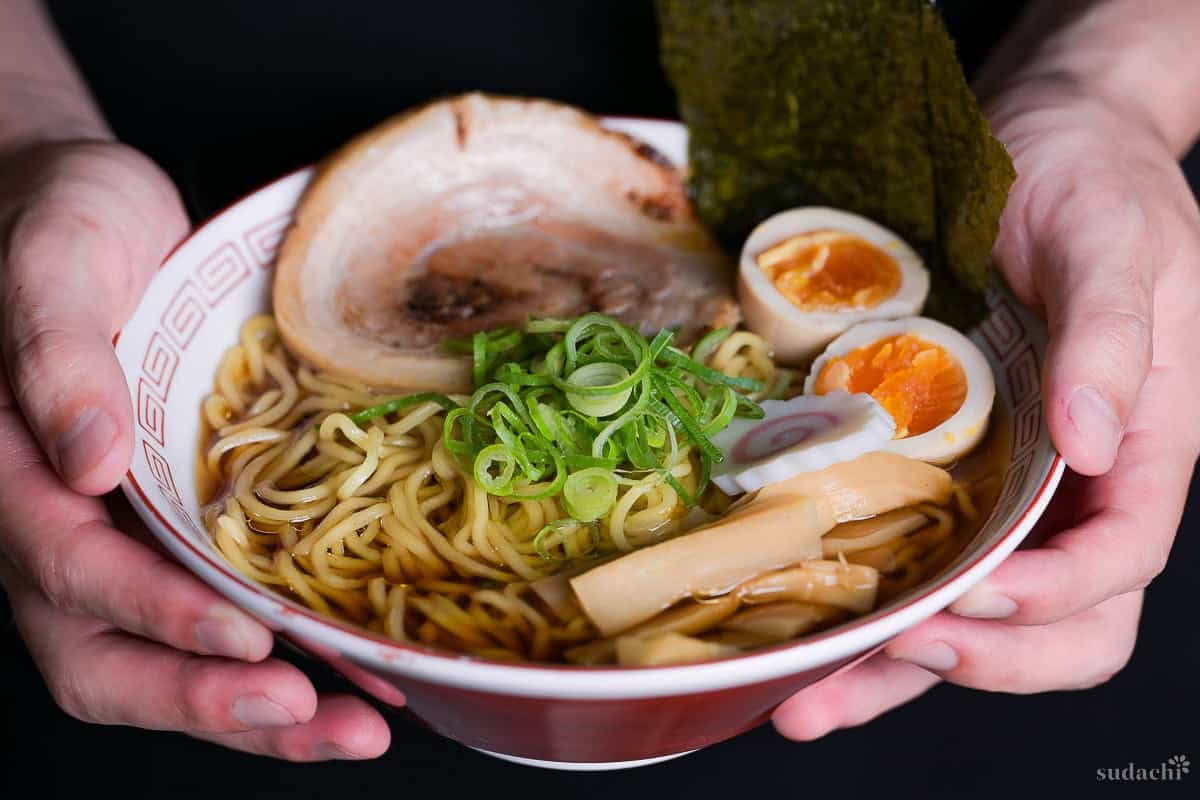
i. Lay your slices on top of a bowl of ramen, or just on a plate if you are eating them on rice. If you have a kitchen torch, pass the flame quickly over the surface of each slice until the fat just starts to bead and the edges brown. Hold the torch 5 to 10 cm (about 2 to 4 inches) from the surface. Closer and you char. Further and nothing happens. Move the flame. Do not hover over 1 spot.
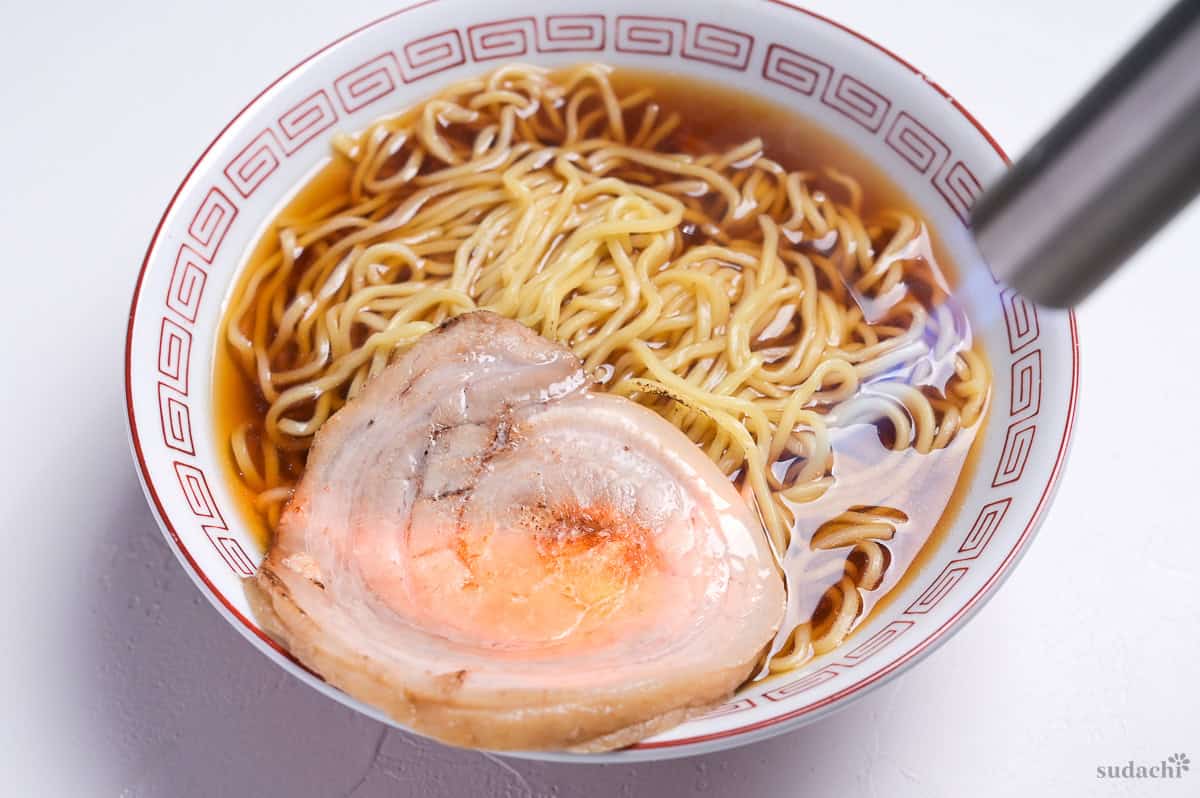
If you do not have a torch, skip this step. The chashu is already excellent.
ii. Stop as soon as the surface fat goes glossy. Overdoing it turns the whole effect into a scorch, and you lose the balance between caramel and meat.
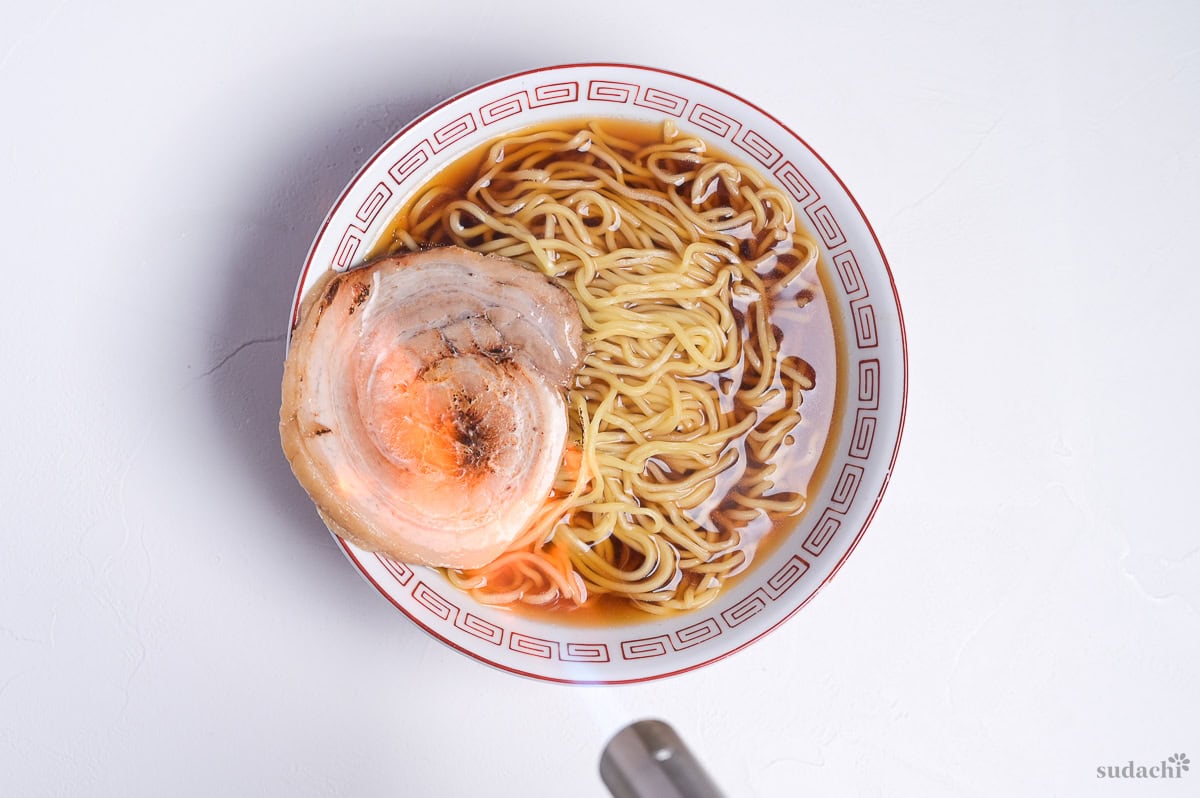
How to Repurpose the Broth and Marinade
After 2 hours of braise you have 3 things in front of you, not 1. The chashu is the visible gift, the one you set out to make, and the one you were already planning to slice. The other 2 are the braising liquid (pork broth) still sitting in the pot, and the marinade sitting in the zip-top bag. Do not throw them out.
Here is what each one actually is, and how to turn both into a bowl of ramen the next day.
- Broth, the accidental pork stock: What is in the pot after you lift the roll out is not a byproduct, it is a real pork stock. The liquid from braising pork belly for 2 hours, with the negi, onion, ginger, and garlic still in it, has pulled collagen, pork fat, and umami compounds. Call it instant tonkotsu-style stock.
- Marinade, the tare that almost made itself: The sake, mirin, soy sauce, oyster sauce, sugar, and honey mixture after it has sat with pork drippings for 12 hours is essentially an 80-percent-done ramen kaeshi (tare) or very fancy “flavored tsuyu“.
How to turn them into a home bowl of ramen
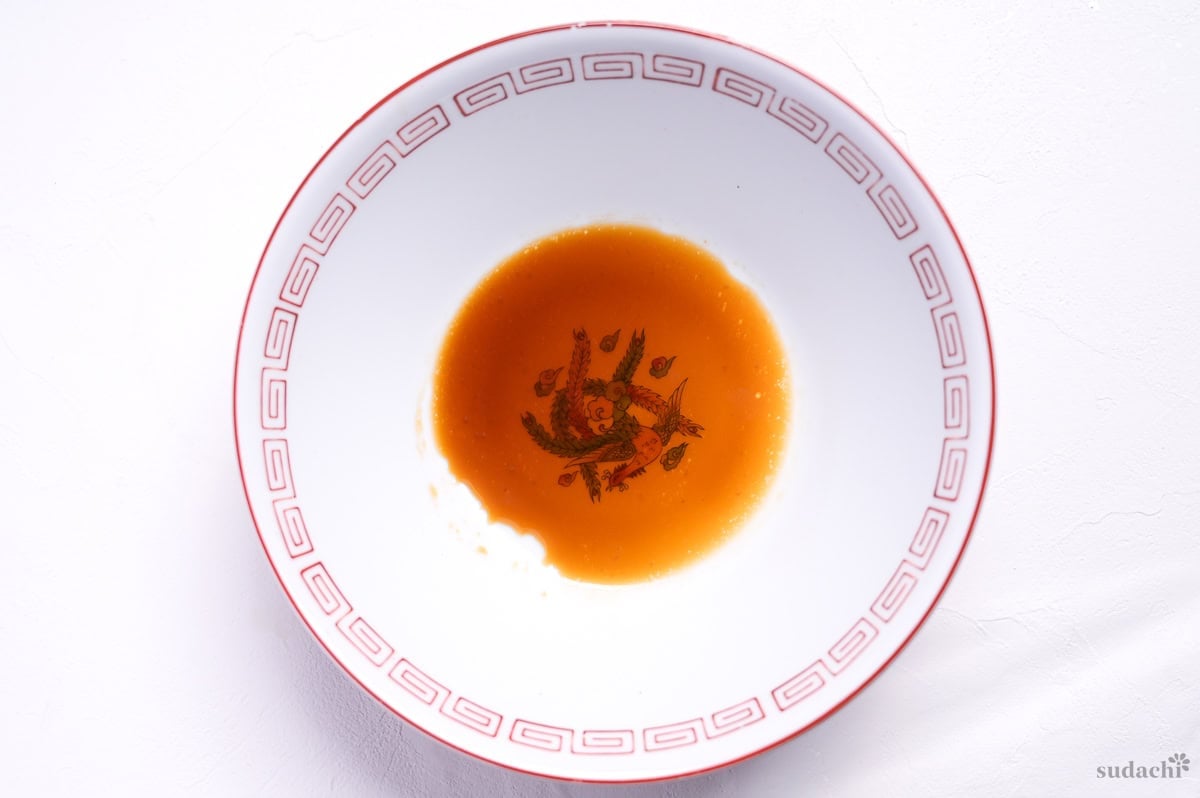
i. Pour all of the marinade into a small saucepan over medium heat. Bring it just below a simmer, around 85 to 90°C (185 to 194°F), small bubbles start appearing at the surface but do not let it reach a rolling boil. Skim the small amount of pork protein that coagulates and floats up.

ii. Add 2 tbsp of dark soy sauce and 1/4 tsp of salt, drop the heat to low for 10 minutes, then kill the heat, cover, and let it come back to room temperature on its own. Refrigerate.
Put 250 ml of the pork broth in a small saucepan over medium heat. Target 80 to 85°C (176 to 185°F), small bubbles around the edge of the pan.

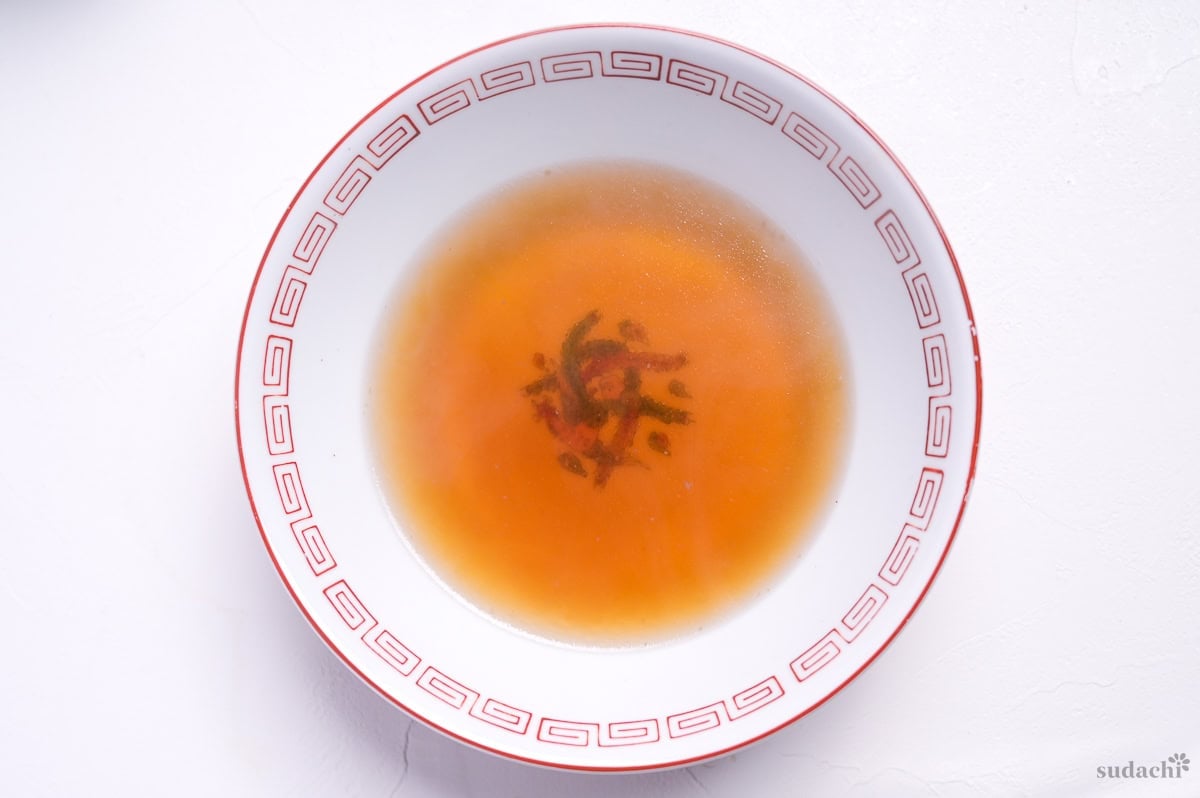
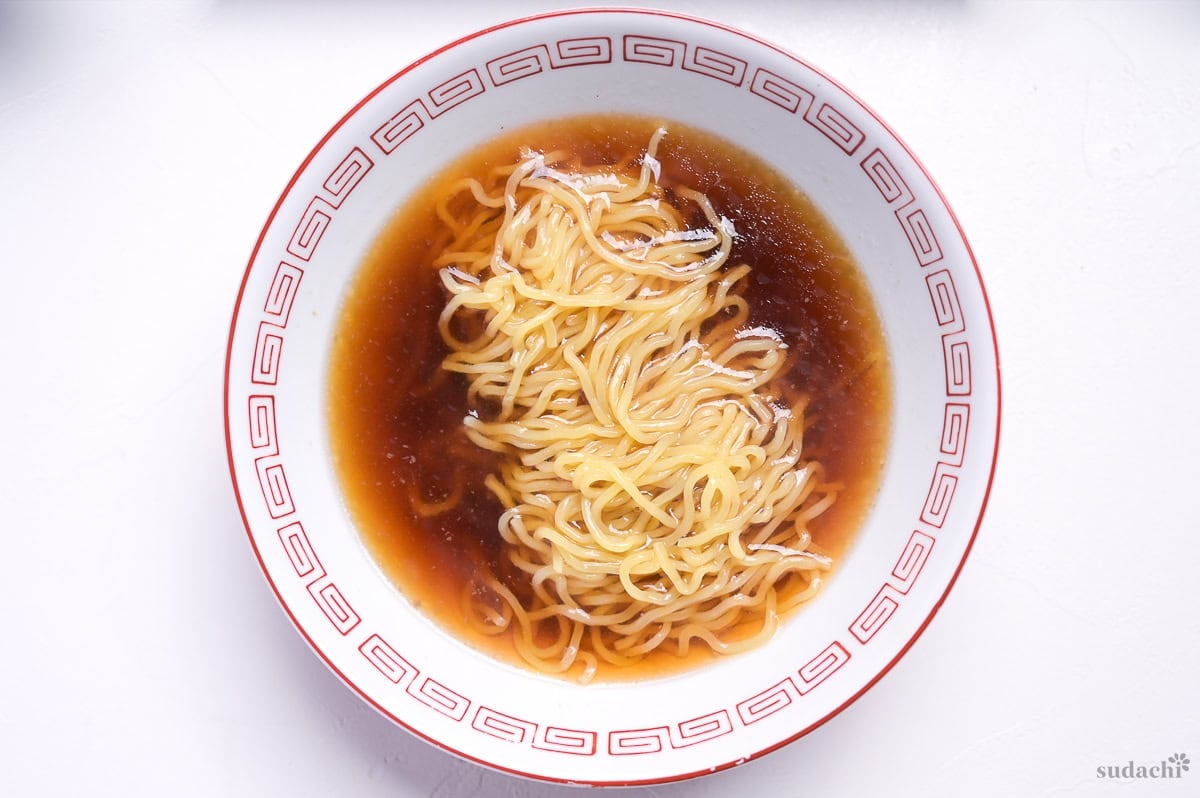
Add 4 tbsp of refrigerated kaeshi to the warmed bowl.
Ladle the broth into the bowl and stir it together with the kaeshi. Taste with a spoon. If it needs salt, adjust with a splash of soy or salt.
Although I say “We’re making ramen,” it’s actually a repurposed soy sauce ramen broth. Since the marinade for the chashu is quite sweet, it ends up sweeter than regular soy sauce ramen. So, feel free to adjust the sweetness to your liking! The soup salinity varies batch to batch too, so taste as you go!
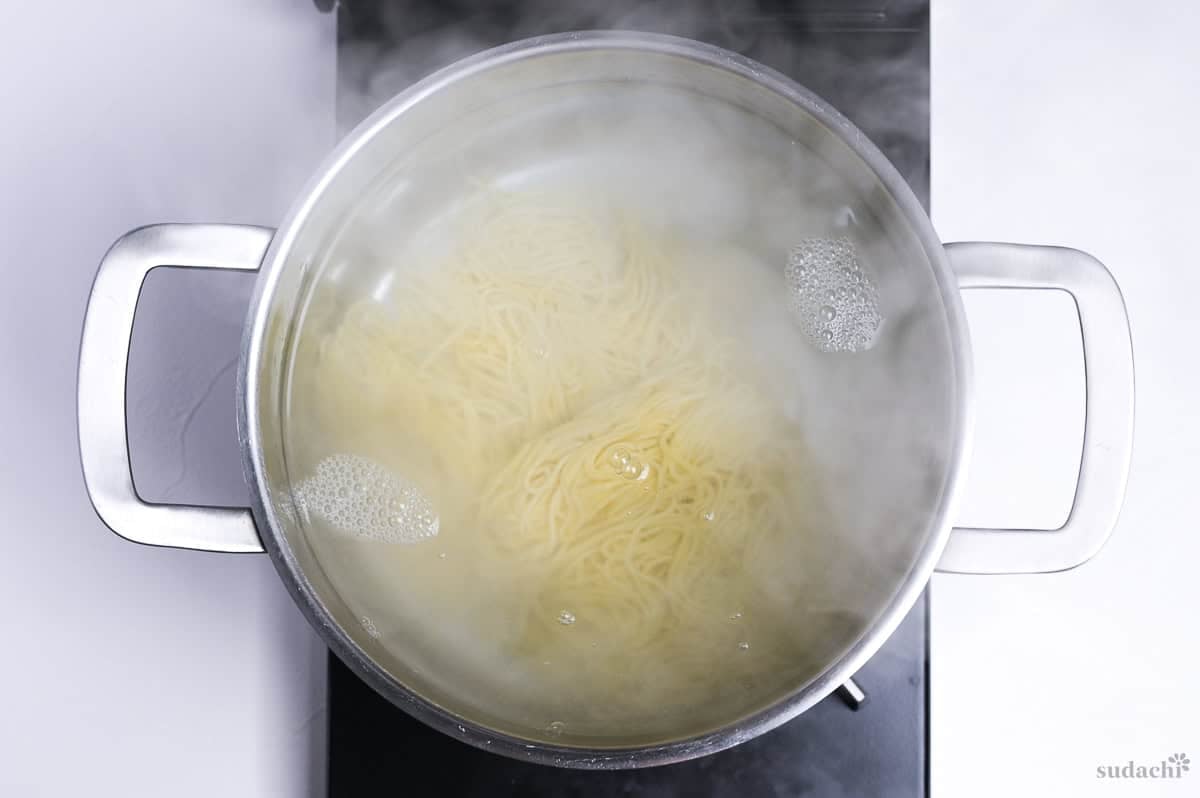
Bring a large pot (at least 1.5 L of water) to a boil, cook 1 portion (120 to 150 g) of medium-thick ramen noodles per the package, but pull them 15 to 20 seconds before the printed time. They keep cooking in the hot bowl. Shake the noodles dry with 2 or 3 firm shakes of the strainer. Do not rinse with cold water.
One more idea, and a closing
I have also swapped the pork broth for dashi stock with this same kaeshi, and it was excellent (more like shoyu ramen because of the dashi ingredients). Try it.
- The marinade on its own makes a great soft-boiled marinated egg if you just drop chilled peeled eggs.
- The kaeshi can work as a seasoned soy sauce.
- The pork broth, as the name suggests, is a base for any simmered dish or soup you want to build next.
The possibilities keep opening up. To me, this is what it means to not waste a single hour of the 2-hour cook that gave you the chashu in the first place.

Essential Tips & Tricks
- Never let the braise come to a rolling boil. The zone you want is 80 to 85°C (176 to 185°F), just tiny bubbles from the bottom of the pot and a barely shimmering surface under the drop lid.
- Slice cold, never warm. A warm roll falls apart the second the knife touches it and the spiral you spent 2 hours building goes with it. Refrigerate the marinated roll in its bag until it is chilled through, then cut the twine off and slice on a sharp knife.
- Do not marinate past 48 hours. Somewhere between 12 and 24 hours is the window where the flavor penetrates without the surface going over-salty. Past 48 hours the soy pulls too much water out of the outer layer, the texture tightens, and you lose the melt in the middle that defines ramen-shop chashu.
With these simple tips in mind, you’re set for success every time you make chashu.
Storage & Meal Prep
Fridge (not so recommended): Store the sliced chashu in a sealed container with a few spoonfuls of the reserved marinade poured over the top, but I much prefer freezer method for convenience.
Freezer:
i. Wrap each slice with cling film.
ii. Put the individual slices into a zip-top bag, press the air out, good for 1 month.
Do not freeze the slices submerged in marinade.
Reheating: For frozen chashu, the best method would be to let it thaw naturally in the refrigerator (half a day to 1 day). Once thawed, you can enjoy it by placing it directly into hot ramen broth or searing it with a blowtorch.
What to Serve With This Recipe
- Cheat Tonkotsu Ramen (Hack)
- Shio Ramen
- Miso Ramen
- Shoyu ramen
Chashu FAQ
No, and this trips up a lot of people because the word chashu and the kanji 焼豚 both point back to char siu. Cantonese char siu is barbecued or roasted over high heat with a sweet-and-savory glaze, and the texture is firm and caramelized on the outside. Japanese ramen-shop chashu is braised low and slow and the texture is softer. Same linguistic root, completely different technique.
Yes, if you want the spiral. The roll will uncoil along the fascia during the braise without tension, and you end up with a loose tangle of belly strips floating in the pot instead of a clean cylinder. A meat net is the fastest option, cotton butcher’s twine at 2 to 3 cm (about 1 inch) intervals is the traditional one. Either works.
Stovetop is 2 hours at 80 to 85°C (176 to 185°F), split into 1 hour + flip + 1 hour. A pressure cooker will shorten the cooking time, but it’s something I need to test before I can give details.
More Ramen Toppings
- Simplified Oven-Baked “Chashu”
- Teppanyaki-Style Crispy Garlic Chips
- Seasoned Bean Sprouts
- Homemade Rayu
Hungry for more? Explore my ramen topping recipe collection to find your next favorite dishes!
Did You Try This Recipe?
I would love to hear your thoughts!
💬 Leave a review and ⭐️ rating in the comments below. 📷 I also love to see your photos – submit them here!

Japanese Chashu Pork (Braised Pork Belly for Ramen)

Ingredients
Pork
- 700 g slab skinless pork belly clean fat-lean layers, you can double it without increasing other ingredients
Blanching and aromatics
- 50 g Japanese leek (naganegi) green tops only, or dark green tops of a large leek
- 25 g ginger root sliced thick
- 3 cloves garlic whole, peeled, lightly crushed
- 100 g onion rough-chopped
- 1 tsp unseasoned rice vinegar (komezu)
Marinade
- 250 ml pork broth reserved from the braise pot at the 1 hour 50 minute mark
- 4 tbsp sake
- 4 tbsp mirin
- 1½ tbsp light brown sugar or regular sugar
- 1 tbsp honey
- 1 piece star anise optional, break into quarters for a softer lift
- 125 ml Japanese soy sauce (koikuchi shoyu)
- 1 tsp oyster sauce
- 25 g ginger root
The ingredient brands and tools I trust are in my Japanese pantry guide and my cooking tools guide.
Can’t find certain Japanese ingredients? See my substitution guide here.
Instructions
- Pat 700 g slab skinless pork belly dry with kitchen paper, then place horizontally on a cutting board with the flesh side facing up. Make shallow vertical cuts all the way across, about 1cm apart.

- Roll and press at each turn to push out any air pockets, then wrap and secure with butchers twine or a meat net.
- Place the pork in a deep pot and fill with cold water. Set the pot on the stove, and bring to a simmer over medium heat. Let it gently bubble for about 5-6 minutes, scooping out any scum that floats to the surface.
- When the scum slows down, use tongs to pull the pork out of the pot and into a bowl of cold water. Rinse the pot and refill it with fresh water. Set it on the stove and bring it to a simmer once more. While you wait, wash the pork with cold running water.
- Once the water is gently bubbling, carefully place the pork into the pot. Add 50 g Japanese leek (naganegi), 25 g ginger root, 3 cloves garlic, 100 g onion, and 1 tsp unseasoned rice vinegar (komezu). Cover with a drop lid, reduce the heat to low, and gently simmer for 1 hour.
- Peel back the drop lid, turn the pork over and use a ladle to reserve 250 ml pork broth. Cover with the drop lid once more and simmer for another 1 hour. It's okay if the pork isn't completely submerged, but if more than one-third is exposed, top up with a little more water.
- Pour the pork broth into a small saucepan and add 4 tbsp sake, 4 tbsp mirin, 1½ tbsp light brown sugar, 1 tbsp honey, and 1 piece star anise. Let it bubble for about 1 minute to burn off some of the alcohol in the sake and mirin.
- Turn off the heat and pour in 125 ml Japanese soy sauce (koikuchi shoyu) and 1 tsp oyster sauce. Mix and set aside.
- After your pork has been simmering for 2 hours in total, transfer it to a large zip-top bag and pour in the contents of the sauce pan (strain and save the leftover pork stock). Add 25 g ginger root cut into thick slices, then push the air out and seal. Cool on the counter, and once cool enough to touch, refrigerate for 12-24 hours.
- Pull the pork out of the marinade, but don't throw it away. You can save it for ramen broth or another dish. Slice about 10-15mm thick.
- For a finishing touch, you can char it with a kitchen blow torch. Serve on your favorite ramen, and enjoy!
How to Make Ramen Broth with Leftover Chashu Marinade (Kaeshi)
- Pour the marinade into a saucepan and bring to a simmer over medium heat. Skim any scum if needed.
- Add 2 tbsp soy sauce and 1/4 tsp salt. Reduce the heat and simmer on low for 10 minutes, then remove from the heat. This is your kaeshi. For best results, cool and refrigerate before use.
- Heat 250ml of strained pork broth over medium until it starts to gently bubble. At the same time, boil your ramen noodles.
- Pour 4 tbsp of kaeshi into a warmed ramen bowl, then ladle the hot pork broth into the bowl and mix. Taste test and add a touch more soy sauce or salt if needed.
- Strain your noodles and gently lower them into the soup. Keep in mind that this method of making ramen is significantly sweeter than regular ramen broth. Add your favorite toppings and enjoy!
Video
Hi, if i use smaller meat, say 250g, will the cooking time be the same or faster?
Thanks
Hi Clara,
Thank you for your question. I haven’t tried the recipe with a smaller piece of meat but in theory it would cook a bit faster. However this recipe is already a quick chashu (they usually take 3-4 hours at least) so I recommend cooking it for the time stated to ensure it’s flavourful. Hope it helps!
Hello, on part 3, what can i do with left over sauce in the bag? It is a lot though, i feel guilty to throw it away. And how can i store it ?
Hi Tram,
Thank you for trying my recipe and giving a 5 star review!
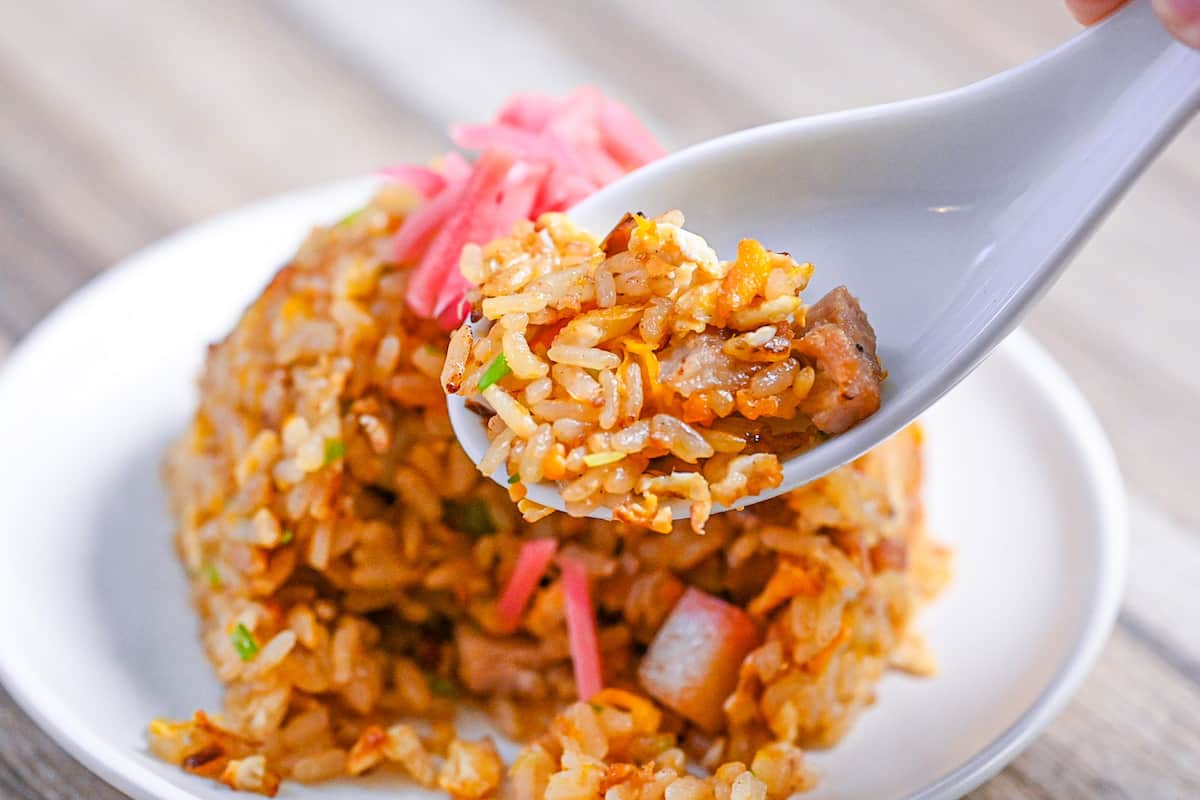
You can reuse the broth to make ramen eggs, my ramen restaurant style chahan (fried rice) or simply use it again to make another batch of chashu.
You can store it for 3-4 days in the fridge or 3 months in a zip lock bag in the freezer. If you’re freezing it, I recommend freezing it in an ice cube tray, you could add it to dishes in small amounts for extra umami.
Hope that helps!