

Are you interested in learning more about tuna sashimi? From selecting and slicing it to understanding its taste profile? If so, you’ve come to the right place!

Yuhiko Okamoto
Contributing Writer
In 2002, with zero experience, Yuhiko began his career in Japanese cuisine and has since worked as a chef and executive chef at a kappo restaurant, a high-end sushi restaurant, and izakayas.
What is Sashimi-Grade Tuna (Maguro)?
Tuna sashimi is a raw, tangy, and flavorful dish that may be unfamiliar to some. While it’s a favorite of many, its strong taste can be an acquired taste; even some Japanese people would agree.
In this guide, I’ll share the secrets of tuna sashimi. Straight from the kitchen of a Japanese chef, I’ll guide you through choosing, preparing, and preserving this unique ingredient.
Tuna sashimi and sushi are highly regarded in Japanese cuisine and often serve as a benchmark for a restaurant’s reputation. They are not just dishes; they are symbols of excellence!
But don’t be deceived by the glamor. Tuna is not only for fine dining but is also popular among people from all walks of life. Tuna is highly appreciated and widely available from conveyor-belt sushi restaurants to local supermarkets in Japan.
A Brief History of Tuna Sashimi
Did you know that tuna has been a part of Japanese cuisine for over 1300 years? The Japanese already enjoyed tuna during the Jomon period, which lasted from 1300 to 2300 years ago. Archeologists have even discovered tuna bones in shell mounds from that era!
Interestingly, tuna was not always considered a high-end delicacy. Before the Edo period, it was considered a low-quality fish because it was difficult to preserve and distribute. The fish would quickly lose its freshness, making it less valuable commercially.
However, with the growth of the fishing industry during the late Edo period (1603-1867), tuna sashimi started to gain popularity. A new technique called ‘zuke,’ which involved marinating tuna in soy sauce, helped to maintain the fish’s freshness and increase its appeal.
It wasn’t until the mid-Showa period (1926-1989) that the fatty parts of tuna, known as otoro (大トロ) and chutoro (中トロ), became highly recognized. These parts were often discarded or cooked in the past, but now they are considered the best parts of tuna. The high-fat content of toro made it delicate and prone to damage, and it was also difficult to marinate in soy sauce for ‘zuke.’ Fortunately, times have changed, and toro is now a sought-after ingredient in Japanese cuisine.
The Difference Between Sashimi-Grade Tuna and Tuna for Cooking
In Japan, in addition to product labeling, there are the following differences:
| Sashimi-Grade | For Cooking |
|---|---|
| Fresh | Less fresh |
| No bones and skin, ready to eat right after cutting | Not suitable parts for sashimi |
| Meets raw food standards | Not intended for raw consumption |
Tuna for sashimi is commercialized only after meeting strict standards, including special water and cooking equipment separate from that used for cooking.
Tuna for sashimi sold in Japan is often in “saku” (block) form, which means that the bones and skin have been removed, and the fish is ready to be cut and eaten raw.
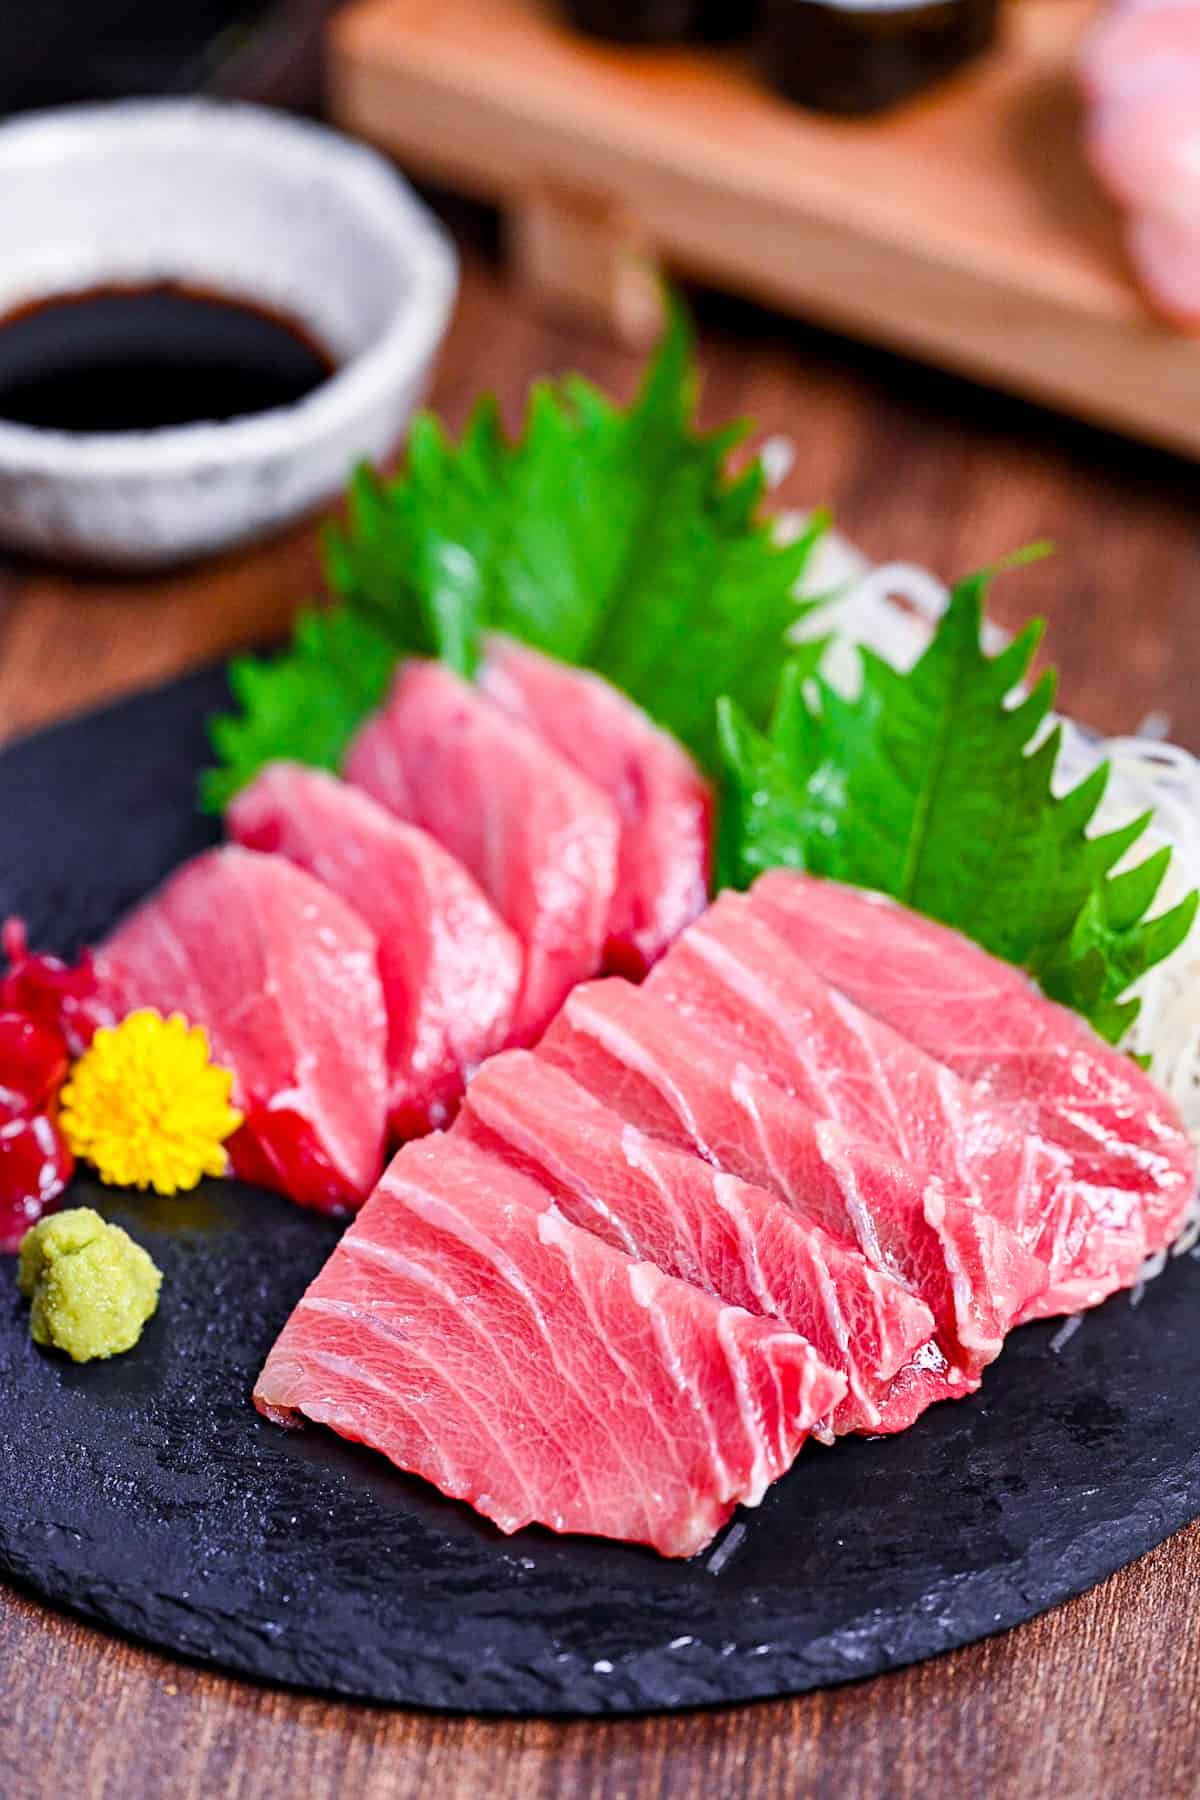
Parts of Tuna Used for Sashimi
There are three commonly eaten parts of tuna. Each part is centered around the backbone, like the annual ring of a tree.
- The center part around the backbone is the lean part (akami).
- The outer part near the fillet is chutoro.
- The part adjacent to the internal organs is otoro (most expensive).
| Akami (赤身) | Chutoro (中トロ) | Otoro (大トロ) | |
|---|---|---|---|
| Area | The center portion near the backbone. Along the spine from head to tail. | Posterior to the middle part of the head only on the ventral side. | Posterior to the middle part of the head only on the ventral side. |
| Characteristics | The striations are of varying degrees of quality. The closer to the spine, the higher the quality. | Variation in meat quality. The belly side is more expensive. | The most premium part of the meat, from which only a little is obtained. |
| Taste | Strong iron taste and acidity. If compared to meat, it is like loin. | Moderate fat and good texture. If compared to meat, it is like rib. | Fatty and melt-in-your-mouth. If compared to meat, it is a sirloin. |
Because there is a wide range of lean and medium fatty parts, the meat quality, fat content, and stringiness vary depending on the location.
Most of what is sold in Japanese supermarkets is the lean part.
Types of Tuna Used for Sashimi
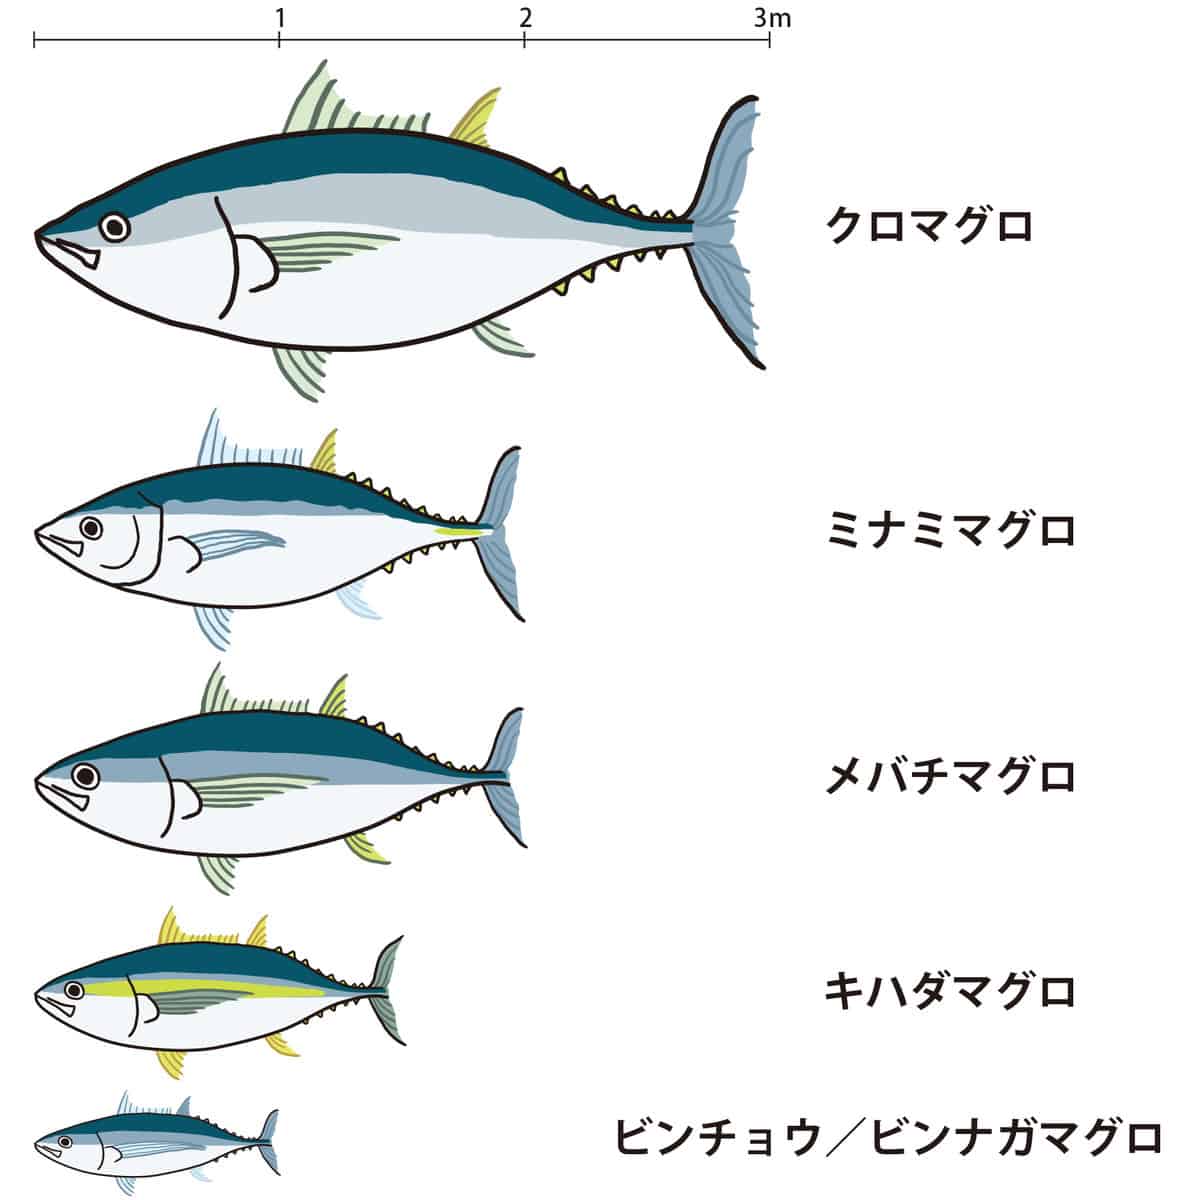
There are five main types of tuna distributed in Japan.
- Bluefin tuna (kuro maguro, also commonly known as hon maguro)
- Southern bluefin tuna (minami maguro)
- Bigeye tuna (mebachi maguro)
- Yellowfin tuna (kihada maguro)
- Albacore tuna (bin-naga maguro)
Bigeye tuna and albacore tuna are the most commonly seen, while yellowfin tuna is more common in the Kansai region (West side of Japan).
Most bluefin tuna is farmed, and southern bluefin tuna is rarely seen in retail stores.
Bluefin Tuna (Kuro/Hon Maguro)
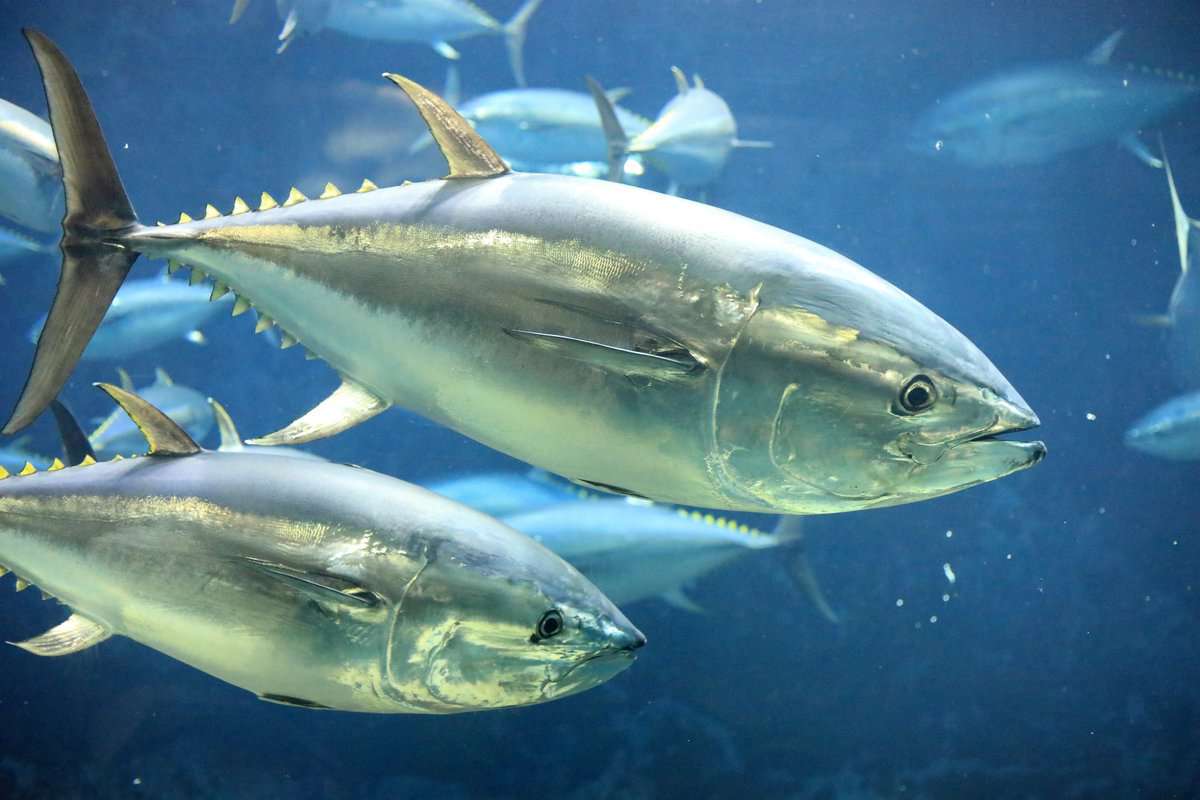
Bluefin tuna or “kuro maguro” is often called “hon maguro” in Japanese, which means “real tuna.” It is a high-end fish and is especially sought after when caught domestically in the seas surrounding Japan. These fish can fetch several million yen (tens of thousands of dollars) each.
The most expensive tuna in Japan is the bluefin tuna from Ohma, Aomori Prefecture, which is caught during the winter. This type of tuna can weigh 400 kilograms (880lbs) or more and is highly prized for its Ootoro and Chutoro portions.
One major difference between bluefin tuna and other types of tuna is that it can be farm-raised. This is done by raising artificially hatched fry to spawn again, allowing for the farming of tuna without relying on natural resources.
Bluefin tuna has a very strong taste that may be too bloody for those who do not like sashimi. It also has a strong flavor and acidity, a fine texture, and varying amounts of fat in different parts of the fish.
Southern Bluefin Tuna (Minami Maguro)
The Southern Bluefin Tuna is highly regarded in the culinary world, with sought-after o-toro and chutoro cuts. It’s known as the “Indian Tuna” due to its southern hemisphere habitat and frequent presence in the Indian Ocean.
Raised on farms in Australia and New Zealand, it’s sold frozen in Japan and found mainly in high-end restaurants. Its dark color may discourage some retailers, but its potent fatty aroma, hint of sweetness, low acidity, and slightly glutinous texture make it worth trying. Toro sashimi and sushi made from Southern Bluefin Tuna are very popular in Japan.
Bigeye Tuna (Mebachi Maguro)
Bigeye tuna is widely available in supermarkets in Japan, especially as sashimi-grade tuna. It doesn’t yield large fatty “O-toro” sections due to its smaller size. However, it can produce “Chutoro,” medium fatty segments exceeding 40kg. Economically, catching wild Bigeye rather than farming is more feasible.
They are caught globally and transported to Japan in a frozen state. Its peak season is during fall and winter when fresh catch from local seas arrives. However, its availability remains limited.
The flavor of Bigeye tuna is traditional yet distinctive. Its appeal comes from balanced fat content, unique crunchy texture, mild flavor, and a touch of acidity – a perfect sushi ingredient.
Yellowfin Tuna (Kihada Maguro)
Primarily found in Japan’s Kansai region, Yellowfin tuna, known as “Bigeye” in Kanto, reflects regional naming differences. Its unique firm flesh stays intact even when sliced for sashimi, resembling Bigeye tuna. Yellowfin is wild-caught and generally cheaper.
With its vibrant color that resists discoloration, Yellowfin is favored in retail stores and sushi restaurants. Its stable supply makes it an ideal choice for canned tuna too. While the peak season is summer, it retains consistent flavor year-round as a primarily frozen product.
Yellowfin tuna offers a light, refreshing taste, and slightly subdued flavor. Its low fat, firm texture, and smooth taste make it a versatile ingredient in various dishes.
Albacore Tuna (Bin-Naga Maguro)
Albacore tuna is the smallest and most affordable among the five tuna species and is distinguished by its long pectoral fins reminiscent of human sideburns. Unlike its counterparts, Albacore yields only lean cuts, devoid of the fatty otoro and chutoro sections. In sushi restaurants, “bin-toro” refers to Albacore itself during its winter season, not the fatty parts.
Albacore’s flesh varies from light pink to white, the latter indicating higher fat content. Initially used mainly for canned tuna, its tasty, affordable nature has made it popular in budget sushi places.
Despite its lack of strong flavor that might disappoint some tuna connoisseurs, Albacore is defined by its softness, light flavor, lack of stringiness, and minimal fat content.
How to Identify Good Sashimi-Grade Tuna
Identifying prime red meat (Akami) and medium fatty tuna (Chutoro) is a go-to option, especially with the rare O-toro (large fatty tuna) often unavailable.
In Japan, sashimi-grade tuna is sold pre-sliced or as a whole block (Saku). Buying a block to slice at home is recommended, as sashimi’s freshness fades once sliced. When choosing frozen tuna, inspect it under direct light, as ambient lighting, particularly fluorescent lamps, can distort its true color.
But there’s no need for confusion – Akami, Chutoro, and Otoro are labeled to denote their specific cuts, allowing you to satisfy your precise cravings.
Three main attributes can help you find good tuna:
- A deep, appealing red color.
- Broadly spaced stripes.
- A distinct triangular shape for the loin (Saku).
Vibrant Color
Assessing tuna quality involves careful color inspection:
- A rich, vibrant red color is desirable.
- The tuna should be glossy and transparent.
Darker hues signal a stronger flavor, allowing you to savor the unique, acidic, iron-rich notes of tuna. A paler, slightly pink hue offers a milder taste for those trying tuna sashimi for the first time.
A glossy surface indicates peak freshness, while less fresh tuna may appear dull and lack clarity. Don’t confuse a dark color with being less fresh; transparency is the differentiator.
When fully frozen, tuna can look white, like a fatty cut (sashi), leading to potential misunderstandings. A tip is to view the fish from the side; the more pink visible, the fattier the cut. This subtle observation is key to discovering the fatty pleasures in your tuna piece.
Stripes are Widely Spaced
Evaluating tuna by its striae, or stripe patterns, requires two key observations:
- Look for wide spacing between the stripes.
- The stripes should run parallel.
A block (saku) with wide gaps between stripes likely comes from the tuna’s center, offering intense flavor and finely textured meat that could fall apart when cooked.
The middle section of the tuna features wider-spaced stripes. However, areas closer to the head and tail display narrower gaps, creating multiple stripe patterns within a single loin. The parallel nature of stripes, especially near the head, influences sashimi texture, reducing the likelihood of a stringy texture.
Saku (block) is Triangular
When choosing tuna for sashimi, aim for triangular ‘saku’ or blocks, the ‘akami no tenmi (赤身の天身)’ and ‘chiai shita no chutoro (血合い下の中トロ)’ – equivalents to beef’s chateaubriand. They offer a rich flavor and tender texture.
‘Tenmi’ denotes the red meat in the tuna’s center, adjacent to the backbone. ‘Chiai shita no chutoro’ refers to the medium fatty portion near the fish’s bloodline.
Before cutting, the tuna is a triangular block, the apex being the tendon—the first cut from the top yields the triangular loin shape. The medium fatty tuna under the bloodline is expertly removed from the area where the bloodline is extracted, resulting in an isosceles triangle.
These sections are typically dark, shiny, with a thin muscle layer. Despite being prime parts, their dark color and unique shape may leave them unsold, leading to quality misjudgments by consumers.
Tuna Sashimi to Avoid
When selecting sashimi, regardless of the tuna type, avoid cuts exhibiting:
- Drips.
- Visible spots or clots.
‘Drips’ refer to the colored fluid accumulating on the sashimi tray, resulting from cell degradation over time. This fluid contains flavor and nutrients, so if sashimi shows excess drippings, it indicates age and decreased flavor, making it less desirable.
Furthermore, this leached fluid and nutrients on the tuna’s surface can foster bacterial growth, significantly compromising fish quality. Such cuts should be avoided.
Tuna with black spots or red stains may indicate improper blood drainage, potentially leading to a fishy odor. Since fish decomposition starts from the blood, residual blood can accelerate this process, affecting the overall quality.
Preparing Tuna Sashimi at Home
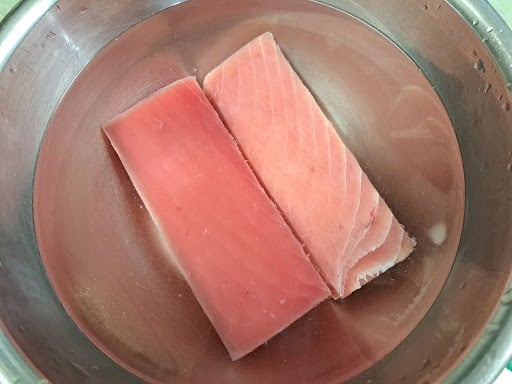
Sashimi-grade tuna is often frozen, and its thawing method significantly impacts its flavor. Professional chefs use two primary thawing techniques: ice or warm salt water.
A common method is to create a 3% salt solution resembling ocean salinity. Freshwater thawing can rapidly drain the cellular fluid, or ‘drip,’ due to osmotic pressure. A 3% saline solution preserves the osmotic pressure close to the tuna’s living state, retaining its flavors. Moreover, using brine enhances the fish’s color.
“Chijire,” or edge warping of the meat during thawing, signifies the frozen tuna’s freshness. Since the tuna is flash-frozen at -60°C before rigor mortis, this process only starts during thawing, resulting in the characteristic warping.
Thaw in Iced Water for the Best Taste
To avoid cellular breakdown and preserve the flavor of frozen tuna, it’s important to gradually equalize its temperature with the environment. Thawing the fish in water takes less time due to the water’s higher thermal conductivity. Here’s a step-by-step guide:
- Rinse off any surface grime on the frozen tuna using salt water.
- Pat the tuna dry using a paper towel.
- Put the tuna in a zipper storage bag.
- Expel as much air as possible from the bag and seal it.
- Immerse the bag with tuna in ice water.
- Allow around an hour to defrost. The tuna is ready when it’s pliable enough to bend, even if the core remains frozen.
- Wipe off any water from the partially defrosted tuna.
- Wrap the tuna in fresh paper towels.
- Let the tuna fully thaw in the refrigerator for approximately 3-5 hours.
If ice starts to accumulate on the bag, remove it by hand. Don’t forget to change the water during defrosting regularly.
Thaw in Warm Salt Water if You are in a Hurry
Quick thawing of tuna can be achieved using a warm salt-water solution. This method thaws the tuna faster than using ice water and doesn’t require large quantities of ice or storage bags. Here’s the process:
- Prepare a warm salt-water solution (temperature: 40°C, salinity: 3%).
- Quickly rinse the frozen tuna surface with tap water.
- Soak the wet tuna in the warm salt-water solution for 2-3 minutes. Note: larger pieces may need more time.
- The thawing is complete once the surface feels soft, but the center may still be frozen.
- Lightly rinse with tap water, avoiding excessive rinsing.
- Quickly pat the tuna dry with a paper towel.
- Wrap the tuna in fresh paper towels and let it fully thaw in the refrigerator for about an hour.
The exact thawing time will depend on the tuna’s size and initial temperature.
Tips and precautions for defrosting
Once the tuna is fully thawed, letting it rest or “ripen” in the refrigerator is beneficial. This period improves the fish’s moisture and enhances its natural flavor. It also enriches the fish’s color as the salt from the brine used in thawing permeates the meat.
You may prefer to consume the tuna immediately after thawing for a lighter flavor and more succulent texture.
However, for the ripening process: Wrap the thawed tuna in thick kitchen paper (like reed paper) and store it in the refrigerator for 12 to 24 hours. The goal is to absorb any excess moisture without sealing the tuna.
Remember not to overextend the ripening period, as it can darken the tuna. Also, managing moisture at each stage is crucial, as leftover moisture can cause the tuna to spoil quickly.
How to Cut Tuna Sashimi
Cutting tuna sashimi is an art form in itself, characterized by specific techniques to optimize the texture and flavor of the fish. There are three primary methods employed:
- Hirazukuri: This is the basic method of cutting tuna sashimi.
- Sogigiri: This technique is utilized specifically for fatty parts like the ‘toro’ (fatty tuna).
- Kaku-zukuri: This technique is ideal for softer parts such as lean meat and when long, thin slices of tuna are desired.
In general, softer and less fatty parts such as lean meat are cut into thicker slices, while parts with more fat and muscle, such as toro, are cut into thinner slices. This approach ensures the optimal enjoyment of each distinct part of the tuna.
Cutting sashimi requires careful attention to the direction of the fish’s muscle fibers or “stripes”. Ideally, the knife should be inserted perpendicular to these stripes. This is crucial because if the cut runs parallel to the muscle fibers, the resulting slices may be tougher to chew.
For tuna specifically, one must also consider the lean of the stripes. Cutting against this lean can cause the flesh to crumble. Ensuring your cut follows the lean of the muscle stripes helps preserve the texture and integrity of the meat, leading to a more enjoyable eating experience.
The inclination of the streaks can be clearly seen by looking at the saku from the side. It is good if you move the knife in the direction where the streaks are leaning.
The key is to place the saku in front of the cutting board so that the knife can move smoothly.
Hirazukuri
To do a Hirazukuri cut, start by positioning the tuna loin, or “saku”, with the muscle slightly tilted towards you. If there’s a height difference in the saku, make sure the higher side is at the back and the lower side is at the front.
Hold the saku with your non-dominant hand. Make sure to fold your fingers and tuck them away from the blade for safety. You should position the knife on the first joint of your index finger to control the depth of your cut, and keep the rest of your hand on the knife’s handle to ensure a secure grip.
For lean meat, a thicker cut typically tastes better.
Move the knife in a large arc, similar to drawing a curve.
Using a kitchen knife to arrange the sashimi is more efficient because you do not need to use your left hand. If you cut with the blade facing slightly outward, the corners of the sashimi will stand up and look beautiful.
Sogigiri
This cutting method is suitable for fatty parts such as chutoro and otoro.
Place the saku at an angle toward the upper right corner (if the saku has a height difference, place the high side toward the back and the low side toward the front).
Gently press down on the saku with the belly of your index to ring your fingers. As long as you do not point the knife blade upward, you will not cut your hand.
For your initial slice, you may need to shape the end of the saku to make it suitable for sashimi. These trimmed-off ends can be pounded and used for other delicious dishes such as negitoro.
This should be perpendicular to the direction of the fish’s muscles.
Remember, the wider you lay your knife, the wider the cross-section of your sashimi will be.
Carefully pull the knife towards you in a smooth circular motion until its tip touches the cutting board.
Pull the knife in a straight line, keeping the tip of the knife in contact with the cutting board throughout the process.
.
Kaku-zukuri
Kaku-zukuri is the cutting method used to shape the tuna into cubes or dice. Preparing tuna sashimi in the kaku-zukuri style requires precision and understanding of the tuna’s structure. Here is a detailed guide to help you get started:
Firstly, place the saku (the block of tuna loin) in front of you so that the grain of the muscle faces you when you view it from the side.
Position your knife so it rests on your hand’s first joint. Curl the fingers of your non-dominant hand slightly, ensuring they are safely out of the way.
For the first cutting pattern, your knife should be aligned to form a square with the width of the saku. Since the saku is typically thin, there’s no need for your knife to rest at the base of the tuna. Make a clean, sharp cut, allowing the corners of the cut piece to stand out. Keep the blade of your knife flat to ensure a precise, dice-like shape.
For the second pattern, you’ll need to take a different approach. Begin by slicing the tuna flat. Keep your knife straight rather than angled outwards. Divide the flat piece of tuna into two or three equally sized parts. The exact number of pieces will depend on the length of the sashimi you want to serve.
One of the advantages of the kaku-zukuri style is that it allows you to stack slices of sashimi. This creates a visually appealing, three-dimensional effect. To achieve this, keep your knife straight and ensure the slices are uniform in size. Avoid tilting the blade, as this can result in uneven sizes and shapes, making it more difficult to stack the sashimi. Make sure each cut is clean and sharp. This will create an attractive, angular effect on the corners, enhancing the overall presentation of your dish.
Recipes that Utilize Tuna Sashimi
Tuna is known for its bold iron-rich flavor, with a hint of acidity. Paired with a robust sauce, the inherent taste of tuna mellows, makes it a more pleasant dining experience even for those apprehensive about its distinctive aroma.
It’s important to note that compared to other fish, tuna has a more fibrous texture, which can turn tough when overcooked. With that in mind, let’s delve into three alternative ways to enjoy tuna, beyond the most basic wasabi and soy sauce pairing.
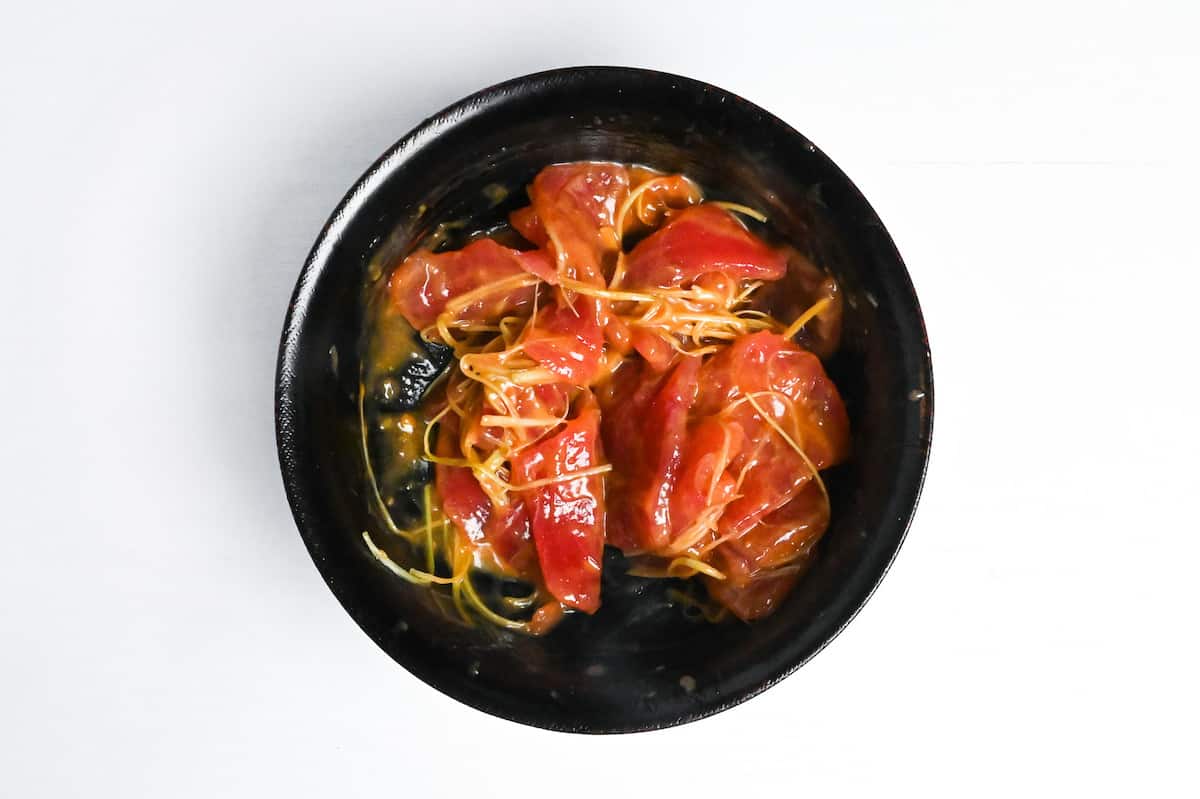
Tuna Zuke-Don (Tuna Marinated in Soy Sauce)
Tuna Zuke-don is a seasoned variant of Tekkadon where tuna, marinated in a soy sauce-based mixture, is served over a bed of warm white rice. There are two primary techniques for preparing this dish.
- Saku-zuke Method: This technique involves briefly boiling the tuna to eliminate any impurities and unpleasant odor, and to prevent over-marination.
- Start by submerging the tuna in boiling water. Once the surface of the tuna turns white, remove it from the heat.
- Quickly cool the tuna in a bath of ice water.
- After draining excess water, let the tuna marinate in the soy sauce mixture for about an hour.
- Direct Marination Method: In this method, the tuna is cut into sashimi slices and immediately marinated in the soy sauce mixture.
- First, slice the tuna for sashimi.
- Marinate the slices in the soy sauce mixture for 4 to 5 minutes.
- Ensure to drain off the excess marinade before use.
For the soy sauce mixture, combine equal parts soy sauce, mirin, and sake in a saucepan, bring to a boil, and allow to cool. Sake can be substituted with white wine for a slightly different flavor. If you’re using commercially available men-tsuyu, there’s no need to boil the mixture.
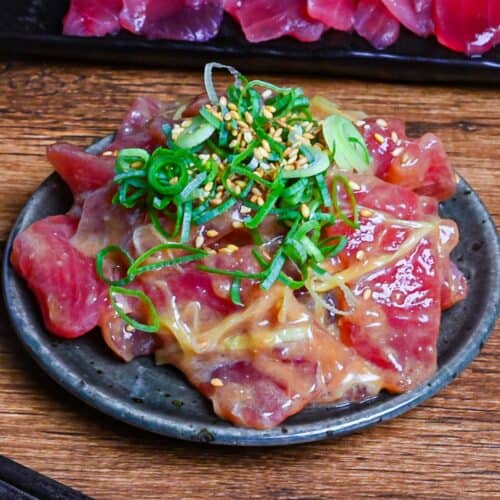
Tuna Yukke
Tuna Yukke, a delectable dish with Korean influences, is a delightful combination of tuna tossed in a flavorful sauce, topped off with a vibrant egg yolk. This dish pairs exceptionally well with both rice and drinks. You can use prime cuts of sashimi-grade tuna, or even misshapen sashimi slices and scraps of tuna saku, making this dish both versatile and economical.
The preparation is straightforward: toss the tuna sashimi in the specially crafted Yukke sauce, then lay it out on a plate. Sprinkle it generously with roasted sesame seeds, finely chopped green onions, and shredded nori seaweed, and nestle an egg yolk at the center to finish off the dish.
The star of this dish is undoubtedly the Yukke sauce. For 100g of tuna, you’ll need the following ingredients:
- 1 teaspoon of grated garlic
- 1 teaspoon of gochujang (red pepper paste)
- 2 teaspoons each of mirin (sweet cooking rice wine) and soy sauce
- 2 teaspoons of sesame oil
To prepare the Yukke sauce:
- First, heat the mirin in the microwave for 1 minute to evaporate the alcohol.
- Combine all the ingredients in a bowl, leaving the sesame oil for last.
- Gradually incorporate the sesame oil, stirring constantly.
Incorporating the sesame oil slowly ensures it mixes thoroughly into the sauce, which can otherwise be a challenge.
Tuna Negima Nabe
The Tuna Negima Nabe is a traditional Japanese one-pot dish that hails from the Edo period, spanning from 1603 to 1868. As a warming blend of tuna and green onions, the Negima nabe is renowned for its delightful balance of flavors. An important note to remember is that tuna tends to toughen when heated, so the perfect moment to relish it is just when its color changes.
To prepare this dish:
- Start by slicing the tuna as you would for sashimi. The type of cut doesn’t matter much for this dish.
- Next, chop the leeks into sizeable chunks, about 2-3 cm wide.
- Now, to your pot, add a mixture of 6 parts water, 1 part soy sauce, 1 part sake, and 1 part grated ginger (do not apply heat at this stage).
- Start by adding the leeks to the pot. At this point, you can switch on the heat and feel free to throw in some tofu and seasonal vegetables, if you wish.
- As soon as the water starts to boil, introduce the tuna slices and let them simmer for a brief moment. Be careful not to let it cook for too long.
Since the tuna meant for sashimi can be consumed raw, it only needs a quick warm-up in the pot. Beware of overcooking, as this could make the tuna tough.
You can play around with different cuts and cooking methods to enjoy a variety of textures and temperatures. For instance:
- Hira-zukuri cut: Allow it to cook for 1 to 2 minutes.
- Sogi-zukuri cut: Best enjoyed in a quick ‘shabu-shabu‘ style dip in the hot broth.
How to Store Sashimi-Grade Tuna
Preserving sashimi-grade tuna requires careful attention. There are three crucial factors to consider:
- Be meticulous about moisture control with your tuna.
- Keep it shielded from air exposure.
- Ensure it’s stored at consistently low temperatures.
Most commercially available tuna comes frozen, so it is essential to return it to the freezer as soon as you bring it home. That’s because the tuna has likely begun to thaw while being displayed in the sashimi section of the store.
For optimal storage, aim to avoid spots near the freezer door where temperature fluctuations due to regular opening and closing could occur. Instead, tuck your tuna securely towards the back of the freezer, where the temperature remains more stable.
How to Refrigerate Sashimi-Grade Tuna
To properly store thawed tuna, follow these steps:
- Wrap the tuna in thick kitchen paper. Ideally, use a type that can effectively absorb any drippings, such as reed paper.
- Seal the wrapped tuna in a storage bag, ensuring it’s safe from moisture and air. Remember, moisture can lead to spoilage, while air exposure can trigger oxidation, resulting in color changes in your tuna.
If you don’t have a zippered storage bag, you can use a regular plastic bag. To seal it, try to remove as much air as possible by carefully sucking it out with your mouth.
In cases where you need to store the tuna for more than a day, it’s essential to change the kitchen paper daily. If the paper, saturated with drippings, remains stuck to the tuna, it could expedite the fish’s deterioration.
Can Sashimi-Grade Tuna be Frozen?
Freezing sashimi-grade tuna at home is possible as long as it’s fresh tuna (not frozen and defrosted), and the key lies in how swiftly you can guide the tuna through the critical temperature range of -1 to -5°C, where its cellular tissue begins to break down. A handy tool for quick freezing is an aluminum bat due to its high thermal conductivity.
However, be mindful to never refreeze tuna that has already been thawed. This process of repeated freezing and thawing triggers cell breakdown and continuous seepage of juices. Not only does this cause a loss of flavor and a watery texture, but it also turns those drippings into a breeding ground for bacteria.
A smart trick to preserve thawed tuna is by marinating it in seasoning before freezing. The marinade penetrates the tuna, minimizing drips and effectively preventing it from drying and oxidizing. There are countless seasoning variations available, including different kinds of marinades. Experiment and discover your preferred one.
The General Expiration Date of Sashimi-Grade Tuna
When storing tuna at home, it’s important to be mindful of safe consumption dates. Here’s a brief guide:
- Frozen tuna: Can be stored for approximately 10 days.
- Thawed tuna: Ideally consumed within 2 to 3 days.
It’s essential to note that frozen tuna should ideally be stored at temperatures below -50°C. However, since most home freezers operate at around -18°C, understand that tuna will gradually deteriorate over time at these higher temperatures. This is because temperatures above -50°C are insufficient to entirely halt protein breakdown and fat oxidation.
Tuna that has been marinated in seasonings can extend its freezer life up to two weeks.
Once thawed, depending on the initial quality of the tuna, it can be safely stored and consumed within 2 to 3 days (from the day of thawing until the day after). Always trust your senses; if the tuna looks, smells, or tastes off, it’s best not to consume it.
FAQ
If the tuna has been properly stored and thawed, you can eat sashimi without any problem. Usually, tuna that can be eaten as sashimi is labeled.
If you like tuna, I recommend bluefin tuna, but if it’s your first time eating tuna, I recommend yellowfin or bigeye tuna.
Tuna sashimi is called “Maguro sashi (マグロ刺し)” or “Maguro no Otsukuri (マグロのお造り)”.
Because demand far exceeds supply.
All of the five types of tuna commonly distributed in Japan are suitable for sashimi, but only those labeled as sashimi-grade can be consumed raw.
There is a difference between Japan, where most tuna is for sashimi, and overseas, where most tuna is processed. The quality of tuna itself is the same, but the preparation and transportation methods are different.
Tuna sashimi is red because it is rich in myoglobin, a protein that stores a large number of enzymes.
Sashimi is just a piece of tuna, while sushi is tuna and sushi rice together.
This may be due to the fact that it has a lot of muscle fibers, either because it is near the tail or because it is cut improperly.
I hope you enjoyed learning about tuna sashimi! I’d really appreciate it if you could spare a moment to let me know what you thought in the comments below. It’s also helpful to share any adjustments you made to the recipe with our other readers. Thank you!
Related Posts
- A Complete Guide to Buri and Hamachi (Yellowtail Sashimi)
- How to Cut and Prepare Sashimi Grade Salmon
- How to Grate Wasabi Root
Want more inspiration? Explore my Udon Roundup Post for a carefully selected collection of tasty udon recipe ideas to spark your next meal!
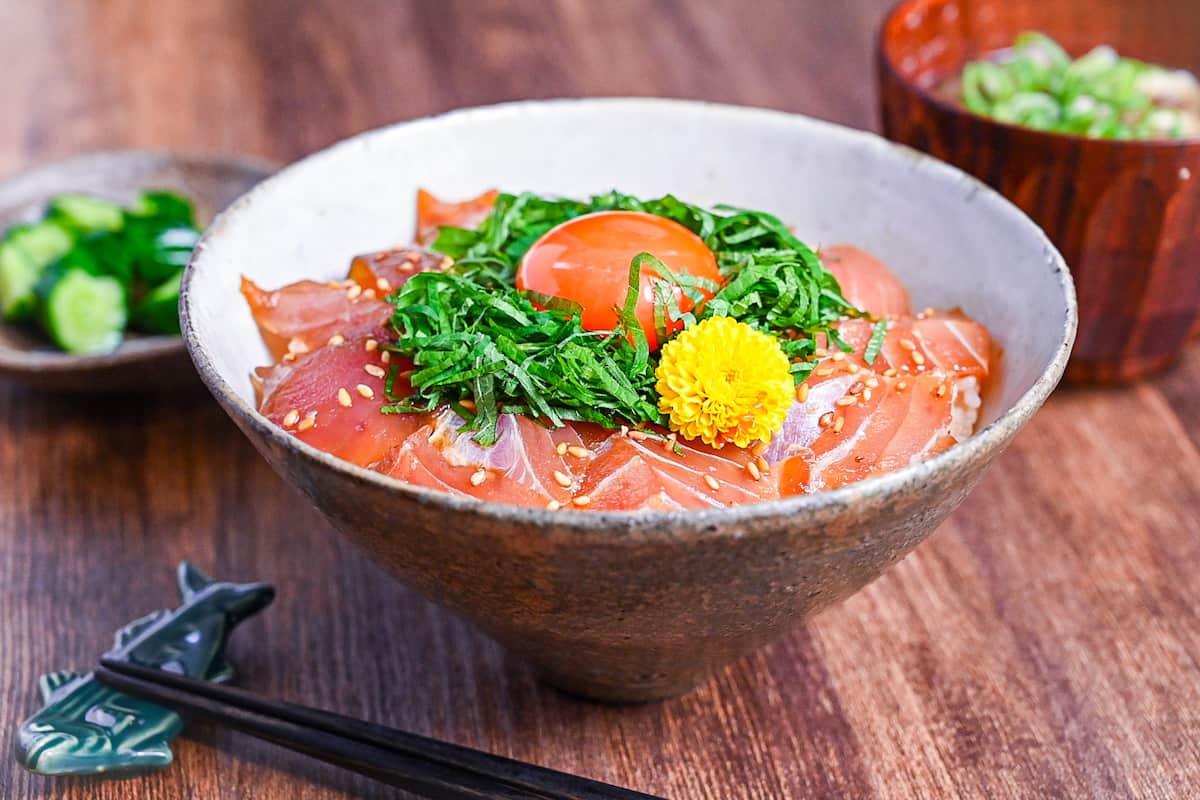
Tuna Sashimi with Miso Sauce (Maguro to Misodare)
Ingredients
- 200 g sashimi-grade tuna block
- 30 g green onion white part
- 1 tbsp Japanese soy sauce (koikuchi shoyu)
- ½ tbsp yellow miso paste (awase) I used "awase" (mixed) miso
- 1 tbsp toasted sesame oil
- ¼ tsp sugar
- 1 tsp wasabi paste
- ½ tsp grated ginger root or ginger paste
- finely chopped green onions to garnish
- toasted white sesame seeds to garnish
My recommended brands of ingredients and seasonings can be found in my Japanese pantry guide.
Can’t find certain Japanese ingredients? See my substitution guide here.
Instructions
- Cut 200 g sashimi-grade tuna using your preferred method from below.
Hirazukuri (Best for Lean Cuts)
- Place the block infront of you with the muscle slightly tilted towards you and place the base of the knife at the thickness you want to cut (ideally the knife should be perpendicular to the "stripes" of muscle fiber). If you are right-handed, start on the right (and vice-versa).

- Hold the block with your non-dominant hand and keep your fingers tucked in, then cut in an arc motion (like drawing a curve) using the full length of the knife.

- Push the slice of tuna to your right (or left if you're left-handed) and twist the knife slightly to remove the sashimi.

- Repeat until the whole block is cut.

Sogigiri (Best for Fatty Cuts)
- Place the block infront of you at an angle. If you are right-handed, point the block towards the upper right corner and start cutting from the left (left-handers should point the block to the left corner and start from the right).

- Position the knife at an angle and remove the corner (you can eat it later or use for another dish).
- Position the base of the knife at the desired thickness of your sashimi, perpendicular to the direction of the fish's muscles. Angle your knife at the width you want the slice to be.

- Pull the knife towards you smoothly until the tip touches the cutting board, leaving a small amount uncut.

- Reposition the knife so that the blade is now at a right-angle and pull it in a straight line to finish the cut.

- Use your non-dominant hand to flip the slice to the side.

- Repeat until the block is finished.
Kakuzukuri (Diced/Cubed)
- Place the block in front of you so that the grain of the muscle faces you when you view it from the side.
- Align your knife at a 90 degree angle over the first cutting position, the width of the cut should be the same width as the block. Make a clean straight cut to form a square.
- Lay the slice(s) flat and cut into 2-3 cubes depending on the size. If the slices are uniform, you can stack them but be careful to cut straight.

- Repeat until all of the block is cut.

Miso Sauce
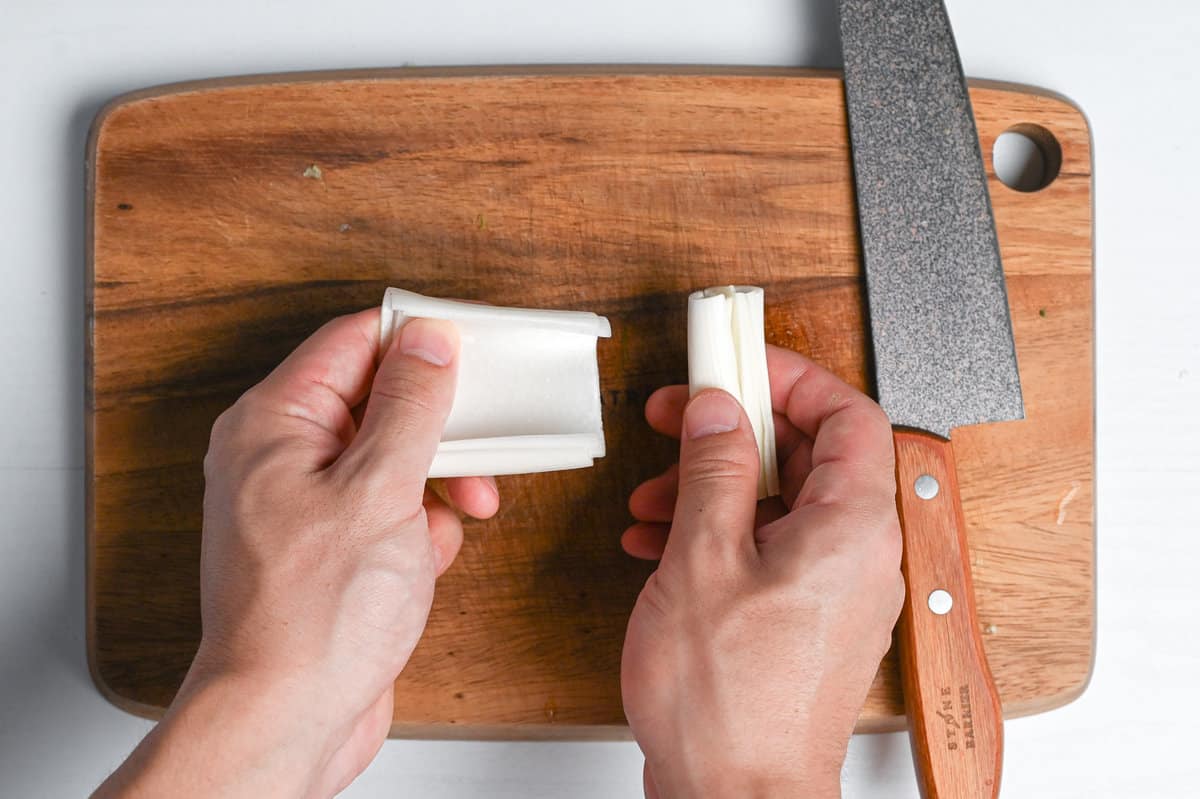
- To make "shiraganegi", cut the white part of 30 g green onion horizontally through to the middle and peel off each layer.

- Place the layers flat on a chopping board and cut into thin strips.
- Soak in water for a few minutes and then drain.
- Take a bowl and add 1 tbsp Japanese soy sauce (koikuchi shoyu), ½ tbsp yellow miso paste (awase), 1 tbsp toasted sesame oil, ¼ tsp sugar, 1 tsp wasabi paste and ½ tsp grated ginger root. Mix until combined.
- Add the tuna sashimi and shiraganegi to the bowl and mix until evenly coated.
- Transfer to a serving dish and top with finely chopped green onions and toasted white sesame seeds.
- Enjoy!


Leave a rating and a comment