


Featured Comment
I just made these today. They were fantastic! Almost all gyoza disappeared instantly, everyone in the family found it incredibly addicting. The cooking method is also great, gyoza turns out to be very juicy but still crispy on the bottom. Thank you so much, it is now my favorite gyoza recipe! 😊
– @niidzumakun8170 (from YouTube)
In Japan, there are endless ways to make gyoza and endless possibilities for what to put inside them.
Me? I like meaty, but I also love the sweetness and texture of cabbage.
Let’s not forget about the garlic chives and the delicious aroma of ginger and garlic.
If that’s your thing about gyoza too, this recipe is for you too!

What is Gyoza?
Gyoza (餃子) is a type of dumpling with a tasty seasoned minced pork filling wrapped in a thin, flour-based wrapper (what we call “skin”) and pan-fried until perfectly crispy. As many food lovers might suspect, this popular dish has its roots in Chinese “Jiaozi”. Over the past century, gyoza has become a big part of Japanese households, winning over the hearts and taste buds of diners all over the country.
The journey from Chinese jiaozi to Japanese gyoza is a great example of how adaptations can be fascinating.
In Japan, pan-frying is the go-to cooking method, which is different from Chinese cooking, where boiled or steamed are more common. On top of that, the Japanese version usually has pork as the main ingredient and the tradition of eating dumplings with white rice is a unique cultural adaptation.
Gyoza’s story is just one part of the bigger picture when it comes to the global story of dumpling evolution. As these tasty pockets of flavor made their way across continents, they inspired countless regional variations.

How I Developed This Recipe
Have you ever met someone who doesn’t like gyoza? I sure haven’t! As a Japanese person, I love these little dumplings, and I wanted to create the perfect recipe that captures everything I love about them.
For me, it’s all about that delicious filling with a hint of vegetable sweetness. Add a crispy bottom for that satisfying crunch, the mouthwatering scent of toasted sesame oil, and a tangy vinegary dipping sauce. Now we’re talking!
I put a lot of work into getting all these elements just right. The result? Gyoza that tastes as good as they look, like they came straight from a ramen shop. Want to try them out?
Just wanted to give you a heads-up: I’ve made a few updates to the recipe as of September 2024. I added cabbage and made some adjustments here and there. If you’re interested in seeing the original version, you can find it on one of my old YouTube videos.
Key Ingredients & Substitution Ideas
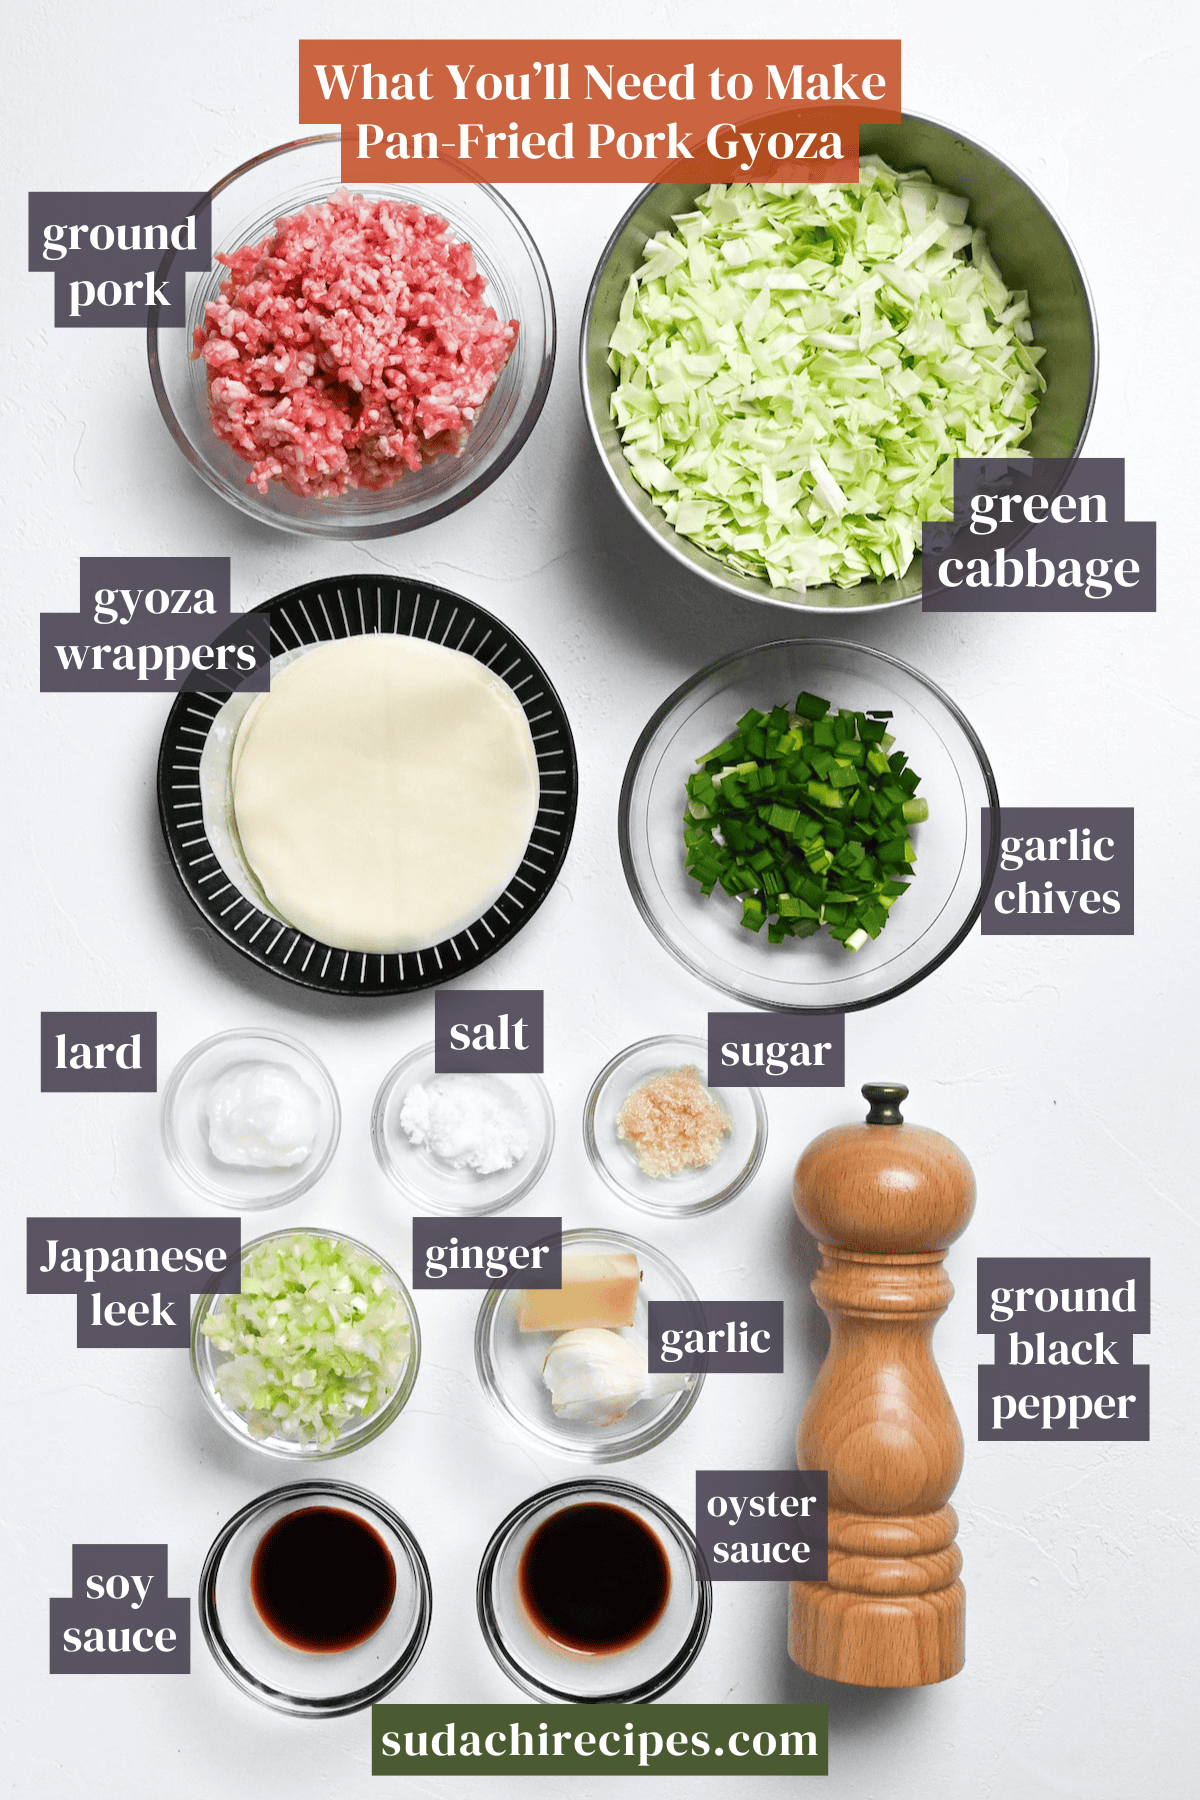
- Ground pork: The star of gyoza! This recipe is designed for pork. So, if you’re looking for other options, I’ve got recipes for beef, chicken, shrimp, and plant-based gyoza on the blog.
- Gyoza wrappers: You can go for store-bought for convenience, or try my homemade wrapper recipe.
- Japanese leek (Negi): Use the white part. If you can’t find Japanese varieties, regular leeks will work just fine.
- Cabbage: I use green cabbage for this recipe, but you can use Napa or white cabbage if you like. Just be careful with very different varieties, like red cabbage or kale.
- Garlic chives: These aromatic greens are essential for achieving that authentic flavor. If you can’t get the right kind, regular chives will do in a pinch, but they’ll taste a little different.
- Lard: My secret for ultra-juicy, flavorful gyoza! Don’t skip this if possible. For a substitute, try toasted sesame oil instead.
- Additional filling ingredients: Fresh ginger root, garlic, salt, sugar, dark soy sauce, oyster sauce, and a touch of ground black pepper.
- Dipping sauce components: Rice vinegar (or substitute with white vinegar), dark soy sauce, chili oil, and a dash of ground black pepper to round it out.
Visual Walkthrough & Tips
Here are my step-by-step instructions for how to make Authentic Pork Gyoza at home. For ingredient quantities and simplified instructions, scroll down for the Printable Recipe Card below.
If you prefer to watch the process in action, check out my YouTube video of this recipe for a complete visual walkthrough!

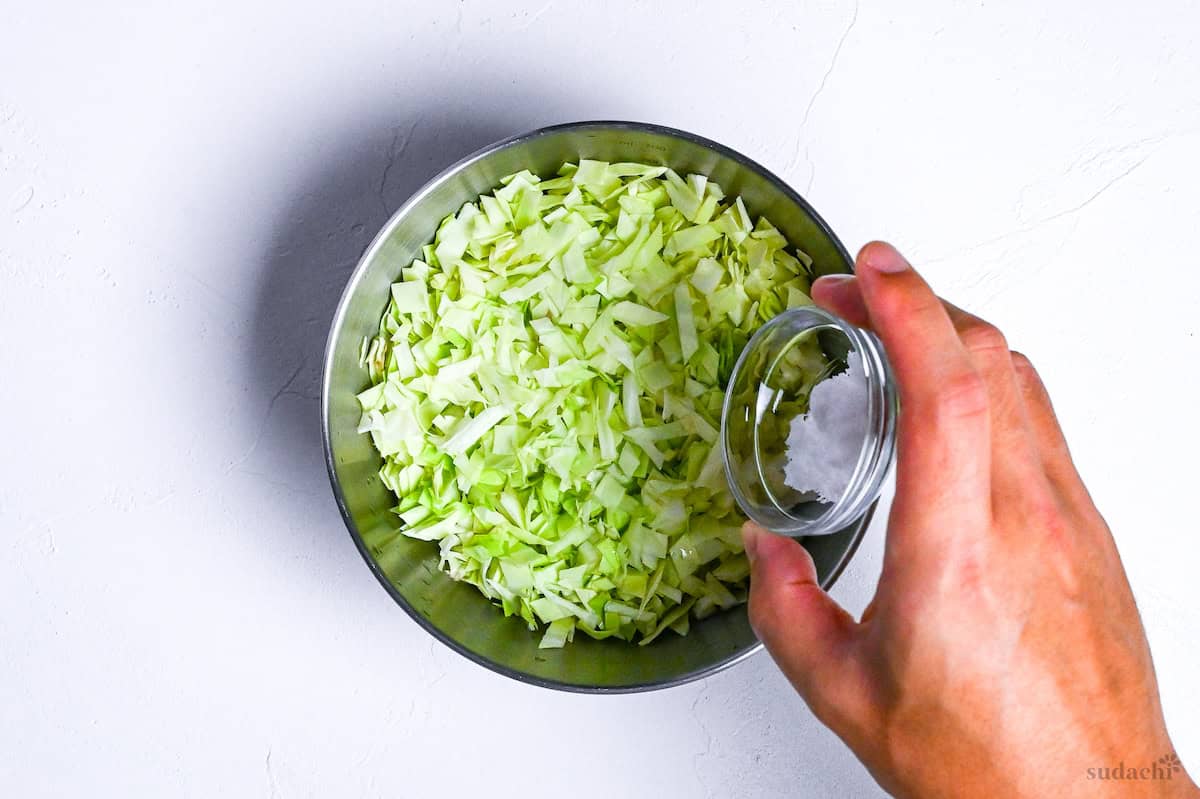
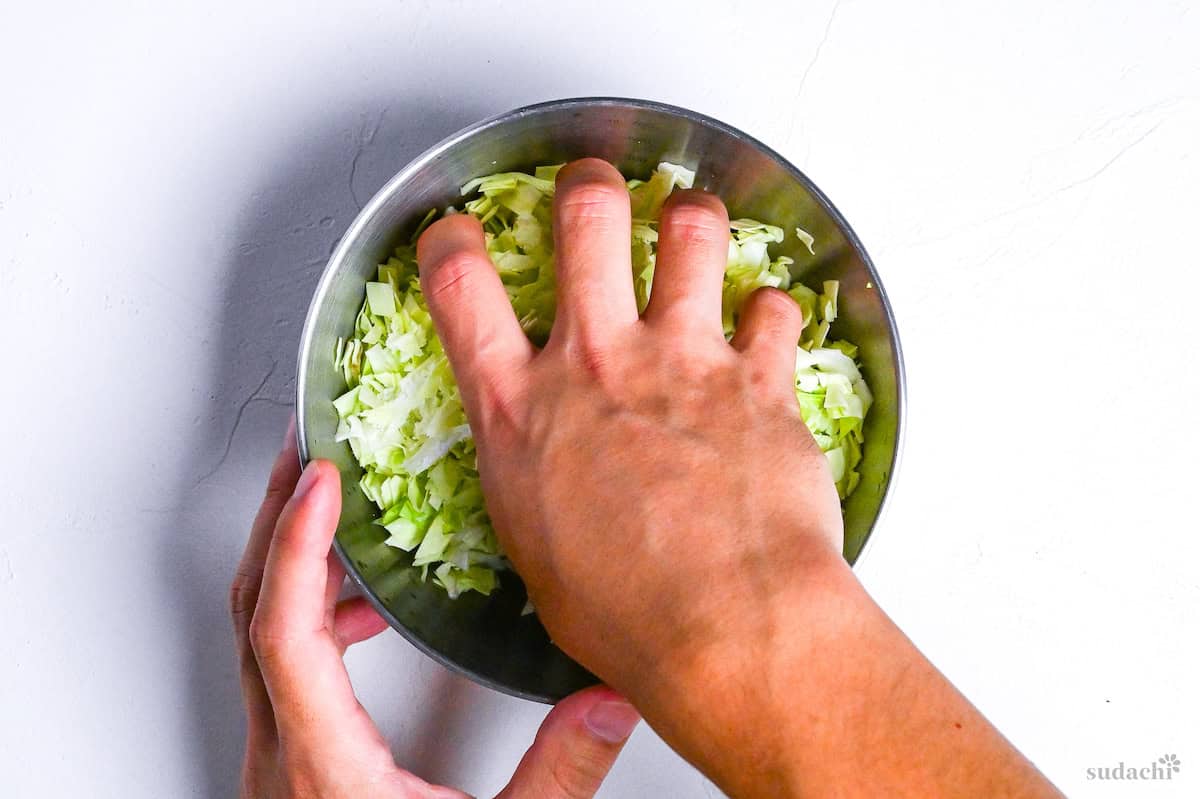
Put the chopped cabbage in a bowl and sprinkle with salt. Rub the salt into the cabbage with your hands. Let it sit for about ten minutes.
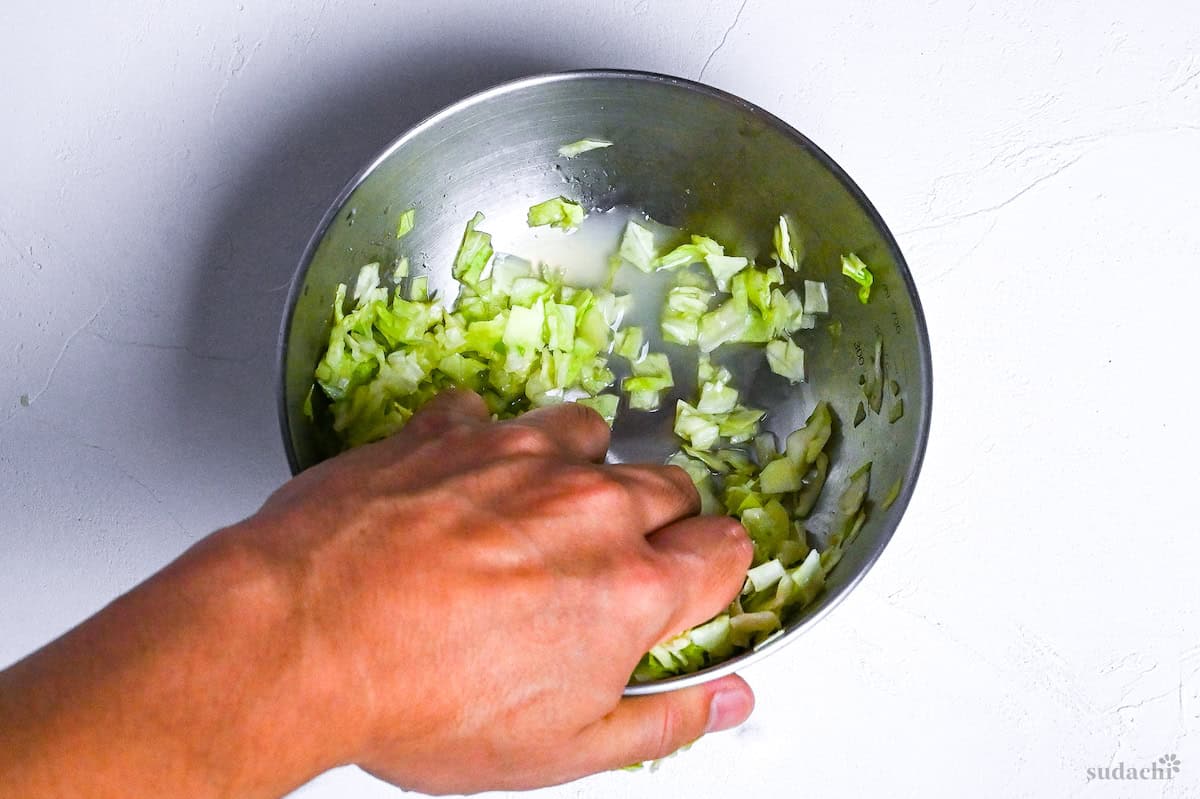
Squeezing the cabbage to remove the water significantly enhances the way it blends with other flavors. Additionally, it reduces the volume, making it easier to wrap as dumplings.
After 10 minutes, give the cabbage a good squeeze to get all the water out.
In a large bowl, mix together the ground pork, soy sauce, oyster sauce, sugar, and black pepper. Medium-fat to high-fat ground pork is ideal for juicy gyoza!
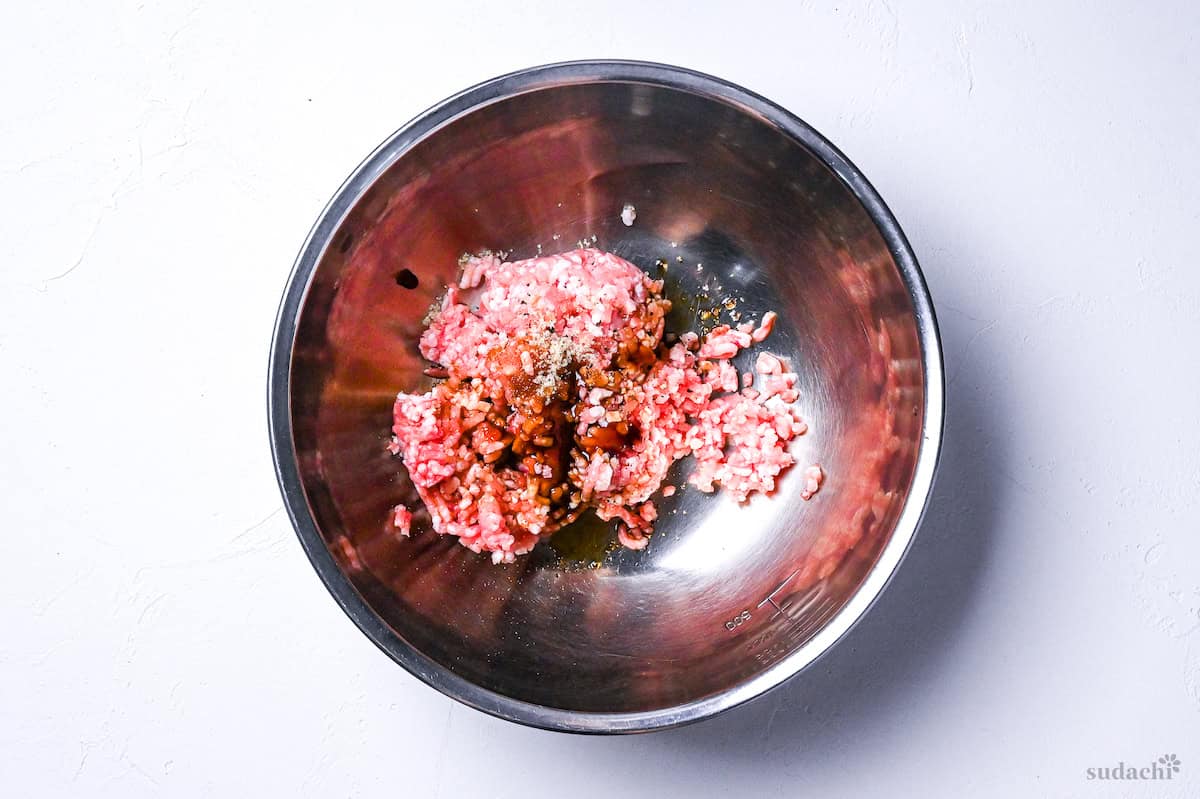
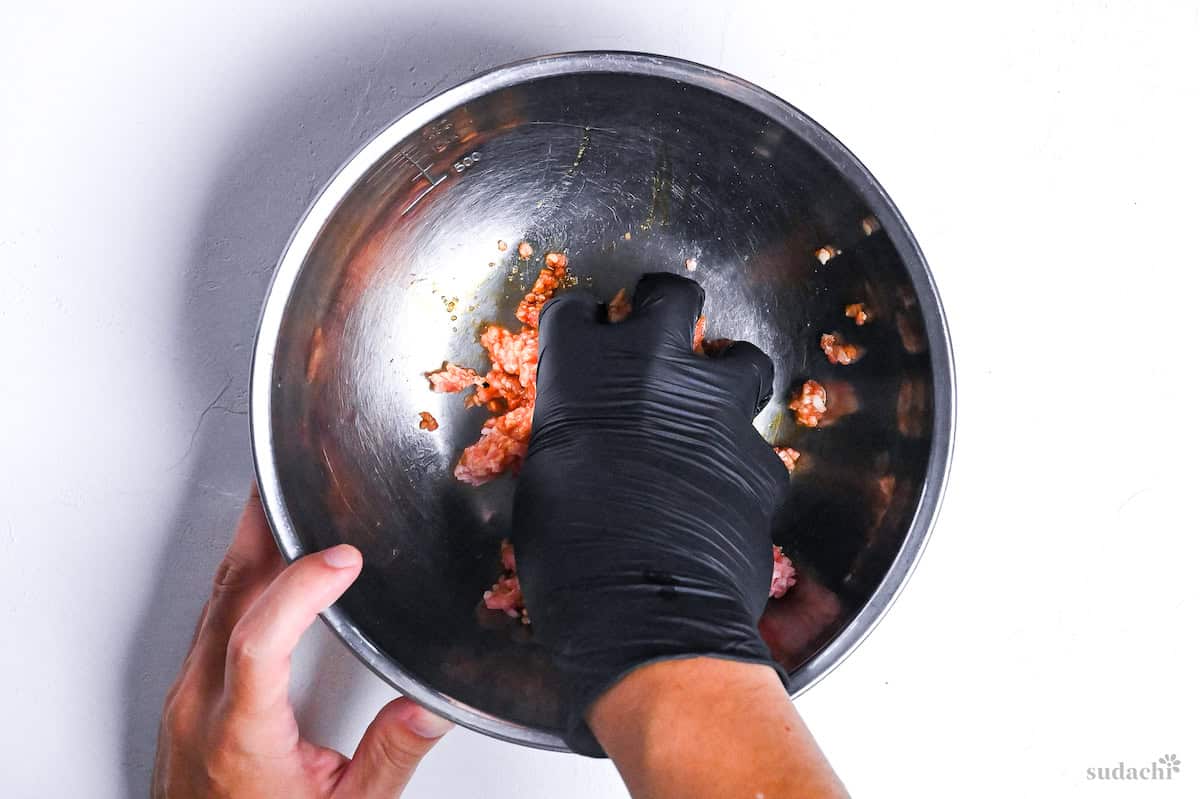
Give it a good mix until everything is well incorporated.
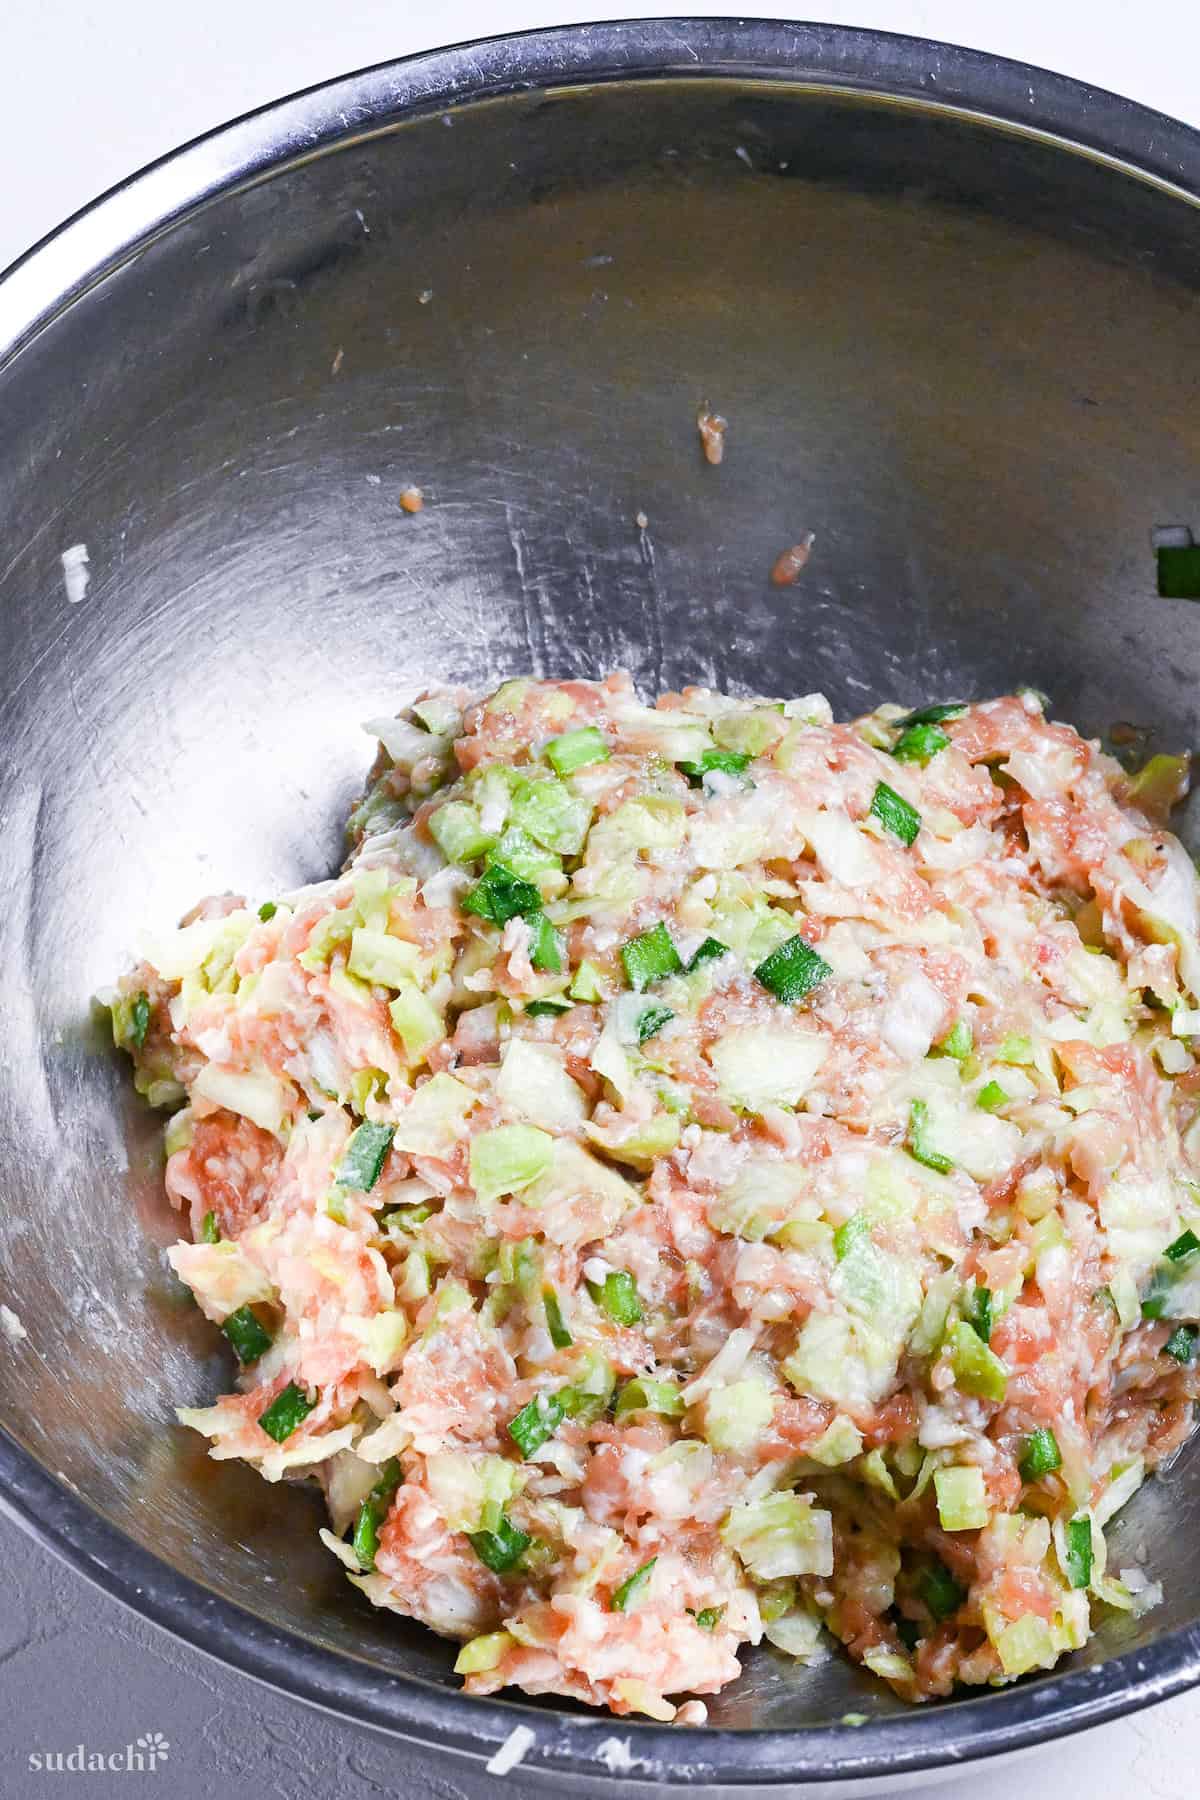
Next, add the salted and drained cabbage, garlic chives, grated ginger, minced garlic, chopped leeks, and lard to the seasoned pork. Just mix everything together with your hands until it’s all evenly combined.
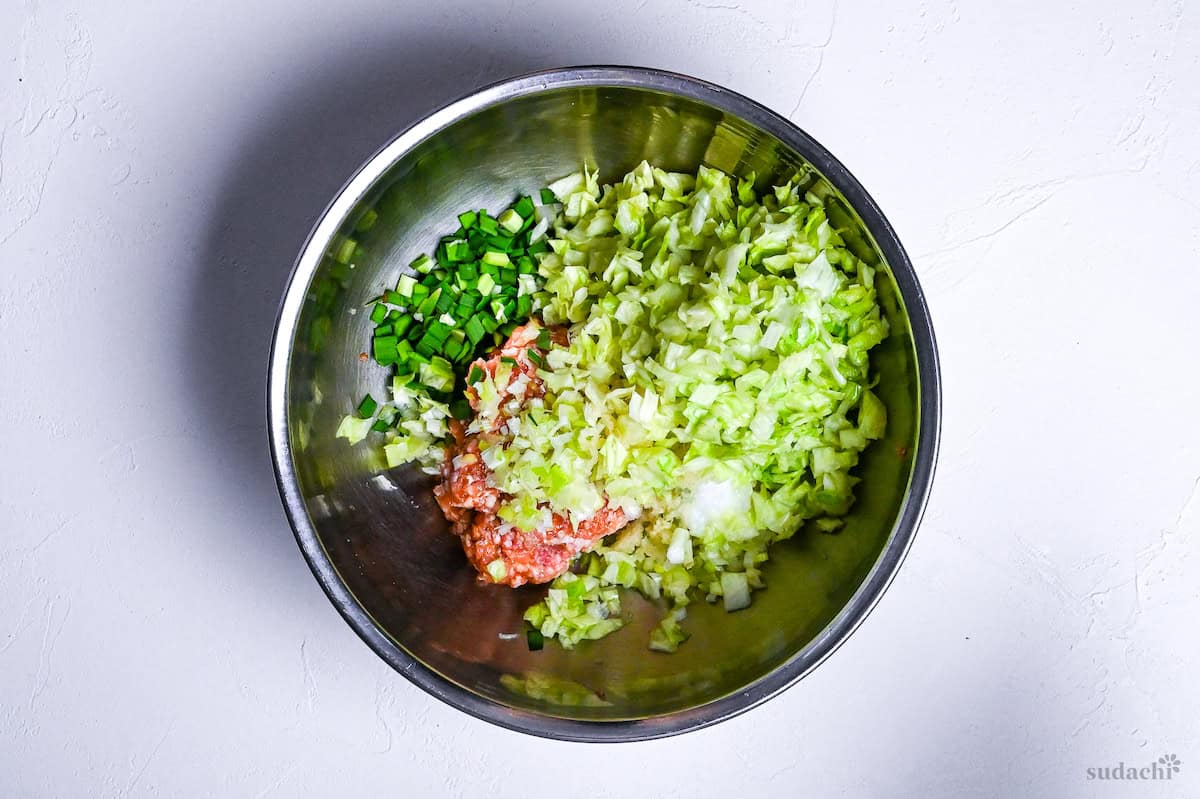
- If you’re using regular leeks instead of Japanese leeks, they’ve got a milder aroma, so you might need to up the amount a bit to get a similar flavor.
- If you’re using regular chives instead of garlic chives, the flavors are different, so you might want to add a bit more grated garlic.
This might take a little while, but it’s important to mix everything thoroughly to get a uniform filling.
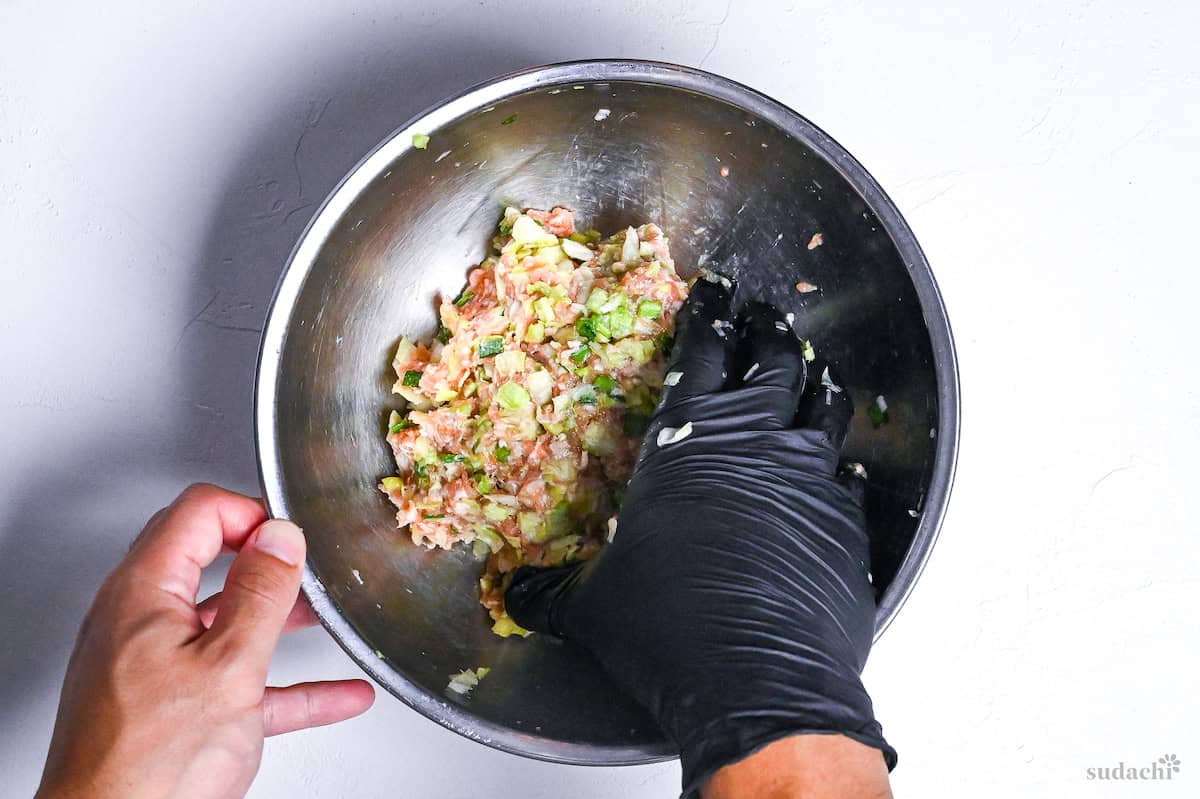
Finally, add one tablespoon of water (luke warm to warm) and mix until it’s evenly distributed.
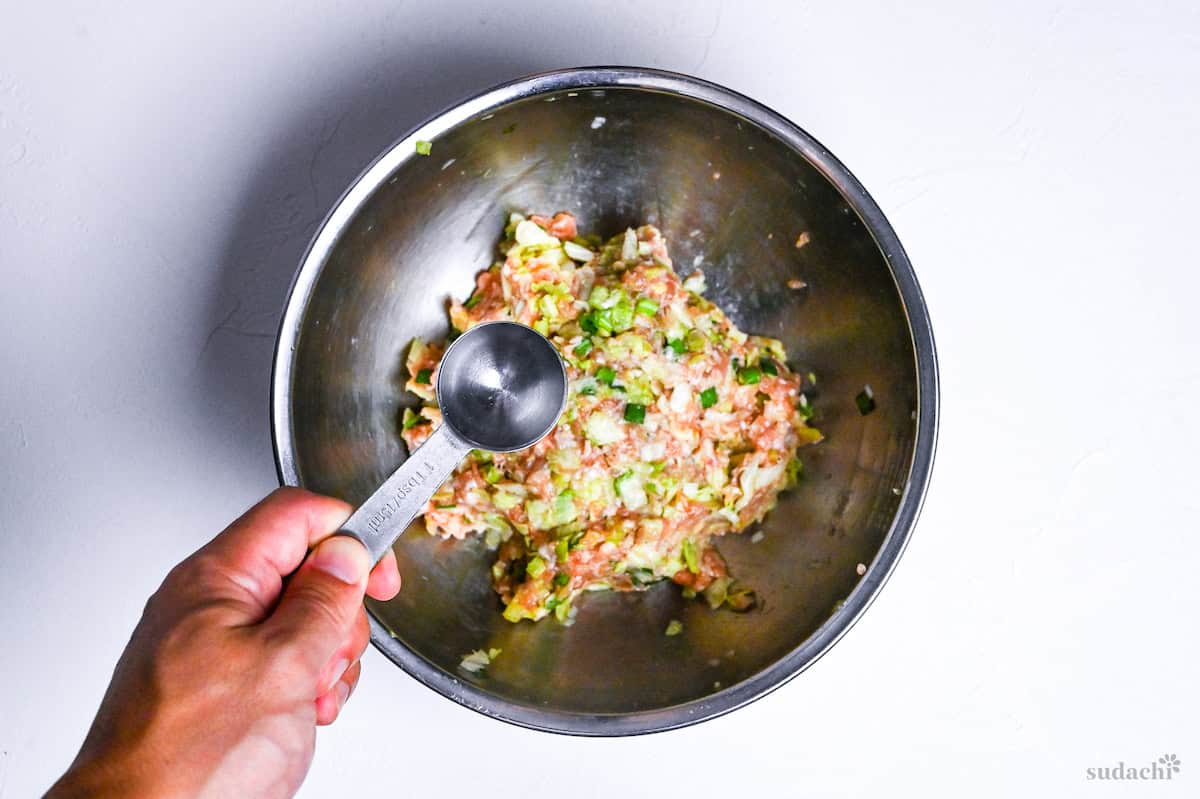
Adding water at this stage helps create a filling that’s full of juice. I add one tablespoon, but if you want the filling to be even more juicy, you can add two tablespoons.
If you have time before dinner, let the filling sit in the refrigerator for about half an hour so the flavors blend together, and it’s easier to wrap.
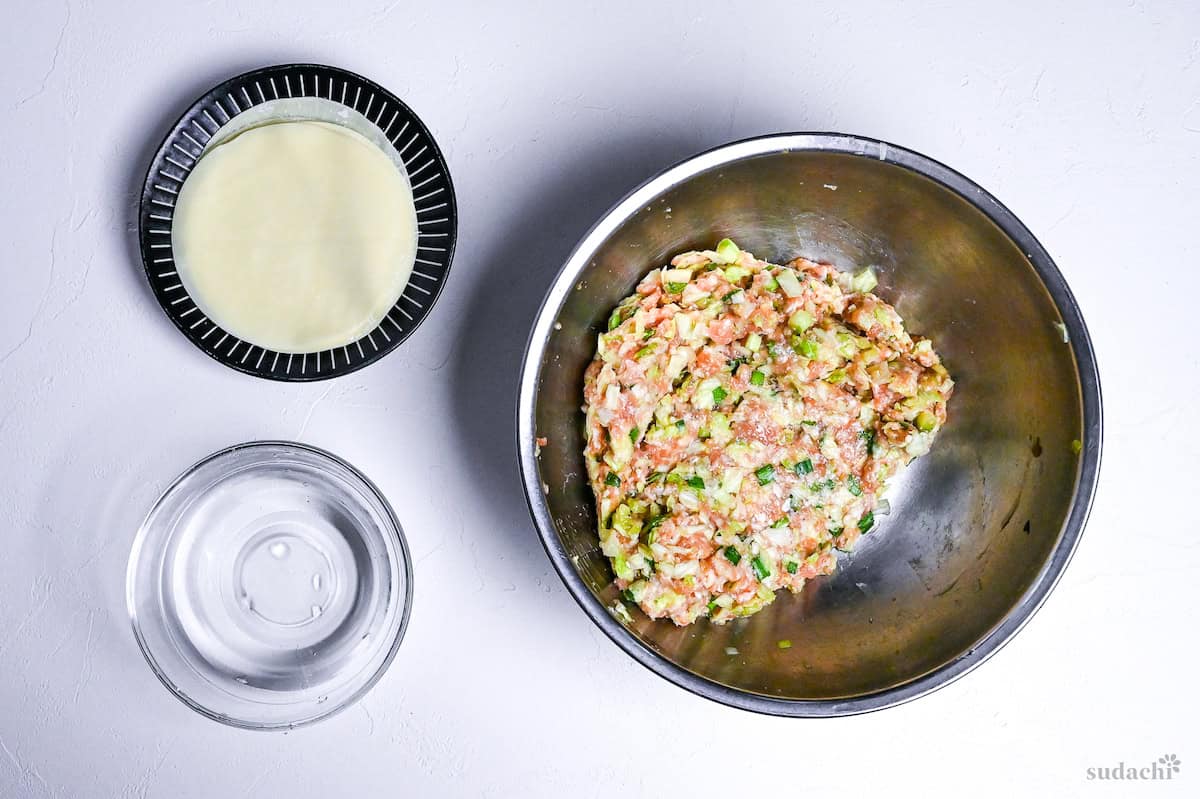
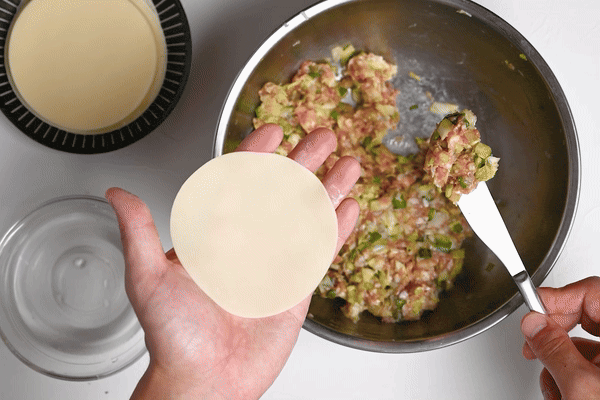
Set up a station with the gyoza filling, gyoza wrappers and a small amount of water.
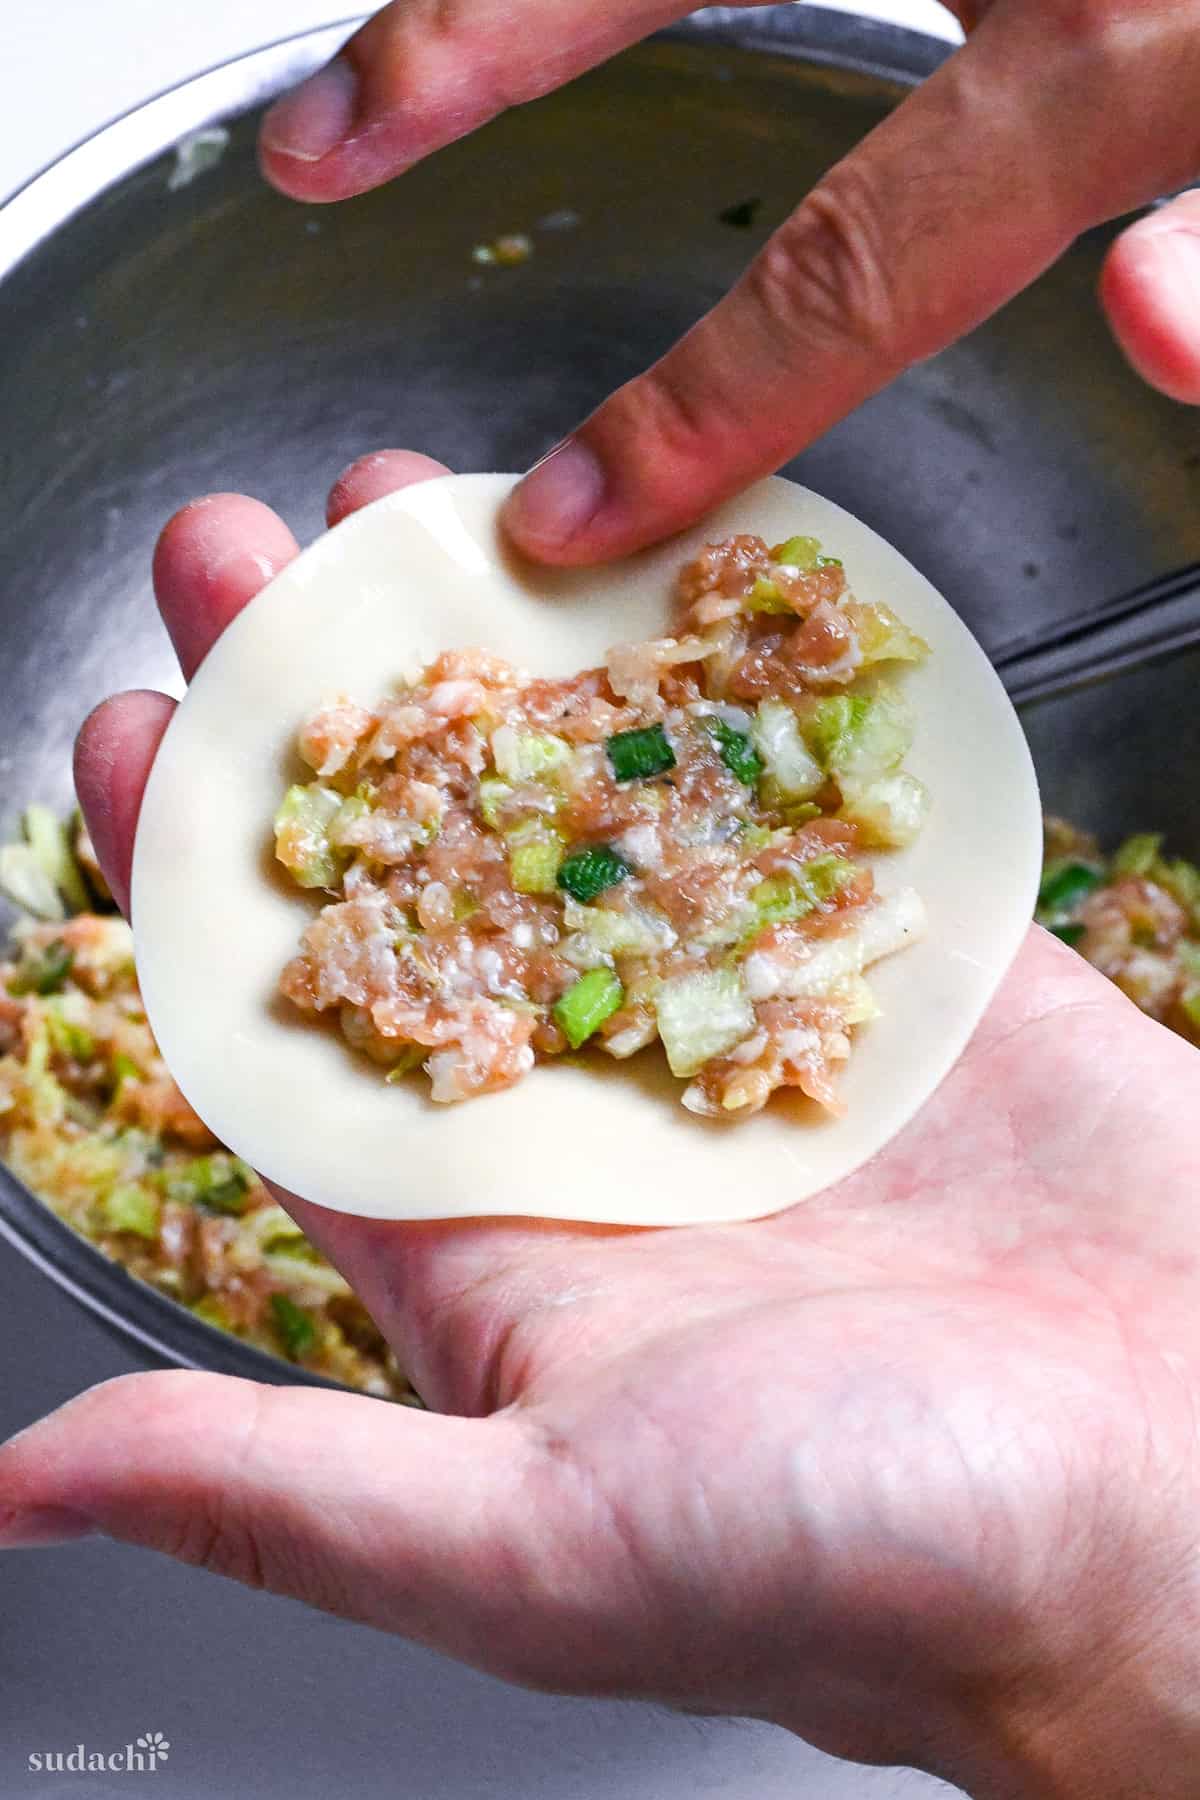
Grab a gyoza wrapper and put about a tablespoon worth of filling in the center, leaving a finger-width border around the edge.
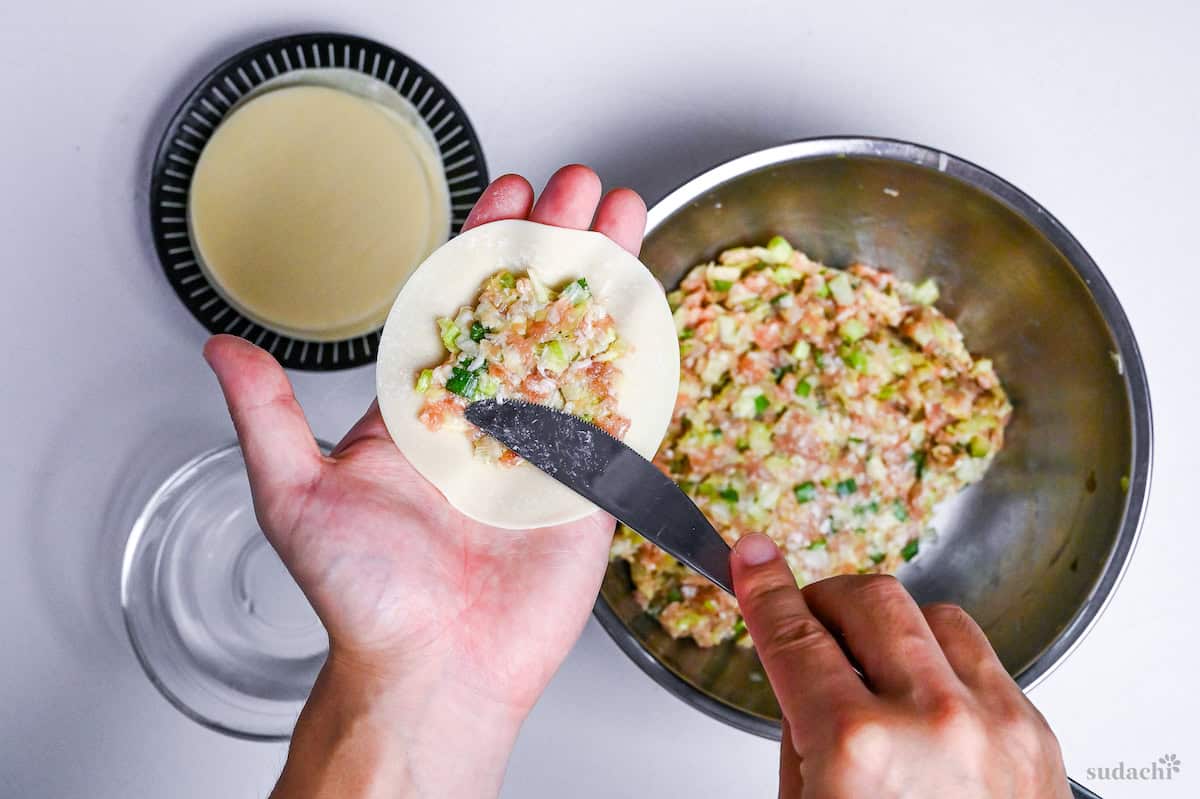
Avoid holes or tears by filling the gyoza with the appropriate amount of filling. If you put too much filling, the wrapper could tear or not close properly. If there are holes, the juices leak into the pan and ruin the finish.
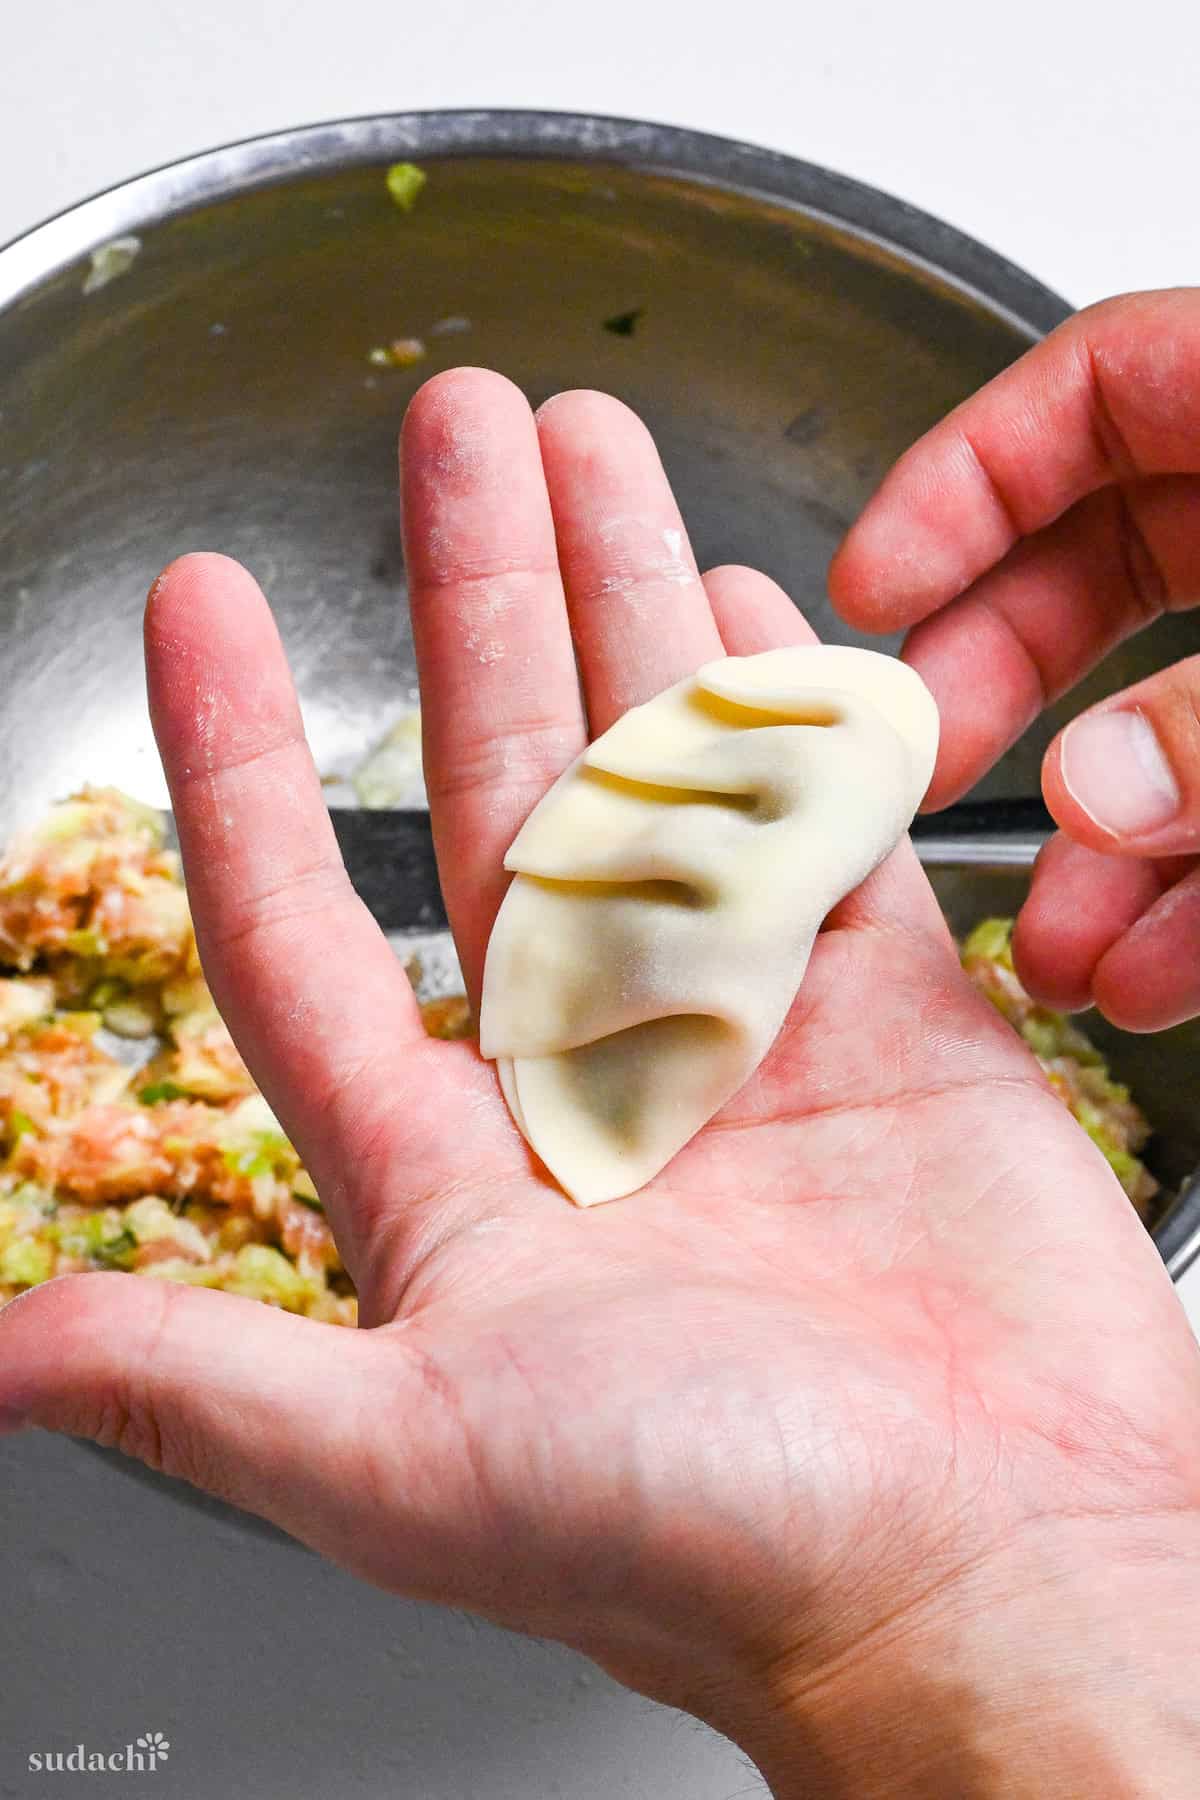
Wet the edge with water.
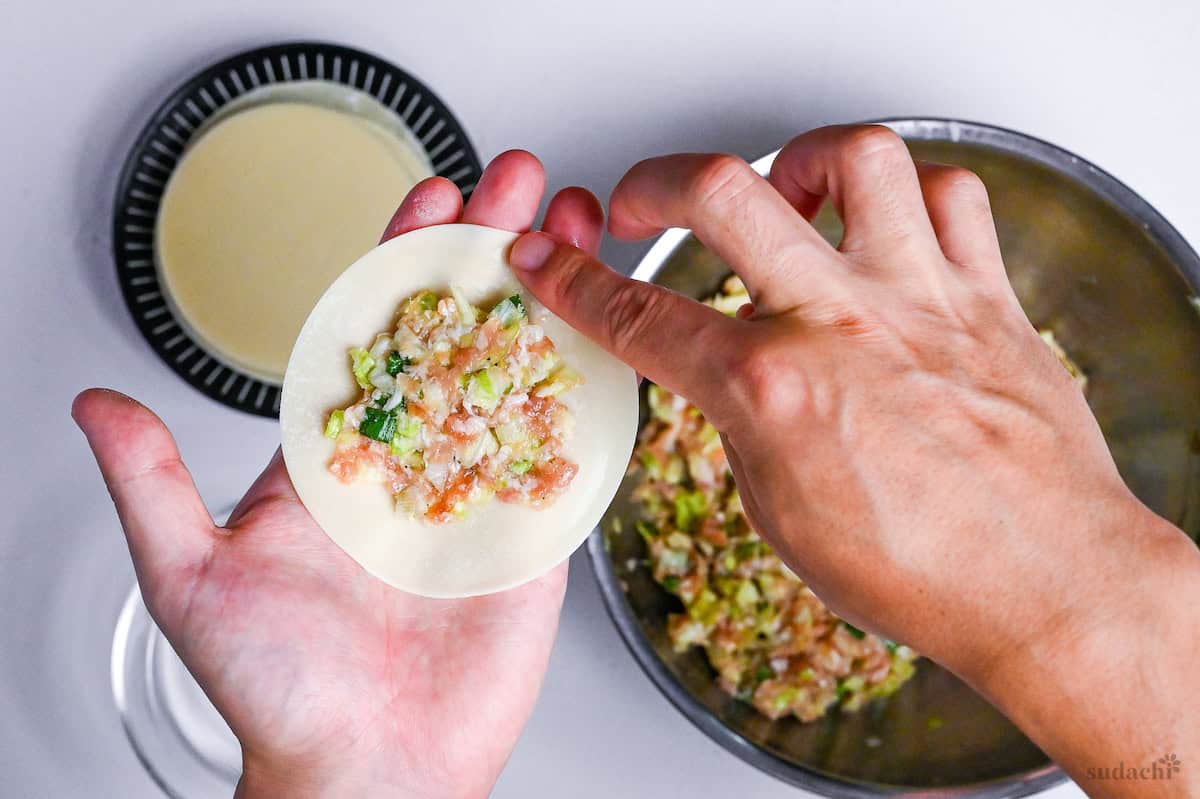
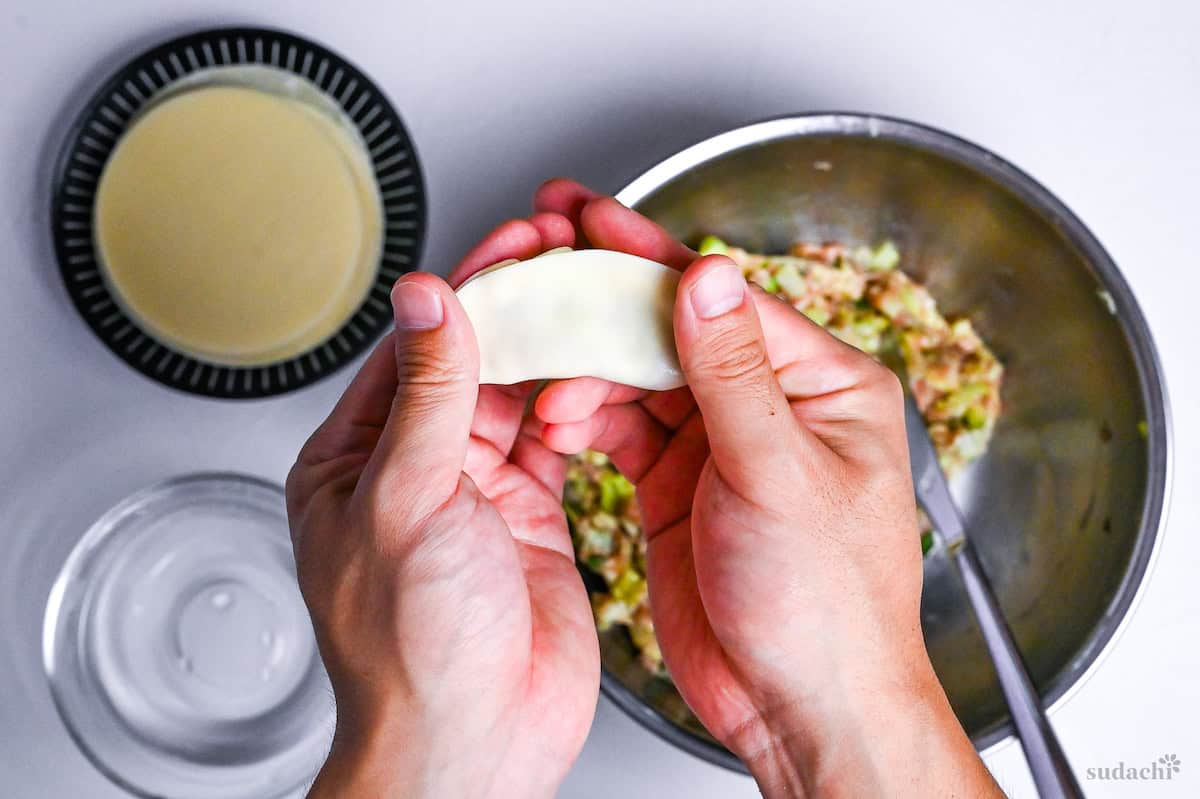
Fold the wrapper in half, but don’t seal it yet.
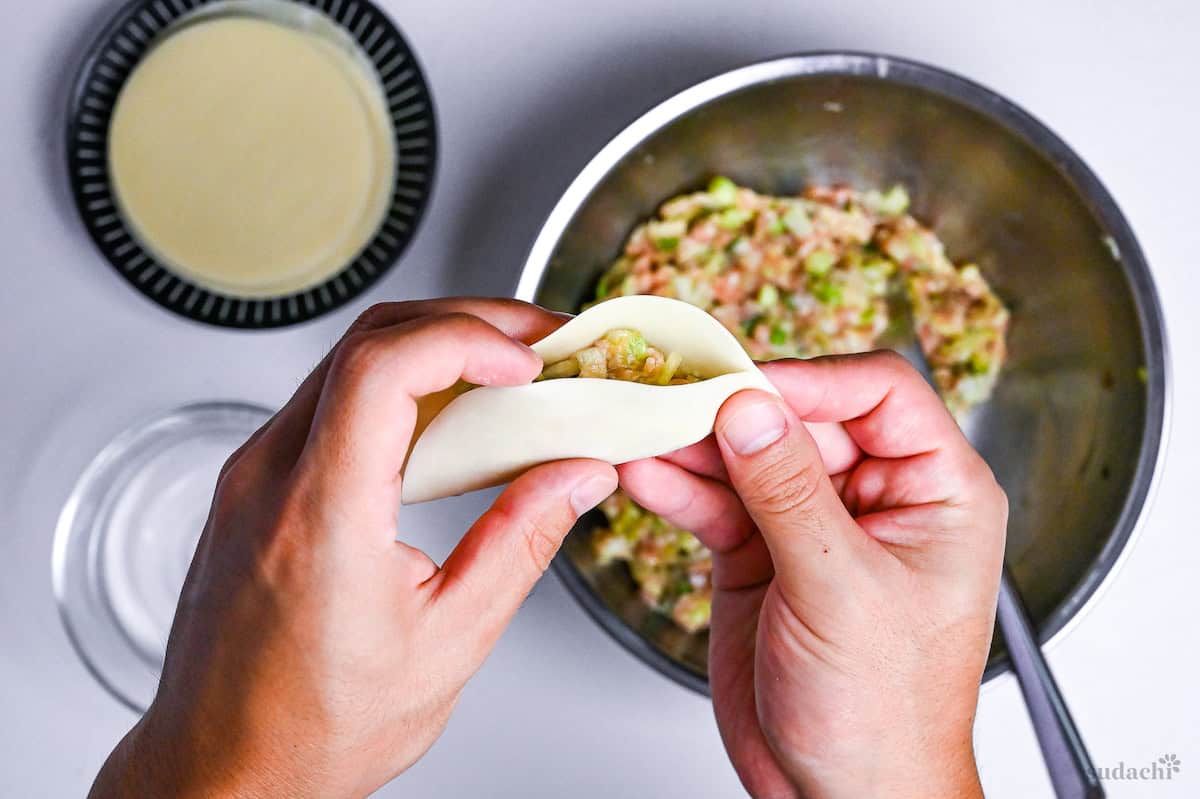
Pinch one corner to start the pleat, then make small folds along the edge and press them down to seal. If you’re right-handed, this will probably start on the right side and vice versa.
To pleat the top, make a small flap on the edge of the top half and push it toward the pinched corner.

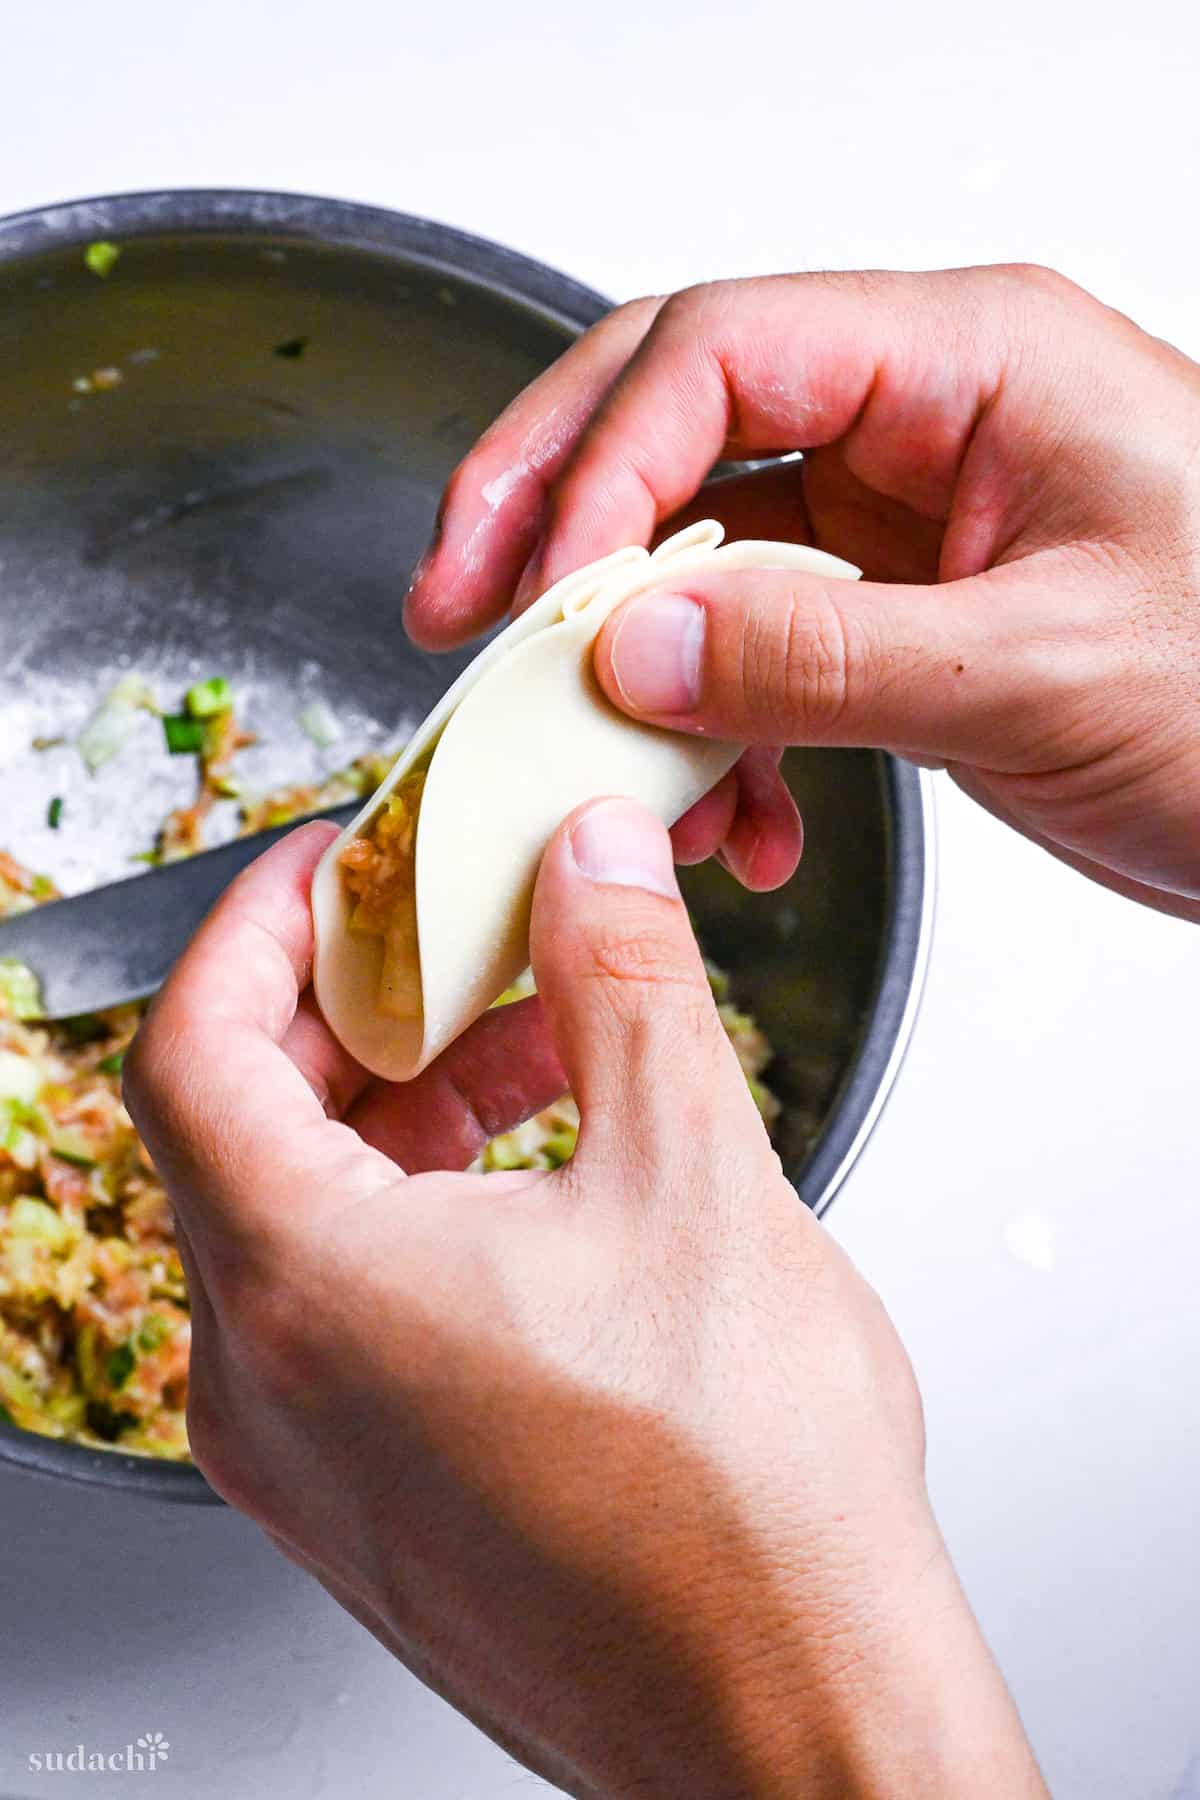
Press it down and make small pleats until the gyoza is closed. Press it firmly along the edge to seal it securely.
The main problem with dumplings that are not sealed well is that juices from the meat will leak out through any gaps during cooking. This will cause the juices to collect at the bottom of the pan.
This is especially important when using a cast iron or carbon steel pan. To create a complete seal, pinch the edges firmly with your fingers.
You can also flatten the base by tapping it on the counter or the palm of your hand a few times. This is important for crisping up the bottom when it’s frying!
Here is a gif to show a roundup of the process:
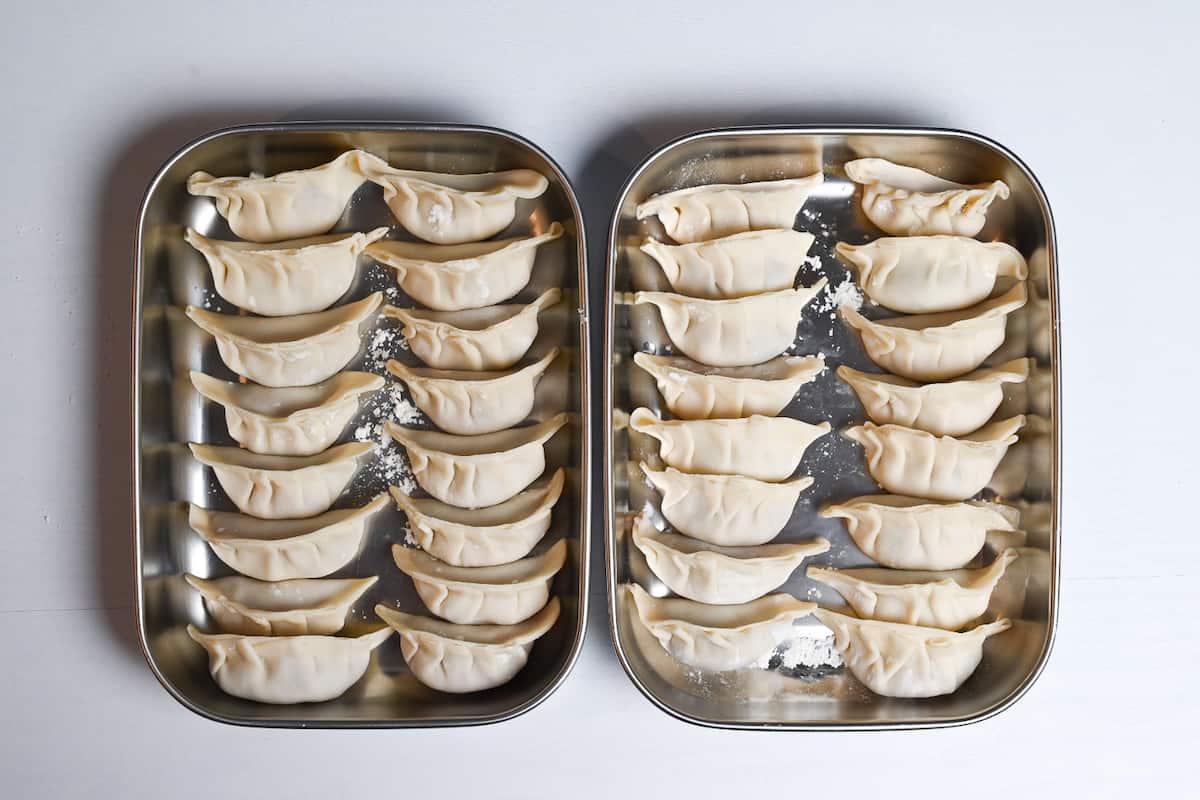
Repeat until you’ve used up all the filling and wrappers.
Dust your plates/containers with a generous amount of flour to prevent the gyoza from sticking together. This is especially important if you don’t plan to cook them immediately!
You can cook your gyoza immediately or store them using the storage instructions in the post later.
Heat a frying pan over medium heat and add a little oil.
If you’re making gyoza for the first time, it’s probably best to use a non-stick frying pan. However, if you’re confident and experienced enough to prevent the gyoza from sticking to the pan, you can make them even more delicious by using a cast iron pan.
But note that if your gyoza sticks to the bottom of the pan, it’ll all be ruined. So think carefully about the risk/reward before choosing your pan.
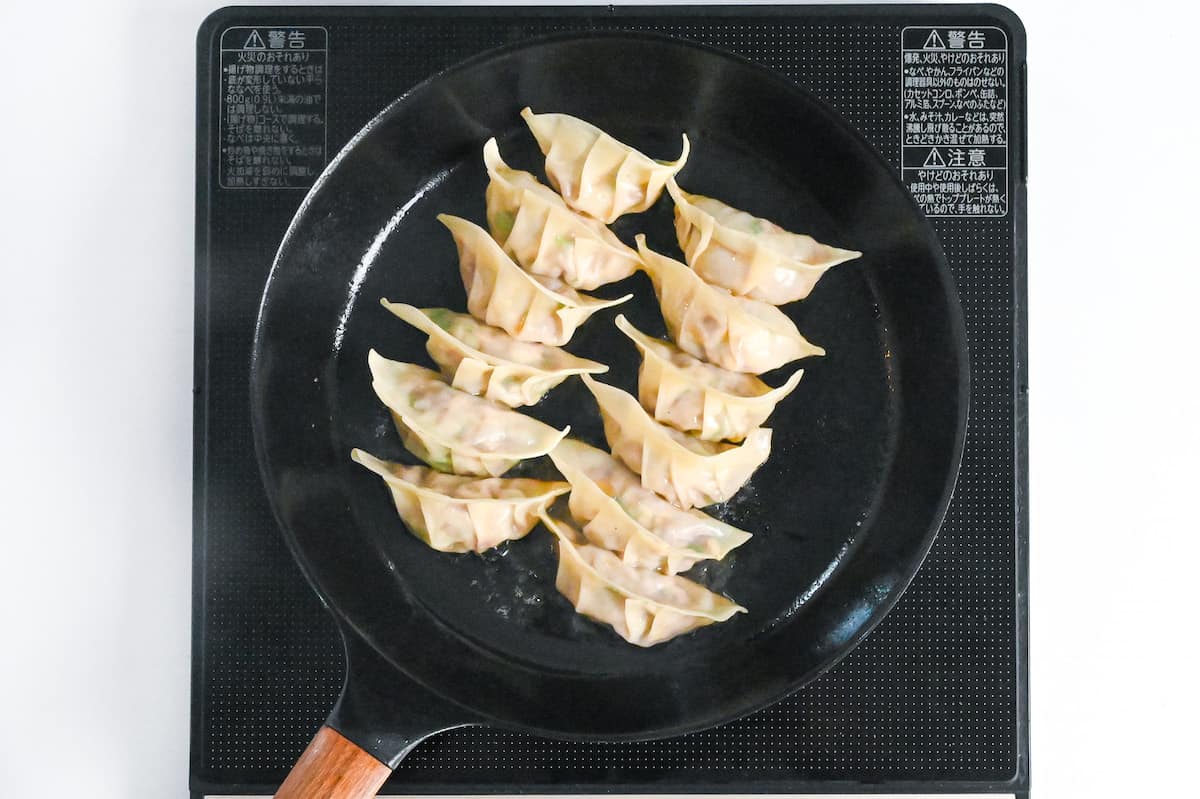
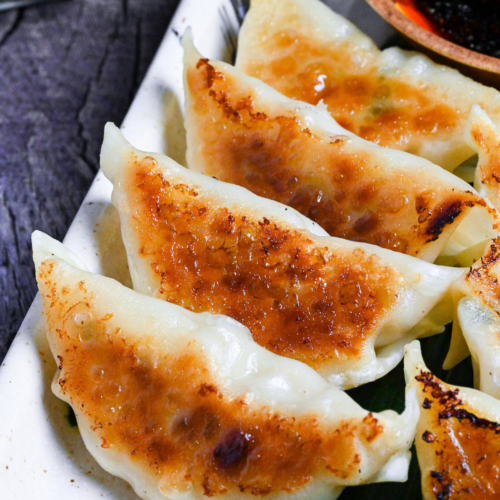
Fill the pan with gyoza in one layer. It’s okay if they’re close together, but make sure the bottom of the gyoza is fully in contact with the pan’s surface (otherwise, it won’t get crispy!)
Cook for about a minute or so, until the bottoms are crispy and brown.
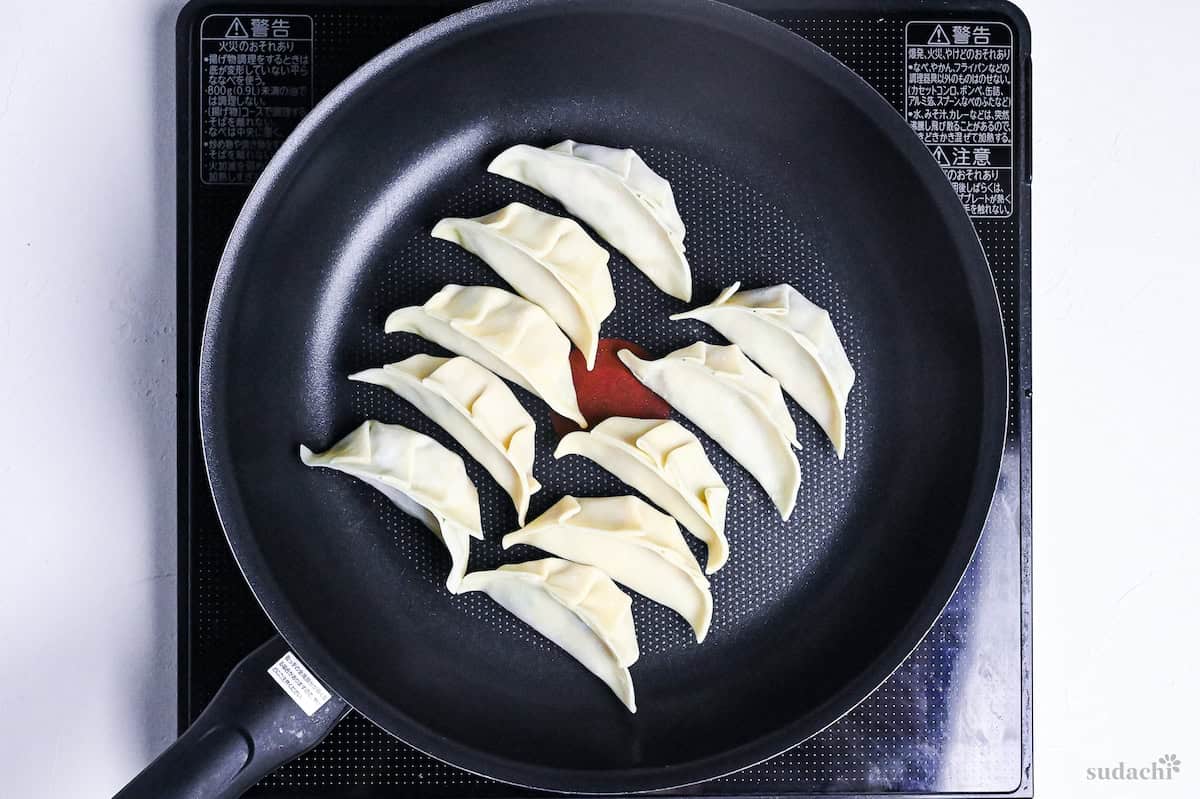
Add boiling water, cover the pan.
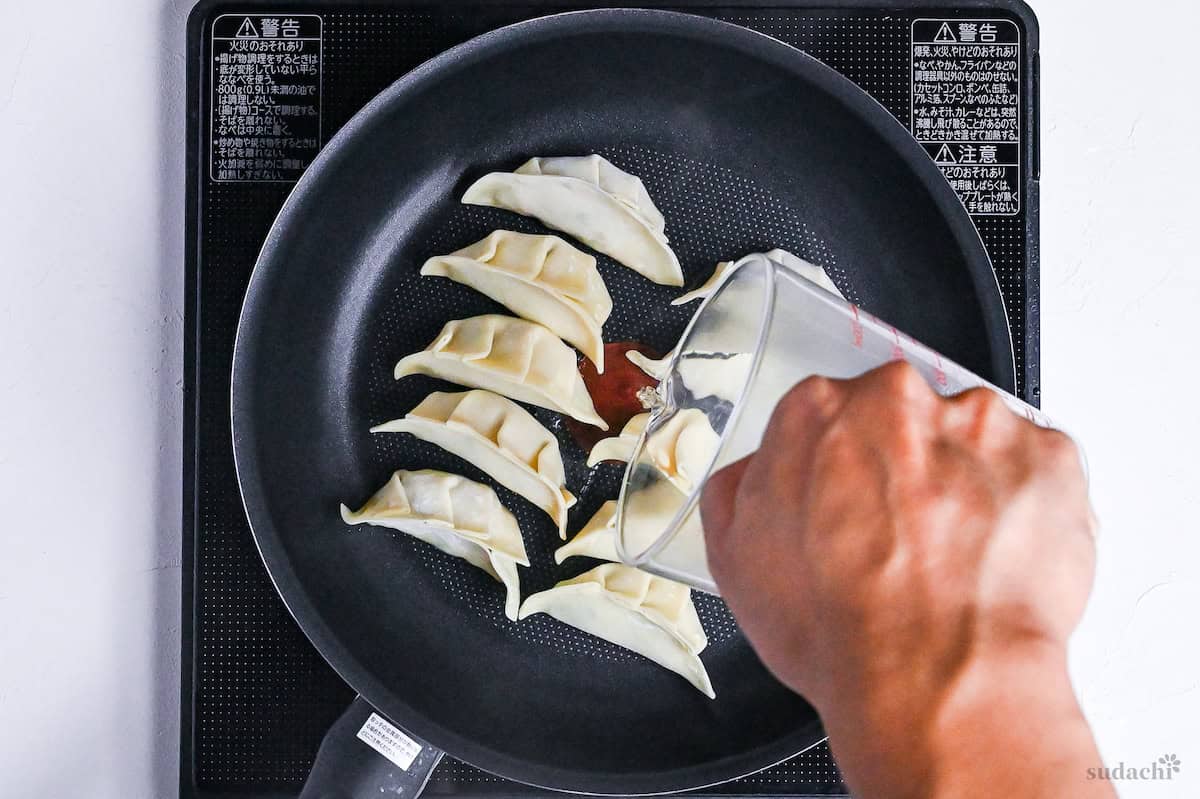
The reason you should use boiling water instead of cold water is that if you add cold water at this point, the temperature of the pan will drop, which will make the wrapper soggy and affect the texture.
Cover with a lid and steam for 4-5 minutes depending on the size of your gyoza (Approximately 4-5 minutes from chilled, a few minutes longer from frozen.) I recommend using a glass lid so you can check what’s happening inside.
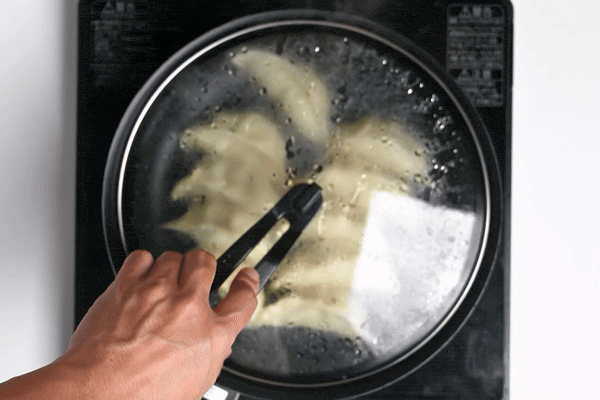
Every minute or so, give the pan a little shake to keep everything from sticking.
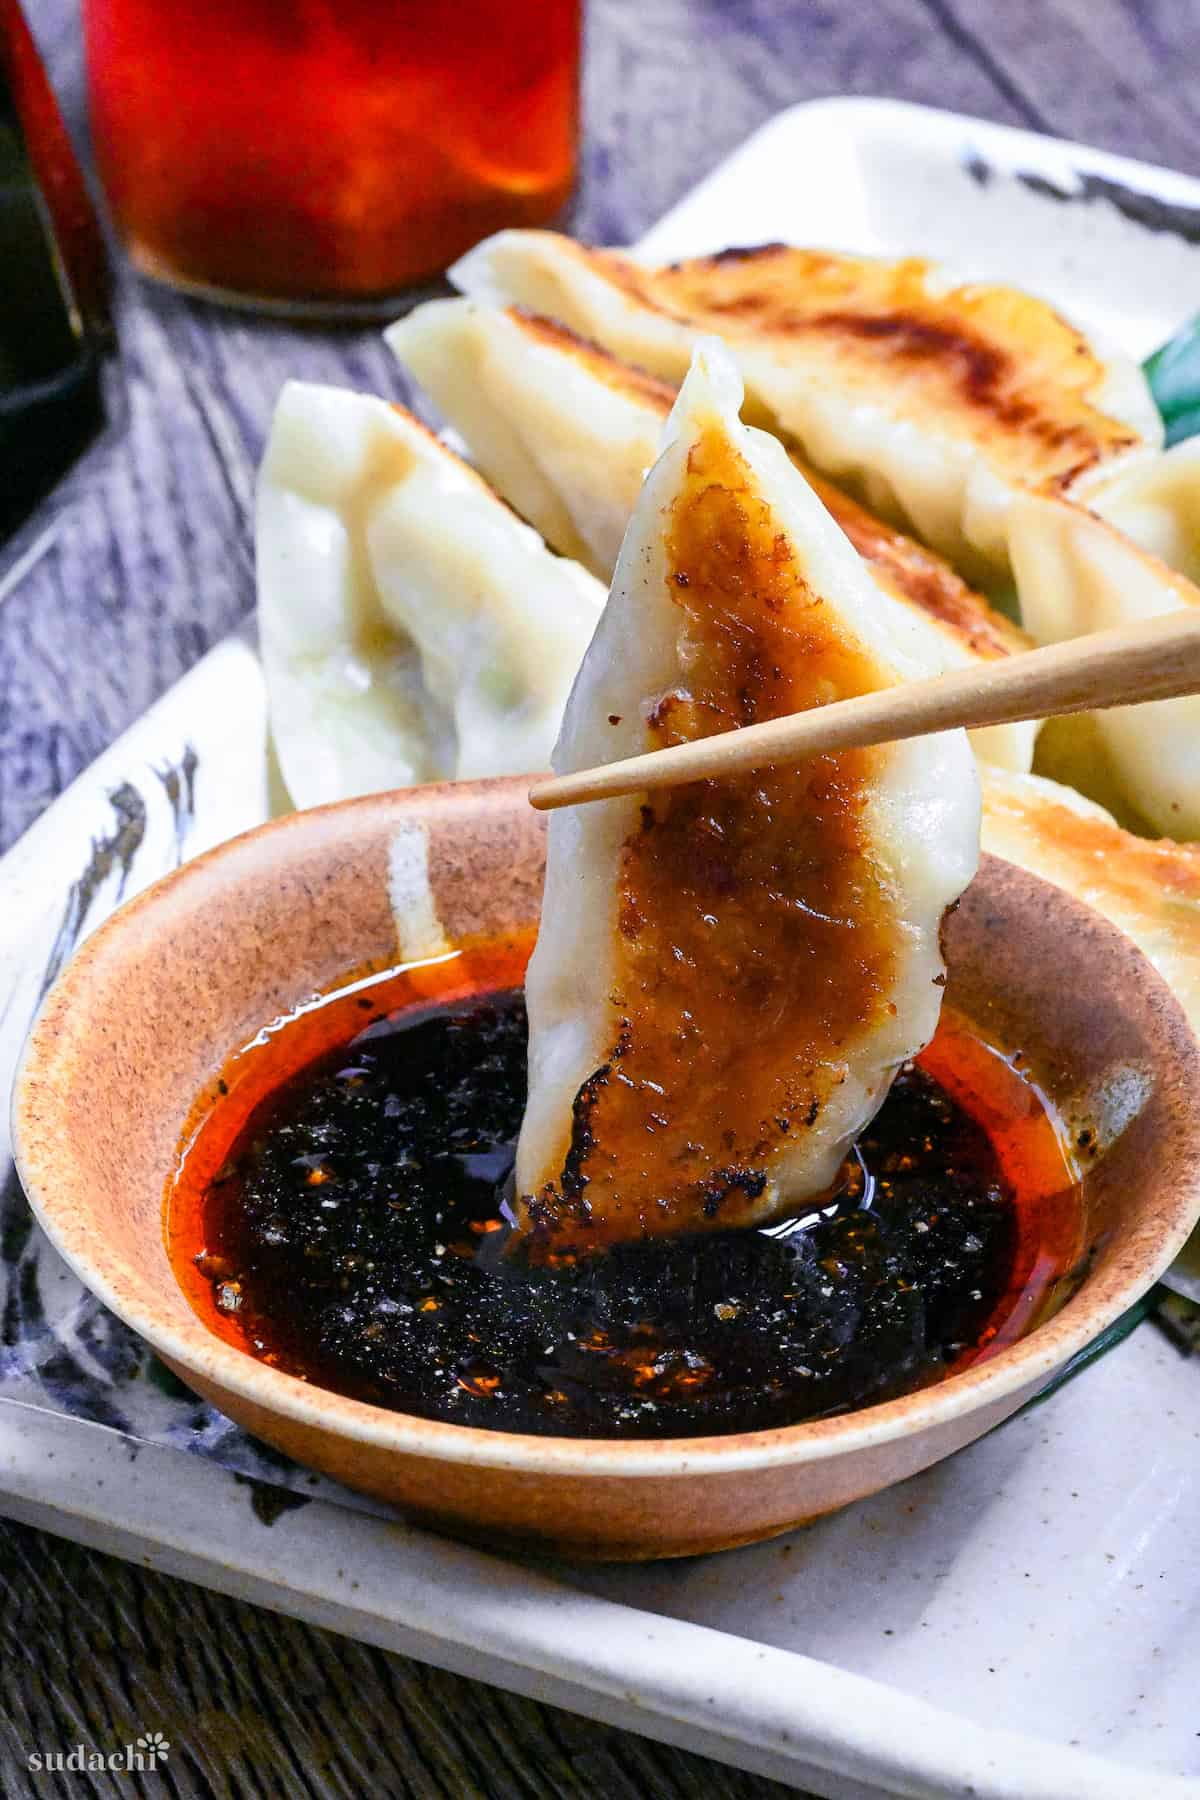
While the gyoza are steaming, you can get the dipping sauce ready.
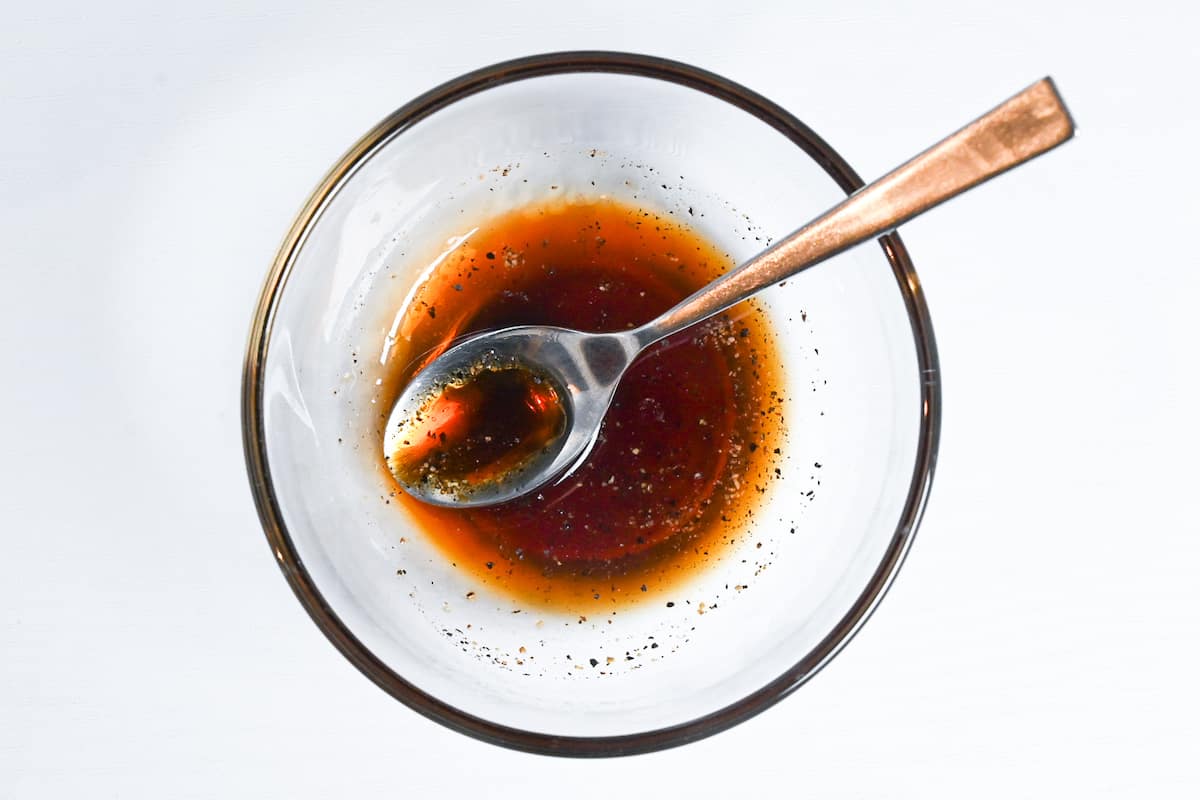
If you want to learn how to customize your dipping sauce, check out my gyoza dipping sauce post here! Alternatively, you can dip gyoza in ponzu sauce.
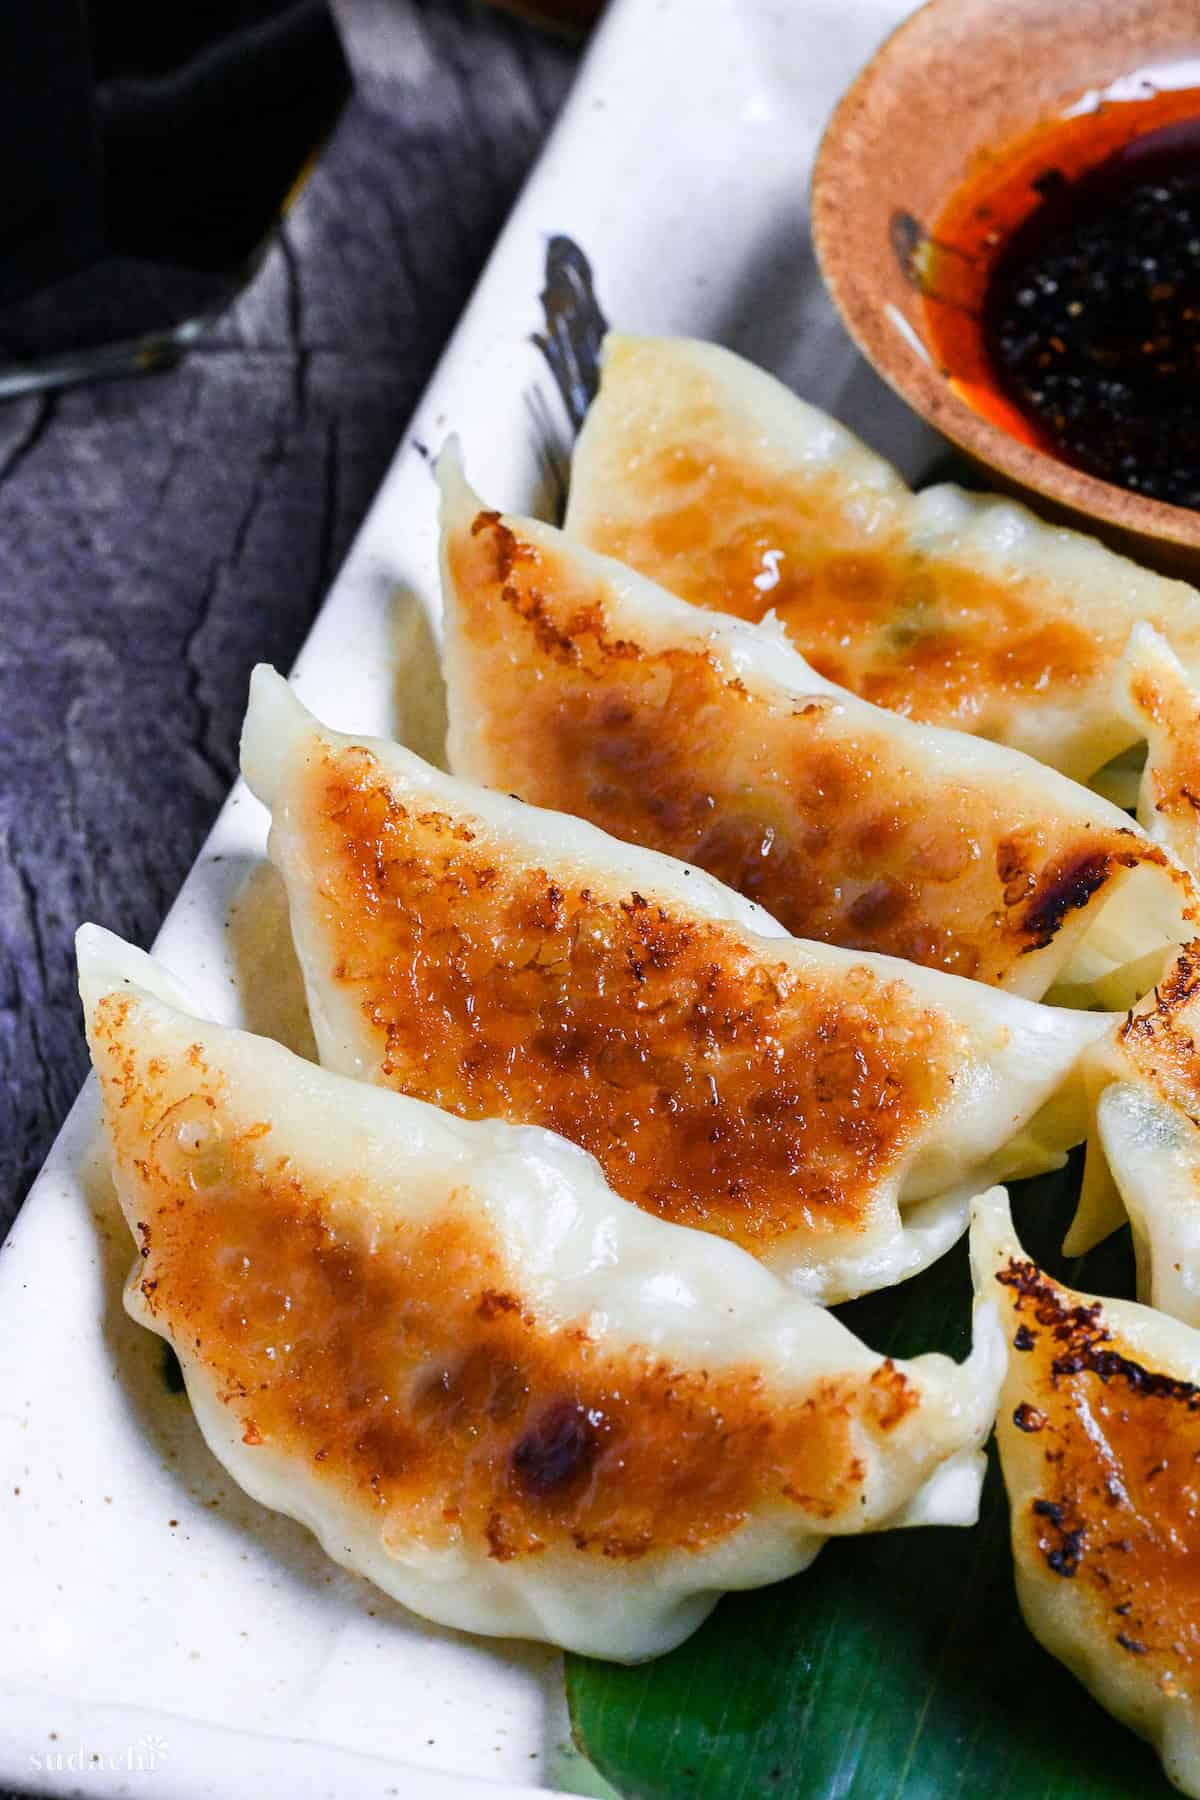
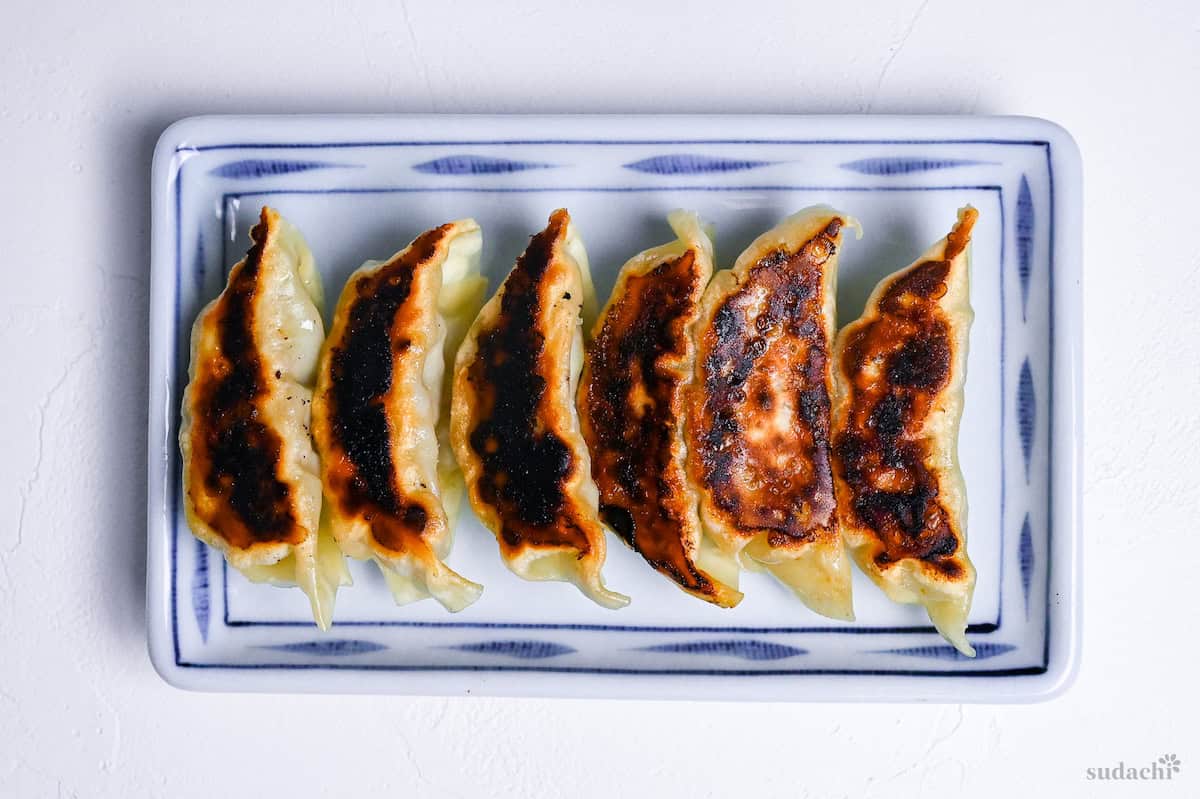
After 5 minutes, take the lid off and turn up the heat to high. Just add a little sesame oil to the gyoza.
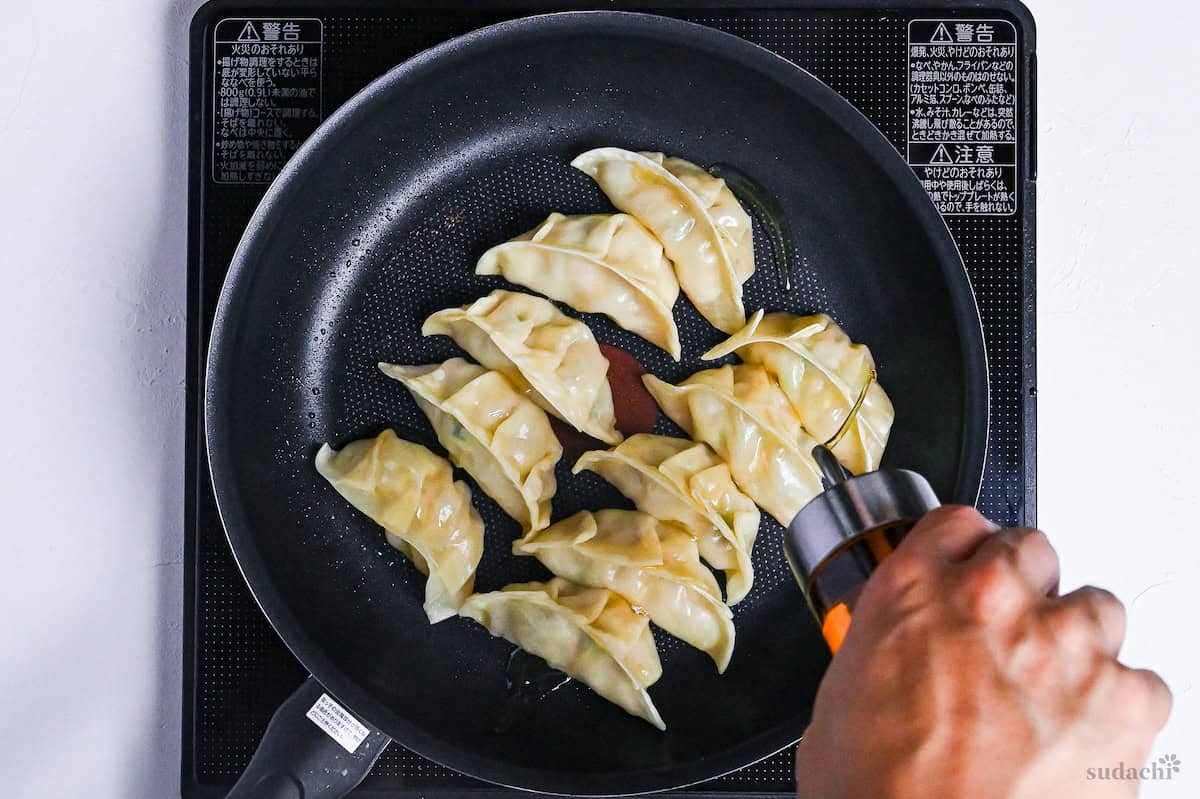
Cook for another 30 seconds or so, then serve right away with the dipping sauce you’ve prepared.

How to Store
Gyoza are easy to store and great for meal prep and parties! If you want to prepare gyoza ahead of time or are looking for a way to store leftovers, follow these tips!
- Filling only: If you run out of wrappers and want to save the filling you can refrigerate it 1-2 days. If you don’t plan to make gyoza for a while and want to save it for next time, place it in a airtight container or freezer bag and store in the freezer for up to 1 month. To defrost, thaw in the refrigerator over night and use as usual.
- Uncooked: Once you’ve shaped them, arrange the gyoza on a large tray lined with baking paper and freeze for one hour, then you can transfer them to a sealable bag and freeze for up to 1 month. Best of all? Frozen gyoza don’t need to be thawed! Just fry from frozen and increase the steaming time by a few minutes to ensure they’re cooked all the way through. If refrigerating, fry them within 24 hours for best results.
- Cooked: If you have leftover gyoza after cooking, let them cool and place them in a sealed container in the refrigerator. Try and use them up the next day and reheat in a pan or in the microwave until piping hot. Avoid freezing as it can make the gyoza skins too soggy.
I’m personally not a huge fan of freezing the filling on its own. If there are leftovers I prefer to cook it up and eat it with rice or make hamburgs, but it’s up to you.
I highly recommend doubling or tripling the recipe if you have time, you can fill up your freezer and enjoy homemade gyoza anytime!
FAQ
Here are answers to frequently asked questions I have received across all platforms, including here, YouTube, Instagram, and Pinterest. If you have any questions, feel free to send them to me anytime! It will be a big help for everyone in this community!
Yes, you can! Other options include toasted sesame oil, duck fat, and chicken fat.
I hope you enjoy this Pork Gyoza recipe! If you try it out, I’d really appreciate it if you could spare a moment to let me know what you thought by giving a review and star rating in the comments below. It’s also helpful to share any adjustments you made to the recipe with our other readers. Thank you!
More Japanese Gyoza Recipes
Hungry for more? Explore my gyoza recipe collection to find your next favorite dishes!
Crispy Pork Gyoza (Japanese Pan Fried Dumplings)

Ingredients
Gyoza filling
- 150 g green cabbage finely chopped, Napa or white cabbage can be substituted; avoid very different varieties like red cabbage or kale.
- ½ tsp salt
- 200 g ground pork medium to high-fat ground pork for juicier gyoza
- ½ tbsp Japanese soy sauce (koikuchi shoyu)
- ½ tbsp oyster sauce
- ½ tsp sugar
- 1 pinch ground black pepper
- 1 tbsp lard or sesame oil, or half of each
- 2 cloves grated garlic or garlic paste
- 1 tbsp grated ginger root or ginger paste
- 50 g Japanese leek (naganegi) white part, finely diced
- 30 g garlic chive(s) finely chopped
- 1 tbsp warm water
Wrapping
- 32 gyoza wrappers check out my recipe for how to make homemade Japanese gyoza wrappers from scratch
- water for sealing the edges
Cooking
- 100 ml hot water freshly boiled
- ½ tbsp cooking oil
- 1 tbsp toasted sesame oil
Dipping Sauce
- 1 tbsp unseasoned rice vinegar (komezu)
- 2 tsp Japanese soy sauce (koikuchi shoyu)
- ½ tsp chili oil (rayu)
- ⅛ tsp ground black pepper
The ingredient brands and tools I trust are in my Japanese pantry guide and my cooking tools guide.
Can’t find certain Japanese ingredients? See my substitution guide here.
Instructions
How to Make Gyoza Filling
- Put 150 g green cabbage (finely chopped) in a bowl and sprinkle with ½ tsp salt. Massage until evenly covered and set aside for 10 minutes.

- Take a large mixing bowl and add 200 g ground pork, ½ tbsp Japanese soy sauce (koikuchi shoyu), ½ tbsp oyster sauce, ½ tsp sugar and 1 pinch ground black pepper.
- Knead the filling until the flavors are well distributed. (Be careful not to over-mix.)
- Squeeze the liquid out of the cabbage and discard the water.
- Add it to the bowl of seasoned pork along with 1 tbsp lard, 2 cloves grated garlic, 1 tbsp grated ginger root, 50 g Japanese leek (naganegi) and 30 g garlic chive(s). Knead until the ingredients are evenly distributed.
- Pour 1 tbsp warm water into the bowl and knead into the filling to make it juicer.
How to Wrap Gyoza
- Prepare your gyoza station with your filling, 32 gyoza wrappers and water.
- Place the gyoza wrapper flat in the centre of your palm and spread about 1 level tablespoon of filling in the middle, leaving a wide gap all the way around the edge. (Be careful not to overfill.)
- Wet the empty border of the wrapper with a small amount of water.
- Carefully fold the gyoza in half but don't let the edges touch yet. Pinch the corner of the semi-circle.
- Using your forefingers, fold small pleats, pressing down each pleat until the gyoza is completely sealed.
- Press the pleats down to secure it, then place on a flour-dusted plate or container. Repeat until you've used all of your wrappers and filling.

How to Pan Fry Gyoza
- Heat a non-stick pan on medium and once hot, add ½ tbsp cooking oil. Spread it evenly around the pan and place the gyoza in with the flat side facing down, leaving a little space between each one. Fry until the bottom becomes golden and crispy.
- Pour 100 ml hot water into the pan. It's important that the water is boiling so that you don't lower the temperature of the pan.
- Place a lid on top and allow the gyoza to steam for 4-5 few minutes. (Increase the time by 1-2 minutes if cooking from frozen). Shake the pan every minute or so to prevent sticking.
- Make the dipping sauce by mixing 1 tbsp unseasoned rice vinegar (komezu), 2 tsp Japanese soy sauce (koikuchi shoyu), ½ tsp chili oil (rayu) (or sesame oil) and ⅛ tsp ground black pepper in a small dipping bowl.
- Once all of the water has evaporated, remove the lid and drizzle the top of gyoza with 1 tbsp toasted sesame oil.
- Flip them all onto a plate together (or divide into individual servings) and serve with the dipping sauce. Enjoy!

Video
Notes
- This recipe yields 32 gyoza with standard wrappers or 24 with large wrappers, serving 3-6 people depending on whether served as a main or side dish.
- Store uncooked gyoza in the freezer for up to 1 month; when cooking frozen gyoza, add 2-3 minutes to the original cooking time.
- This recipe is designed for pork, so if you want to use other ingredients, check out my other recipes: beef, chicken, shrimp, and plant-based gyoza.
- A glass lid is recommended for pan-frying as it allows you to monitor cooking progress.
- Ponzu sauce can be used as an alternative dipping sauce.
These were so so delicious, the crispy bottom was just perfect! Really easy recipe to follow and the veggie ones came out just as tasty! The homemade wrappers are a complete game changer as well, so much better than the pre-made ones! Will be making these again and again!
Thank you so much for your lovely comment, I’m so happy they turned out well!
The homemade wrappers are definitely worth the hassle right? Haha
May I ask what flour you use to mix with water to make that crispy bottom?
You can use all purpose flour but it works best with weak flour. Hope it helps!
I have question:
Have you ever made Kabocha Gyoza?
Something makes wonder what would that be any different?
By itself or with something?
I like Pork, and chicken Gyoza. Just, I am planning to make appetizer where people have choices to eat one more loved item.
My niece is a huge Gyoza fan.
Hi Caroline,
Thanks for your comment!
While I haven’t tried making kabocha gyoza myself, I’m excited about the idea and confident it would turn out tasty. For a pumpkin gyoza, I’m envisioning a deep-fried dumpling approach. You might find my recipe for curry age gyoza interesting: https://sudachirecipes.com/curry-age-gyoza/
This particular recipe features pork, but I believe a combination of curry powder and cheese would pair well with a pumpkin filling as an alternative.
Additionally, if deep-frying isn’t your preference, I think this flavor profile and the dipping sauce would also be great with pan-fried version.
I hope this helps! 🙂
I will try to do it soonest and give u feed back. You are are soo good. I salute u
Thank you!
It taste great even with ready made gyoza skin and boiling it! Thank you so much for all your effort in creating this post!!
Hi Angie,
Really appreciate you making it and taking the time to share! I’m happy that you enjoyed the fillings and it’s good to know it worked with boiling too! 🙂
Yuto
Great for skill useless-convert, lots of usable and simple adaptations.
NHK used to/still have lots of great videos
Hi Justin,
Thank you! Glad you found the article useful! 🙂
Yuto
I teach middle school culinary and my students made these and absolutely loved them. Very easy recipe to follow.
Hi Lisa,
Thank you, and it means a lot that it made its way into a classroom. Glad the recipe was easy enough for the students to follow, and that they enjoyed making them! 🙂
Yuto
I’ve made this recipe and it tastes so good! thank you! but honestly, I really need to work on my pleating skills! mine turn out slightly wonky, but I have faith that this will improve ❤️
Hi Valerie,
Thank you so much for trying this one. So glad it came out delicious. Honestly, nobody pleats them cleanly on the first a few goes, so no need to worry at all! The folds get neater and quicker the more you make them, so keep at it here and there and you’ll see it click! 🙂
Yuto
arigatou goizaimasu for giving me the motivation to keep my dreams in sight! matane!