
Featured Comment:
Highly rate this recipe, the whole family enjoyed it greatly, including requests for me to make again soon!
– Andy
What is Menchi Katsu?
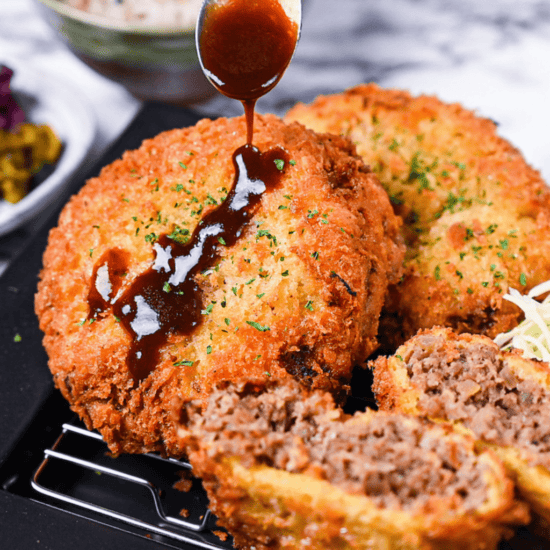
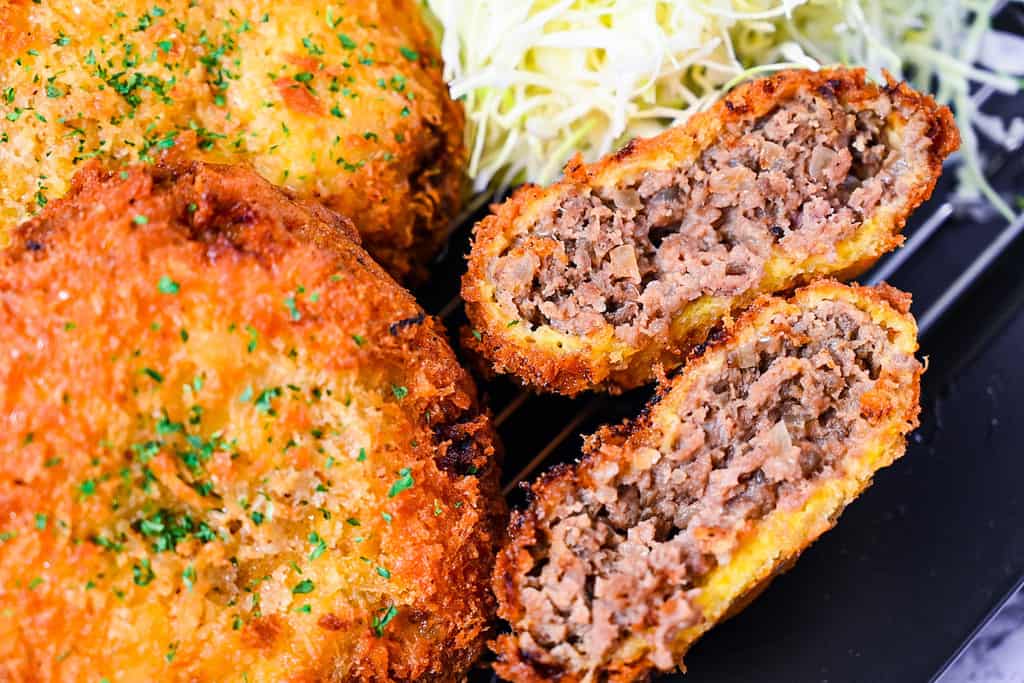
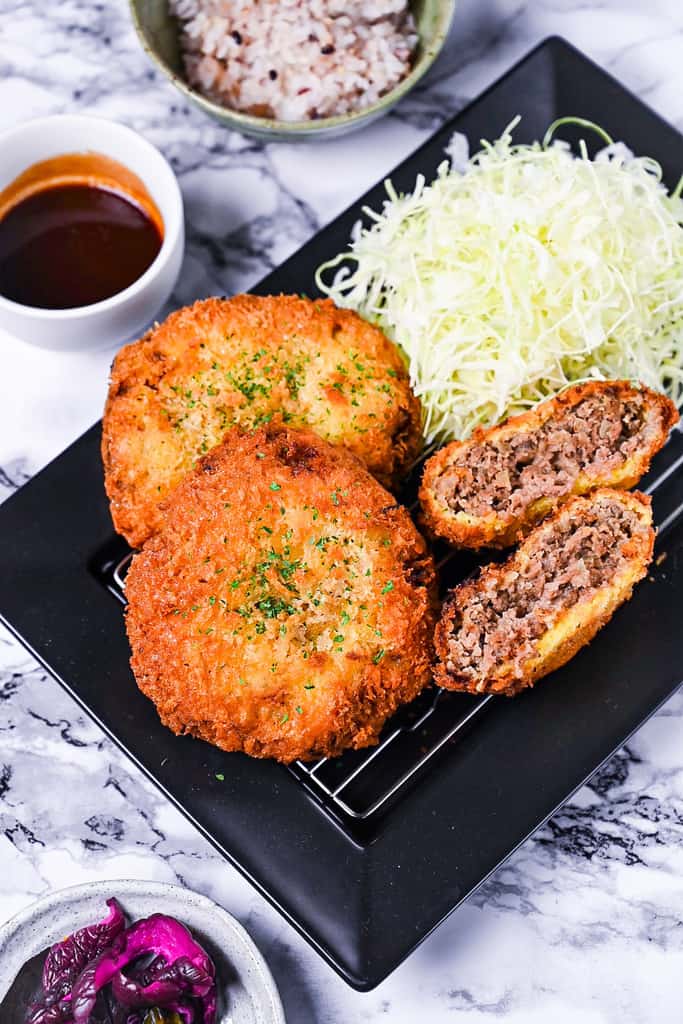
Menchi Katsu (メンチカツ) is a delicious deep-fried dish made with ground meat, onions, and seasonings that are shaped into a patty and coated in crunchy, golden panko breadcrumbs. You can think of it as a deep-fried hamburger patty, but the filling for Menchi Katsu is typically made with a blend of beef and pork, with a slightly higher beef ratio.
Although the term “katsu” refers to cutlet in Japanese, Menchi Katsu is actually considered more of a croquette (korokke) variation due to its shape and various ingredients.
This popular dish is commonly found in Yoshoku (Western-inspired Japanese cuisine) restaurants, convenience stores, and supermarkets.

How I Developed This Recipe
Menchi katsu is one of my favorite yoshoku dishes. So, I knew I had to look closely at the filling to find the golden ratio that would strike the right balance.
But what if we could take it to the next level? That’s when I came up with this idea: a chicken stock jelly. Picture this: You take a bite of the perfect Menchi Katsu, and a rush of rich, savory juices floods your mouth.
I’ve included lots of tips and tricks, each one showing you how I created this recipe. If you like deep-fried food, I highly recommend giving this a try!
Ingredients & Substitution Ideas
- Ground Meat: I recommend a 60/40 blend of beef and pork. This combo gives you a rich, juicy result. If you prefer, 100% beef is a great option, but I’d advise against using only pork.
- Unsalted Butter: Go for unsalted butter.
- Yellow Onion: If you can’t find a yellow onion, a white one is a great substitute.
- Mirin: For authentic flavor, seek out “hon mirin” (本みりん).
- Worcestershire Sauce: This is key to getting that classic yoshoku (Western-influenced Japanese cuisine) flavor.
- Panko breadcrumbs: If you want to enjoy the freshest taste, I suggest making them at home using my simple panko recipe. Store-bought is also a great option!
- Patty Seasonings: I used whole milk, egg yolk, tomato ketchup, a sprinkle of sugar, nutmeg, salt, and pepper.
- Secret Ingredients (Optional): For an extra juicy patty, I incorporate gelatin and chicken stock to create a savory chicken stock jelly.
- Batter Ingredients: To make the batter, use ice-cold water, a fresh egg, all-purpose flour, and some extra panko breadcrumbs.
- Dry Parsley: A sprinkle of dried parsley adds a pop of color.
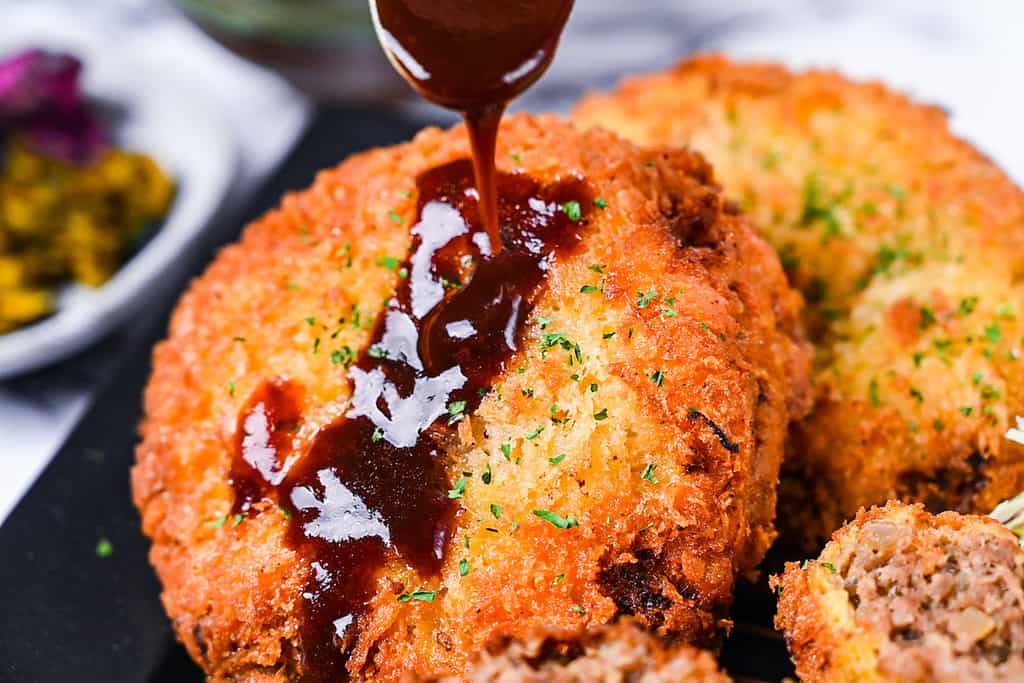
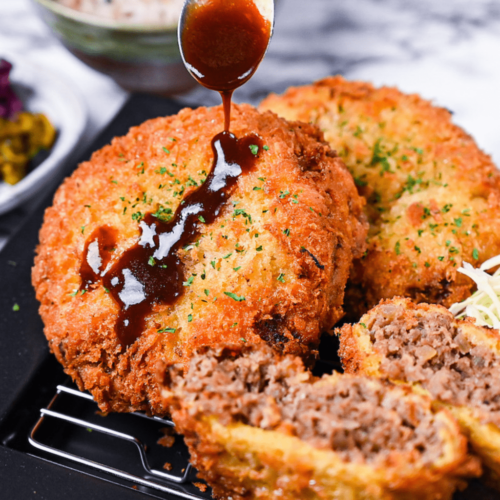
- Sauce Ingredients: To make a tasty dipping sauce, mix together tomato ketchup, Worcestershire sauce, oyster sauce, a little olive oil, and a dash of rice vinegar.
- Cooking oil: For the best results, use a neutral-flavored oil with a high smoke point. I always use rice bran oil for deep frying, but you can also use canola, sunflower, or peanut oil.
Visual Walkthrough & Tips
Here are my step-by-step instructions for how to make Japanese Menchi Katsu at home. For ingredient quantities and simplified instructions, scroll down for the Printable Recipe Card below.
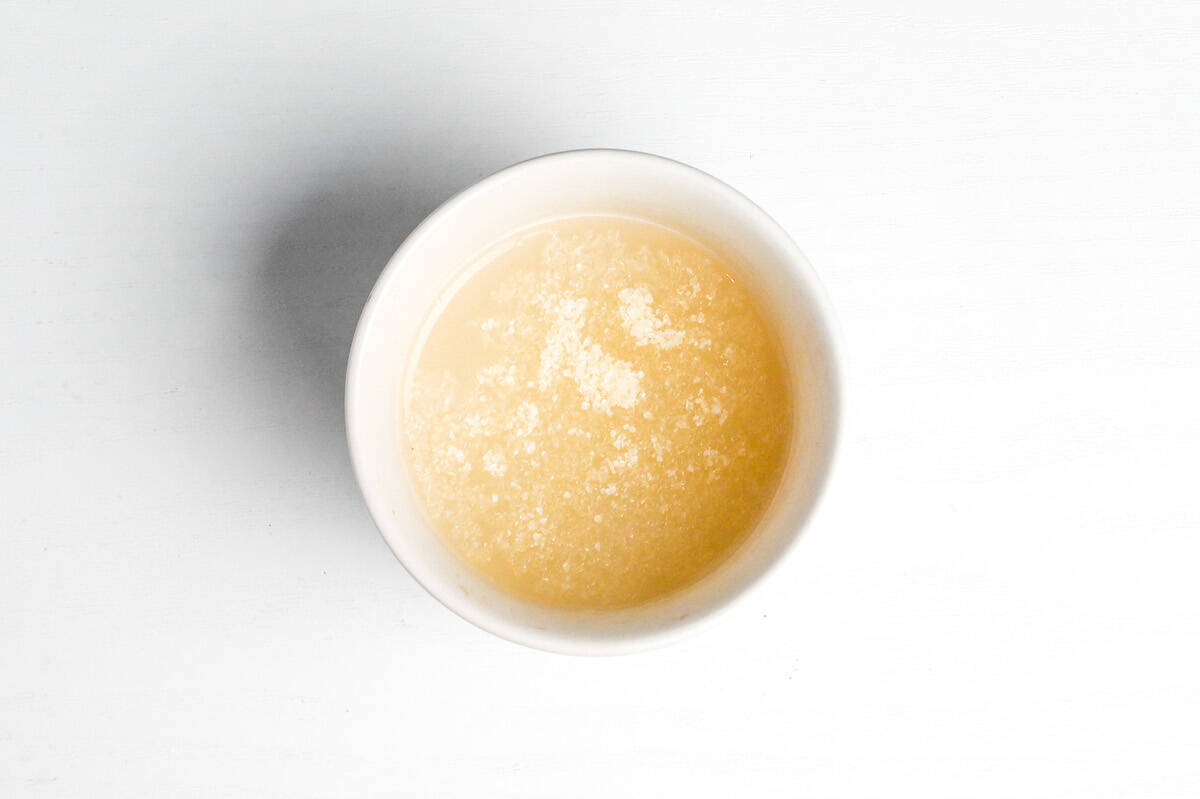
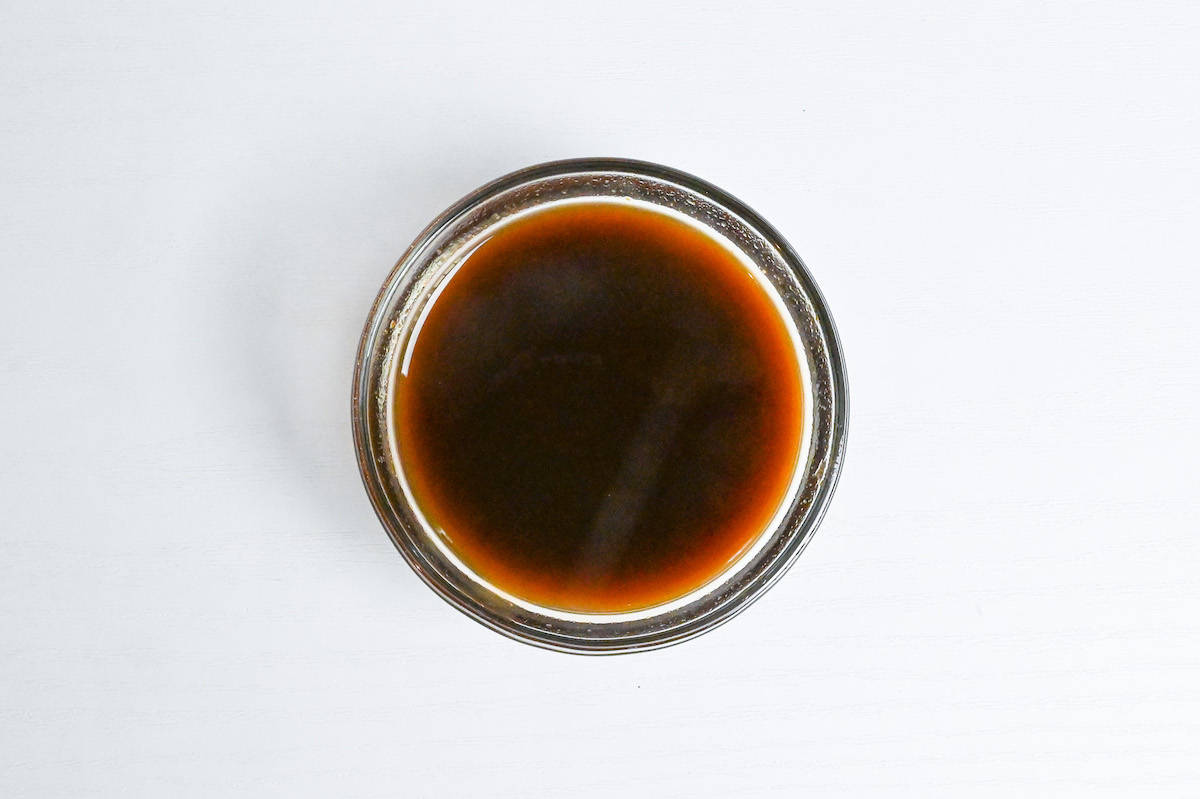
Combine chicken stock with gelatin in a microwave-safe bowl. Allow it to bloom for 5-10 minutes. Microwave in 20-second intervals until the gelatin dissolves.
Chill in the refrigerator for 3 hours. Once set, crumble it into small bits using a spoon.
For an extra juicy Menchi Katsu, I add chicken soup jelly to the meat mixture. This jelly is made by mixing chicken stock soup with gelatin and setting it in the fridge for 2-3 hours.
The jelly acts as a juice bomb, producing a deliciously juicy Menchi Katsu. However, it’s important to note that this process is optional due to the long waiting time.
You can still make great Menchi Katsu without this step.
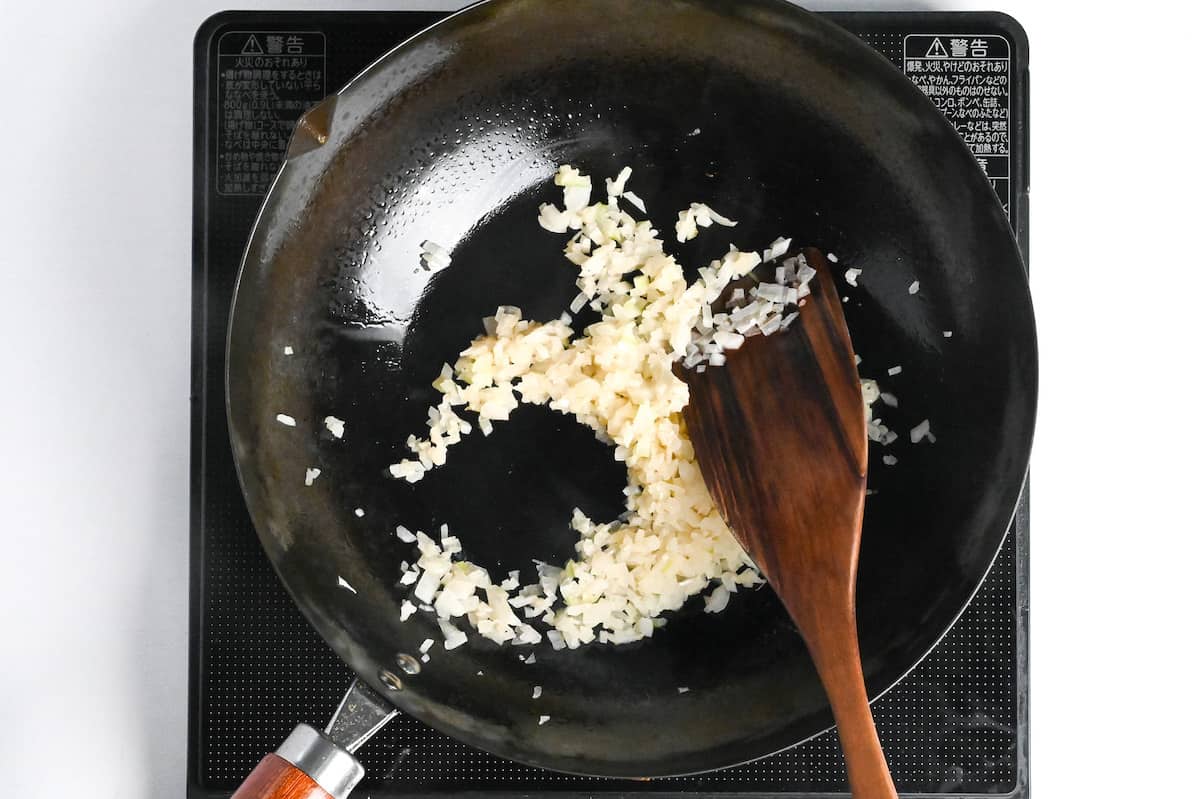
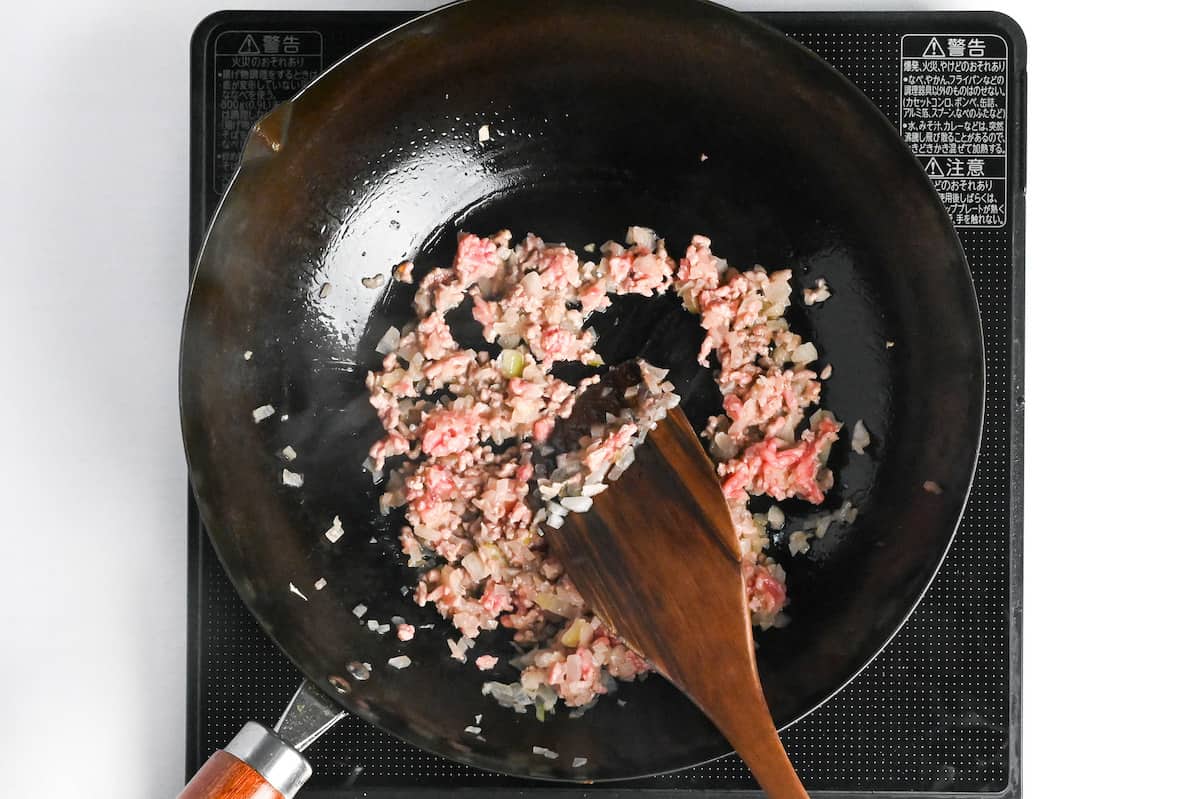
Heat a frying pan over medium heat. Melt butter and sauté yellow onions until they’re soft and golden.
By frying onions with butter until golden brown, you can bring out the sweetness and deep flavor of the onion. Just be careful not to brown them too much.
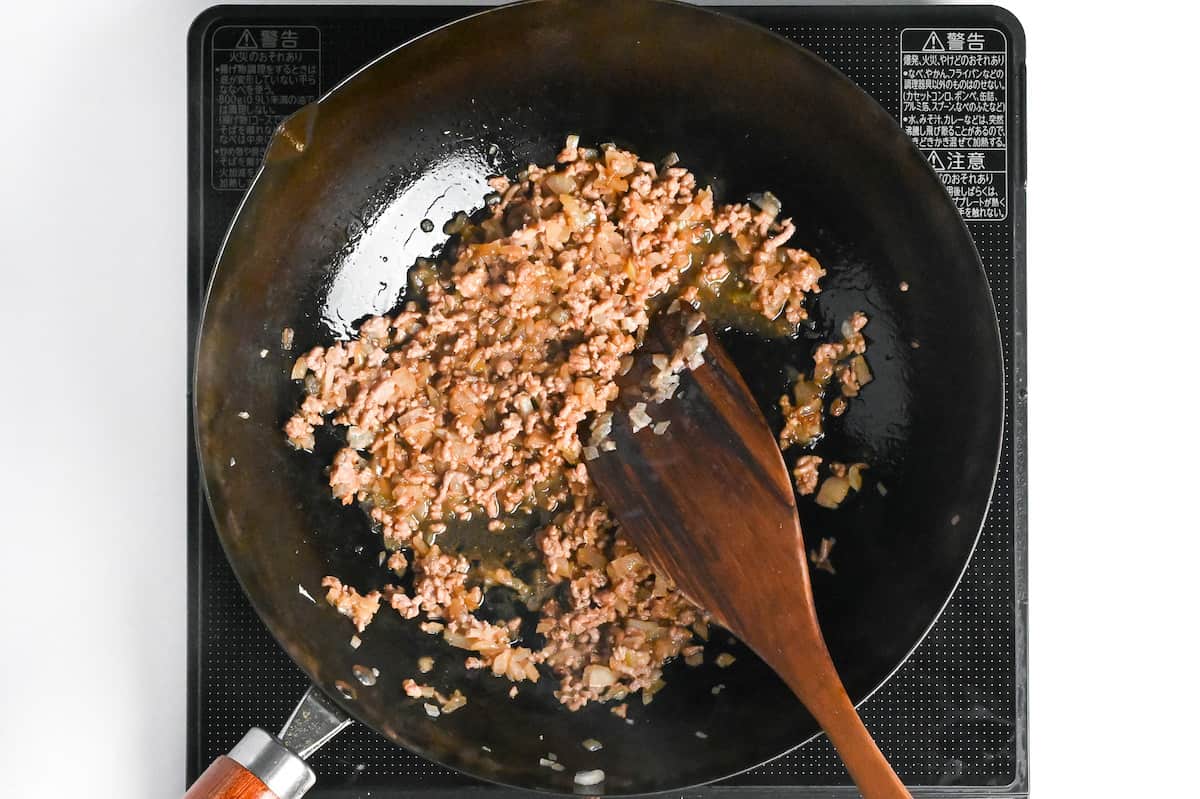
Add about one-third of the ground meat to the onions. Cooking a small amount of the meat before adding them to the patties creates a firmer and contrasting texture, sure to guarantee a meatier bite!
Once browned, stir in mirin and Worcestershire sauce. Cook until the liquid reduces. Let this mixture cool to room temperature.
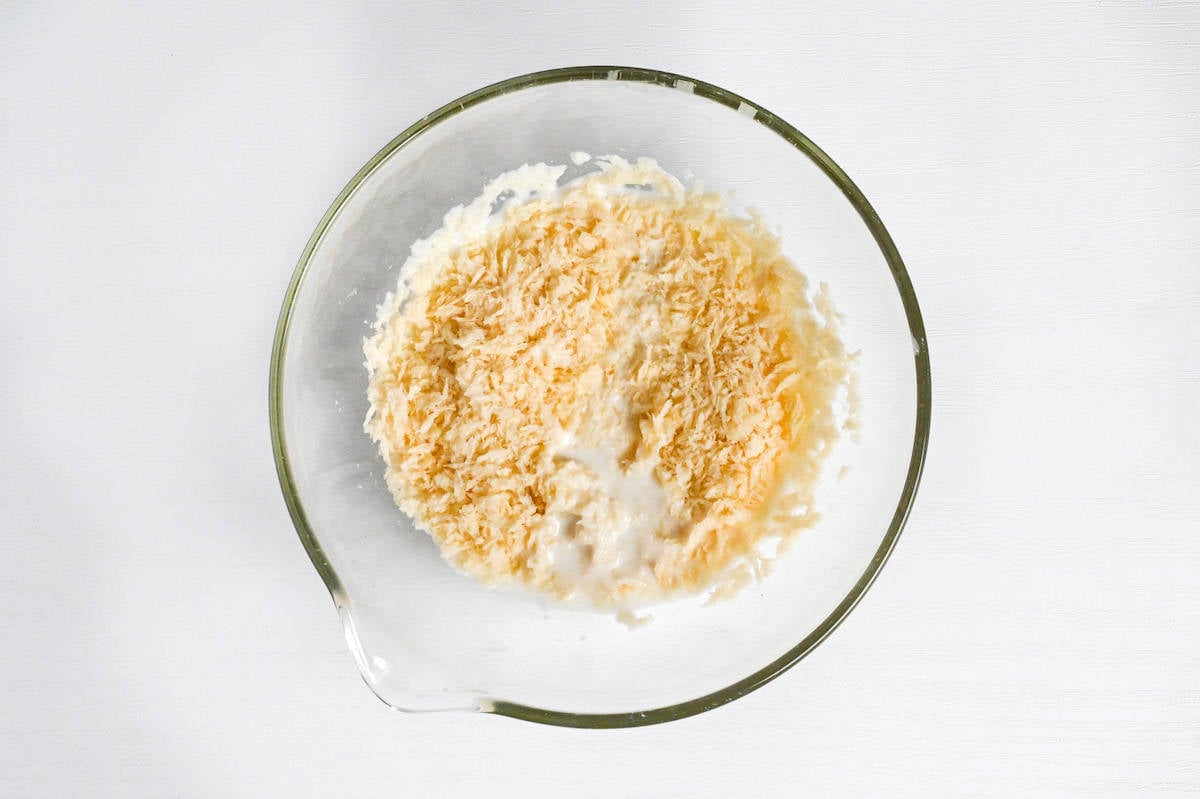
Combine panko breadcrumbs with whole milk in a separate bowl for a binder.
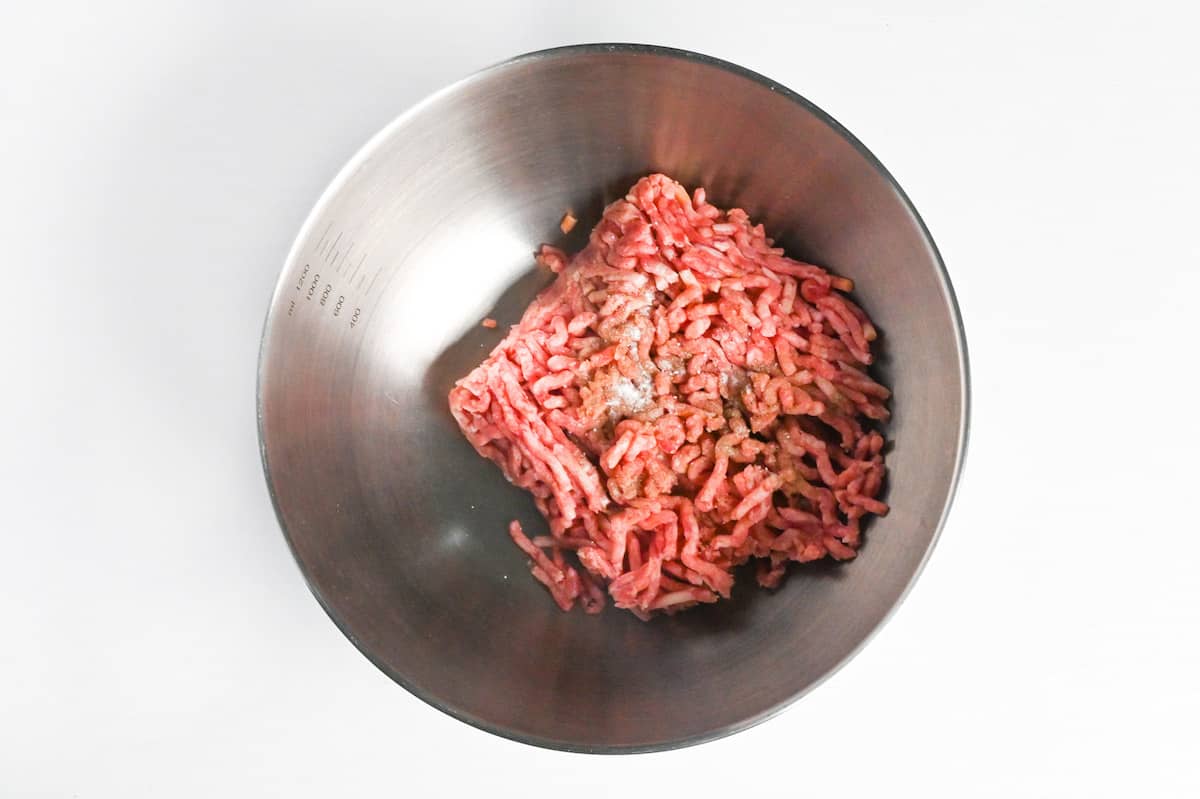
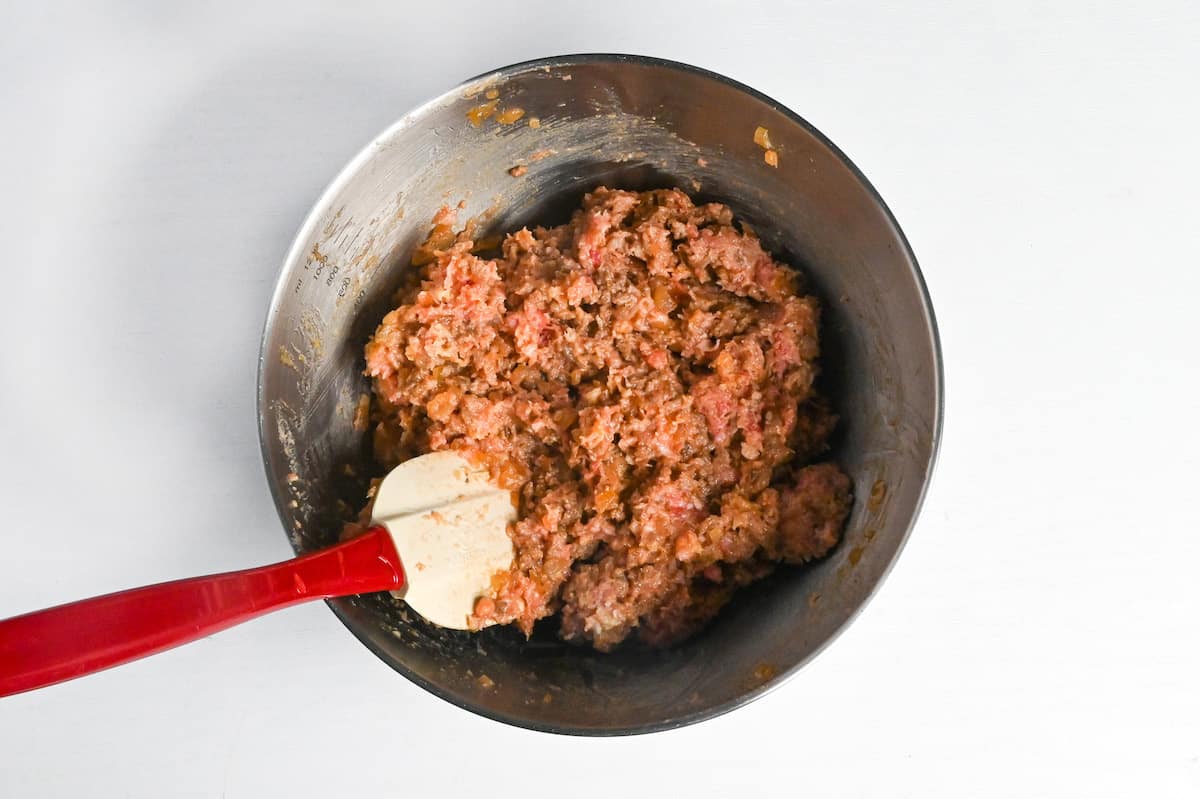
In a large bowl, combine the leftover raw ground meat, salt and pepper, the breadcrumb mixture, egg yolk, tomato ketchup, sugar, nutmeg, and the cooled beef-onion mix. If you made the optional gelatin, add it now. Mix everything until evenly distributed.
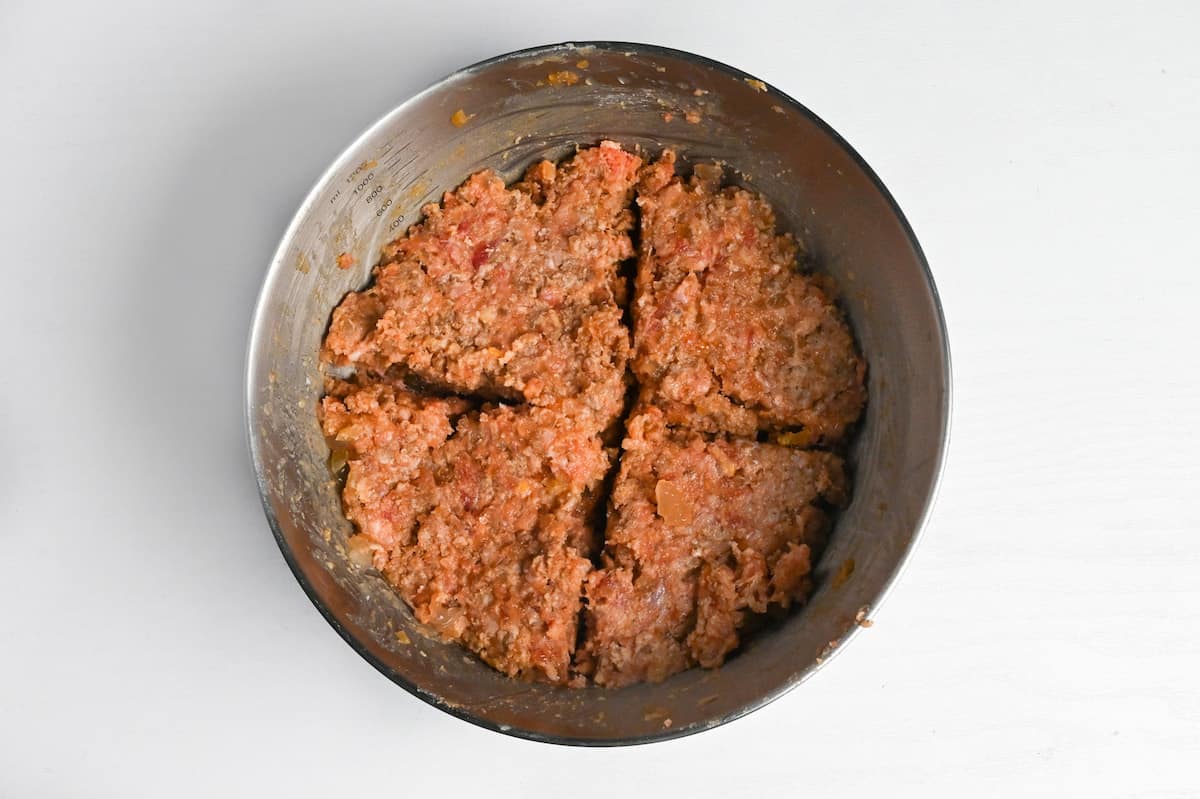
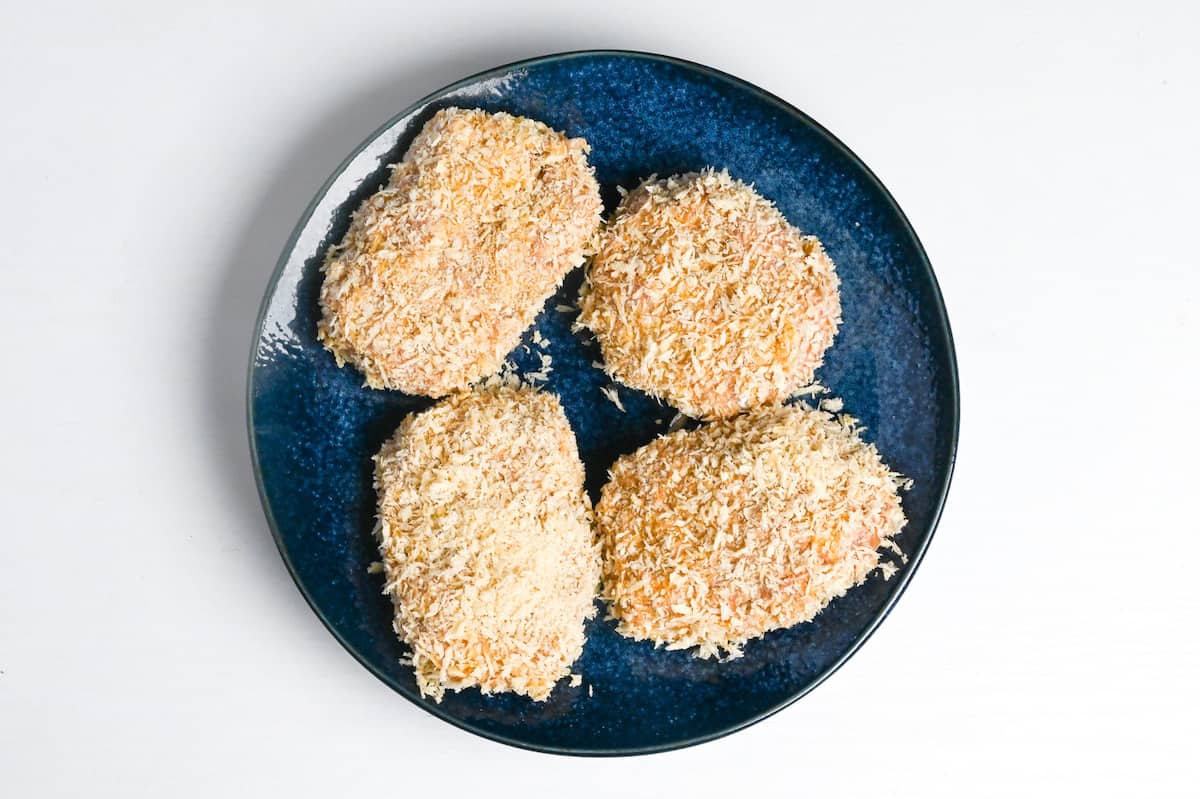
Divide the mixture into equal portions (I usually get about 4) and shape them into ovals or discs.
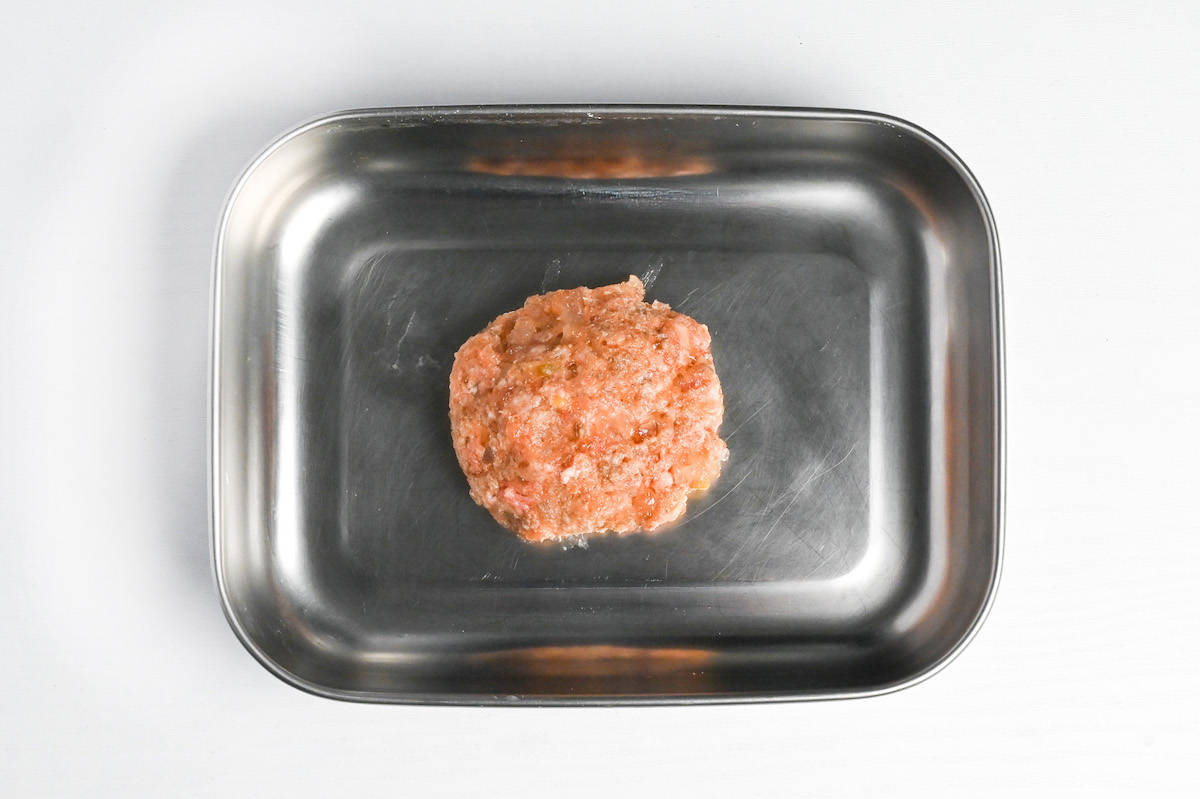
When making Menchi Katsu or Hambagu, I toss the patties from one hand to another while shaping. Not only does this push the air out of the patty, but it also prevents the warmth of your hands from overheating the meat.
After shaping the patties, it is important to rest them in the fridge for 30 minutes to allow the fat in the meat to solidify. This makes the filling juicier and more delicious and also makes the patties more stable.
Additionally, the batter sticks better to the patties. Not only does this technique improve the final texture and flavor, but it also helps to prevent the patties from exploding while frying.
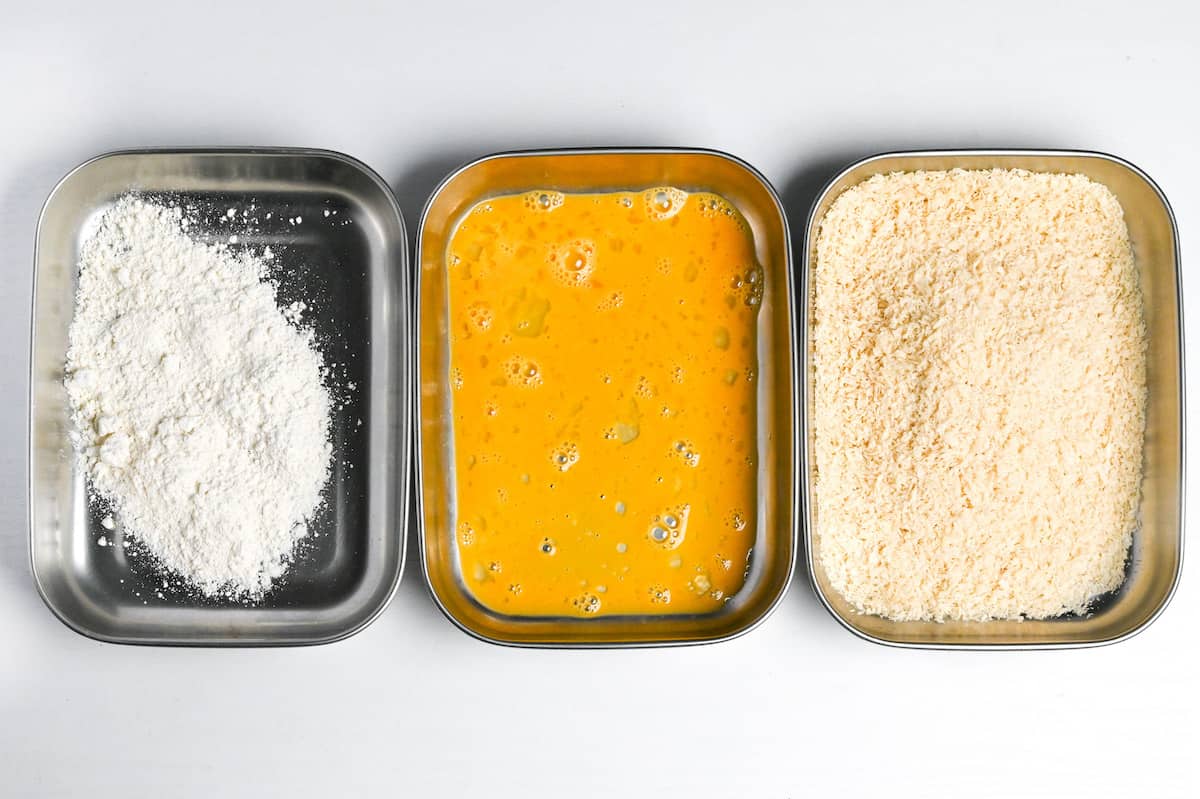
Set up three plates: one with all-purpose flour, one with a whisked large egg, and one with panko breadcrumbs.
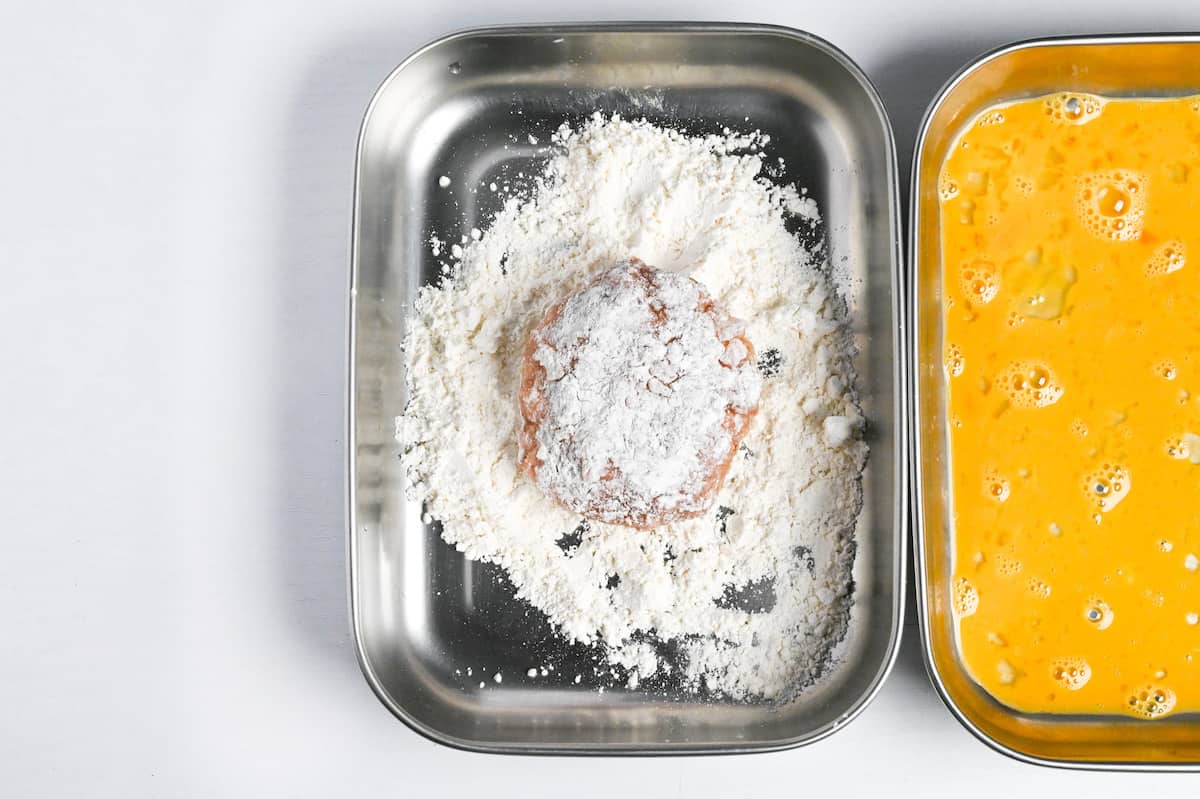
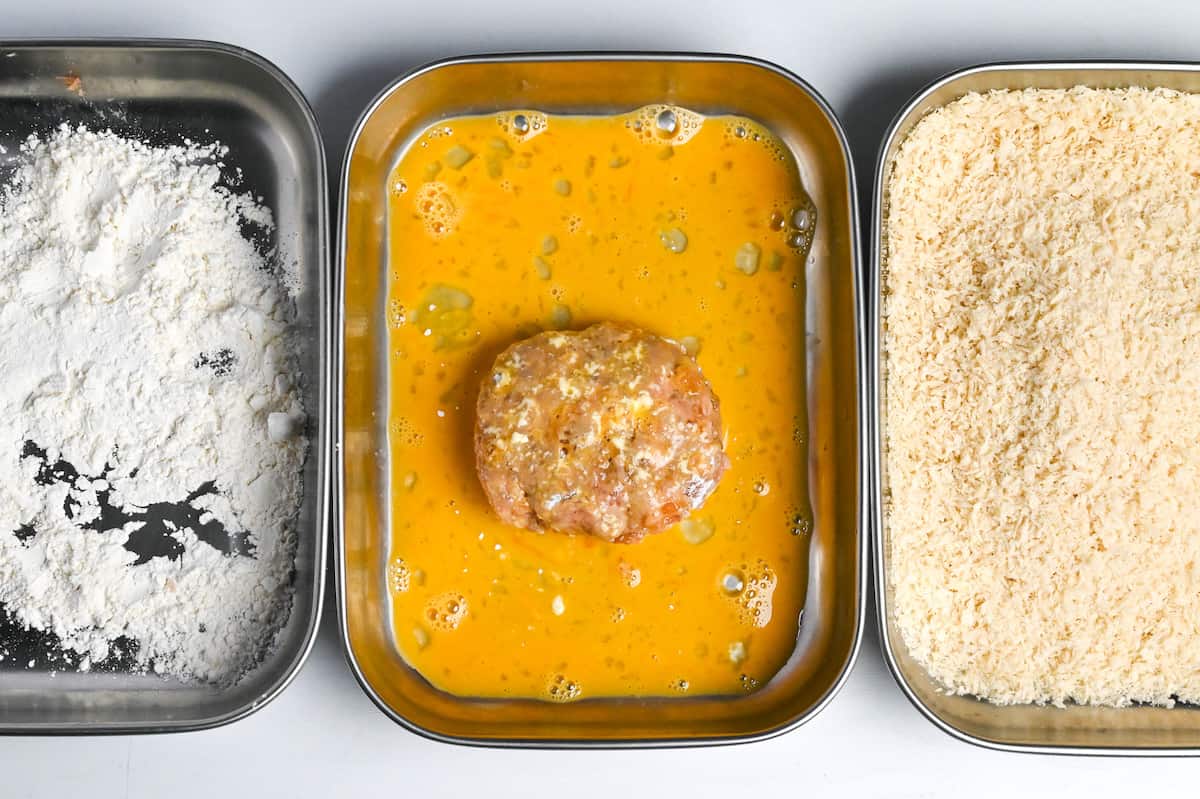
Coat each patty in flour, then egg, then breadcrumbs. Press the breadcrumbs gently onto the patty.
I use a double battering technique to prevent the katsu from bursting during frying. This involves coating the patties with flour, egg, and panko and then repeating the process with egg and panko again.
By doing this, the batter is less likely to peel off, and the reinforced outer layer of the katsu makes it stronger and less likely to burst. It also makes it extra crunchy!
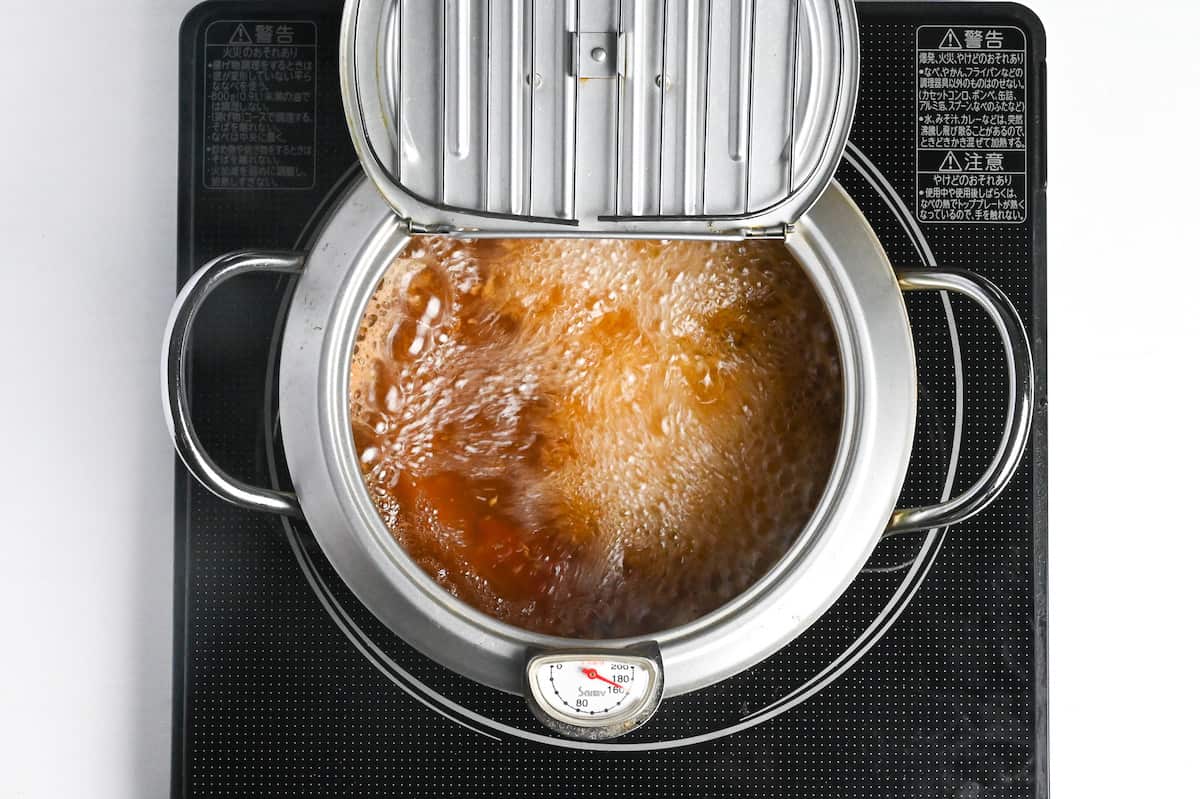
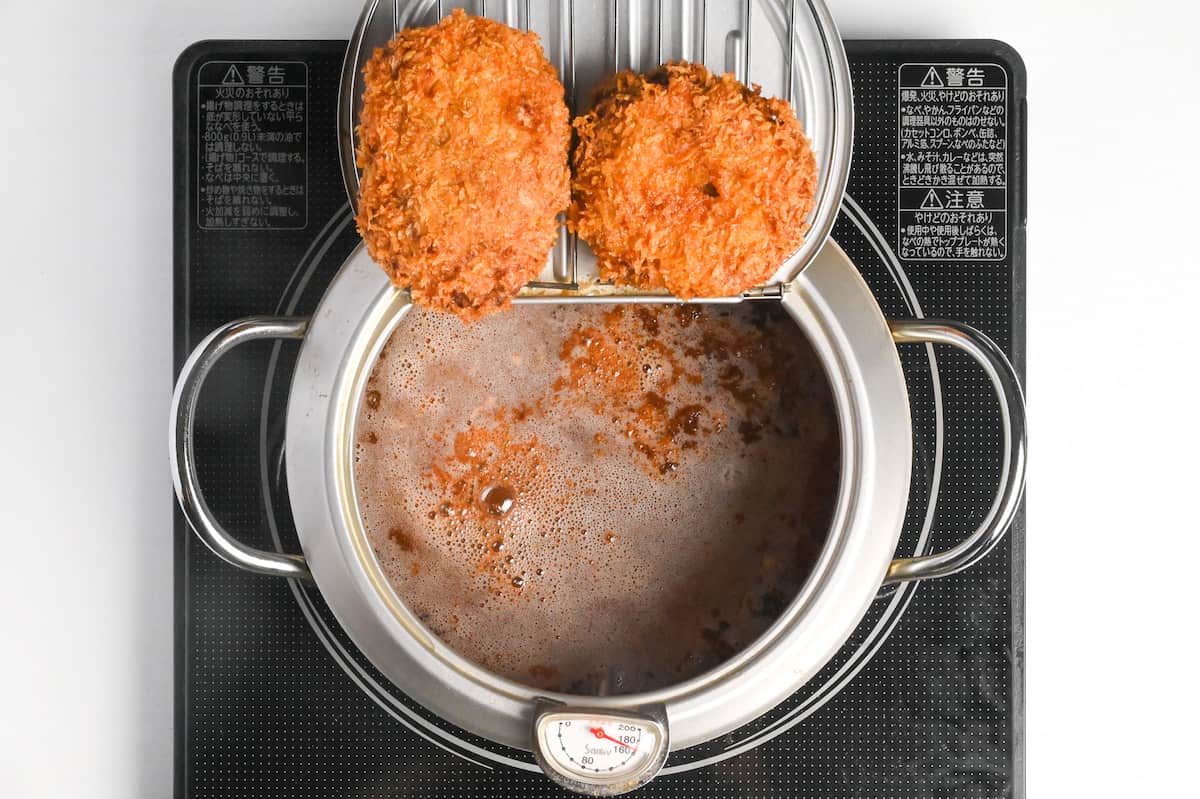
Heat your oil to 160 °C (320 °F). Fry the Menchi Katsu for about 1-2 minutes on each side.
When frying multiple Menchi Katsu at the same time, it is important not to overcrowd the pot.
The number of katsu you can fry depends on the size of your pot or fryer, but it is recommended to fry as few katsu as possible to increase the chances of success.
Frying too many katsu at once can cause the temperature of the oil to drop, leading to katsu absorbing more oil. This can negatively impact the texture of the katsu, making the batter less crispy and oily.
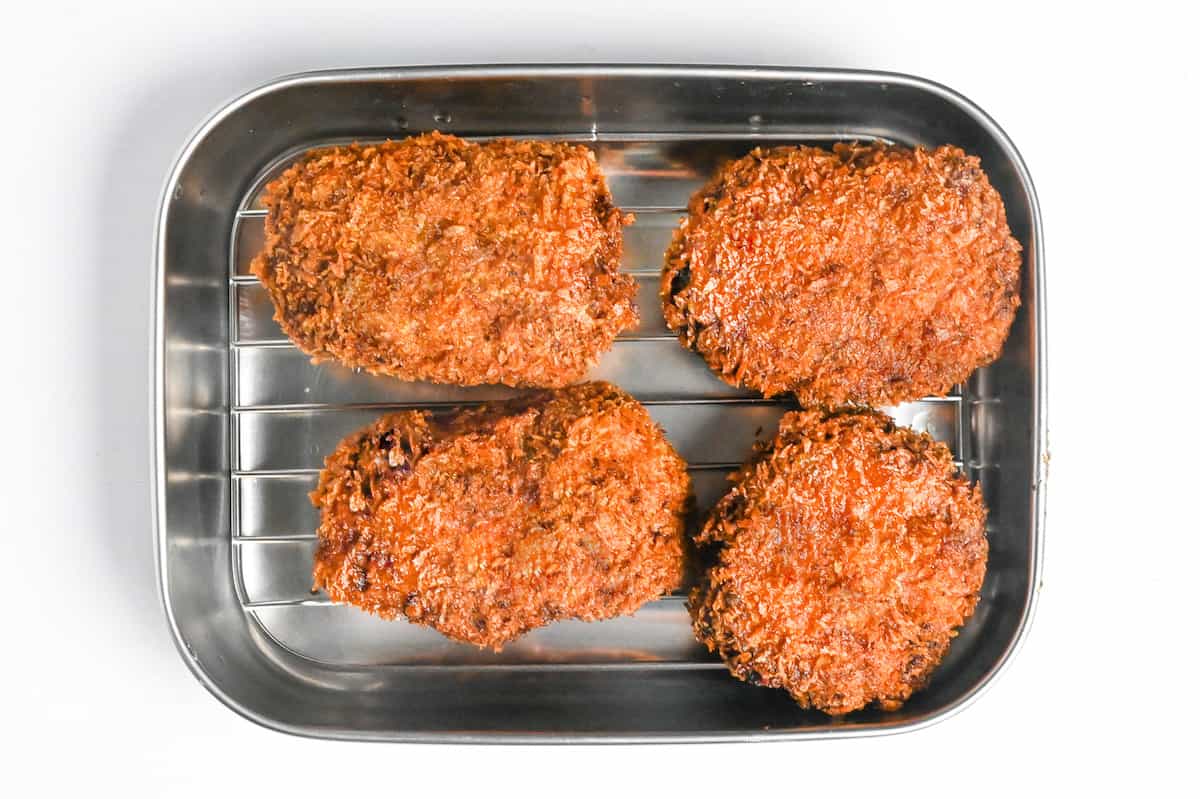
Remove and drain on a wire rack. Crank the heat to 180 °C (356 °F) and fry them again until golden. This double-frying technique helps to achieve juicy and crispy Menchi Katsu.
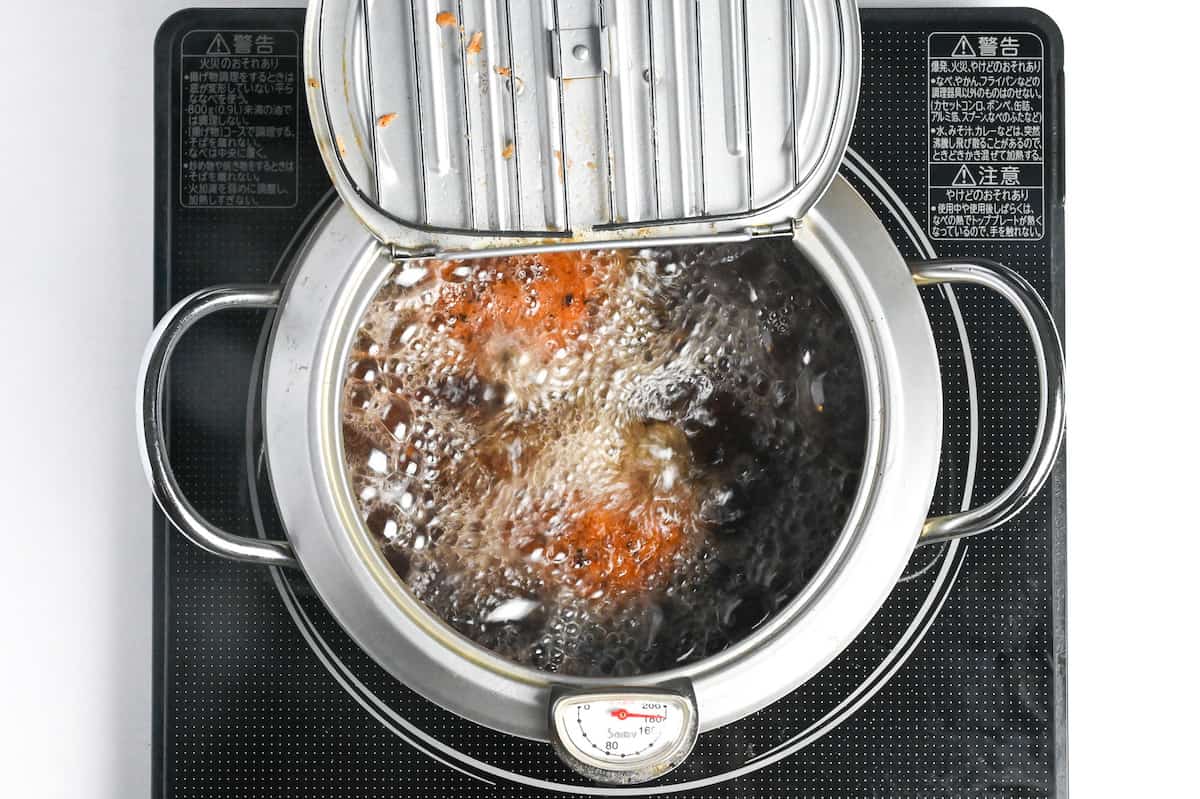
Once double-fried, transfer to a wire rack to let the excess oil drip off before serving.
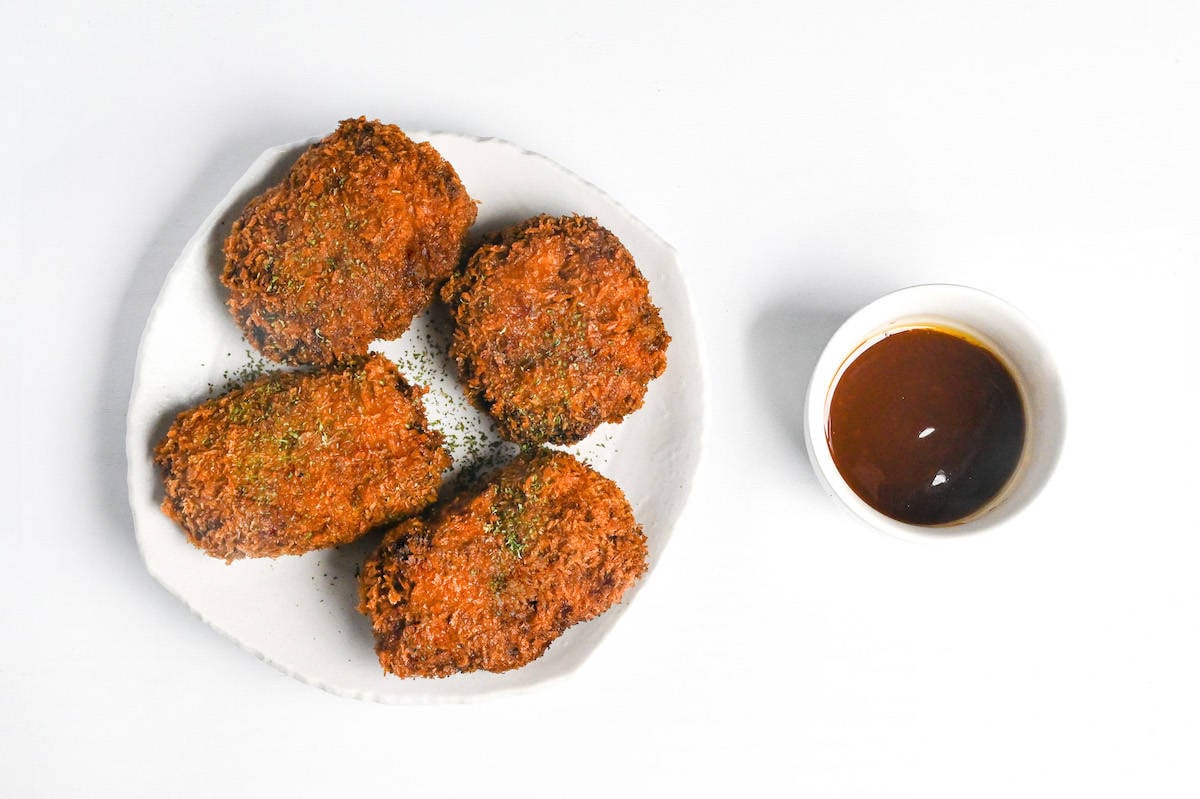
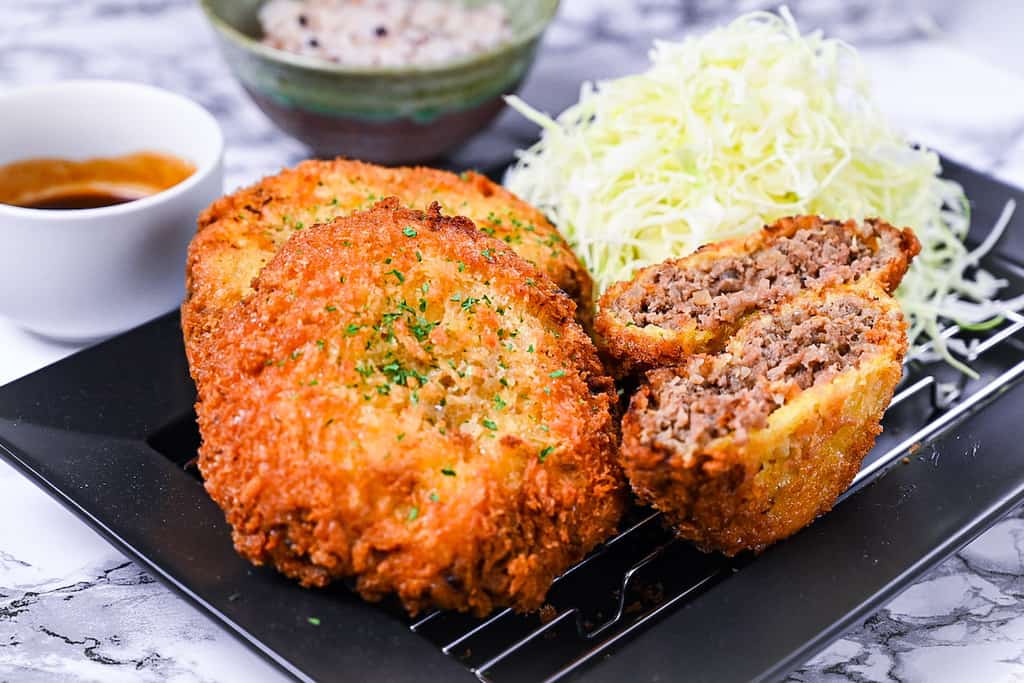
Mix tomato ketchup, Worcestershire sauce, oyster sauce, olive oil, and rice vinegar in a small bowl until combined. Sprinkle the freshly fried menchi katsu with a few pinches of dry parsley and enjoy!
Jump to Full Recipe Measurements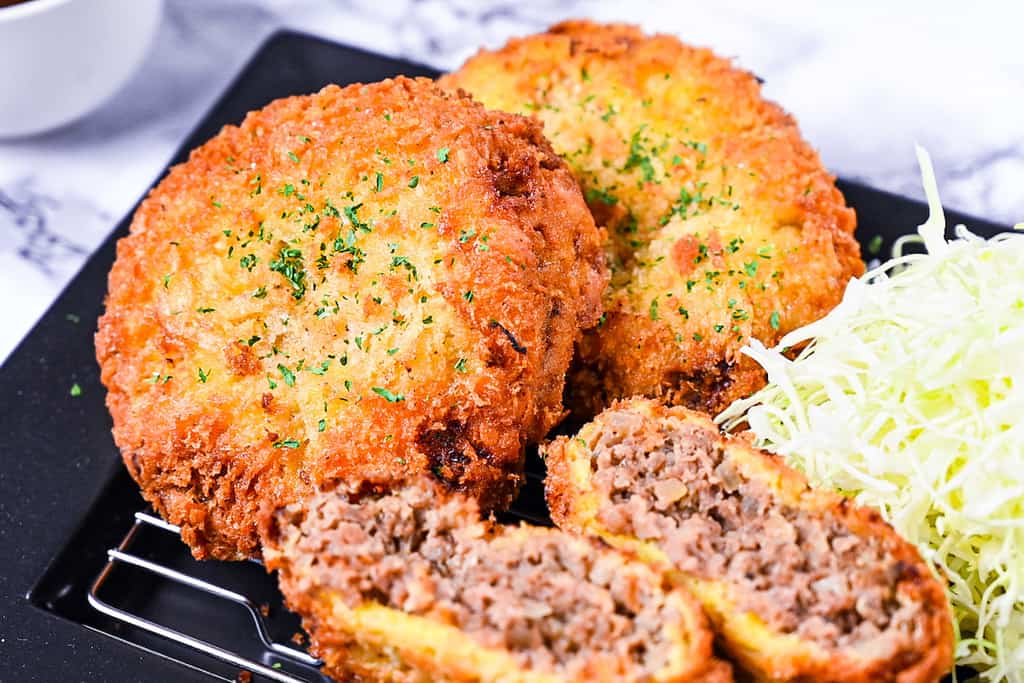
How to Store
If you have some leftover fried Menchi Katsu, you can store them in the refrigerator or freezer.
To store them in the refrigerator, wait for them to cool, and wrap each one securely in plastic wrap. Place them in an airtight storage bag at the back of the refrigerator and consume them the next day or two.
If you prefer to freeze them, wrap each one tightly in plastic wrap and store them in Tupperware or freezer bags in the freezer. You can also freeze them before frying if you want to prepare them in advance. Fry from frozen and increase the cooking time to ensure they’re cooked all the way through. Whether fried or not, the storage period should not exceed 2-3 weeks.
If you want to restore the crispiness, you can use an oven or toaster oven/grill.
I hope you enjoy this Menchi Katsu recipe! If you try it out, I’d really appreciate it if you could spare a moment to let me know what you thought by giving a review and star rating in the comments below. It’s also helpful to share any adjustments you made to the recipe with our other readers. Thank you!
More Japanese Yoshoku Recipes
Menchi Katsu (Japanese Ground Meat Cutlet)

Equipment
- Japanese-style fryer
- Stainless steel cooking tray with wire rack
Ingredients
Menchi Katsu
- ½ tsp gelatin powder optional
- 50 ml chicken stock optional
- 1 tsp butter
- 100 g onion finely diced
- 100 g ground beef or beef/pork mix, for frying
- 150 g ground beef or beef/pork mix, for using as it is
- ½ tbsp mirin
- 1 tbsp Worcestershire sauce
- 3 tbsp panko breadcrumbs
- 1 ½ tbsp whole milk
- 1 egg yolk
- ½ tsp tomato ketchup
- 1 tsp sugar
- 1 pinch nutmeg powder
- 1 pinch salt and pepper
- 85 g all-purpose flour for dusting
- 1 egg
- 150 g panko breadcrumbs
- dried parsley to garnish
- cooking oil to fry
Sauce
- 1 tbsp tomato ketchup
- 1 tbsp Worcestershire sauce
- 1 tsp oyster sauce
- 1 dash olive oil
- 1 dash rice vinegar
My recommended brands of ingredients and seasonings can be found in my Japanese pantry guide.
Can’t find certain Japanese ingredients? See my substitution guide here.
Instructions
- Optional step: Add 50 ml chicken stock and ½ tsp gelatin powder to a microwaveable bowl. Let it bloom for 5-10 minutes and then microwave for 20-second intervals until the gelatin has dissolved. Place it in the refrigerator to set (approx 3 hours). Once set, use a spoon to mix and break it up into small pieces.

- Heat a frying pan on medium and melt 1 tsp butter. Add 100 g onion and fry until softened and slightly golden.
- Add 100 g ground beef to the pan and fry until browned.
- Pour in ½ tbsp mirin and 1 tbsp Worcestershire sauce. Stir and continue to fry until the liquid is almost gone, then remove the pan from heat and leave the mixture to cool to room temperature.
- In a small bowl, mix 3 tbsp panko breadcrumbs with 1 ½ tbsp whole milk.
- Place 150 g ground beef in a mixing bowl and sprinkle with 1 pinch salt and pepper.
- Add the wet panko mixture, 1 egg yolk, ½ tsp tomato ketchup, 1 tsp sugar, 1 pinch nutmeg powder, and the cooled meat/onion mixture from earlier to the bowl. Mix well. (If using chicken stock jelly, add that here too.)
- Divide the mixture into equal portions (I shaped into 4) and shape into ovals/discs.
- Place the patties on a tray, cover and rest in the fridge for 30 minutes.
- Preheat your cooking oil to 160 °C (320 °F). While you wait, prepare 3 plates or containers. One with 85 g all-purpose flour, one with 1 egg (whisked) and one with 150 g panko breadcrumbs.
- Coat each patty with flour and pat off the excess. Coat with an even layer of whisked egg and then a generous layer of panko breadcrumbs. Press them down gently without squashing the patty to secure them.
- Coat each patty with egg and panko one more time.
- Place the breaded patties in the oil and fry for 2 minutes on each side. Be careful not to overcrowd the oil and cook in batches if necessary.
- Remove the patties from the oil and place them on a wire rack. Increase the heat of the oil to 180 °C (356 °F).
- Once the oil temperature has increased, return the menchi katsu to the oil for 1-2 minutes on each side or until golden and crispy.
- Place on a wire rack to drain the excess oil.
- Mix the sauce ingredients in a small bowl or serving jug.
- Serve menchi katsu with a sprinkling of dry parsley and the homemade sauce. Drizzle or dip and enjoy!

Hello! I don’t understand this instruction, so there is 2 separated minced meat and 2 different ways to handle them? the 100 gr is cooked and the 150gr is not cooked, then combined? Thanks!
Hi! That’s exactly right 🙂 I cook some of the mince before mixing it in so that I can add more flavours during the cooking process, then the uncooked mince is to keep it juicy. Thanks for your question!
Thank you for your reply! I’ll try this this weekend but with baked version, hopefully it will be as good as your double fry version.. have a good weekend! Thank you for sharing all the wonderful recipes and techniques, cheers!
Anytime! Thank you for your kind words, hope you enjoy the recipe! 🙂
Recently learned about menchi katsu after my trip to Japan last November so I wanted to make it from scratch. I’m so happy I went with your recipe, the extra step to adding the chicken broth gelatin made it juicy and was definitely worth the time and effort. I made a mentaiko bechamel along with the sauce suggested, both were delicious. Thank you so much for sharing, I will be doubling the recipe next time bc it was divine!
Hi teresu,
Thank you so much for trying my recipe! I’m happy that you tried the jelly trick and you enjoyed it! I’m honored you found it divine enough to double the recipe next time! Thank you for sharing your experience.
Yuto
Great recipe! This was delicious. I didn’t add the gelatin mixture and used 80-20 ground beef. Still turned out super moist!
Hi Liv,
Thank you for trying this recipe! Love the 80-20 beef choice! Really happy to hear it turned out moist and delicious! 🙂
Yuto
Made this tonight and it was very good. I skipped the gelatin and used 80/20 ground beef and the katsu was very moist. I also pan fried it and it turned out well. I decided to make a Japanese curry sauce to drizzle over the Katsu. Will definitely make again.
Hi Selina,
Thank you for trying this recipe! I’m so glad to hear it turned out well! Love the twist with Japanese curry sauce! 🙂
Yuto
Great tasting and relatively easy to prepare, I left out the gelatin and chicken stock and made a mirin alternative using 1Tbsp of honey to 1 Tsp of rice vinegar. Highly rate this recipe, the whole family enjoyed it greatly, including requests for me to make again soon!
Hi Andy,
Thank you so much for giving it a try! I really like the creative substitutions you made! And I’m so glad your family enjoyed it enough to ask for it again! 🙂
Yuto
I have been searching for ages to find a recipe of these spectacular meatballs I ate years ago when Inwas in a business trip in Kitchijoji. But I was not aware of the name. Thank you very much for this recipe! I Will make this very soon and I am looking forward to it! Do you think you can freeze Menchi Katsu before deepfrying or so I can make Some stock? Domo Arigato gozaimazu.
Hi Jeffrey,
Thank you so much for your kind comment! I’m really happy I could help you rediscover this dish. Yes, you can definitely freeze them before frying! Just keep in mind that they’ll take a bit longer to cook through, so I recommend extending the first (low-temperature) frying time slightly.
Yuto
Goodmorning. I am about to make this receipe. You mention to use 1/2 tsp tomato ketchup and 1 tsp sugar. Just to make sure, this is half a teaspoon tomato ketchup? (I am not a very good cook, so I do’t have knowledge about ratio’s.
Hi Jeffrey,
Thank you for wanting to try this recipe! That’s correct. I can confirm 1/2 tsp tomato ketchup is half a teaspoon (2.5ml) and 1 tsp sugar is 1 teaspoon (5ml).
Yuto
Is there anyway to substitute a diary free milk for the cow’s milk?
Hi K,
Yes, any unsweetened dairy-free milk like soy, oat, or almond milk will work perfectly since it’s only used in a small amount to moisten the panko binder! 🙂
Yuto
Thank you! We tried it and my other half loved it.
Hi K,
Thank you so much for your follow-up feedback! I’m happy you guys enjoyed it! 🙂
Yuto
My family enjoyed the menchi katsu. The tempura was fluffy and had a nice crunch. Served it with some cabbage salad and sesame dressing. Love the option to change the servings between 1-3 and how it automatically adjusted the recipe. So smart!
Hi Kim,
So glad your family enjoyed it! Pairing it with cabbage salad and sesame dressing sounds like the perfect combo for this. Thanks so much for taking the time to share, it genuinely means a lot! 🙂
Yuto