

If you love the light and fluffy texture of strawberry shortcake or matcha roll cake, this Japanese soufflé cheesecake belongs at the top of your baking list.
I’ll be honest, this recipe nearly broke me. I baked it what felt like a thousand times, convinced that I would never publish it, until I finally cracked the technique that gives you a tall, perfectly fluffy cheesecake with no cracks, and now I cannot stop making it!

Japanese SOUFFLé CHEESECAKE
Recipe Snapshot
- What is it? A light, airy Japanese cake with a fluffy “fuwa-fuwa” texture, somewhere between a cheesecake and a soufflé. It’s baked in a hot water bath for a delicate and jiggly crumb.
- Flavor profile: Light, airy, delicate.
- Why you’ll love this recipe: The cloud-like texture is lighter than any cheesecake you’ve ever tried before. My recipe includes troubleshooting for every common failure (cracks, sinking, dense bottoms) and precise temperatures so you will get a beautiful rise every time.
- Must-haves: Full fat block of cream cheese, eggs, 15cm round cake pan (plus foil if using spring form), electric hand mixer for meringue, deep roasting tray for water bath.
- Skill Level: Hard, but I share tips to prevent failure!
- Freezer Friendly: Yes.
What is Soufflé Cheesecake?
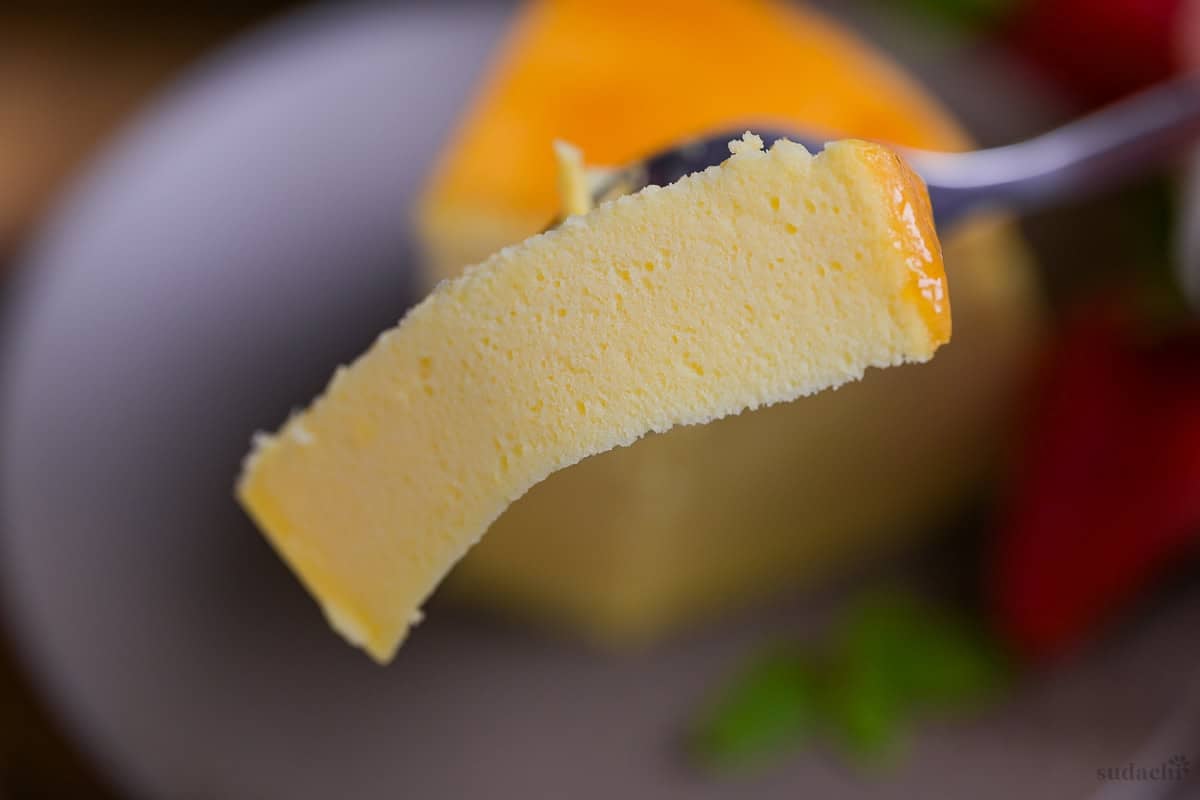
Japanese soufflé cheesecake is a light and airy cake with a cloud-like texture and gentle wobble that has earned it nicknames like cotton cheesecake. While most cheesecakes are celebrated for their dense texture and rich, tangy flavor, soufflé cheesecake leans in the opposite direction. It’s subtly sweet, with the cream cheese flavor sitting in the background rather than taking center stage, and feels almost closer to a chiffon cake than a cheesecake.
This cake is part of a long tradition of Japanese chefs taking inspiration from rich, sweet European desserts, and reinventing them into something light, delicate and distinctly Japanese. The fluffy “fuwa-fuwa” quality is something that defines a whole category of modern Japanese baking.
The Origins of Japanese Soufflé Cheesecake
The first Japanese soufflé cheesecake was created in 1969 by Tomotaro Kuzuno, who was the president of Kobe-based confectionery chain Morozoff at the time. During a trip to Berlin, Kuzuno encountered a German-style cheesecake called “käsekuchen” which was made with quark and whipped egg whites. Inspired by its light and fluffy texture, he adapted the recipe and refined the technique to create an even airier and delicate cake to suit Japanese tastes.
Soufflé cheesecake really took off in the 70s, and it became a staple in Japanese cafes and bakeries ever since. Speciality stores like Rikuro Ojisan and Uncle Testu have since helped spread its fame in Japan and beyond.
Soufflé Cheesecake Ingredients
Ingredients
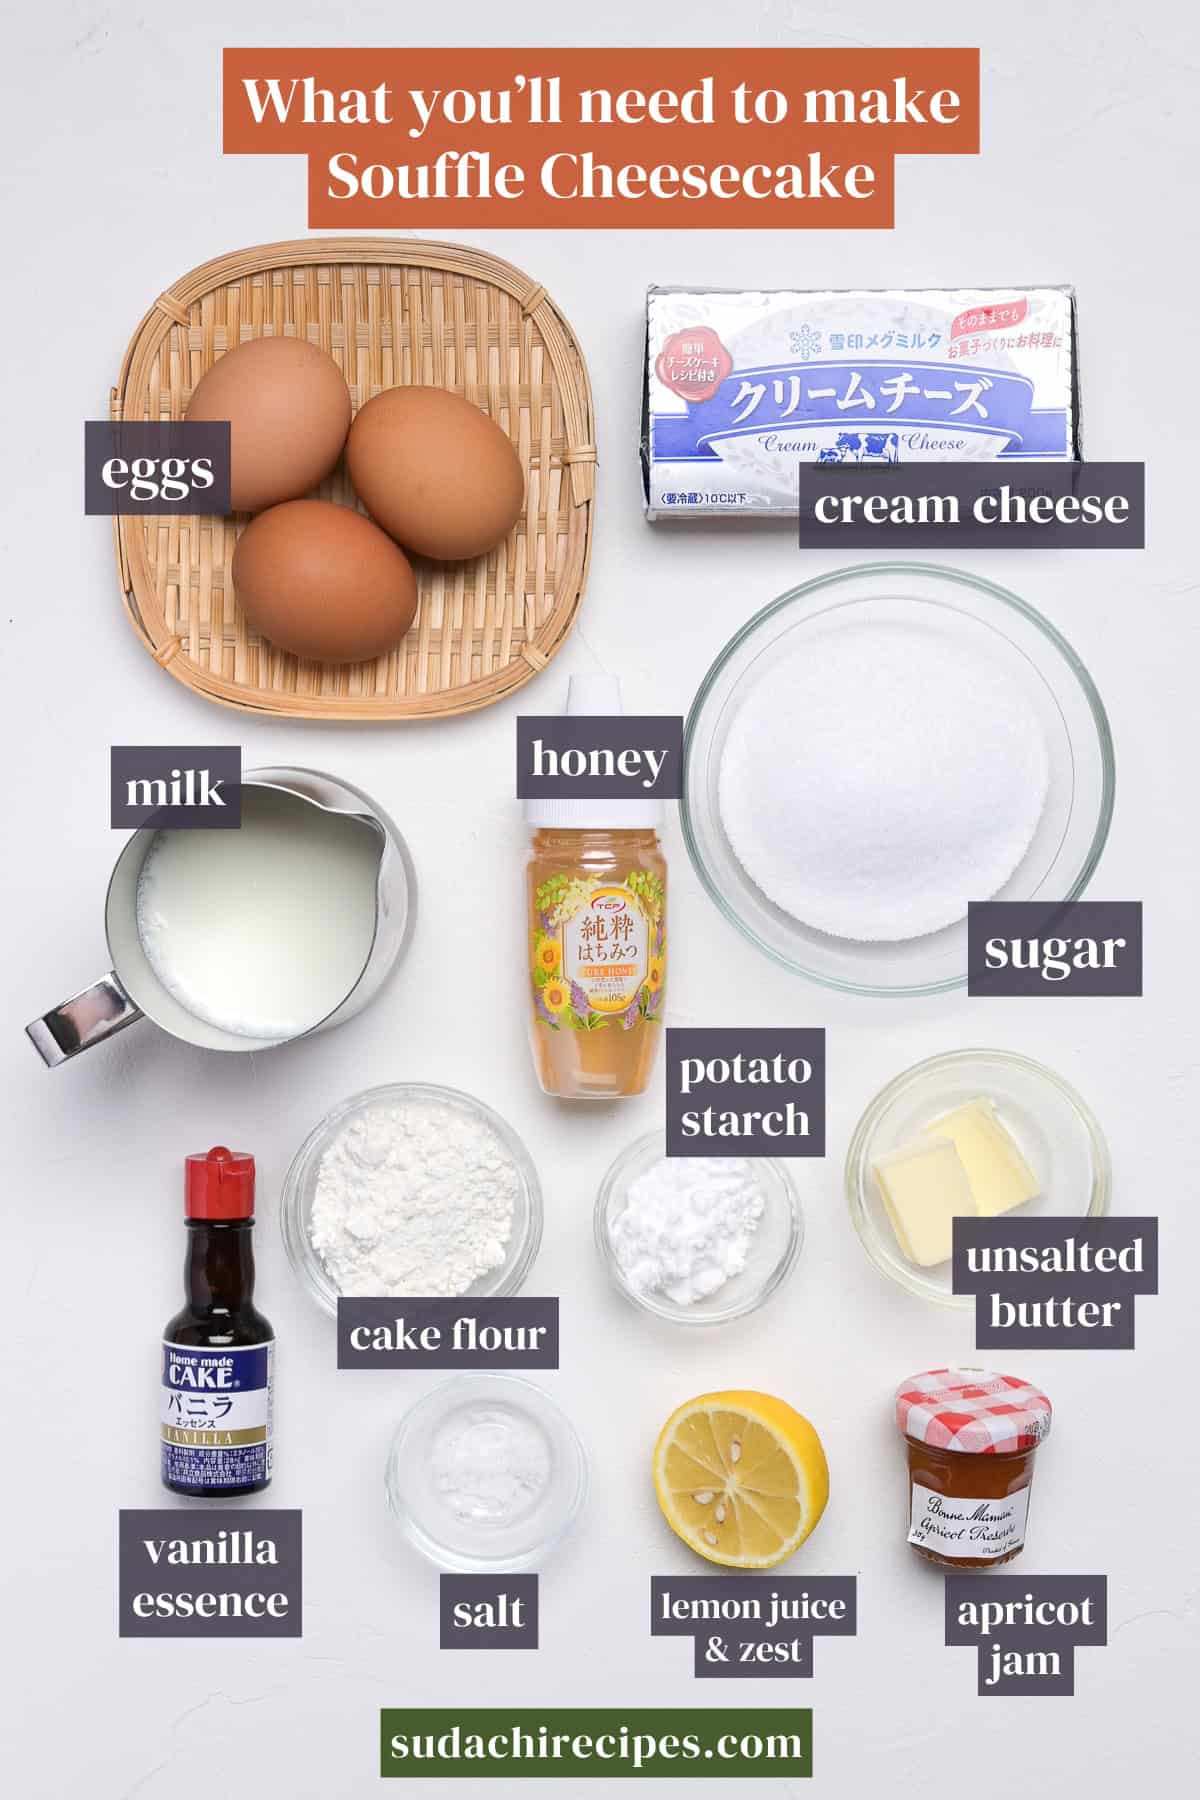
The key ingredients for Japanese Soufflé Cheesecake are pretty straightforward.
- Cream cheese: Always use a block of full fat cream cheese for a rich, smooth texture and stable structure. Spreadable types tend to contain extra water and stabilizers that throw off the liquid ratio, and can make the cheesecake dense or gummy.
- Eggs: Use large chicken eggs (about 50g without the shell) separated and warmed to room temperature to ensure the eggs whip up to full volume, which is the foundation of the cheesecake’s airy rise.
- Flour blend: A blend of unbleached cake flour and potato starch keep the crumb light and tender. Cake flour has lower protein content than all-purpose flour, which means less gluten development and a softer texture. In a pinch, all purpose flour and cornstarch are reasonable substitutes, but might make the texture a little more dense. And if you want to make it gluten free, swap the wheat flour for all starch (a blend 2:1 blend of potato starch and cornstarch works well here), just keep in mind that the cheesecake might become a bit more delicate.
Tools
- Electric whisk: to whip the meringue.
- 15cm round cake pan: preferably with a fixed base (or a spring form pan wrapped with aluminium foil).
- Baking paper: to line the cake pan.
- Roasting pan: or similar wide deep pan for the hot water bath.
Flavor Variations
Experiment with different flavors! Here are a few ideas:
- Matcha: Replace the half of the starch with high quality matcha powder.
- Tea: Tea powders work best (just replace half of the starch). If you want to use tea leaves, steep them in warmed milk until concentrated, then strain before mixing with the cream cheese and butter.
- Cocoa: Replace the starch with high quality cocoa powder.
- Flavored essence/extracts: Can be added in small amounts instead of vanilla essence.
- Orange/Yuzu: Switch the lemon zest for a different citrus zests.
How to Make My Japanese Soufflé Cheesecake Recipe
If you prefer to watch the process in action, check out my video of this soufflé cheesecake recipe!
Before you start:
- Preheat your oven to 160℃ (320℉). This is actually hotter than we need, but some heat will be lost when we open the oven door.
- Separate the egg yolks and whites while cold into different bowls. Cold egg yolks are less likely to break, which is important for keeping them from splitting into the whites. Use a thoroughly clean and dry glass (or steel) mixing bowl for the egg whites. Let the whites warm to room temperature before you use them.
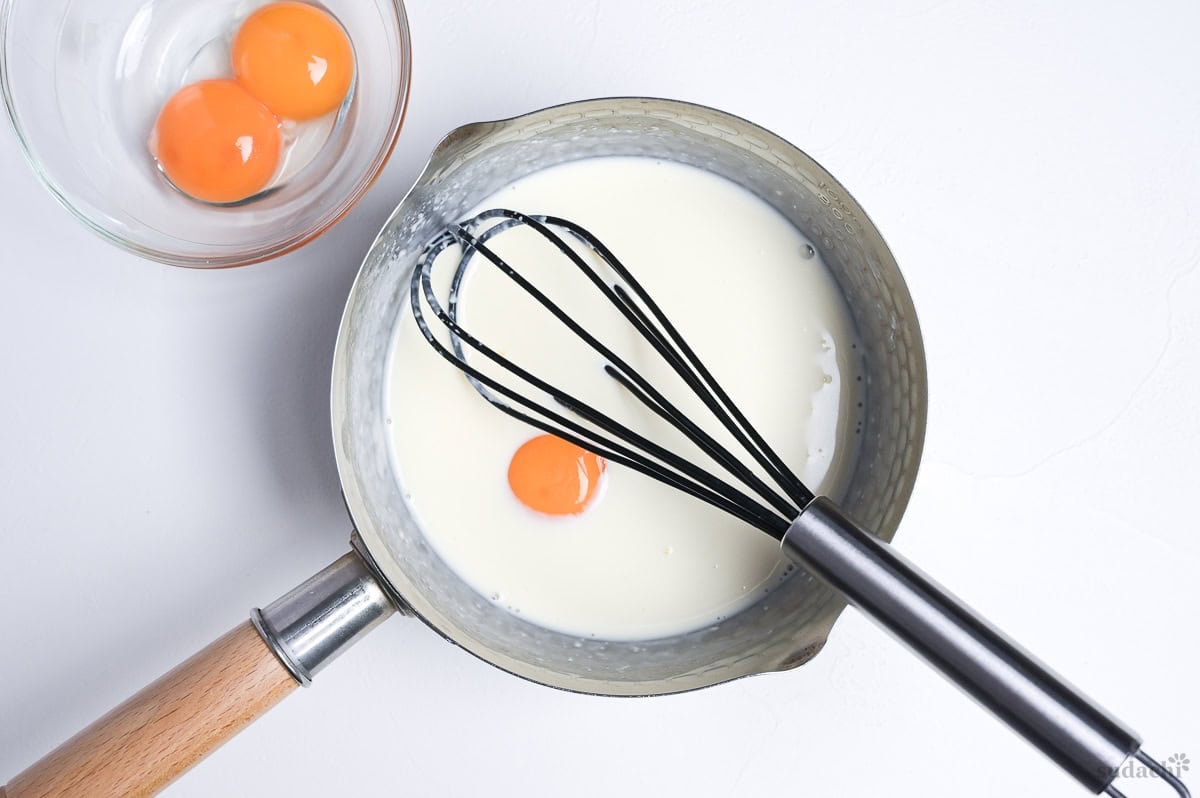
i. Add the cream cheese, milk, and butter to a small saucepan. Heat on low and mix continuously until the cream cheese is soft and smooth. Alternatively, heat in a microwave-safe bowl in 20-30 second increments, mixing each time.
It is important not to let the mixture boil or get too hot. As soon as the cream cheese is about three-quarters melted, turn off the heat and finish melting it with the residual heat. Overheating can cause the milk to split or curdle, and the mixture might form a skin on top once cooled.
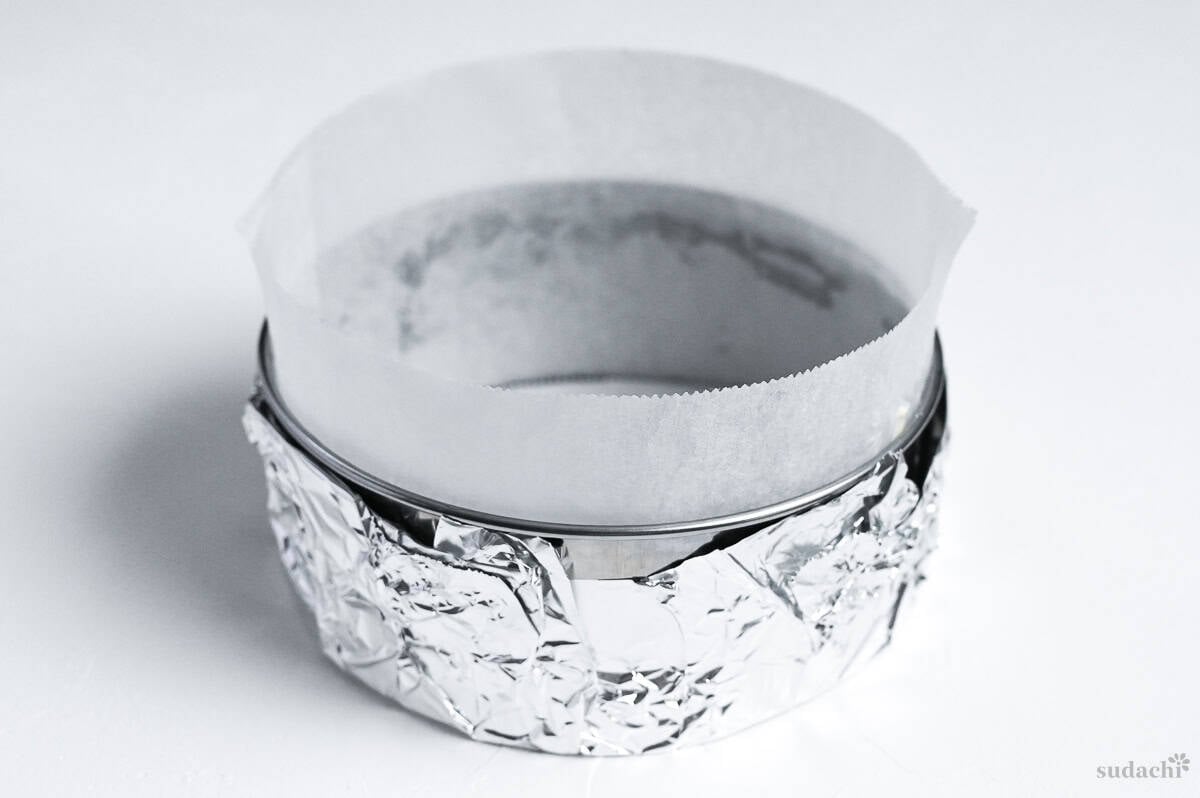
ii. Take the pan off the heat and leave to cool for a few minutes. While you wait, measure out the rest of your ingredients and line your cake pan with baking paper. This cheesecake rises a lot, so cut the paper on the edges taller than the pan.
Tip: If using a fixed base pan, lay two strips of baking paper across the bottom in a plus sign before lining the base and sides. The overhanging ends act like handles which can help you lift the cheesecake from the pan cleanly. Use butter or oil spray to help stick the baking paper to the surface of the pan.
If your cake pan has a removable base, we need to take extra care to prevent water from entering the pan and making the cheesecake soggy. Wrap the base tightly with aluminium foil and make sure it goes up the sides. I use 3 layers to make sure no water can get in.
i. When the pan/bowl is cool enough to touch, add the egg yolks one at a time, whisking gently between each addition. Whisking too vigorously will create unwanted air bubbles.
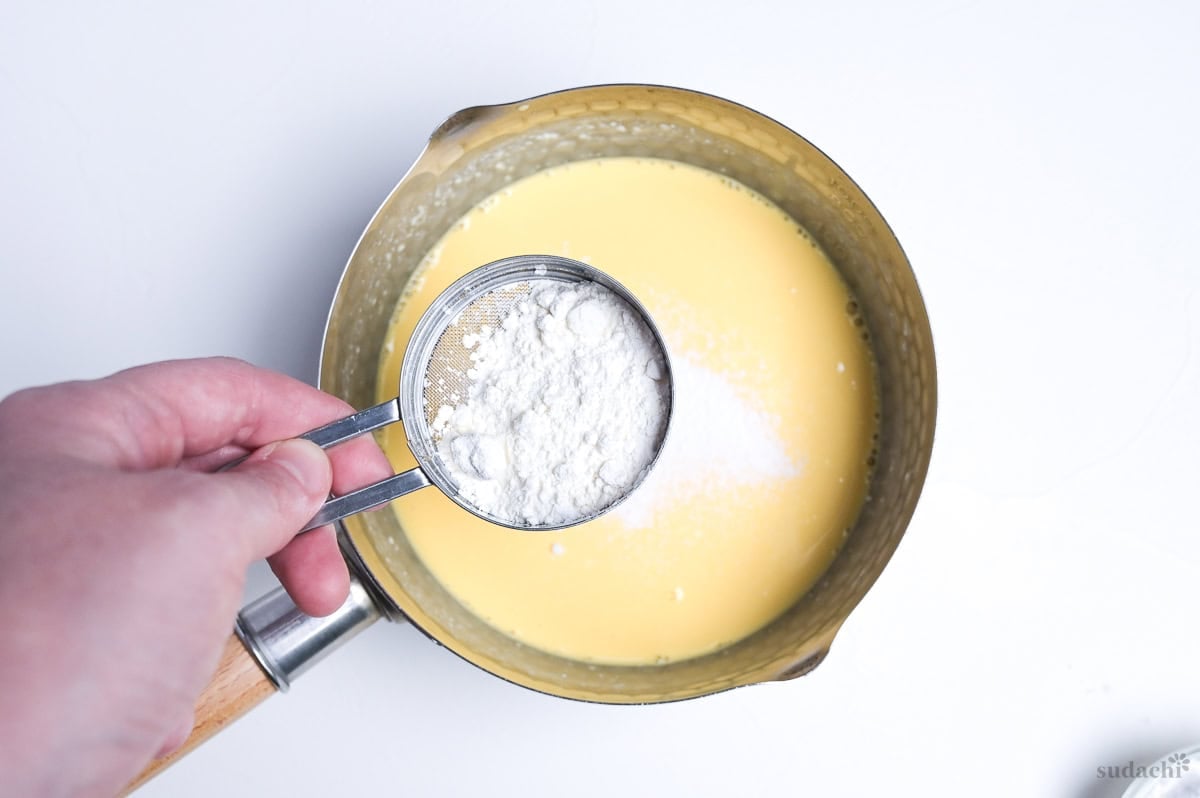
ii. Mix the flour and starch in a small bowl, then sift it into the mixture and mix well. Once well incorporated, pour all of the mixture through a mesh sieve into a new bowl. Use a spatula to work through any lumps of flour or cream cheese.
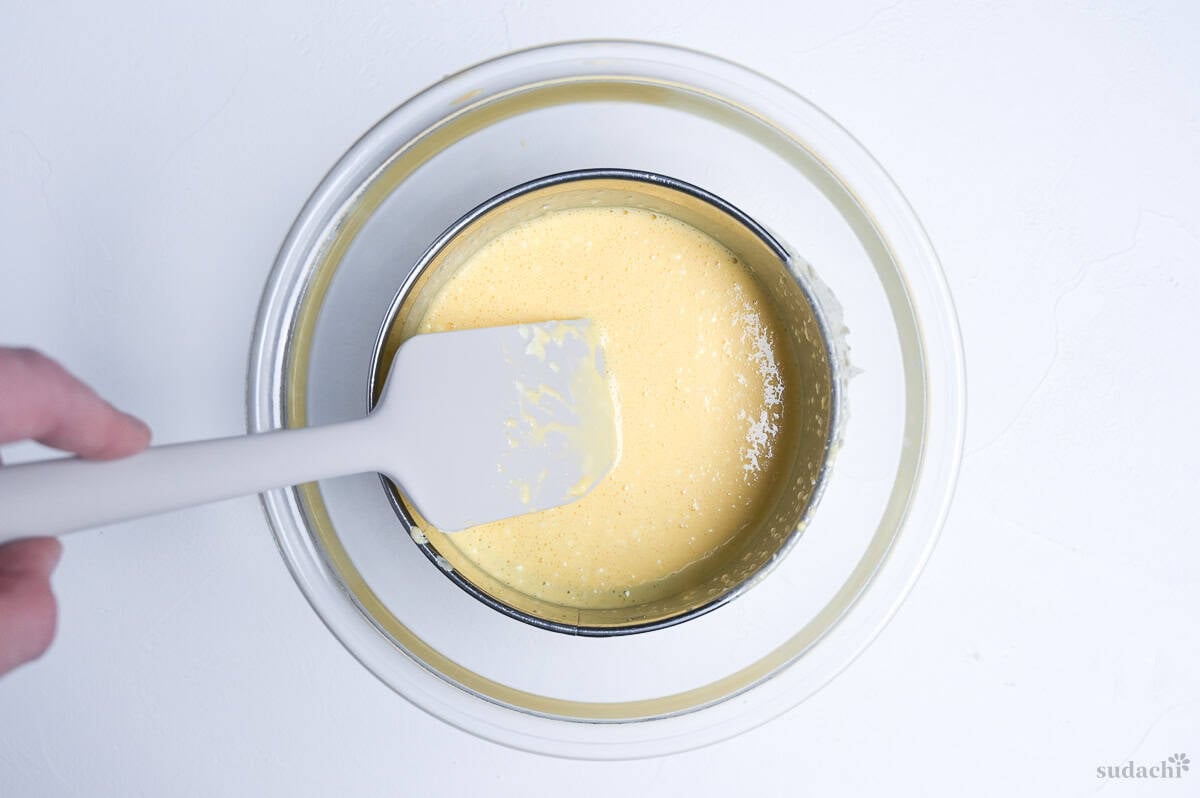
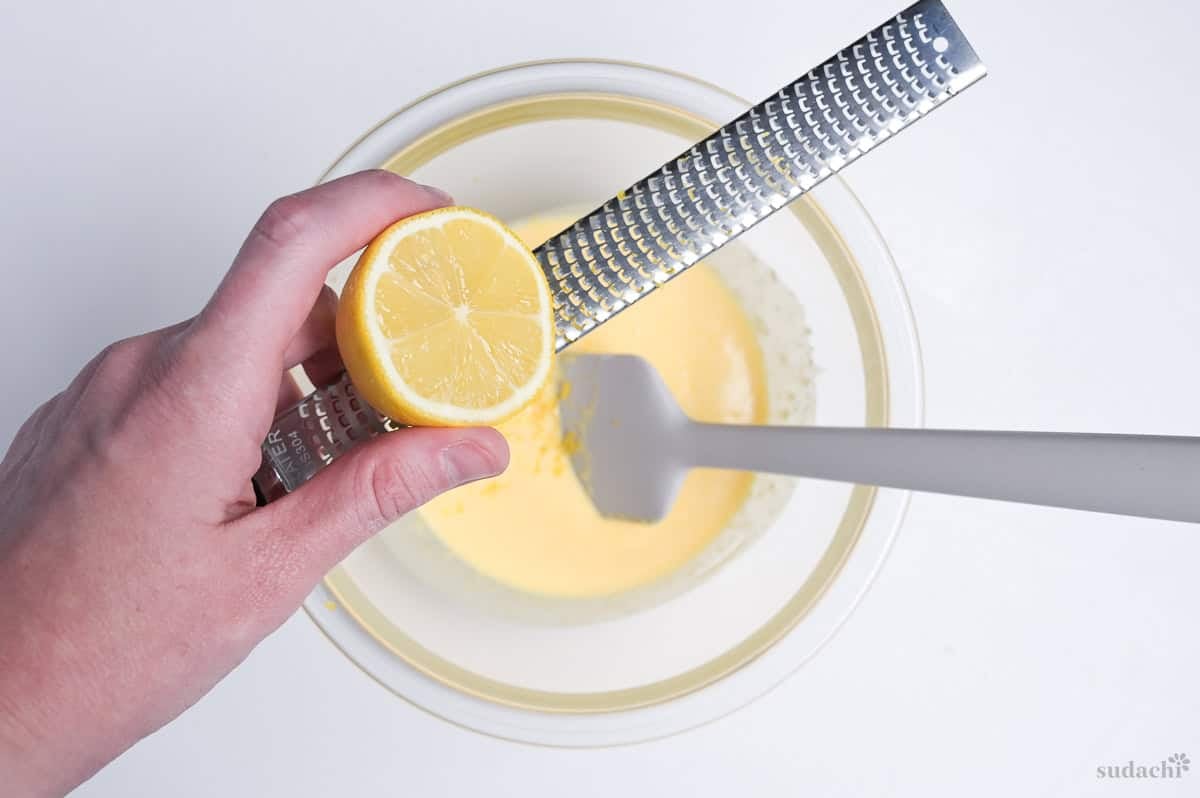
iii. Add a pinch of salt, the vanilla essence, and the zest of half a small lemon. Mix and set aside for later.
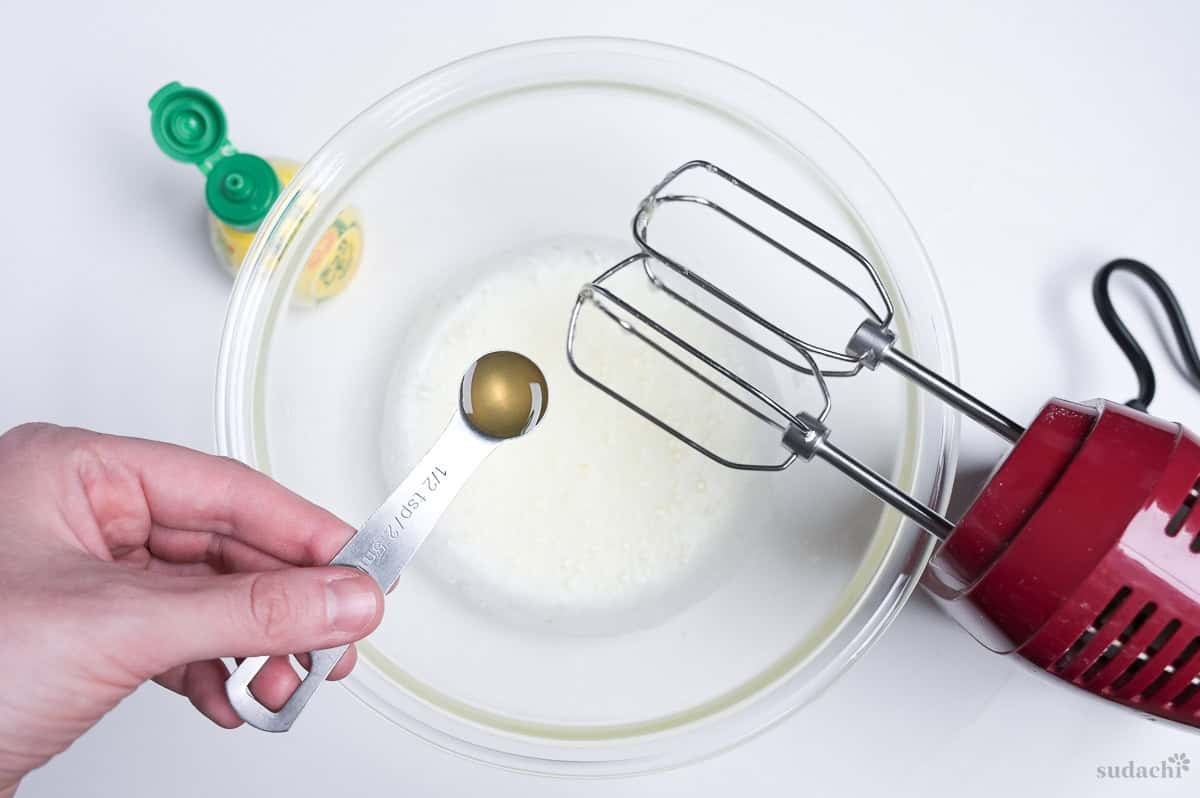
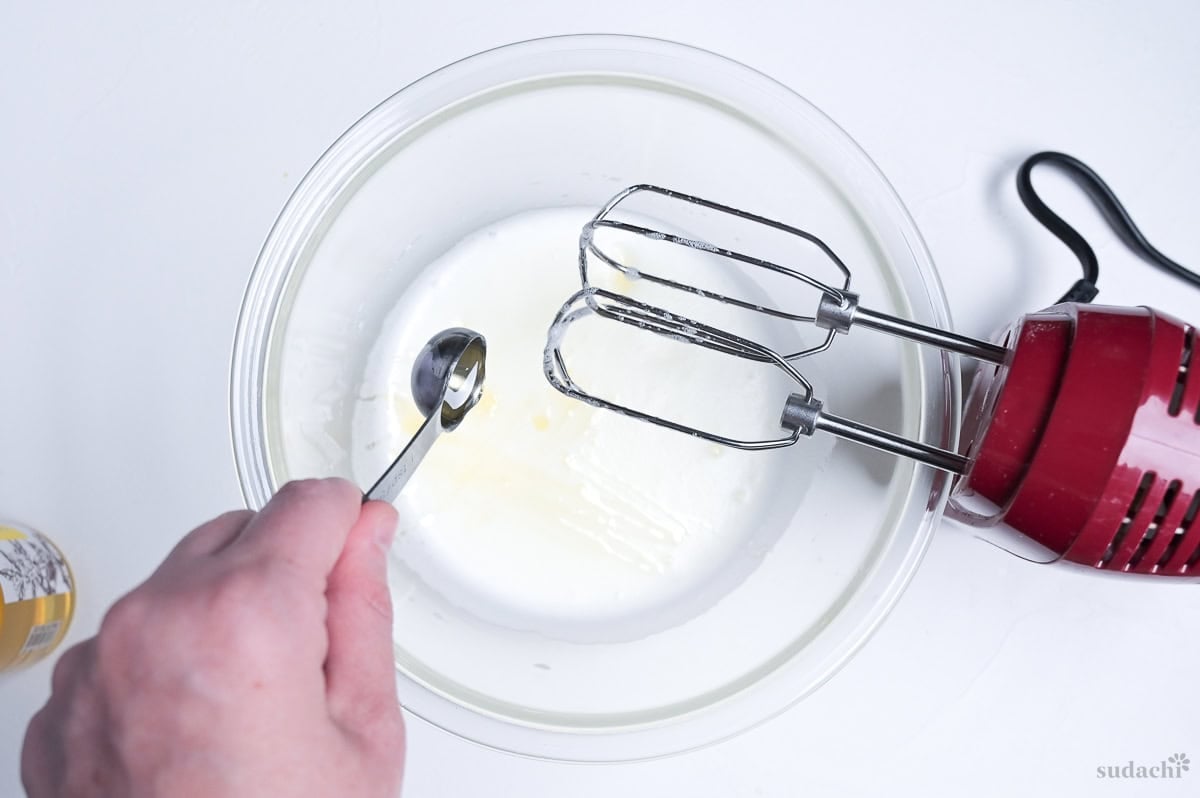
i. Whip the whites on medium speed until foamy and doubled in size, then add the lemon juice. The acidity in the lemon juice helps create a more flexible and stable meringue.
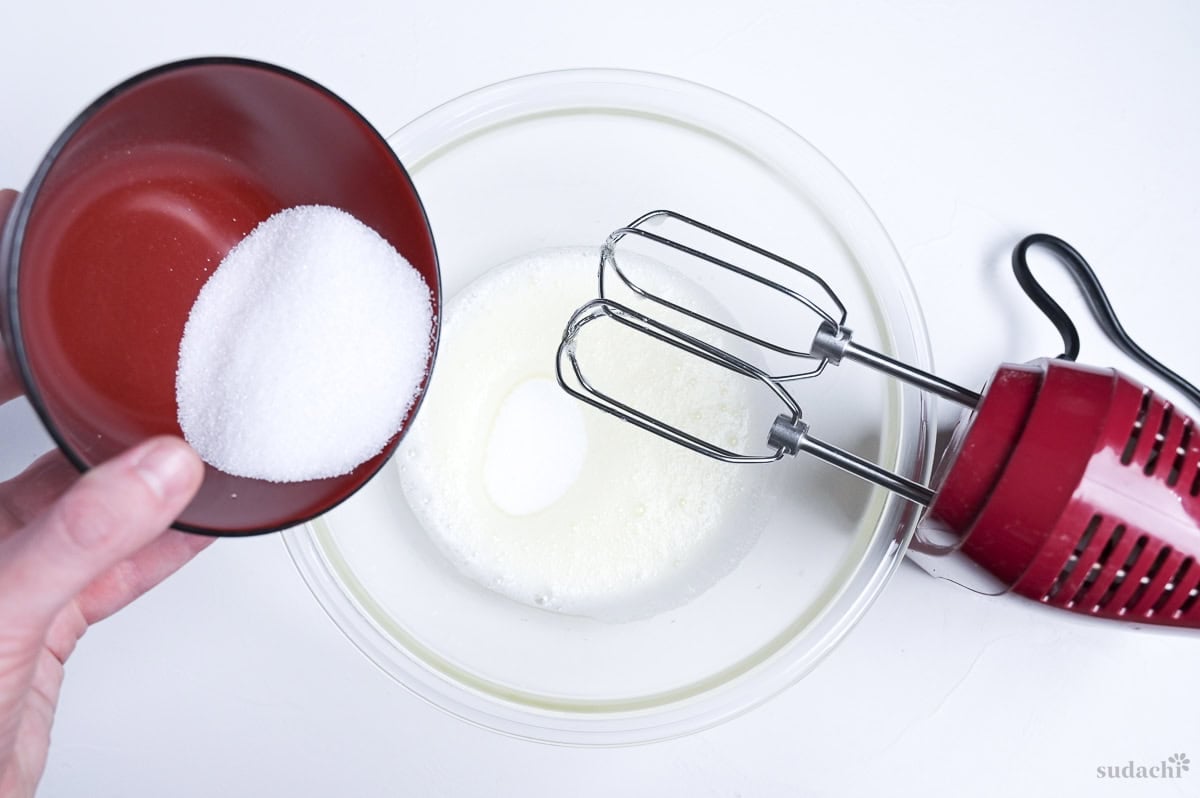
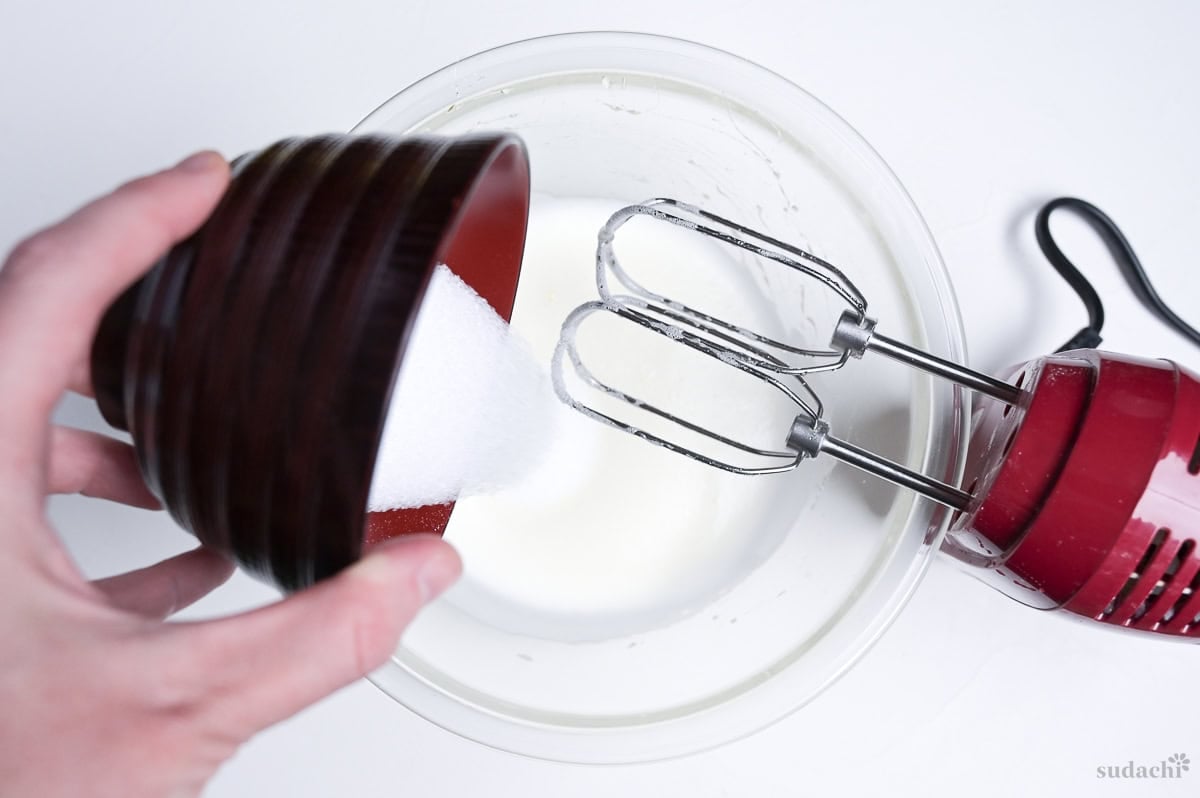
ii. Whip for 10 seconds to incorporate the lemon juice, then add half of the sugar.
iii. Continue to whip on medium or medium low until smooth and slightly glossy, then drizzle in the honey while whisking.
If you use a high speed, your meringue will have large bubbles that pop easily. The goal is microbubbles that are small and stable, and the best way to achieve them is to stick to the lower speeds, even though it takes longer.
Honey might be an unusual addition for meringue, but I had a lot of problems with the cheesecake cracking, so I use honey to help make it a little more flexible. If you can’t use honey, swap for agave syrup or glucose syrup.
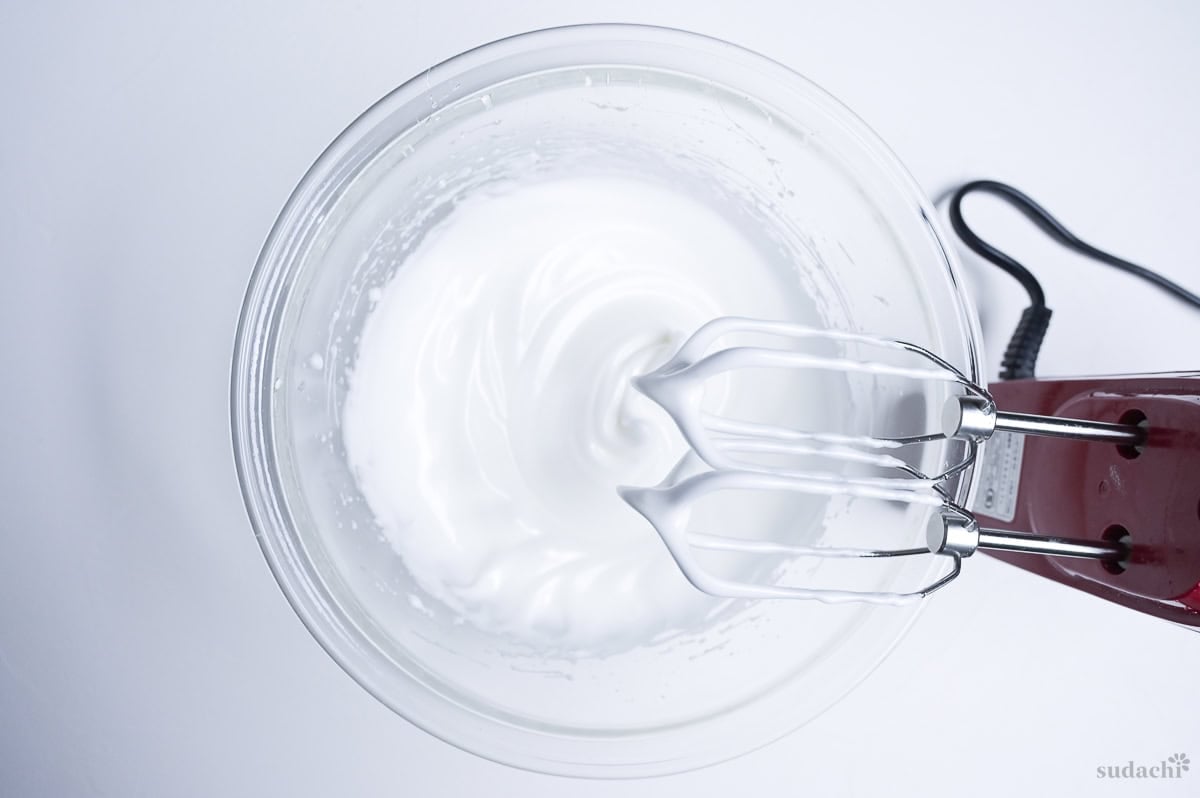
iv. Once the honey is incorporated, scrape down the sides of the bowl and add the other half of the sugar. Continue to whip on medium or medium low until the meringue has very soft peaks that fold over.
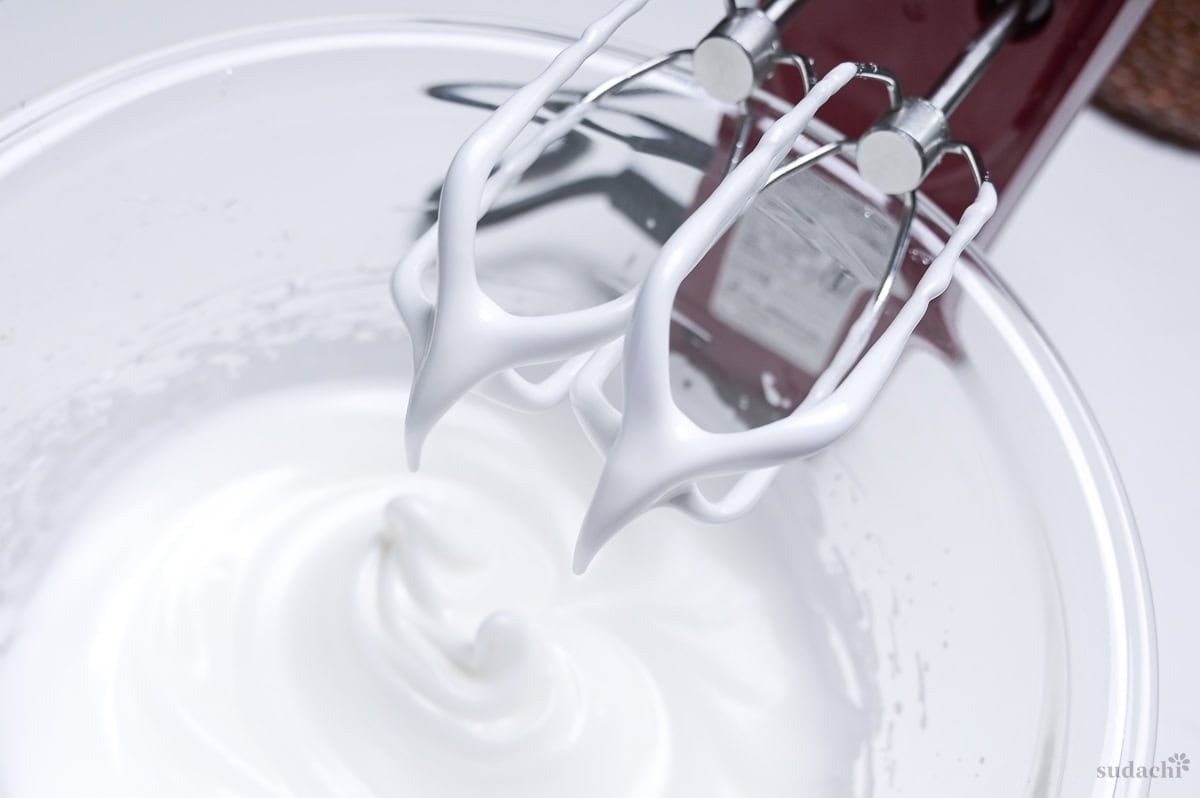
We’re not looking for firm or stiff peaks here, as this can causes the cheesecake to expand too much and make it prone to cracking. It also shouldn’t run off the whisk when lifted, under-whipped meringue will cause the cheesecake to collapse. Soft, stretchy, and flopping over is the sweet spot.
i. Heat water for the water bath to about 50℃ (122℉) using your preferred method. It should be enough to fill your water bath about 2cm (just under 1 inch) deep.
Heating the water for the water bath to about 50℃ helps avoid lowering the oven temperature when it goes in, keeping the bake more stable. On the other hand, if the water is too hot (like boiling) then the base of the cheesecake cooks too fast and can turn rubbery, and it might rise too quickly making the structure unstable and more likely to deflate when it comes out of the oven.
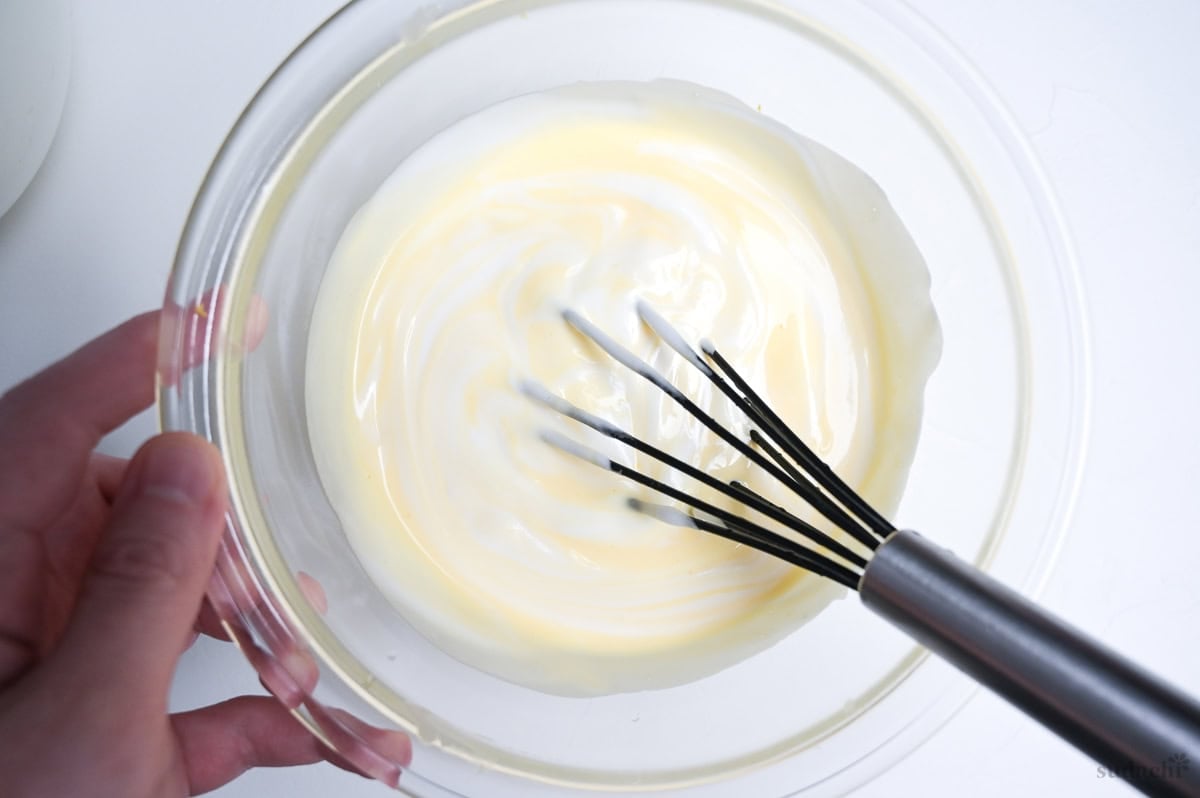
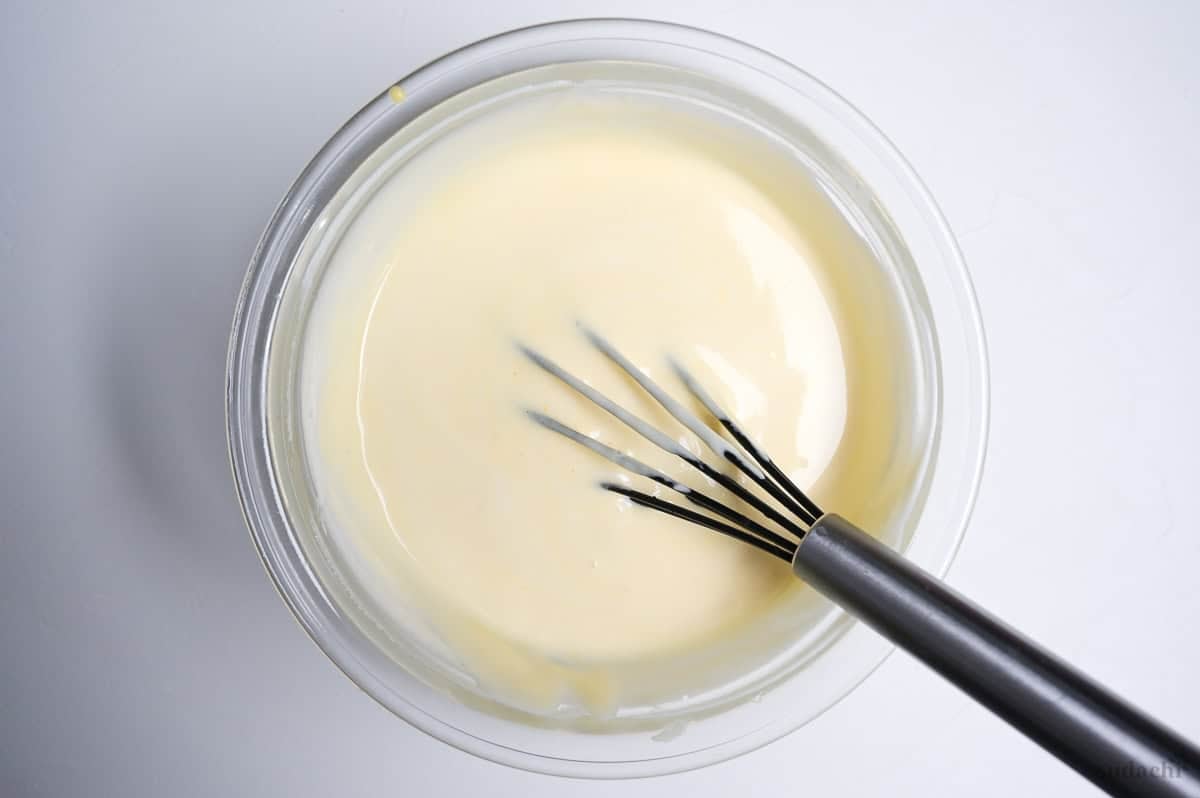
ii. While the water heats, add about one-third of the meringue to the cream cheese mixture and whisk thoroughly. You will lose some air, but that’s okay. This step is called a “sacrifice”. Mixing a little bit of the meringue into the base first lightens it to a similar consistency, so folding in the rest is much easier without deflating the air you just whipped in.

ii. Continue to add the meringue one-third at a time, and use the whisk to gently fold it while turning the bowl. Do not whisk vigorously, as this will deflate the meringue and add large unwanted bubbles to the mixture.
iii. Stop mixing when there are no more streaks of white in the batter.
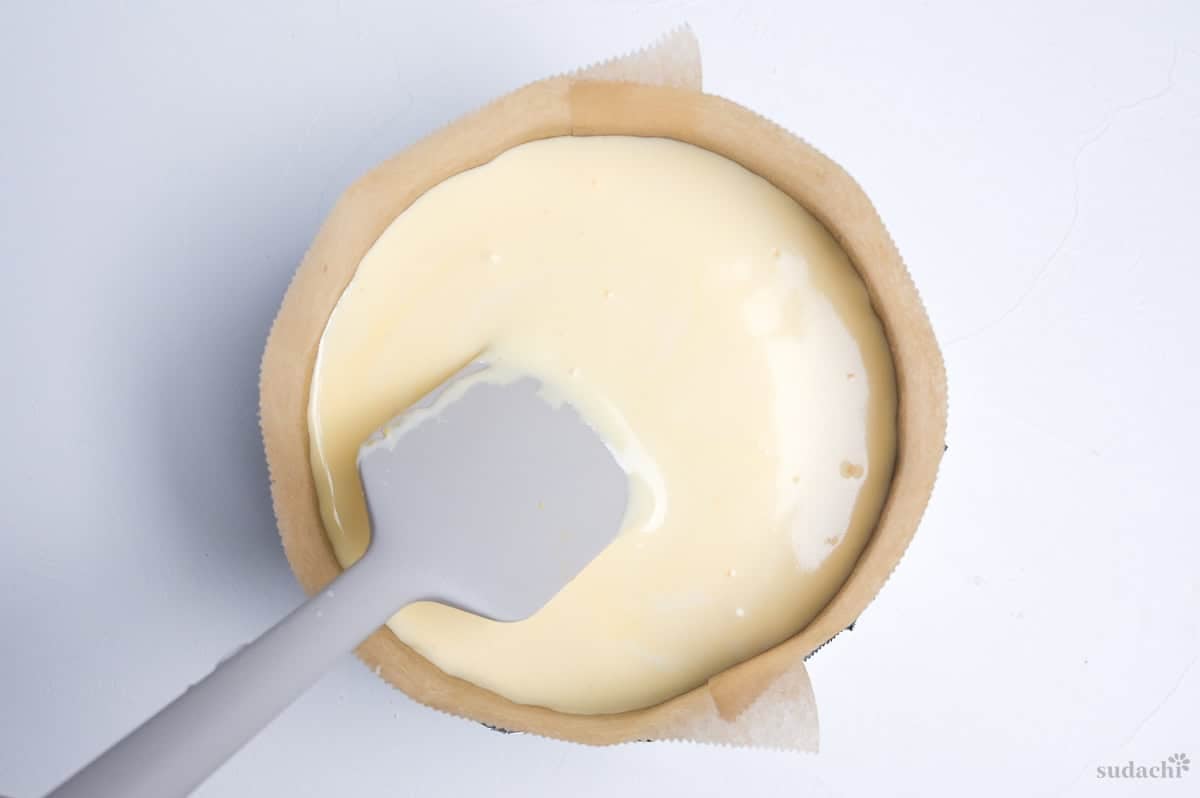
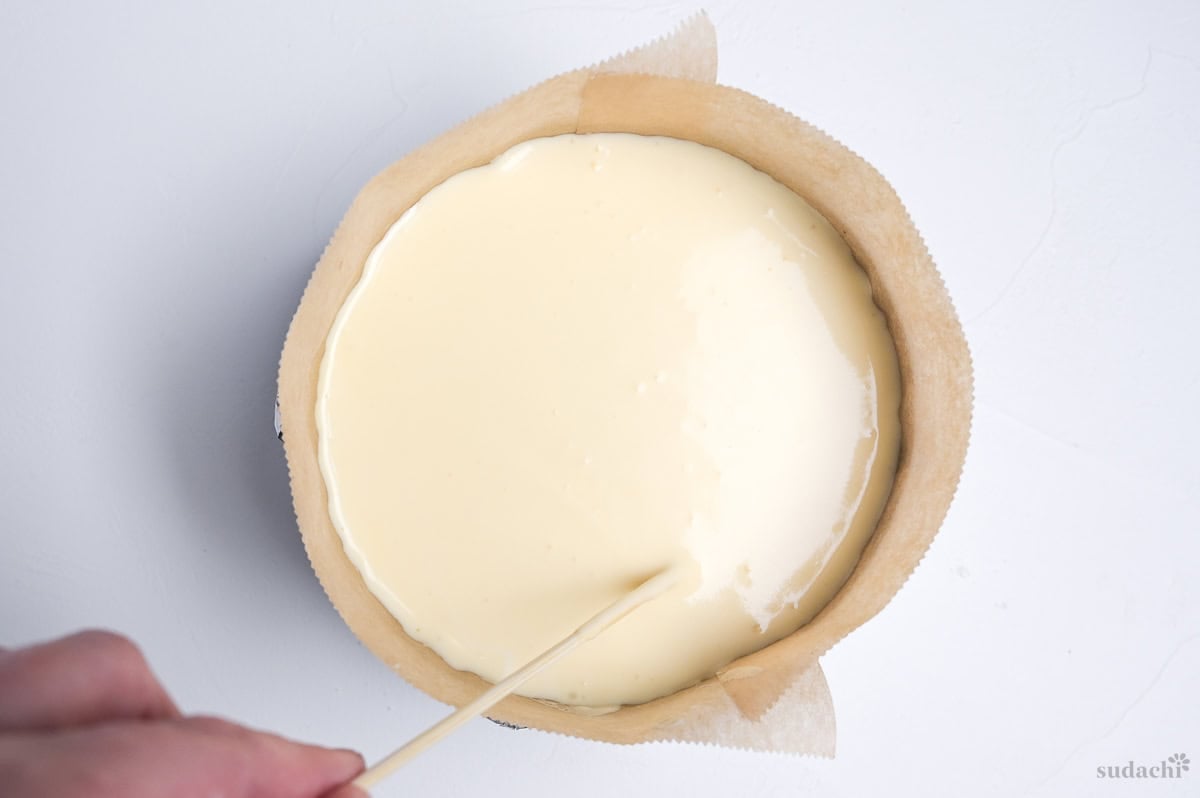
i. Pour the cheesecake batter into your prepared pan. Place a spatula into the center at a 45° angle and move it up and down to send any large air bubbles to the top, then draw through the batter with a bamboo skewer or chopstick to pop them.
ii. Place the cake pan inside your roasting pan and pour the hot water so that it is 2cm deep. Make sure it doesn’t pass over the top of the foil.
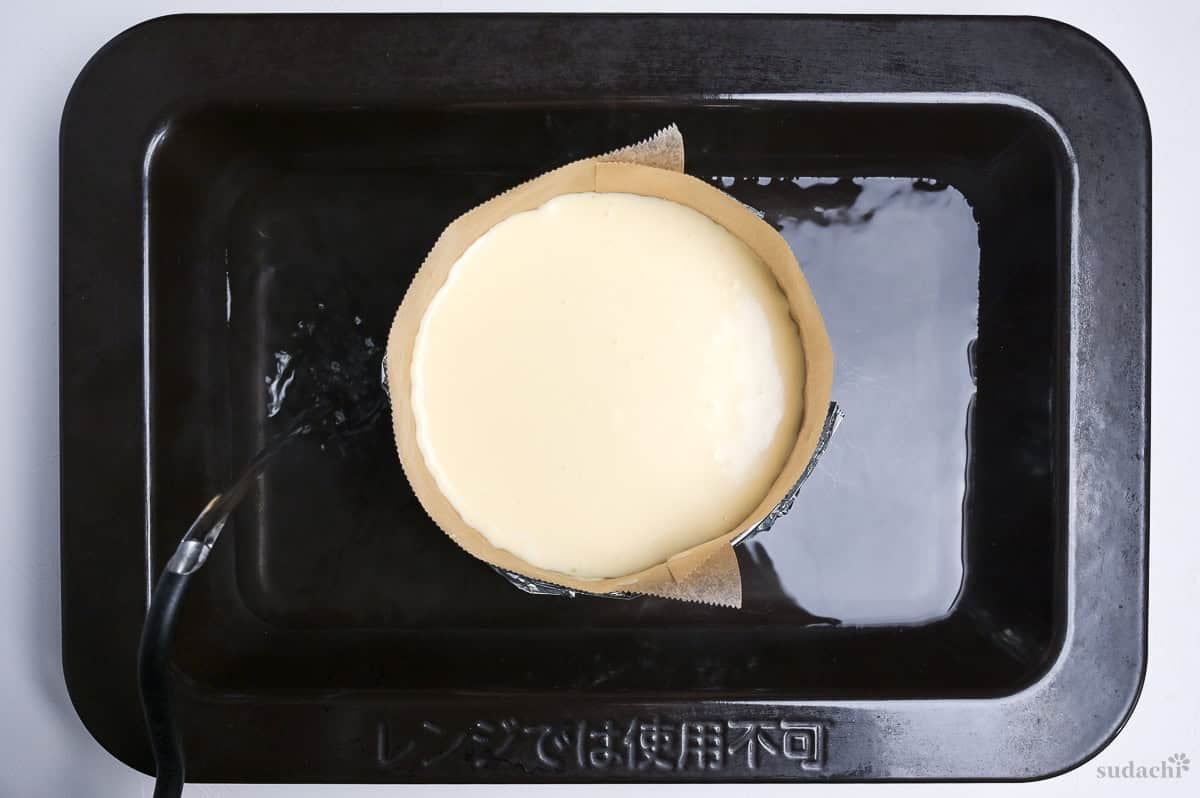
i. Place the roasting pan onto the middle shelf of the oven.
Now here is the tip that changed the way I make soufflé cheesecake forever.
If you’re like me and use a fan assisted oven, place an empty baking sheet on the shelf above it to protect it from harsh dry heat and keep the steam from the water bath near the top of the cheesecake. This simple step put a stop to my cracking problem.
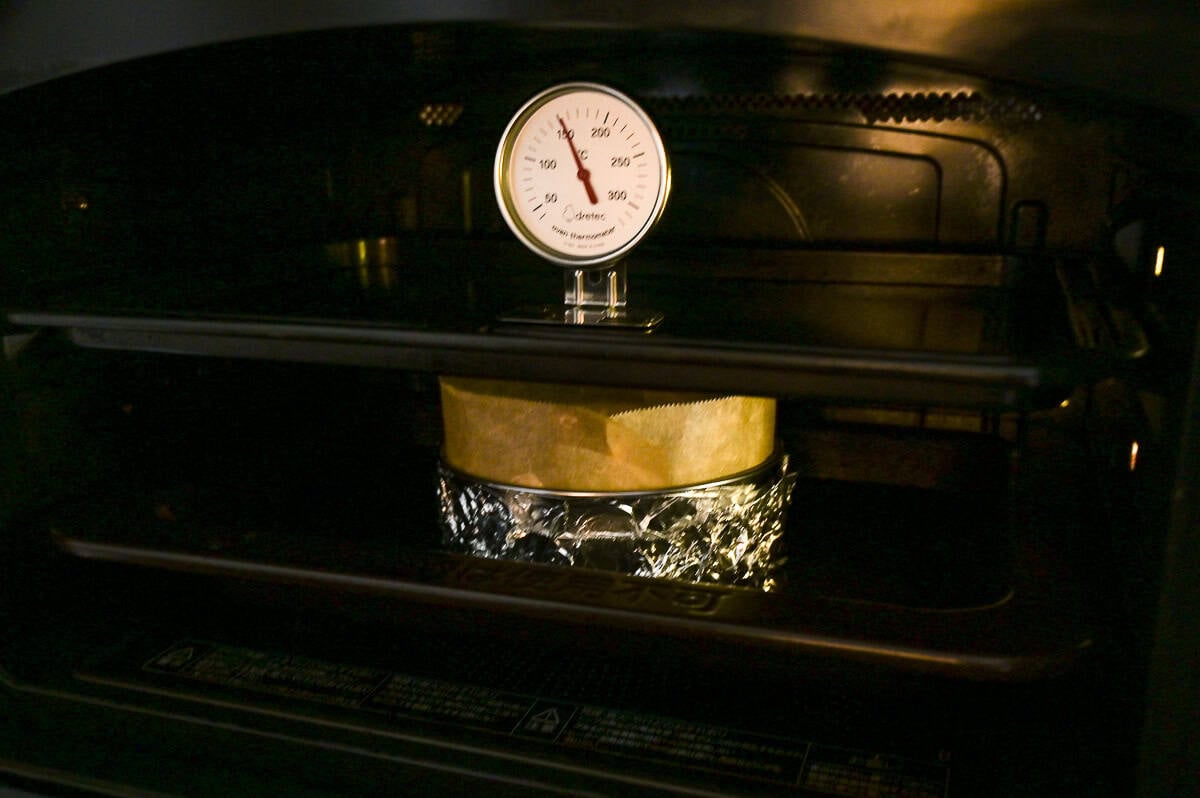
ii. Reduce the oven temperature to 140℃ (284℉) and bake for 50-60 minutes. Check occasionally for signs of cracking or rising too quickly, and reduce the oven temperature by 10-20℃ if needed. Avoid opening the oven while it bakes, as this can make it deflate.
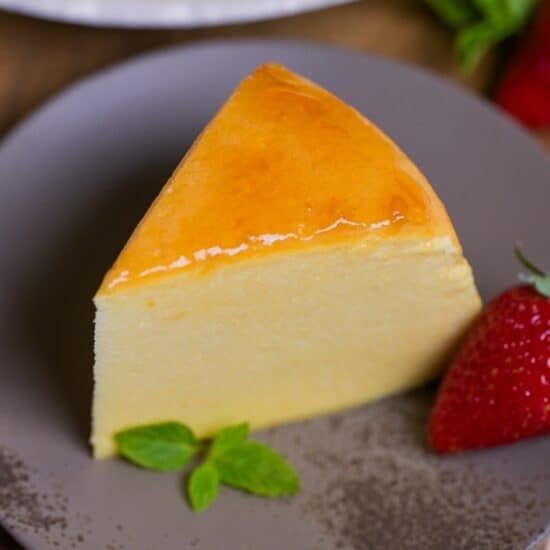
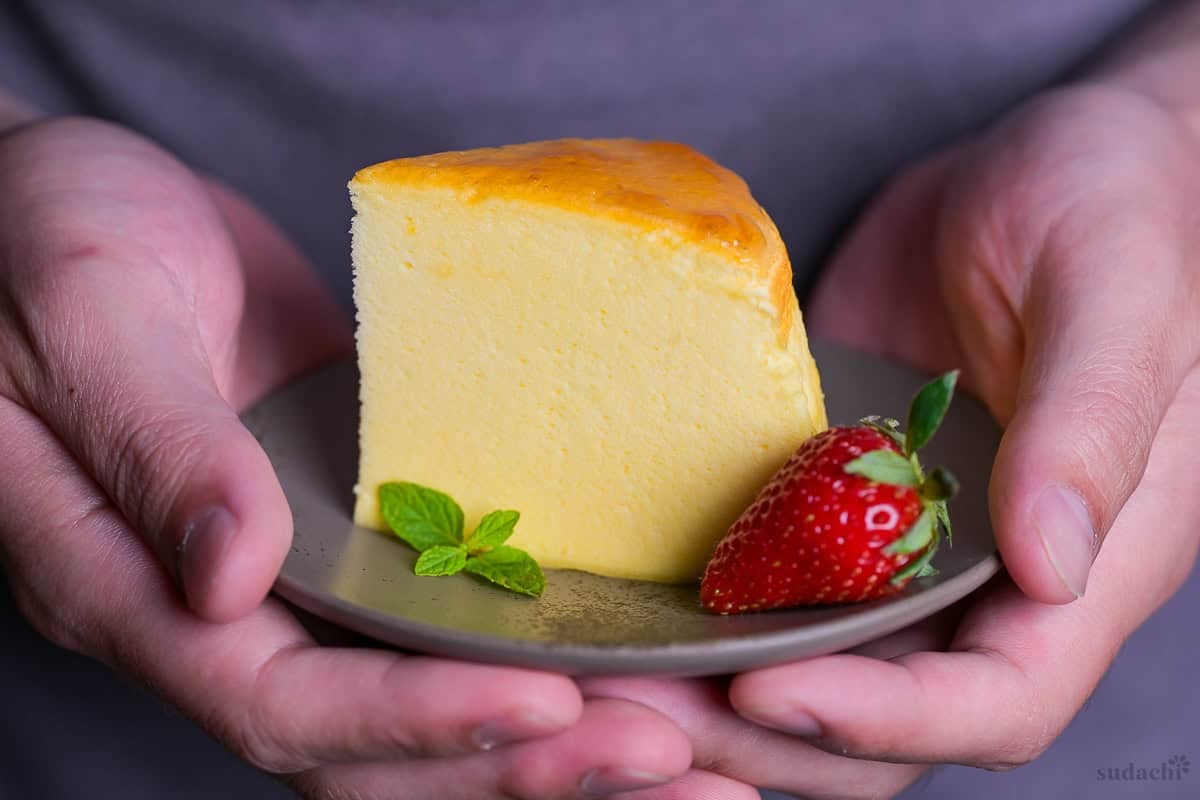
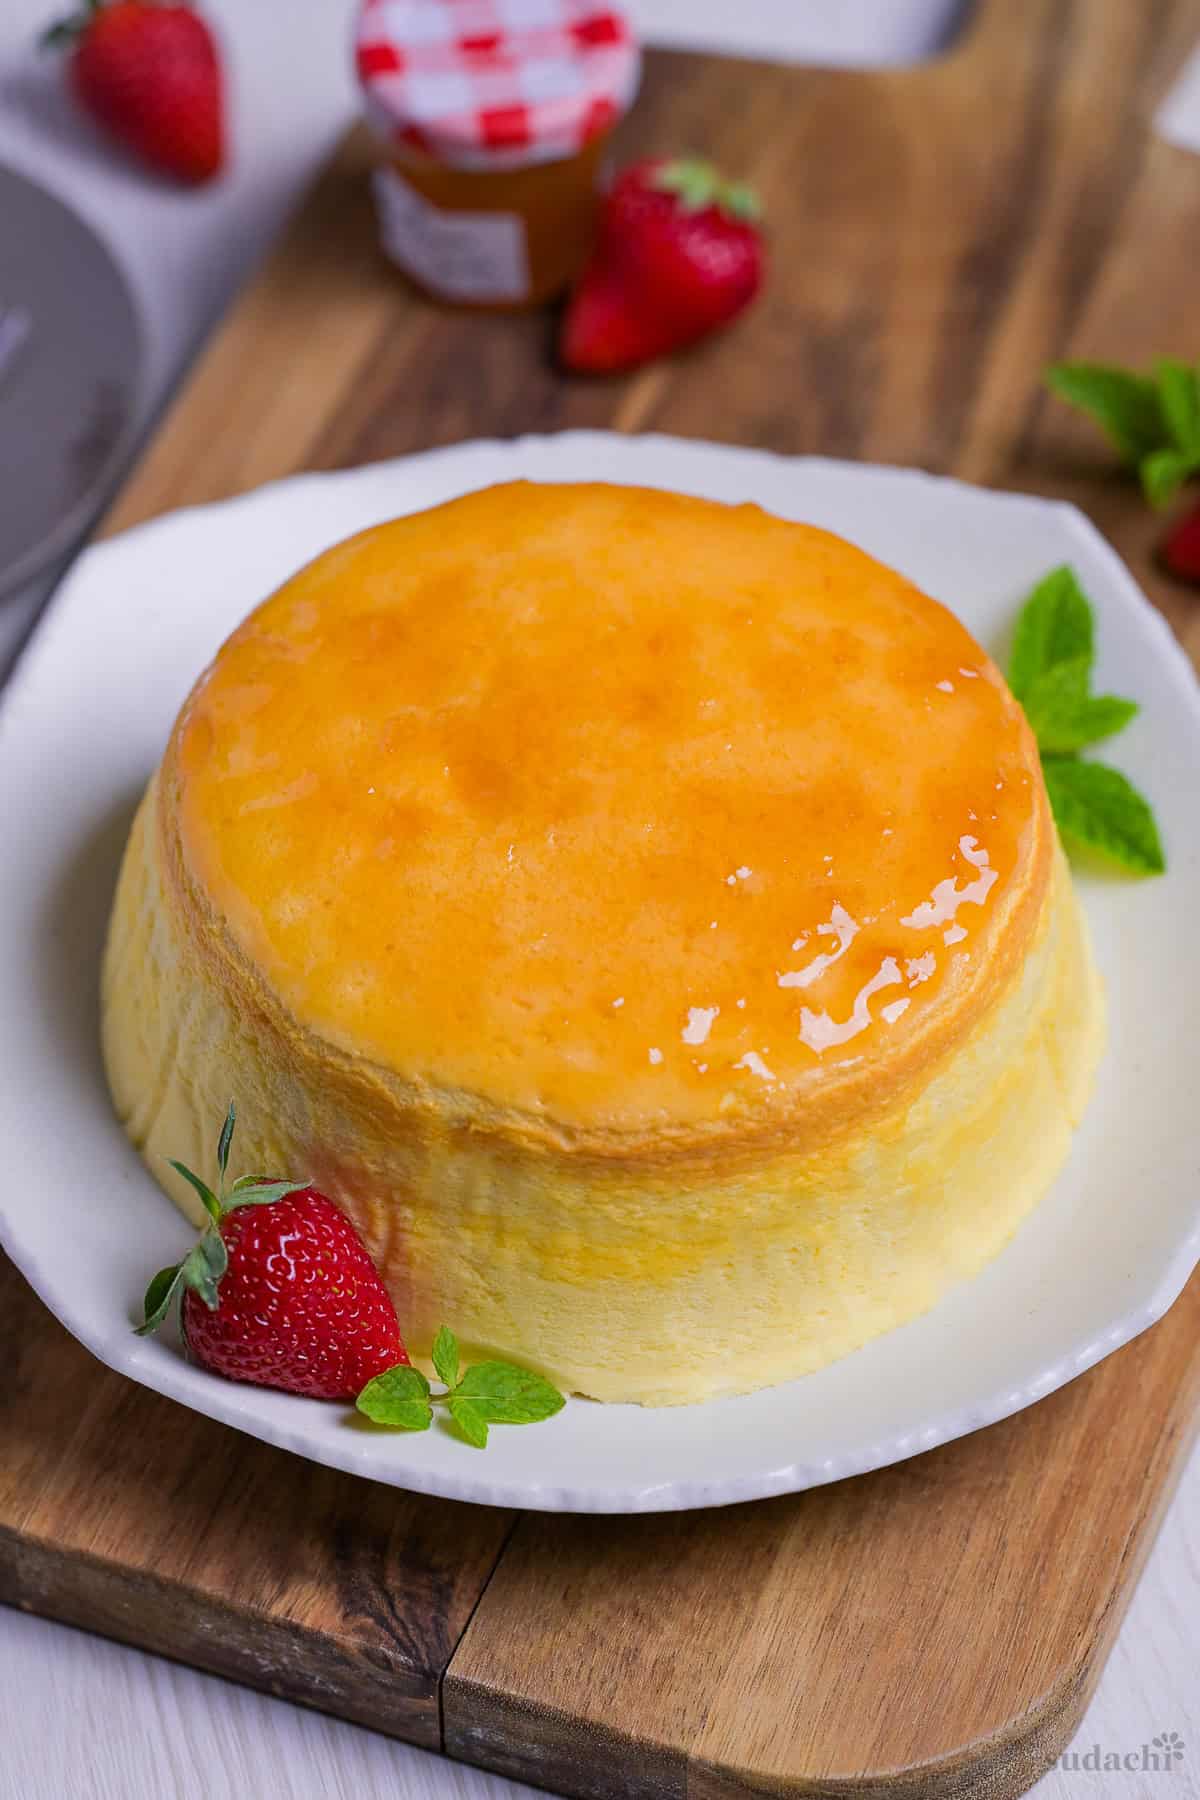
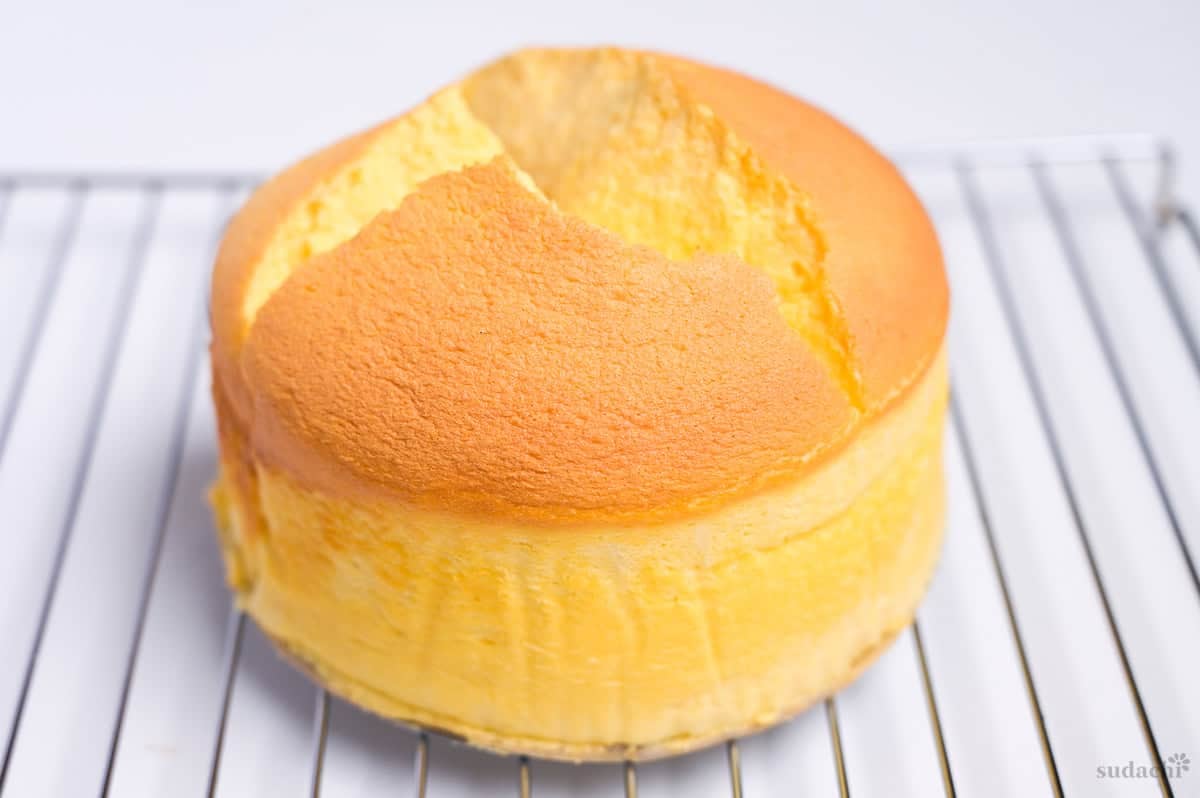
iii. Once the timer sounds, check the condition. The cheesecake should be smooth and lightly golden on top, and the edges should be coming away from the pan.
Crack the door open slightly (I wedge an oven mitt in the corner of the door to stop it from closing) and let it cool slowly for 30 minutes in the warm oven. Sudden temperature changes can cause it to collapse, so this slow cooling is the best way to preserve the shape and texture.
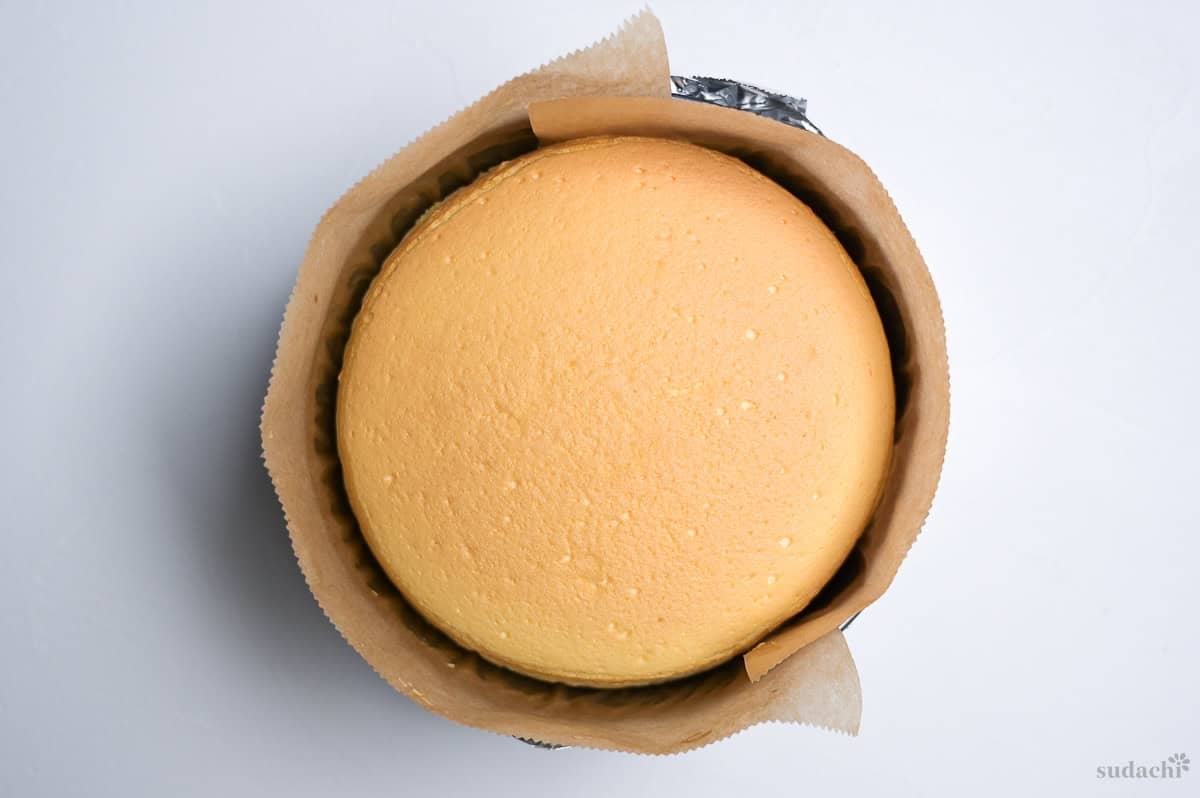
i. Take it from the oven and place it on a wire rack to cool completely. I recommend removing it from the pan once it’s fully cooled to prevent breaking.
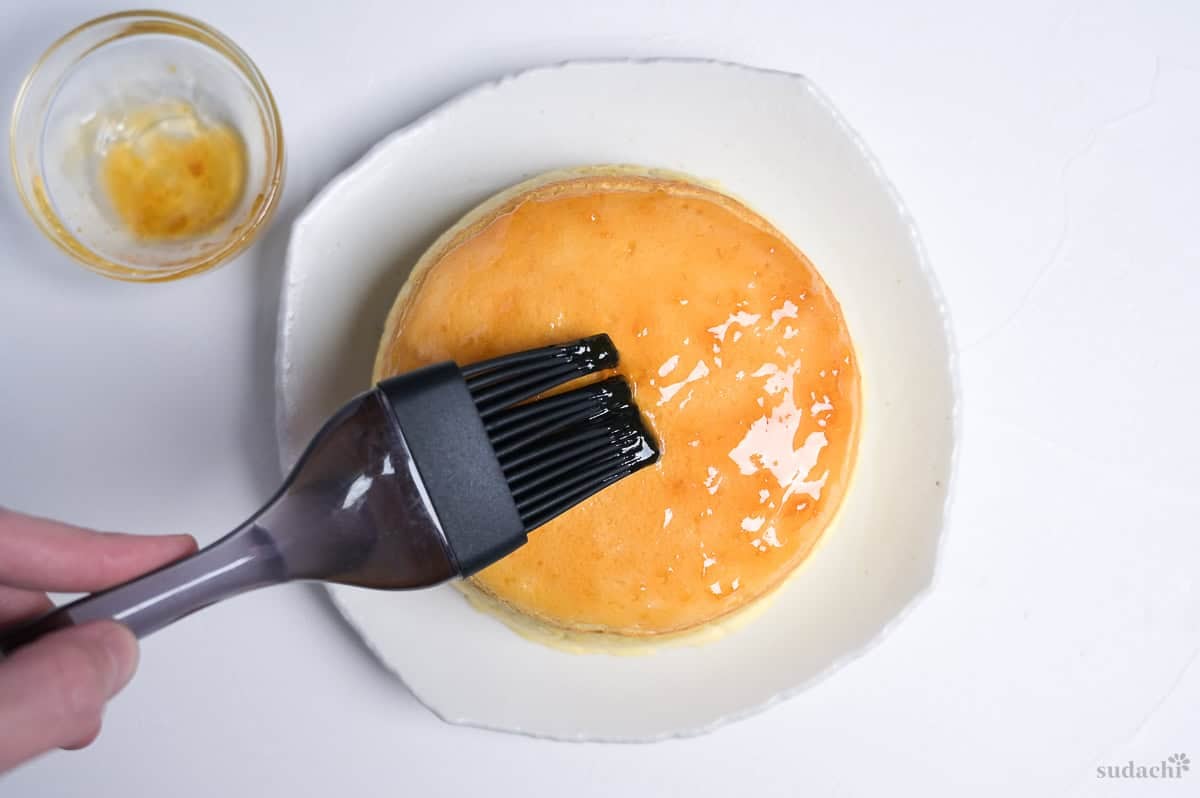
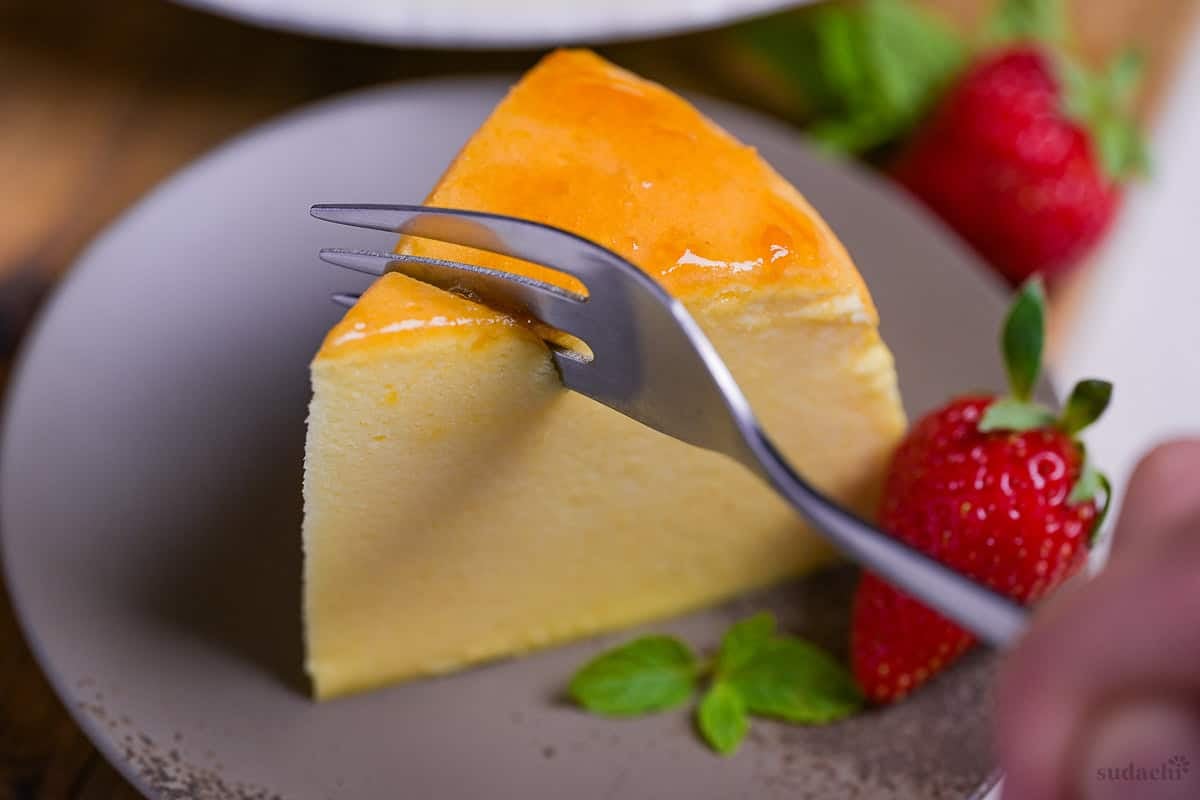
ii. Add a few spoonfuls of apricot jam to a heatproof bowl and microwave for 10-20 seconds. Use a pastry brush to brush it over the top.
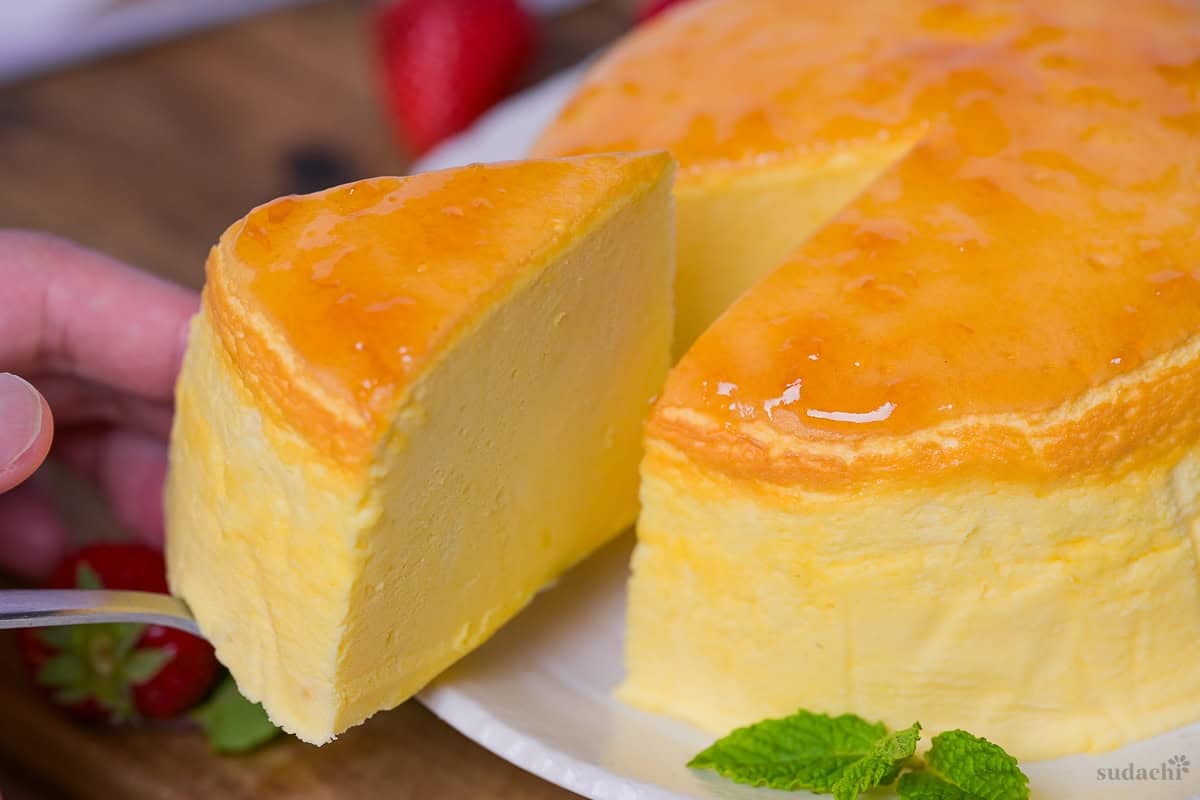
i. This soufflé cheesecake can be eaten warm or chilled depending on preference. When warm, the texture is wobbly and super fluffy, when chilled it takes on an almost light mousse-like texture. If you prefer it warm, you can even microwave individual slices to restore that freshly baked feeling.
Make sure it is fully cooled before storing to prevent condensation.
Enjoy!

Essential Tips & Tricks
- Separate the egg yolks and whites while they’re cold for less chance of breaking, but let them warm to room temperature before starting the recipe for a more stable meringue.
- Be careful not the boil the milk & cream cheese, this can make the mixture split or form a skin which makes lumps in the cheesecake.
- Whip the egg whites in a clean, dry glass bowl. Bits of egg yolk, shell, oil or water can prevent the meringue from stabilizing.
- When whipping the egg whites, start with a low or medium-low speed to form stable micro-bubbles. Avoid high speeds that create large unstable air bubbles.
- For cloud-like results that don’t crack or break, whip meringue to soft peaks that fold over. Avoid whipping stiff peaks, which can cause cracking.
- If using a cake pan with a removable base, be sure to wrap the base several times with foil to prevent water leaking in.
- Heat your water for the water bath to about 50℃ (122°F) to avoid lowering the oven temperature when it goes in.
- If using a fan assisted oven or top heating oven, place an empty baking tray on the shelf above the cheesecake. This will protect it from hot dry air (which can cause cracking).
- If your oven runs hot, reduce the temperature by 10-20℃ (20-35℉) and check it early just in case.
- Once baked, crack the oven door open slightly and let it slowly cool. Sudden temperature changes might cause the cheesecake to collapse or shrink.
- Cool on a wire rack before trying to remove it from the pan.
With these tips in mind, you’re set for success when you make this Japanese Soufflé Cheesecake!
Soufflé Cheesecake Troubleshooting
Japanese soufflé cheesecake is a technique-driven recipe, and even experienced bakers run into issues with it. I’ve made this recipe more times than I can count, and the troubleshooting tips below cover every problem I’ve encountered along the way. If your first attempt does not come out perfect, do not be discouraged. Each bake teaches you something, and brings you closer to that perfect jiggly cake you dreamed of.
Cracking is probably the most common failures when it comes to soufflé cheesecake and it can happen for many reasons.
Too hot: The most common reason is the oven is too hot. The top sets too fast, the cake rises too quickly and then the top bursts open. If your oven runs hot, you need to reduce the temperature by 10-20℃ (50-70℉).
Too dry: I bought an oven thermometer to check the accuracy of my oven, but to my surprise, it didn’t run hot. All this time, the fan was the problem, blowing hot air around, then drying the surface of my cheesecake and ending with cracks even at lower temperatures.
If you use a fan assisted or convection oven, you will most likely have this problem too, and even reducing the temperature won’t fix it. To overcome this, place an empty baking sheet on the shelf above the cheesecake. This protects it from the hot air blowing directly on top, and pushes the humidity from the hot water bath back down and around the cheesecake, reducing cracking. After testing every oven temperature imaginable, this baking sheet technique is the only one that achieved consistent results for me.
Just so you know, the cheesecake will still be delicious and fluffy, it just doesn’t look great.
Insufficient water bath: If your water bath is too shallow, evaporates or dries out, the internal temperature of the cheesecake rises which will make it cook faster, forcing it to rise quickly and crack. A 2cm water bath is the perfect amount to maintain a steady temperature throughout the entire bake.
Stiff meringue: Over-whipping the meringue to stiff peaks is another cause of cracking because it rises more and puts more strain on the surface of the cheesecake. But I honestly think this matters slightly less than oven temperature and humidity.
So it looks beautiful in the oven, then as it cools, it sinks into a sad shell of its former self. This is usually an underbaking issue, where the internal structure is not completely set. Try baking it longer next time.
It can also happen if you over-whipped or under-whipped the meringue, which makes it unstable and prone to deflation.
The cheesecake can become dense and rubbery if the temperature is too low, or if your water bath is too deep. Low temperatures slow the rise, and without a good rise, you don’t get fluffy, cloud-like results.
If you’re using a springform pan, a rubbery base can also be caused by water seeping into the bottom of the pan. Make sure to wrap it with foil at least 3 times to make sure no water gets in.
Soufflé cheesecake is delicate and sudden temperature changes can cause the surface to contract faster than the interior, creating a wrinkled surface. To prevent this rapid temperature change, crack the oven door open slightly (I wedge an oven glove into the edge of the door to keep it slightly open) and let it cool for about 30 minutes before you take it out. 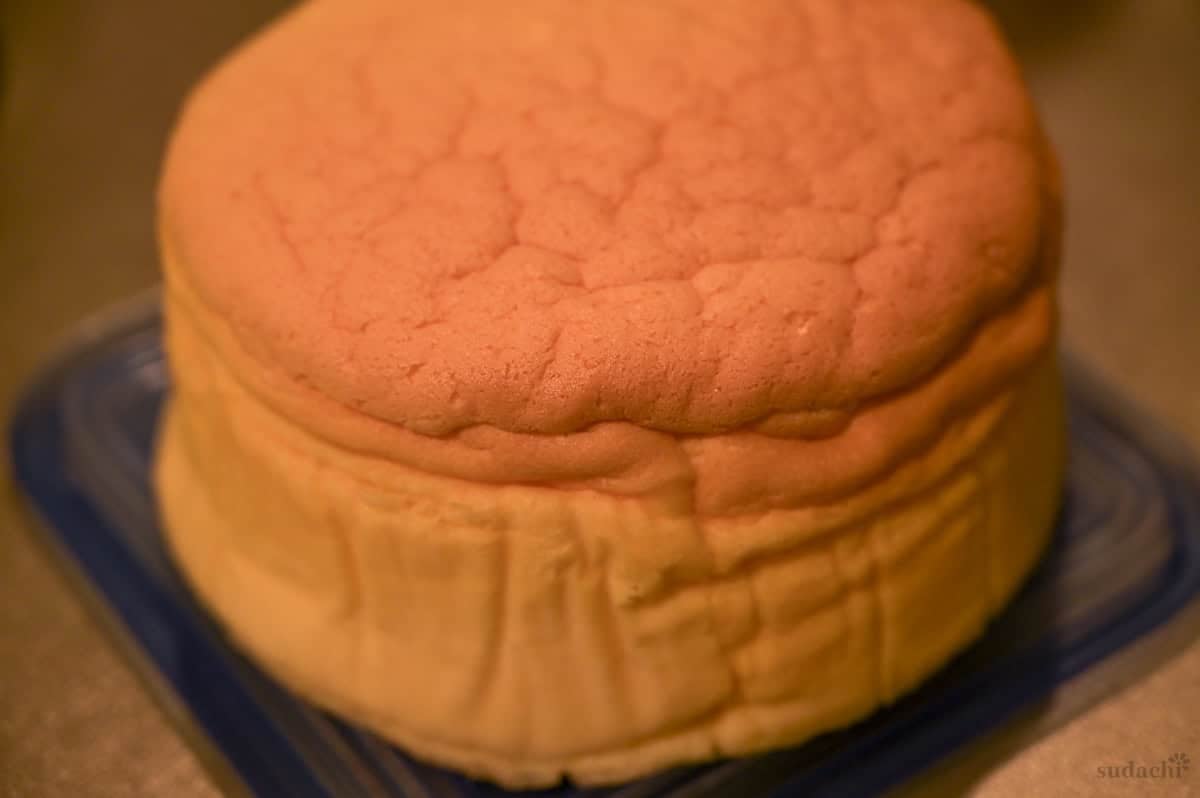
This happened when I wasn’t patient and took it straight out of the oven. The buckling on the edges also show signs of being slightly underbaked.
Okay this one didn’t happen to me because my oven doesn’t heat from the top, but if you have a top heating oven, or the top heating element runs hotter than the bottom, you might find your cheesecake browns too quickly. You can prevent this by moving the pan to a lower shelf, or placing an empty baking sheet on the shelf above it to protect it from the direct heat.
You can scale up the recipe, but the bake time will need to be increased slightly.
For an 18cm (7″) pan (increase the bake time to 60-70 minutes)
– 4 eggs
– 160g cream cheese
– 20g unsalted butter
– 120g whole milk
– 25g cake flour
– 13g potato starch
– 1 pinch salt
– ¾ tsp vanilla essence
– zest of half or ¾ lemon
– 3/4 tsp lemon juice
– 90g sugar
– 2½ tsp honey
– 1½ tbsp apricot jam
For 20cm (8″) cake pan (increase the bake time to 65-75 minutes)
– 5 eggs
– 200g cream cheese
– 25g unsalted butter
– 150g whole milk
– 33g cake flour
– 17g potato starch
– 1 pinch salt
– ¾ tsp vanilla essence
– zest of ¾ lemon
– 1 tsp lemon juice
– 115g sugar
– 1 tbsp honey
– 2 tbsp apricot jam
How to Store
Room Temperature: Once baked, soufflé cheesecake can be kept at room temperature for a maximum of 2 hours. It holds up well out of the fridge, so it’s ideal for parties, but from a food safety point of view, store in the fridge until close to serving time.
Fridge: Keep in an airtight container for up to 1 week.
Freezer: Cut and wrap individual slices with plastic wrap, then place in a sealable freezer bag to prevent freezer burn. Frozen soufflé cheesecake might change texture slightly, but can be kept for about 1 month in the freezer.
Thawing: Thaw in the fridge for several hours before serving.
More Japanese Cheesecake Recipes
- Matcha Rare Cheesecake (no bake)
- Lawson Basque Style Cheesecake
- Lemon Rare Cheesecake (no bake)
Want more inspiration? Explore my Japanese Desserts Roundup Post for a carefully selected collection of tasty recipe ideas to satisfy your next sweet craving!
Did You Try This Recipe?
I would love to hear your thoughts!
💬 Leave a review and ⭐️ rating in the comments below. 📷 I also love to see your photos – submit them here!

Japanese Soufflé Cheesecake

Equipment
- 1 15cm (6 inch) Cake Tin
Ingredients
- 50 g egg yolks approx 3 eggs
- 100 g egg whites approx 3 eggs
- 120 g cream cheese full fat block type (not spread)
- 15 g unsalted butter plus extra for greasing the pan
- 90 g whole milk
- 20 g unbleached cake flour
- 10 g potato starch (katakuriko) or cornstarch
- 1 pinch salt
- ½ tsp vanilla essence
- ½ lemon zest
- ½ tsp lemon juice
- 70 g granulated sugar
- 2 tsp honey pourable liquid honey, or agave syrup
- 1 tbsp apricot jam
My recommended brands of ingredients and seasonings can be found in my Japanese pantry guide.
Can’t find certain Japanese ingredients? See my substitution guide here.
Instructions
Cream cheese base
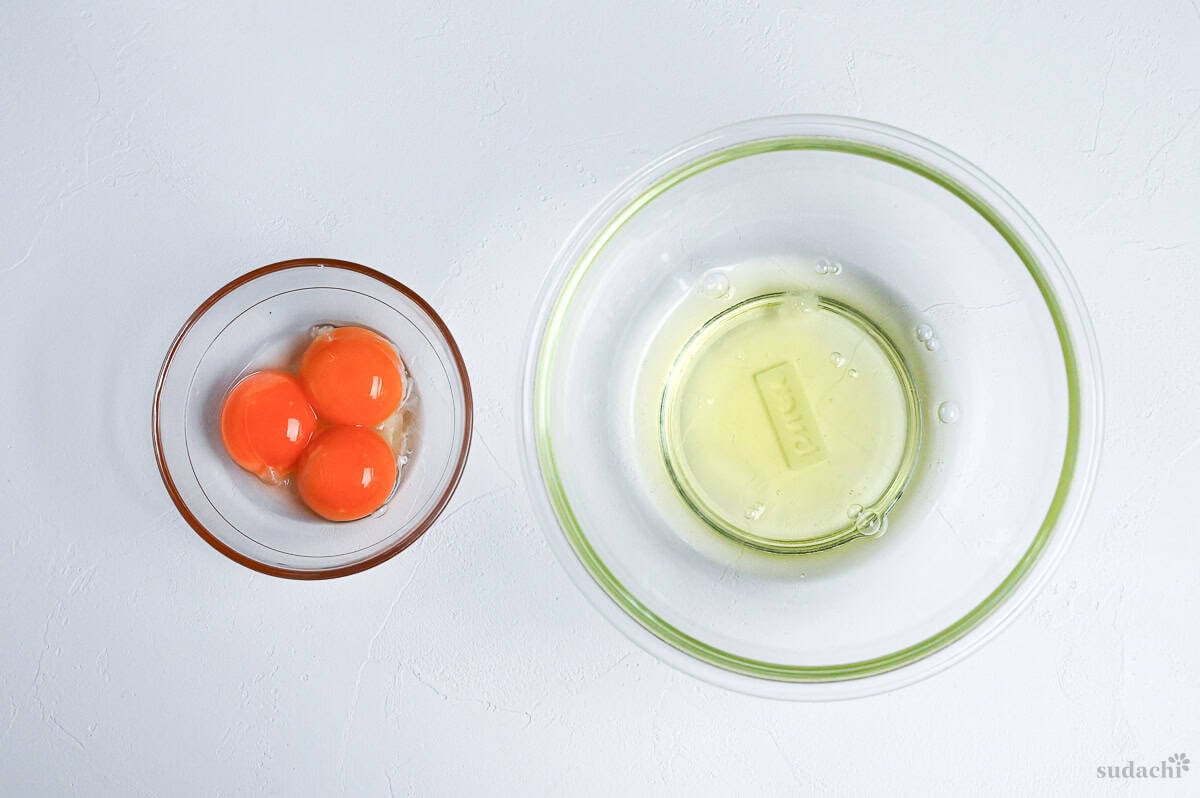
- Separate the eggs, 50 g egg yolks into a small bowl and 100 g egg whites into a clean and dry glass mixing bowl. Preheat your oven to 160 °C (320 °F).

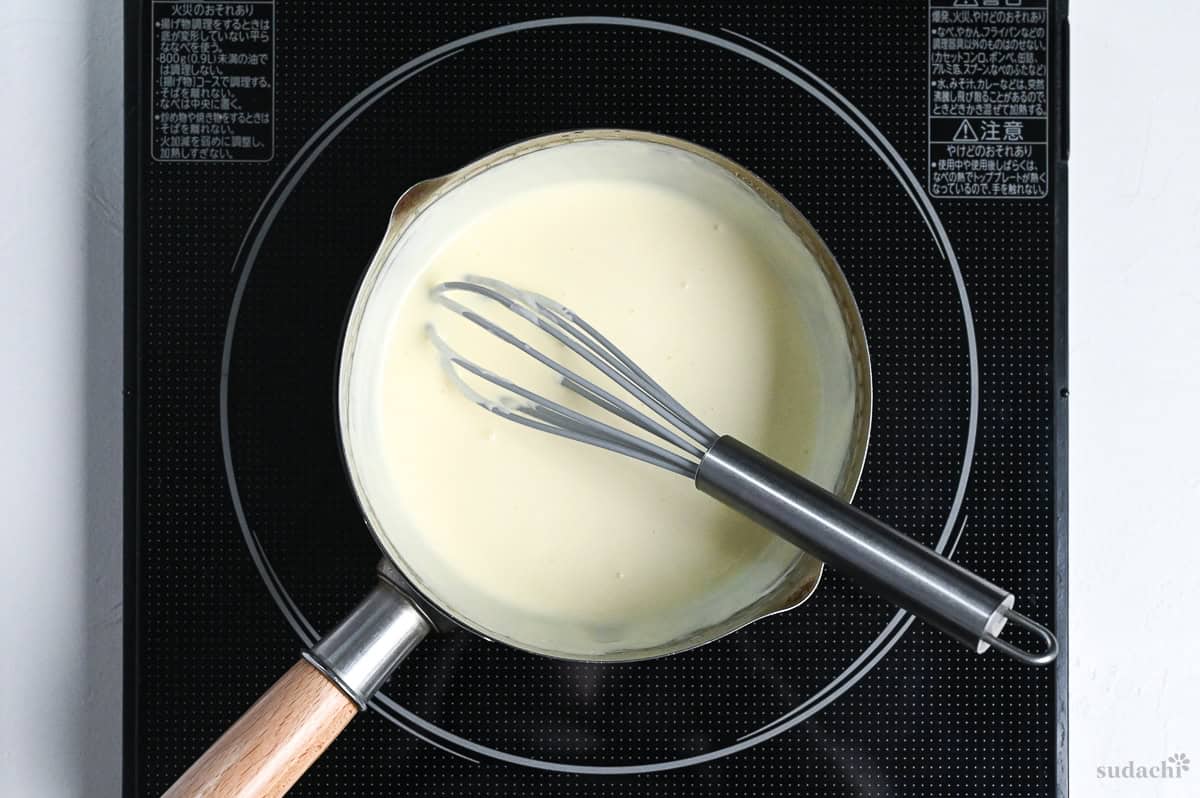
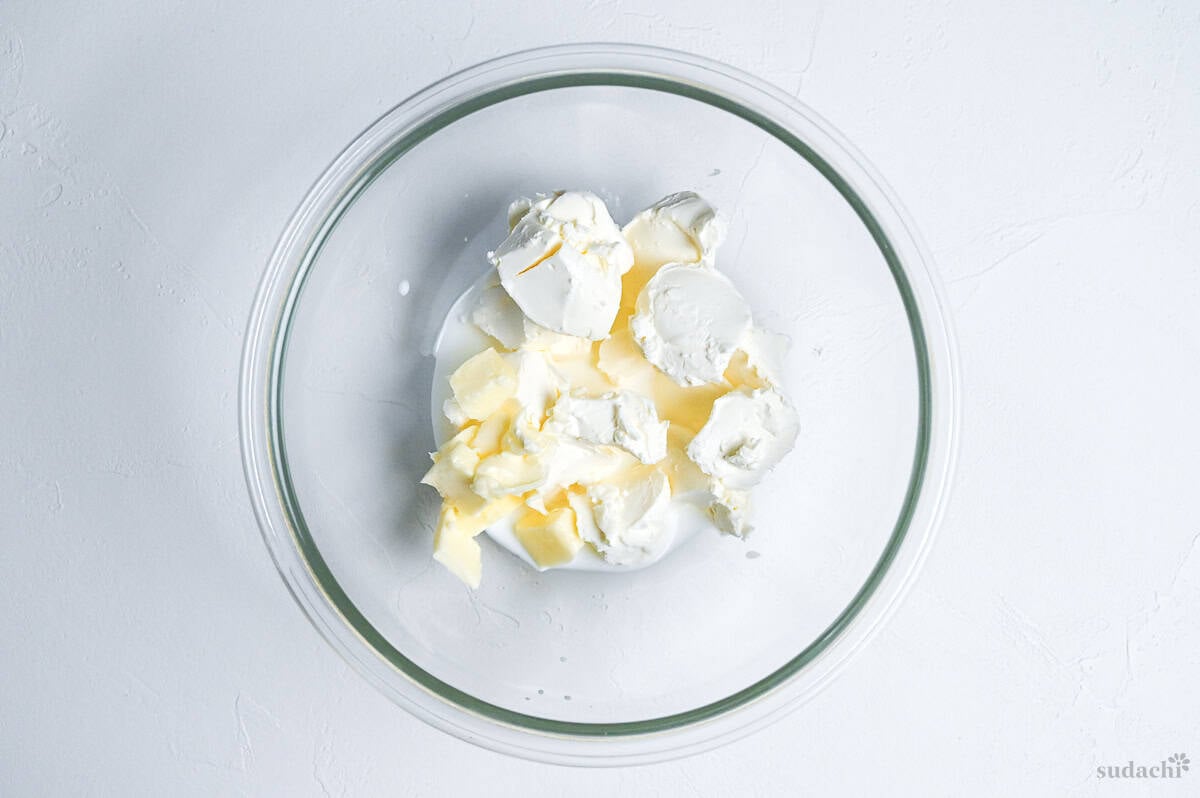
- Take a small saucepan and add 120 g cream cheese, 15 g unsalted butter, and 90 g whole milk. Heat on the lowest setting and stir continuously until the cream cheese has mostly melted and smooth, do not let it boil. Alternatively, melt everything together in the microwave in 20-30 second increments. Leave to cool.
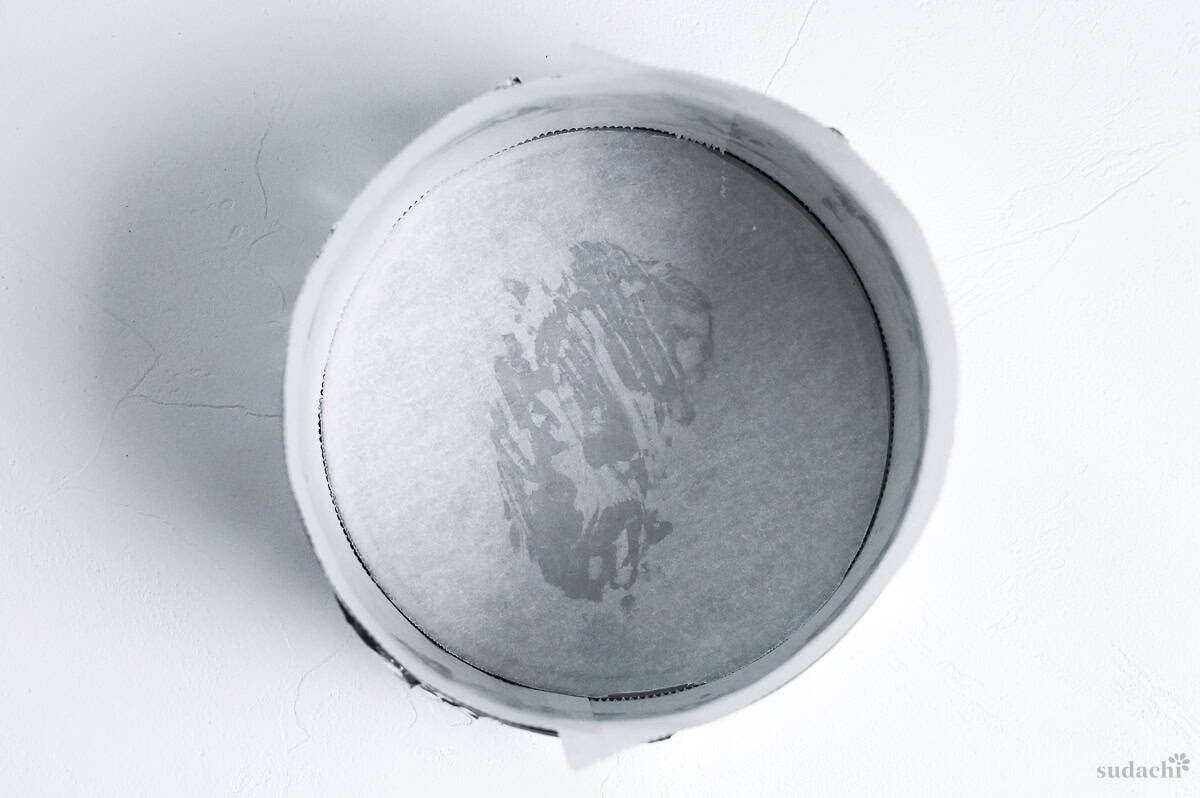
- While you wait, measure out the rest of your ingredients. Lightly grease the cake pan with butter, then line with baking parchment. If using a springform pan, wrap the base with 2-3 layers of aluminium foil, making sure it goes up the sides.
- Once the cream cheese mixture is cool enough to touch, add the egg yolks one by one, whisking gently each time until evenly incorporated.
- Mix 20 g unbleached cake flour and 10 g potato starch (katakuriko) together in a small bowl, then sift it into the cream cheese mixture.
- Strain the mixture into a large mixing bowl using a fine mesh sieve, use a spatula to work through any stubborn lumps of cream cheese.
- Mix in 1 pinch salt, ½ tsp vanilla essence, and ½ lemon zest. Set aside for later.
Meringue
- Using a medium speed, whip the egg whites until foamy and doubled in size. Add ½ tsp lemon juice and whip for 10 seconds.
- Measure out 70 g granulated sugar and add half of it to the egg whites. Whip on medium-low speed until smooth and slightly glossy.
- Drizzle in 2 tsp honey while whipping continuously.
- Once incorporated, add the rest of the sugar and continue to whip on medium low until it reaches very soft peaks that fold over.
- Start heating the water for the water bath to about 50 °C (122 °F). While you wait, add one-third of the meringue to the cream cheese base and mix gently, but thoroughly.
- Continue to add the meringue one-third at a time, folding gently with the whisk while turning the bowl until no white streaks remain.
- Pour the mixture into the lined cake pan, the push a spatula into the batter at a 45° angle and move it up and down to send air bubbles to the top. Draw through the mixture with a skewer to break any large air bubbles.
- Place the cake pan in the center of your roasting pan, then pour the heated water until it's 2cm deep (a little less than 1 inch).
- Carefully push the pan onto the middle shelf of your oven and reduce the temperature to 140 °C (284 °F). If your oven is convection or fan assisted, place an empty baking sheet on the shelf above it. Bake for 50-60 minutes. Once lightly golden on top with the edges coming away from the pan, turn off the heat and crack the oven door open slightly, and wedge an oven mitt in the corner to keep it slightly open. Let it cool slowly inside the oven for 30 minutes.
- Take the cheesecake out of the oven, and cool it on a wire rack.
- Once cool enough to touch, remove it from the pan. Spoon 1 tbsp apricot jam into a small heatproof bowl, microwave for 10-15 seconds and brush it over the top of the cooled cheesecake.
- You can serve it warm or room temperature, but I like to chill it in the fridge for a few hours before serving. Enjoy!

Video
Notes
- The base recipe uses 3 eggs, approximately 17g per yolk and 33g per white.
- Separate eggs while they’re cold (the yolks are firmer and less likely to break), then let the whites come to room temperature before you start. Room temperature egg whites whip into a more stable meringue.
- Warm the milk and cream crease gently. Boiling can cause the mixture to split or form a skin, which can leave lumps in the finished cheesecake.
- Use a clean, dry glass bowl for the egg whites. Any trace of yolk, shell, oil, or water will stop the meringue from holding its structure.
- Whip the eggs on low or medium low speed to build small, stable bubbles. High speeds create large bubbles that collapse easily during baking.
- Whip the meringue to soft peaks that gently fold over, not stiff peaks. Over whipped meringue is a common cause of cracking in souffle cheesecake.
- In your pan has a removable base, wrap it tightly with several layers of foil to stop water seeping in during the hot water bath.
- Heat the water bath to around 50℃ (122℉) before pouring it into the roasting pan. Cold water will drop the oven temperature and slow the cakes rise, hot water will cook the base, make it rubbery and make the cheesecake rise too quickly.
- For fan assisted or top-heat ovens, place an empty baking tray on the rack above the cheesecake. It shields the top from the dry direct heat that dry out the surface and cause cracks.
- If you know your oven runs hot, or the cheesecake is showing signs of rising too quickly, lower the temperature by 10-20℃ (20-35℉) and check regularly. It might need less cooking time than the time stated in the recipe.
- When the cake is done, crack the oven door open and let it cool slowly inside for at least 30 minutes. A sudden change in temperature can cause it to collapse or shrink.
- Cool on a wire rack before trying to take it out of the pan.
- Store in the fridge in a sealed container for up to 1 week, or wrap and freeze for up to 1 month.
Leave a rating and a comment