

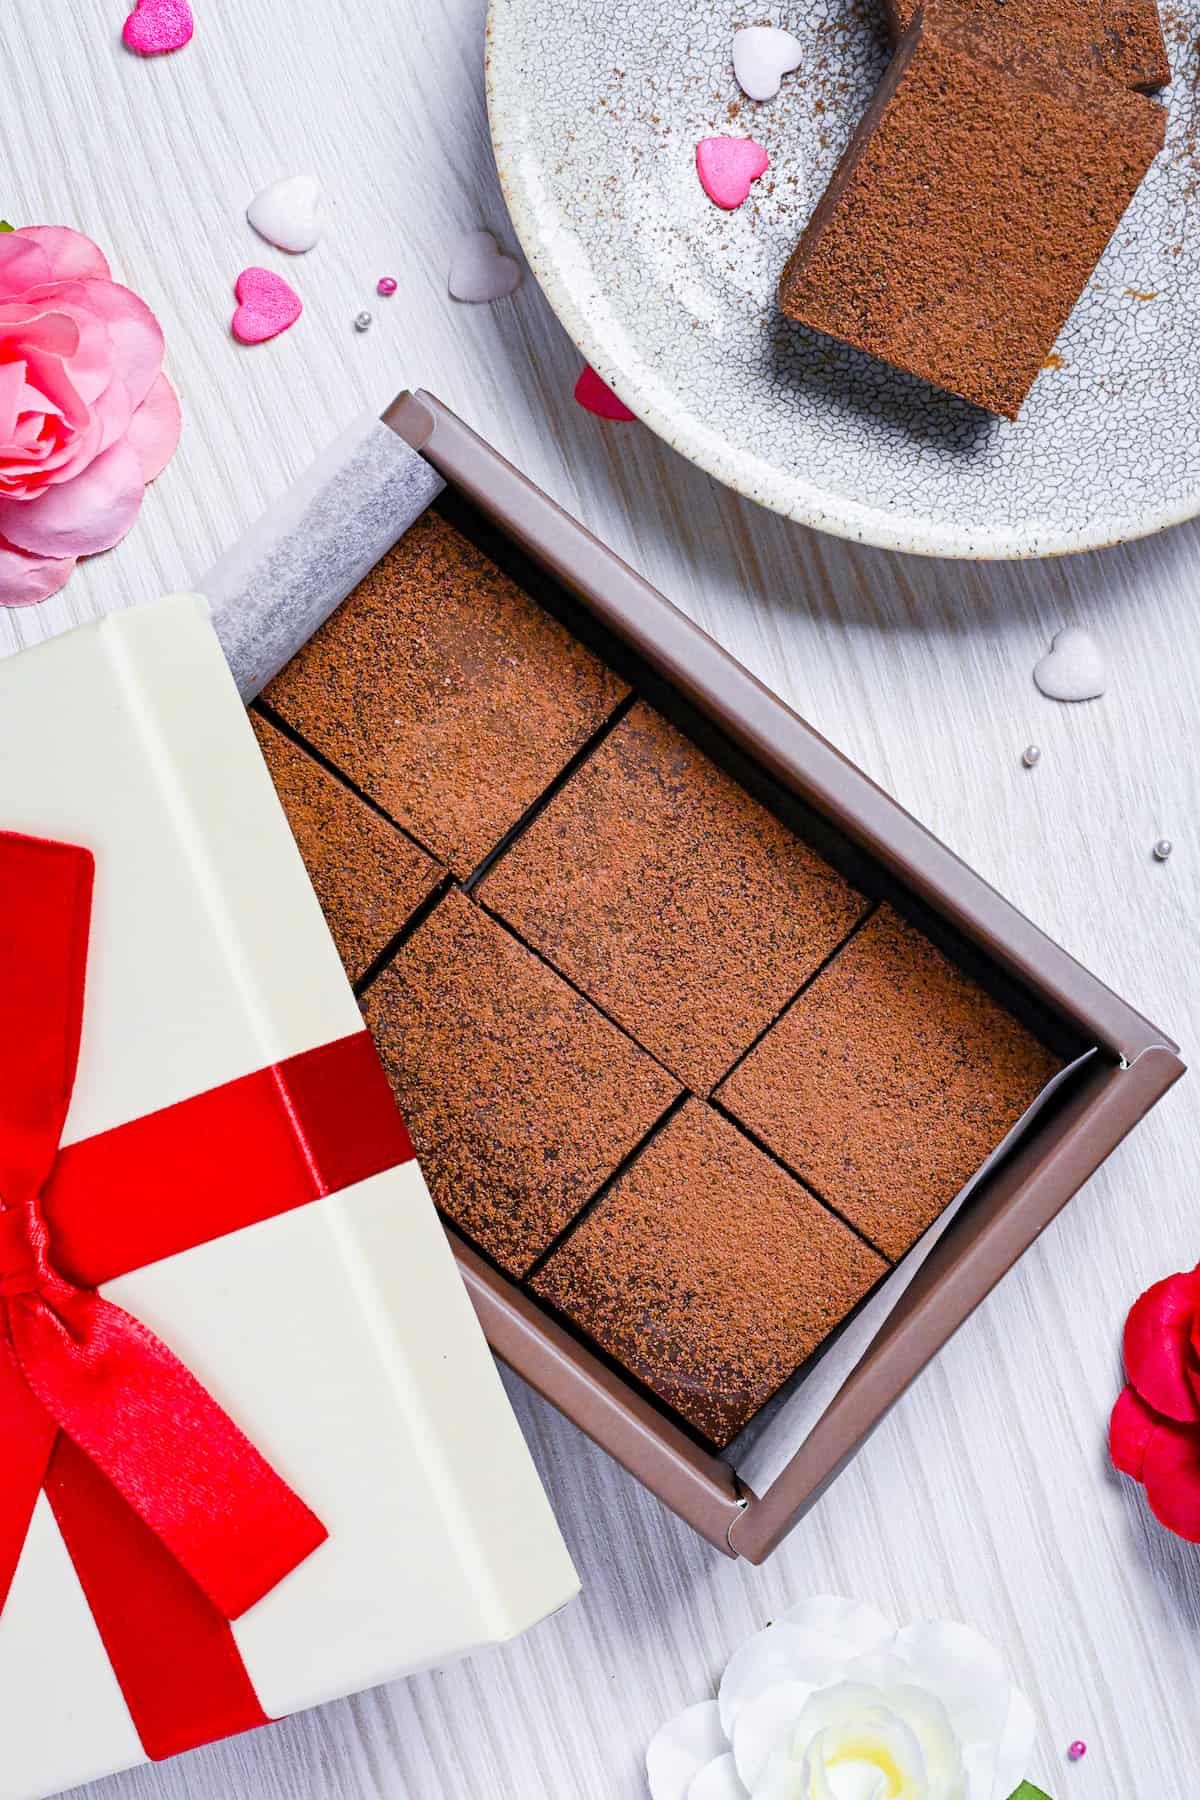
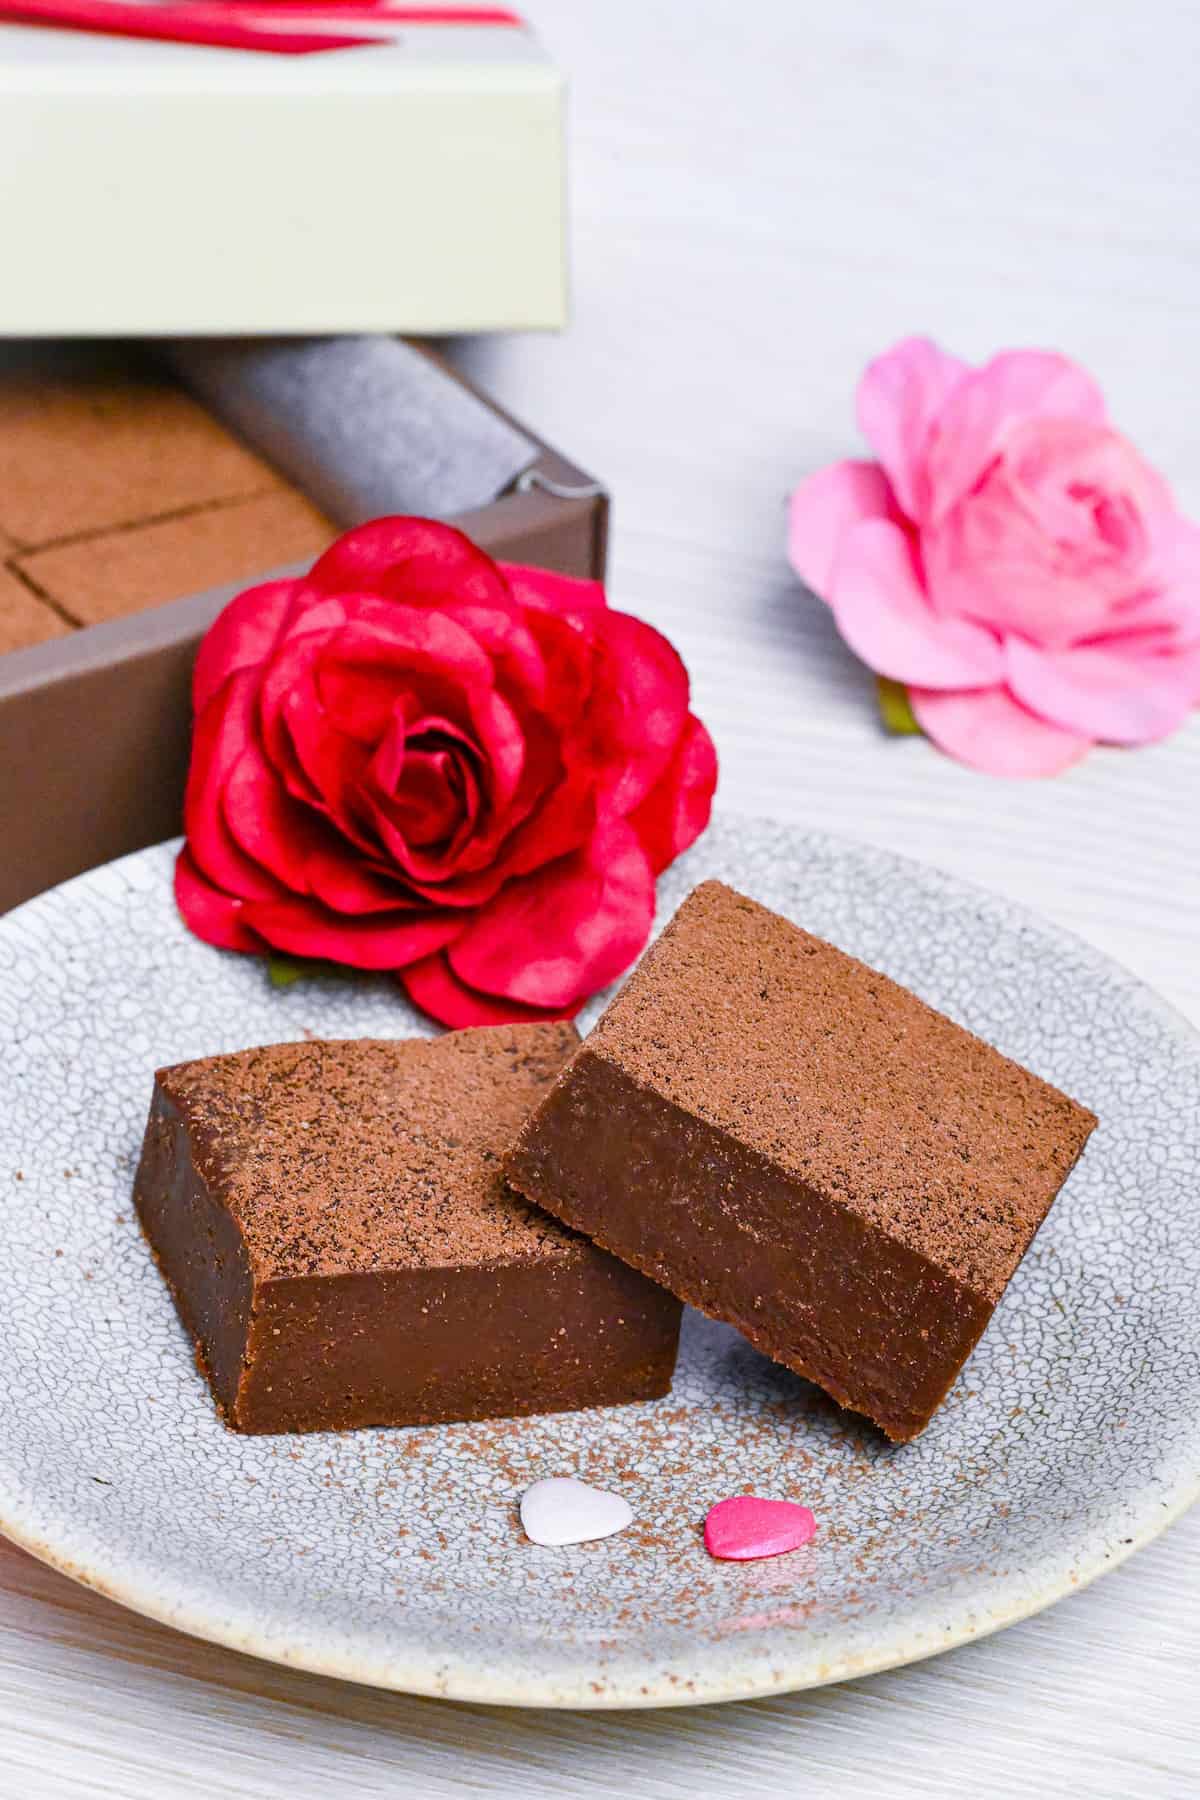
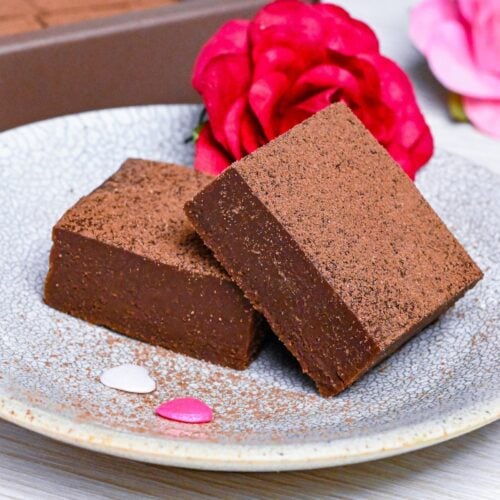
In Japan, Valentine’s Day flips the script. It’s a day where girls buy or make sweets to give to not only love interests, but also friends, and even co-workers as giri choco (obligation chocolates). With so many people to gift, easy and delicious is the goal. Think chocolate-studded cookies and fudgy brownies, but one treat reigns above them all: melt-in-the-mouth Nama Chocolate.
These silky, cocoa dusted squares are Japan’s ultra luxurious take on the chocolate truffle. They’re rich, creamy and dangerously addictive. And the best part? You don’t need any fancy equipment or difficult-to-find ingredients, just a simple ganache, a quick(ish) chill, and a clean slice to create perfect bites to gift, share, or stash in the fridge.

Nama Chocolate
Recipe Snapshot
- What is it? Japan’s take on a chocolate truffle, a soft chocolate and cream ganache that is chilled, cut into bite-size squares and dusted with cocoa powder.
- Flavor profile: Rich chocolate, ultra-creamy, lightly bitter cocoa finish.
- Why you’ll love this recipe: It’s luxurious yet genuinely simple with just 5 ingredients and minimal prep. Just chill, slice, and gift (or keep and snack).
- Must-haves: High quality chocolate, fresh cream, heatproof container (I used a 13.5x15cm rectangular mold).
- Skill Level: Easy.
- Freezer Friendly Yes!

What is Nama Chocolate?
Nama Chocolate, or Nama Choco (生チョコ) for short, is a type of ganache made with a simple yet divine blend of chocolate and cream cut into squares and dusted with a generous coating of rich cocoa powder. It’s essentially Japan’s take on the well-loved chocolate truffle.
The name “Nama Chocolate” comes from the Japanese word “nama” (生) which means fresh (or raw/uncooked) and highlights the use of fresh cream (nama kurimu), as one of its key ingredients. Because of its high moisture content, it has a shorter shelf life than regular chocolate truffles and must be refrigerated.
Despite Japan not being a center player in the chocolate world, Nama Chocolate is a Japanese creation, invented by Yokohama-based confectionary company, “SilsMaria” (シルスマリア) in 1988. It boasts a silky, almost buttery texture that melts in your mouth, and has a rich, creamy and chocolatey flavor. It is a popular gift or souvenir chocolate, especially the famous brand “Royce” from Hokkaido.
Due to its simple ingredients and preparation combined with its luxurious taste, it is a popular chocolate to make at home and gift to loved ones on Valentine’s day in Japan.
Nama Chocolate Ingredients
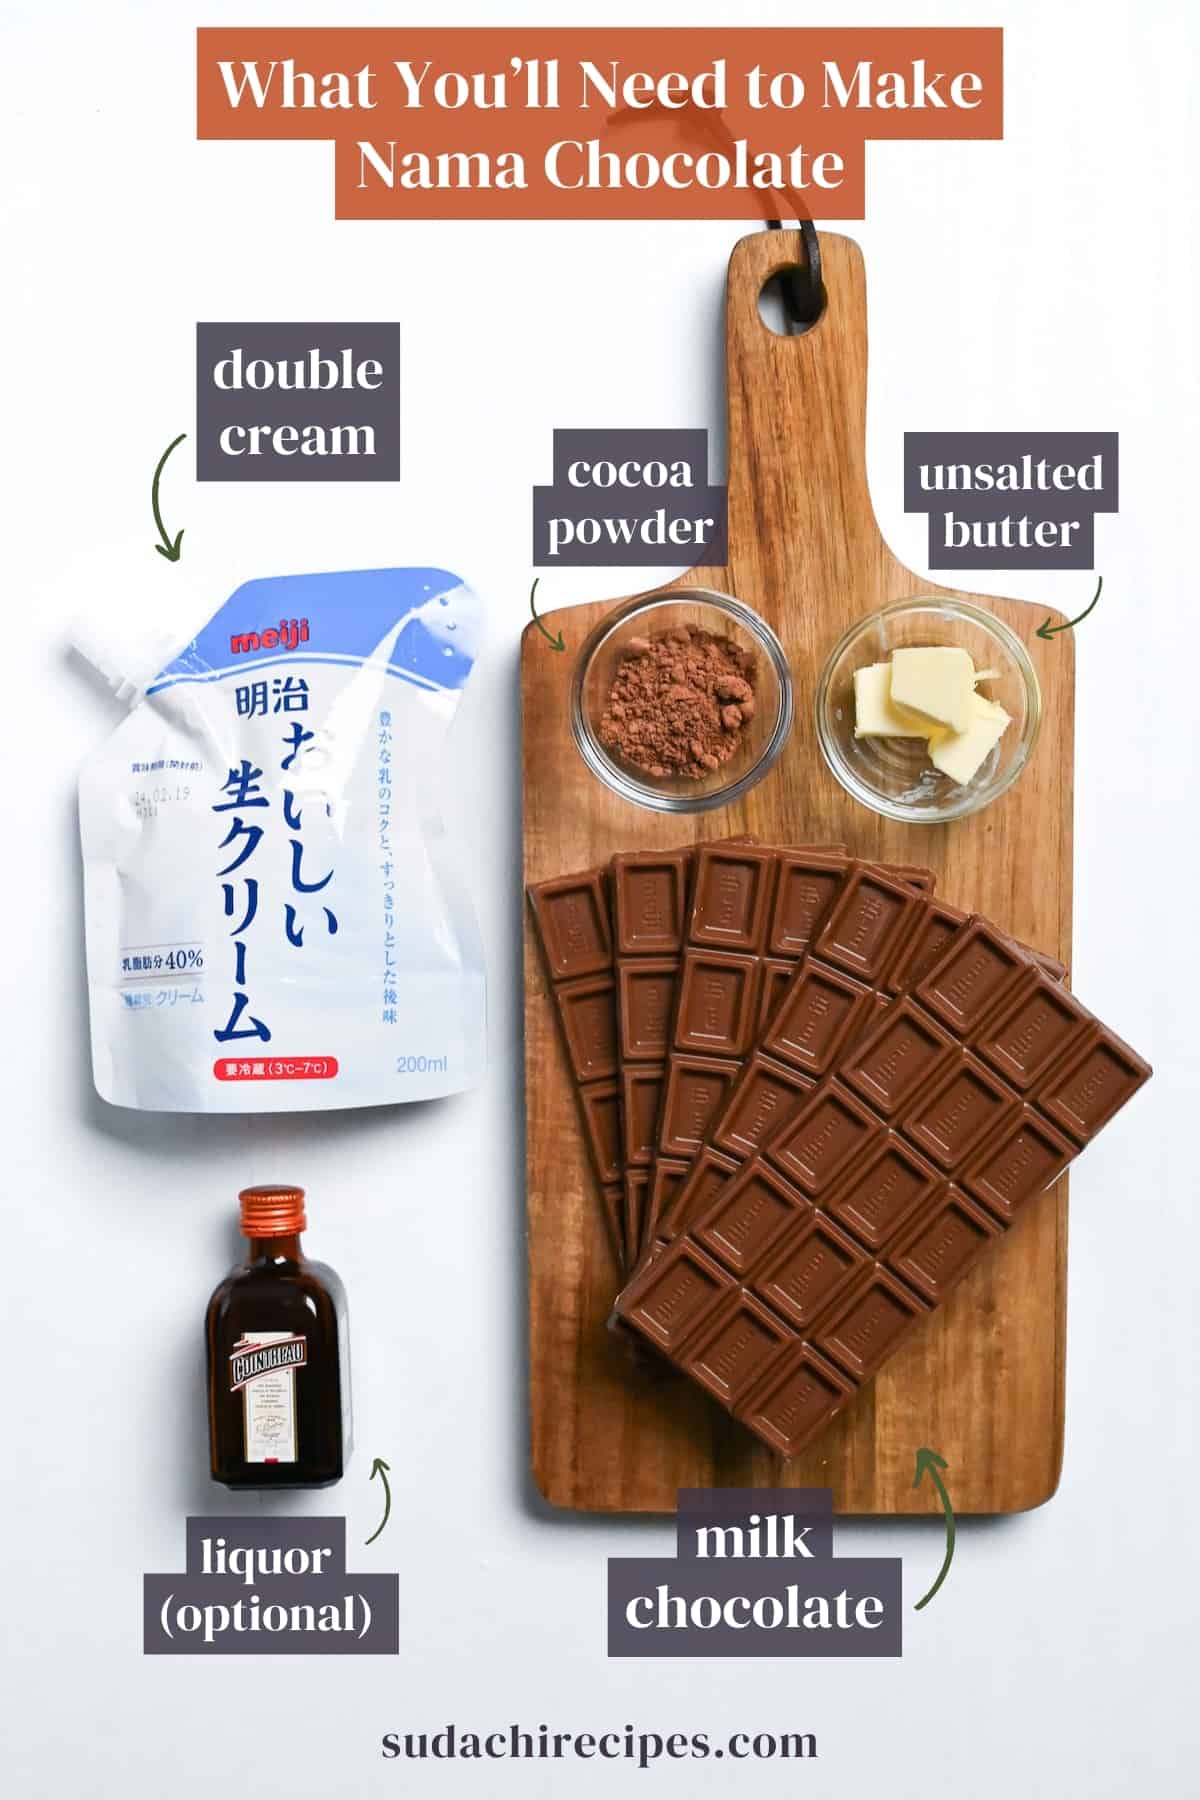
- Milk chocolate: Since chocolate is the main ingredient in this recipe, it’s important to get the good stuff. I recommend using a quality milk chocolate with between 20-40% cocoa mass. I used Japanese “Meiji Hi Milk” which has 20-30% cocoa and a sweet creamy taste. This recipe will work with semi-sweet or dark chocolate, but you will need to add more cream (the amount depends on the cocoa percentage) and the result will be intensely chocolatey. I don’t add any extra sugar in this recipe and the sweetness will rely on the sugar content in the chocolate, so keep this in mind when selecting your chocolate.
- Heavy cream: Cream with a milk fat percentage above 36% is ideal for the best texture and creamy flavor.
- Unsalted butter: Not essential but I find a small amount of butter makes the nama chocolate richer and even more delicious. Opt for unsalted to avoid making it salty.
- Liquor (optional): Adding liquor will improve the texture and add depth to your chocolate, and make it taste more like the Nama Chocolate you find in Japan (most stores include liquor in their ingredients). I used Cointreau (an orange-flavored triple-sec) but other flavored liquors work well such as Grand Marnier or Chambord. You could also use rum, whisky, brandy etc. If you want to leave out the alcohol, replace with an equal amount of heavy cream.
- Cocoa powder: Use to dust the top at the end. If you want the Nama Chocolate to be fully coated you can roll them in the cocoa powder if you prefer.
Bonus Ingredients
Nama Chocolate is the perfect blank canvas that you can make extra special and personal. Try some of these bonus additions!
- Dip in regular melted chocolate for a shell with bite, the perfect textural contrast!
- Freeze dried strawberries or raspberries crushed and sprinkled over the top before it sets will add vibrant color and a complimentary tartness.
- Citrus zest like lemon (or yuzu to stick with the Japanese theme) will give a bright and fragrant finish.
- Edible rose petals or gold leaf for luxurious Valentine’s vibe.
- Toasted pistachio, hazelnut, or almonds finely chopped add a wonderful nutty crunch.
How to Make My Nama Chocolate Recipe
Before you start: Line a container with baking paper for easy removal. I used a 13.5x15cm rectangular mold, but a similar sized lunchbox or brownie pan also works well.
Tip: Cut the baking paper larger than your container so it’s easy to lift out.
Finely cut the chocolate into small flakes. The smaller you cut, the easier it will melt. It is important not to leave any big chunks here.
Once cut, place in a heatproof bowl.

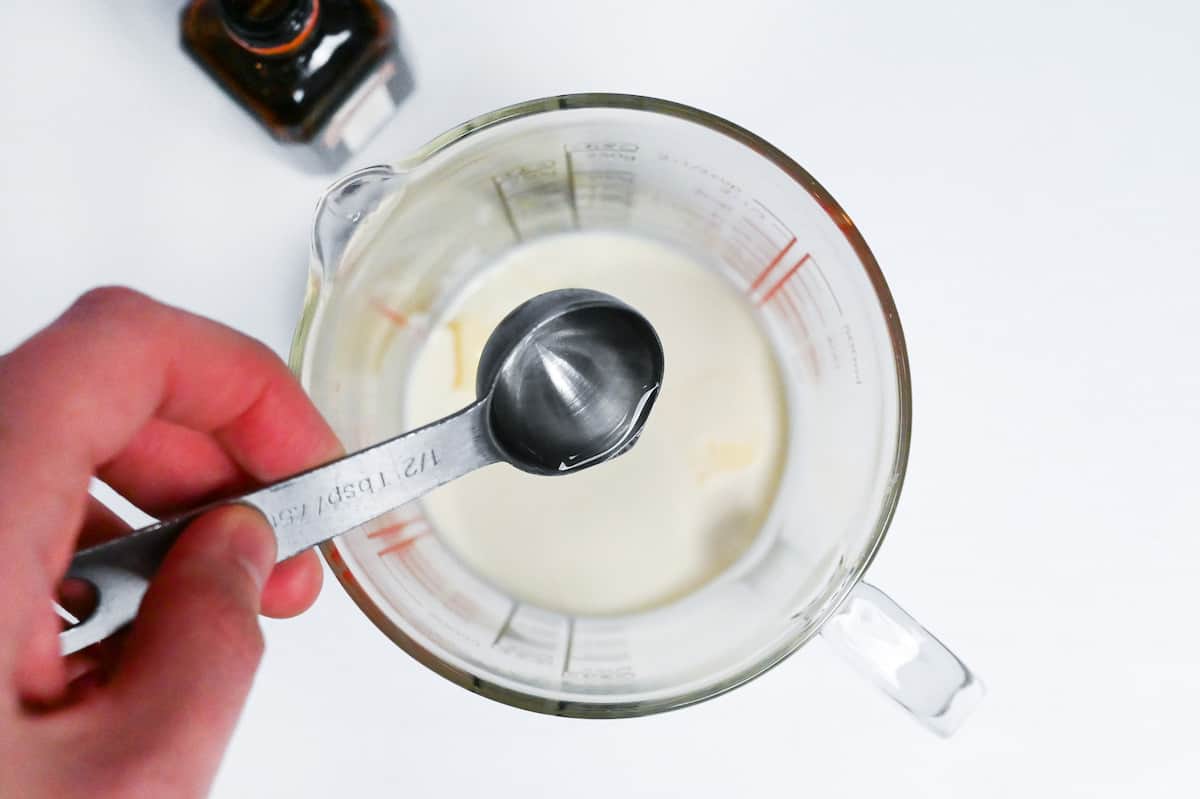
Pour the cream, butter and liquor (if using) into a heatproof jug and cover with plastic wrap. Heat in the microwave in 20-30 second intervals until it reaches just below 70°C, make sure not to boil it.
Alternatively, heat the ingredients in a saucepan over a low heat until small bubbles start to appear around the edge.
Pour the cream into the bowl of chocolate and let it sit for 30 seconds.
Mix until the chocolate has completely melted and you have a smooth, lump free mixture. Tip: If you find stubborn lumps of chocolate in your mixture, heat the bowl over a bain marie (hot water bath) to help melt it completely.

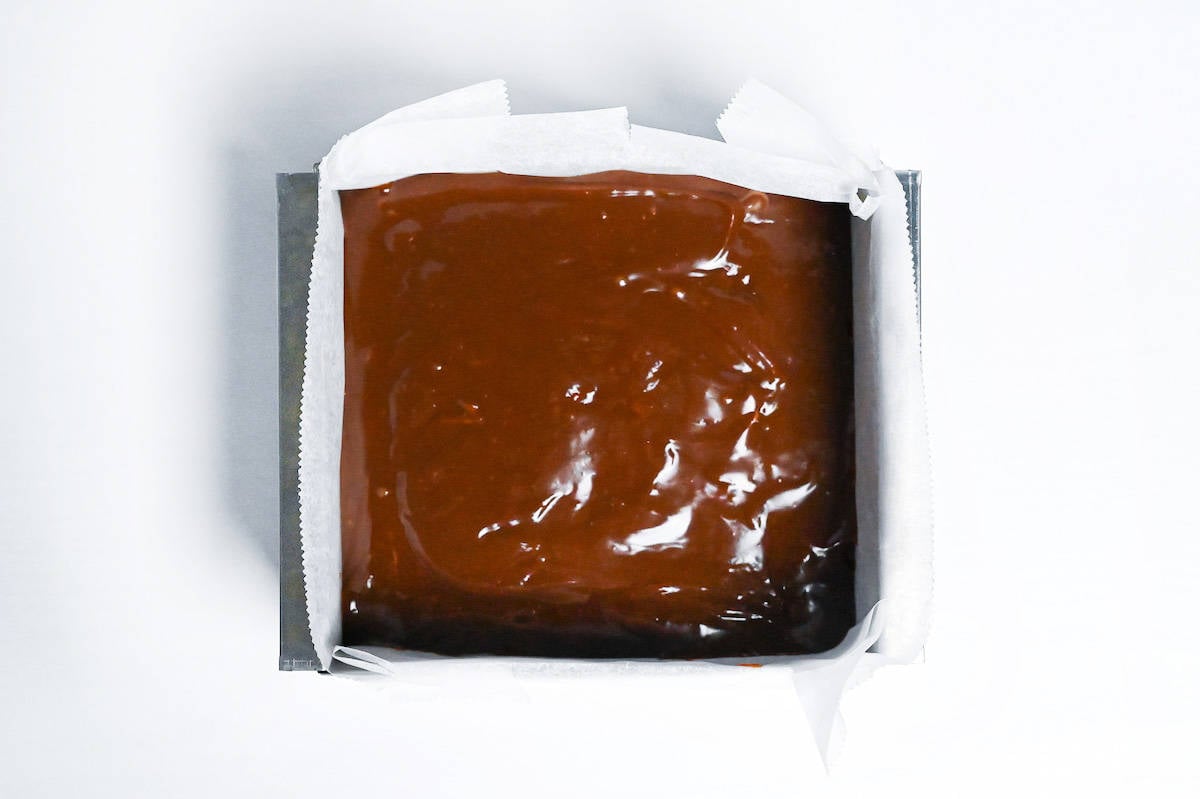
Pour the chocolate mixture into your lined container, smooth out the top and leave it to reach room temperature before covering and placing in the refrigerator for 3-4 hours.
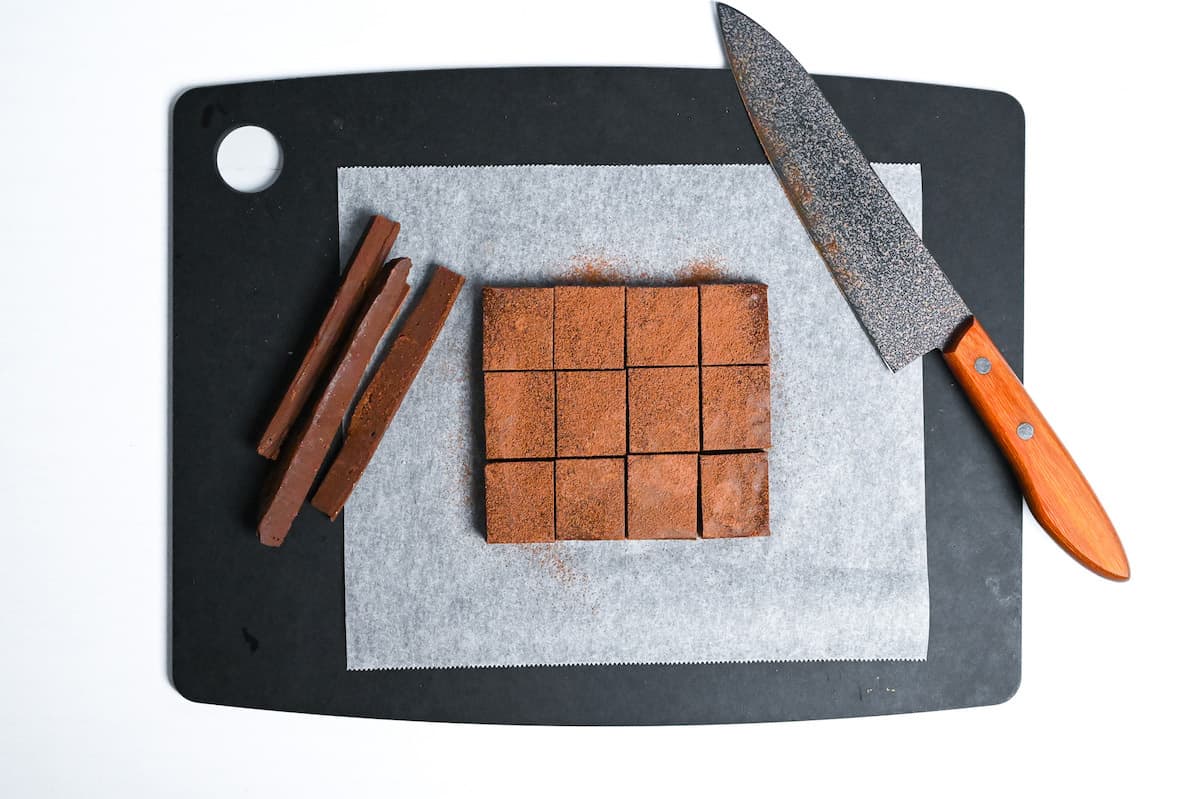
Take the set nama chocolate out of the container and trim the edges (you can eat them as a taste test!). Cut into equal pieces and dust with cocoa powder.
Tip: Wipe the knife between cuts for cleaner edges.
Enjoy!

Essential Tips & Tricks
- Use a high quality chocolate with 20-40% cocoa mass for best results.
- If you use semi-sweet or dark chocolate, you might need to add extra cream to achieve the buttery texture.
- Cut the chocolate into fine flakes so that it melts more easily.
- Warm the cream slowly over a gentle heat (or short increments in the microwave) to avoid curdling. If using a microwave, mix regularly for even heating.
- Avoid boiling or heating cream over 75℃ (167℉) to reduce the chance of scalding (scalding will alter the flavor).
- If the chocolate doesn’t fully melt, place it in a glass bowl over a hot water bath to gently finish melting it.
- If you want to personalize them with freeze dried fruits, nuts, or other edible decorations, sprinkle them over the top when the chocolate is half set so they can adhere to the top without sinking.
- Wipe the knife between each cut for perfectly clean edges.
With these simple tips in mind, you’re set for success every time you make homemade Nama Chocolate.
How to Store
Fridge: Nama Chocolate contains fresh cream so keep them refrigerated and consume within 4 days. If you are giving them as a gift, make sure to tell the receiver how to store and for how long.
Freezer: For longer storage, Nama Chocolate is freezable for up to 2 months. Cut into pieces and store in an airtight container to protect them from freezer burn. Thaw in the refrigerator overnight to defrost.
Nama Choco FAQ
Most Nama Chocolates in Japan contain alcohol and this will be listed in their ingredients. To achieve a similar flavor to store-bought versions, I’ve included alcohol as an optional ingredient in my recipe. If you cannot consume alcohol, it’s fine to omit it!
Due to its high cream content, Nama Chocolate melts faster than regular chocolate and needs to be kept chilled. It literally melts in your mouth, that’s the beauty of it!
If you are giving Nama Chocolate as a gift or bringing it to an event, be sure to store it in a cool bag with an ice pack and refrigerate it as soon as possible.

More Japanese Chocolate Recipes
- Dark Chocolate and Matcha Brownies
- Matcha White Chocolate Chip Muffins
- Matcha White Hot Chocolate
- Japanese Steamed Cakes (Mushi Pan)
Want more inspiration? Explore my Japanese Dessert Roundup Post for a carefully selected collection of tasty recipe ideas to spark your next tea party!
Did You Try This Recipe?
I would love to hear your thoughts!
💬 Leave a review and ⭐️ rating in the comments below. 📷 I also love to see your photos – submit them here!
Nama Chocolate (Japanese Valentine’s Day Chocolate)

Ingredients
- 255 g milk chocolate 20-40% cocoa mass recommended
- 120 ml heavy cream 36% milk fat or higher
- 15 g unsalted butter
- ½ tbsp liquor of choice or equal amount of heavy cream
- cocoa powder for dusting
The ingredient brands and tools I trust are in my Japanese pantry guide and my cooking tools guide.
Can’t find certain Japanese ingredients? See my substitution guide here.
Instructions
- Cut 255 g milk chocolate into small flakes and place them in a heatproof bowl. The smaller the flakes, the better it will melt.

- Pour 120 ml heavy cream into a heatproof jug and add 15 g unsalted butter and ½ tbsp liquor of choice (or replace with extra cream). Heat on low power in 20-30 second intervals until it reaches about 70 °C (158 °F). Alternatively, heat on the stove until small bubbles appear around the edge, but be careful not to let it boil.
- Pour the heated cream mixture into the chocolate and let it sit for 30 seconds to 1 minute. Stir until all the chocolate has melted into the cream. If there are stubborn lumps of chocolate, heat further over a hot water bath and mix until smooth.
- Pour the mixture into a square or rectangular mold lined with baking paper, and cool to room temperature before covering and placing in the refrigerator for about 3-4 hours.
- Remove from the mold and cut off the edges. Cut into equally sized pieces, dust with cocoa powder, and enjoy!
Notes
- Keep refrigerated and consume within 4 days. Alternatively, cut and freeze for up to 2 months. (Store in an airtight container to protect them from freezer burn).
- Warm the cream slowly over a gentle heat (or short increments in the microwave) to prevent curdling. If you use a microwave, mix between intervals for even heating.
- Avoid boiling or heating cream over 75℃ (167℉) to prevent scalding.
- If adding toppings like freeze-dried fruits or nuts, sprinkle them over the top when the chocolate is half-set to help them stick to the top without sinking.
- When cutting, wipe the knife between each cut for clean edges and better presentation.
Leave a rating and a comment