


Featured Comment
It’s simple yet delectable dessert, love it so much. I’ve been making this daifuku many times now, and each time it will be “vanished” swiftly.
★★★★★
– Elvira
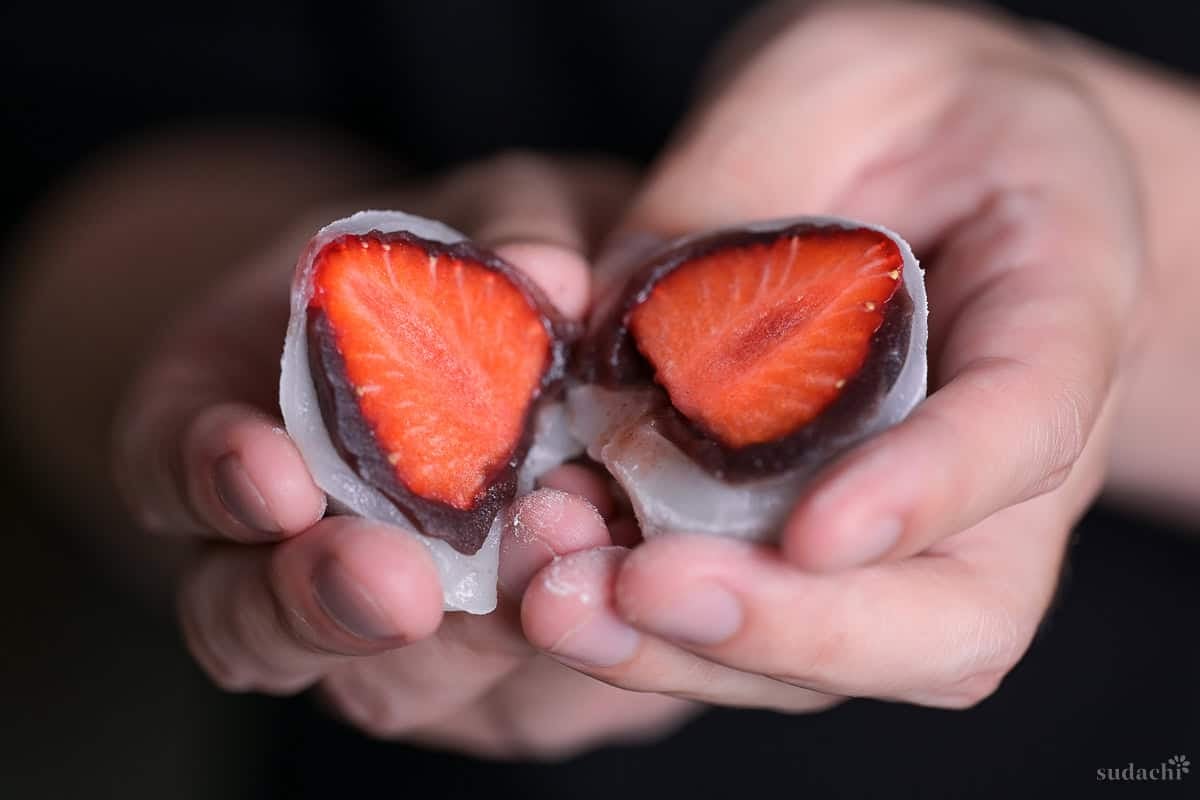
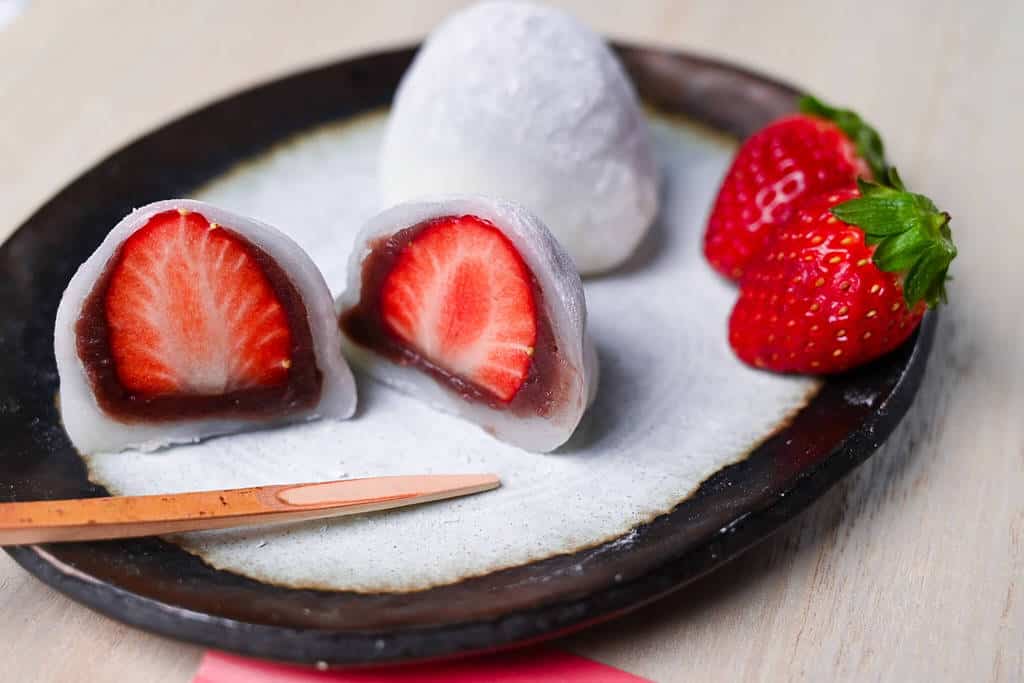
If you love Japanese sweets like dango or warabi mochi, you’re going to fall head over heels for this Ichigo Daifuku. With its soft, pillowy exterior and juicy strawberry center, this treat is as fun to make as it is to eat. And it tastes even better homemade!
By the way, if you love this recipe, check out my strawberry mochi milk recipe. It’s a unique twist that turns this irresistible sweet into a luxurious drink!
Ichigo Daifuku
Recipe Snapshot
- What is it? A soft and chewy mochi dessert filled with a sweet red bean paste coated strawberry.
- Flavor profile: Sweet, chewy, fruity.
- Why you will love this recipe: It’s the perfect balance of textures and flavors. Soft mochi, smooth anko and juicy strawberries in every bite. It’s relatively simple to make, but it feels like a special Japanese confectionary treat.
- Must-haves: Glutinous rice flour, starch to prevent sticking (potato starch or cornstarch), microwave or steamer.
- Skill level: Medium. The shaping takes a little practice, but I guarantee it will taste delicious even on your first try!
Summarize & Save this content on:
Disclaimer: This post may contain Amazon affiliate links. Sudachi earns a small percentage from qualifying purchases at no extra cost to you. See disclaimer for more info.
What is Ichigo Daifuku?
Daifuku (大福) is a Japanese sweet that consists of a sweet and stretchy rice flour dough called “gyuhi” wrapped around a sweet filling. It is most commonly filled with a red adzuki bean paste called anko (餡子). You can also fill them with fruits, cream or even ice cream.
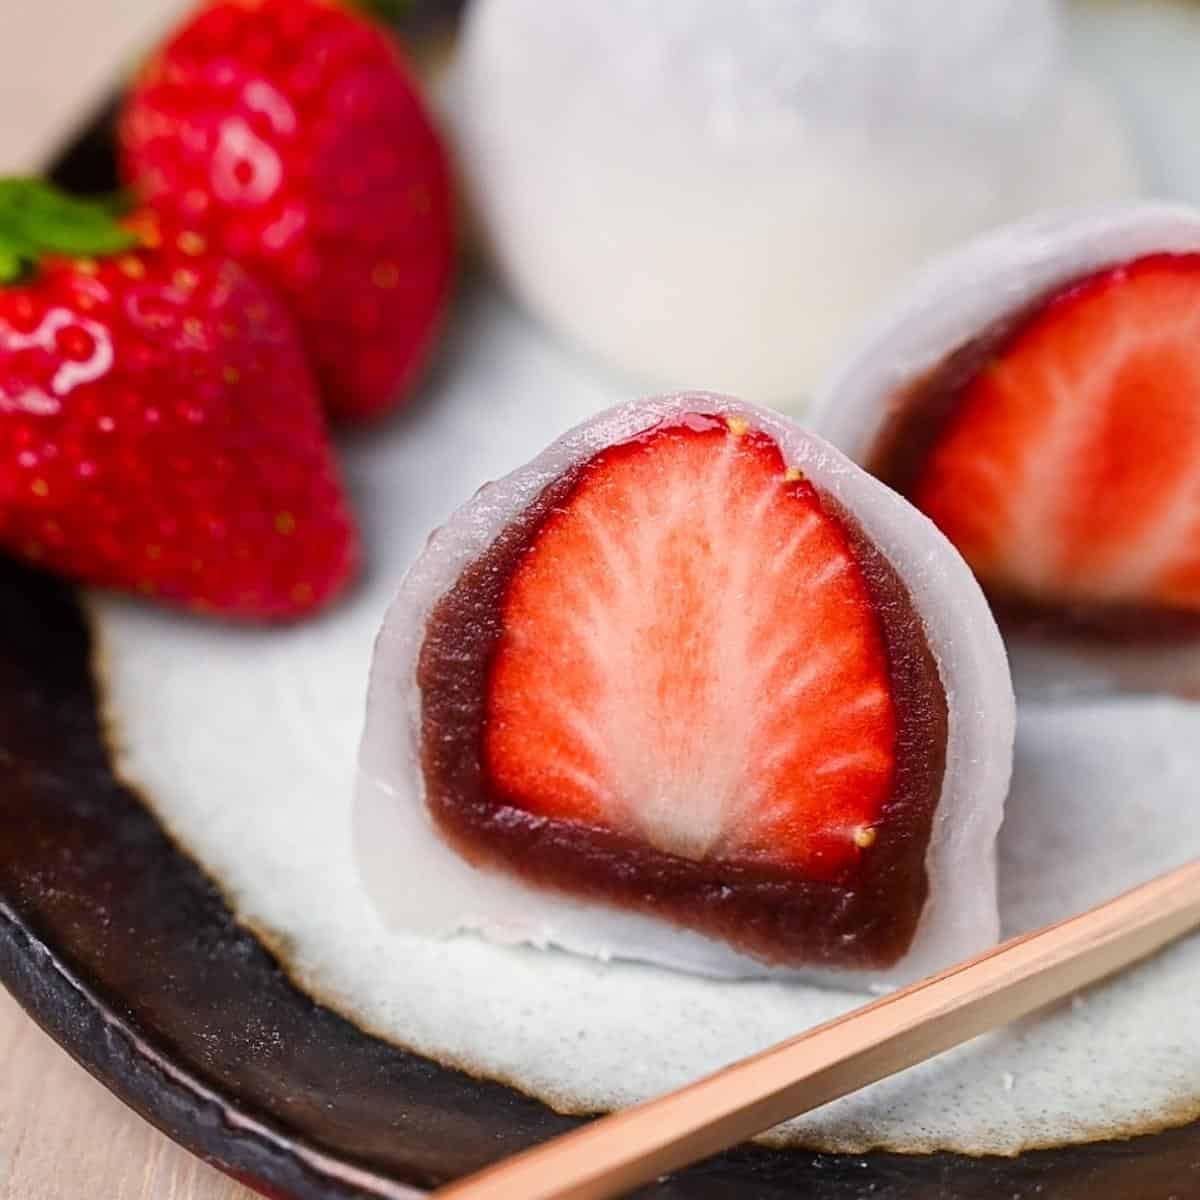
Ichigo daifuku gets it’s name from ichigo, the Japanese word for strawberry. Each piece contains a whole strawberry tucked inside soft mochi and sweet red bean paste. I have to say that the tart strawberry combined with the sweet anko and mochi creates a wonderful balance and it’s no wonder that it’s one of the most popular kinds of daifuku!
The Difference Between Mochi and Daifuku
You’ll often see ichigo daifuku translated as “strawberry mochi” in English, so it’s natural to ask, why isn’t it called “ichigo mochi”? Well, there’s actually a good reason for that.
Mochi is a Japanese rice cake made from glutinous rice called mochigome (もち米). The mochigome is steamed and pounded to form a firm and chewy rice cake. Traditional mochi would be pounded in a mortar called an “usu” (臼). This kind of mochi is often served toasted with dipping sauce or cooked in soups, it’s known to Japanese people as a savory ingredient.
At its core, daifuku is also made from mochigome, but the process and final result is completely different to mochi. The mochigome is processed into flour we know as glutinous rice flour (either mochiko, or shiratamako). The flour is mixed with sugar and water, then steamed to make a soft and stretchy dough called “gyuhi” (求肥).
Gyuhi remains soft and pliable even after cooling, unlike regular mochi which tends to firm up. This is what distinguishes daifuku from mochi, and why gyuhi is more suitable for making sweets. Somewhere, the word “mochi” became lost in translation, and in Japan, daifuku and mochi are considered completely different things.
Ichigo Daifuku Ingredients

- Glutinous rice flour: The most important ingredient for this recipe is glutinous rice flour; regular rice flour will not work. This is because glutinous rice flour is made from a special kind of sticky rice called “mochigome.” The two most common types of glutinous rice flour are mochiko (もち粉) and shiratamako (白玉粉). You can use either for this recipe, but I find shiratamako results in a softer, stretchier texture. If you want to mimic the texture of shiratamako, substitute with a mixture of mochiko and potato starch at a 70/30 ratio.
- Anko: Traditionally, white bean paste called shiroan (made with lima beans or butter beans) was more common to use for ichigo daifuku. These days, I see red bean paste used more. The smooth type called “koshian” works best texturally. You can buy koshian on Amazon or if you’re interested in making your own, check out my homemade koshian recipe here. Tip: Keep koshian in the refrigerator for easy shaping.
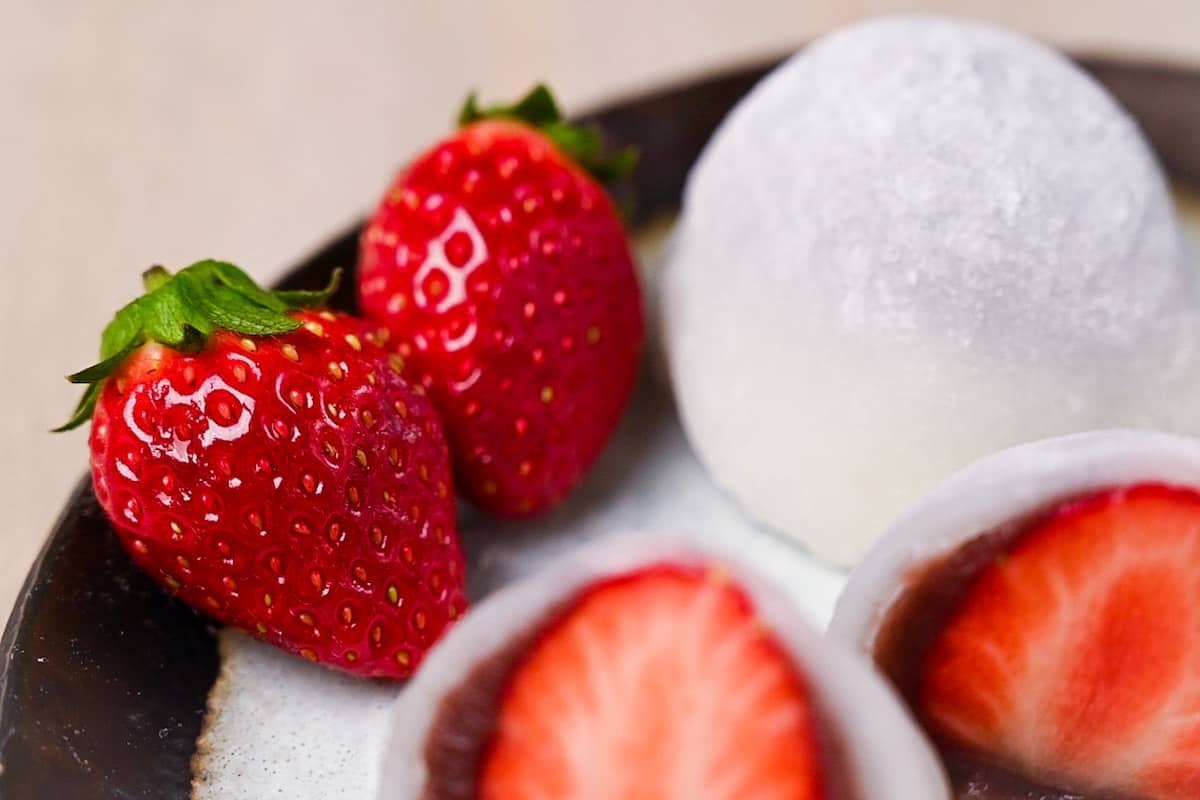
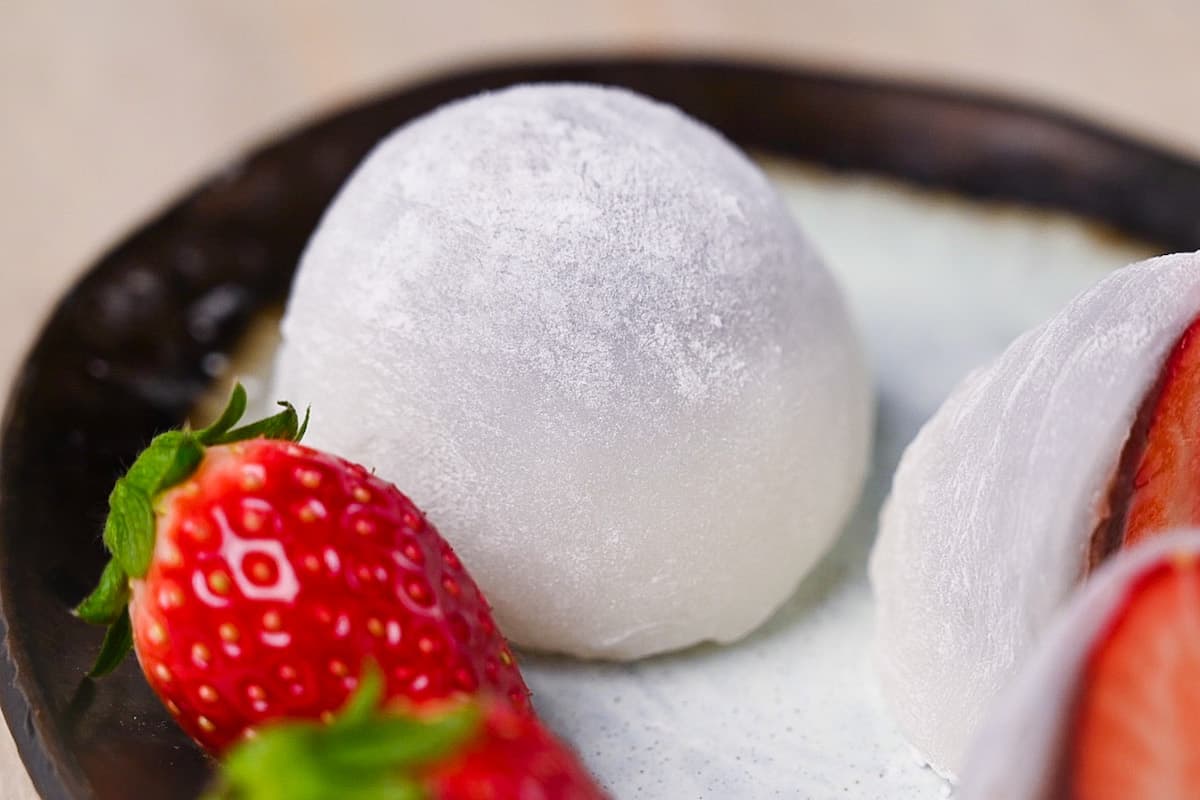
- Strawberries: Using small or medium strawberries will make it easier to wrap the daifuku.
- Potato starch (or cornstarch): Will stop the gyuhi (mochi dough) from sticking to hands, surfaces and utensils.
Filling Ideas
The beauty of daifuku is that you can fill it with whatever you like! Mix things up with some of these variations.
- Other fruits: You don’t have to strictly make it with strawberries! Other popular options include whole mikan, kiwi or grapes!
- Cream: Whipped cream makes a great filling, but it can be difficult to shape. Pipe onto a tray and freeze for 1 hour before assembly.
- Chocolate ganache or cream: For a luxuriously rich daifuku, chocolate ganache is a delicious filling. Again, shape and freeze before wrapping.
- Ice cream: Ice cream daifuku is a wonderful summer treat! Scoop your favorite ice cream, then freeze individual scoops on a tray for 1 hour before shaping.

How to Make My Ichigo Daifuku Recipe
Before you start:
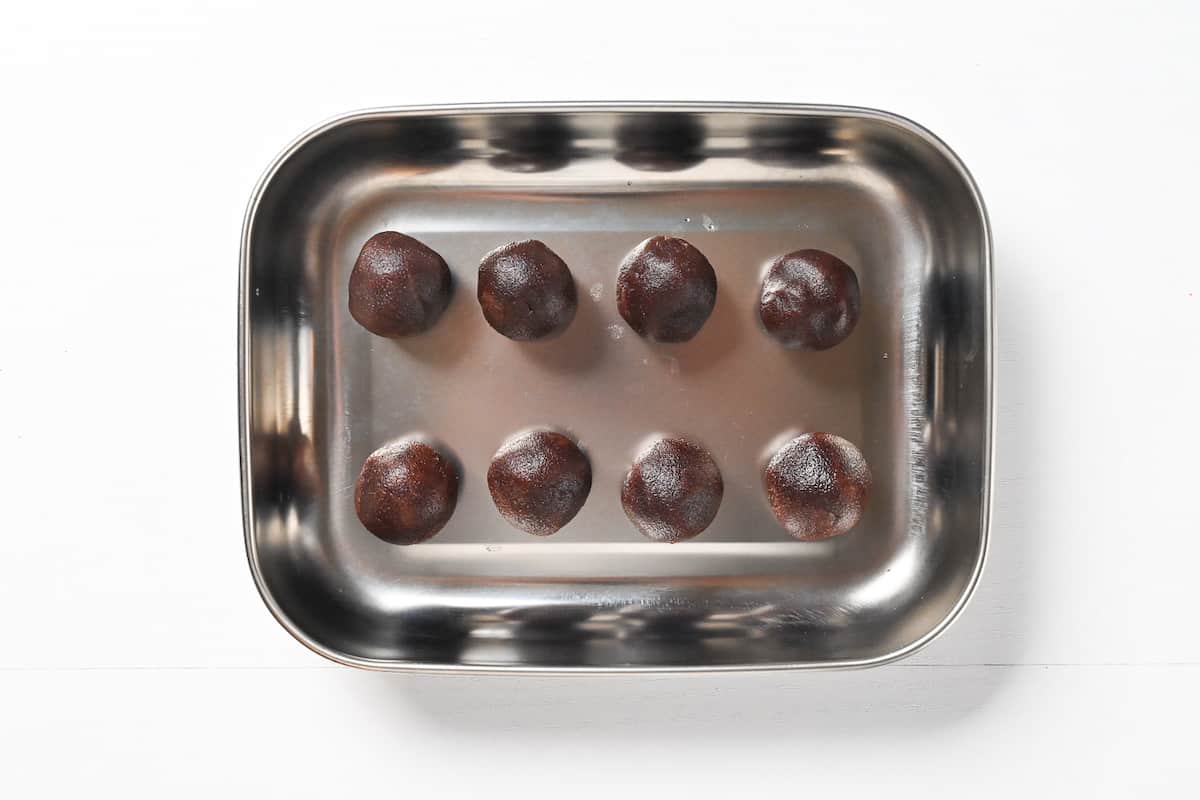
- Refrigerate the anko thoroughly before you start so that it’s firm and easy to shape, soft room-temperature anko is likely to melt in your hands.
- Remove the green stems of the strawberries, then wash and dry thoroughly with kitchen paper. If there is any water droplets on the strawberries, the anko won’t adhere to the surface.
- Roll the anko into 20g balls and store covered in the fridge until use.
Smooth anko (koshian in Japanese) can vary in texture depending on your brand. Some can be rolled straight from the packet with no problem, others need refrigeration and some are extremely soft and difficult to handle.
Please only use this step if your anko is too soft to roll!
If your anko is still too soft to shape even after refrigeration, divide it into 20g pieces (how much I use per daifuku) and chill it in the fridge uncovered to dry it out a little (check it regularly to ensure it doesn’t become too dry).
If it is particularly soft, microwave it or heat it in a saucepan to evaporate some of the moisture. If you do this, be sure to mix continuously to prevent burning and stop once it starts to lighten in color. Spread it out on a plate and lightly cover it with plastic wrap to help it cool quickly without drying out too much. Chilling in the fridge uncovered will also help dry it out some more.
Important: Remember that it will thicken when cooled, so heat until slightly softer than you want it to be.
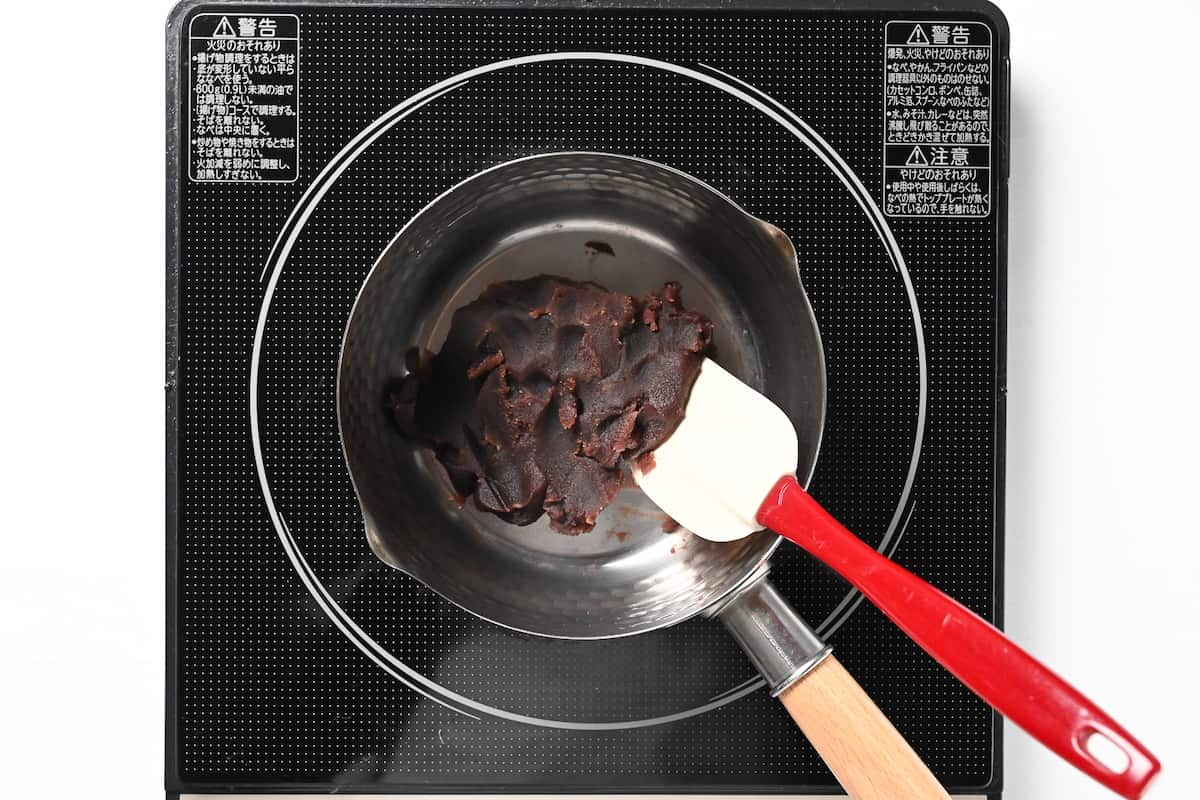
If you went too far and your anko becomes dry and crumbly, you can fix it by heating it with a splash of water in a pan. Mix until evenly distributed, and then take it off the heat.
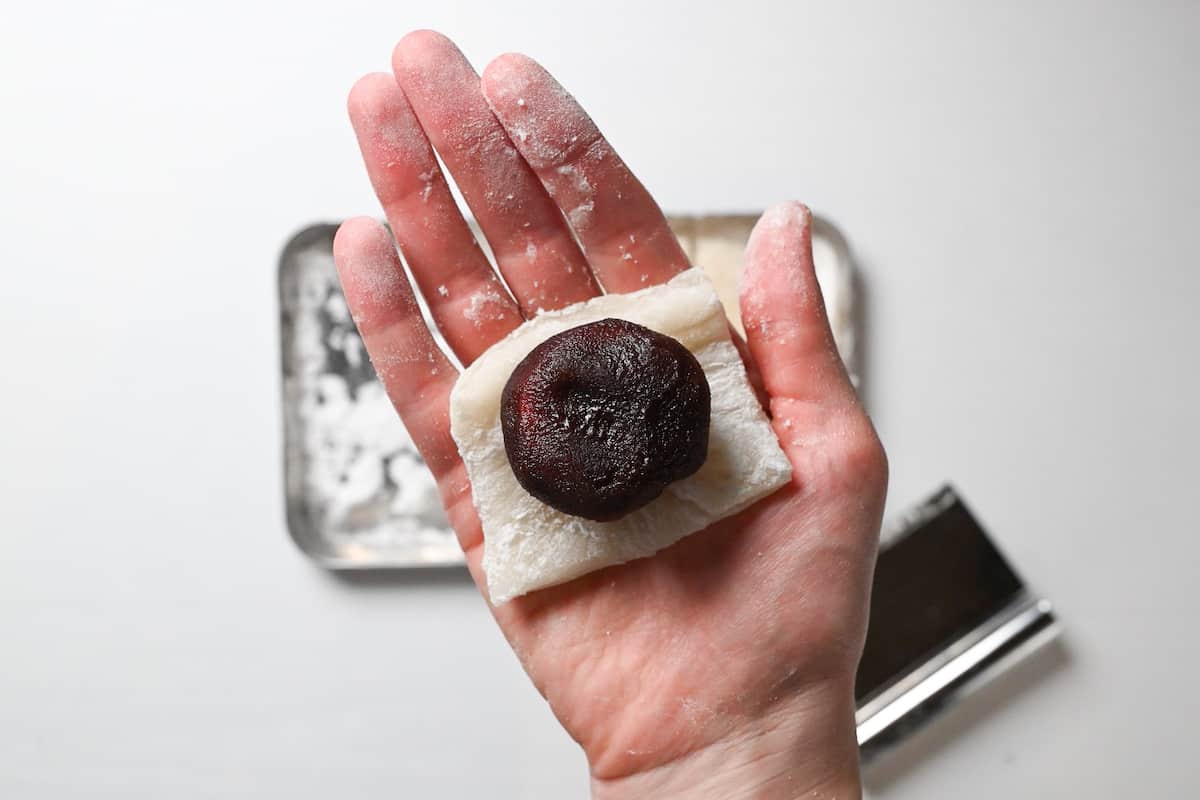
i. Take each ball of anko and press it gently on the palm of your hand to flatten it out into a disc a little bigger than the stem side of strawberry. Don’t press too hard or it will stick to your hand.
ii. Once it’s a good size, place the strawberry in the center with the point facing up.
Tip: Use small-medium sized strawberries for easier wrapper (and better flavor!)
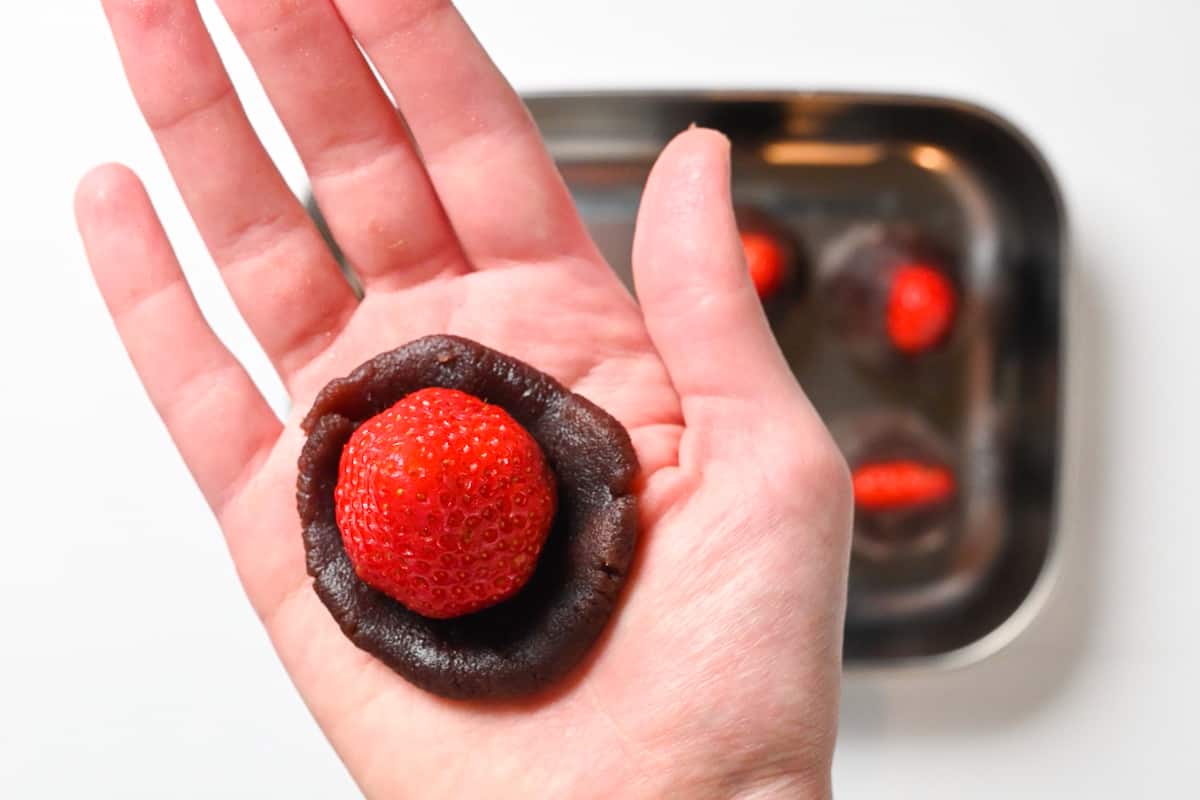
iii. Pull the sides of the anko up and over the edges of the strawberry, leaving the top slightly exposed. This is so that you can see the position of the strawberry when wrapping it in the mochi. The strawberry’s point should always be at the top.
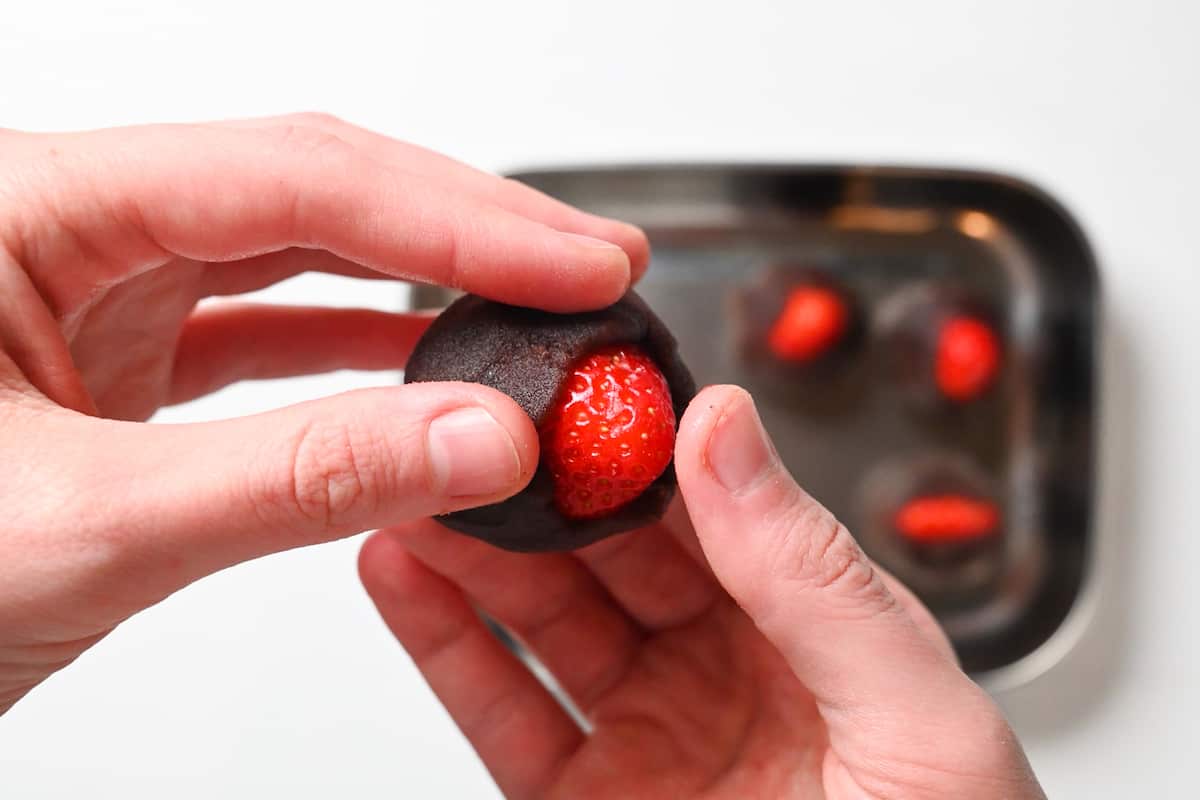
iv. Once they’re all wrapped, cover them and store them in the fridge for later.
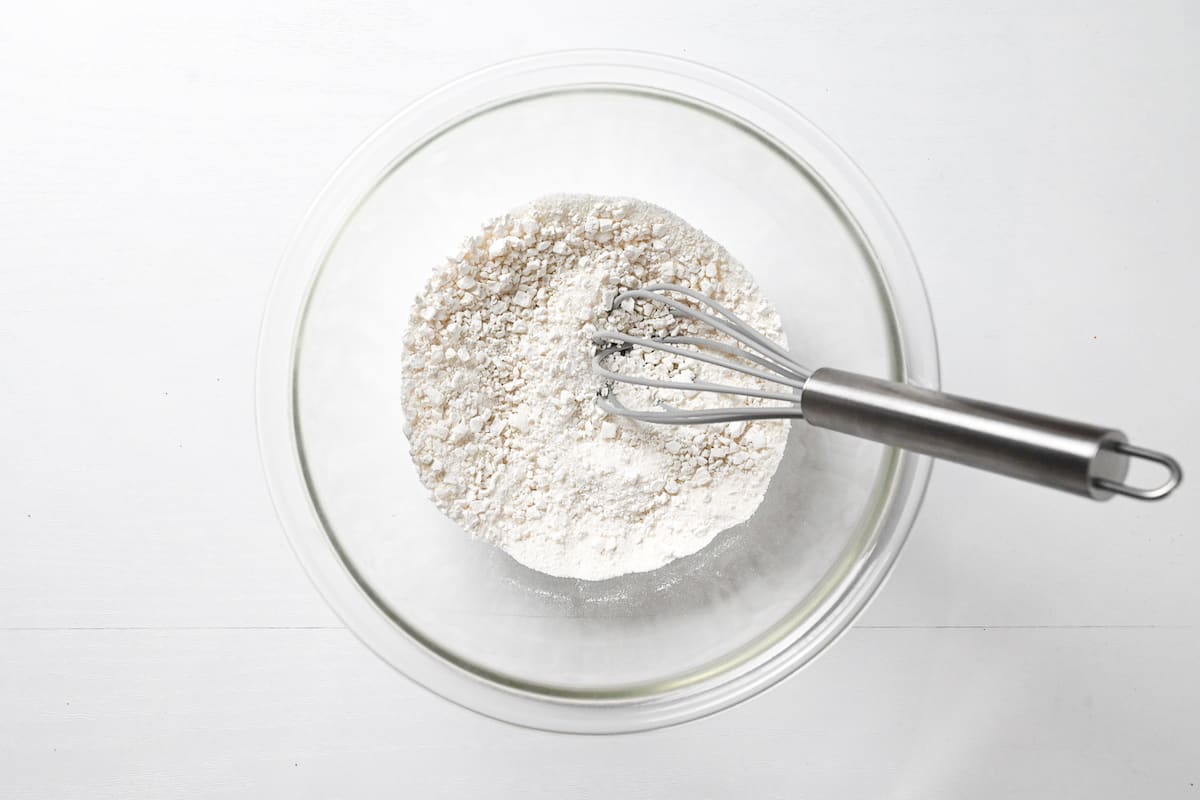
i. Whisk the glutinous rice flour with sugar in a microwavable mixing bowl, mixing the dry ingredients first will ensure the sugar is evenly distributed.
I recommend using a glass bowl for this.
Using mochiko alone can make the gyuhi a bit dense, but you can soften it by swapping in some potato starch. I like to use 70g of mochiko and 30g of potato starch for every 100g glutinous rice flour used in the recipe.
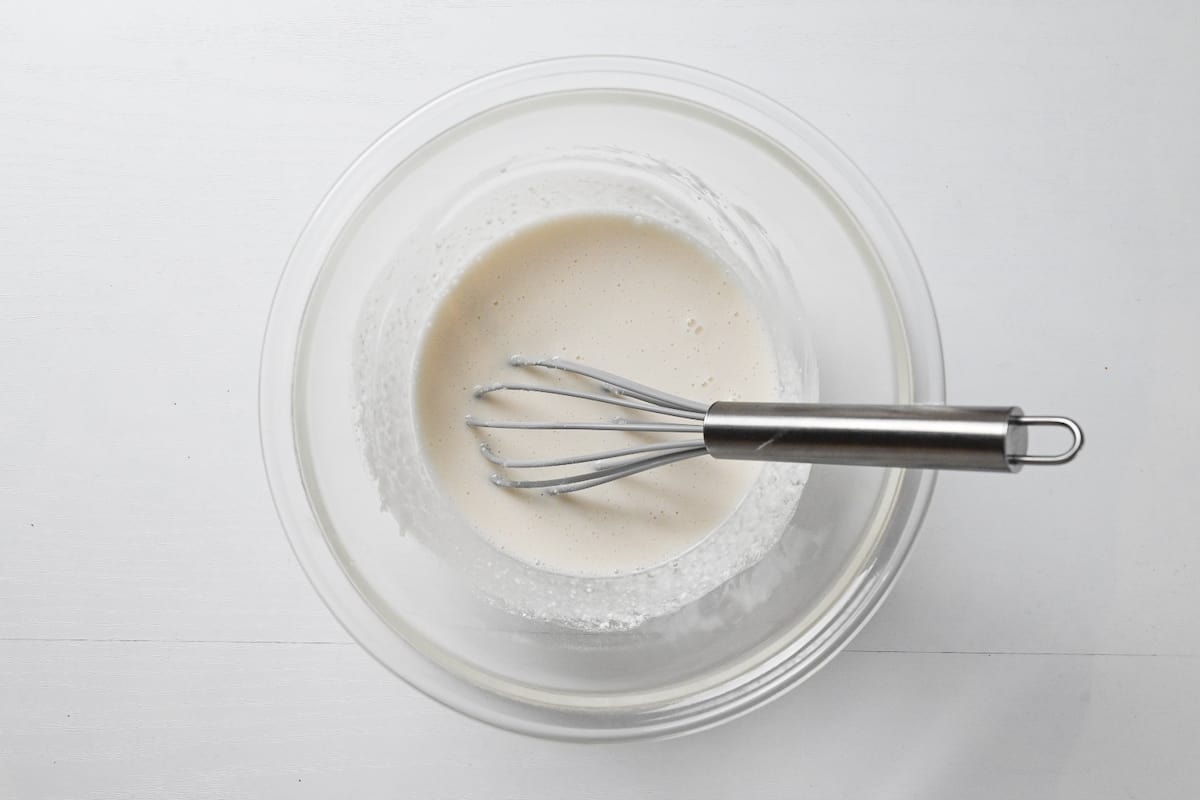
ii. Next add the water all at once and whisk until smooth.
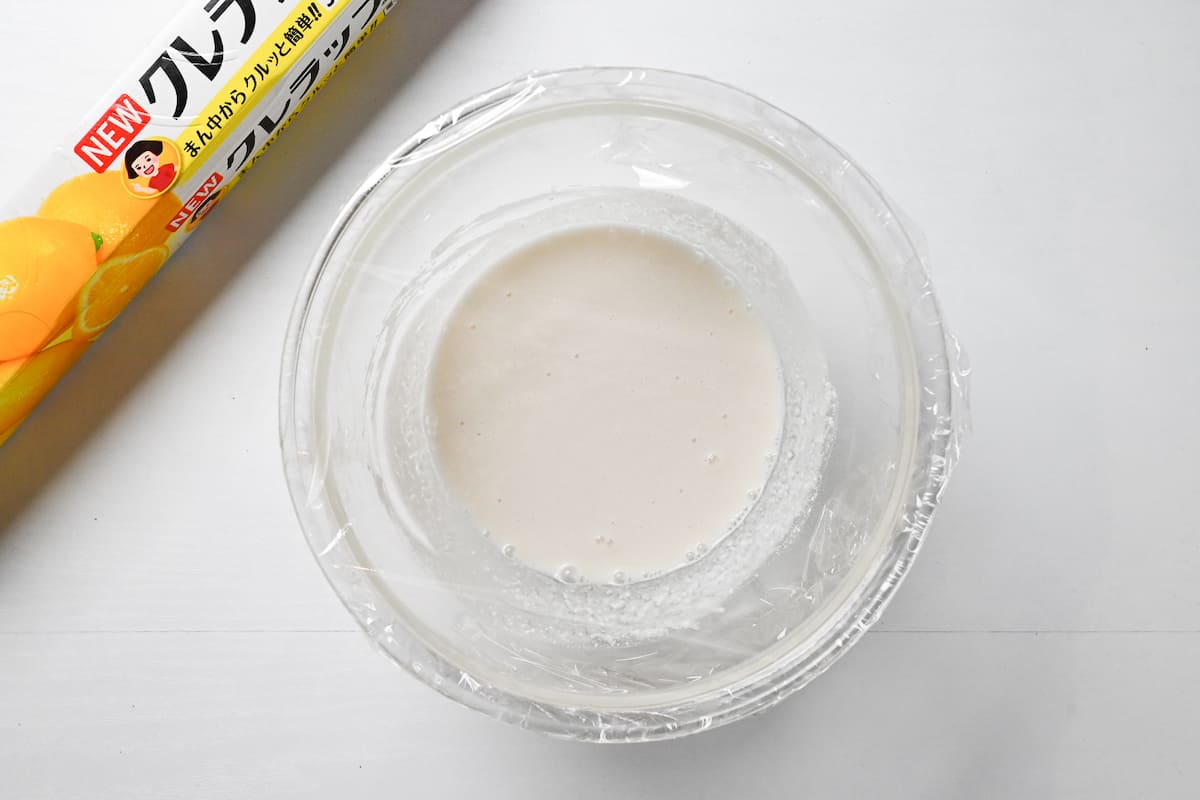
iii. Cover the bowl tightly with plastic wrap and microwave for 1 minute 30 seconds at 600W. (Lower wattage will require longer, higher should be shorter.)
iv. After the first blast in the microwave, the mixture will become lumpy. Switch to a spatula (preferably silicone) carefully peel back the plastic wrap, mix until the lumps are distributed through the mixture.

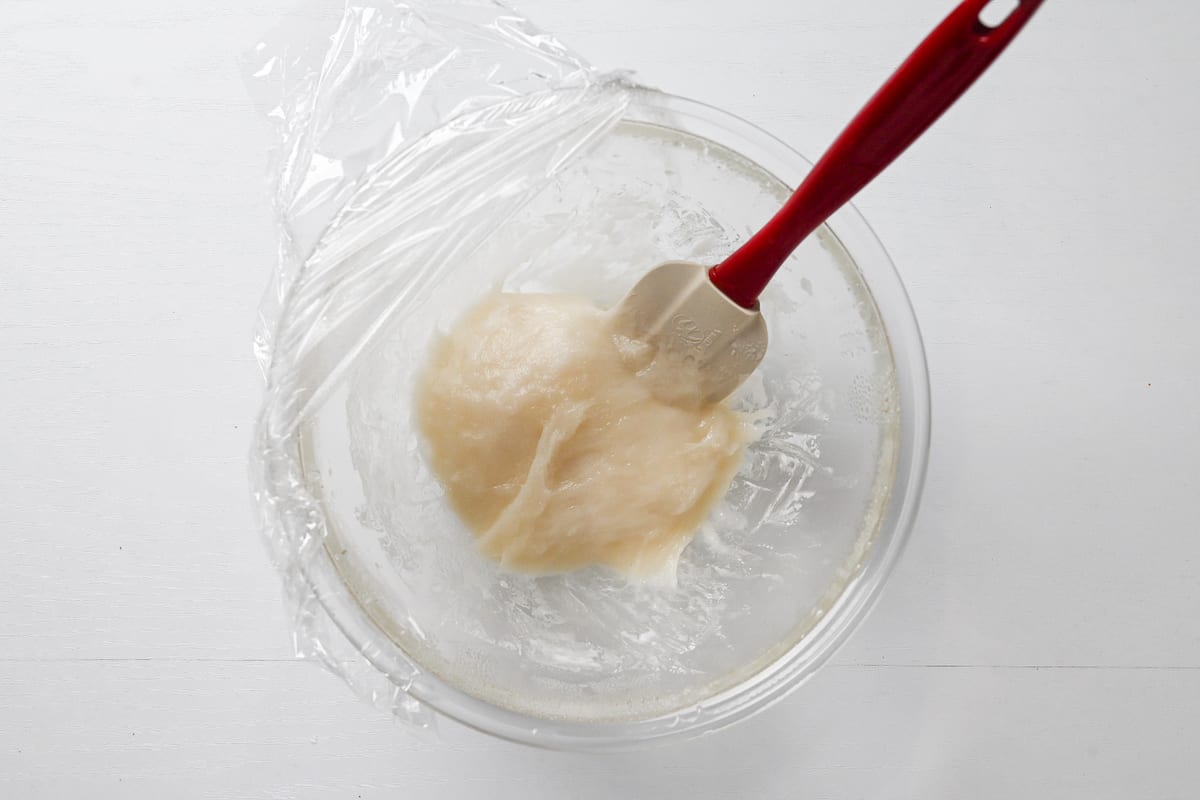
v. Cover with plastic wrap again and microwave once more for 2 minutes at 600W. When it comes out, mix the dough thoroughly until it becomes slightly translucent, it shouldn’t have any white parts left. Here is a close up of how it should look:
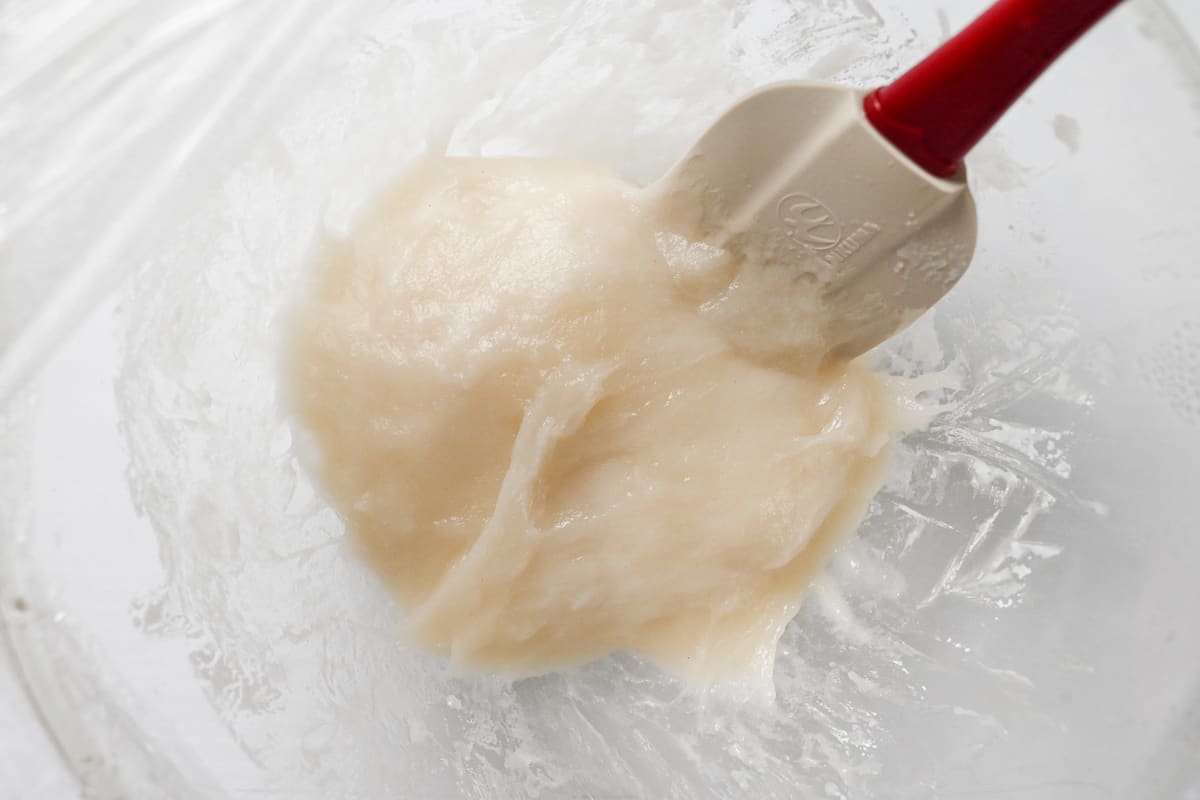
If there is still white bits, return to the microwave in short intervals (10-20 seconds at a time) and mix thoroughly each time until it looks like above.
If you’re doubling or tripling the recipe, it will need a few minutes longer.
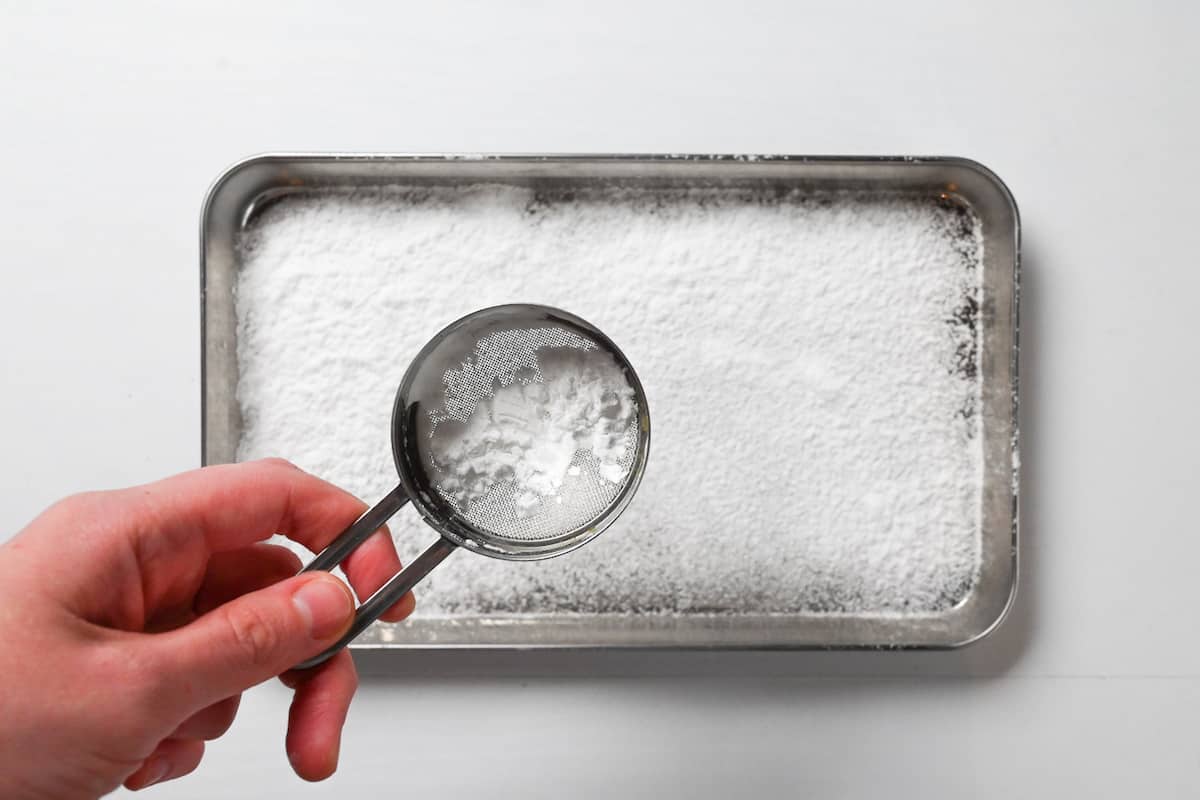
i. The gyuhi is extremely sticky, so cover a surface with potato starch or corn starch. I like to use a tray to keep the mess contained for easy clean-up.
If you plan to use a rolling pin to roll it out, sprinkle a dusting of starch over a cutting board lined with parchment paper instead.
ii. Use the spatula to scrape the mochi mixture onto the starch and then cover it generously with more starch.
The mochi will still be hot, so wait for it to cool down until warm to the touch. Don’t let it cool completely, as it will be more prone to tearing.
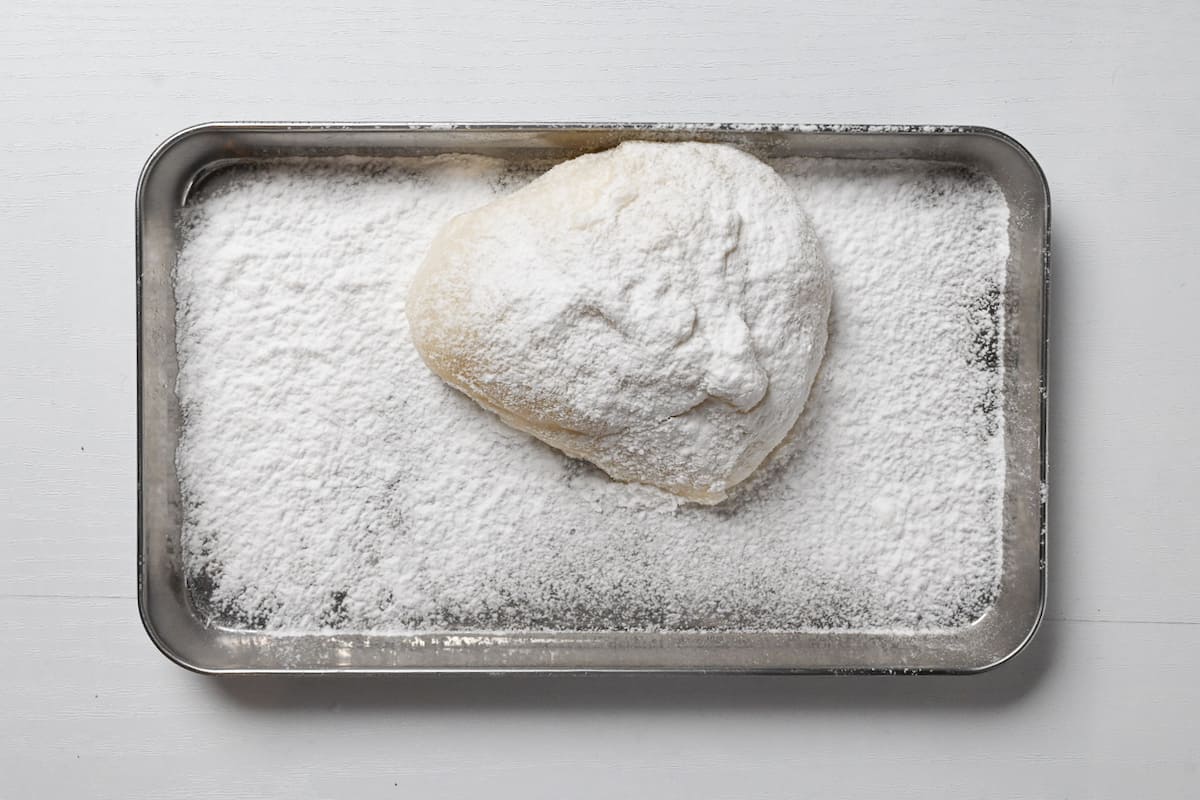

iii. Generously coat your hands with starch and stretch the dough out into a rectangle. If using a rolling pin, make sure to coat it with starch. Flip the dough over from time to time to stop it sticking to the tray and add more starch if it gets sticky again.
It should be about 1cm thick. If you roll it too thin, the color of the anko will show through and it will tear more easily.

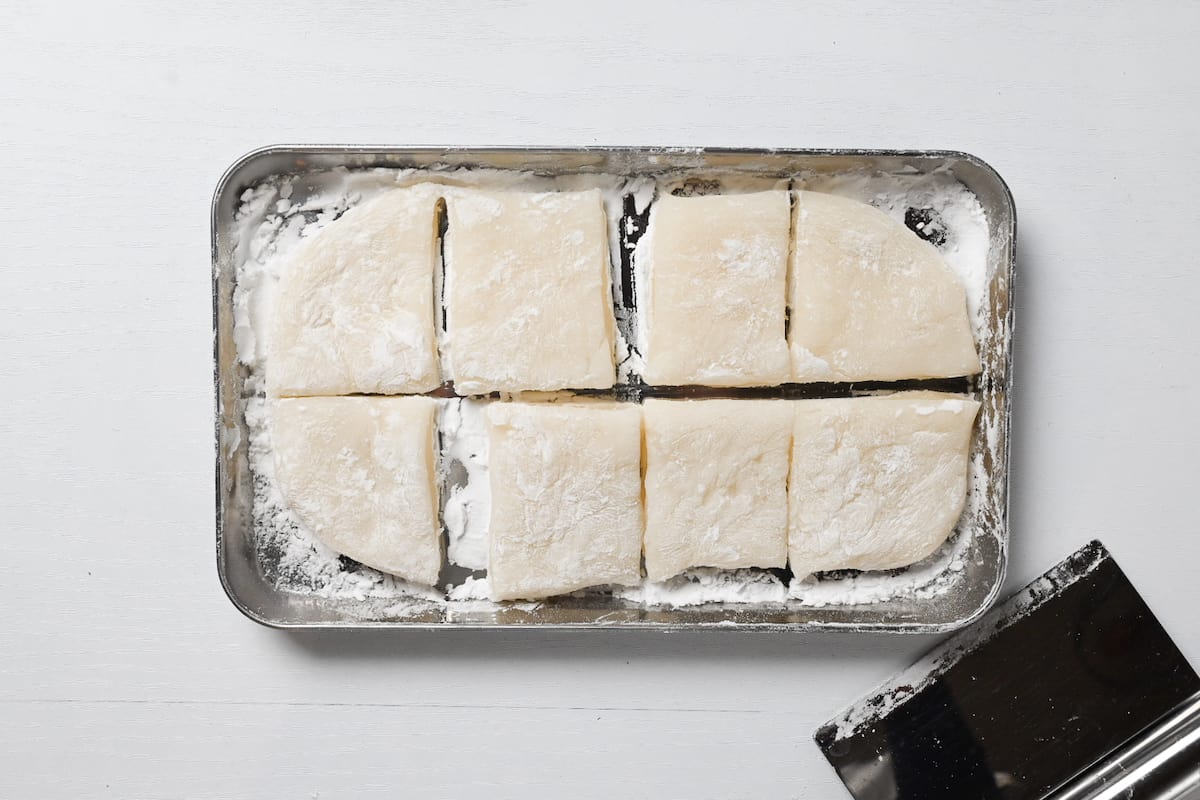
iv. Once rolled out, cut into equal pieces. Ideally the pieces shouldn’t be too big, otherwise you will have excess dough at the bottom of the daifuku.
i. With starch-coated hands, place a square of mochi in your palm and position the anko-coated strawberry in the center with the point facing down. (This is why we left the point slightly exposed earlier.)
ii. Pull the corners together over the base of the strawberry and pinch them to help them stick.
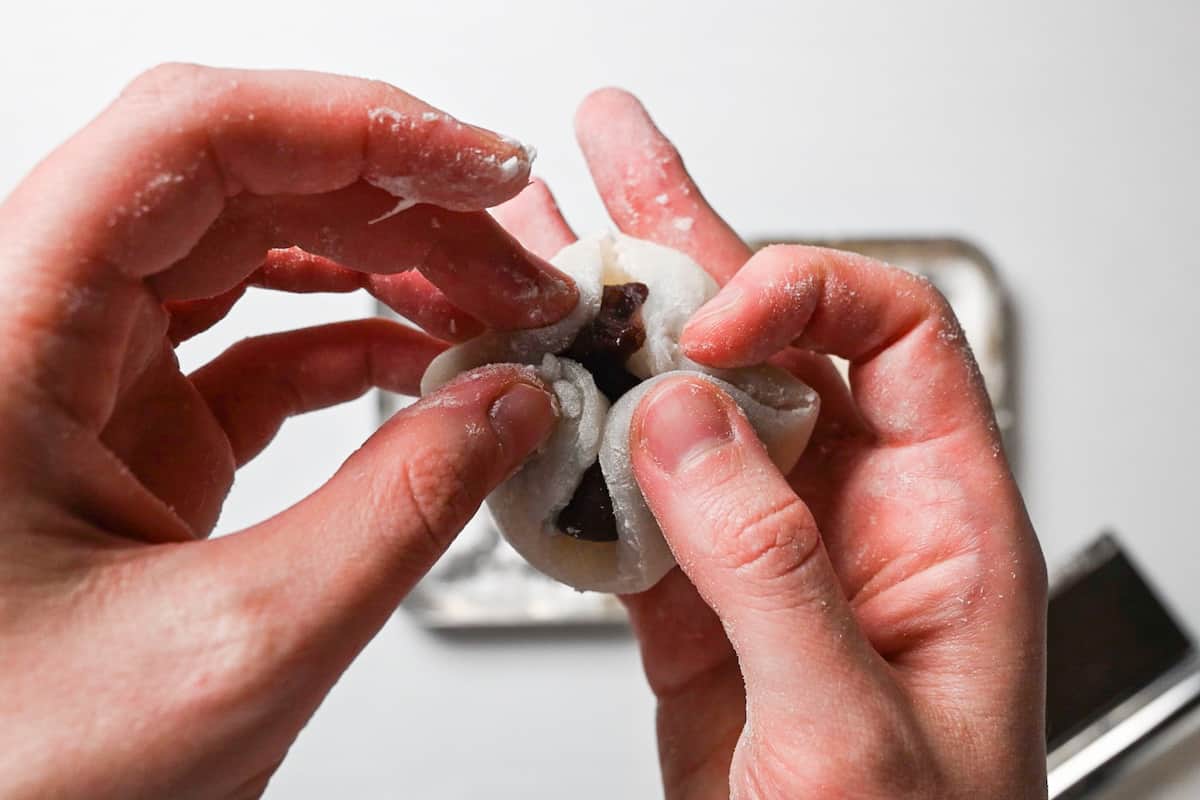
iii. Pinch the edges together to seal.
While shaping the mochi, the cut edges will be sticky. These are good for helping you seal up the mochi, but they tend to stick to your fingers. I always keep a bowl of potato starch nearby to sprinkle some extra whenever dough starts to stick to my hands.
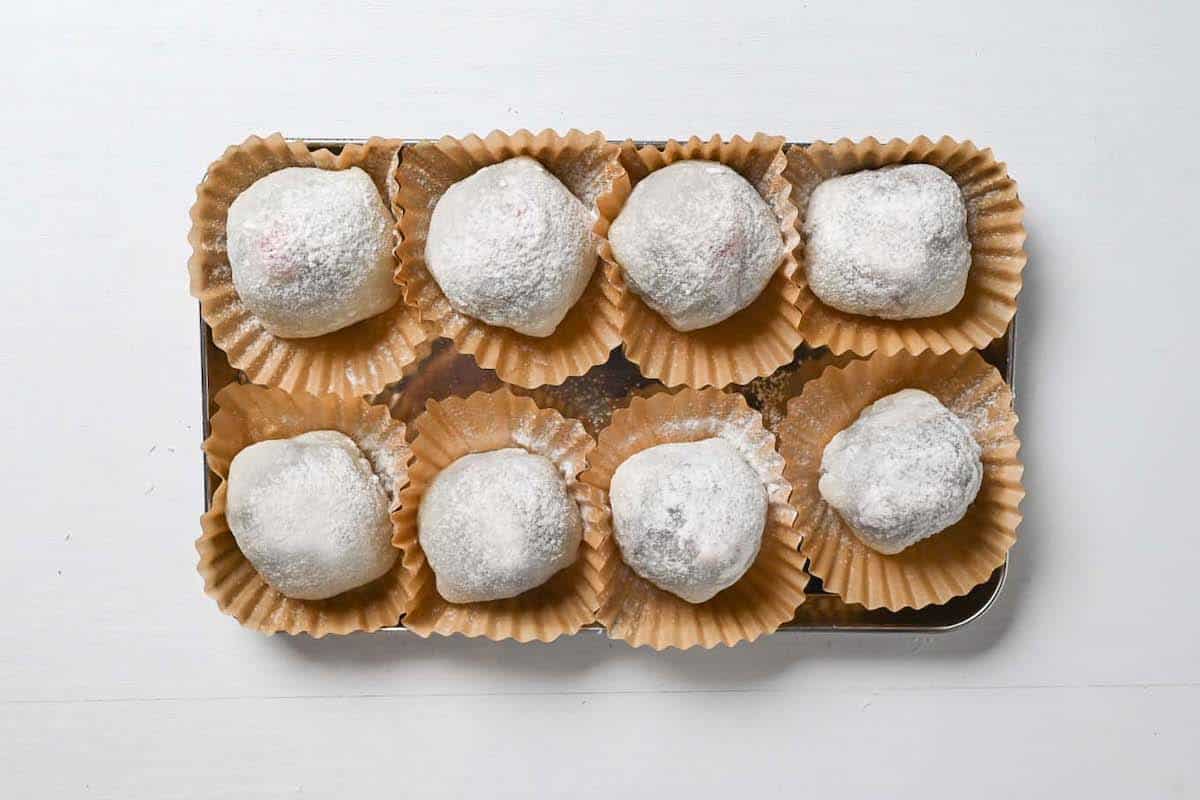
iv. Gently roll the mochi in your palm to smooth out the surface.
Tip: Place them in cupcake cases to stop them from sticking to the tray or together!

Essential Tips & Tricks
- If your anko is too soft and sticky to handle, try refrigerating or leaving it out to air dry slightly so it’s easier to handle.
- If using mochiko (instead of shiratamako), substitute about 20-30% for potato starch or cornstarch for a softer texture. I use 70g mochigo 30g starch.
- Starch is your best friend when making daifuku. Whether you use potato starch or cornstarch, keep it in a small accessible bowl near by to save you whenever you get in a sticky situation. Dust your work surfaces, tools and hands at all times.
- If using a rolling pin, be careful not to roll it too thin. This will make the anko show through and it might tear easily when shaping.
- Don’t cut the gyuhi too big. Slightly smaller pieces can be stretched over the anko & strawberry, then pinched at the bottom to seal. If the pieces are too big, the excess will bunch underneath and become thick & messy.
- This recipe works best with small/medium strawberries. If you can’t find small strawberries, cut the gyuhi (mochi dough) into larger pieces and make 4-6 instead.
- If your gyuhi cools too much, it might tear more easily. Revive it with 5-10 seconds in the microwave.
- Place them in cupcake cases once shaped to keep them from sticking together.
With these simple tips in mind, you’re set for success every time you make homemade ichigo daifuku.
How to Store
Ichigo daifuku is best eaten the same day.
Room temperature: Keep them in a sealed container in a cool dry place for up to 12 hours. Avoid humid environments that can make the outside sticky.
Refrigerated: Not ideal as it can dry out the gyuhi, but if you don’t want to waste leftovers then store them in an airtight container in the warmest part of your fridge for up to 24 hours. Keep in mind that the texture significantly deteriorates after being in the fridge.
Freezing: Not suitable.
Ichigo Daifuku FAQ
Since mochi is made from rice flour, if it is exposed to air for a prolonged time it tends to dry out. This can also happen if you leave them exposed to air or put them in the refrigerator. To keep the mochi soft, store it in an airtight container at room temperature and consume within 24 hours.
I always recommend shiratamako because the result is softer and stretchier, but you can absolutely use mochiko instead. The
I recommend rolling and shaping daifuku while the mochi is still warm and more pliable. As it cools, it becomes less flexible and more prone to tearing. Try warming it in the microwave for 5-10 seconds to soften it again. Other causes can be rolling it too thin or using strawberries that are too big.
While mochi and daifuku are both are made from mochigome (glutinous rice), mochi is usually made from the actual rice and needs to be warmed (either grilled or placed it soups/hotpots) to soften it enough for eating, it’s also often eaten savory. On the other hand, daifuku is made with gyuhi, a sweetened dough made from glutinous rice flour, a product of mochigome. The sugar and water content make it stay soft even at room temperature.
Daifuku can be filled with pretty much anything you like! There are many kinds in Japan, including whole mikan, grape (muscat) and kiwi. Ice cream, cream and even chocolate also make great fillings.
More Japanese Dessert Recipes
- Sata Andagi (Okinawan Donuts)
- Matcha Roll Cake (Green Tea Swiss Roll)
- Matcha Christmas Tree Butter Cookies
- Fudgy Dark Chocolate and Matcha Brownies
Want more inspiration? Explore my Japanese Dessert Roundup Post for more delicious Japanese sweet treats!
Did You Try This Recipe?
I would love to hear your thoughts!
💬 Leave a review and ⭐️ rating in the comments below. 📷 I also love to see your photos – submit them here!

Easy Strawberry Mochi (Ichigo Daifuku)

Ingredients
- 160 g smooth red bean paste (koshian)
- 8 strawberries small or medium size
- 100 g glutinous rice flour 100g shiratamako, or 70g mochiko + 30g potato starch
- 60 g granulated sugar
- 150 ml water
- potato starch (katakuriko) or cornstarch for dusting
The ingredient brands and tools I trust are in my Japanese pantry guide and my cooking tools guide.
Can’t find certain Japanese ingredients? See my substitution guide here.
Instructions
- Roll 160 g smooth red bean paste (koshian) into 20g balls. Cover and store in the refrigerator between steps.

- Wash 8 strawberries and dry them thoroughly. Cut off the stems and place them on a sheet of kitchen paper.
- Take the anko from the fridge and press each ball in the palm of your hand to flatten into a disc. Place a strawberry in the center with the point facing up.
- Pull the edges of the bean paste up around the strawberry, leaving the tip slightly exposed.
- Cover and refrigerate until later.
- Mix 100 g glutinous rice flour and 60 g granulated sugar together in a microwavable bowl.
- Pour 150 ml water into the bowl and mix until smooth. Then cover with plastic wrap and microwave for 1 minute 30 seconds at 600W.
- Carefully peel back the plastic wrap. Use a spatula to scrape down the sides of the bowl and mix well. Cover again and microwave for 2 minutes at 600W.
- Being careful of the steam, peel back the plastic wrap and mix vigorously with the spatula until the mochi looks translucent. If there are still white bits, microwave in 20 second intervals. Let it cool slightly until it's warm to the touch.
- Dust a tray or cutting board with potato starch (katakuriko) and use the spatula to scrape the gyuhi (mochi dough) out of the bowl and onto the prepared surface. Sprinkle starch generously over the top.

- Roll it about 1cm thick (not too thin). You can use your hands to stretch it or roll gently with a rolling pin, just make sure to dust your chosen tools generously with starch. Then cut the dough into equal pieces.
- Coat your hand with starch and place one piece of mochi in the center of your palm. Place an anko coated strawberry in the middle with the point facing down
- Pull the corners of the mochi over the base of the strawberry until they meet in the middle. Pinch them together until sealed. (Keep extra starch nearby in case it sticks to your fingers.)
- Roll the finished mochi in your hand to smooth out the shape and place it in a cupcake case, or in a wide container lined with parchment paper (or dusted with starch). Repeat until all the ingredients are used up.
- Store in a cool dry place, and enjoy the same day!

Video
Notes
- Best stored in a cool dry place and consumed the same day.
- Not recommended, but if you have leftovers, seal the mochi in a container and store in the warmest part of your fridge to eat the next day (24 hours max).
- Make sure to have a bowl of cornstarch or potato starch nearby while you shape the mochi, just in case it gets stuck to your hands or tools. Make sure your hands are completely dry after washing and before handing the mochi.
- Use small/medium strawberries if you are making 8, larger strawberries will probably make only 4-6. Consider this when cutting the “gyuhi” sweet mochi dough.
- If your dough cools too much, it might become prone to tearing. Heat in the microwave for 5-10 seconds to warm it slightly.
- Don’t roll the dough too thin, about 1cm is ideal. Too thin will tear more easily, and the anko will show through.
- Avoid cutting the gyuhi pieces too big, otherwise excess will bunch up underneath.
After cooling for 30 mins, it was crumbling and impossible to roll it
Are you talking about the red bean paste? If your anko is already easy to roll then you can skip that first step. I’ll edit the recipe to make that clearer. If it’s overcooked it can become dry and crumbly. You can try to save it by adding a little bit of water and honey/corn syrup gradually to try to add some moisture back in. Hope this helps.
Is there a work around for the mochi if you don’t have a microwave?
Hi Doug,
You can also steam it! I recommend using a cake pan or similar, line it with baking paper and pour the mochi mixture inside. Place it in a steaming basket over boiling water, cover with a lid and stir it twice in the first five minutes (be careful not to burn yourself on the steam). After 5 minutes, continue to steam for another 10-12 minutes and then continue the rest of the steps as stated in the recipe. Hope this helps!
Yuto
Well, I’m completely new to cooking in general, but I gave this a go – I made my own koshian (which I think was a little bit too loose…) But it turned out pretty tasty. I’ll make it again when I’m a bit more experienced. Thanks for the recipe!
Hi Craig,
Thank you so much for giving this recipe a go! Making koshian from scratch can be very tough, and even if it was a bit loose, I’m glad it turned out tasty. I’m really happy you enjoyed it! 🙂
Yuto
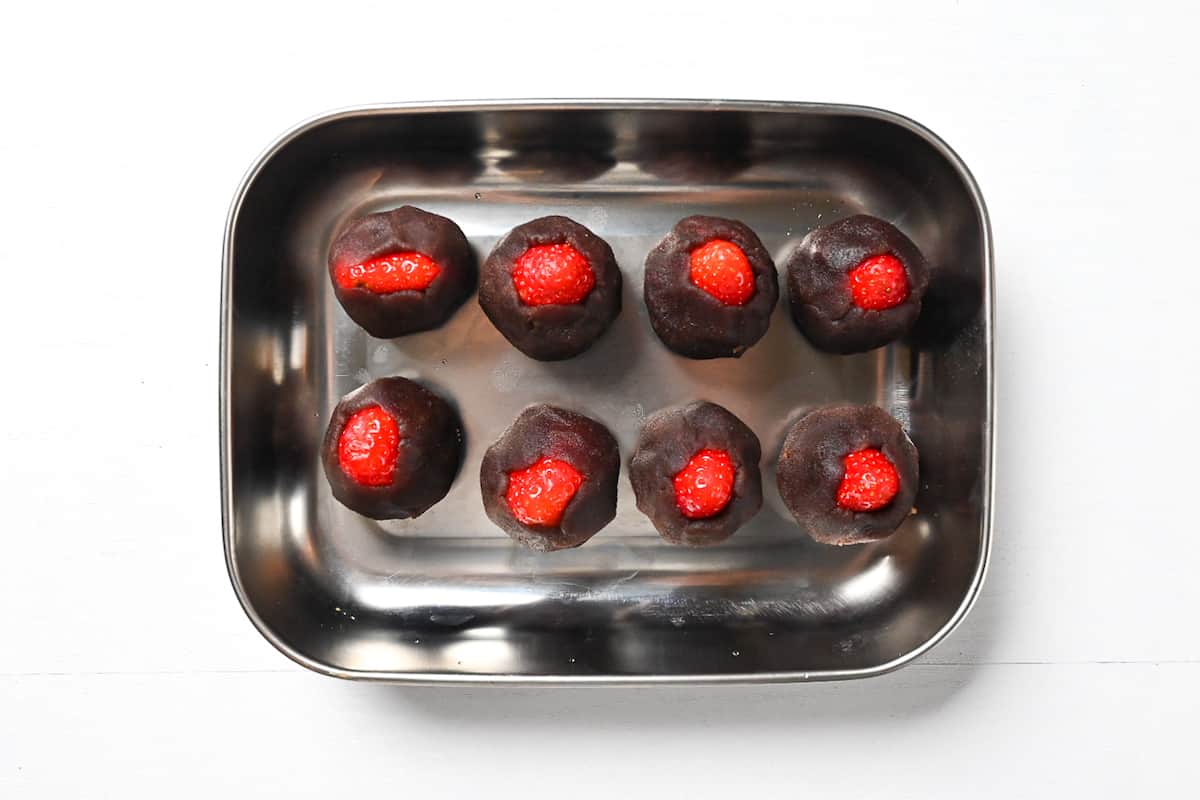
It’s simple yet delectable dessert, love it so much. I’ve been making this daifuku many times now, and each time it will be “vanished” swiftly. I use normal steamer and for the filling I swap the strawberry and anko with homemade chocolate truffle and custard. The whole family love it! Thank you very much for sharing this recipe!
Hi Elvira,
Thank you so much for your lovely comment — I’m really happy to hear you’ve made it many times! Great to know it works well with a regular steamer, and I love your twist with chocolate truffle and custard! 🙂
Yuto