


Featured Comment
Great little recipe Yuto. After a final rinsing I added a little rice vinegar (which happens to be yellow!) to the jar, just to keep a bit of pickle flavour there.
– Vincent
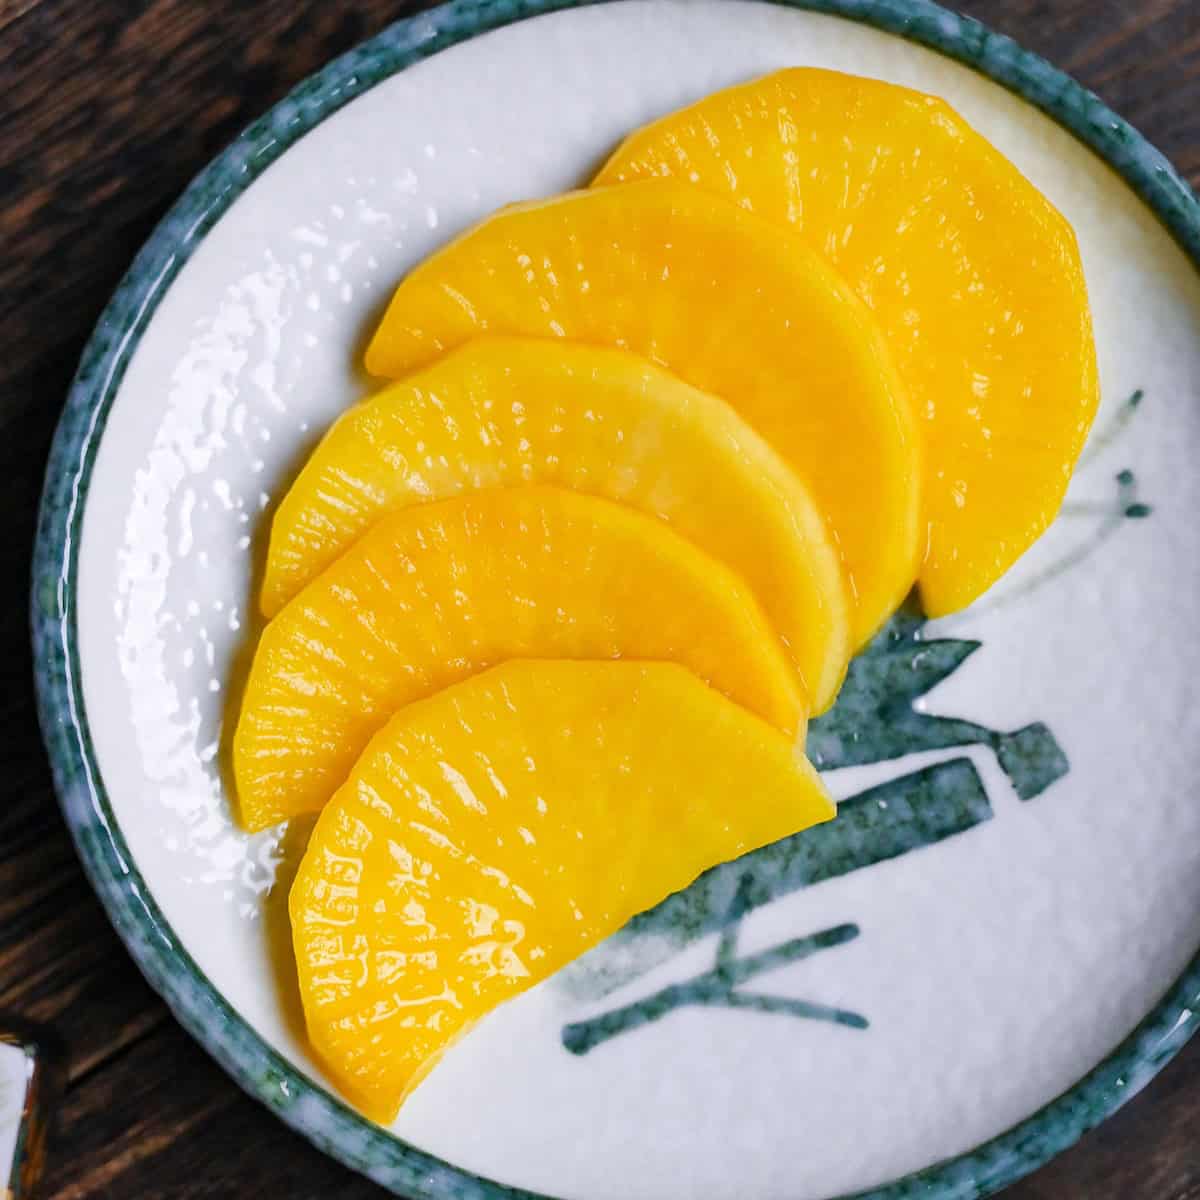
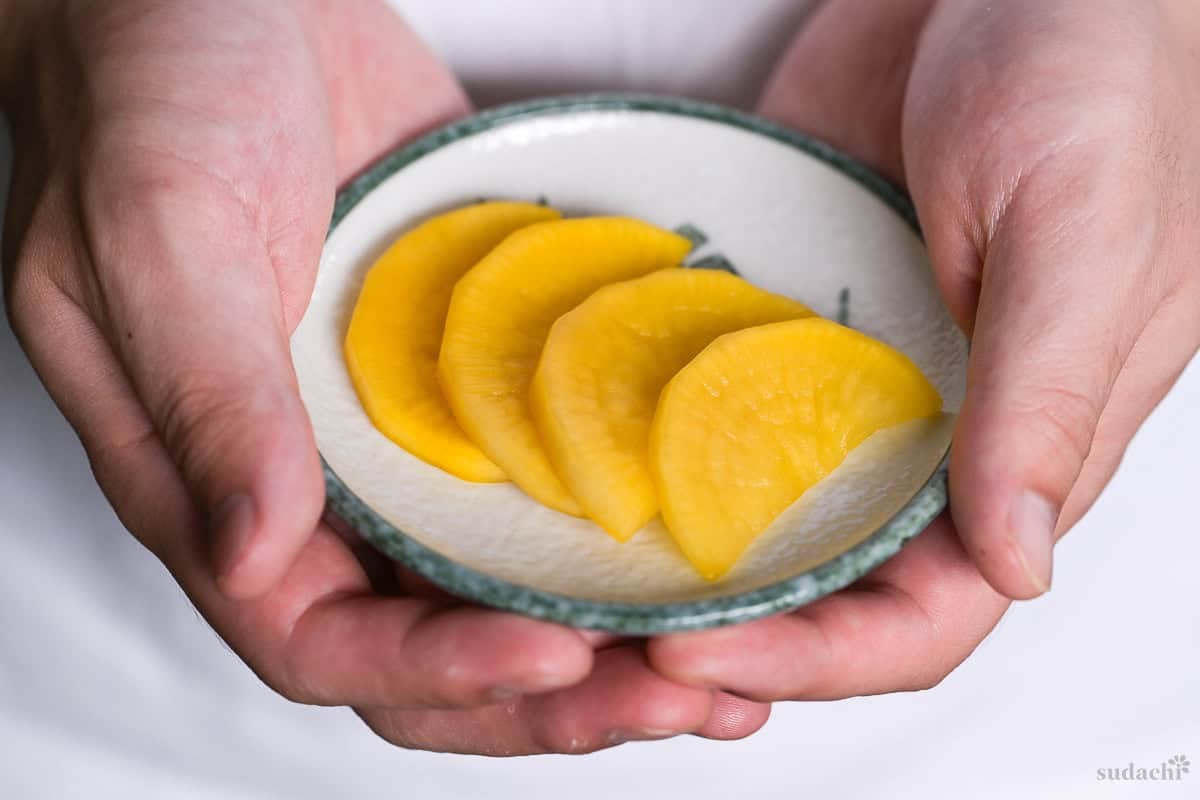
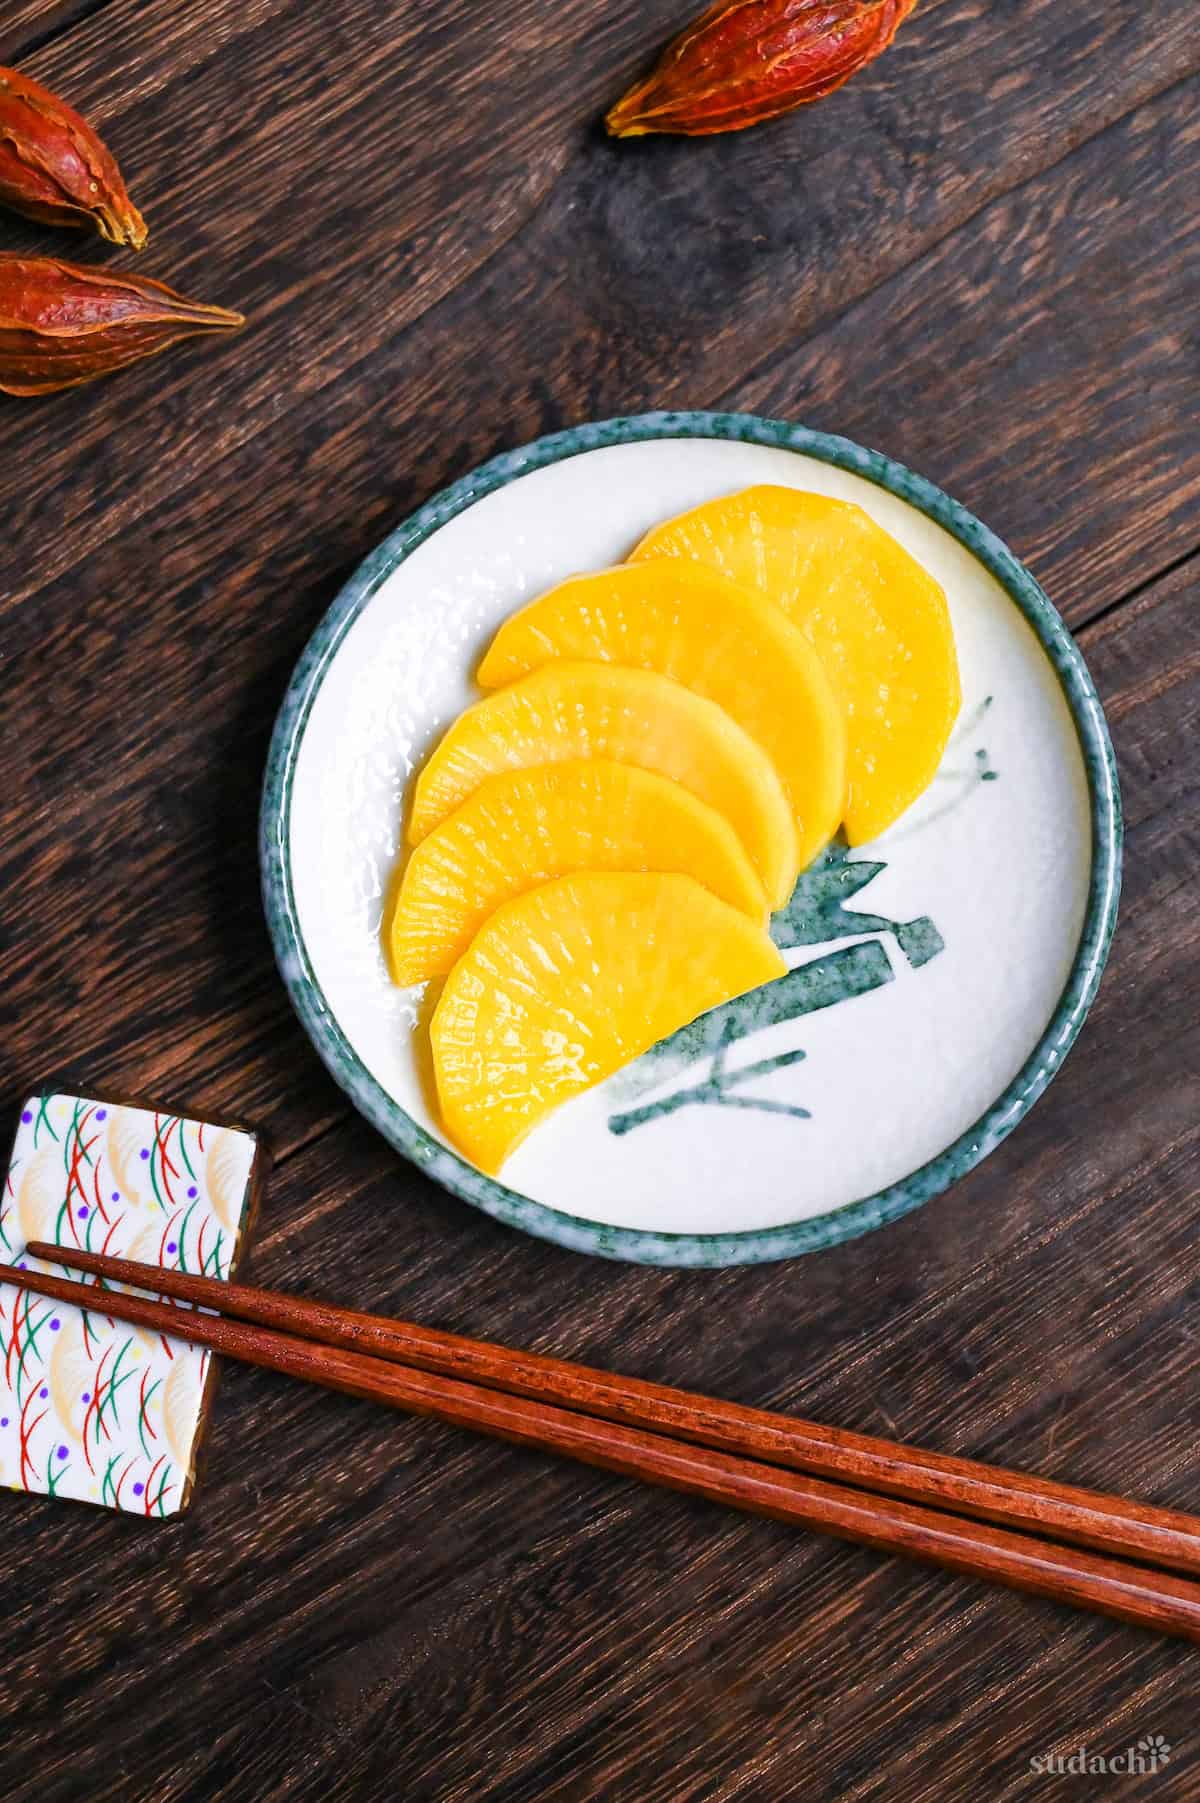
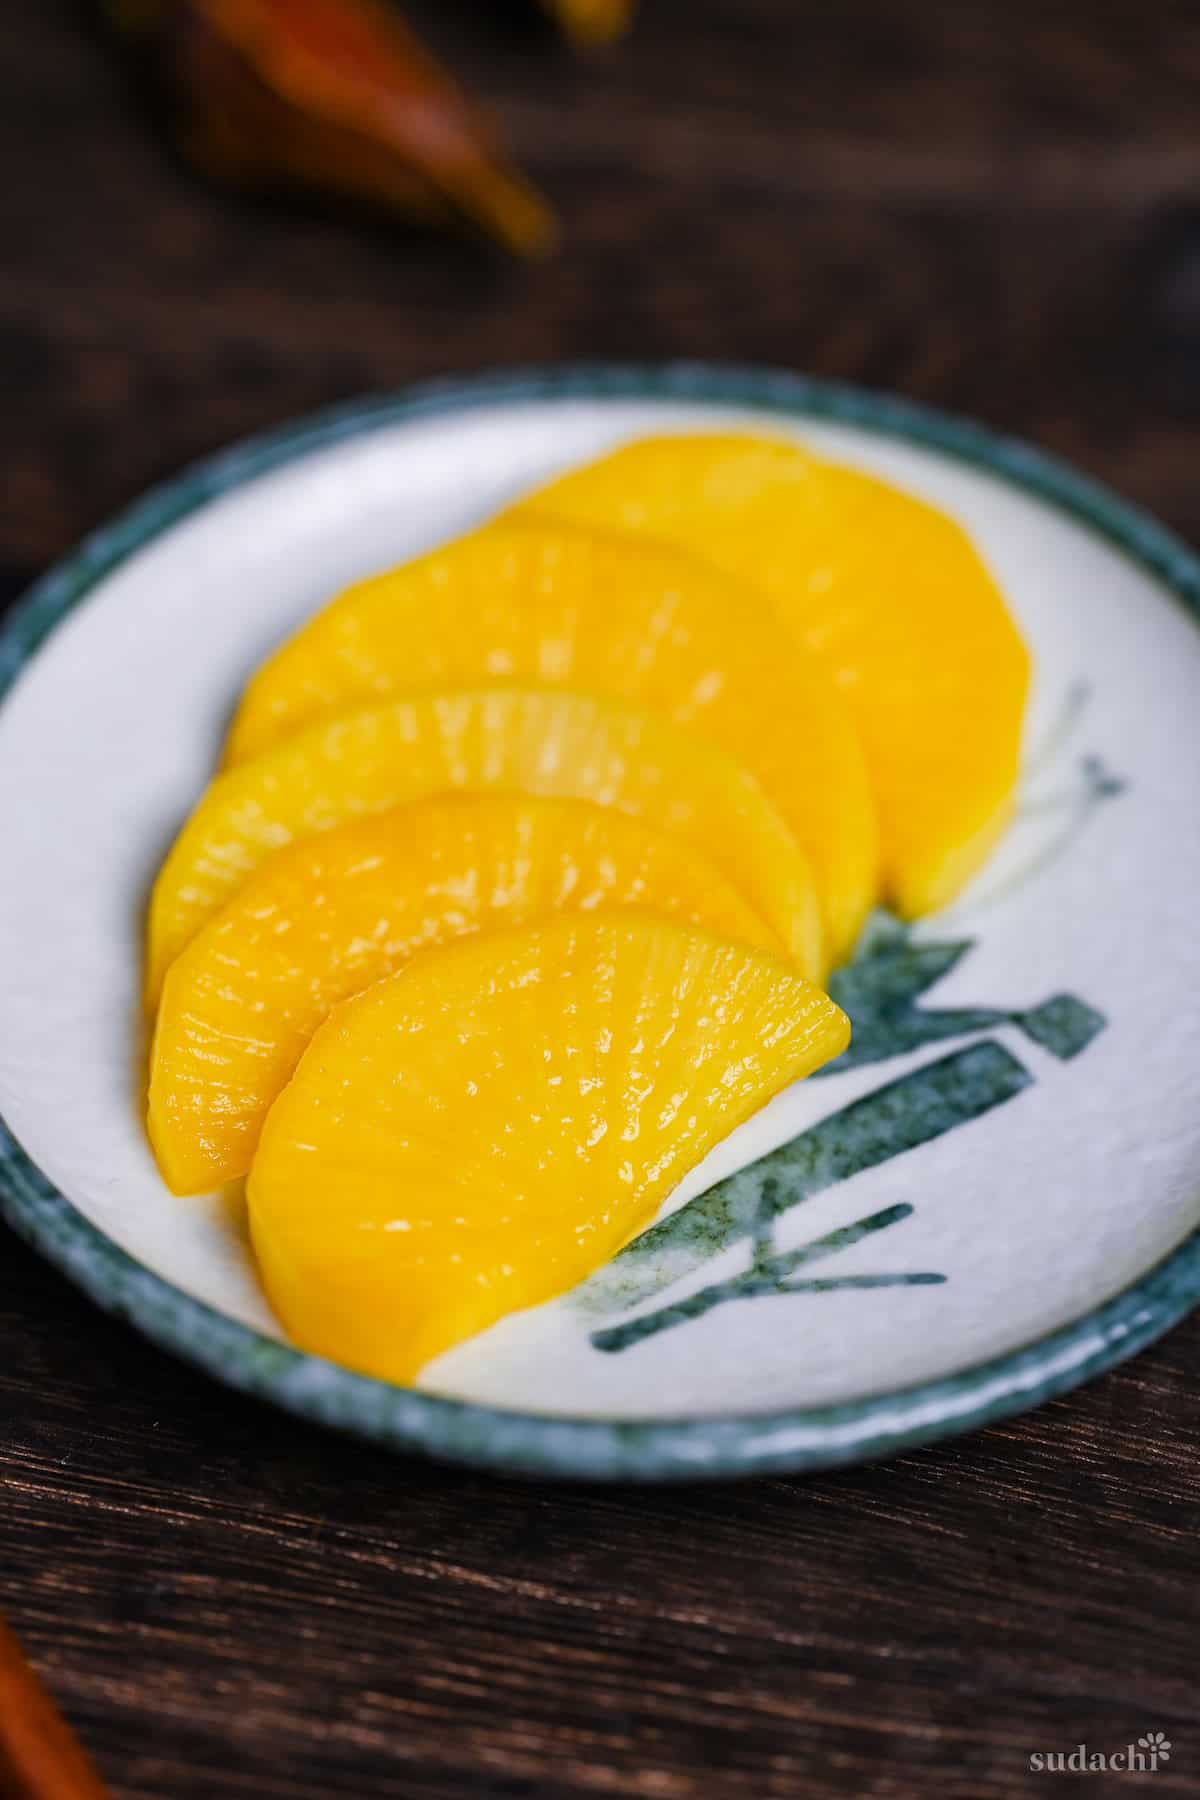
Takuan is one of those Japanese pickles that earns a permanent spot in the fridge. Sweet, crunchy, and unmistakably yellow, it works as a palate cleanser, a sushi filling, or something to reach for straight from the container.
Traditional takuan takes weeks or months until the flavor deepens and the color intensifies naturally. This recipe is the shortcut version. No drying, no fermentation, just all natural ingredients and a few days of patience.
If you already love Japanese quick pickles like bettarazuke or cucumber tsukemono, this quick and easy takuan deserves a place in your rotation.
TAKUAN DAIKON PICKLES
Recipe Snapshot
- What is it? A vibrant yellow Japanese pickle made from daikon radish.
- Flavor profile: Sweet, tangy, crunchy.
- Why you’ll love this recipe: Traditional takuan takes months of drying and fermenting. This shortcut version skips all of that and delivers a similar satisfying crunch, deep flavor and bold color in a just a few days with minimal effort.
- Must-haves: Daikon radish, rice vinegar, gardenia pod for the signature yellow color (or food coloring/turmeric in a pinch)
- Skill Level: Easy.
- Suitable for Meal Prep? Yes! Takuan keeps perfectly in the fridge and is ready to pull out whenever you need a quick side or snack.
Summarize & Save this content on:
What is Takuan?
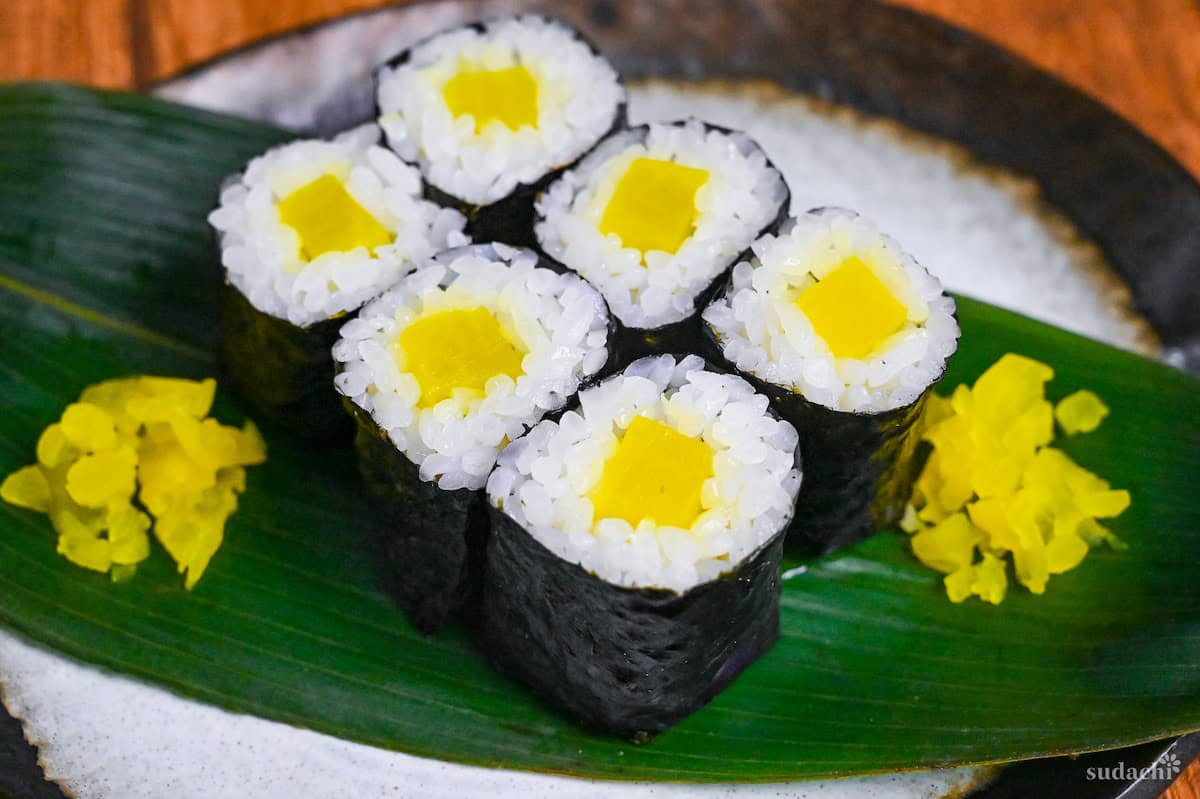
Takuan is a type of Japanese tsukemono (pickle) made with daikon radish and is known for its bright yellow color, sweet and salty flavor and satisfying crunchy texture. It not only acts as a palate cleanser but also as a flavor enhancer and even a post-meal snack since it is believed to aid digestion. It is often served on its own, but it’s not uncommon to see it inside sushi rolls such as shinko maki (pickles sushi rolls) or futomaki (thick sushi rolls with various ingredients).
Real Takuan is a type of “nukazuke”, a pickle that is made using a traditional Japanese technique of drying and fermenting vegetables in a bed of rice bran and brine. This technique causes the daikon radish to change color naturally, with a longer fermented period resulting in a more intense yellow color.
Nukazuke is not difficult to make, but it takes a long time and drying the vegetables requires a good stretch of decent weather or dehydrating equipment. Store-bought versions often use different techniques or artificial ingredients to shorten the process, and food coloring to intensify the color.
This recipe is my shortcut Takuan made for everyday cooks who want to enjoy the sweet crunch of this addictive pickle without weeks of drying and fermenting. It uses all-natural ingredients and only takes a few days, so keep reading if you want to know how I do it!
Takuan Ingredients
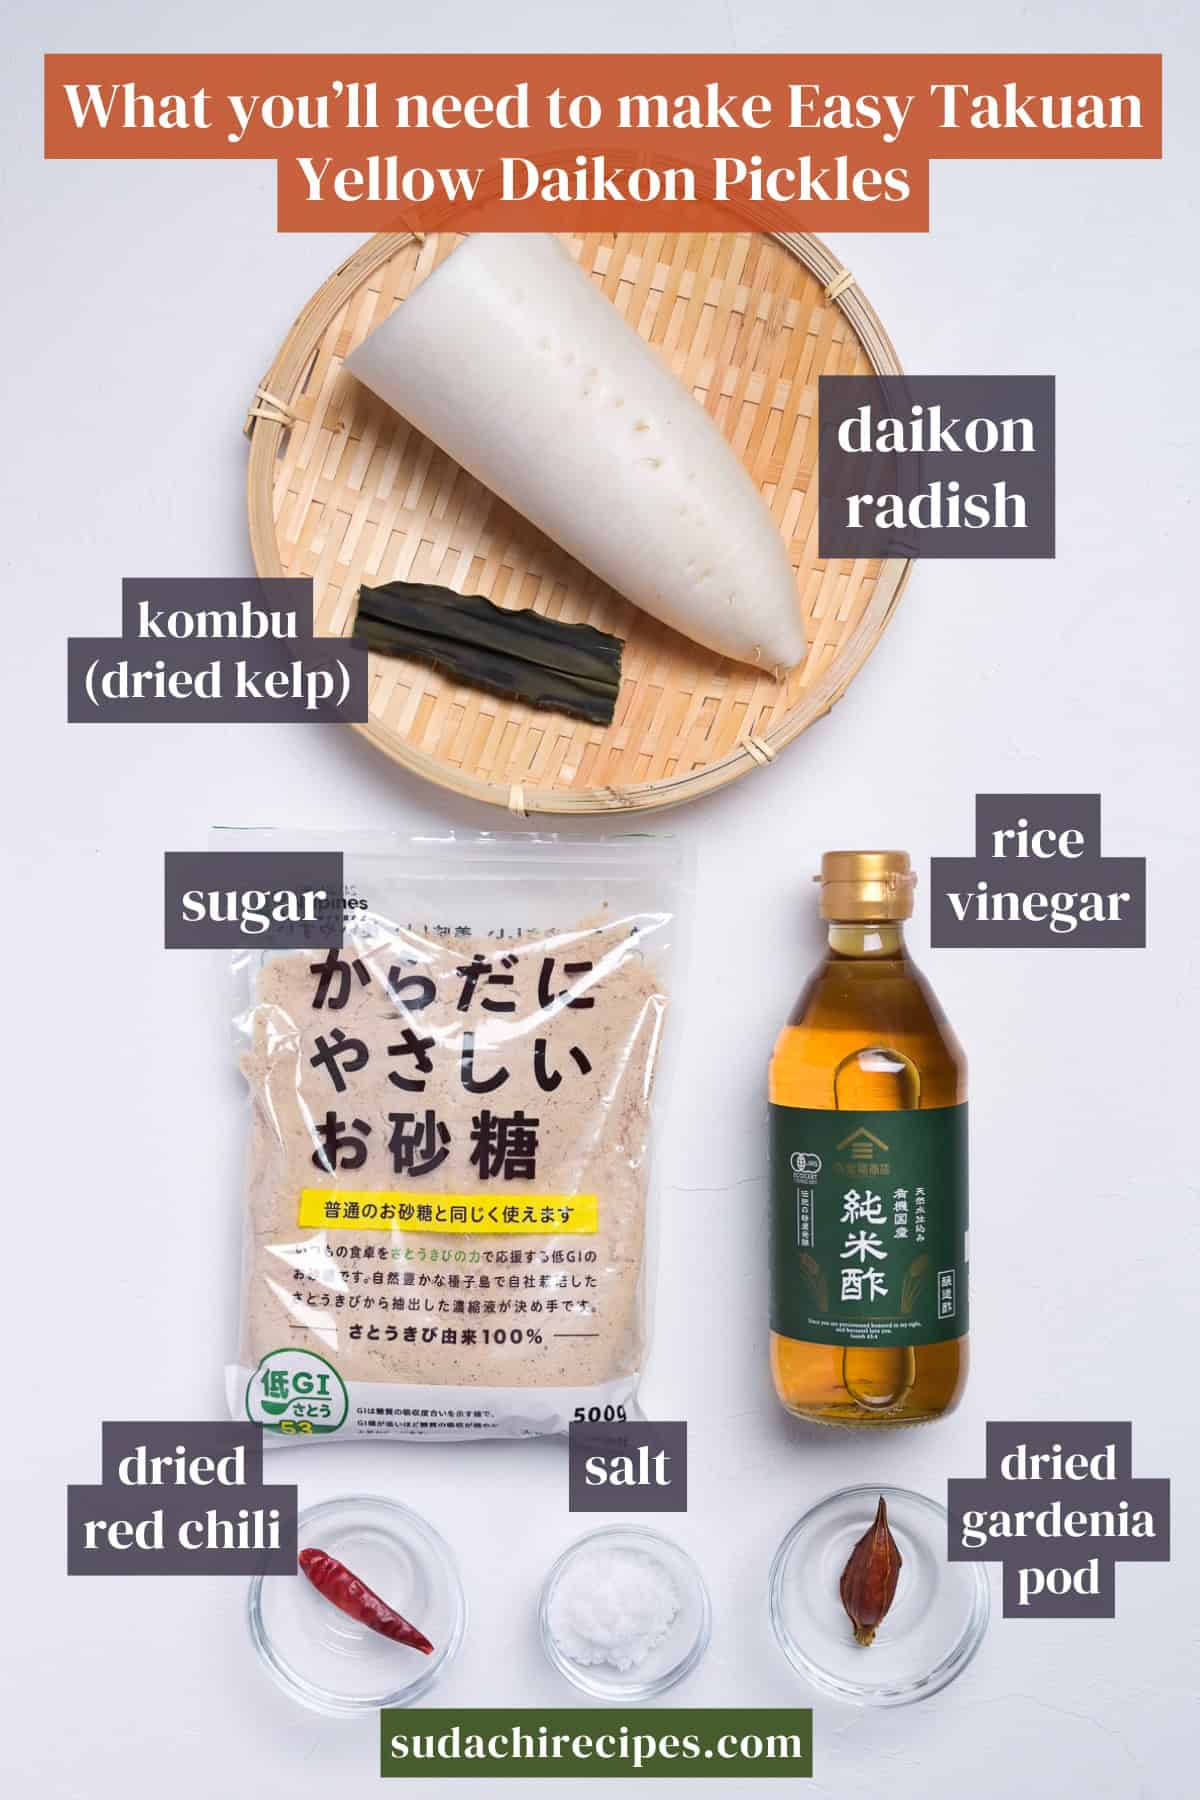
- Daikon Radish: This large white root vegetable is known for its peppery flavor and crunchy texture. Since daikon is the star of this dish, there aren’t any substitutions for this. You might find it labeled White Radish, Mooli or Japanese Radish.
- Salt: Use a coarse sea salt to flavor the daikon and draw out the excess moisture in a process called “osmosis”.
- Kombu: Using this dried kelp in the pickle brine adds the perfect amount of umami which would usually be developed through long pickling. Perfect for a shortcut recipe.
- Dried Gardenia pods: Known in Japanese as kuchinashi no mi, these dried flower pods add natural vibrant yellow color. See below for substitutions.
Substitution Ideas
- Rice vinegar → Apple cider vinegar and white wine vinegar: Vinegar is there to lower the PH of the daikon and help preserve it. Rice vinegar has a mild and slightly sweet taste which contributes to the flavor too. Apple cider vinegar and white wine vinegar work in a pinch, but will significantly change the flavor profile.
- Dried gardenia pods → Food coloring or turmeric: The pods are there to make the pickles yellow, they’re not there for flavor. Using turmeric will add a slight flavor, so only use a little.
Have trouble finding Japanese ingredients? Check out my ultimate guide to Japanese ingredient substitutes!
How to Make My Shortcut Takuan Pickles
If you prefer to watch the process in action, check out my YouTube video of this Takuan recipe for a complete visual walkthrough!

Wash the daikon, peel the thin outer skin, and cut off any blemishes. Cut it in half lengthways, or quarters if it’s particularly thick.

For pickles, we usually cut it into thick half-moons. If you plan to use it to fill sushi rolls, you can cut it into long sticks instead.

i. Place the sliced daikon in a sealable freezer bag and add the salt. I use 2% of the original weight of the daikon, so 2g of salt for every 100g of daikon. Massage until each piece is evenly covered.

ii. Push the air out of the bag and seal it tightly, then place it in a container and weigh it down with something heavy, about double the weight of the daikon. I find a 1kg bag of salt works perfectly.


iii. Store in the refrigerator for at least 3 hours, or overnight if you have time.
You can mix the daikon and salt together in a glass or ceramic bowl, then cover with a piece of baking paper before placing the weight on top. Preferably, use a bowl with a lid to keep the daikon smell contained.
During the resting time, the salt draws out the excess liquid in the daikon. Pour the contents of the bag through a sieve and shake thoroughly and pat the surface with kitchen paper to remove all the excess moisture.

Rinse out the bag, dry it and then add the daikon slices back in. Add the sugar and vinegar, then massage by scrunching the bag until evenly covered.

i. Next, we will be adding a gardenia pod, a piece of kombu (dried kelp) and a dried chili. The gardenia pod is for the iconic yellow color, kombu adds depth and umami, and the chili adds some subtle heat.

ii. Pierce holes in the gardenia pod with a fork, or carefully use the tip of a knife. Making a few holes helps extract the color.

iii. Add all of them to the bag whole so that they are easy to remove later.

Push the air out of the bag and seal tightly. Rest in the refrigerator for 2-3 days and flip the bag once or twice a day to encourage even coloring.

Stack the daikon in the container and add all of the ingredients. Seal with a lid and shake well, then shake a few times each day to promote even coloring. Avoid using plastic containers, they will absorb the smell and color of the pickles.
i. Once you’re happy with the color and flavor, pour the Takuan into a mesh strainer and rinse with cold water.

ii. Pat them dry with kitchen paper, then transfer them to a clean, lidded airtight container. Add a fresh splash of rice vinegar to help preserve them (thank you for the tip Vincent!), then seal and store in the refrigerator.
Enjoy them on their own, as a side or in sushi rolls!


Essential Tips & Tricks
- Salt the daikon first and don’t rush it. The salt draws out excess moisture from the daikon through osmosis before the pickling liquid goes in. Skip this step or cut it short, and the brine gets diluted, which weakens the flavor and crunch. 3 hours is minimum, but overnight is best.
- Use a weight during the salting stage. Pressing the daikon while it rests helps teh salt work more efficiently and speeds up moisture extraction. A 1kg weight is enough. Without it, the salt works unevenly and you risk a less consistent texture throughout.
- Drain and shake well before adding the brine. All that liquid the salt pulled out needs to go. If you skip this, you will dilute the sugar and vinegar, and the final flavor falls flat.
- Pierce the gardenia pod before you add it. The color is locked inside, so piercing it allows the yellow pigment to bleed into the brine and reach the daikon. Without it, the color will be paler and uneven.
- This recipe is possible in a container, but it requires a little more work. I opt for freezer bags for more even flavor and color, and to keep the smell contained. If you prefer to use a container, stick to glass or ceramic (plastic absorbs color and odors) and make sure you can seal it airtight with a lid. You will need to be able to fit the weight inside the container for the salt rest, and once the brine is added, shake it multiple times a day for even flavor and color.
With these simple tips in mind, you’re set for success every time you make my shortcut takuan pickles recipe.
How to Store
Since this Takuan is a shortcut version, it doesn’t store as long as traditional Takuan made with rice bran.
Fridge: Once drained, store in an airtight container in the fridge and consume within about a week.
Freezer: You can also freeze Takuan. Use plastic wrap to wrap up the slices in individual portions, then place in a sealable bag and freeze for up to one month.
Serve Takuan With These Dishes
- Unagi Kabayaki
- Saikyo Yaki (White Miso Grilled Fish)
- Chicken Yakitori
- Pork Katsudon
Takuan FAQ
Traditionally, Takuan is made by pickling daikon radish for a long time in salt water and rice bran. Through fermentation, the spicy components of daikon radish naturally turn yellow. Many supermarkets speed up the pickling process with different ingredients and methods, and use yellow food coloring to make it look more vibrant. My recipe uses gardenia pods as a natural food coloring, but many people use tumeric, food coloring, or simply leave it white.
It is believed that Takuan was created by and named after a famous Japanese Buddhist Monk called “Takuan Soho”.
Takuan is believed to aid digestion and is commonly eaten after meals. Takuan is also said to be high in vitamin B, but this only applies to daikon radish that has been fermented in rice bran, not my quick pickled version.
More Easy Pickle Recipes
- Pickled Cucumber with Ginger
- Bettarazuke (Sweet Daikon Amazake Pickles)
- Pickled Napa Cabbage
- Easy Pickled Ginger for Sushi (Gari)
Did You Try This Recipe?
I would love to hear your thoughts!
💬 Leave a review and ⭐️ rating in the comments below. 📷 I also love to see your photos – submit them here!

Quick & Easy Takuan (Japanese Yellow Daikon Pickles)

Ingredients
- 450 g daikon radish (approx half)
- 2 tsp sea salt approx 2-3% of the weight of the daikon
- 65 g light brown sugar (cane sugar)
- 4 tsp unseasoned rice vinegar (komezu)
- 3 g dried kelp (kombu)
- 1 dried red chili pepper
- 1 dried gardenia pod (or turmeric or yellow food coloring) optional
The ingredient brands and tools I trust are in my Japanese pantry guide and my cooking tools guide.
Can’t find certain Japanese ingredients? See my substitution guide here.
Instructions
- Wash the surface of 450 g daikon radish, peel and cut in half lengthways. Cut off any blemishes or discolored parts.

- Slice into thick half-moons or round quarters depending on thickness. If using for sushi, cut it into long sticks.
- Drop the slices into a sealable bag and add 2 tsp sea salt. Massage until evenly covered, then push the air out, seal the bag and place it in a container.
- Place a weight (approximately 1kg) on top and rest in the refrigerator for at least 3 hours, preferably overnight.
- Pour the daikon into a colander and discard the accumulated liquid. Shake thoroughly and pat the surface dry with kitchen paper to remove as much surface moisture as possible.
- Place the daikon slices back into the bag and add 65 g light brown sugar and 4 tsp unseasoned rice vinegar (komezu). Massage until combined.
- If using 1 dried gardenia pod, pierce it with a fork to help extract the color.
- Place the gardenia pod, 3 g dried kelp (kombu) and 1 dried red chili pepper inside the bag. Push the air out and seal.
- Rest in the refrigerator for 2 days. Flip the bag over 1-2 times a day to ensure even flavoring and coloring.
- Once you're happy with the color and flavor, drain the pickling liquid and wash the takuan with fresh cold water. Shake well to remove excess moisture, then transfer to an airtight container. Add an extra splash of rice vinegar to the jar for flavor and preservation.
- Enjoy!

I love the idea of quick takuan! I have a gardenia plant in my garden. Can I use the pods from it in this recipe?
Hi Jan,
Wow that’s amazing! I’ve only used store-bough dried pods so I’m not 100% sure how it works with the fresh ones. But I believe if you dry them, you can use them for this recipe.
I’m very curious how it turns out!
Yuto
you look pretty angry in that picture.
Haha I’m usually not really photogenic!
where can I buy the gardenia pods?
I’ve heard you can sometimes find them at Korean supermarkets. If not, online is your best bet!
Although gardenia pods are a great way to add natural yellow color without changing the flavor, it’s an optional ingredient.
Other options include yellow food dye or even turmeric (although turmeric can change the flavor slightly).
Hope you enjoy the recipe!
Yuto
Can you do this in a glass container without the plastic bag? Any tips?
You can make it in a glass container and place something small and heavy inside to weigh it down, especially during the first salting. You can buy pickle weights but it depends on the size of your glass container.
You will also need to mix it occasionally to make sure everything is evenly salted/pickled.
Hope this helps!
Could you use annato to color it?
Hi Beatrice,
I’ve never tried annatto for anything, so I’m not totally sure what kind of color or flavor it would bring. But as a natural coloring, it definitely sounds promising!
Yuto
Anna to is what they color margarine and cheese with. Seems to be flavorless. Used often in Hispanic cooking as well. Thanks!
I love this! The color on mine is not as vibrant as yours though🤔 I may try pure white sugar next time…maybe my sugar was too dark? How many pods can I add without it affecting it negatively? Thanks for another great recipe 🙂 I am going to add some as a pizza topping🫢
Hi Donna,
Thank you so much for trying this recipe! Adding too many gardenia pods can bring out a bit of bitterness, but one extra should be totally fine 😊 Love the idea of using it as a pizza topping!
Yuto
Great little recipe Yuto. After a final rinsing I added a little rice vinegar (which happens to be yellow!) to the jar, just to keep a bit of pickle flavour there.
Hi Vincent,
Thank you for trying my takuan recipe! Adding rice vinegar sounds like a great twist, love that idea 😊
Yuto
More ratings after I try the recipe
Thank you!! 🙂
Love this recipe. Brings back memories of my mom’s takuan. Perfect!
Hi Sue,
Thank you for trying my recipe! Glad it turned out well. I’m so happy to hear that it brought back a good memory! 🙂
Yuto