

What is Omurice?
Omurice (オムライス) is a Japanese dish consisting of ketchup rice or butter rice wrapped in an omelette. It is a popular Western-style (yoshoku) dish for both children and adults and in recent years, many specialty restaurants have appeared offering all kinds of beautiful omurice.
The name “omurice” is simply a combination of the French word “omelette (オムレツ)” and the English word “rice (ライス),” which is an abbreviation of “omelette rice.”

Omurice is a distinctive dish that has evolved significantly since its inception. Its origins trace back to “Renga Tei (煉瓦亭),” a restaurant in Tokyo established in 1895, where the idea of combining omelette and rice in a busy kitchen to serve workers was born. Initially, the dish was more like fried rice with lots of eggs, featuring minced meat and onions but lacking the now-iconic ketchup addition.
A change came in 1922 when “Hokkyokusei (北極星)” in Osaka first served ketchup rice wrapped in a thinly fried egg. Legend has it that this dish was created for a customer with dietary restrictions who always ordered an omelette and rice, illustrating the chef’s considerate nature.
From then on, Omurice continued to transform and diversify. Today, the dish ranges from half-boiled, melt-in-your-mouth versions to those devoid of ketchup rice altogether, offering a unique Omurice experience.


How I Developed This Recipe
I know that making omelets or omurice can be a bit intimidating, especially for those who aren’t as confident. That’s exactly why I made sure this recipe is simple and easy to follow, so anyone can make it.
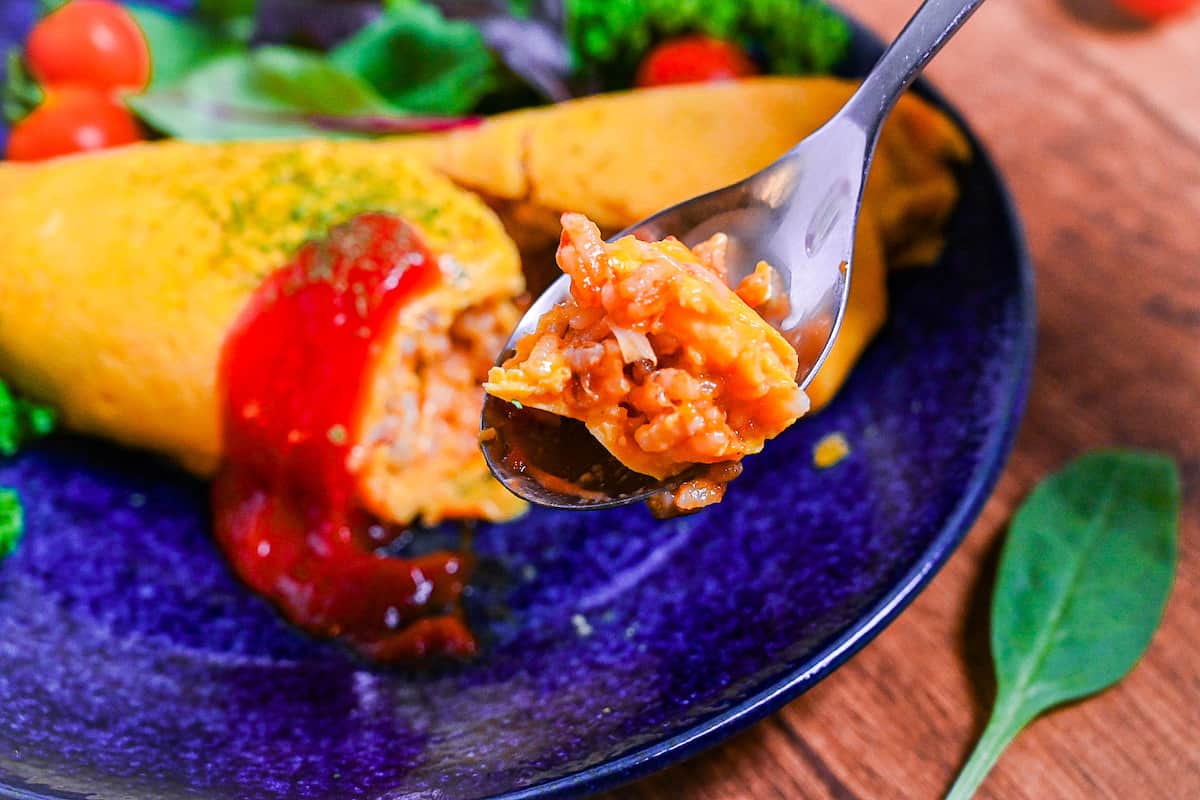
The key to this recipe is not just the omelet itself, but the ketchup rice filling. I made sure to get the ketchup rice just right, so it’s flavorful and goes well with the soft, gently cooked egg.
It’s the combination of flavors that makes this dish special. The tangy, savory rice paired with the delicate omelet is a delight to experience!

What Pan To Use
Omurice is a simple recipe, and it’s easy to make it taste good. The difficulty often lies in the presentation. Getting that smooth and fluffy omelette to wrap perfectly around the rice might take a bit of practice!
When I make omurice, I personally use a 20cm (8 inches) seasoned cast-iron pan. This might sound very small, and if I’m honest, I was a bit skeptical when I saw how tiny it looked, but using this pan helped me to cook the best omurice I’ve ever made!
Using a small pan actually creates less room for error. The smaller the pan, the less likely your omelette will be too thin (which creates breakage) and the easier it is to fold the edges over.
Additionally, using cast iron has huge advantages for cooking omelettes. Firstly, as long as it’s well seasoned (oiled) and preheated thoroughly, you won’t have any problems with the egg sticking to the pan. Secondly, cast iron has amazing heat retention and because it heats so evenly with no heat spots, your omelette will have a beautifully smooth and even color.
Of course, if cast iron isn’t for you, a regular pan with a non-stick coating would also work well for omurice. Just make sure to use a small pan (20cm/8inch) for best results, and be aware that cheap non-stick pans often have heat spots which might create a spotty surface on your omelette.
Visual Walkthrough & Tips
Here are my step-by-step instructions for how to make Japanese Omurice at home. For ingredient quantities and simplified instructions, scroll down for the Printable Recipe Card below.
How to Make Ketchup Fried Rice
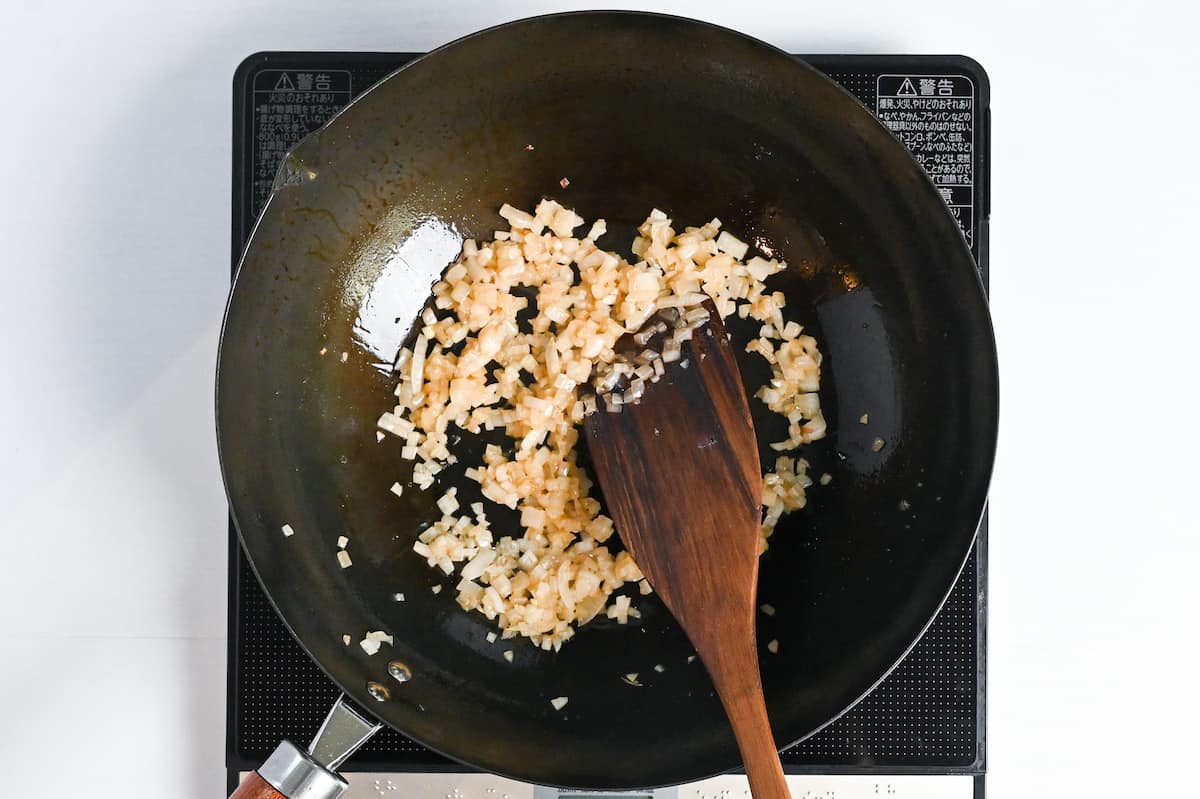
Heat a wok or pan over a medium setting and add olive oil and butter. Finely dice the onion and add it to the pan. Sauté until slightly golden and translucent to bring out their natural sweetness.
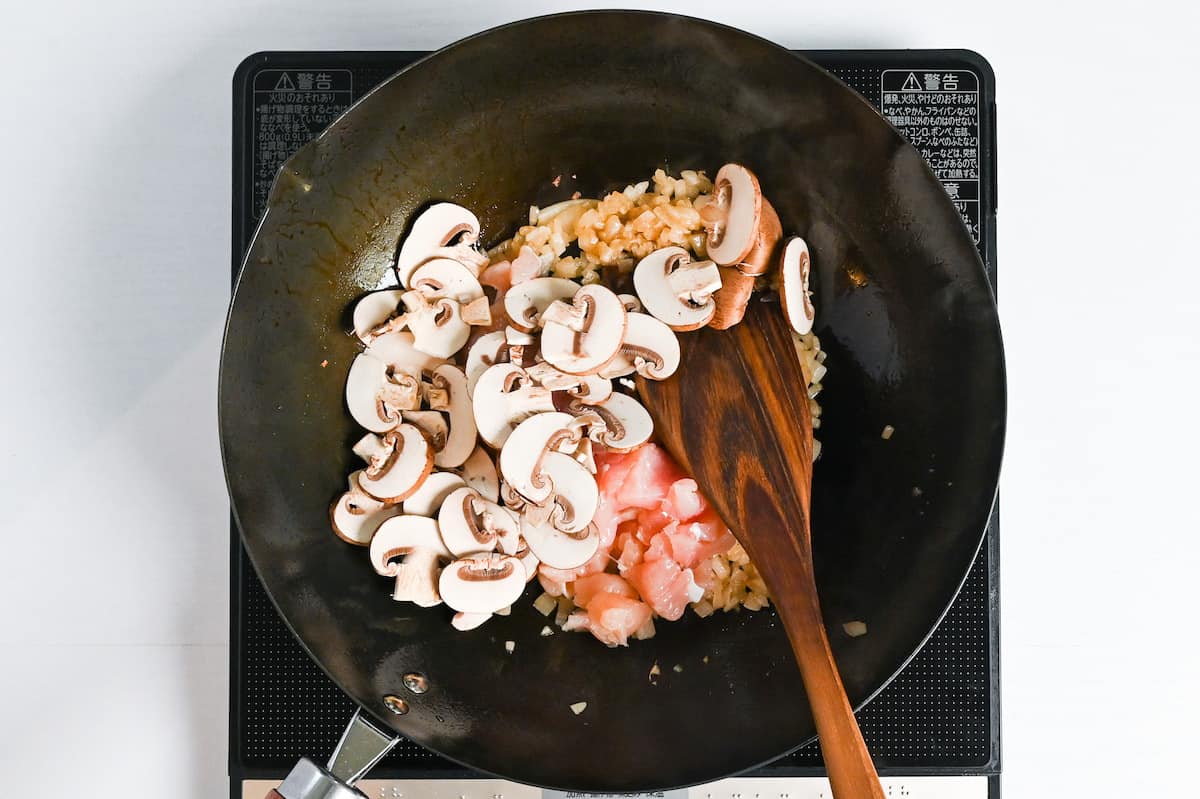
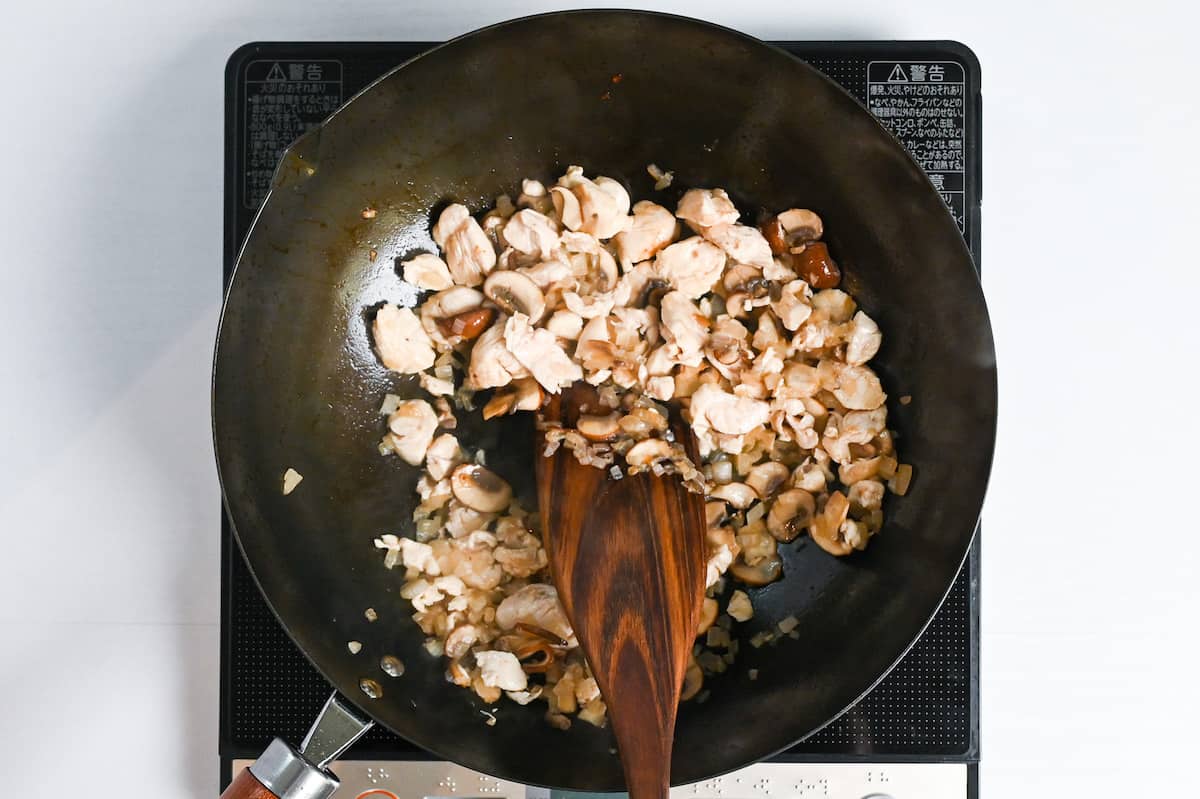
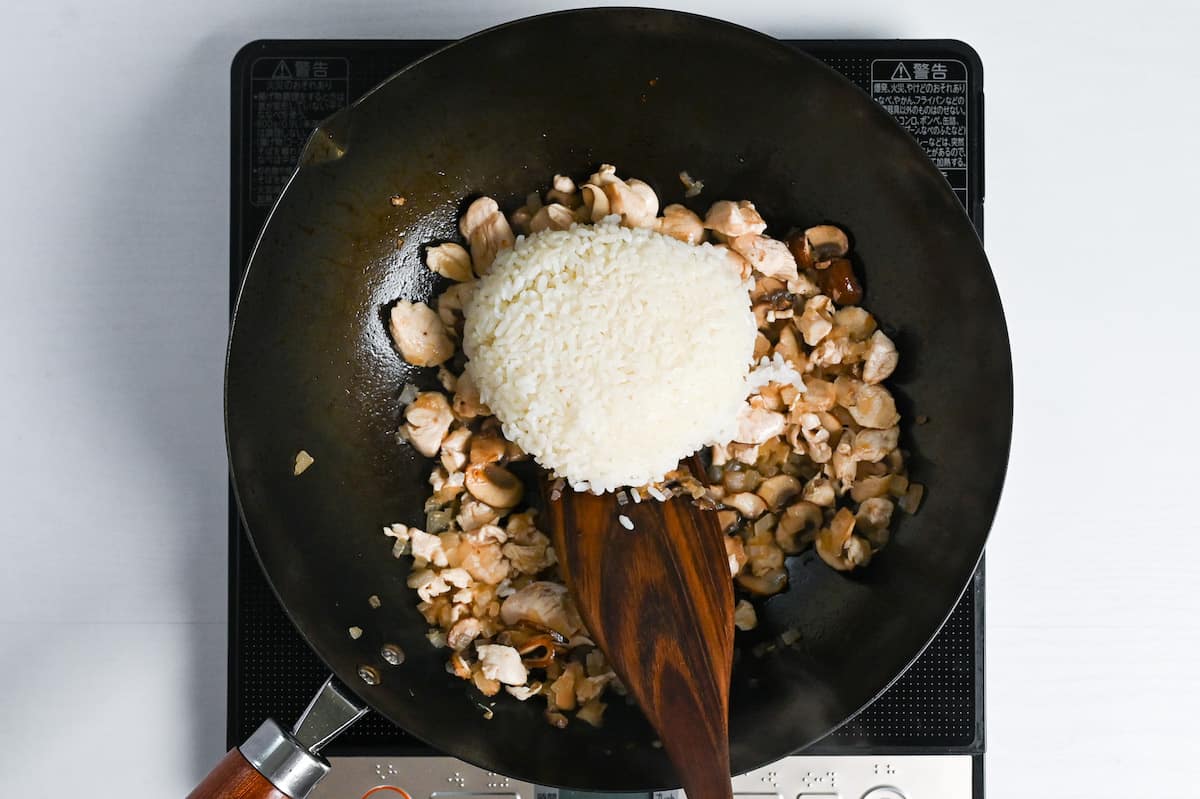
Cut the chicken into small bitesize pieces and thinly slice the mushrooms. Add them to the pan and stir fry until the surface of the chicken is sealed.
Add the white wine and continue to stir fry until all the ingredients are cooked.
Add the rice along with a pinch of salt and pepper and mix everything together.
Add the ketchup and Worcestershire sauce and stir fry until they are evenly distributed throughout the rice.
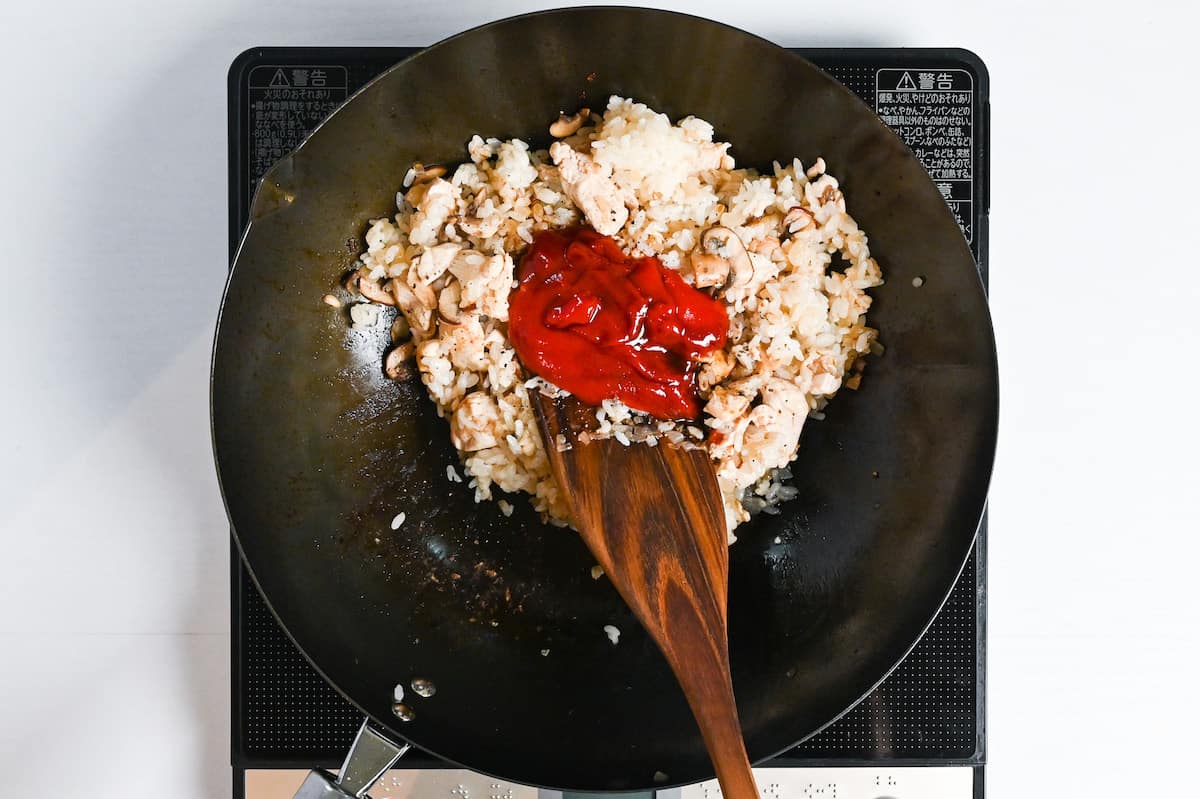
Add the green peas and a generous sprinkle of dry parsley, and stir-fry for one more minute before removing the pan from the heat.
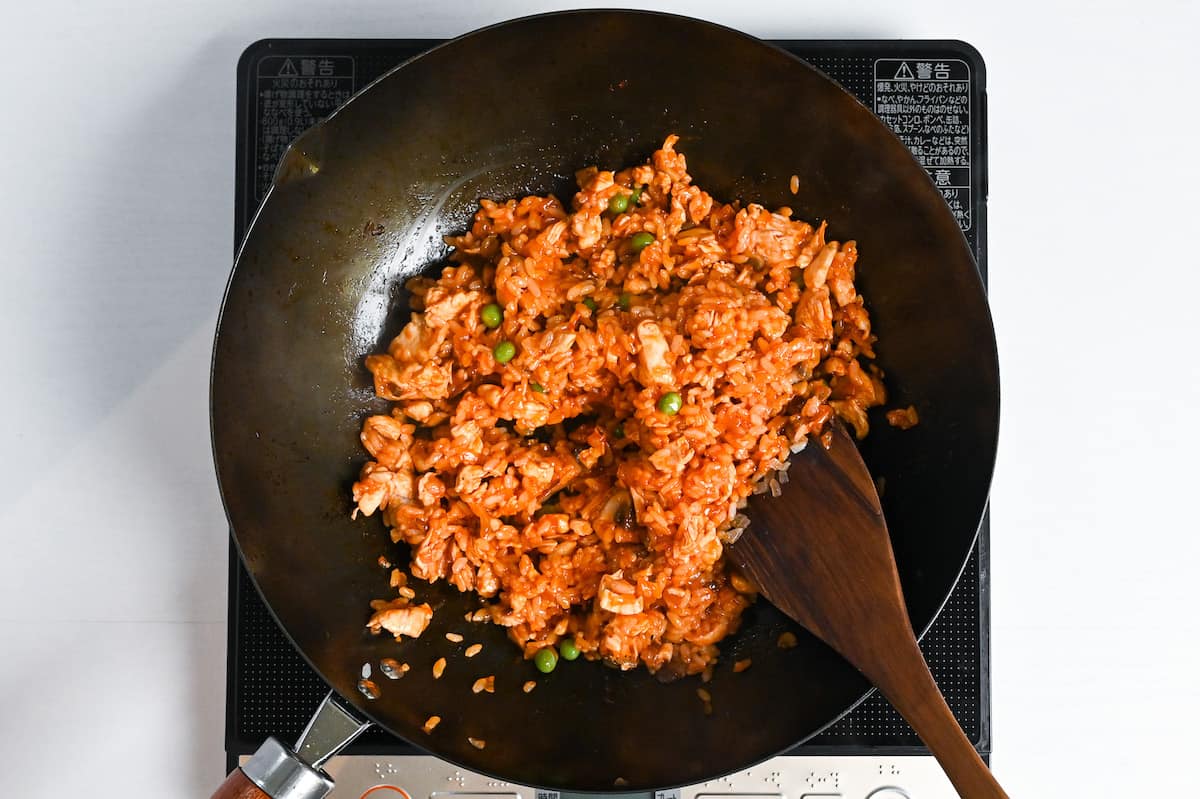
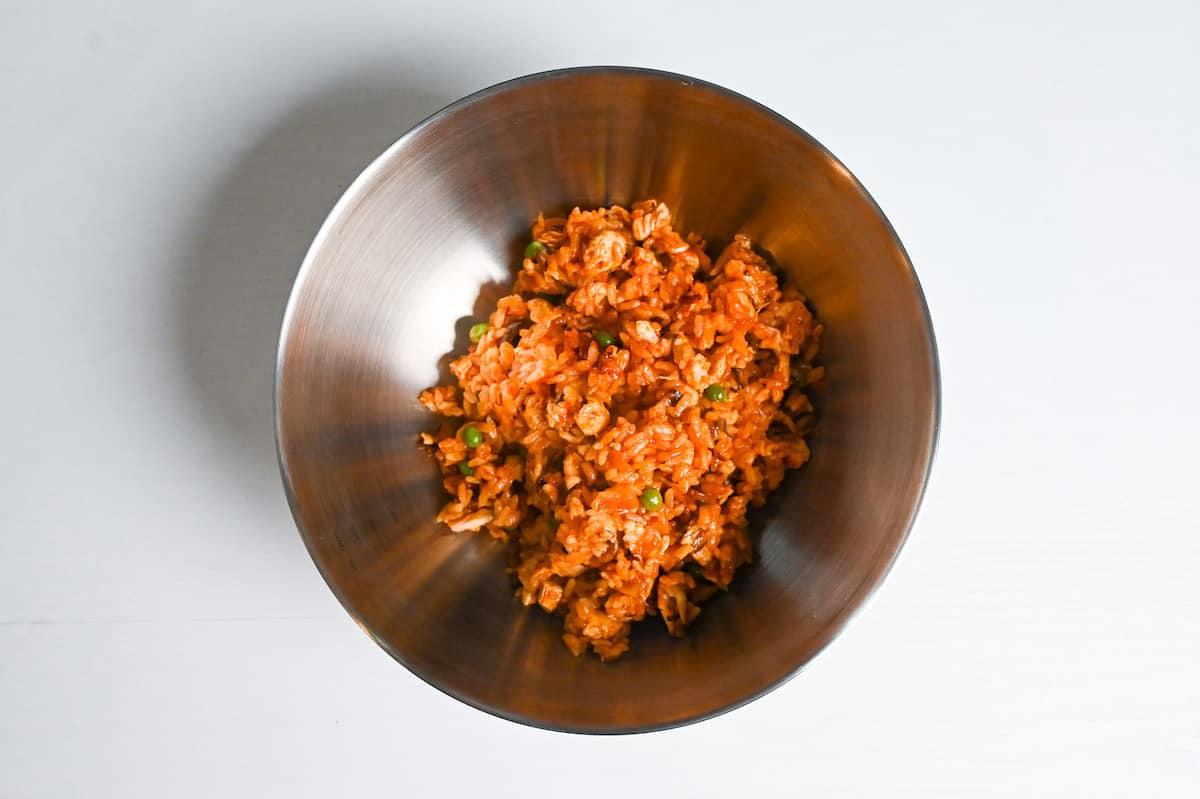
Cover to keep the rice warm and set aside for now.
How to Cook and Shape the Omelette for Omurice
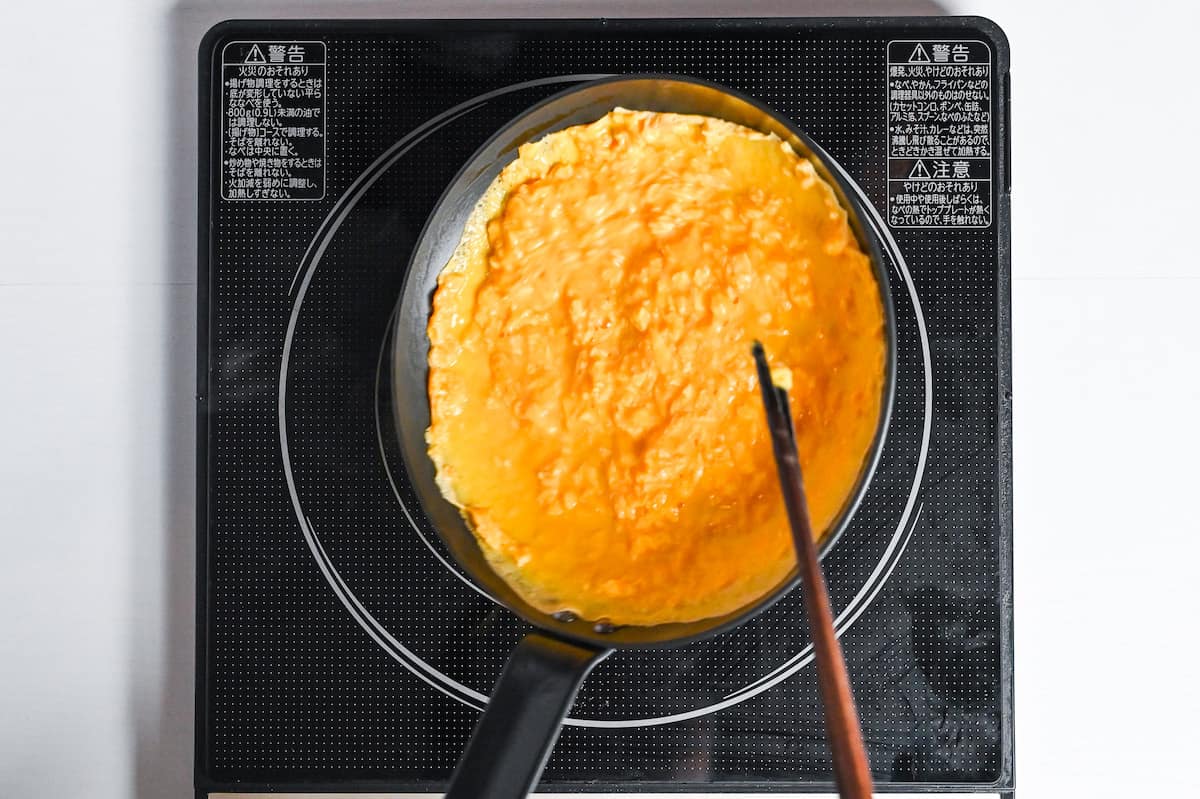
Heat a 20cm non-stick pan on a medium Crack the eggs into a mixing bowl and add milk and olive oil. Whisk until the whites and yolks are combined.
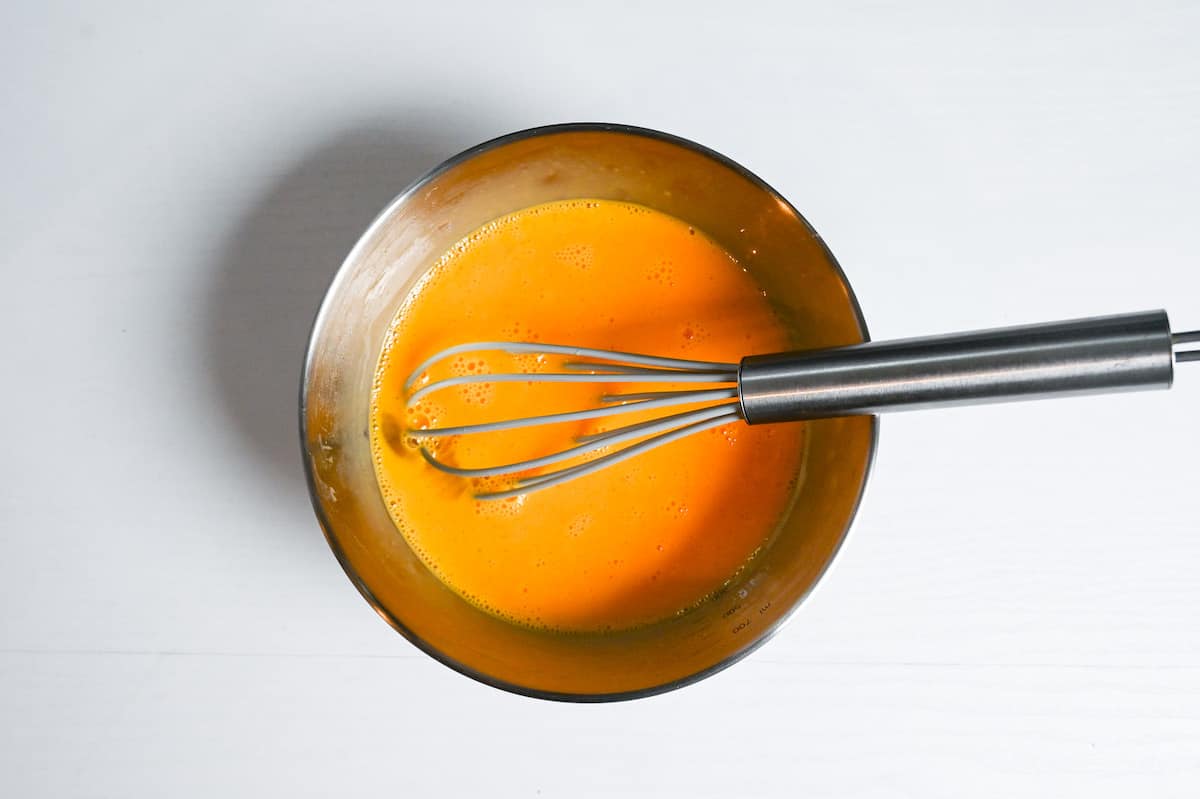
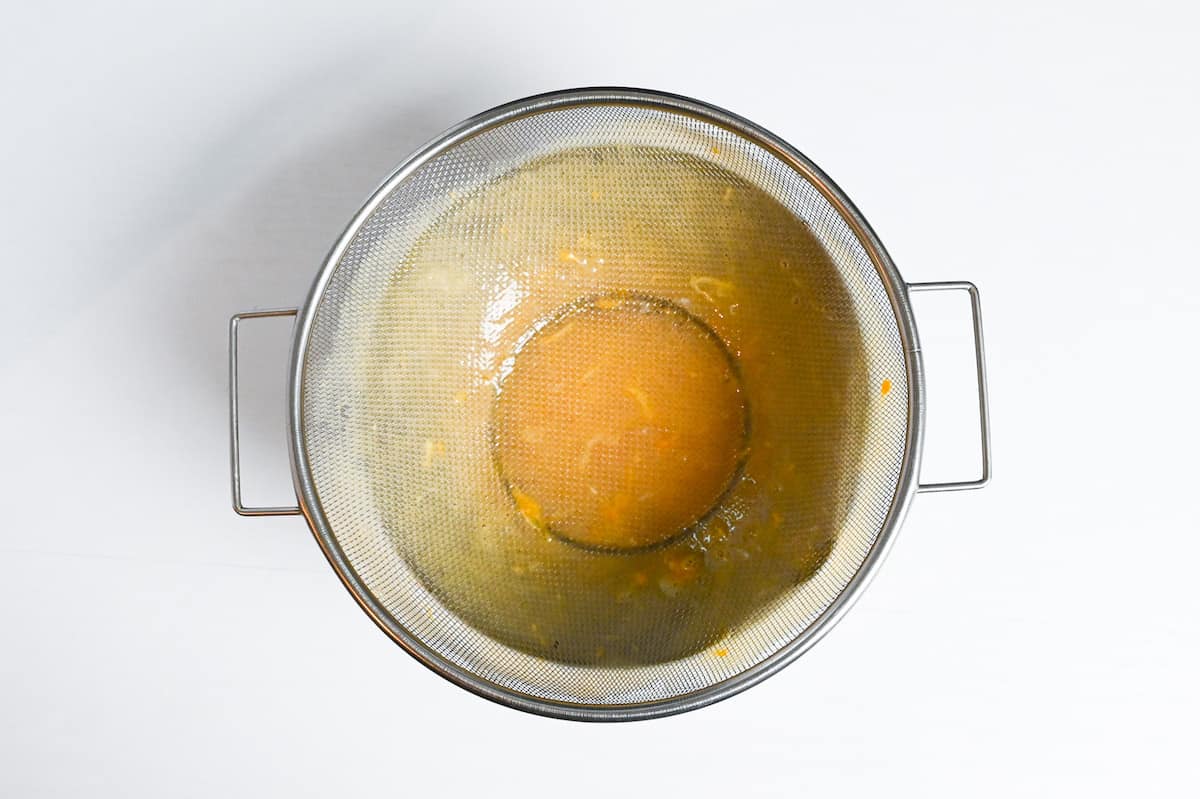
Pour the mixture through a fine mesh sieve to remove any lumps and ensure it’s smooth and adequately combined. This step prevents specks of white on the surface of the omelette.
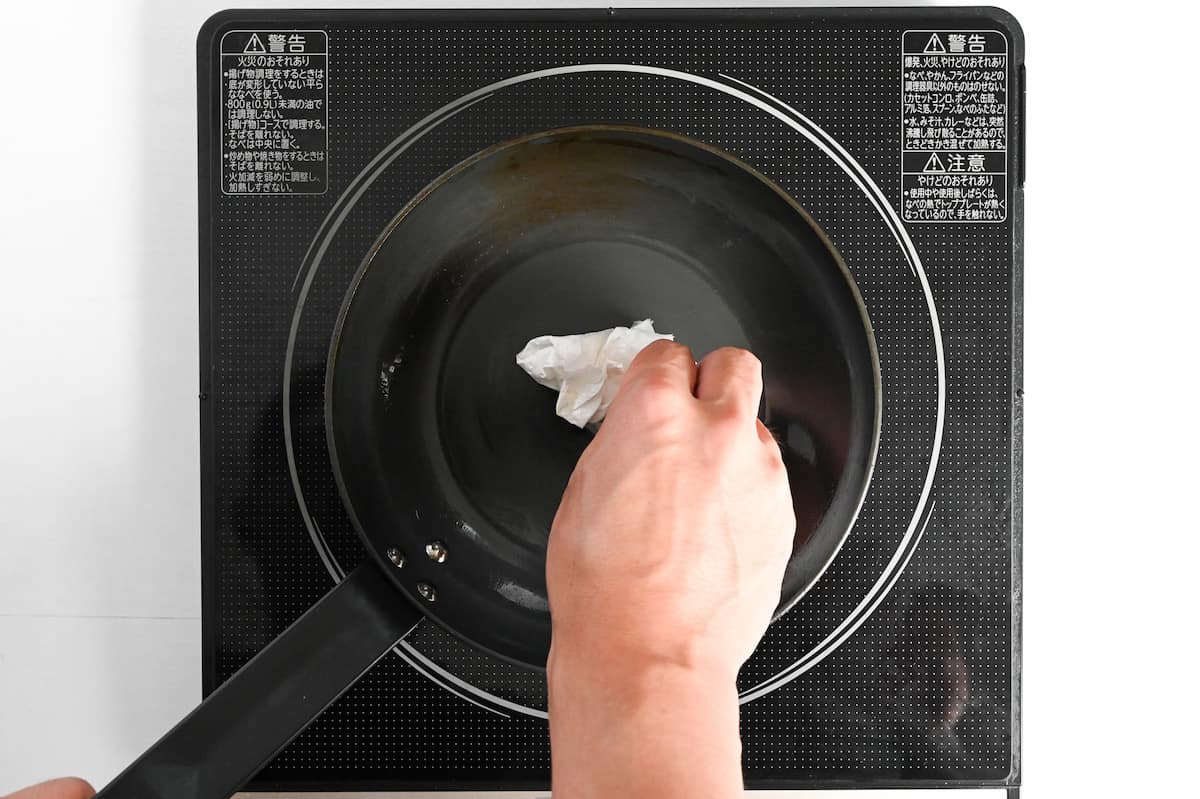
Add a small amount of cooking oil to the heated pan and spread it around using kitchen paper. This will ensure the oil is evenly spread and any excess is wiped away, helping prevent oil spots on the surface of the omelette.
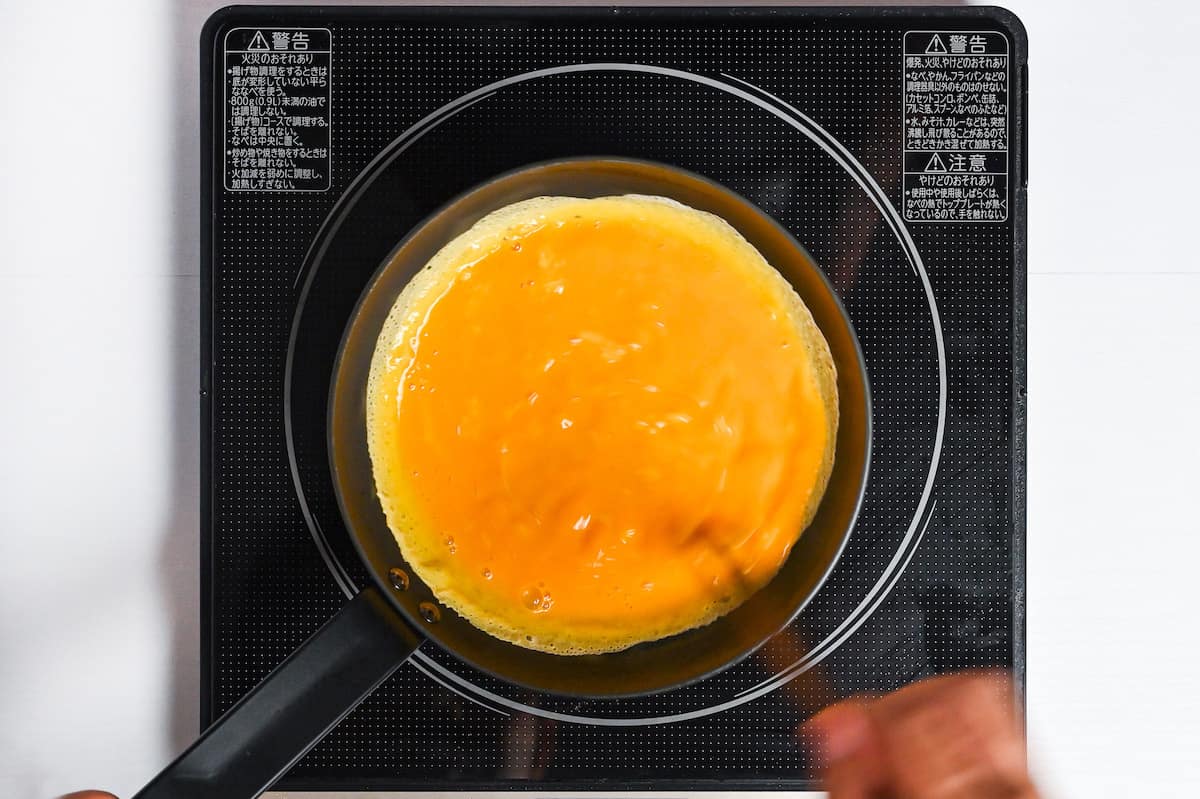
Pour two eggs-worth (1 portion) of the omelette mixture into the pan and whisk to make it fluffy and soft. Continue to do this until the egg starts to set.
Swirl the egg around and tilt it to coat the edges. Thoroughly covering the edges with the omelette mixture will make it easier to fold later.
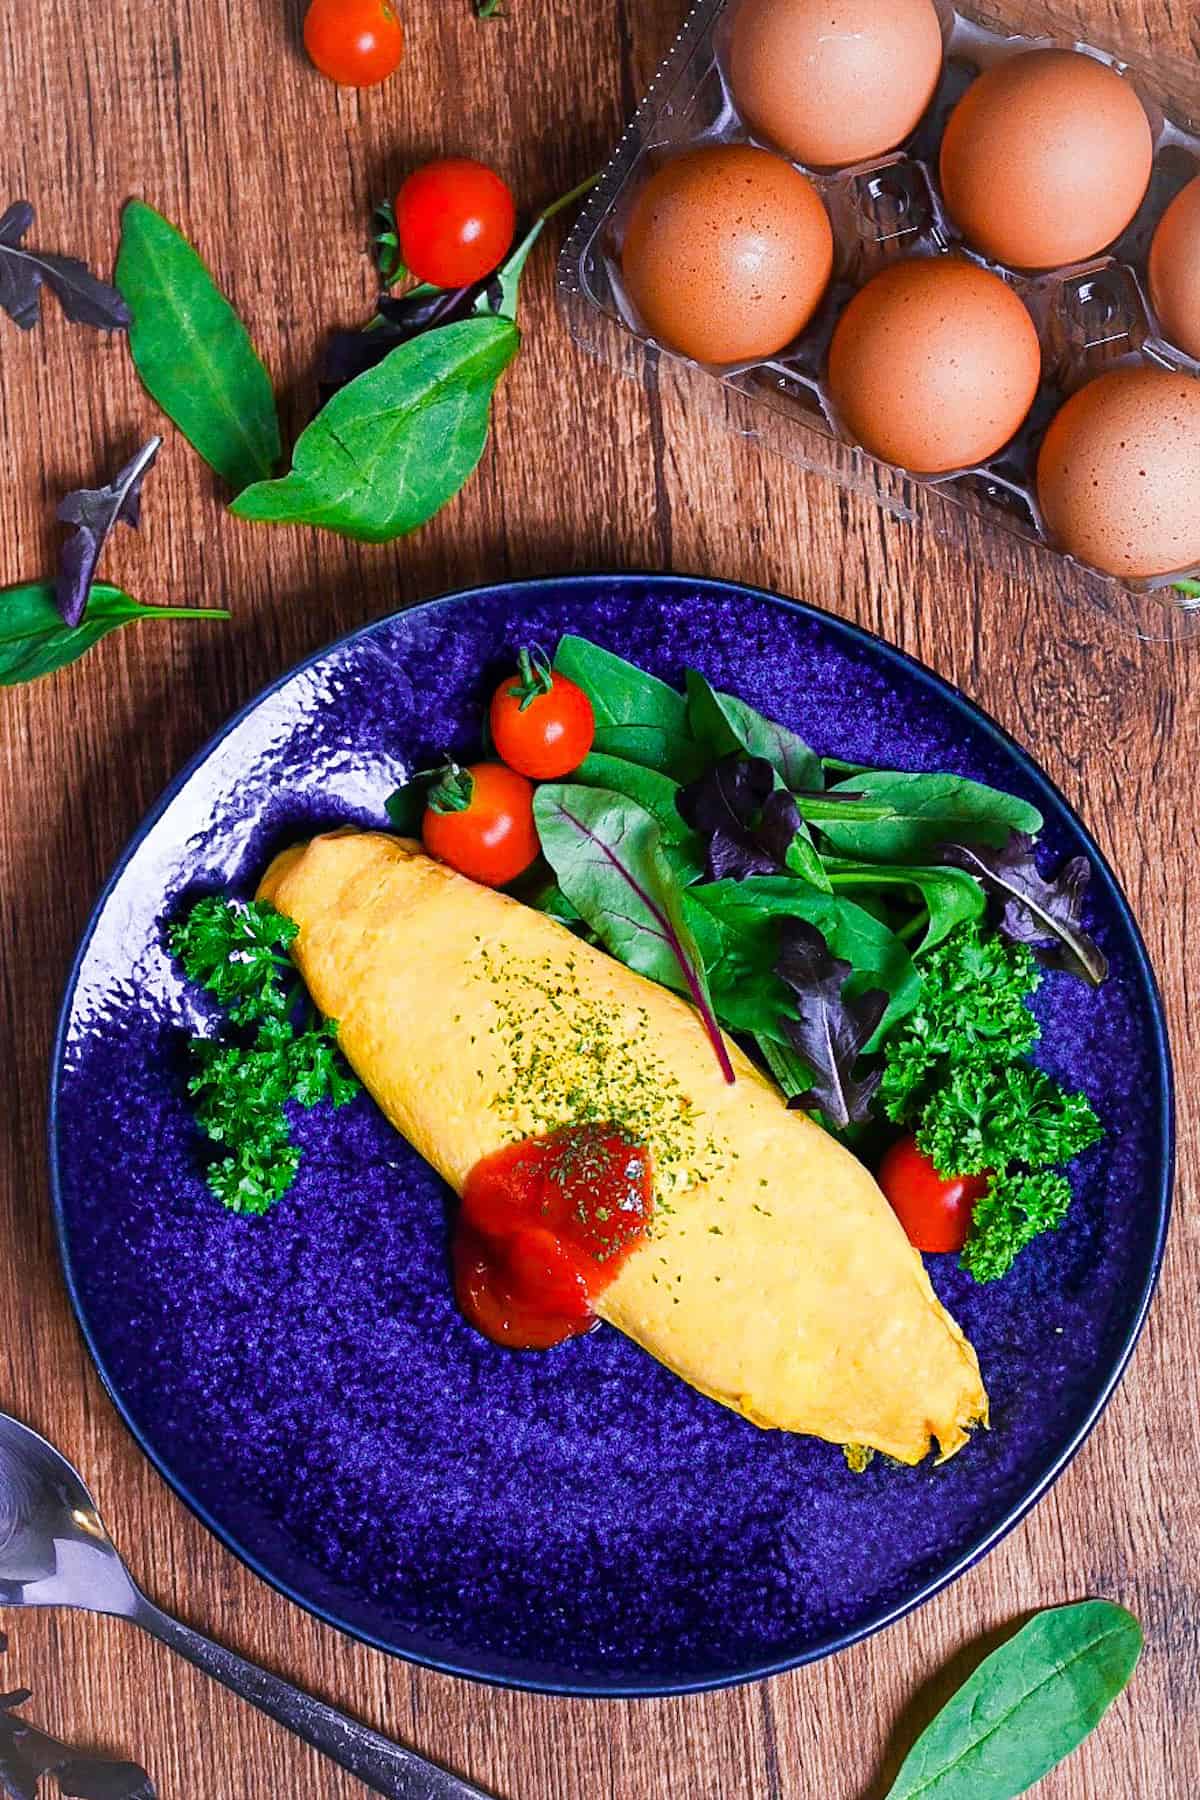
Once the omelette is half cooked, place one portion of fried rice down the center and form it into an American football shape.
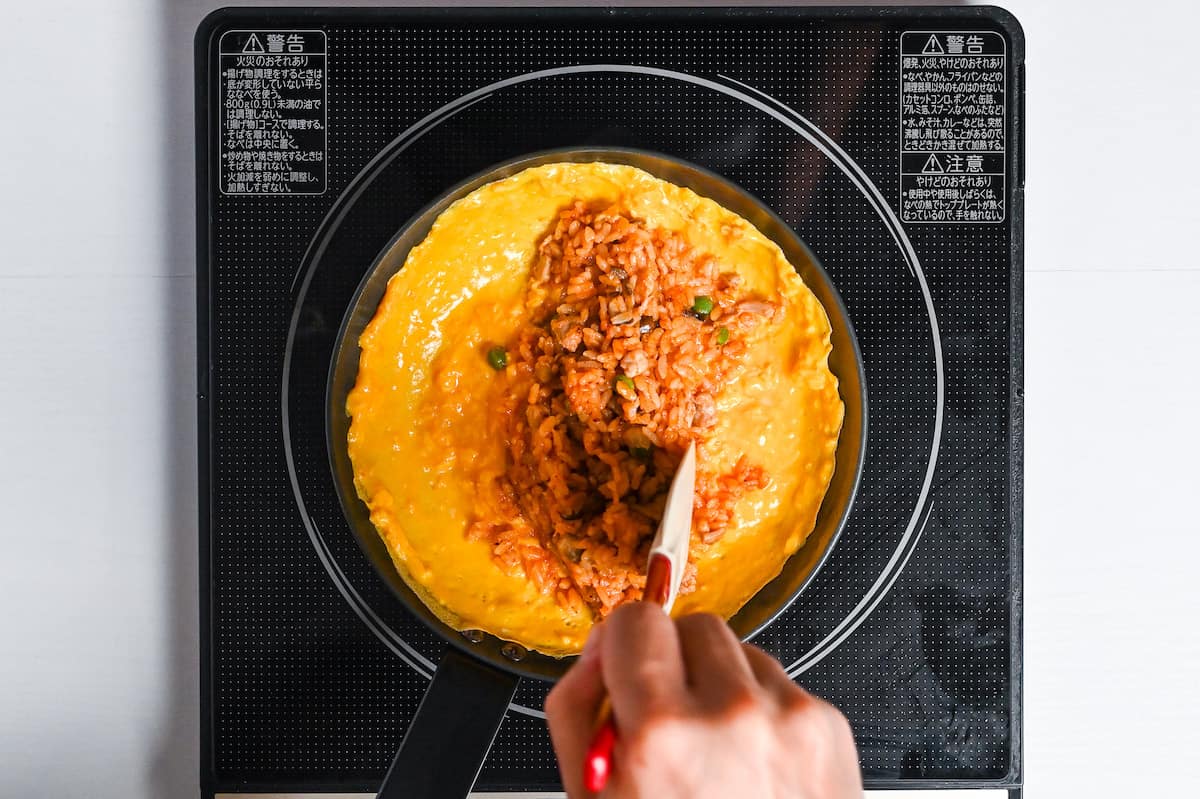
Be careful not to add too much rice, as this can cause the omelette to break.
Use a spatula to help loosen the edges of the omelette away from the pan. Carefully fold one side over the rice.
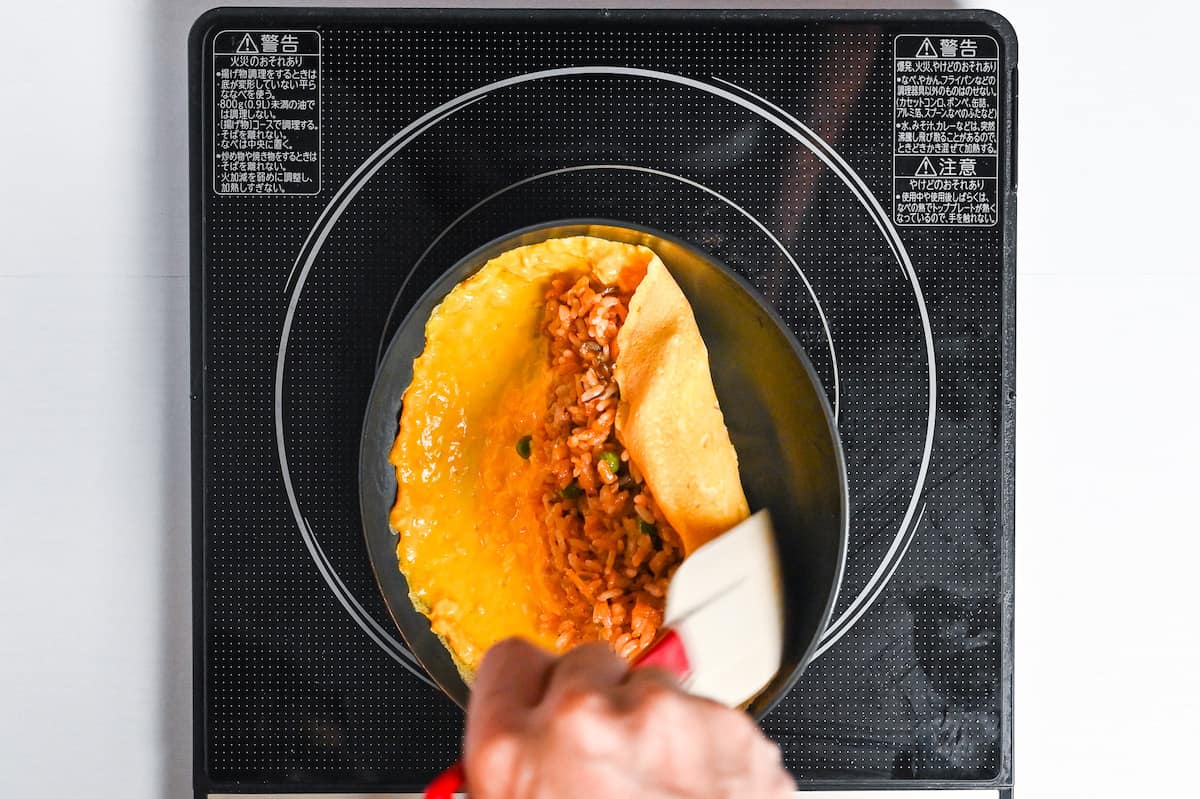
Repeat on the other side. The edges don’t need to meet, since this will be the underneath. Don’t try to force the omelette to meet in the middle as this can break it.
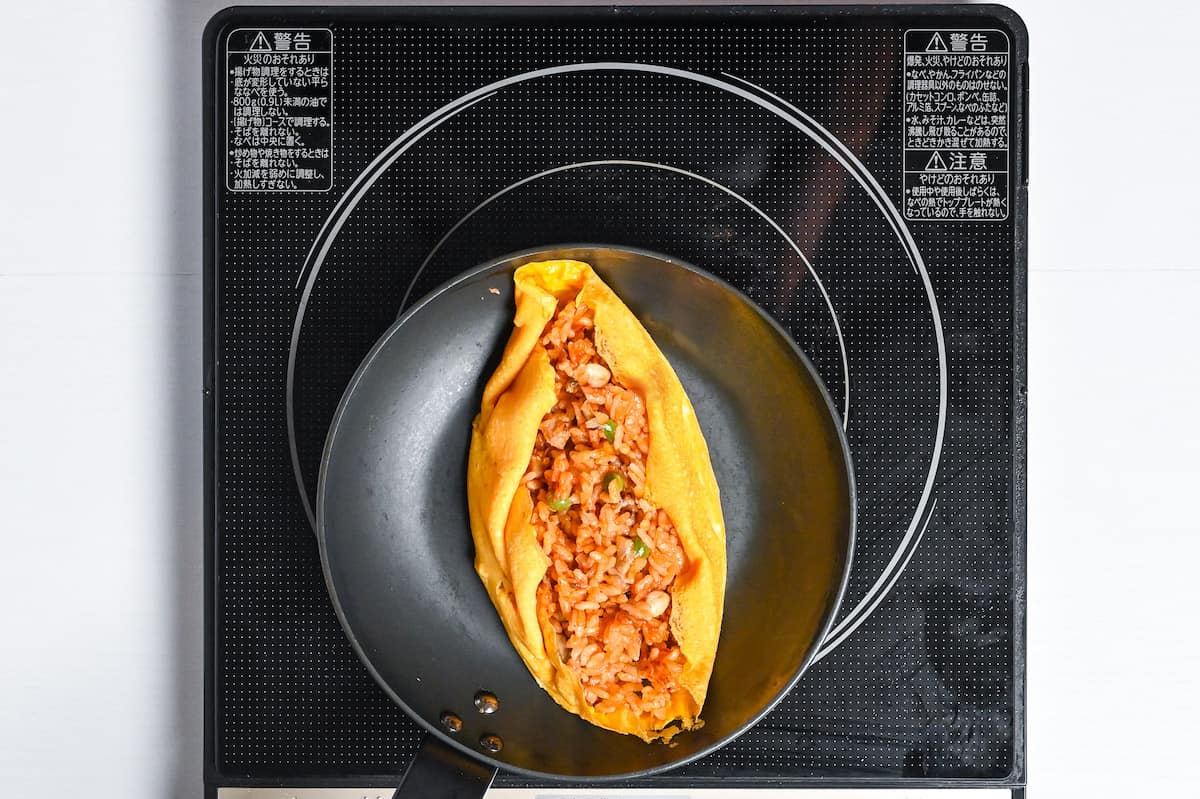
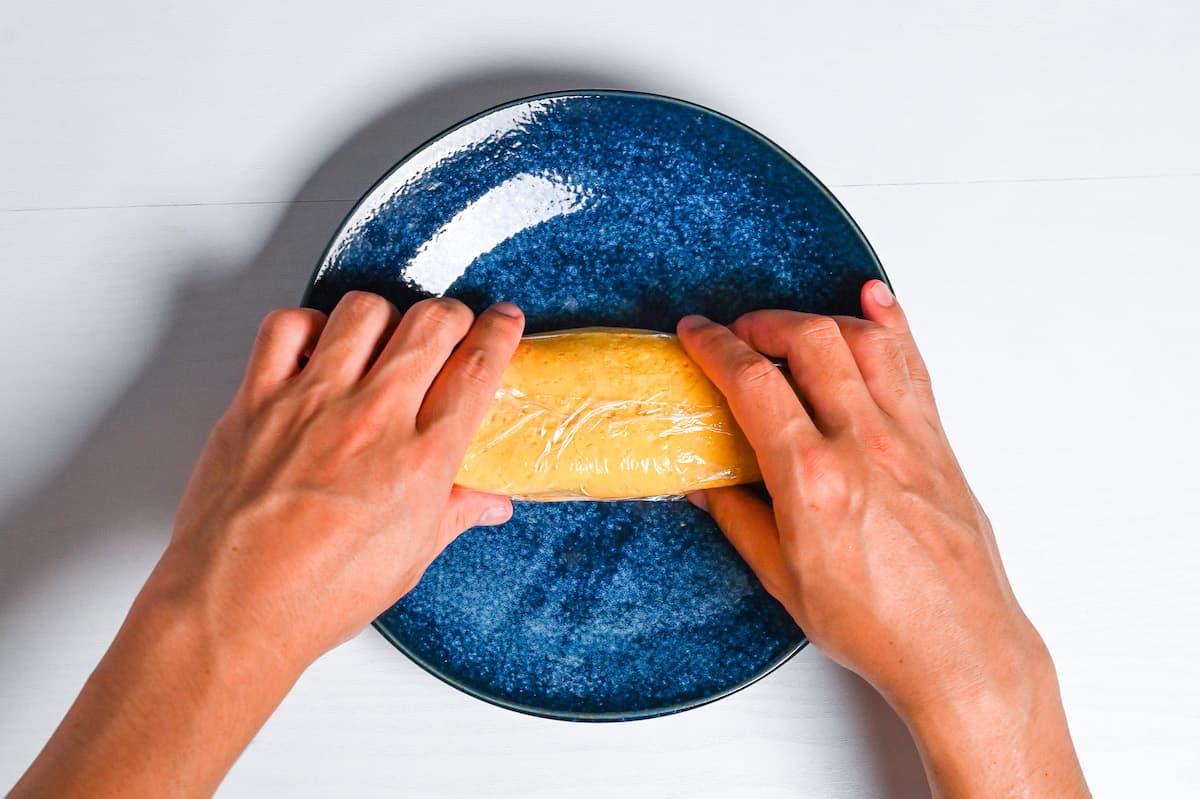
Slide a spatula underneath the omurice to ensure no areas have stuck to the pan. Once you’re sure, take a serving plate and flip the omurice onto the plate.

Cover with plastic wrap or kitchen paper and gently press the edges in to neaten the shape.
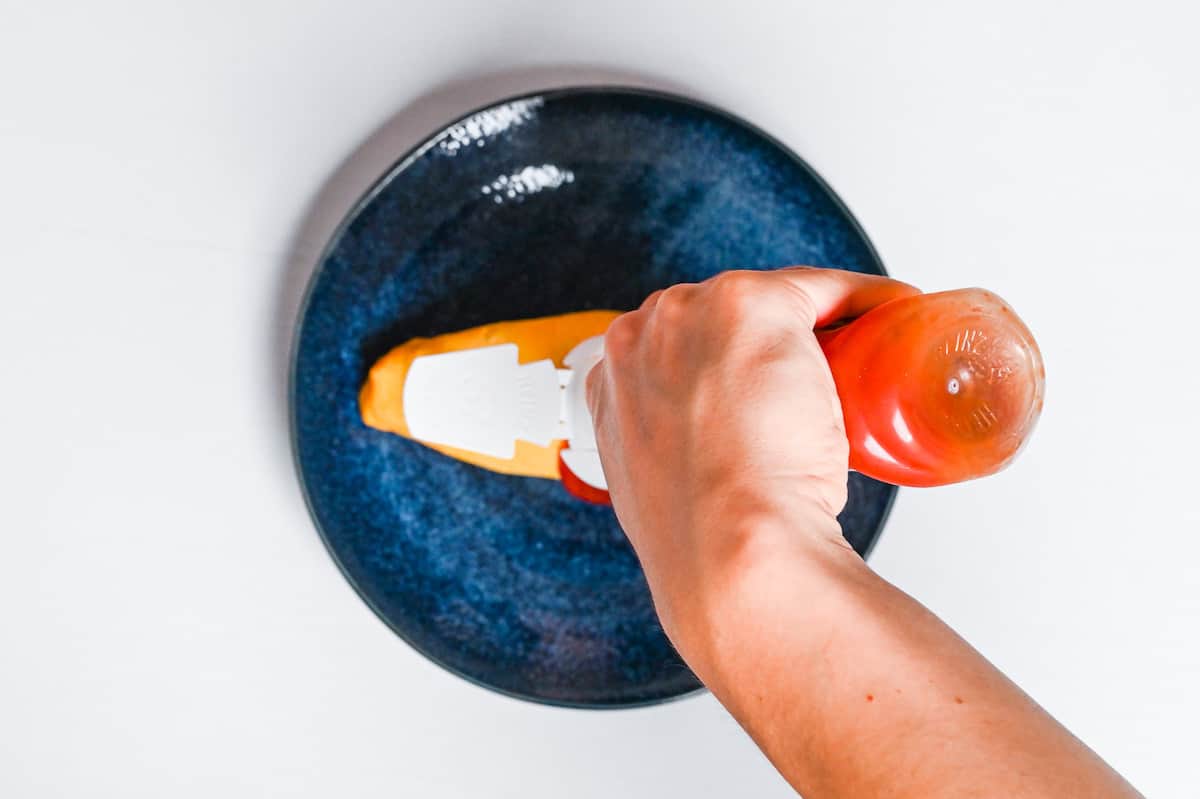
Remove the plastic wrap and top with a drizzle of ketchup and a sprinkle of parsley.
Add your choice of salad or other garnishes and enjoy!
Jump to Full Recipe Measurements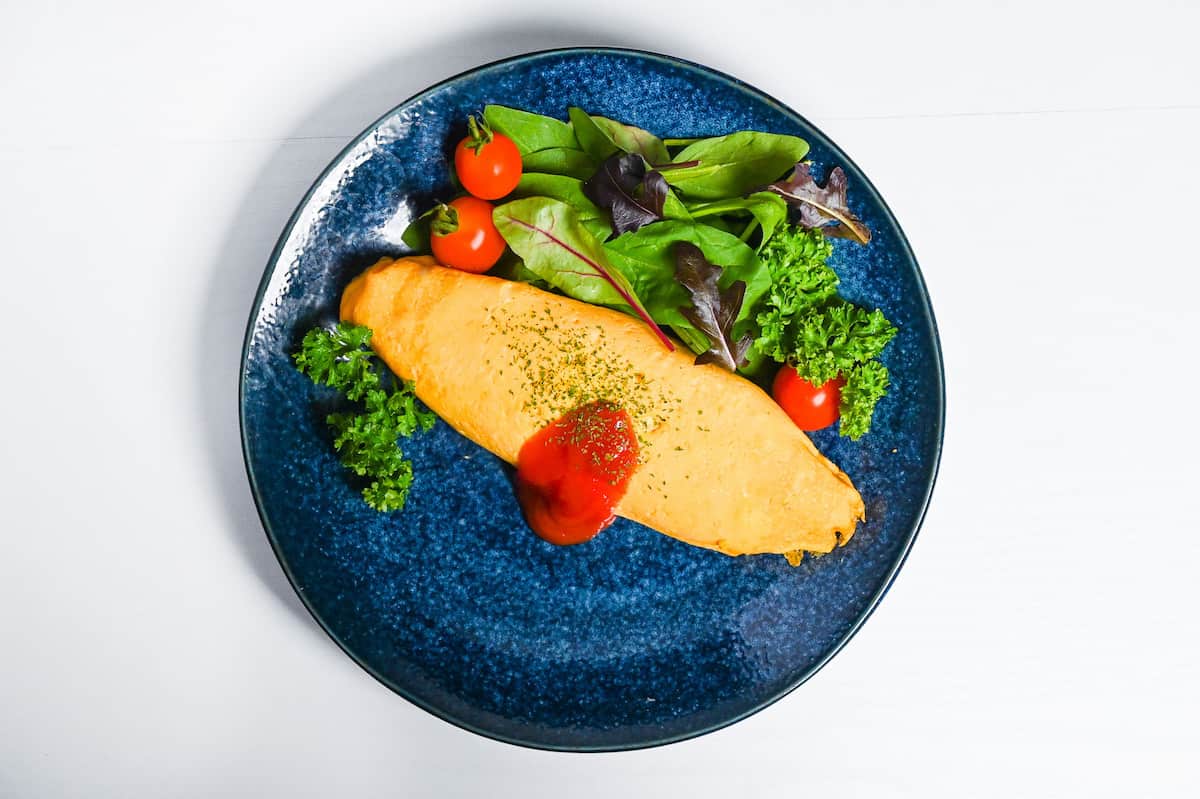
How to Store
Omurice is best enjoyed fresh and does not keep well at room temperature; it should ideally be consumed immediately after cooking. If you need to store omurice, the recommended approach is to refrigerate the ketchup rice on its own, then reheat and add it to the freshly cooked omelet right before serving. Refrigerated ketchup rice can be stored in an airtight container in the fridge for up to 2 days.
The same method applies for freezing: freeze only the ketchup rice before it’s wrapped in egg, and aim to consume it within three weeks for the best flavor and texture.
If serving in a bento box, keep it in a cooler bag with an icepack and consume it within 3-4 hours (2 hours in summer).
Storage summary
Room temperature – Not recommended.
Refrigerated – Up to 2 days (only ketchup rice).
Frozen – Up to 3 weeks (only ketchup rice).
FAQ
The degree to which the eggs in an omelet are cooked varies from restaurant to restaurant and home to home, but the classic omelet is almost completely cooked. Recently, however, many omelets have been semi-cooked for a softer texture.
Yes, it is safe to say that omurice is one of the top three most popular dishes among Japanese children. Because of this, omurice can be considered a nostalgic dish that quite a few people continue to love even into adulthood.
Omurice are rarely eaten for breakfast and are most often eaten for lunch or dinner.
Ketchup’s addition to omurice likely had multiple reasons. One of the main considerations could have been accessibility and convenience. Although demi-glace sauce, a rich brown sauce, was a common accompaniment in restaurants, it was not as readily available for home cooks or too time-consuming to prepare from scratch back then. On the other hand, ketchup was an accessible, easy, and flavorful alternative. Another reason could be the visual appeal that ketchup added to the dish. The vibrant red color of the ketchup contrasting with the bright yellow omelet made the dish more enticing and appetizing, contributing not just to the taste but also to the dish’s visual appeal.
I hope you enjoy this Omurice recipe! If you try it out, I’d really appreciate it if you could spare a moment to let me know what you thought by giving a review and star rating in the comments below. It’s also helpful to share any adjustments you made to the recipe with our other readers. Thank you!
More Yoshoku Recipes

Simple Omurice (Japanese Omelette Rice)

Equipment
- 20cm Cast Iron Frying Pan
Ingredients
Rice
- 100 g onion finely diced
- 2 tsp olive oil
- 1 tsp butter
- 150 g chicken breast cut into small pieces
- 40 g button mushrooms (or mushrooms of choice) thinly sliced
- 1 tbsp white wine
- 200 g cooked Japanese short-grain rice
- 1 pinch salt
- 1 pinch ground black pepper
- 3 tbsp tomato ketchup
- 1 tsp Worcestershire sauce
- 1 tbsp green peas
- 1 pinch dried parsley
Omelette
- 6 eggs
- 2 tbsp milk
- 1 tsp olive oil
My recommended brands of ingredients and seasonings can be found in my Japanese pantry guide.
Can’t find certain Japanese ingredients? See my substitution guide here.
Instructions
Ketchup Fried Rice
- First, heat your pan on medium with 2 tsp olive oil and 1 tsp butter. Once the butter has melted, add 100 g onion and sauté until softened.

- Once the onions are softened, add 150 g chicken breast and 40 g button mushrooms to the pan.
- Add 1 tbsp white wine to the pan and fry everything until the chicken is cooked through.
- Add 200 g cooked Japanese short-grain rice with 1 pinch salt and 1 pinch ground black pepper.
- Add 3 tbsp tomato ketchup and 1 tsp Worcestershire sauce and mix until evenly distributed.
- Add 1 tbsp green peas with 1 pinch dried parsley. Stir fry for one minute and then remove the pan from the heat.
- Set aside for now. (Cover to keep it warm or see note.)
Omelette
- Start heating a small non-stick pan on medium. While you wait, crack 6 eggss into a large bowl and add 2 tbsp milk and 1 tsp olive oil. Whisk for 1 minute or until well combined.
- Strain the eggs through a fine mesh sieve to ensure even coloring.
- Add a small amount of cooking oil to the pan and then spread it around evenly with kitchen paper. This will stop too many brown spots from appearing on the surface of the omelette.
- Pour two eggs-worth of the egg mixture into the pan and whisk with chopsticks until it starts to set. This step is important to make the omelette fluffy and soft.
- Swirl the pan around from time to time to coat the edges of the pan.
- Once it's half cooked, add one portion worth of fried rice to the center of the omelette and shape it into an American football shape.
- Use a spatula to carefully separate the edges of the omelette from the pan and fold one side over the top of the rice.
- Repeat on the other side. It's ok if you can't close the omelette since this will be hidden underneath. (Don't try to force it as this can cause the omelette to break.)
- Slide the spatula under the omelette to ensure it's not stuck to the pan, then flip it onto a plate.
- Cover the omurice with plastic wrap (or kitchen paper) while it's still warm and press the edges in to neaten up the shape. Repeat until you've used all of the omelette mixture and fried rice.
- Garnish with ketchup and parsley for decoration.
- Serve and enjoy!
Hallo Yuto.
Heute an Ostern gab es viel mit Eiern, da blieb es nicht aus, dieses Rezept zu machen 😀
Vielen Dank.
Bei uns Fleischfrei , dafür mit Paprika bunt und Mais.
War sehr lecker.
Frohe Ostern und gute Zeit.
Liebe Grüße Kathleen
Hallo Kathleen,
Frohe Ostern auch für Sie! Omurice ist auch in Japan eine der beliebtesten Arten, Eier zu verwerten!
Und es sieht wie immer gut aus! Mir gefällt, wie Sie auf dem Bild einen Hasen aus dem Ei gemacht haben!
Ich bin gespannt, mehr von Ihren kreativen Kochkünsten zu sehen!
Mit freundlichen Grüßen,
Yuto